- Most Common Issues with Blue Yeti Microphones
- How to Fix Blue Yeti Microphone Not Detected (And Other Issues)
- Make sure your microphone is turned on
- Check your microphone connection
- Make sure it is not a hardware issue
- Set your Blue Yeti as the default device
- Make sure your mic is not disabled in Windows
- Restart the audio service
- Run the audio troubleshooter
- Update your microphone driver
- Update the driver manually
- Use Device Manager
- Check for Windows updates
- Disable the USB selective suspend setting
- Adjust Blue Yeti microphone settings for better performance
- How to Fix Blue Yeti Microphone Not Detected or Recognized in Windows 10 and 11: Fixed
- FAQ
We know simple and effective ways to fix Blue Yeti not recognized on Windows 10 and other issues with this mic. Just work your way down through the list of tips below and get your device up and running again.
Most Common Issues with Blue Yeti Microphones
Blue Yeti microphones are popular among podcasters, streamers, and home recording enthusiasts due to their versatility, sound quality, and ease of use. However, like any technology, they can encounter issues. Here are some of the most common problems users might face with Blue Yeti microphones and general insights into each:
- Poor sound quality
This can result from incorrect placement, environmental noise, or incorrect settings in the recording software. Insights: Ensuring optimal placement (not too far or too close to the source), reducing background noise, and adjusting the gain and pattern settings can help.
- Microphone not detected by the computer
This issue often stems from problems with the USB cable or port, outdated drivers, or conflicts with the computer’s audio settings. Insights: Checking the cable, trying different USB ports, updating drivers, and ensuring the microphone is selected as the input device in audio settings are useful steps.
- Recording volume too low
Low volume can be due to low gain settings on the microphone, incorrect input level settings on the computer, or the microphone being too far from the sound source. Insights: Adjusting the microphone’s gain knob, increasing the input volume in the computer’s sound settings, and positioning the microphone closer to the sound source can help improve volume.
Also read:7 Best Free Volume Boosters for Windows 10: Increase Your Sound
- Background noise or interference
This can be caused by electronic devices near the microphone, room acoustics, or computer fans. Insights: Minimizing interference by turning off unnecessary devices, using pop filters, and improving room acoustics can reduce background noise.
- Echo or feedback in recordings
Echo or feedback might occur when the microphone picks up output from speakers or due to room characteristics. Insights: Using headphones to monitor audio, adjusting the microphone’s directionality settings, and treating the room to reduce echo can help.
- Microphone being muted or disabled accidentally
Users might accidentally press the mute button on the microphone or mute it in software settings. Insights: Checking the physical mute button on the microphone and verifying that it’s not muted in software settings can resolve this issue.
- Difficulty with software integration
Compatibility issues with recording software or incorrect software settings can lead to problems. Insights: Ensuring compatibility with chosen software and correctly configuring audio input settings are important steps.
- Hardware malfunction
Over time or due to accidents, the microphone’s internal components may fail. Insights: If troubleshooting does not resolve the issue, the microphone might need repairs or replacement.
How to Fix Blue Yeti Microphone Not Detected (And Other Issues)
Make sure your microphone is turned on
Yep, we know that seems too obvious, but a lot of users get panicked into troubleshooting before checking if their Blue Yeti mic is actually on. So, take a closer look at yours and see if the piece of hardware has been switched on; this might save you both time and effort.
Check your microphone connection
The second step is to ensure that your mic is properly connected. It is a good idea to reconnect it—some users have reported that this maneuver has worked for them. You can also try another USB port and/or cable since the current one might be faulty.
Make sure it is not a hardware issue
Now it is time to connect your device to another computer. The point is, the mic might be faulty. If so, you need to invest in a new device.
Set your Blue Yeti as the default device
You may have issues with your Blue Yeti mic if it is not configured to be your default device. Here is how you can fix that:
- Go to your taskbar.
- Navigate to the system tray.
- Right-click on the speaker icon.
- Select Recording devices.
- Locate your Blue Yeti mic (keep in mind that it might be under the name USB Advanced Audio Device).
- Right-click on the device and select Set Default Device.
- Click Apply and OK to save the changes.
Now check if your Blue Yeti issue has been resolved.
On Windows 11, go to the Settings application and click on Sound under the System page. When you get to the Sound page, click on Microphone to check your default mic. If you want to add a Bluetooth device, click on Add device beside “Pair a new advice.” No success so far? Then keep on reading—one of the following fixes is sure to help you.
Make sure your mic is not disabled in Windows
To do that, take the steps below:
- Go to the volume icon in the taskbar.
- Right-click on the icon.
- Select Recording devices.
- Locate an empty space and right-click on it.
- Select “Show disconnected devices” and “Show disabled devices.”
On Windows 11, follow these steps:
- Go to the Settings application and click on Sound under the System page.
- When you get to the Sound page, click on Microphone to check if your default mic is enabled.
- If you want to add a Bluetooth device, click on Add device beside “Pair a new advice.”
- See if your microphone is detected now. Then enable it.
Restart the audio service
The audio service is responsible for audio-related processes, including the microphone. You may be experiencing the error because the service isn’t properly configured. Restarting the Windows Audio and Windows Audio Endpoint Builder services should fix the issue in this case. The steps below will guide you, whether you use Windows 10 or Windows 11:
- Open the Start menu and type
“Services.” - Click on the Services app in the search results.

- After the Services application opens, scroll down to Windows Audio and double-click it.

- Click on the Stop button once you see the Windows Audio Properties (Local Computer) dialog window.
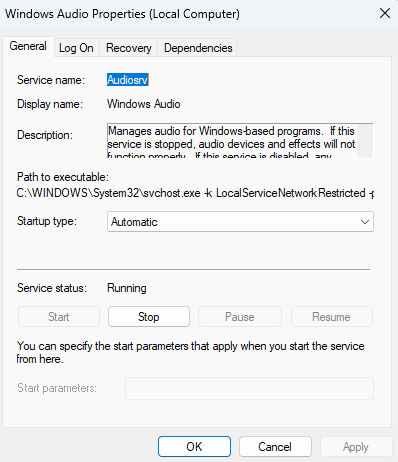
- Select Automatic beside the Startup type drop-down menu and click on the Start button.
- Click on OK and repeat steps 3 to 5 for the Windows Audio Endpoint Builder service.
Run the audio troubleshooter
Windows’ native audio troubleshooter finds and fixes audio-related problems. It can detect mic issues and resolve them or suggest solutions. Follow these steps to run the troubleshooter in Windows 10:
- Tap
Win + Ion your keyboard to launch Settings. - Click on Update & security once you get to the Settings app’s home page.
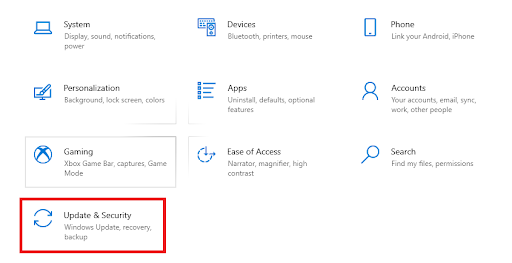
- Go to the left pane of the Update & Security page and click on Troubleshoot.
- Next, go under the Troubleshoot page, click on Playing Audio, then select the Run the troubleshooter option.
- The tool will scan for audio-related errors, which may include the microphone, and provide solutions.
Follow these steps to run the troubleshooter in Windows 11:
- Tap
Win + Ion your keyboard to launch Settings. - Click on Sound under the System page of the Settings app.
- Scroll down under the System > Sound page to the Advanced section.
- Click on Input devices beside “Troubleshoot common sound problems.”
- The tool will ask for your consent to run the troubleshooter. Choose Yes and follow the prompts.
- It’ll scan for issues and resolve them if it has the corresponding fix. If the troubleshooter can’t resolve the problem, it will tell you what’s wrong.
Windows 10/11 (8, 7, Vista, XP)
Update your microphone driver
If your Blue Yeti microphone drivers are out of date, it can prevent the device from functioning properly. This means that updating Blue Yeti drivers will most likely resolve your mic problem. Here’s how to update Blue Yeti drivers:
Update the driver manually
You can update the driver in question yourself. To do that, you should go to the manufacturer’s website and find the necessary software. Download it, then install it on your PC. Remember that you should be very careful since installing the wrong driver may cause your system to malfunction.
Use Device Manager
Another option is to use the built-in Device Manager tool:
- Navigate to the taskbar and right-click on the Windows logo icon.
- Select Device Manager from the list of options.
- Locate your problematic Blue Yeti mic.
- Right-click on the device.
- Select the Update driver option.
- Select the “Search automatically drivers” option.
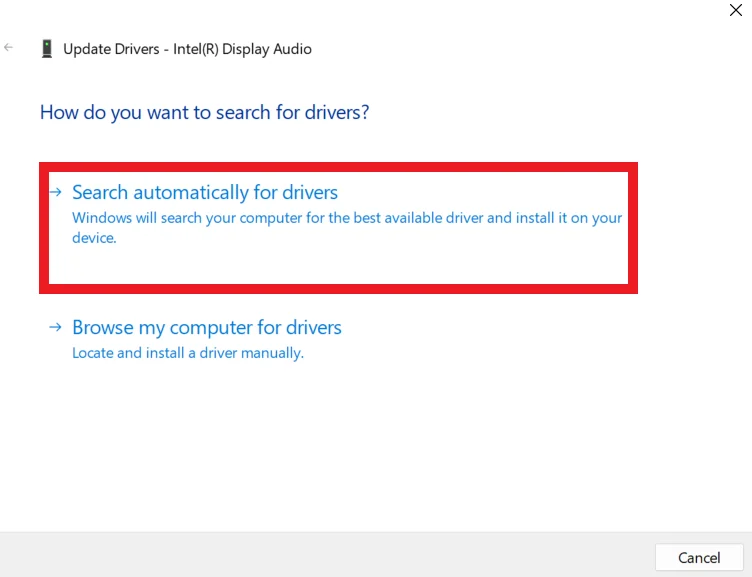
- Device Manager will search for the driver needed online. However, it may fail to succeed in this. So, bear in mind that this method is not flawless.
Also read:[EASY GUIDE] How to Update Device Drivers on a Windows 10 PC?
Check for Windows updates
Ensure your operating system is up to date. Sometimes, a Windows update can resolve unrecognized device issues. Navigate to Settings > Update & security > Windows Update and click “Check for updates.”

Disable the USB selective suspend setting
Disabling the USB selective suspend setting can help prevent your Blue Yeti microphone from being intermittently recognized or disconnected due to power-saving features in Windows. This setting helps conserve power by suspending USB devices when they’re not in use, but it can sometimes interrupt the consistent connection needed for USB microphones to function properly. Adjusting this setting ensures your microphone remains active and connected during your recording sessions.
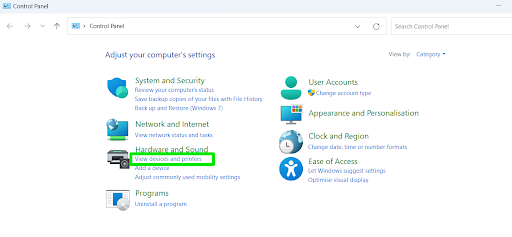
- Open Control Panel.
- Navigate to Hardware and Sound.
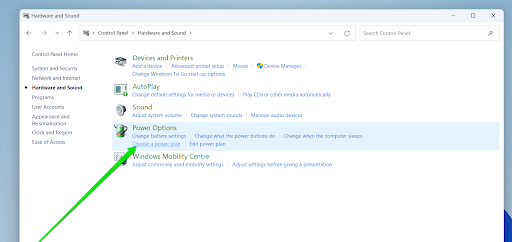
- Here, click Power Options.
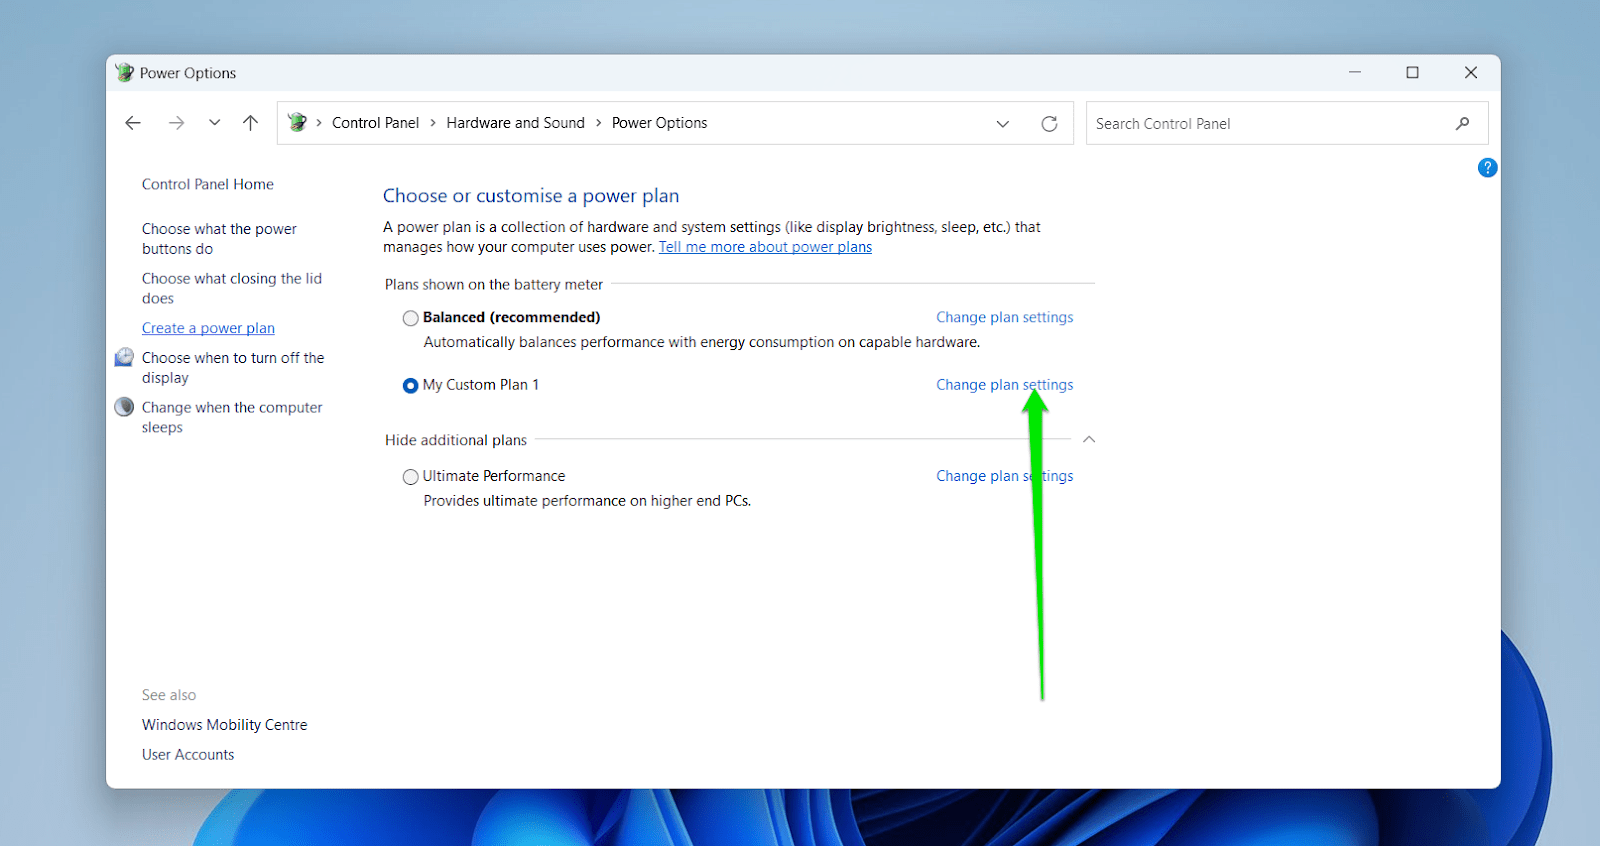
- Choose Change plan settings next to your selected plan .
- Click Change advanced power settings and expand USB settings.
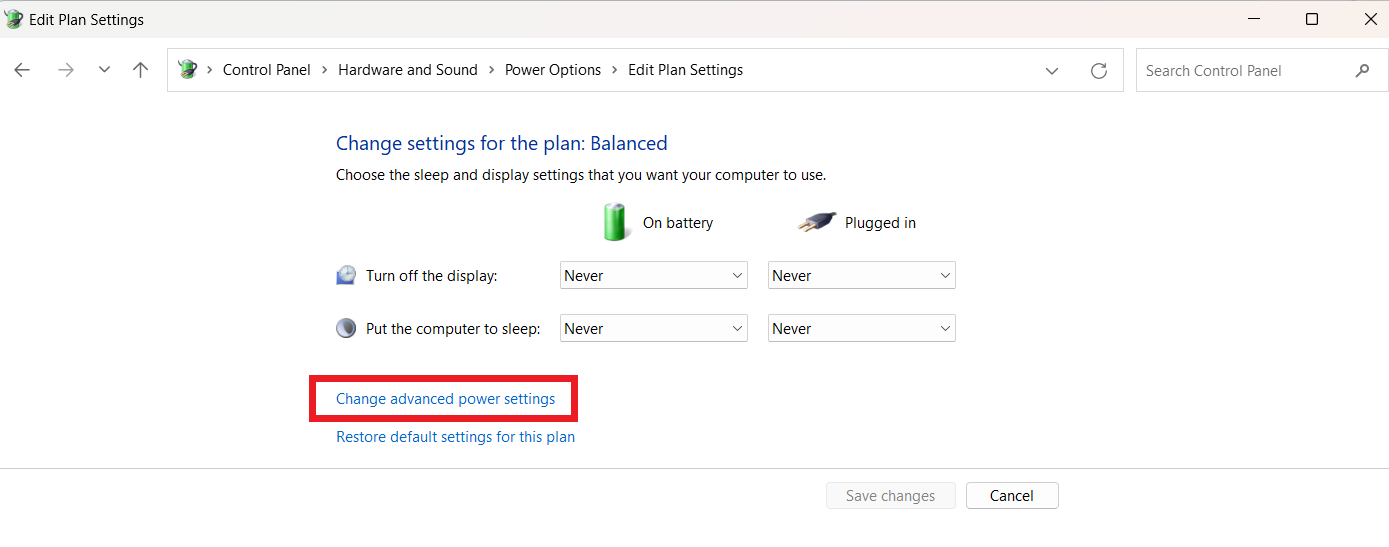
- Set USB selective suspend setting to Disabled.
Adjust Blue Yeti microphone settings for better performance
Adjusting the settings of your Blue Yeti microphone can significantly enhance your recording quality and overall performance. The Blue Yeti is renowned for its versatility and quality, making it a favorite among podcasters, streamers, and voice-over artists. However, to truly capitalize on its capabilities, a proper understanding and adjustment of its settings are crucial.
- Firstly, one of the most important settings to adjust on your Blue Yeti is the gain control. The gain determines the microphone’s sensitivity to sound. Setting it too high can lead to distortion and unwanted background noise, while setting it too low may make your recordings too quiet. Finding the right balance is key. Start with the gain knob at the midpoint, then adjust gradually while doing test recordings until you achieve the clarity and volume level that suit your project.
- Next, the polar pattern selector is a feature that sets the Blue Yeti apart. The Yeti offers multiple patterns—cardioid, bidirectional, omnidirectional, and stereo—each suitable for different recording scenarios.
- The cardioid pattern, which captures sound directly in front of the microphone, is ideal for podcasts and voice-overs.
- The omnidirectional pattern is perfect for capturing ambient sounds or a group conversation, while the bidirectional pattern works well for interviews.
- The stereo pattern gives a realistic soundstage effect, ideal for recording musical performances. Experimenting with these patterns in various contexts can help you find the best option for your recording needs.
- Additionally, the position of your Blue Yeti microphone plays a significant role in audio quality. Position the microphone about six to twelve inches away from your sound source, with the Yeti logo facing you, to ensure you’re speaking into the correct side of the microphone. Adjusting the microphone’s angle can also help minimize plosives (hard “p” and “b” sounds) and breathing sounds. For even better performance, consider using accessories like pop filters or shock mounts to further reduce unwanted noise and vibrations.
- Moreover, don’t overlook the importance of your recording environment. Even with optimal microphone settings, a noisy or echo-prone room can degrade your audio quality. Try to record in a quiet, carpeted room with curtains and soft furnishings that absorb sound. These small adjustments can make a big difference in reducing echo and background noise.
How to Fix Blue Yeti Microphone Not Detected or Recognized in Windows 10 and 11: Fixed
Navigating through Blue Yeti microphone issues in Windows 10 and 11 doesn’t have to be daunting. This guide has aimed to streamline the troubleshooting process, providing straightforward solutions to common problems. From checking if your microphone is on to adjusting settings for peak performance, we’ve covered essential steps to get your Blue Yeti back in action. Now you know how to fix Blue Yeti microphone issues in Windows 10 and 11. If you need further assistance, do not hesitate to leave your comment below.
FAQ
- Adjust the gain: Lower the gain on the microphone to reduce the pickup of distant sounds.
- Use the cardioid pattern: Select the cardioid pattern to capture sound from the front and minimize background noise.
- Improve your environment: Reduce noise sources in your room, use soft furnishings to dampen echo, and consider using a pop filter.
- Employ software solutions: Utilize noise-reduction features in your recording software or dedicated noise-canceling software.
- Cardioid: Best for podcasts and voiceovers, picks up sound from the front.
- Bidirectional: Picks up sound from the front and back, suitable for interviews.
- Omnidirectional: Captures sound from all directions, ideal for group recordings.
- Stereo: Captures a realistic sound image, good for musical instruments.
This could be due to Discord’s automatic input sensitivity settings, which might not be optimized for your setup. To fix this:
- Go to Discord’s “User Settings.”
- Select “Voice & Video.”
- Disable “Automatically determine input sensitivity” and manually adjust the slider until your voice is clear without background noise.
- Ensure Discord is using the correct microphone and check the “Echo Cancellation” and “Noise Suppression” options under “Advanced.”