
![[FIXED] Skype Installation Failed: Error Codes 1603, 1618 and 1619](https://www.auslogics.com/en/articles/wp-content/uploads/2023/08/shutterstock_1116572228-1-1-scaled.jpg)
Installing software can be a straightforward process, but sometimes unexpected hurdles like error codes can disrupt the otherwise smooth journey. Skype, a widely used chat platform, is no exception to this.
If you’ve encountered error codes 1603, 1618, or 1619 during your Skype installation, you’re not alone. These errors can arise due to various reasons, ranging from conflicting software to incomplete installations.
In this guide, we’ll dive into the specifics of each error code and provide step-by-step solutions to help you navigate through the installation process and enjoy seamless communication through Skype.
What Are Skype Error Codes 1603, 1618 and 1619?
Before we look into the possible resolutions for Skype installation errors, let’s figure out why these error codes pop up in the first place.
Error Code 1603
Error code 1603 is a common installation error that typically occurs when there’s a problem with the installation process, such as a conflict with existing software, corrupted installation files, or issues with system permissions. This error can prevent Skype from being installed successfully.
Error Code 1618
Error code 1618 is often related to another installation process already running on your computer. It indicates that there’s a conflict because another installation or uninstallation is in progress. This error might occur if you’re trying to install Skype while another installation is still ongoing, or if a previous installation was interrupted or not completed properly.
Error Code 1619
Error code 1619 typically indicates that the installation package you’re trying to use is corrupted or incomplete. This could be due to issues during the download or problems with the installation files themselves. It can also occur if the Windows Installer service is not functioning correctly.
Encountering any of these error codes can be frustrating, but fortunately, there are steps you can take to address each one and successfully install Skype on your system.
Also Read: [FIXED] Why Skype Keeps Not Responding in Windows 10
How to Fix Skype Installation Errors 1603, 1618 and 1619?
Remember, troubleshooting and resolving these errors might involve actions like checking for conflicting software, ensuring no ongoing installations, repairing or reinstalling the Windows Installer service, and verifying the integrity of the installation files.
Always ensure you have a backup of important data before attempting any troubleshooting steps that might involve changes to your system.
Fixing Skype Installation Error 1603
Method 1: Clean Boot
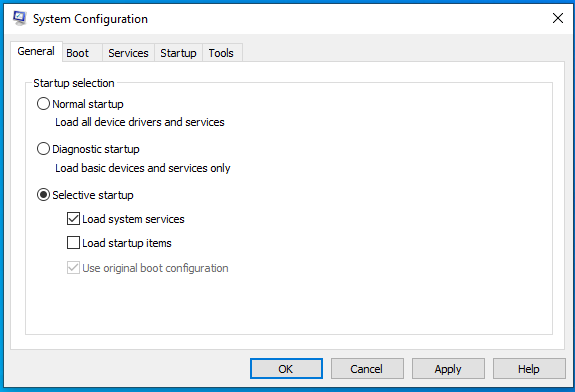
A clean boot starts your computer with a minimal set of drivers and startup programs, which can help isolate and troubleshoot software conflicts.
- Press Win + R to open the Run dialog box.
- Type msconfig and press Enter to open the System Configuration window.
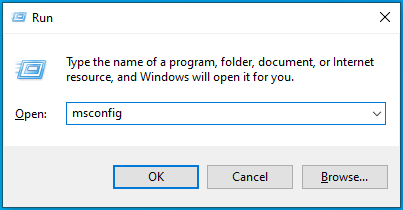
- In the General tab, select “Selective startup” and uncheck “Load startup items.”
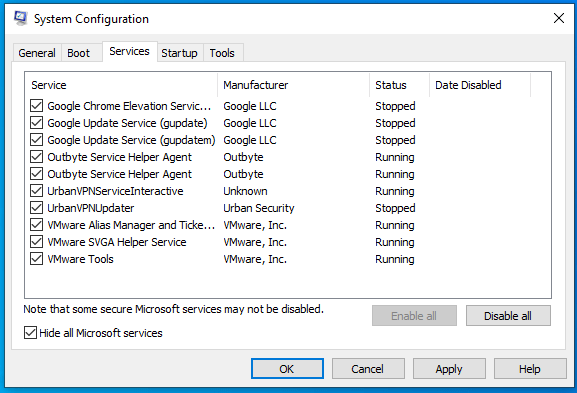
- Go to the Services tab, check “Hide all Microsoft services,” then click “Disable all.”
- Apply the changes and restart your computer.
- Install Skype again.
Method 2: Remove Previous Versions
If you have a previous version of Skype installed, it might be causing conflicts.
- Uninstall any existing Skype installations from Control Panel > Programs > Uninstall a program.
- Restart your computer.
- Install Skype again.
Also Read: How to Uninstall Programs and Delete Unnecessary Files in Windows 10
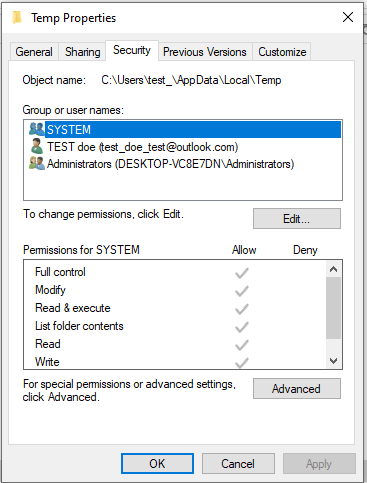
Method 3: Change the security permissions
Sometimes, the Skype install error 1603 can pop up if you don’t have sufficient privileges over the Temp folder on your PC. To change security privileges, follow these steps:
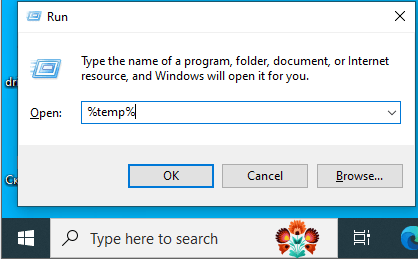
- Press Windows Key + R and enter %temp%. Click OK.
- Navigate to the Local folder by pressing the “up” arrow button.
- Find the Temp folder, right-click it and select Properties.

- Next, open the Security tab and click the Edit button.
- Press the Add button.
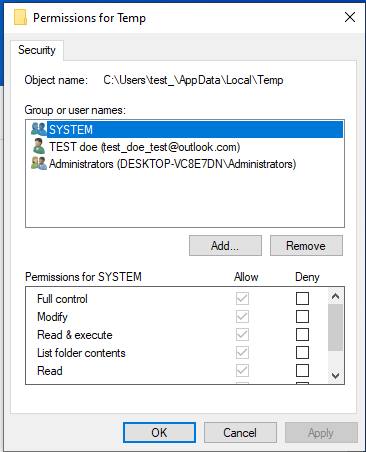
- Under Enter the object names to select put in Everyone.
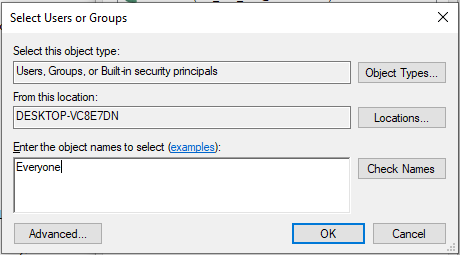
- Click Check Names and then OK.
- In the Group or user names section, select Everyone.
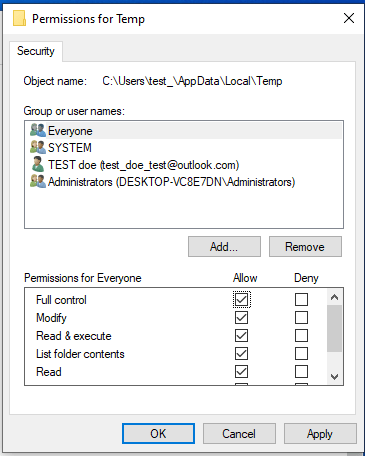
- In the Allow column, check Full control.
- Click Apply and OK to save changes.
Method 4: Make sure the installation directory isn’t encrypted
If you encounter error 1603, verify that the installation directory is not subject to encryption. It’s important to note that Skype cannot be installed in encrypted directories. To address this issue, temporarily disable encryption on the directory in question until the installation is complete.
Outdated drivers often lie at the core of errors and system-related complications. When certain drivers are outdated or missing, consider using an automated tool like Auslogics Driver Updater. The software can swiftly update your drivers with just a few clicks.
Fixing Skype Installation Error 1618
Method 1: Check for Other Installations
Ensure that there are no ongoing installations or uninstallations.
- Check Task Manager for any ongoing installation processes. End them if found.
- Restart your computer.
- Install Skype again.
Method 2: End msiexec.exe process
- Launch Task Manager: press Ctrl + Shift + Esc at the same time.
- Once the Task Manager opens, go to the Details tab.
- Locate and choose msiexec.exe, then proceed to click on End task, effectively terminating the process.
- After ending the msiexec.exe process, try installing Skype again.
Method 3: Change Registry Values
Before we dive into editing the Registry, it’s important to be aware that changing it can lead to problems with your operating system. To play it safe, it’s highly recommended to create a backup of your registry in case anything goes wrong. If you’re ready to edit the registry, here’s how:
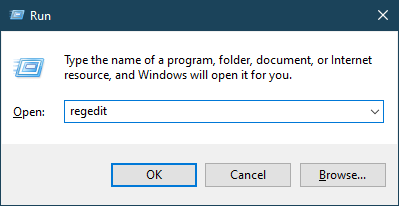
- Press the Windows Key + R, and type in “regedit” before hitting Enter.
- In the left panel, find “HKEY_LOCAL_MACHINE\Software\Microsoft\Windows\CurrentVersion\Installer”.
- Locate and remove the “InProgress” string.
- Now, move to “HKEY_LOCAL_MACHINE\System\CurrentControlSet\Control\Session Manager”.
- Delete the “PendingFileRenameOperations” string.

- Navigate to “HKEY_LOCAL_MACHINE\SOFTWARE\Microsoft\Updates”.
- Find the “UpdateExeVolatile” entry, double-click it, and change its value to 0.
Also Read: What is the Windows Registry And Why Do You Need a Registry Cleaner?
Method 4: Restart Windows Installer service
- Press the Windows Key + R, type “services.msc,” and either press Enter or click OK.
- Find the Windows Installer service, then double-click it to access its properties.
- Modify the Startup type to Disabled.
- Save your changes and restart your computer.
- Once your PC restarts, return to the Services window and adjust the Startup type of the Windows Installer service to Manual.
- Save your changes and restart your computer again.
- After the reboot, attempt to install Skype once more.
Method 5: Delete temporary setup files
Numerous applications store temporary setup files on your computer prior to commencing installation, and these files can lead to the emergence of error 1618 during Skype installation.
To resolve this issue, it’s essential to remove these temporary files:
- Press the Windows Key + R, type “%temp%” and click OK.
- Remove all files and folders within the Temp folder.
- Navigate to the C:\Windows\Temp folder and eliminate all files and folders contained therein.
Also Read: How to Delete Temporary Internet Files?
Method 6: Re-register Windows Installer files
- Access the Win+X menu by pressing the Windows Key + X, then opt for Command Prompt (Admin).
- Once the Command Prompt initializes, input the subsequent commands:
msiexec /unregister
msiexec /regserver
- Close Command Prompt and restart your PC
Method 7: Change Group Policy Settings
- Initiate the Run dialog by pressing the Windows Key + R, then input “gpedit.msc” before clicking OK or pressing Enter.

- Upon the launch of the Group Policy Editor, navigate within the left panel to Computer Configuration > Windows Settings > Security Settings > Local Policies > User Rights Assignment.
- In the right pane, locate the Debug programs option and execute a double-click on it.

- Ensure inclusion of the Administrators account in the list. If absent, click Add users/Group, include it, then save with Apply and OK.
Fixing error code 1619
Method 1: Try installing the latest version of Skype
Skype installation error 1619 often comes up when you are installing an older version of Skype. In this case, all it takes to solve the error is downloading the latest version of Skype.
Also Read: How to Keep Your Software Up to Date
If all fails – reinstall Windows
Finally, if none of the above solutions have worked, consider reinstalling your Windows. Doing so is a great opportunity to start from scratch: actually, bugs are supposed to give your system a wide berth after that procedure.
Nonetheless, a clean install of your Windows 10 is a kind of escapade that might end in tears – the drama is, it causes your personal files to disappear for good. Thus, make sure you have backed up your important data to avoid painful losses.
Also Read: How to Get And Use Windows 10 Media Creation Tool
Conclusion
The issues of Skype installation failures with error codes 1603, 1618, and 1619 have been successfully addressed through a series of troubleshooting steps. By carefully following these solutions, users can overcome these errors and ensure a smooth Skype installation process. If further assistance is needed, referring to official support resources can provide additional guidance in resolving any persisting installation challenges.
FAQ
How to Revert a Skype Update?
To revert a Skype update:
- Uninstall the current version from “Control Panel” > “Apps.”
- Find an older version online from a trusted source.
- Disable automatic updates in Skype settings.
- Install the older version.
- Keep in mind the risks of using older software.
How to Remove Skype from Windows 10?
To remove Skype:
- Search “Skype” in Start menu, right-click, and select “Uninstall.”
- Or, go to “Settings” > “Apps” > find Skype and select “Uninstall.”
- Check startup programs for any lingering references.
Why Does Skype Keep Closing Itself?
Skype might close itself due to reasons like software conflicts, outdated version, unstable internet, or background apps. To resolve this, update Skype, check for conflicts, ensure stable internet, close unnecessary apps, and consider reinstalling if needed.