
Hard disk drives that live in older computers as the primary storage or modern systems as backup media still require tender loving care.
External HDDs are no exception. These drives become fragmented over time, which leads to traffic on the disk surface that can threaten drive health and system performance. Disk defragmentation is the only way to restore and maintain the order your drive and computer require to perform optimally.
I’ll show you all the practical steps on how to defragment hard drives, using built-in Windows tools and third-party programs.
I’ll also walk you through scheduling options to keep the process automated and other advanced disk defrag processes to boost system performance.
🔀 To defragment a hard disk drive, type defrag in the Start menu, select Defragment and Optimize Drives, choose a drive in the Optimize Drives window, and click Optimize.
🔍 You can click Analyze to check your drive’s level of fragmentation before starting the defrag process.
❌ Do not defragment or attempt to defragment an SSD.
📈 Defragmentation is best for hard disk drives with fragmentation levels of 10% and higher.
📍 Third-party programs show better fragmentation analysis, including visual cluster maps.
🗓️ Scheduling defragmentation helps you avoid the effects of fragmentation over time and removes the need for the manual defrag process.
👨💻 You can also run file and folder fragmentation to arrange empty disk sectors and clusters.
📦 Free space consolidation arranges empty sectors and clusters close together to avoid further fragmentation.
⏳ Boot-time defrag and boot optimization can help you defragment critical system files to improve performance.
🗑️ You can reduce the chances of fragmentation by clearing out temporary files and separating data across multiple partitions.
Why Should I Defragment My Hard Drive?
To line up files and undo the effects of fragmentation on hard disk drives. HDDs become fragmented over time due to how they physically write and erase data. File fragments are scattered across the disk as you save and delete files.
Here’s how it works:
➡️ A 10 MB file can be broken up into hundreds to thousands of pieces to be saved into different sectors on the disk.
➡️ When you delete the 10 MB file, those sectors become empty. The drive will allocate pieces of other files you save to those empty sectors.
➡️ As time goes on, pieces of subsequent files will be stored on different ends of the disk in empty sectors left by deleted files. This phenomenon is called fragmentation.
➡️ The hard drive’s mechanical head must cover greater distances to locate those pieces whenever it wants to read the file.
This operation is suboptimal and can impact drive health and performance, particularly if the drive is fragmented to a certain percentage. Your computer will also slow down every time the system waits for the drive to read badly fragmented files.
Windows can become slow to boot, file transfers will take forever, and the chances of disk failure increase with prolonged stress on the mechanical head.
❓How does defragmentation help in these cases?
When you defragment a hard drive, you instruct Windows to rearrange file fragments so that the pieces of each file can be lined up closely together. That way, the hard drive’s mechanical head can locate and read files faster.
Thus, defragmentation helps to speed up Windows, reduces application launch times, accelerates read/write operations, and enhances drive health.
Which Type of Storage Drive Should I Defragment?
Hard disk drives. Defragmentation was originally designed to help rearrange file fragments on HDDs to reduce the strain on the actuator arm and make read/write processes faster. While the process is possible for solid-state drives, it is not recommended.
You should never defragment SSDs because they use flash memory and access files instantly. That means the location of file fragments does not affect the drive’s performance. Thus, defragmentation provides no meaningful impact.
Instead of defragmentation, SSDs rely on TRIM and active garbage collection for optimization. These processes and techniques help improve the drive’s unique write and erase operations to enhance performance.
What Should I Do Before Defragmenting My Hard Drive?
The following steps will make the defragmentation process faster and more efficient:
![IMG]() Check for disk errors
Check for disk errors

I once had a disk that would always fail to undergo defragmentation because it had logical errors. You can run the CHKDSK tool through the Command Prompt window to find and fix these errors before you begin. That way, your HDD head will ignore corrupted sectors when rearranging files. Our guide on fixing disk errors will walk you through the process.
You can check for disk errors by opening the Command Prompt window (search for CMD in the Start menu) and entering the chkdsk C: /f command. Replace C with the letter assigned to the drive you want to repair.
You can also use Auslogics Disk Defrag to check for errors in specific drives. Just click the drive and go to Options & Settings > Check for Errors > Check & Correct Selected.
![IMG]() Delete unnecessary files
Delete unnecessary files
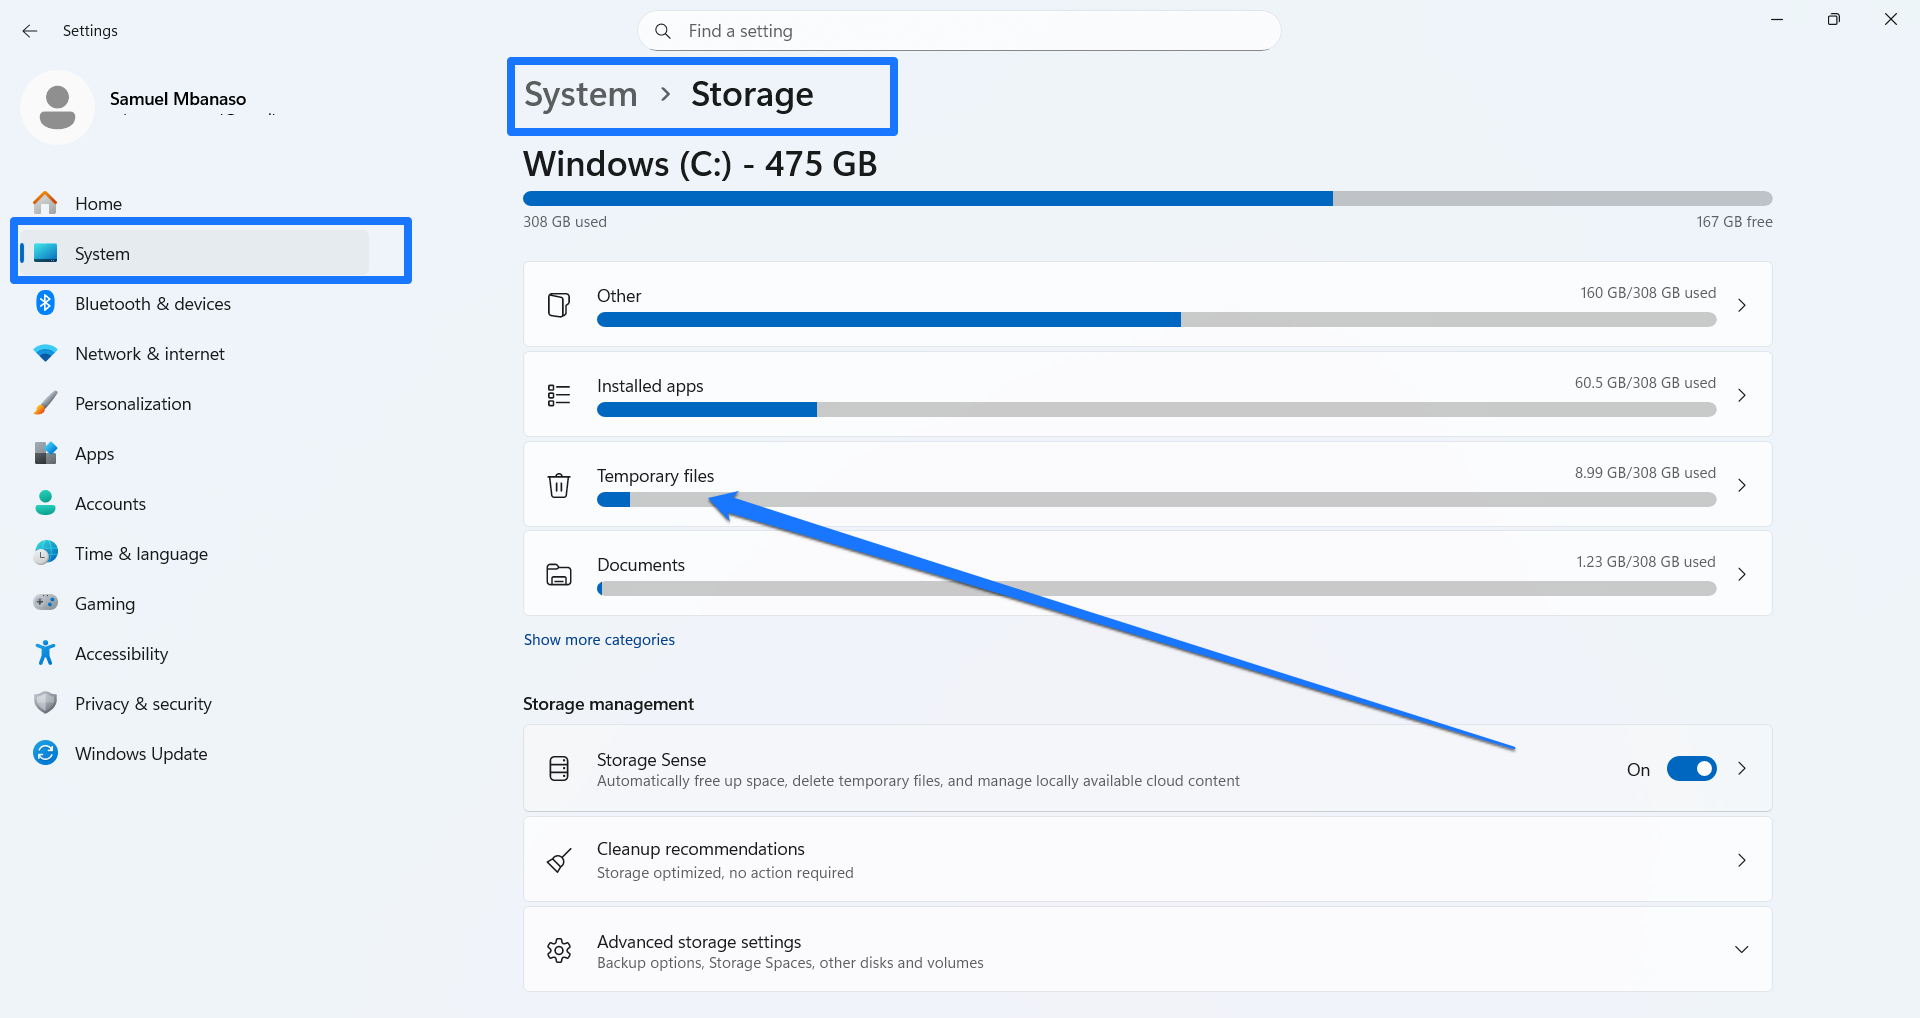
Unnecessary temp and junk files that fill up your hard drive increase the hard disk’s workload during defragmentation and prolong the process. You can use Windows’ Disk Cleanup tool or the Settings app to remove temporary files before you start the process.
Go to Settings > System > Storage > Temporary files, then select and delete the files you want to remove.
![IMG]() Close running programs
Close running programs
Terminating background processes and active apps reduces system drag and ensures you’re not moving files engaged by other programs. That way, the process is seamless, does not compete for system resources, and will not interrupt other processes.
![IMG]() Ensure sufficient power
Ensure sufficient power
Some programs provide the option to prevent defragging when your laptop is running on battery. That’s because sudden shutdowns in the middle of defragmentation can cause file corruption. So, even if you’re using a desktop computer, make provisions for backup power in case your primary source of energy goes out.
![IMG]() Back up your data
Back up your data
I just mentioned that you could lose data in the event of a power loss. You can back up your important files to protect yourself from such situations.
How Do I Defrag My Computer Hard Drive?
You can use Windows’ built-in drive optimizer, the Command Prompt, or third-party disk defragmenters.
I’ll show you how to use these programs to run regular defrag processes and schedule future defragmentations. Later, we’ll discuss advanced disk defragmentation methods, such as boot optimization and file/folder defragmentation.
But first, here’s a snapshot of what to expect with each method:
| Feature/expectation | Windows built-in tool | Third-party tools (e.g, Auslogics Disk Defrag and Defraggler) | Command Prompt |
|---|---|---|---|
| Ease of use | Very easy | User-friendly and intuitive | Complex and more suitable for advanced users |
| Defrag speed | Moderate | Often faster with defrag algorithms | Comparable to the built-in tool |
| Defrag options | Standard drive analysis and defragmentation | Advanced options and flexibility: file/folder fragmentation, file type prioritization, boot-time defrag, customizable algorithms, and more | Moderate control through command parameters |
| Scheduling | Yes, but only monthly, weekly, and daily options | Yes, with more customizations | No, but advanced users can create defrag tasks using Task Schedule commands |
| SSD safety | Yes, automatically detects SSDs and performs TRIM | Detect SSDs and warn users; some tools provide SSD optimization | Specific commands for SSD TRIM |
| Extra features and capabilities | None | Disk cleanup, performance testing, and more | One can run speed tests, error checks, and disk cleanup using specific Command Prompt commands |
| Reporting and logs | Minimal | Comprehensive reports | Minimal |
![IMG]() How to defragment a hard drive using the built-in defragmenter
How to defragment a hard drive using the built-in defragmenter

✅ Benefits of using this method:
- Pre-installed and free
- Designed for general users with minimal risk of misuse
- Lower resource usage
- Supports automatic optimization on a schedule
- TRIM for SSDs
🛑 Downsides:
- Defrag analysis may not be entirely accurate, as the program ignores files larger than 64 MB
- It can be quite slow, especially on larger drives
- Scheduling options are limited to daily, weekly, and monthly
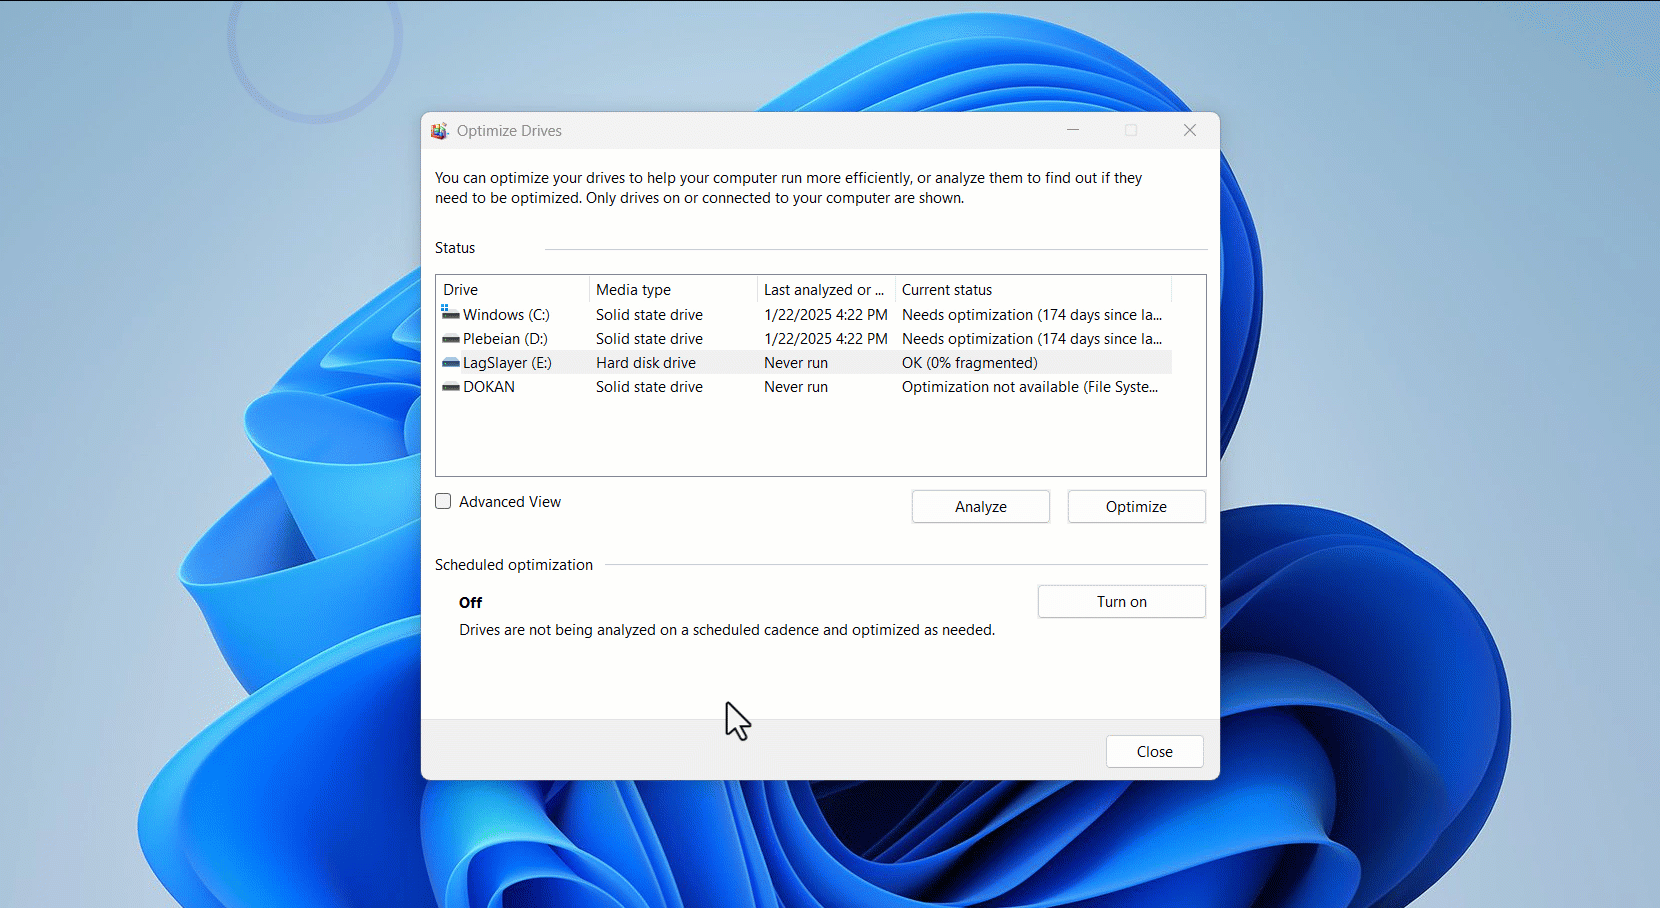
The built-in defragmenter goes by different names. It’s called Microsoft Drive Optimizer in Task Manager, Defragment and Optimize Drives in the Start menu, and Optimize Drives on its title bar.
📌 Also read: Microsoft Drive Optimizer vs. Third-Party Alternatives: Which Is Better for Defragmentation?
Here’s how to use the program:
- Launch the Start menu, type defrag, and click Defragment and Optimize Drives.
- Once it shows up, select your hard disk drive and click Analyze.
- You should now see your drive’s level of fragmentation under Current status.
- After the analysis is complete, click the Optimize button.
The program will analyze your drive before it starts the defragmentation. You should see multiple passes. For each pass, the tool relocates blocks, defragments files, and then consolidates free space. The number of passes depends on the drive size and level of fragmentation. Mine had 10 passes and took about 2 hours to complete, despite the tool reporting a 2% fragmentation.
- You should see the progress in percentages under Current status.
- Close the tool once the process is completed.
Follow these steps to set up defragmentation schedules:
- Click Turn on under Scheduled optimization.
- Once the Optimization Schedule window appears, check the box for Run a schedule (recommended).
- Select the frequency and choose the drive you want the schedule to apply to.
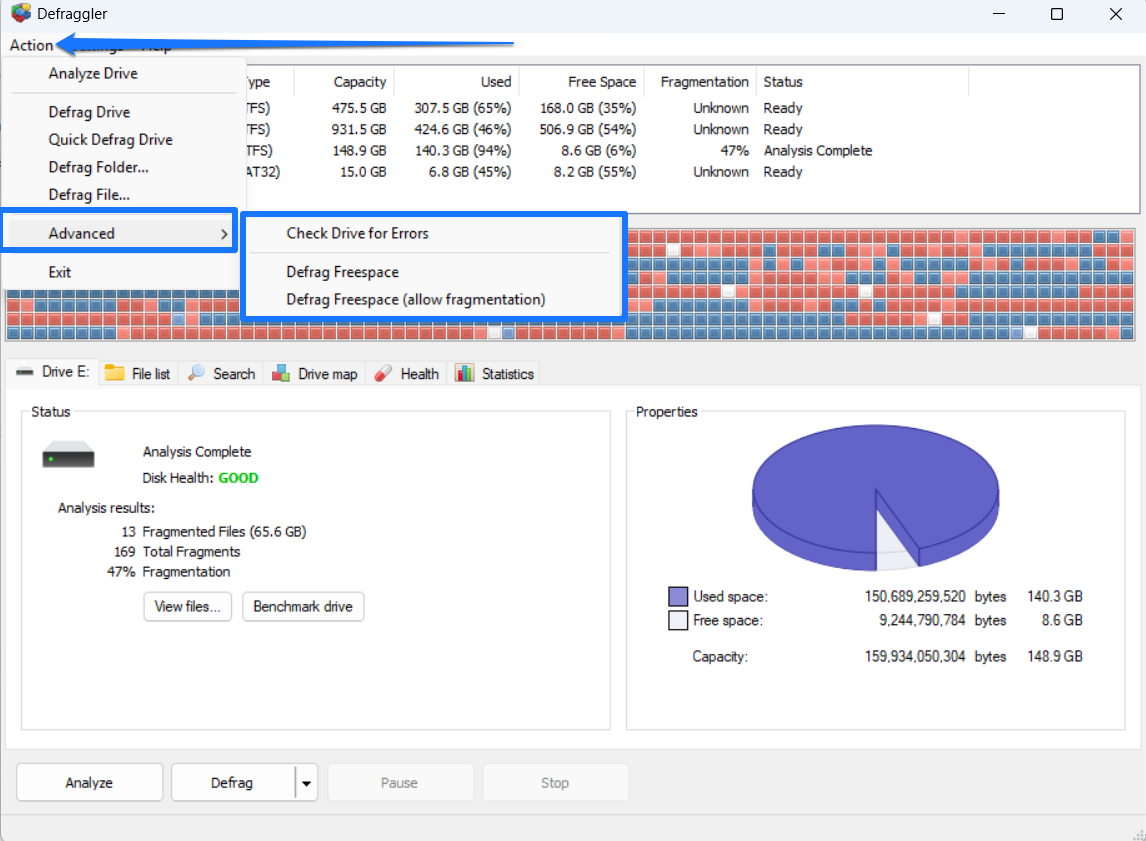
![IMG]() How to defragment hard drives using third-party programs
How to defragment hard drives using third-party programs
I’ll provide guides for two popular third-party defragmenters, Auslogics Disk Defrag and Piriform Defraggler.
✅ Benefits of using this method:
- More accurate defrag analysis
- Visual representation of disk fragmentation
- Offers more scheduling options, allowing users to choose the exact time for recurrent or one-time defragmentation
- Customizable defrag algorithms
- SSD detection available
- Faster defrag
🛑 Downsides:
- The best features might be behind a paywall in some cases
- Some tools, like Defraggler, have not been updated in a while
- More settings and options mean more room for user misuse or errors
➡️ Auslogics Disk Defrag
Download and install the program. The process is simple and fast.
- After the program launches, click the arrow beside the Defrag & Optimize button.
- Select Analyze in the drop-down menu.
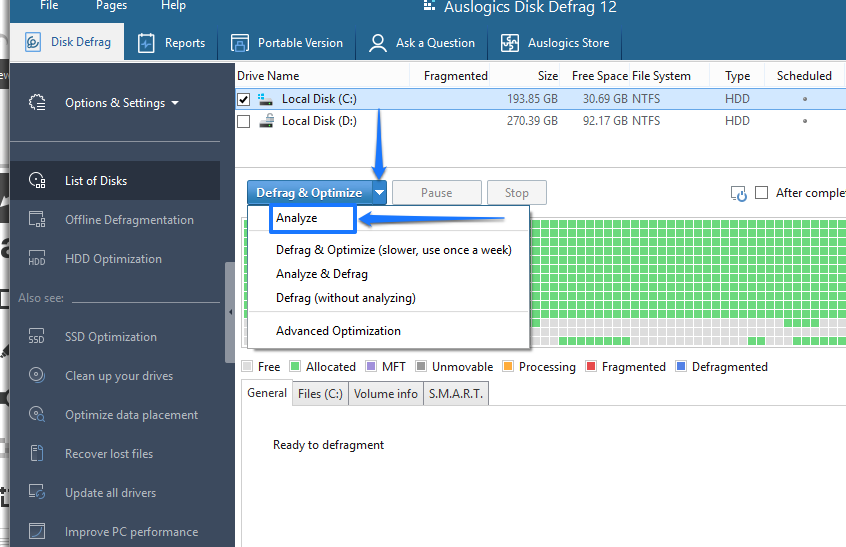
- After the analysis is complete, click the Optimize & Analyze button directly to start the defragmentation.
Auslogics Disk Defrag provides better scheduling options, unlike Microsoft Optimize Drives window. It can automatically defrag your drive when your PC is idle and allows you to set a specific time for the defrag. You can also choose other parameters, such as preventing disk defrag when the laptop is in battery mode.
Here’s how to choose your scheduling options in Auslogics Disk Defrag:
- Click File in the tool’s top-left corner and select Settings.
- After the Settings window opens, go to the left navigation pane and click Scheduler.
- Check the box next to Defragment automatically.
- You can now select your option.
To select a time, highlight the hours, minutes, or seconds, and type your preferred option with your keyboard. You can also use the arrow keys to the right to move each option up or down when selected.
- Click the OK button after selecting your preferences.
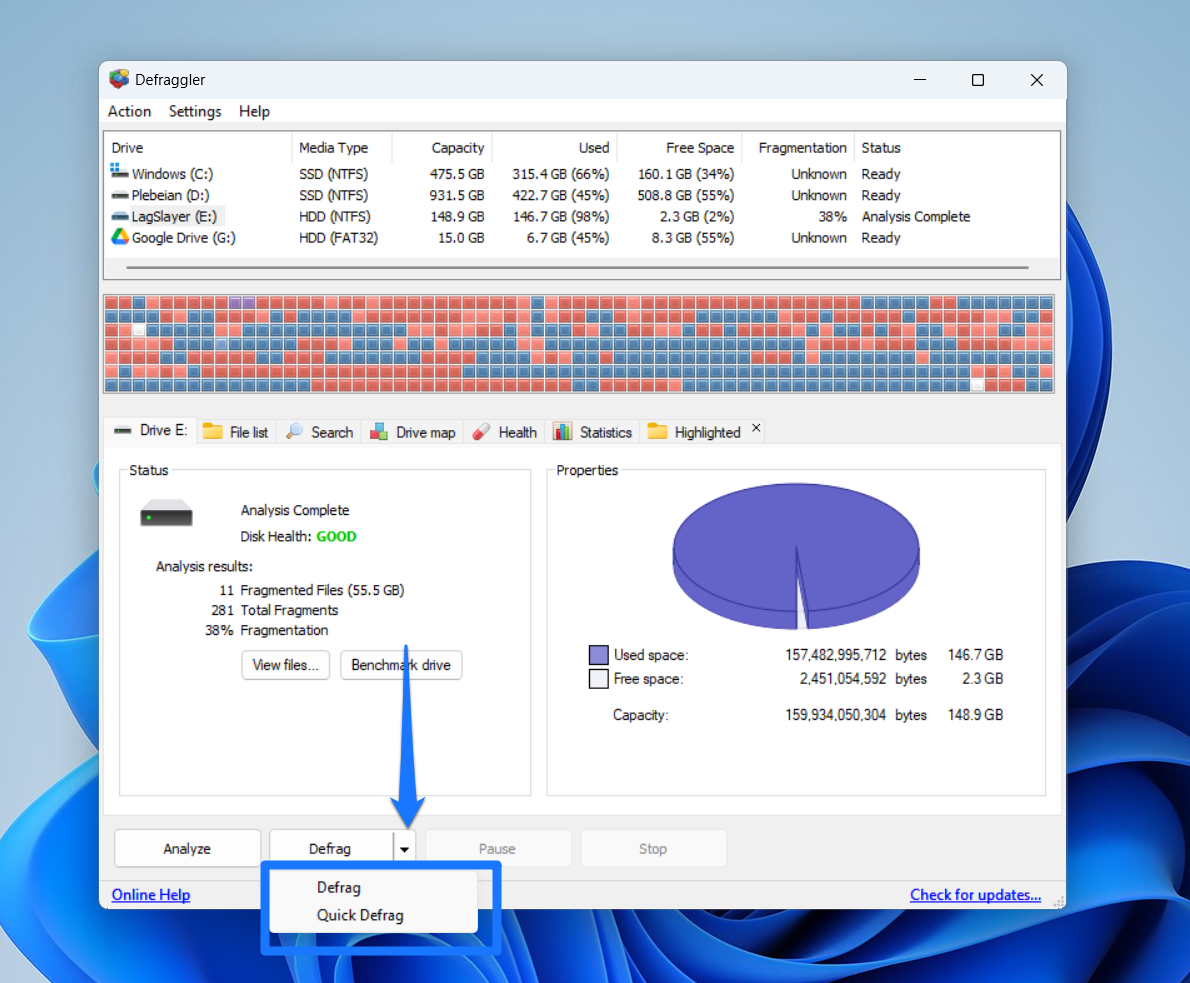
➡️ Defraggler
Defraggler works similarly to Auslogics Disk Defrag because it shows file fragments visually and offers better scheduling customizations. Here’s how to use it:
- Download and install Defraggler.
- Once you launch the program, click the Analyze button.
- After the analysis completes, you should see your drive’s fragmentation status represented visually and an Analysis results section under the Drive tab.
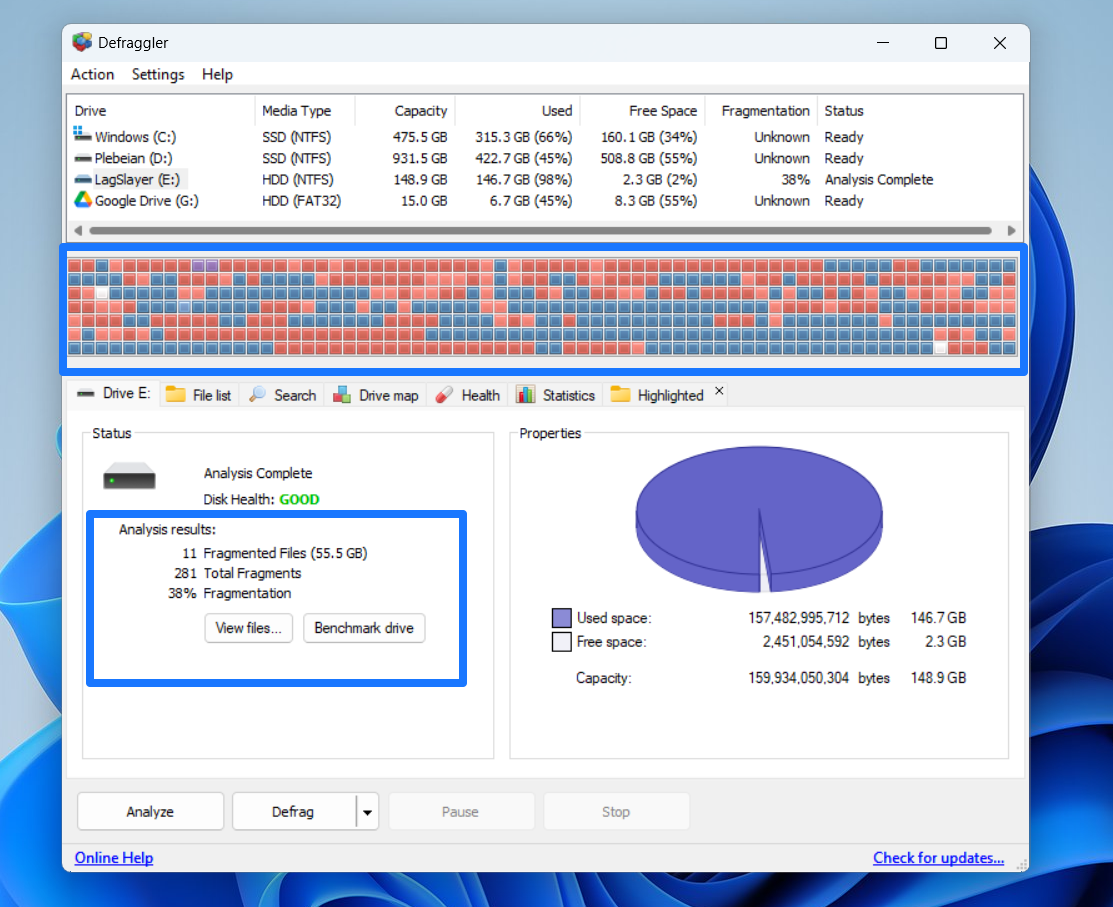
- If you decide that your drive is ripe for defragmentation, click the Defrag button. You can also click the arrow button beside Defrag to choose Quick Defrag from the drop-down, which only focuses on files with fragments that are smaller than 50 MB by default.
- Allow the program to rearrange your file fragments.
What about scheduling in Defraggler? Follow these steps:
- Click Settings in the menu bar and select Schedule.
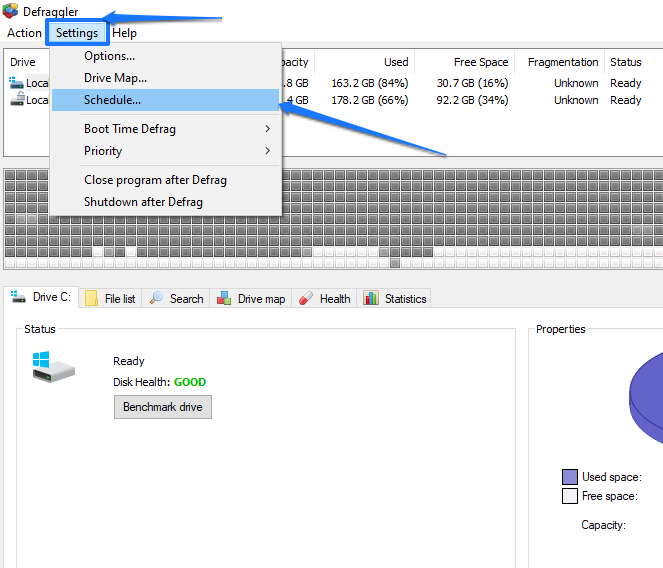
- Choose the drive you want to defrag and select Schedule defragmentation for chosen volume.
- Choose a period and select the date, time, and frequency where available. Select the type of defrag (full or quick) under the Advanced section.
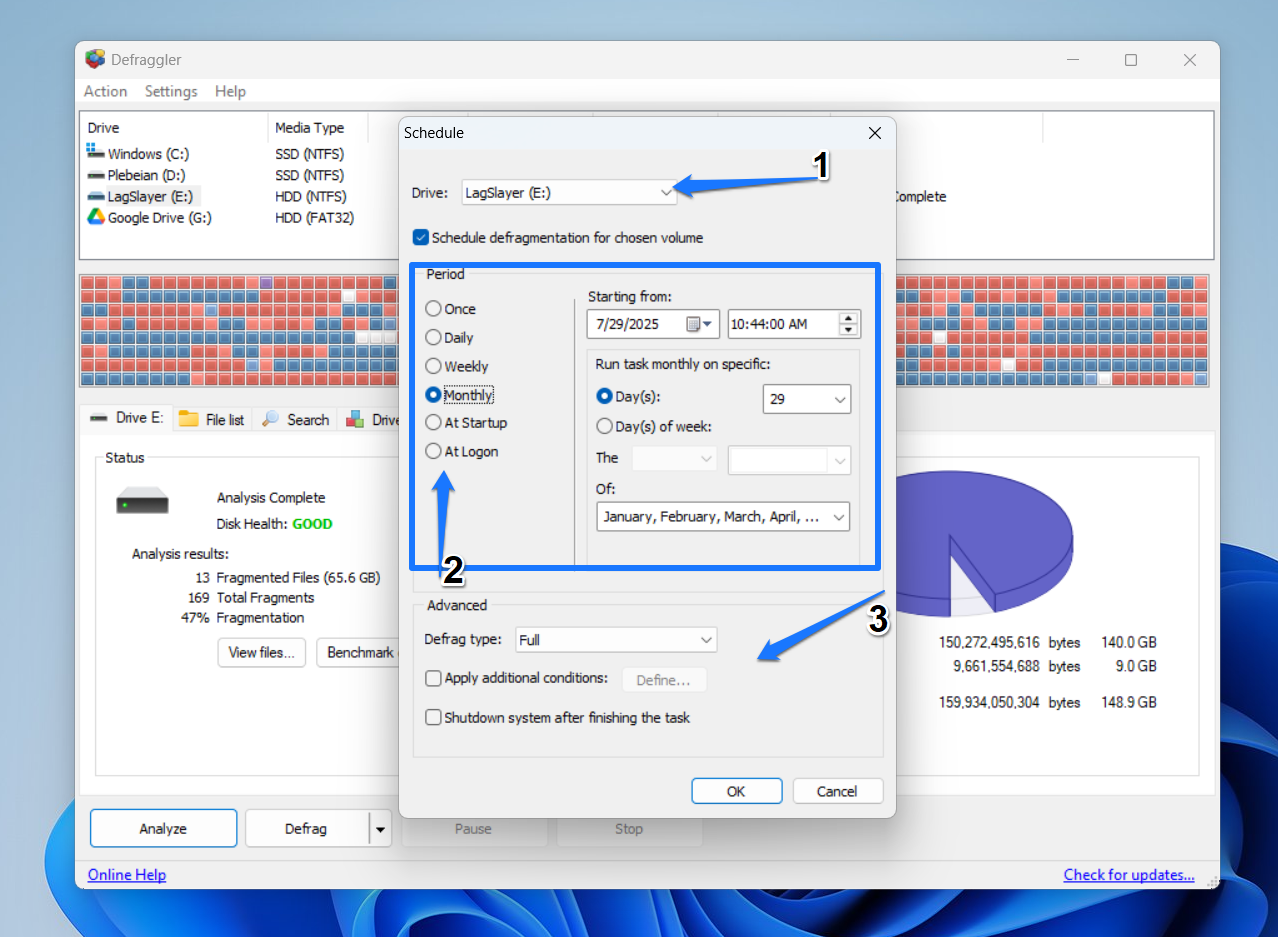
- Selecting Apply additional conditions and clicking Define under the Advanced section provides access to more options.
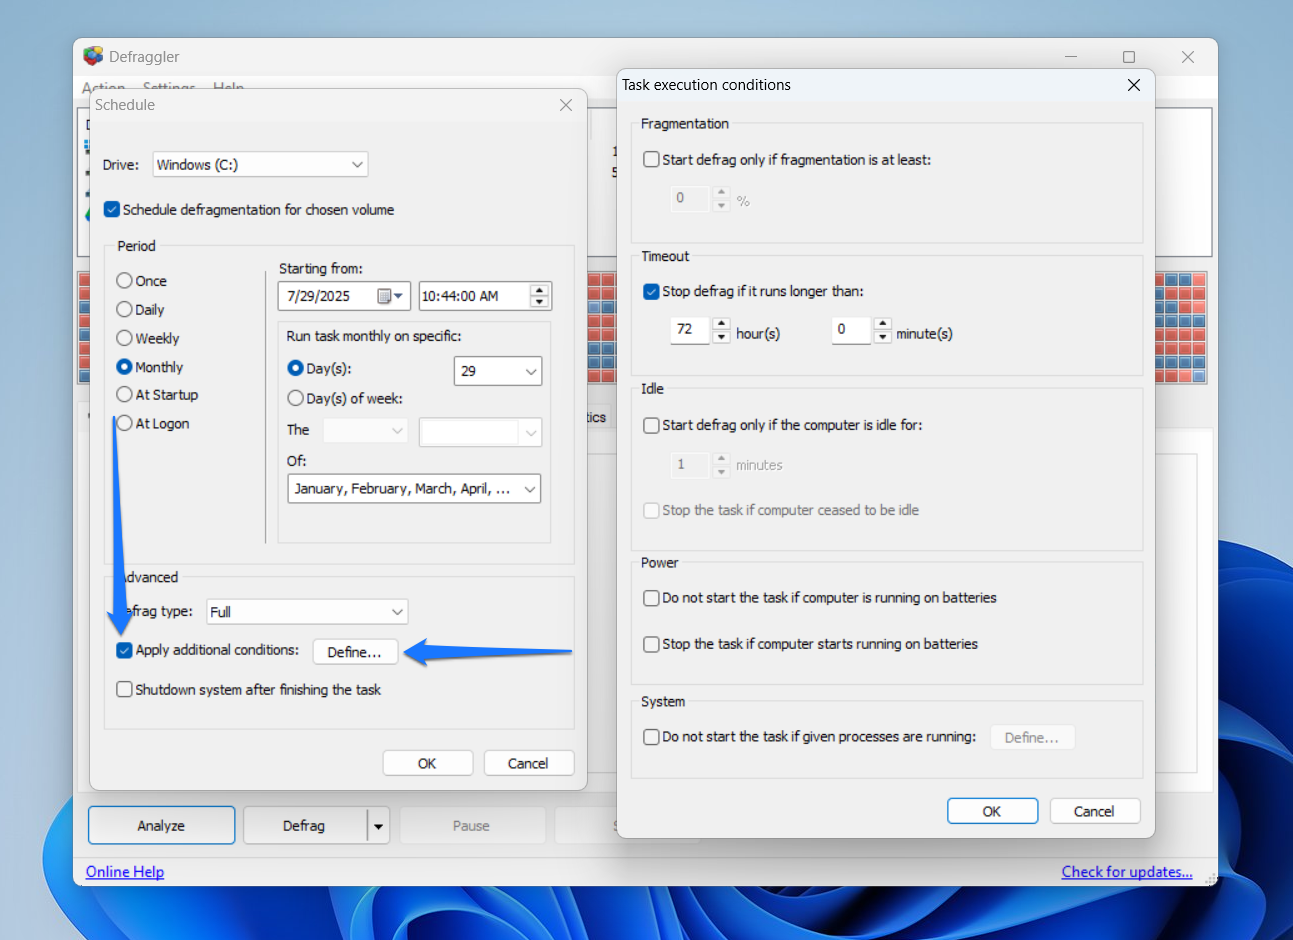
The additional conditions allow you to define how and when the defrag process runs within your schedules. For example, you can start defragging only when fragmentation reaches a specific level, stop defragging if it runs for more than a preset timeframe, and prevent defragging if specific processes are running.
- Click OK.
![IMG]() How to defrag hard drives using the Command Prompt
How to defrag hard drives using the Command Prompt
✅ Benefits of using the method:
- More defrag controls using switches like /U (show progress) and /V (show more defrag information)
- Relatively lesser resource overhead since there’s no GUI
- Can defrag multiple drives concurrently
🛑 Downsides:
- Less user-friendly, as it requires command line knowledge
- Fragmentation analysis has the same limitations as Microsoft Drive Optimizer
Pay close attention here. Successfully using the Command Prompt depends on typing the correct command lines.
Let’s start with the basics.
- Open the Start menu and type cmd.
- Click Run as administrator.
- Once the Command Prompt opens, type defrag.exe and hit the
Enterbutton on your keyboard.
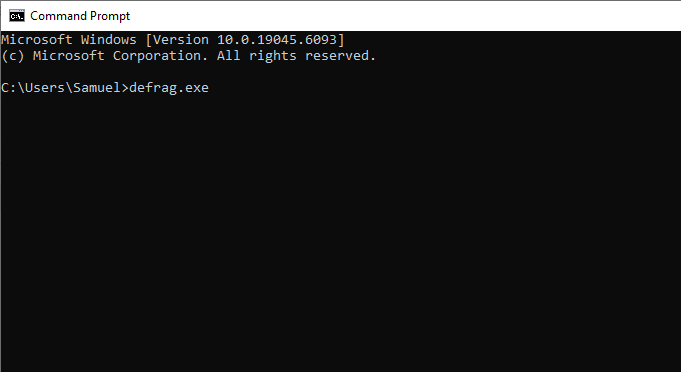
- You should now see a guide that shows you how to run defrag processes in the Command Prompt.
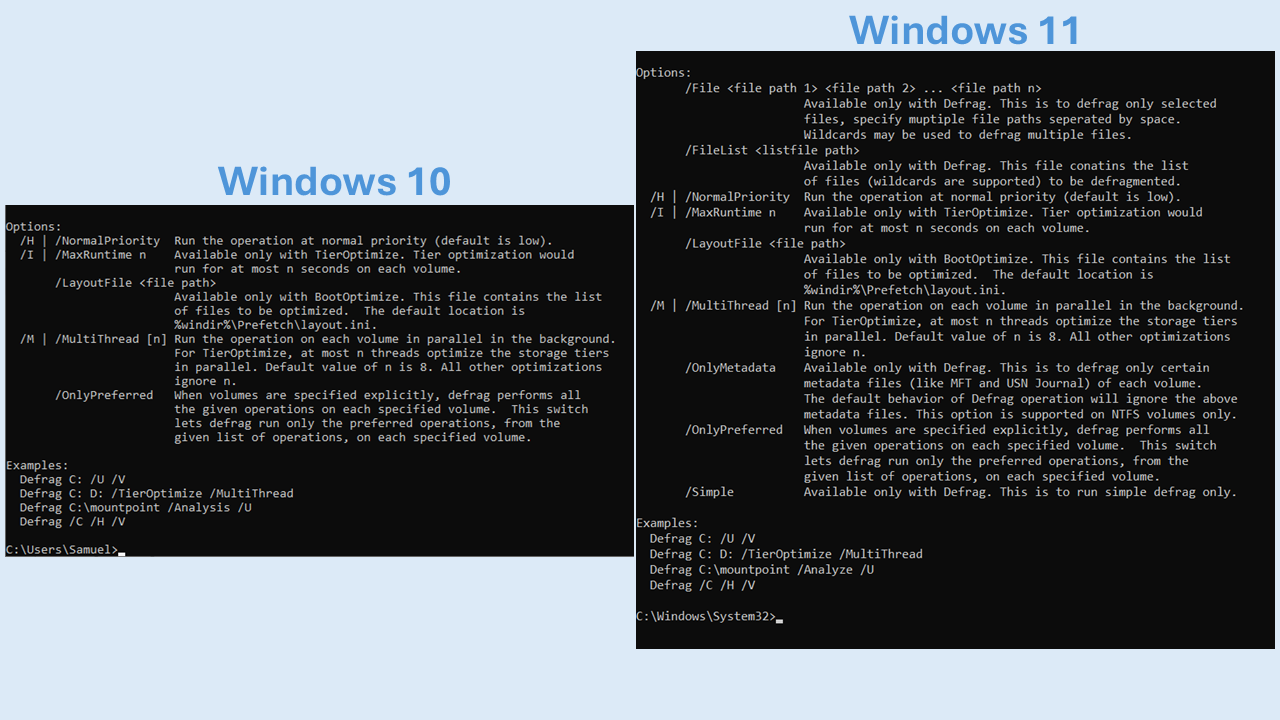
- To analyze a drive’s level of fragmentation, type defrag C: /A and hit the
Enterkey (replace C with the letter of the drive you want to defrag).
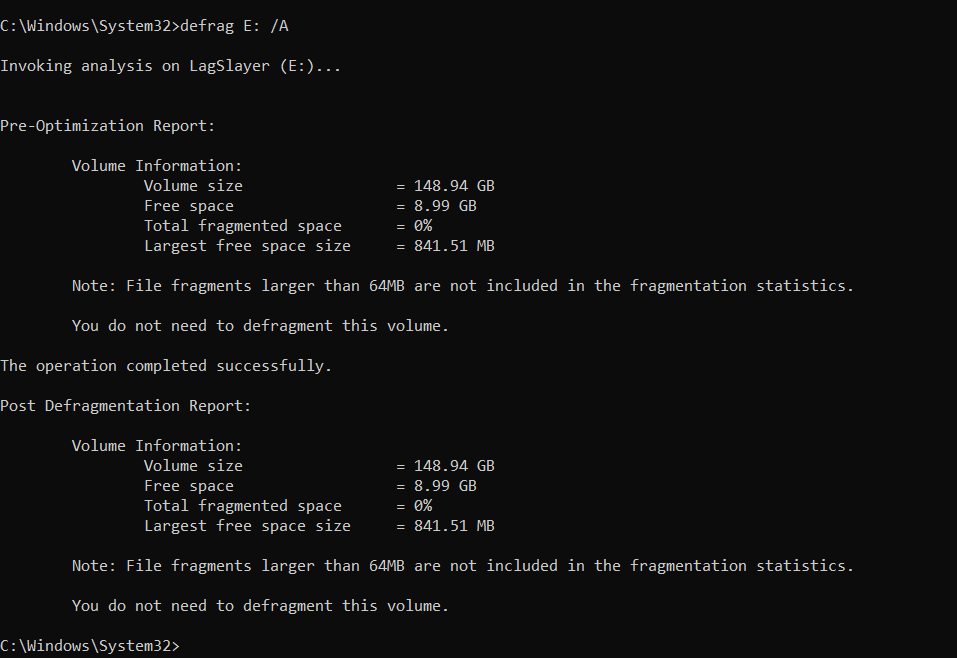
You should see the percentage of fragmentation alongside other stats. The tool will also advise you whether to defragment.
- If you want to defragment a specific drive, type defrag C: /U /V and tap
Enter.
This command runs the regular defragmentation process you get with the GUI app. However, ensure you replace the letter C with the letter of the drive you want to defrag. The /U parameter shows defragmentation progress, while /V shows relevant statistics.
- To defrag multiple drives at once, you can type defrag C: D: /M and tap
Enter. Remember that you have to change C and D to the relevant drive letters.
Advanced Disk Defragmentation
There are different advanced disk defragmentation processes, from performing boot-time defrag to running file and folder defragmentation. Here’s a snapshot of the advanced methods:
| Method | Description | Tools to use | Level of difficulty | When to use |
|---|---|---|---|---|
| File and folder defragmentation | Defragments specific files and folders | Third-party programs, the Command Prompt, Sysinternals Contig | Difficult when using command lines |
|
| Boot defrag/optimization | Defragments system and boot files | The Command Prompt and third-party tools | Intermediate: requires rebooting your system in most cases |
|
| Free space consolidation | Lines up empty blocks on the drive to prevent future fragmentation | The Command Prompt and third-party tools | Should be done correctly to avoid further fragmentation |
|
![IMG]() How to defragment specific files and folders
How to defragment specific files and folders
You can run this process through Auslogics Disk Defrag, Defraggler, the Command Prompt, and Sysinternals Contig.
➡️ Let’s start with Auslogics Disk Defrag:
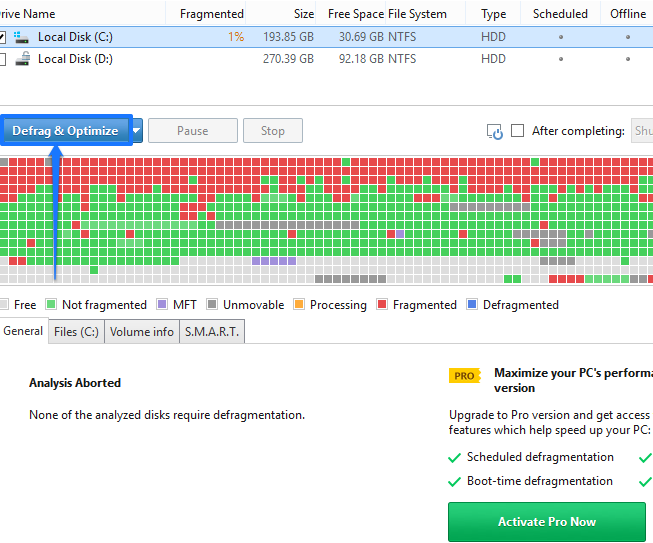
- Open Disk Defrag, click the arrow beside Defrag & Optimize, and select Analyze.
- Once the analysis is complete, click the Files tab under the cluster map to see a list of fragmented files in descending order based on the number of fragments per file.
- Scroll through the list to locate the file you need. Right-click it and select Defrag Selected from the context menu.
- To select multiple files, hold the Ctrl button and click the files you want to defragment. Now, right-click and choose Defrag Selected.
- If you know where the file is located, select Options & Settings, select Advanced, and click Defrag File. Click Defrag Folder if you want to defragment a specific folder.
- You can select the file or folder you want to defragment and click Open or Select Folder.
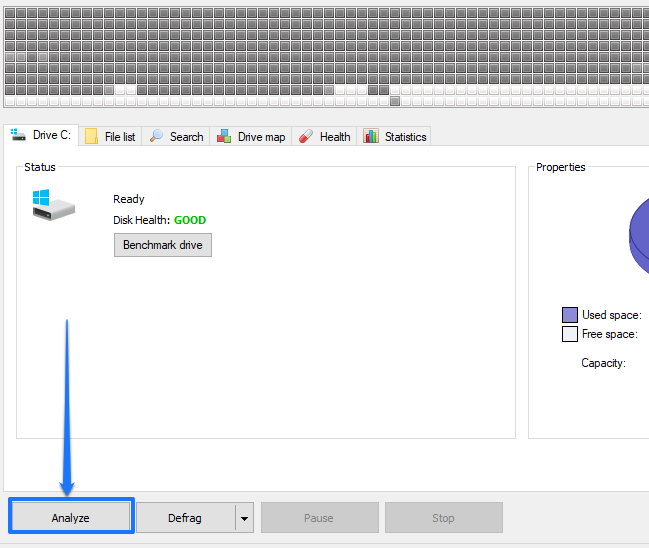
➡️ Follow these steps to use Defraggler:
- Open Defraggler.
- Click your drive and select the Analyze button.
- Go to the File list tab under the cluster map.
- Like Disk Defrag, you can right-click the file you want to defrag and click Defrag Highlighted. You can also select multiple files by holding the Ctrl button and clicking each.
- You can also click Action at the top of the window and select Defrag File. Browse to the file you want to defragment, select it, and click the Open button. Choose Defrag Folder to defragment a folder.
➡️ Here’s how to use the Command Prompt:
- Launch the Command Prompt.
- After the program opens, type Defrag <Drive> /File <file path 1> <file path 2> and hit
Enter. Replace <Drive> with the letter of the drive where the file is located and <file path 1> and so on with the path to the file you want to defrag. - For example, let’s say I want to defragment the files screenshot.png and screenshot01 on my E drive. Here’s the command I’ll use: Defrag E: /File E:\Chunky\screenshot.png E:\Chunky\screenshot01.png
Ensure you add the full path as shown above, add the file’s extension, and leave spaces after each path if you want to defragment multiple files.
- The Command Prompt will show you the total size of the files you want to defrag, the number of files, the number of fragments, and the total fragmented space.
➡️ Use Sysinternals Contig
Contig is a command-line utility primarily designed to defragment individual files. While it’s part of the Sysinternals Suite, a collection of advanced system utilities, you can install Contig as a standalone tool.
Here’s how to use the program to defrag files and folders:
- Go to Microsoft’s website to download Contig.
- Extract the ZIP file and run the installer.
- After the installation completes, launch the Command Prompt window as an administrator.
- Now, type cd <path to contig> and hit
Enter. Replace <path to contig> with the path to the extracted folder. For example, cd C:\Users\Samuel\Downloads\Contig. - Now, type contig.exe -a <file path> and tap
Enterto analyze a file. Accept the Sysinternals terms of service. - For instance: contig.exe -a C:\Users\Samuel\AppData\Local\Microsoft\Windows\Explorer\thumbcache_1280.db
- You should now see details of the file, including the number of fragments.
- To defragment a file, type contig <file path> and hit
Enter.
You can also type contig -v <file path>р. The -v parameter prompts the command to show details during the process.
For example:
contig -v “C:\Program Files (x86)\Google\GoogleUpdater\updater.log”
Take note of the quotation marks for paths with spaces.
Like the Command Prompt process, you can also use wildcards and defragment multiple files at once.
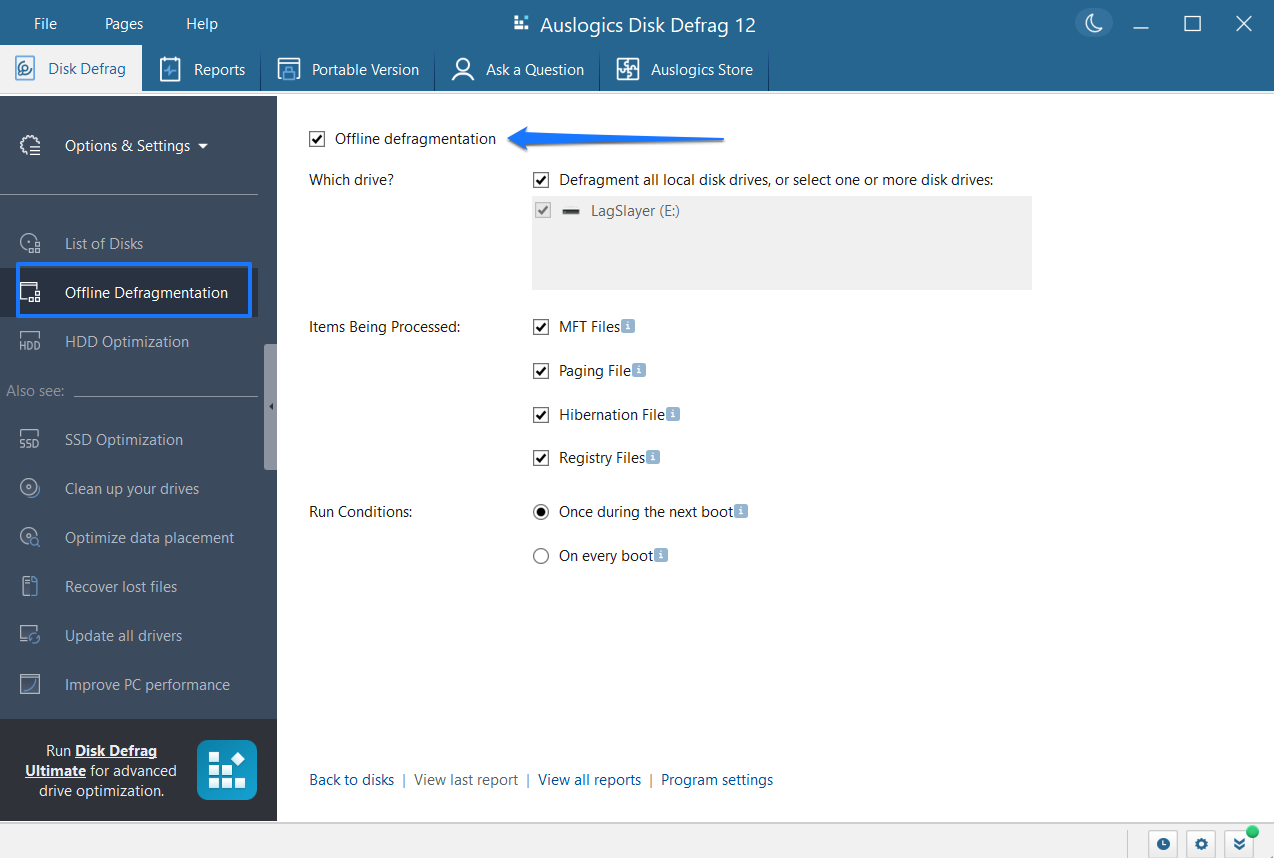
![IMG]() How to run boot-time defrag
How to run boot-time defrag
Boot-time or offline defrag is a defragmentation process that runs before Windows boots. It is designed to defragment system files that would otherwise not be rearranged when Windows is running.
It helps boost startup speed and optimize your computer’s performance. You can also use the Command Prompt, Auslogics Disk Defrag, and Defraggler to run this process.
➡️ Using Auslogics Disk Defrag:
This function is limited to paid users.
- Launch the program and click Offline Defragmentation in the left pane.
- Go to the right side of the screen and check the box beside Offline defragmentation.
- Now, select the drive, items to be processed, and running conditions (during the next boot or on every boot).
➡️ Using Defraggler:
- Open Defraggler.
- Click Settings at the top of the window.
- Select Boot Time Defrag and click Run Once.
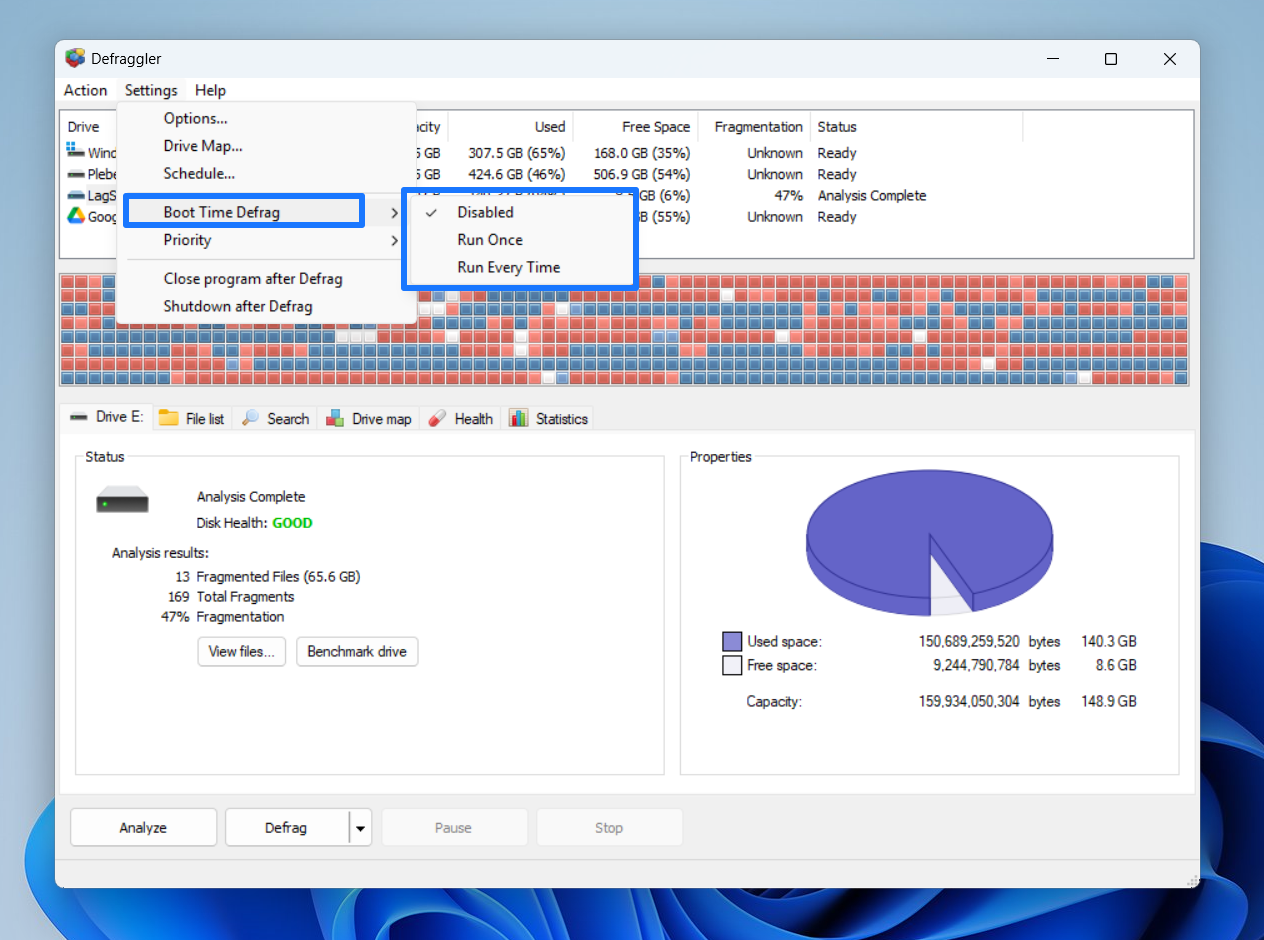
- You can choose to restart your system immediately to run the process or wait until your next reboot.
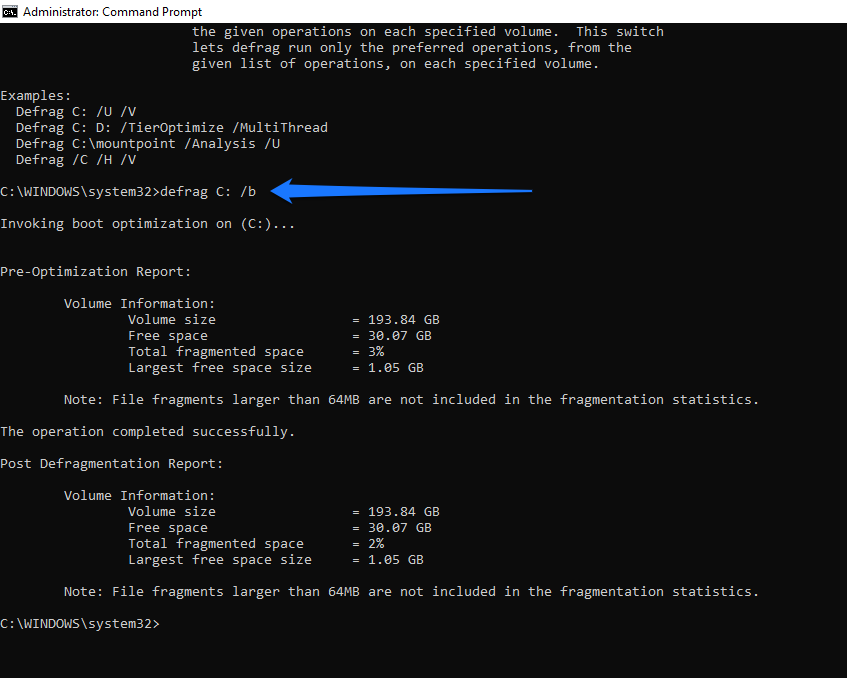
➡️ Using the Command Prompt:
In the Command Prompt, the process is called boot optimization. It rearranges boot files even when Windows is running.
- Open the Command Prompt as an administrator.
- Type defrag C: /b. You can change the letter C to the letter of the drive that you want to defrag.
- You should see a pre-optimization report before the process begins to run.
- This process may take a while, so stay put.
- You’ll see a report in the Command Prompt saying “The operation completed successfully” alongside a post-optimization report.
How to run free space consolidation
Free space consolidation is another process that you can perform using Auslogics Disk Defrag, Defraggler, and the Command Prompt. When you run the command, it lines up free sectors closer together. That way, files you subsequently write to the disk will be saved contiguously.
➡️ In Auslogics Disk Defrag, clicking the Defrag & Optimize button automatically consolidates free space after defragging the drive.
➡️ Here’s how to run free space consolidation in the Command Prompt:
- Open the Command Prompt window.
- Type defrag C: /X and hit
Enter.
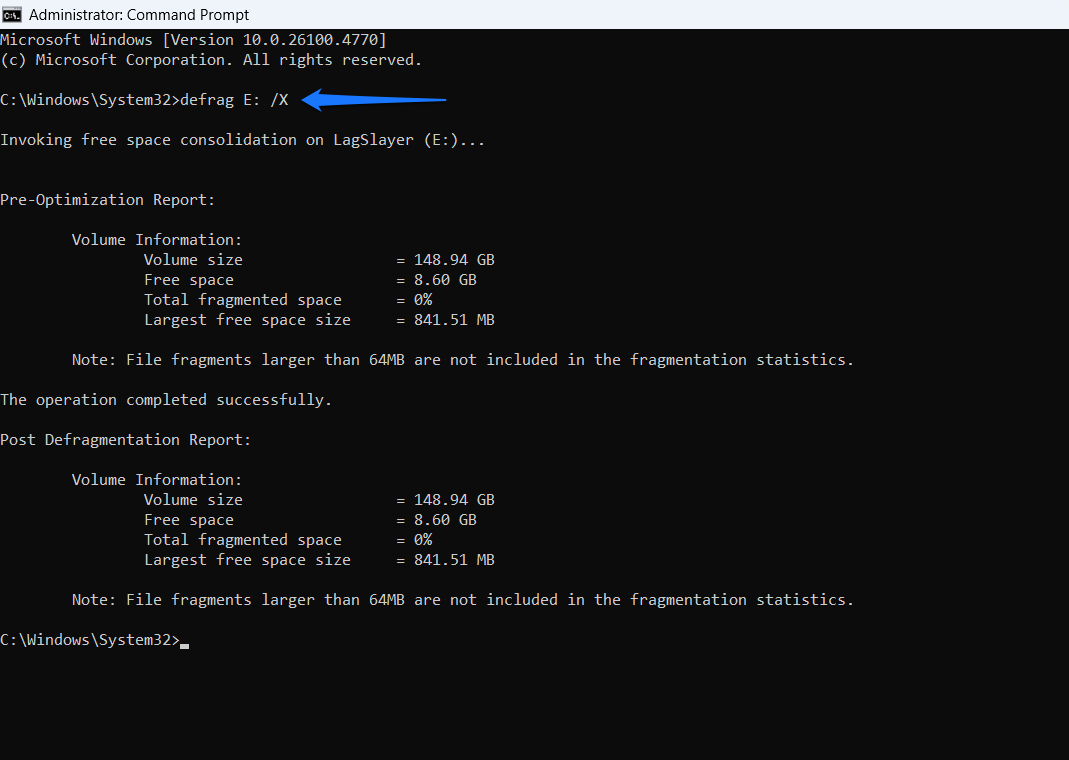
Replace C with your drive letter.
- The tool will provide pre-optimization and post-optimization reports.
➡️ Follow these steps to use Defraggler:
- Open Defraggler.
- Click Action at the top of the window.
- Select Advanced > Defrag Freespace.
Can I Prevent Disk Fragmentation?
No. However, you can significantly reduce it and minimize its impact on system performance. You can do the following:
- Perform regular disk cleanup: Temporary files created by Windows and third-party programs can cause fragmentation if they are not managed promptly. When these files occupy space and you save other permanent files, deleting them (temp files) later will cause fragmentation.
You can use the Disk Cleanup utility to clear out these files periodically. However, it’s best to automate the process using Windows’ Storage Sense feature (under Settings > System > Storage) or third-party tools like Auslogics BoostSpeed.
- Create disk defrag schedules based on your drive usage: Allowing Windows or your third-party app to defrag your drive weekly or monthly should help you effectively avoid fragmentation and its associated issues.
Here’s my recommendation:
| Use case (HDDs only) | Description | Schedule |
|---|---|---|
| Light home use | Occasional document editing, web browsing, media playback | Once every 1 to 3 months |
| Moderate use (professional and office use) | Regular file operations, productivity apps, spreadsheets, etc. | Every month |
| Heavy use (video editing, gaming, etc.) | Frequent large file transfers, editing, saving, and deleting files | Every 1 to 2 weeks |
| File servers (HDD-based NAS systems) | Constant file access by multiple users | Weekly or daily, depending on the number of users and activity |
| Backups | Periodic backups, archiving, and file copies | After major backups and large data changes |
- Use different partitions: Keeping your system and program files in one partition and personal files in another can help you reduce fragmentation. That way, your permanent files will not fill up spaces when Windows and programs create and delete temporary files like logs and cache.
Defragment Your Hard Drive the Smart Way
Creating defragmentation schedules is the most effective way to avoid the time-consuming process of manual defragmentation.
Third-party tools allow you to pinpoint when these schedules run so that you never miss out on the defrag process. You can also enable the Increase task priority option in the Optimize Drive window to ensure you don’t miss native defrag schedules for too long.
However, manual defragmentation comes in handy when you need to defragment an external hard disk drive or specific files and folders. In some cases, you also need to run advanced defrag processes, such as boot-time and free space defrag, manually.
At the same time, remember to avoid defragging SSDs and use SSD optimization tools instead.
Let us know if you have any questions about defragging your hard disk drives!
FAQ
Enter key. You can also type defrag.exe and tap Enter to view other commands you can use.