
- How Do SSDs Work, and Why Should I Optimize My SSD?
- HDD vs. SSD Optimization
- What Is a Good SSD Speed?
- How Can I Determine That My SSD Is Working Well?
- Essential Pre-Optimization Setup and Checks
- How to Optimize Your SSD on Windows
- Ensure TRIM is enabled
- Update your drive’s firmware
- Set up SSD overprovisioning
- Turn on write caching
- Keep free space
- Ensure defragmentation is disabled
- Disable Search indexing
- Adjust your power plan
- Disable hibernation
- Archive cold files
- Use DirectStorage when gaming
- Use a reputable SSD optimizer Use a reputable SSD optimizer
- Things You Should Avoid
- Maximize Your SSD’s Performance with Smart Optimizations
- FAQ
SSD performance can dip for many reasons, from low space and outdated firmware to disabled TRIM and thermal throttling. Whatever the contributor, reduced performance is a bad signal for your solid-state drive.
Although SSDs have become more affordable over the last few years, nobody likes throwing money around. So if you care for your drive (and your wallet), it’s time to show it some TLC. And even if your drive works fine now, it still needs to be treated well.
Let’s optimize your SSD!
🤒 Check SSD health and SMART stats, then back up important data.
📈 Test your SSD performance and sustained speed.
🔗 Verify the correct M.2 slot and confirm BIOS controller mode.
🔥 Use a heatsink or adequate cooling for high-end NVMe drives to avoid thermal throttling.
✂️ Make sure TRIM is enabled and firmware is up to date.
🆓 Free up ~10–20% of drive space, set up overprovisioning, and enable write caching.
❌ Disable defragmentation.
👍 Use Auslogics SSD Optimizer or similar trusted tools for safe SSD maintenance
How Do SSDs Work, and Why Should I Optimize My SSD?
SSDs store data in flash memory and, unlike HDDs, have no mechanical parts—like read/write heads or actuator arms—which gives fast random access and boot times, beating traditional hard drives in speed—like a brand new Tesla vs. a rusty Fiat.
📌 Also read: SSD vs. HDD: What’s the Difference and How to Choose the Right One
That raw speed is great, but real-world SSD performance depends on more than marketing numbers: interface (SATA vs. NVMe and PCIe generation), platform limits (CPU, motherboard lanes, thermal throttling, and drivers), and how the drive is used.
In short, SSD optimization is not only about making your drive faster now but also about keeping those speeds steady, preventing slowdowns that sneak up over time, and extending its lifespan.
HDD vs. SSD Optimization
Like I mentioned, since HDDs have lots of moving parts and SSDs don’t have any, this means that they operate differently and that each requires a particular approach. In short, what’s good for one drive may not affect (and sometimes may even harm) another.
Defragmentation, for example, rearranges data to shorten head travel on an HDD—useful there, but pointless and wasteful on an SSD, because SSDs already access files instantly and defragging just adds unnecessary writes.
So how do you optimize an SSD then? Mainly, by focusing on things that reduce write amplification: leave free space, enable TRIM and active garbage collection, use overprovisioning (OP) when possible, and minimize background activity from apps that write nonstop. More on that later in the article.
What Is a Good SSD Speed?
Alright, we already know that SSDs are fast, but how fast exactly? A good SSD speed is not one fixed number—like I mentioned, it depends on three big things: the interface, your system limits, and, of course, how you use the drive.
📌 Also read: How to Check What SSD You Have: A Comprehensive Guide
In short: a top-tier Gen 5 NVMe drive won’t feel dramatically faster than a SATA one for everyday web browsing or Office work, but it will for video editing, large transfers, and certain load-heavy games. But there’s still a question: how do you calculate SSD speed? There are two major measurements:
- Sequential speed (MB/s): This measures how fast the drive moves large contiguous files (think copying big video files). Higher sequential numbers cut large transfer times.
- 4K random (IOPS): This represents your SSD’s responsiveness—how many small 4 KB reads/writes the drive can handle per second—measured in IOPS (input/output operations per second), reflecting OS snappiness and app launch times.
That said, let’s see how various SSD types stack up against each other in terms of sequential and random speeds.
| SSD type | Sequential read, MB/s | Sequential write, MB/s | 4K random read, IOPS | 4K random write, IOPS | Notes |
|---|---|---|---|---|---|
| SATA III | ~450–550 | ~400–520 | ~30,000–100,000 | ~20,000–90,000 |
|
| NVMe PCIe Gen 3 | ~2,000–3,500 | ~1,800–3,000 | ~100,000–600,000 | ~100,000–500,000 |
|
| NVMe PCIe Gen 4 | ~4,000–7,000 | ~3,000–6,900 | ~300,000–1,000,000 | ~200,000–900,000 |
|
| NVMe PCIe Gen 5 | ~8,000–15,000+ | ~7,000–14,000+ | ~1,000,000–4,000,000+ | ~800,000–3,000,000+ |
|
If your daily tasks are browsing, Office, and light photo work, a SATA or Gen 3 NVMe drive already feels instant. If you edit multi-hour 4K video, copy many huge files, or use an SSD for gaming, Gen 4/5 can cut transfer and loading times noticeably. And remember: always compare real-world benchmarks (sequential + 4K random) rather than a single marketing number for a full picture.
How Can I Determine That My SSD Is Working Well?
Want to know how to check your SSD’s health and ensure it is delivering the performance it should? Don’t rely on feelings—test it.
Here’s a step-by-step checklist (mind the order) of what to run, what to compare, and when to worry:
✅ Check SMART & health metrics
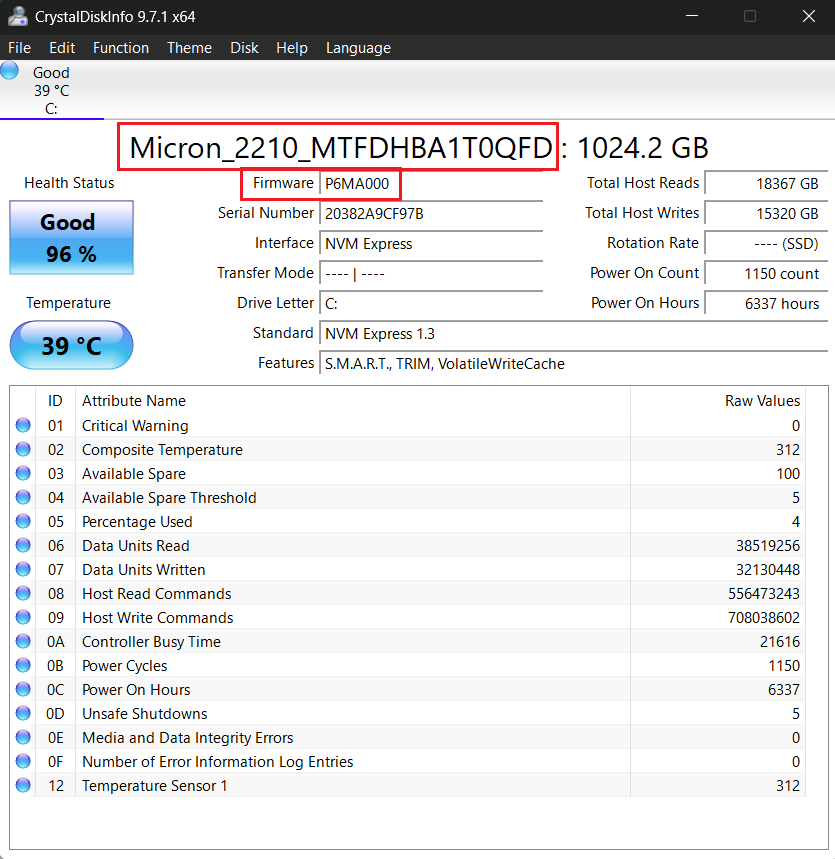
Run a SMART reader like CrystalDiskInfo or your SSD manufacturer’s tool. I’ll be using CrystalDiskInfo as an example. What to look for:
⇢ Health Status: Raw data on your SSD’s life used. Start worrying and planning replacement when it falls below ~50%.
⇢ Critical Warning: Reports high-level controller/state problems like spare capacity below the vendor threshold, temperature over limit, or degraded reliability. Anything more than 0 is a bad sign.
⇢ Media and Data Integrity Errors: These are direct indicators that reads/writes have failed and data integrity is at risk. Any number over 0 is serious.
⇢ Total Host Writes: That’s how much data you’ve written so far, aka your SSD’s wear level. Compare this number against your SSD’s rated TBW (terabytes written), which you can find in your model specs. In my case, Total Host Writes shows around 15 TB, while my drive’s TBW is 360 TB—nothing to worry about yet.
⇢ Temperature: Your drive’s current temperature. An idle temp over 50°C or a sustained load temp over 70°C indicates you need to add cooling. Mine is 42°C—perfectly normal for an NVMe at idle/light load.

If you see bad results, here’s what you should do:
- Back up immediately—each of the SMART red flags is no joke.
- Stop heavy write workloads.
- Check firmware (update only from the official vendor page and only after a backup).
- Contact your SSD’s vendor/RMA if SMART reports errors or critical warnings within the warranty period.
✅ Test your SSD performance
Use CrystalDiskMark, AS SSD, or DiskSpd to benchmark your SSD. Compare results to your drive’s spec (or the ranges in the table above). If sequential or 4K random numbers are far below expectations yet SMART shows no errors:
- Confirm slot & lanes—is your drive connected to an x4, CPU-attached slot?
- Check temps while testing → add cooling if they consistently exceed 70°C.
- Update drivers (NVMe driver, chipset) & BIOS firmware.
- Update SSD firmware via the vendor tool (back up first).
Run benchmarks only to diagnose—otherwise, it just eats your drive’s write budget.
✅ Test sustained performance
Some drives show fast initial bursts and then slow during long transfers. Run a large sequential test (several GB or more) or copy a large file to check your SSD speed over a distance. If performance plunges, suspect SLC/DRAM cache exhaustion or thermal throttling—retest while monitoring temps and, if needed, add cooling, update firmware, or free up overprovisioning.
Essential Pre-Optimization Setup and Checks
A few simple setup checks before you start tweaking will save time—and avoid accidentally bottlenecking a fast drive.
📌 Also read: How to Initialize an SSD: Set Up Your New SSD for Best Performance
- Verify the M.2 slot is a CPU-attached x4 (for NVMe drives).
- Add a heatsink/improve airflow if you run sustained loads frequently.
- Ensure AHCI for SATA SSDs and NVMe mode or RAID for NVMe SSDs.
- Back up before changing drive modes or flashing firmware.
➡️ Connect to the right SSD slot (if you have a desktop PC)
If you use an M.2 SSD, prefer the M.2 slot wired to the CPU with x4 lanes—that’s where an NVMe drive gets full bandwidth (SATA drive speeds are limited by the SATA bus, so they don’t get that benefit). Some motherboard slots share lanes with SATA or the GPU and can drop your drive to x2 or Gen 3 speeds or even lower.
Also check the PCIe generation—plugging a Gen 4 or Gen 5 SSD into an older Gen 3 slot will cap its performance. Check your motherboard manual, and if you’re using a PCIe adapter, make sure it’s a true x4 slot. If you see unexpectedly low benchmarks, this is the first thing to rule out
➡️ Use a heatsink for hot NVMe drives
High-end NVMe drives (especially PCIe Gen 4 and 5) can get hot under sustained load and will throttle to protect themselves. If you do heavy transfers or editing, adding a heatsink to your SSD or improving case airflow is often the simplest fix. Check SSD temp under load: sustained temps over 70–75°C = time to cool it down.
➡️ BIOS/UEFI: Set the correct mode
For most setups, AHCI is the right mode for SATA SSDs, and native NVMe mode is best for M.2 NVMe drives. RAID/RST is appropriate when you use a RAID array or your OEM depends on RST features.
❗ Important: Don’t change the RAID mode if your drive is part of a RAID array (you’ll break it), if your OEM requires RST for features you use, or if you’re unsure.
🔶 SATA SSDs
If you use a SATA SSD, setting the controller to AHCI instead of IDE in the BIOS enables TRIM and modern SATA features and improves SSD performance.
Here’s how to do it:
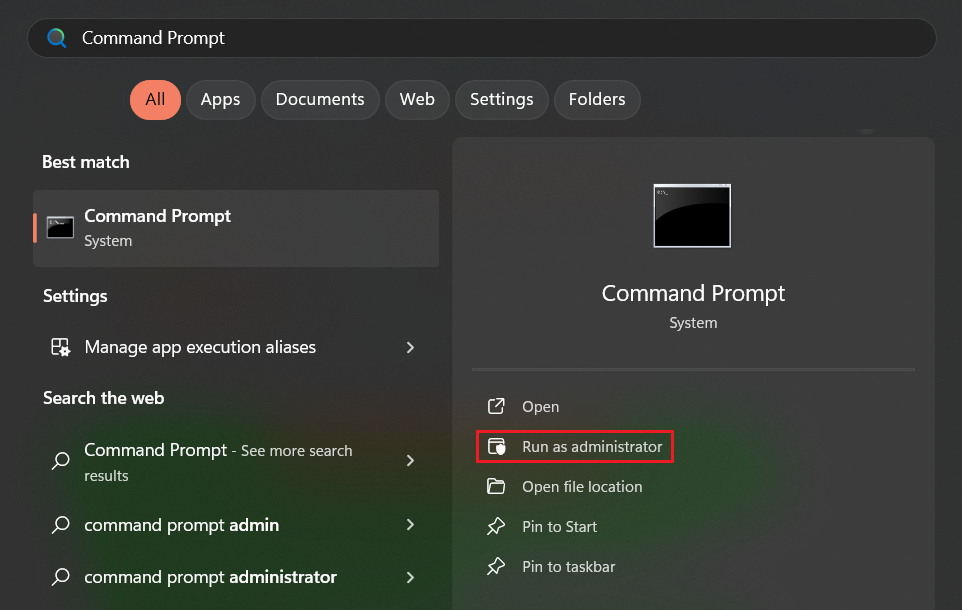
- Click Start, search for Command Prompt, and click Run as administrator.
- Enable safe boot by running the following command:bcdedit /set {current} safeboot minimal.

- Reboot your PC and enter the BIOS by pressing the designated key (usually
F2,F10,F12, orDel) during bootup. - Change storage mode from IDE to AHCI under Storage Configuration or a similarly named section.
- Save changes and reboot.
- This will force Windows to start in Safe Mode. It will install the AHCI driver automatically.
- Now open an elevated Command Prompt and remove safe boot:
bcdedit /deletevalue {current} safeboot

- Reboot again—Windows should start normally with the new driver.
If anything goes wrong, you can revert the storage mode change in the BIOS and reboot. Your system should return to the previous state.
🔶 NVMe SSDs
For NVMe, confirm the M.2 slot is enabled and the controller is set to NVMe mode—that gives the drive direct access to PCIe lanes and full performance. However, if you have an NVMe drive and your PC or laptop defaults to RAID or RST, start by checking if TRIM works and SMART stats can be read:
- Open an elevated Command Prompt window.

- Run the fsutil behavior query DisableDeleteNotify command ( 0 means TRIM is enabled).

- Confirm if CrystalDiskInfo or the vendor tool can read SMART, temps, and other metrics.
If TRIM works and your tool can access the drive, leaving RAID is usually fine. If TRIM is blocked or your tool can’t see the drive, update the Intel/OEM RST driver first—and if that fails and you’re on a single-drive system, consider switching to AHCI/NVMe (don’t forget to back up first).
- Right-click Start and select Device Manager.
- Go to Storage controllers, right-click your RST controller, and click Update driver → Search automatically for drivers.
- If Windows doesn’t find anything and you already downloaded the OEM/Intel package, choose Update driver → Browse my computer for drivers and point to the downloaded folder.
If no update is available, download the latest storage driver/RST package from your motherboard manufacturer’s website (preferred) or Intel’s Download Center.
⚠️ Important! Back up your data and suspend BitLocker before changing storage drivers. Only install drivers that match your exact model—wrong drivers can affect drive and system stability.
How to Optimize Your SSD on Windows
Assuming you’ve done the quick checks covered above, applying these OS-level tweaks will help your SSD cooperate with Windows—less wear, better sustained speed, and fewer surprises.
![IMG]() Ensure TRIM is enabled
Ensure TRIM is enabled

TRIM is the single most important OS-level feature for SSDs—Windows enables it by default, but you never know. Here’s how to check:
- Open an elevated Command Prompt.


- Run the fsutil behavior query DisableDeleteNotify command.

- 0 = TRIM is enabled. If you see 1, run the fsutil behavior set DisableDeleteNotify 0 command to enable it.
![IMG]() Update your drive’s firmware
Update your drive’s firmware
Check if there’s a firmware update available for your drive—this can fix bugs and improve stability. Follow these steps:
- Start by backing up your drive and suspending BitLocker if it’s active.
- Open CrystalDiskInfo and note your drive model and firmware version.
Now go to your SSD manufacturer’s official website and download the updater tool or firmware package (that’s where you’ll need to know your model).
- Update the firmware via the updater or by running the downloaded package and restart your PC.
- After the reboot, check the firmware revision in CrystalDiskInfo (should be newer than the previous one) and run a quick benchmark and SMART check.
- If something goes wrong, you can restore from the backup.
![IMG]() Set up SSD overprovisioning
Set up SSD overprovisioning
Wondering how to improve SSD performance and endurance? Overprovisioning is one of the simplest and most effective ways to do that. OP reserves a slice of the NAND as a spare area for the controller to use for wear leveling and garbage collection. Setting up OP can reduce write amplification, improve speeds, and extend SSD lifespan.
Here’s how to set it up:
❓How much to reserve?
- Everyday use/laptops: 7–10% is a good balance.
- Heavy writes (video editing, VMs, databases): 10–20% recommended.
🧠 Remember: OP reduces usable capacity—plan accordingly and back up before changing partitions.
✓ Using the manufacturer’s tool
Setting up OP with your SSD vendor’s utility is the safest method—the tool handles the resize and remap for you. Follow these steps:
- Download and install your manufacturer’s tool (Samsung Magician, WD Dashboard, Crucial Storage Executive, etc.).
- Go to the Overprovisioning (or similarly named) section.
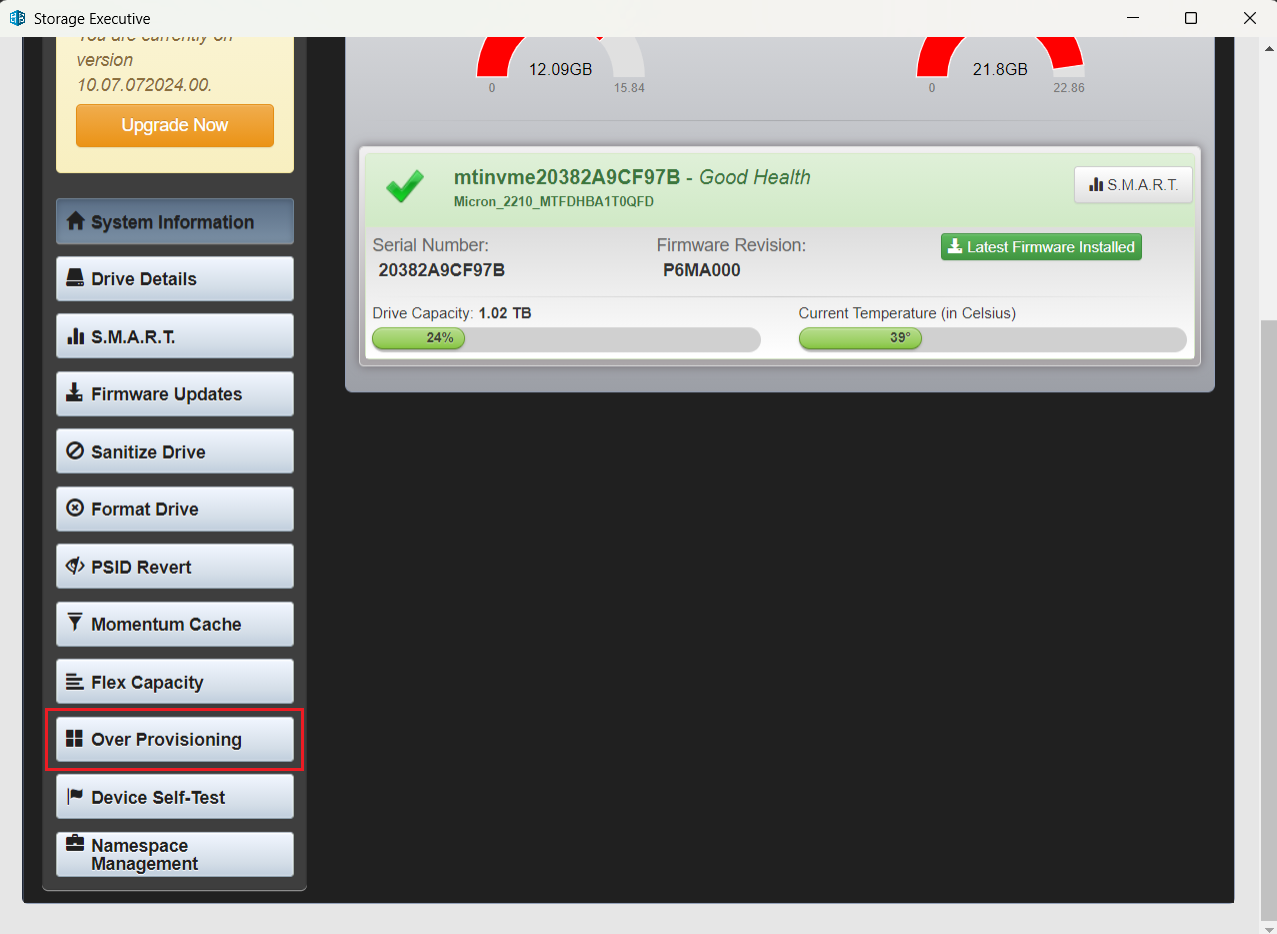
- Enable automatic OP or set a custom value within the recommended range above.
- Apply and confirm.
✓ Setting up OP manually
If you prefer doing things yourself, here’s how you can set up OP manually in Windows:
- Back up your data (if you haven’t already).
- Right-click Start and select Disk Management.
- Right-click the main SSD partition and click Shrink Volume.
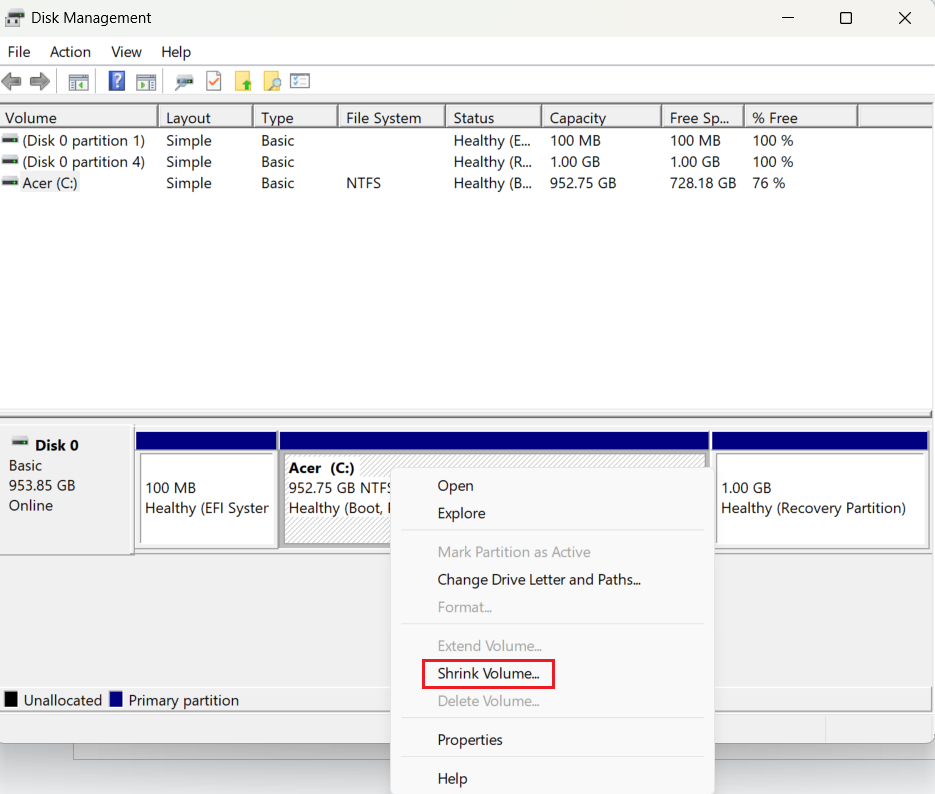
- Leave unallocated space equal to the overprovisioning you want. Like I mentioned above, keep it within the recommended values (7–20% of total drive space).
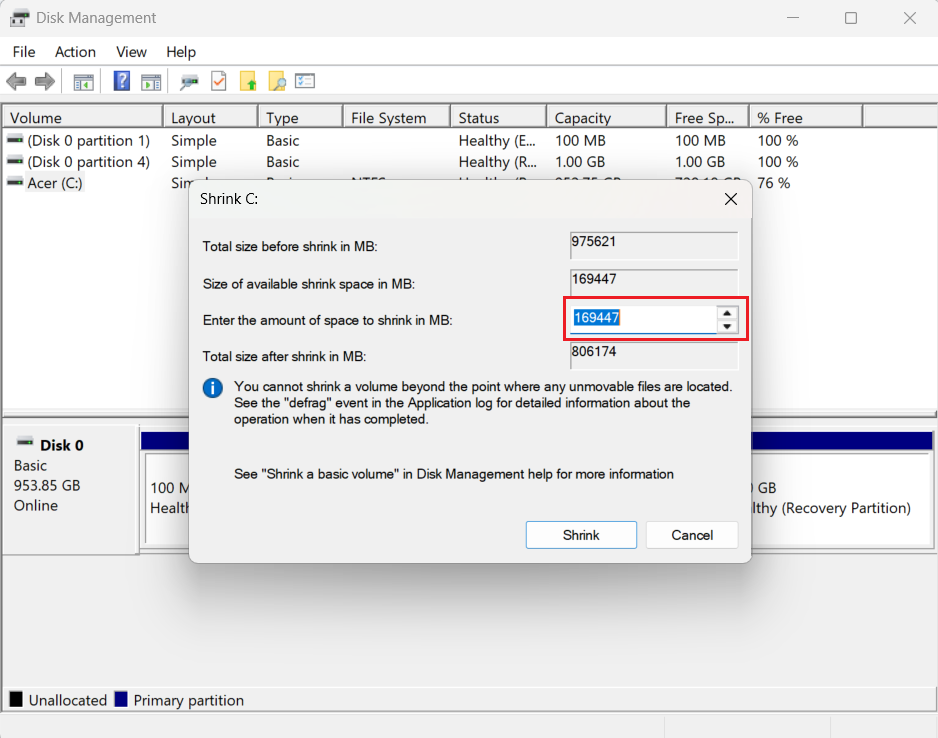
Do not create a new partition in that unallocated space—leave it empty for the controller to use.
![IMG]() Turn on write caching
Turn on write caching
Write caching improves write throughput by letting Windows report writes as complete before the drive flushes them to NAND.
Here’s how to enable write caching:
- Right-click Start and select Device Manager.
- Right-click your SSD under Disk drives and select Properties.
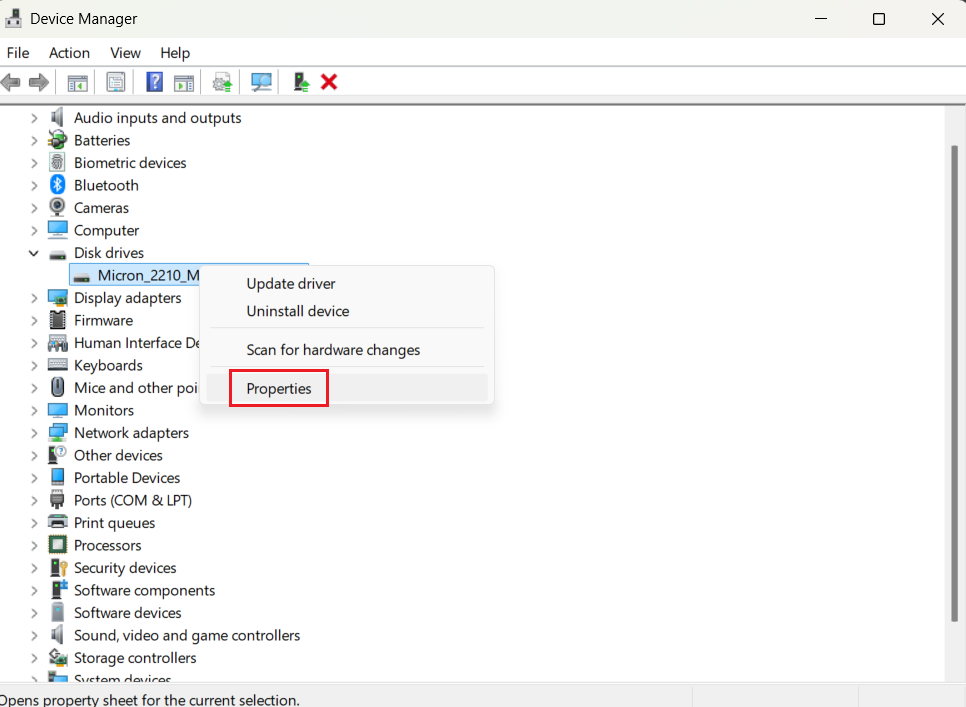
- Go to the Policies tab and check Enable write caching on this device.
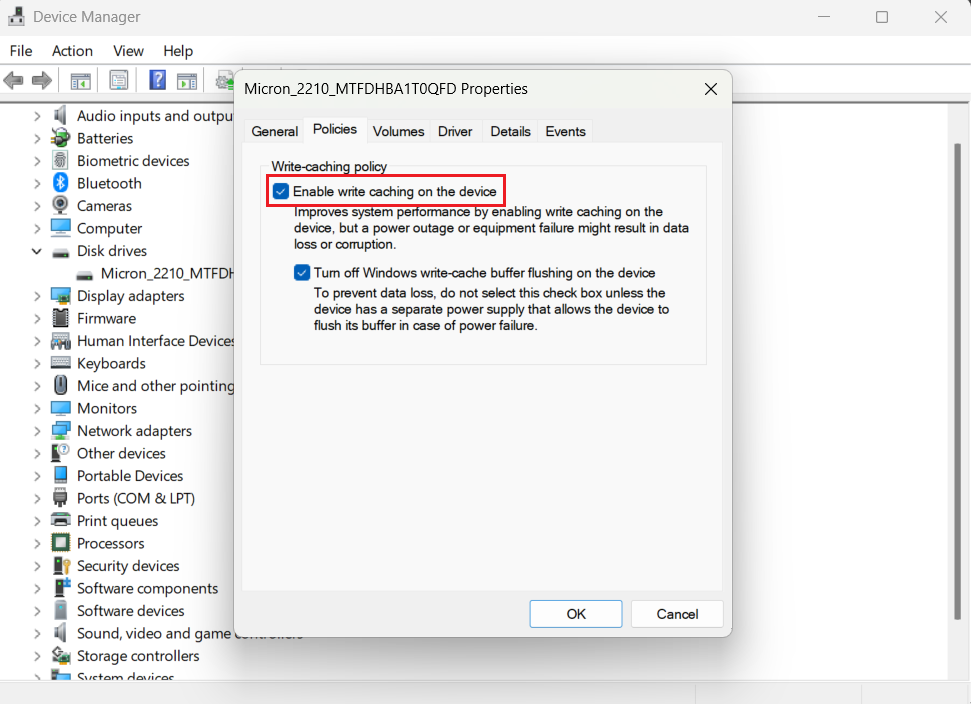
- If you enable caching, avoid disabling the default flush behavior unless you really know what you’re doing.
![IMG]() Keep free space
Keep free space
Leave about 10–20% free or even a bit more for heavy write workloads. Just like overprovisioning, free space gives the controller room for wear leveling and garbage collection, reducing write amplification and maintaining higher speeds.
If you need space, run Storage Sense to clean out temporary files and archive large ones.
![IMG]() Ensure defragmentation is disabled
Ensure defragmentation is disabled
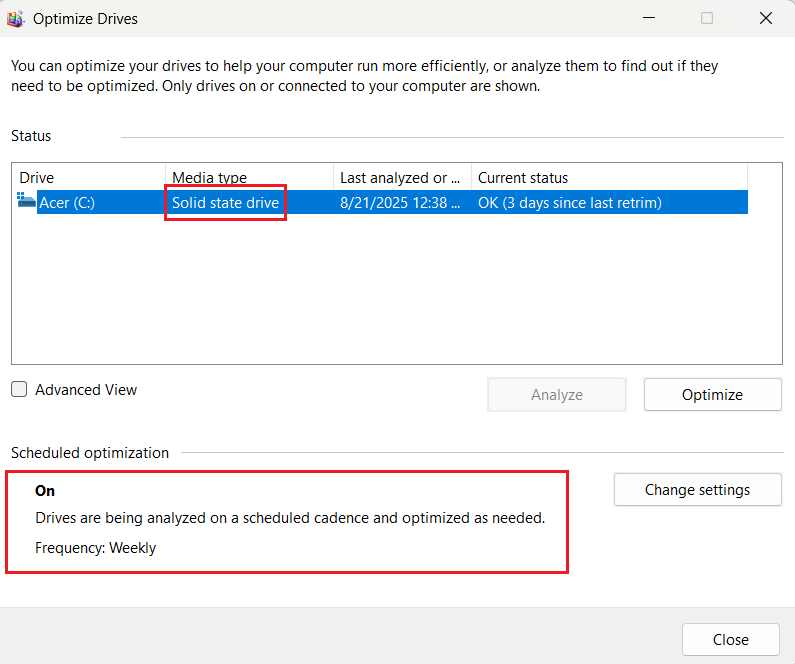
Old-school defrag is only good for HDDs. And since SSDs require a whole different approach, you should never defragment an SSD. Here’s how to confirm your SSD is recognized correctly:
- Click Start, type optimize, and open the Defragment and Optimize Drives app.
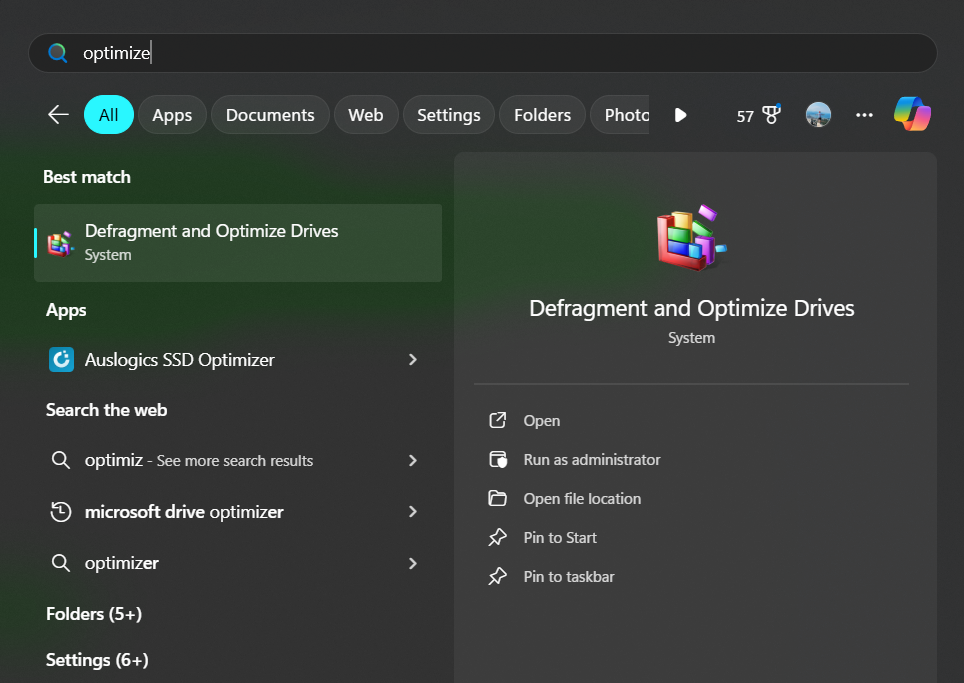
- Check if your SSD is recognized correctly under Media type and if optimization is scheduled (weekly is fine).
If your SSD is recognized as a hard disk drive, follow these steps:
- Update the chipset, storage controller, and NVMe/RAID/RST drivers from your motherboard vendor website or a reliable driver updater tool.
- Ensure the correct mode is set in the BIOS (see the Essential Pre-Optimization Setup and Checks section above).
- If none works, consult with tech specialists via the Auslogics’ Ask a Question forum or contact your motherboard or SSD manufacturer—they’ll tell you whether a driver, firmware, or BIOS update is required, or if the device needs RMA.
![IMG]() Disable Search indexing
Disable Search indexing
Windows Search indexing speeds searches but causes extra read/write activity. If you rarely search old files, you can switch it off for big folders (or turn the service off entirely) with a clear conscience. Check out our article on how to disable Search indexing to make an informed decision and pick a suitable method.
![IMG]() Adjust your power plan
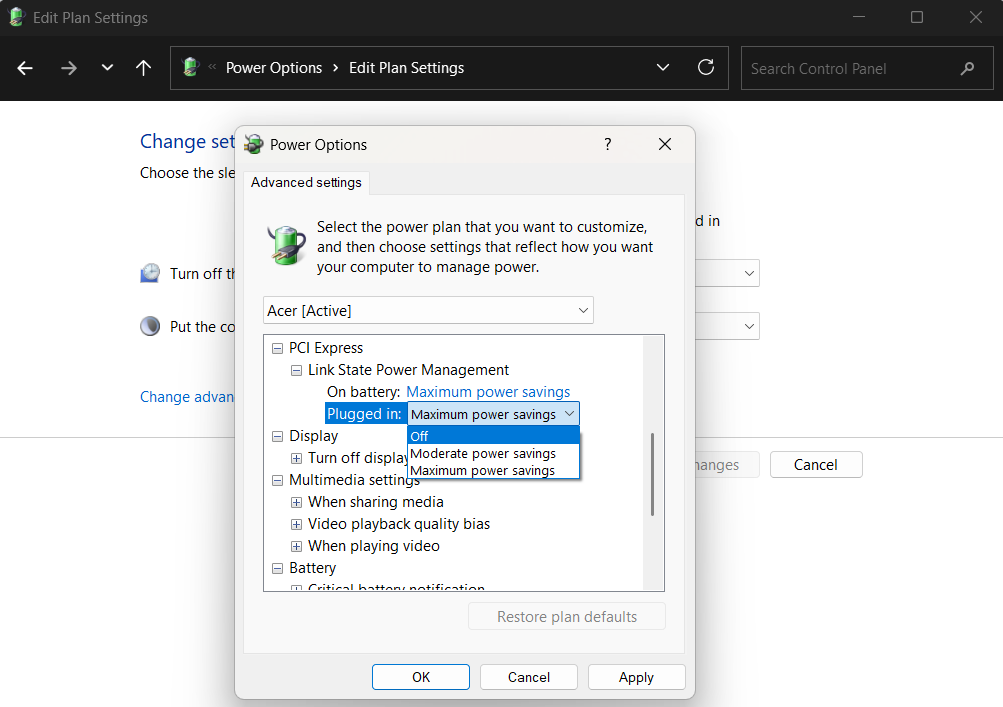
Adjust your power plan
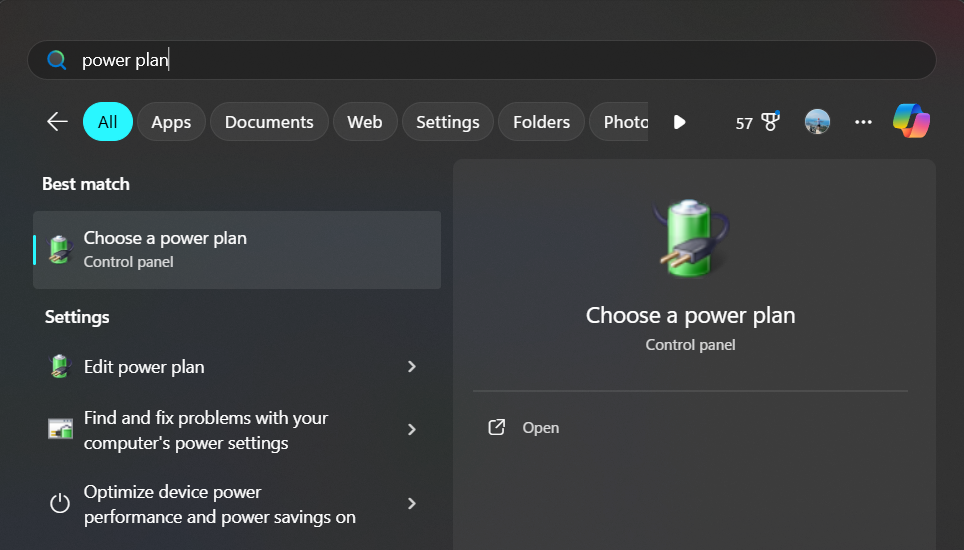
When your PC or laptop is idle, the drive will eventually enter a low-power state after some time. You can change this behavior in the power plan settings to keep your SSD awake at all times and save the one or two seconds that it takes to wake up. Curious about how to speed up your SSD even further? The PCIe bus is set to preserve power by default, so switching this setting off will squeeze a bit more juice out of your drive at the expense of increased power consumption. Here’s how to adjust your power plan:
- Click Start, search for power plan, and select Choose a power plan.
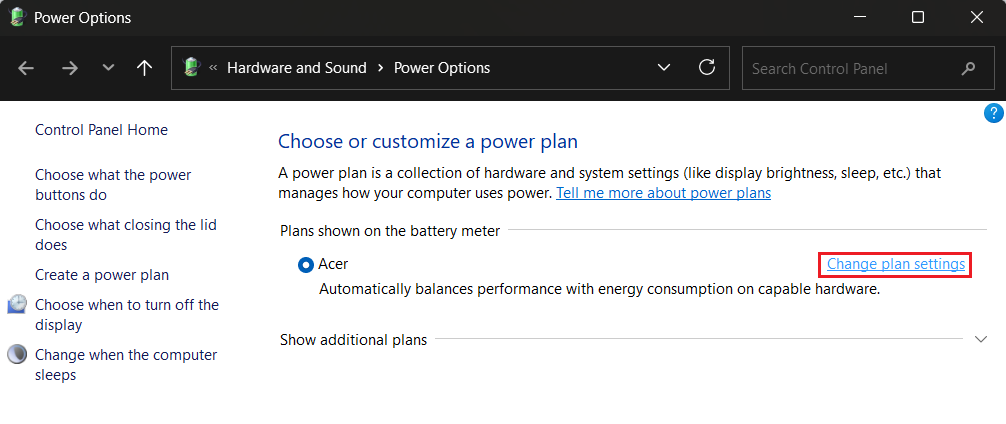
- Click Change plan settings next to your active power plan.
- Click Change advanced power settings.
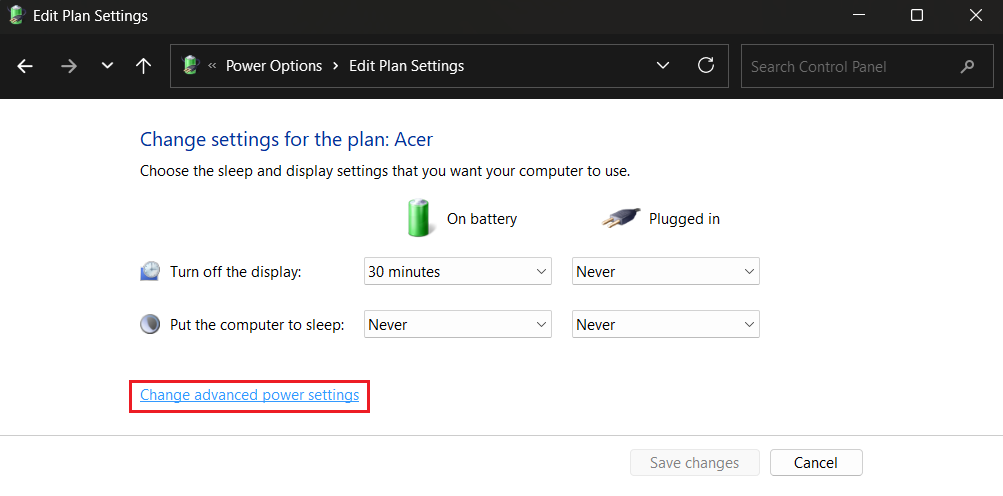
- Expand Hard disk and set Turn off hard disk after to Never.
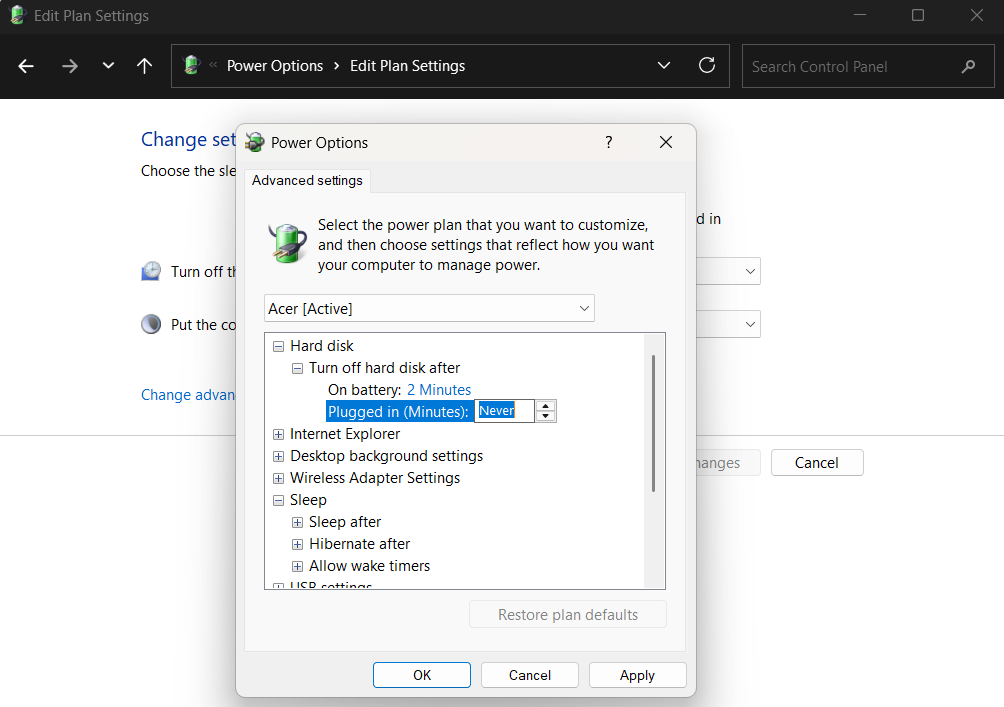
- Expand PCI Express and set Link State Power Management to Off.
![IMG]() Disable hibernation
Disable hibernation
Hibernation creates a hiberfile equal to your RAM size, which can be huge on modern rigs, and touches the system drive during writes/reads. Disabling it frees space and removes those periodic large writes.
Here’s how to disable hibernation:
- Open an elevated Command Prompt.

- Run the powercfg -h off command.

![IMG]() Archive cold files
Archive cold files
Offload large, infrequently used files (video projects, installer ISOs, old VM images) to an HDD, NAS, or external drive. Keeping cold data off the system SSD preserves free space and reduces unnecessary write cycles—a simple archive habit buys both speed and longevity.
![IMG]() Use DirectStorage when gaming
Use DirectStorage when gaming
DirectStorage reduces CPU overhead for streaming game assets and lets NVMe drives feed GPUs more efficiently—a real benefit on fast NVMe drives and modern games that support it. In simple terms: it can significantly speed up in-game load times.
The feature works automatically, and you can’t turn it on or off. To use DirectStorage, you need Windows 10 (version 1909 or later) or Windows 11, an NVMe SSD (PCIe Gen 3 or faster recommended), and a GPU with DirectX 12 and Shader Model 6.0 support. Also, update your graphics driver to make sure your GPU runs the latest version. Here’s how to check if you meet the requirements:
- Press
Windows + Gon your keyboard. - In the upper menu that appears, click the gear icon.
- Click More settings → Gaming features.
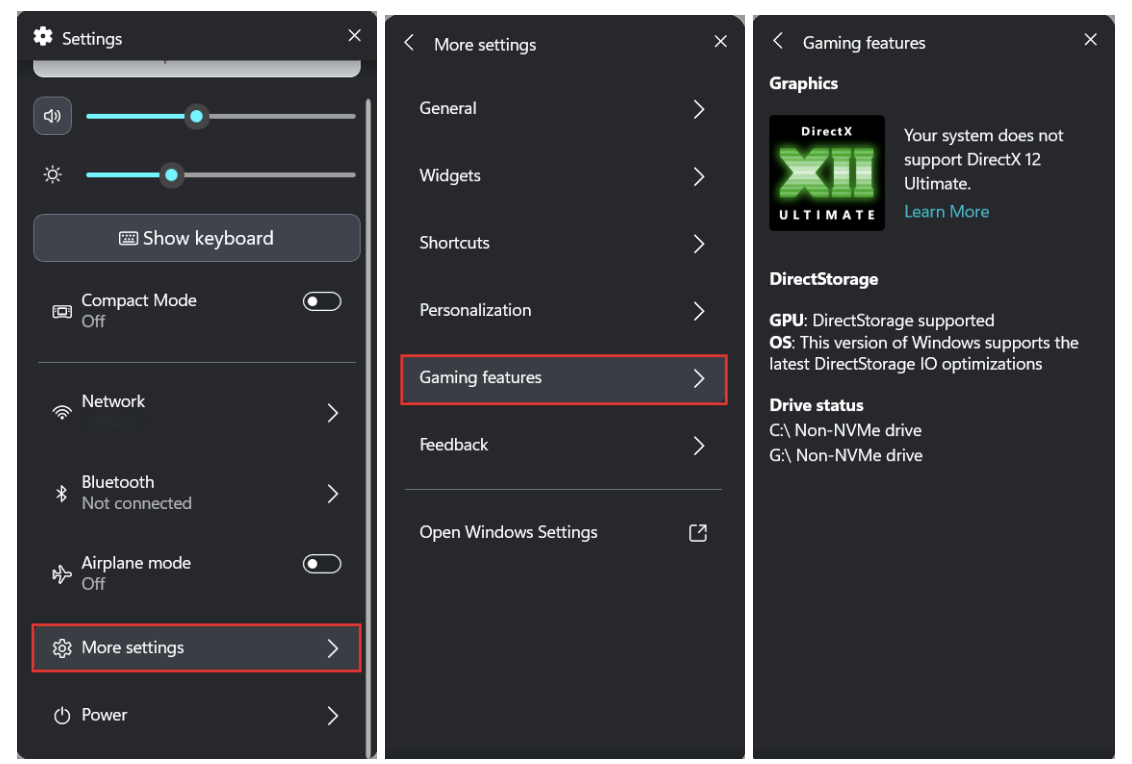
If you check all the boxes, DirectStorage should be enabled by default. If your GPU doesn’t meet the requirements, consider upgrading.
Use a reputable SSD optimizer
![IMG]() Use a reputable SSD optimizer
Use a reputable SSD optimizer
For safe, SSD-aware maintenance, stick to vendor utilities or trusted tools like Auslogics SSD Optimizer, which allows you to monitor drive health, tune up optimization algorithms, add files and folders to ignore lists, schedule optimization, and much more.
Things You Should Avoid
SSDs are fast and forgiving—but they’re not invincible. The wrong habits don’t just reduce speed; they shave down lifespan. Here are the common mistakes people make, why they’re bad for an SSD, and what to do instead.
🔄 Unnecessary reads and writes
❌ Why avoid: Constant small writes (temp files, noisy apps, heavy logging) increase write amplification and wear.
✅ Do this instead: Move heavy temp or log folders to a secondary drive or exclude them from real-time syncs during big jobs.
🧩 Defragmentation
❌ Why avoid: Defrag rewrites large amounts of data for no benefit on an SSD—pointless wear with zero speed gain.
✅ Do this instead: Use SSD-aware tools like Auslogics SSD Optimizer and run TRIM.
📊 Regular micro-benchmarking and constant synthetic tests
❌ Why avoid: Benchmarks write and stress the drive. This may be useful for diagnosis but is pretty harmful as a habit.
✅ Do this instead: Benchmark only when diagnosing an issue or after a big change (firmware flashing, slot change, driver update).
🗂️ Saving large, unnecessary files on the system SSD
❌ Why avoid: Big, seldom-used files (ISOs, raw footage, VM images) fill free space and force more write/erase cycles.
✅ Do this instead: Archive cold files to an HDD, NAS, or external drive—keep the system SSD for OS and apps.
🥵 Always-on, write-heavy software like torrent clients
❌ Why avoid: Continuous heavy writes accelerate wear and can reduce SSD performance.
✅ Do this instead: Configure such software to use a secondary drive, pause sync during big transfers, and limit activity windows.
💾 Filling the drive to the brim
❌ Why avoid: A nearly full SSD has nowhere to shuffle blocks, so write amplification spikes and performance tanks.
✅ Do this instead: Keep ~10–20% free (more for heavy workloads) and set overprovisioning via vendor tools.
🧹 Disabling TRIM or blocking TRIM via controllers/drivers
❌ Why avoid: Without TRIM, the drive can’t reclaim freed blocks efficiently—as a result, SSD performance drops over time.
✅ Do this instead: Confirm TRIM is enabled and that your storage driver or RAID configuration supports TRIM passthrough.
Smart avoidance is half the work: stop doing the damaging stuff, and your SSD will reward you with steadier speed and longer life.
Maximize Your SSD’s Performance with Smart Optimizations
In this article I’ve shared what I know on how to improve SSD performance, so let’s just quickly recap what’s already been said:
- Make sure your SSD is connected to the right slot
- Check if the correct drive mode is selected in the BIOS
- Enable TRIM and schedule weekly optimization
- Set up overprovisioning and keep 10–20% free on your drive
- Turn on write caching and disable Windows Search indexing
- Adjust your power plan and disable hibernation
- Finally, use reputable, SSD-aware tools and never defrag your SSD
How do you optimize your SSD ? Drop a comment below!