
- What Does the Error “Your Connection Is Not Private” in Chrome Mean?
- Why Is My Connection Not Private?
- How to Fix the “Your Connection Is Not Private” Error
- Fix one: reload the page
- Fix two: bypass the error
- Fix three: check your computer’s time and date
- Fix four: update your operating system and Google Chrome
- Fix five: clear Google Chrome’s cache and cookies
- Fix six: use Incognito mode
- Fix seven: Disable your antivirus, firewall, or VPN
- Fix eight: change your DNS server
- Fix nine: clear your DNS cache
- Fix ten: clear your browser’s SSL state
- Fix eleven: prevent Chrome from enforcing SSL certificate checks
- Browsing Safely and Removing the Error “Your Connection is Not Private”
- FAQ
The error “ Your connection is not private ” in Chrome is a security warning intended to keep you safe. While it may be a frustrating experience, there are ways to resolve the issue and shore up your privacy.
Google Chrome’s security system has saved me from opening compromised websites more times than I count. But these interruptions are unnecessary in some cases, especially when you know the website is safe.
If you’re experiencing this issue or you receive the error every time you open a page, I’ll show why it’s happening and how to resolve it.
You can follow our guide on reporting malware sites to learn how to update Google about malicious websites that are not under Chrome’s radar.
Also read: Digital Privacy: Tips on How to Protect Yourself on the Internet
What Does the Error “Your Connection Is Not Private” in Chrome Mean?
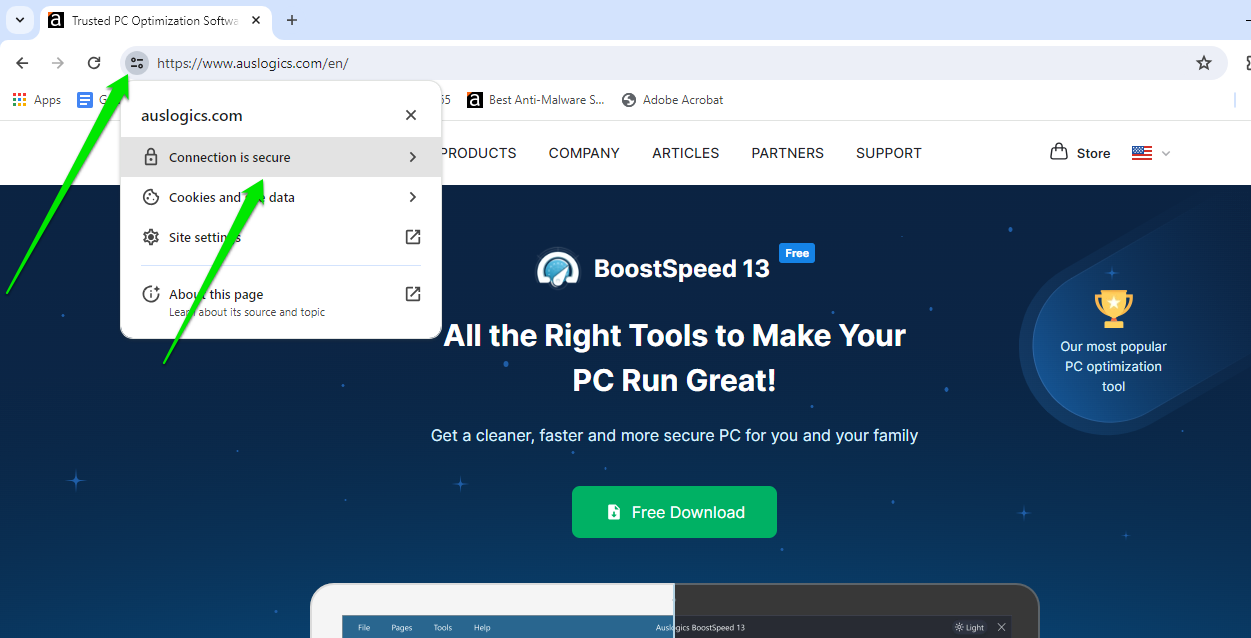
The “Your connection is not private” error is a Google Chrome warning that shows up when the browser fails to verify the security of a website you want to visit. This issue means Chrome believes you may be vulnerable to hackers because it can’t guarantee your data’s privacy and safety over the connection.
Why Is My Connection Not Private?
While security is the main cause of the problem, other issues can trigger the error message. Let’s go through those problems:
- Invalid or expired SSL certificate: Websites use SSL (Secure Sockets Layer) certificates to encrypt data. Chrome will display the message if it determines that the certificate is outdated or incorrectly installed.
- Incorrect date and time settings: An incorrect device clock can interfere with certificate validation, as Chrome will be unable to verify expiration details.
- Antivirus or firewall interference: Security software can block connections it seems unsafe, even if you consider them legitimate.
- Problematic extensions: Some installed extensions, such as VPNs and other web utilities, can interrupt Chrome’s security checks.
- Outdated browser cache and cookies: These stored files can sometimes contain incorrect information that triggers the error.
- Issues with your Wi-Fi network: A faulty network connection or using a public Wi-Fi network can prevent proper certificate verification.
- Outdated browser version: Using an old version of Chrome may lack the necessary security updates to handle newer certificates.
How to Fix the “Your Connection Is Not Private” Error
The following solutions and suggestions are different ways to get rid of the problem for good and access the website.
-
Fix one: reload the page
Reloading the webpage is often the simplest way to resolve the Privacy certificate issue. Sometimes, the error happens because of temporary glitches or communication hiccups between your browser and the website’s server.
Restarting the process allows your browser to initiate a fresh connection to the server without those inconsistencies.
You can also try restarting your browser and check if that works. The best way to do that is through the Task Manager:
- Right-click the taskbar and select Task Manager .
- Right-click Chrome once Task Manager opens, and select End task .
- Restart Chrome, load the webpage, and check if that resolves the issue.
Also read: How to Reset the Google Chrome Browser to Its Default Settings?
-
Fix two: bypass the error
You can scroll through the error page, click Advanced, and click Proceed to URL if you’re sure the website is safe.
However, you won’t see the option if the website uses HSTS (HTTP Strict Transport Security) protection. It’s a security feature that instructs browsers to use HTTPS connections, preventing access over plain HTTP exclusively.
-
Fix three: check your computer’s time and date
Google Chrome often depends on your computer’s date and time to confirm a website’s SSL certificate validity. If your computer’s clock is significantly off, it can lead to a mismatch between the current time and the certificate’s validity period.
This disparity can cause your browser to perceive the certificate as expired or invalid, triggering the privacy error.
Follow these steps to get the correct date and time for your PC:
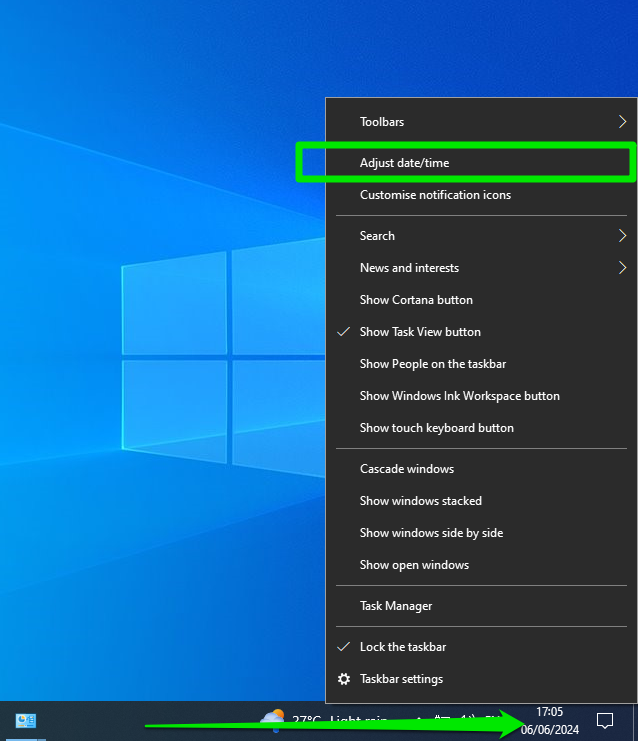
- Right-click the time and date display in your taskbar (right side).
- Select Adjust date/time in the context menu.
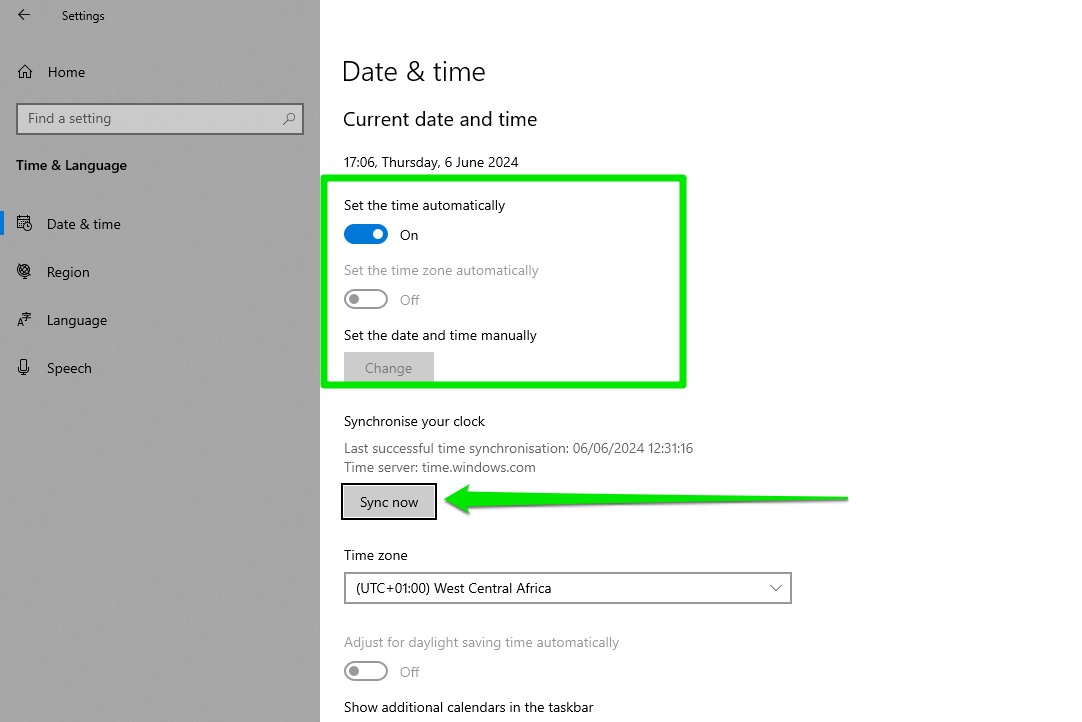
- Toggle on the switch for Set the time automatically once the Date & time settings window appears.
- If the time or time zone is incorrect, toggle off the automatic settings options and manually adjust them.
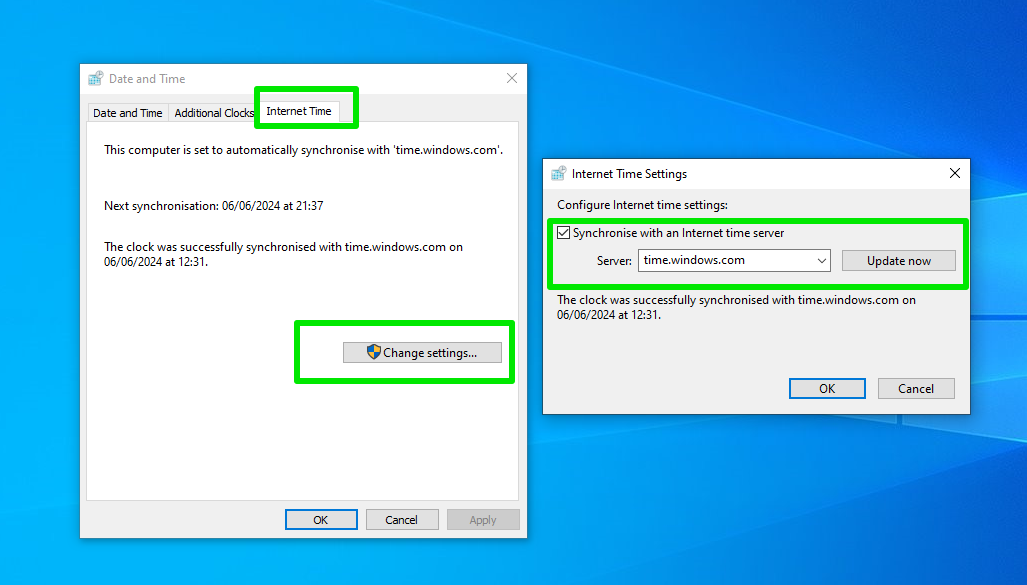
- You can click Sync now to synchronize your clock with an Internet time server.
Read more: How to change time and date on Windows 11
-
Fix four: update your operating system and Google Chrome
Updating Windows
Windows updates often include patches for security vulnerabilities and enhancements to network components. An outdated Windows version might lack the resources to properly verify modern SSL certificates, leading to the privacy error. Even Google advises users to always update their operating system.
You can type “ Update ” in the Start menu and click the Check for updates result to check for and install Windows updates.
You can follow our Windows update guide to learn how to download and install updates manually.
Updating Chrome
An outdated Chrome version may not support and recognize the latest security standards. Chrome updates install these components and deploy bug fixes for issues in previous versions that may cause the error.
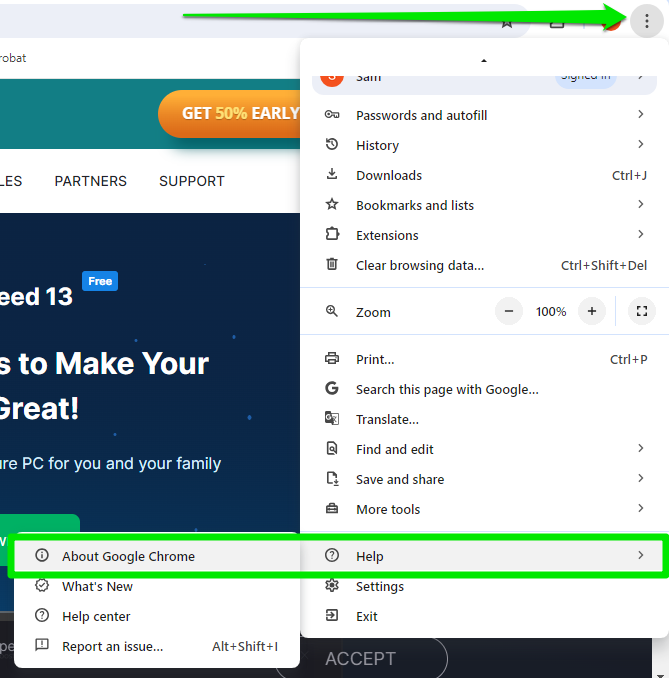
While Google Chrome automatically installs updates, you may have to manually start the process sometimes. You can click the three dots in the top-right corner and select Help > About Google Chrome to force Chrome to check for and download updates.
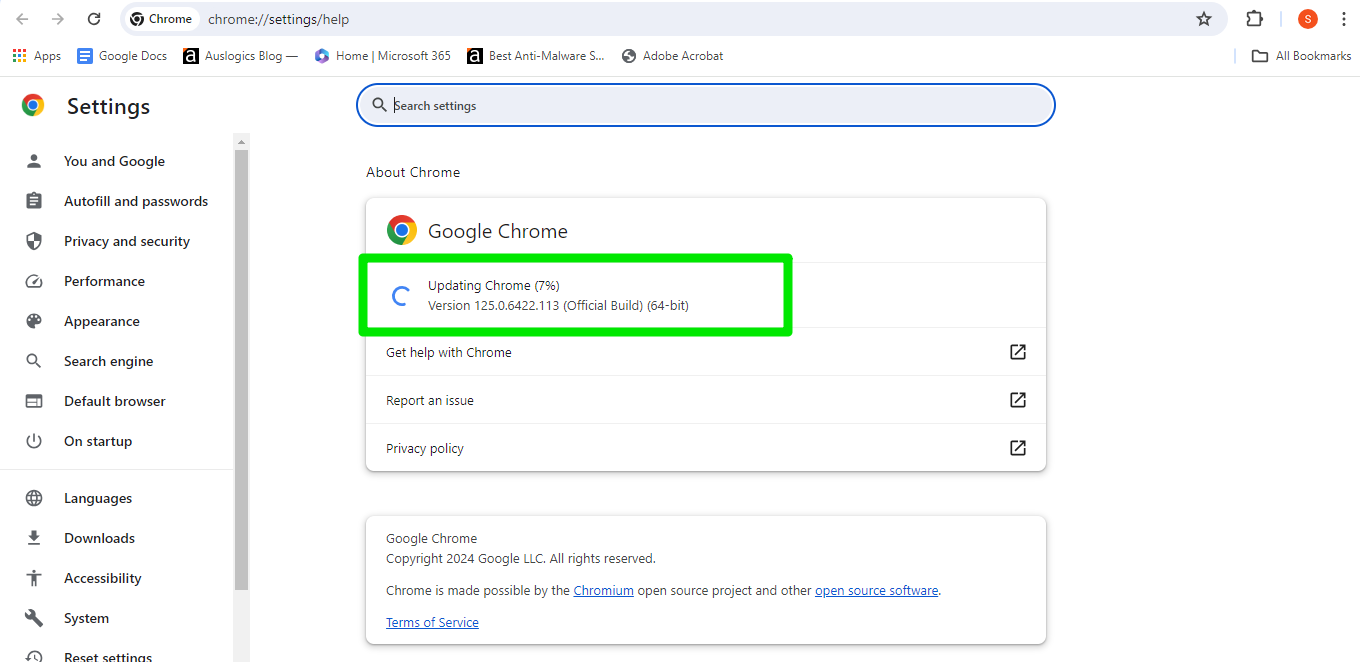
Click the Relaunch button to install the update after the browser completes the download.
-
Fix five: clear Google Chrome’s cache and cookies
Your browser’s cache is a file used to store web browsing data, such as images, text, completed forms, and other site information, so your browser can load websites faster.
Cookies are files that websites download to your computer to store your preferences and login information. They can also be used to collect data.
These files may become outdated and cause your browser to display the privacy error. Clearing temporary internet files can help resolve the problem, especially if you believe the site you want to visit is safe and secure.
Follow these steps:
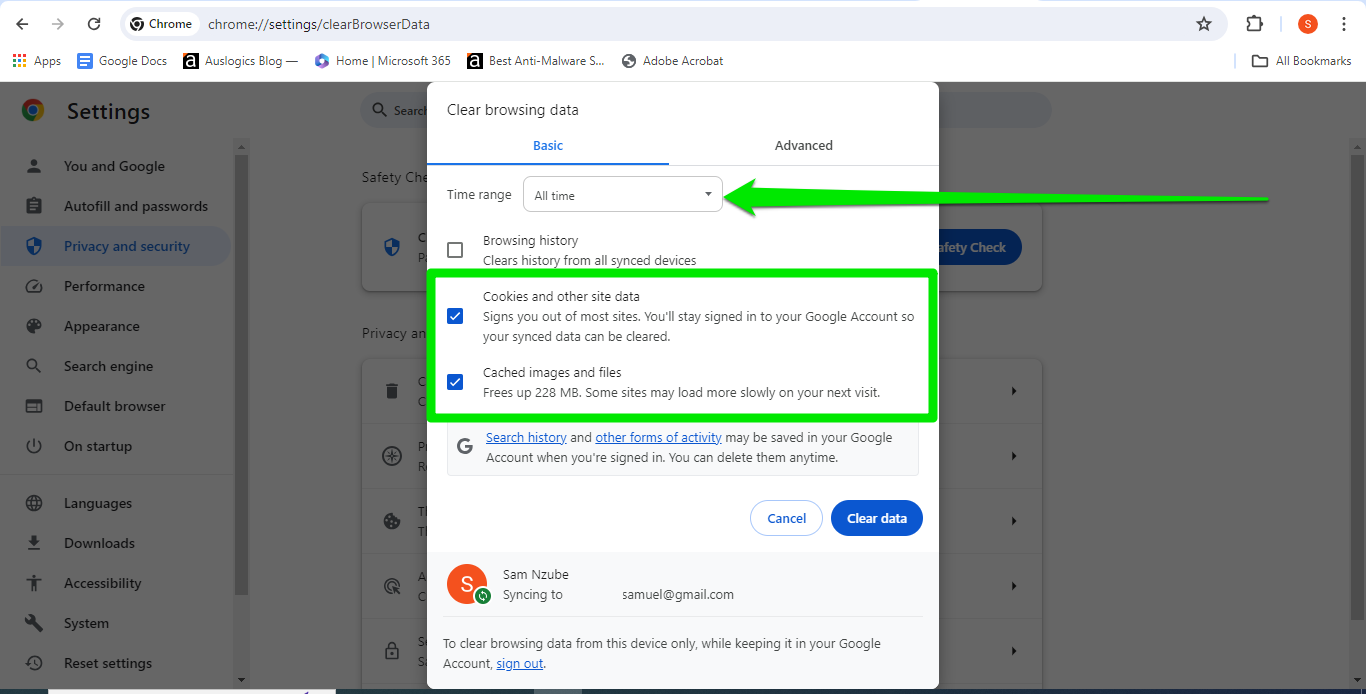
- Click the three dots in the top-right corner and select Clear browsing data from the menu. You can also tap the Ctrl + Shift + Del keyboard shortcut in Chrome to open the Clear browsing data dialog.
- Select a preferred time range.
- Check the boxes for Cookies and other site data and Cached images and files .
- Click the Clear data button, restart Chrome, and check if the issue has been resolved.
-
Fix six: use Incognito mode
Incognito mode is a private browsing feature in Chrome that doesn’t save your browsing history, cookies, or site data. An Incognito window also opens without loading extensions and saved cache and cookies.
Since you’ve deleted your cache and cookies, opening the website in the Incognito window will help you confirm if a Chrome extension is the problem.
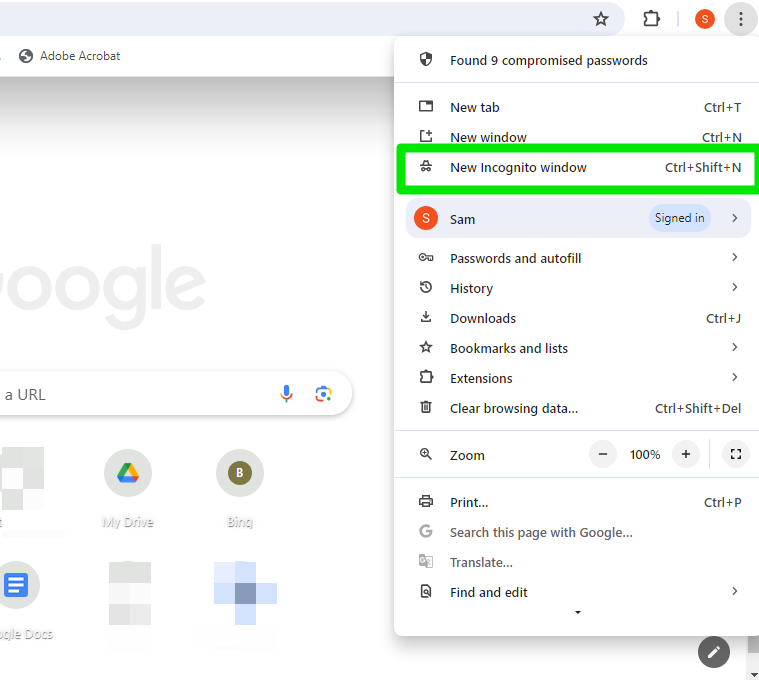
Click the three dots in the top-right corner and select New Incognito window to get started. You can also use the Ctrl + Shift + N keyboard shortcut to launch the window.
If the site opens without issues, then an extension is likely triggering the error. Here’s how to find the responsible extension:
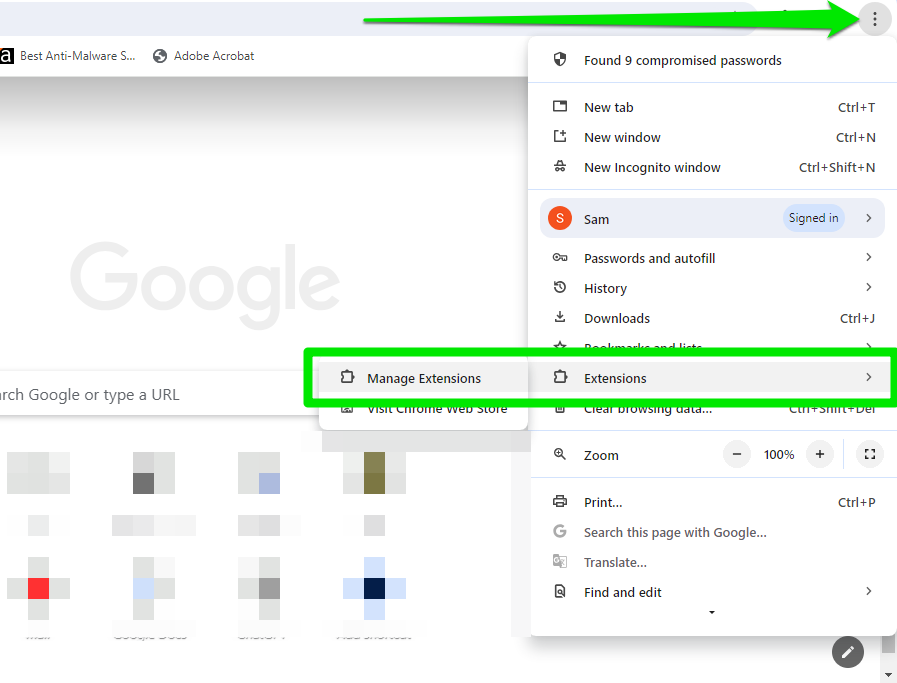
- Click the three dots in the top-right corner and select Extensions > Manage Extensions .
- Turn off all your extensions, restart Chrome, and launch the website.
- Now, return to the Extensions page, enable one extension, and launch the website again.
- Continue the process until Chrome throws the error again. The last extension you turned on before the error appeared is responsible.
-
Fix seven: Disable your antivirus, firewall, or VPN
Some antivirus and firewall programs have features that interrupt Chrome’s security checks. For example, antivirus software with HTTPS scanning or HTTPS protection can prevent the browser from verifying a site’s SSL certificate.
Temporarily disable your antivirus and firewall and check if the site opens without issues. If the site opens, consider turning off internet privacy settings on your firewall and antivirus.
VPNs can also trigger the warning, as some websites specifically blacklist certain VPN IP addresses. Turn off your VPN and check if the website opens with the error. You can use a different VPN if you want to bypass restrictions.
Most importantly, Auslogics Anti-Malware can detect even the rarest form of malware and will keep your system safe from the sneakiest threats.
-
Fix eight: change your DNS server
Changing DNS servers is another fix that I can attest to. I’ve removed the “Your connection is not private” error many times by switching to Google’s DNS server from my ISP’s.
However, the issue can happen with any DNS, as Cloudflare and Google servers are not always 100% reliable. ISP servers are also notoriously known to cause different types of internet connection problems. So switch from your current server and check if that resolves the problem.
Here’s how to change your DNS server:
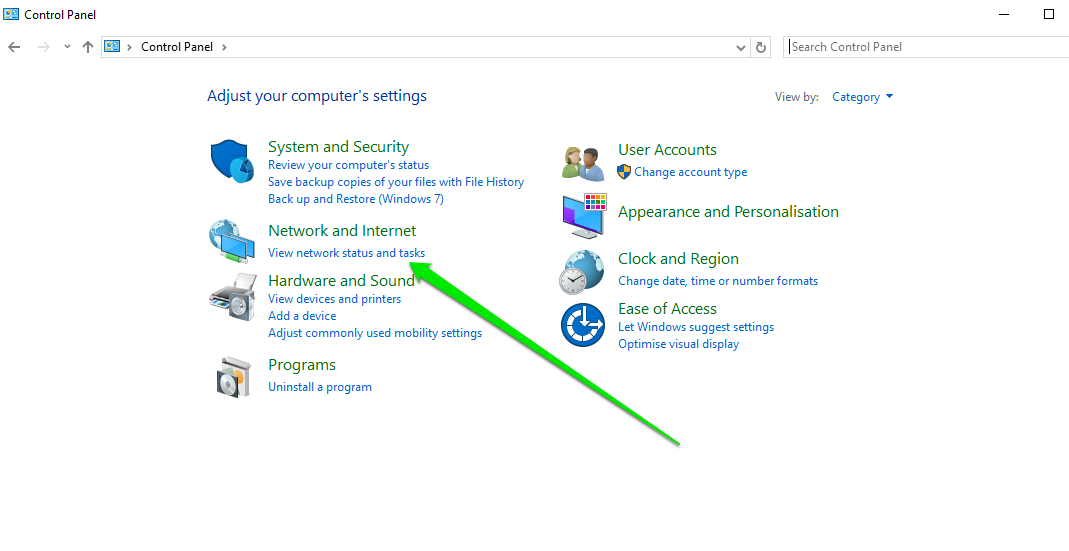
- Search for Control Panel in the Start menu and open the program.
- Select View network status and tasks under Network and Internet.
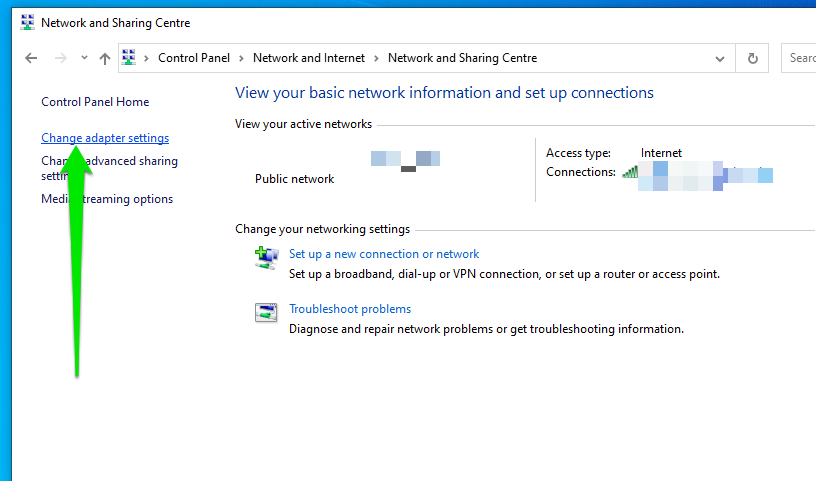
- Click Change adapter settings in the left pane of the Network and Sharing Center window.
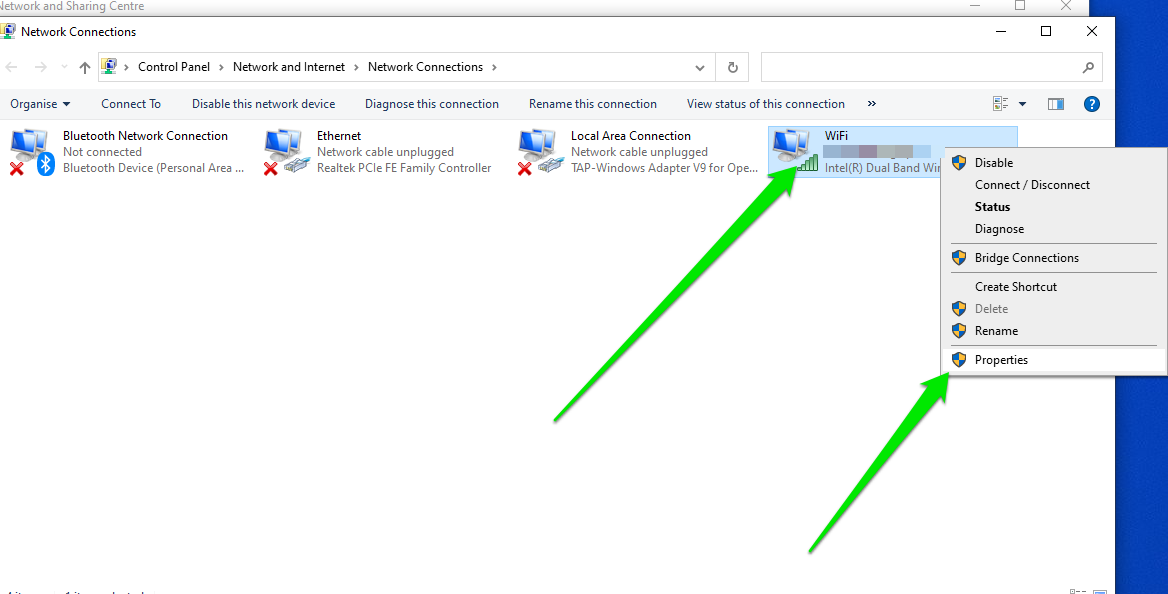
- Right-click your current connection (whether it’s Wi-Fi, Ethernet, or LAN) and select Properties .
- Click Internet Protocol Version 4 (TCP/IPv4) and click the Properties button under the list.

- Select the radio button for Use the following DNS server address and enter the following:
Preferred: 8.8.8.8
Alternative: 8.8.4.4
- Click OK and check if the error message persists.
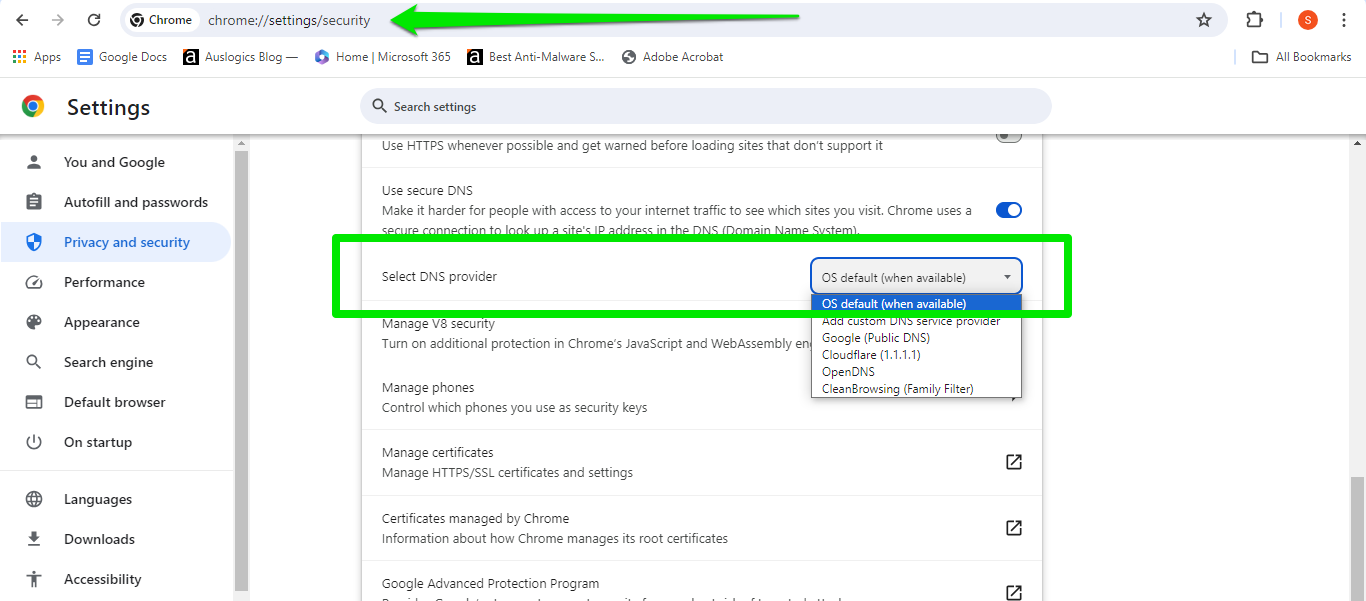
You can also change your DNS server within Chrome. Here’s how:
- Type chrome://settings/security into the address bar.
- Scroll down and select OS default (when available) next to Select DNS provider.
-
Fix nine: clear your DNS cache
The DNS cache is a file that temporarily stores website URLs and their corresponding IP addresses. It helps your browser load pages faster instead of going through the DNS server every time.
That said, your browser might be directed to a wrong or insecure server if the DNS cache is outdated or incorrect, causing the error to appear. This issue might persist even after changing your DNS server.
Follow these steps to clear the cache:
- Press the Windows key and type “ cmd .”
- Right-click Command Prompt and select Run as administrator.
- Enter the following command and press Enter:
ipconfig /flushdns -
Fix ten: clear your browser’s SSL state
The SSL state is cached information about previously established secure connections. It allows Chrome to launch websites using details stored in the cache rather than going through the verification process from scratch.
The error might be showing up because the SSL state contains outdated or incorrect information. Clearing the state will force Chrome to establish the connection again.
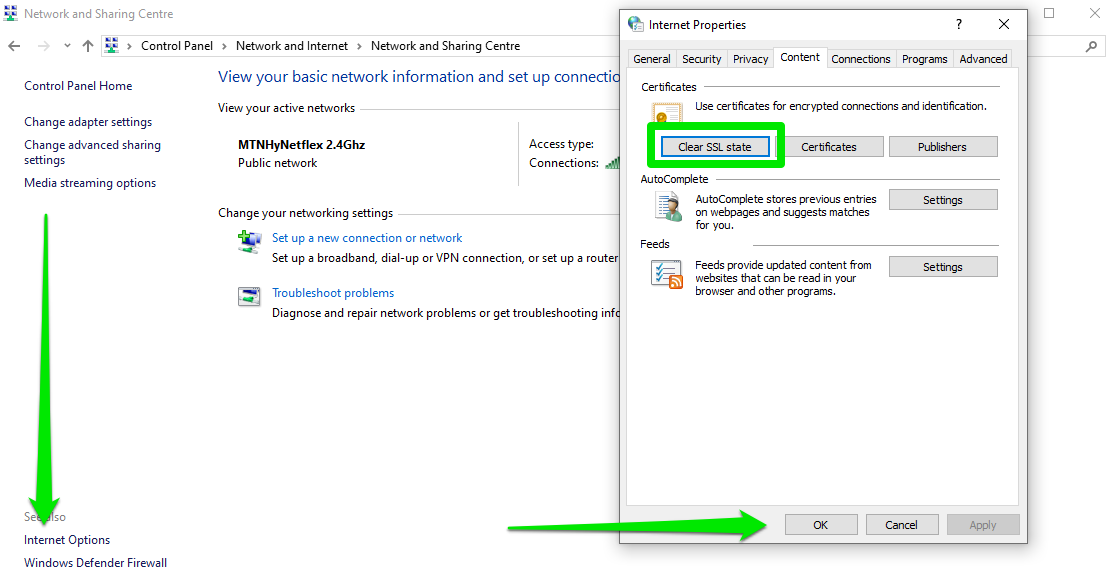
Follow these steps:
- Open the Control Panel window.
- Click View network status and tasks under Network and Internet .
- When the Network and Sharing Center window opens, go to the See also section at the bottom of the left pane and click Internet Options .
- Switch to the Content tab once the Internet Properties dialog opens.
- Click Clear SSL state and select OK .
-
Fix eleven: prevent Chrome from enforcing SSL certificate checks
You should only use this method when you know what you’re doing. If possible, shut down Chrome and open just the website you want to view after applying this fix. Undo your changes after visiting the site.
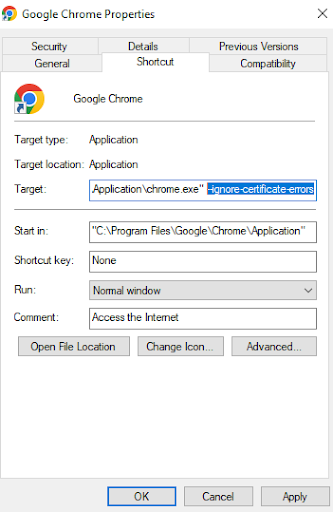
Here’s how to bypass the “Your connection is not private” error by ignoring SSL checks:
- Right-click Google Chrome’s shortcut and select Properties .
- Go to the Target text field under the Shortcut tab and add the following:
--ignore-certificate-errors
- Click the OK button.
Browsing Safely and Removing the Error “Your Connection is Not Private”
Bumping into a browser error can be enough to spoil one’s day. But remember, it may be for a good reason. It allows you to correct your date and time, use a better DNS server, clear your DNS cache, and get rid of problematic extensions. Remember to proceed with caution, as the website you’re trying to visit could be genuinely compromised.
Let us know what you think about our solutions and the method that worked for you.