Portable devices are very easy to connect to a Windows computer. Most of them are plug and play (PnP), meaning you just need to plug them in. If the device driver is already installed, you can start using it right away. Sometimes, setting up a device for the first time can be a bit tricky, but after that, it’s usually smooth sailing.Everything should be working fine, but then you see a “WPD FileSystem Volume Driver” message in Device Manager. Your device shows up with a yellow triangle or exclamation mark instead of the correct label. And even if you remove the driver and restart your computer, the problem persists, making your portable device unusable.
What Is “WPD FileSystem Volume Driver”?
WPD stands for Windows Portable Device.
It is a generic name assigned by the operating system to a portable device that it cannot recognize. Windows knows the device in question can be used as portable storage. It also knows it uses a supported file system format. But it does not know exactly what kind of device it is or what to do with it, so it gives it a generic name.
If the device you have just connected to your PC has issues, you are likely to see the “WPD FileSystem Volume Driver” label under the “Portable Devices” node.
You might think the “WPD FileSystem Volume Driver” issue only affects older versions of Windows, but that’s not exactly true. In fact, this pesky error can happen on any version of Windows . As more new devices are used as portable storage, each with its own driver, the chances of this error increase.
So, if you see the “WPD FileSystem Volume Driver” label under “Portable Devices” in Device Manager, don’t worry. Many people have faced this issue and fixed it using the solutions in this guide.
Common WPD Error Codes
The “WPD FileSystem Volume Driver” error can come with different error codes. The most common ones are Code 10 and Code 31. Both are related to driver issues but are caused by slightly different problems.
- Code 10: ” This device cannot start. Try upgrading the device drivers for this device. (Code 10). ”
- Code 31: ” This device is not working properly because Windows cannot load the drivers required for this device. (Code 31). ”
Other similar error codes that trigger the same behavior are:
- Code 37: ” Windows cannot initialize the device driver for this hardware. (Code 37). ”
- Code 43: ” Windows has stopped this device because it has reported problems. (Code 43). ”
- Code 52: ” Windows cannot verify the digital signature for the drivers required for this device. A recent hardware or software change might have installed a file that is signed incorrectly or damaged, or that might be malicious software from an unknown source. (Code 52). ”
How to Resolve the “WPD FileSystem Volume Driver (Code 31)” Error
Sometimes, the problem with your portable device is a Code 31 error. This error is more common on older versions of Windows, but Windows 10 users might also see it if they use card readers.
When you run into the Code 31 error after you’ve plugged in or installed a driver, the Windows Event Viewer usually says it couldn’t access the device. In other words, the driver you just installed is either corrupt or incompatible with the device it’s meant to be used for.
Your way out of this is to uninstall that driver and perform a fresh installation. Provided you have the driver file for the WPD FileSystem Volume Driver in question, you can just reinstall it again and see if that works.
However, it is easier and safer to let Windows do it for you. Here’s how:
- Press
Windows key + Xto bring up the Windows Tools menu. - Select Device Manager from the list.
- Click on Portable Devices to expand it to reveal WPD FileSystem Volume Driver .
- If it isn’t there, check some of the other nodes in Device Manager since the issue can result from other peripherals like external monitors that might not be classed under Portable Devices .
- Once WPD FileSystem Volume Driver is located, right-click the item and select Uninstall device .
- If a confirmation dialog pops up, click Uninstall.
- Restart your PC and ensure you have an internet connection.
- When the machine boots up, Windows will automatically install the latest version of the driver you’ve just uninstalled.
With that, your “WPD FileSystem Volume Driver Code 31” issue should be fixed. Now, when you open Device Manager again, the yellow exclamation mark should be gone, and you’ll see the correct name of your portable device. This solution can work for other related driver errors too. If Device Manager is showing the same error for multiple devices, simply repeat the steps above for each. If you’ve tried everything and rebooted your PC, but the error still wouldn’t’ go away, or you are now looking at the new Code 10 error, follow the steps below.
How to Fix “WPD FileSystem Volume Driver (Code 10)” Issues
As we’ve noted, the Code 10 error is the most common version of the “WPD FileSystem Volume Driver” issue. Usually, it has something to do with problematic drivers on the OS. Maybe they’re too old for your version of Windows, too damaged, or just not up to handling the work they’re meant to be doing on the system.
Luckily for you, with the proven steps shared below, you can make your Code 10 and related error code issues vanish in the blink of an eye. You can update your drivers, change your drive letters, or uninstall hidden devices.
Update relevant device drivers
The best way to fix the Code 10 error in Device Manager is to update the driver for the device that is causing the error. If it’s your card reader that is showing the “WPD FileSystem Volume Driver” label with a yellow exclamation mark, you probably need to update its driver.
If the driver isn’t on your PC, you might need to install it for the first time.
The same rule applies to any other portable or connectible device, like a USB flash drive, external hard drive , camera , Bluetooth dongle, or wired headset . You can use the steps from the section above to uninstall and install the latest driver versions.
You will have a few options when it comes to updating your drivers. In theory, you could do that via Device Manager. However, the chances are that Windows won’t be able to locate the needed drivers. And then you are left with two options: you can update the drivers manually or use automatic driver updating software.
Also read:[EASY GUIDE] How to Update Device Drivers on a Windows 10 PC?
Update drivers with Device ManagerThe Device Manager is your go-to tool for standard driver updates. This is where you start. Updating your drivers with Device Manager is also very straightforward. Here are the steps to take:
- Press the
Windows key and Xbutton at the same time and select Device Manager from the Quick Access Menu . - In the Device Manager window, expand a node to display the correct hardware.
- Right-click the hardware entry and select Update driver .
- Windows will find, download, and install the latest version of the driver.
There you have it—your drivers are now up to date. Now, as we’ve mentioned above, there is a chance that Windows may not be able to locate the needed drivers. In this case, consider the two options below. Update drivers manuallyDevice manufacturers want their hardware to work well, so they regularly release driver updates. This is great news for you, as you can easily download the drivers you need from the manufacturer’s website. Just make sure you know the correct name and model of your hardware. Here’s the standard set of steps to follow:
- Head to the manufacturer’s websites and download the needed driver.
- Once downloaded, unzip the file if needed and run the installation wizard.
- Repeat this for each driver.
- Reboot your PC.
After rebooting, your drivers should be up to date, and you shouldn’t have any more driver issues. Update drivers automaticallyManually downloading drivers can teach you a lot, but it takes time that many people don’t have. You also risk installing the wrong driver, which can cause more problems. Using a tool that automates driver installation can save time and reduce errors.
It doesn't take much time to scan your machine and come up with a list of all the drivers. It will present them in an easy-to-see manner, highlighting those that are missing or out of date Auslogics Driver Updater replaces your missing or corrupt drivers with only newer versions that are recommended for use on the OS version and hardware model by the manufacturer.
This way, the chance of driver conflicts is kept to a minimum. Go ahead, download the tool and easily give your system drivers a collective refresh. If you like what you see, the full version unlocks even more features, such as the ability to update all missing drivers with a single click.
Assign drive letters to portable devices
Sometimes, Code 10 and related error code issues that affect portable devices happen because the system has not assigned them file letters.
It could also be that the current file letter assigned to the portable device plagued by the “WPD FileSystem Volume Driver” issue conflicts with the internal device management scheme in Windows. A situation where two devices are mistakenly assigned the same drive letter will also lead to errors.
The obvious solution here is to assign drive letters to all the portable devices that display this problematic behavior.
Take note, however, that certain letters, such as C, shouldn’t be used as they’re automatic system-assigned letter labels. To be on the safe side, use letters from J onward.
Here’s how to make Windows recognize your portable devices by assigning each a drive letter:
- Press
Windows key + Xto bring up the Windows Tools menu. - Select Run from the menu list.
- In the Run box, type
diskmgmt.mscand pressEnterto launch the Disk Management program. - In the Disk Management window, you will see a list of the storage devices associated with your computer, both internal and external.
- Check that the portable storage in question has no drive letter assigned.
- Right-click the device and select Change Drive Letter and Paths.
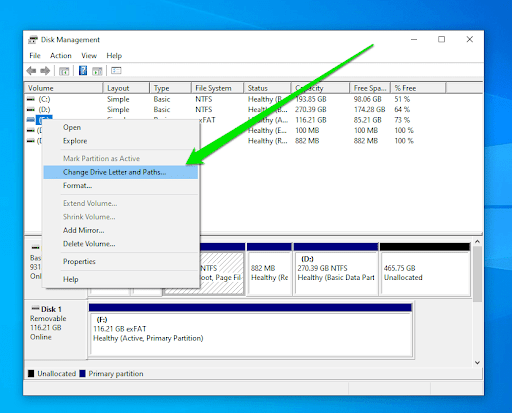
- In the Change Drive Letter and Paths window, click Change.
- Click the alphabetical drop-down next to Assign the following drive letter and choose a letter that isn’t already in use. If you’re unsure, minimize the current window, open Windows Explorer, click This PC , and view the connected drives and their respective drive letters.
- After selecting your preferred drive letter, click OK .
- Close the Disk Management window, open the Windows Tools menu, and select Device Manager.
- Your device should now be visible under the Portable Devices node or elsewhere, depending on the device.
- Right-click your device and select Disable device to temporarily make it stop working .
- Once a minute or two has passed, right-click on the device again and select Enable device to make it active again.
- Click Action on the Device Manager menu bar at the top left.
- Select Scan for hardware changes. Windows will begin searching for a newer version of the device driver and install it if it finds one.
Remove unwanted hidden devices from your computer
Sometimes, a driver for a device that’s not connected to your computer can still claim a COM port. This means that as you are trying to connect another device to that port, Windows may tell you it’s already in use.
This typically happens because some ports are automatically reserved for certain devices.
The problem is that you won’t be able to see the device using that port because its driver is hidden.
So, your only option here is to remove the hidden device from your system. But there’s a catch: the driver/device in question could be something you are actually using.
To see which device is taking up the needed port, you will first need to “unhide” it.
Here’s how to view all devices and remove any unwanted ones from your PC:
- Press the
Windows key + Rcombo. - Type
Sysdm.cpland hitEnter. - Click on the Advanced tab.
- Click the Environment Variables button.
- Click the New button under System variables.
- In the New System Variable window, set Variable name to DEVMGR_SHOW_NONPRESENT_DEVICES and Variable number to 1.
- Click OK .
- Close the System Properties window and open the Windows Tools menu again.
- Select Device Manager from the menu list.
- Click the View option in the Device Manager menu and select Show all hidden devices.
- Expand the Universal Serial Bus controllers node and look for grayed-out devices. Right-click on those you no longer need and select Uninstall device to remove them.
- Comb through your Device Manager, opening nodes and looking for other grayed-out devices that you no longer require. Uninstall them in the same way.
- Restart your computer for the changes to take effect.
All device drivers holding any COM port hostage will be cleared from your PC. Your portable storage device can now use the port without problems. When you return to Device Manager, the ” WPD FileSystem Volume Driver ” label should be gone. Alternatively, you can use the Device Cleanup utility for Windows to automatically remove all unused drivers that are taking up ports and causing issues. As a bonus, it solves your ” WPD FileSystem Volume Driver ” error as well. Here’s how to use the tool:
- Download Device Cleanup Tool and unzip it to a folder on your desktop.
- Copy the x64 folder among the unzipped files and paste it to the root of your computer (i.e., C:/ ).
- Remove all your portable storage devices. Even those without issues should be removed as well. It is recommended to use the Safely Eject method.
- Close all background processes related to all your portable storage devices in Task Manager.
- Press
Windows key + Xto bring up the Windows Tools menu. - Select Command Prompt (Admin) .
- Type the following in the Command Prompt window and press
Enter. This will completely shut down your machine:
shutdown /f /s /t 0<
- Open Device Manager as described above and check that the WPD FileSystem Volume Driver label is gone. If so, continue. If not, stop and try another solution.
- Open an elevated Command Prompt as shown above.
- Type the following in the window and press
Enter:
cd c:\x64

devicecleanupcmd *
- The unused drivers have been removed from your PC. Reboot the machine for the changes to take effect.
How to Fix “WPD FileSystem Volume Driver” Problems: Answered
Dealing with “WPD FileSystem Volume Driver” problems can definitely be frustrating. But all you need here is the right approach.
Whether you’re dealing with a Code 31 or Code 10 error, start by updating drivers, go on to assign drive letters, and remove hidden devices from your PC.
Remember, these issues are common, and many users have successfully fixed them using one of the solutions above. Happy troubleshooting!
We value user opinion and feedback. So, if you have any suggestions or tidbits to share, don’t forget to tell us in the comments.