![[FIXED] Mouse and Keyboard Stopped Working on Windows 10/11](https://www.auslogics.com/en/articles/wp-content/uploads/2021/07/FIXED-USB-mouse-and-keyboard-stopped-working-after-plugging-in-a-USB-flash-drive-568x359.webp)
- A Quick Troubleshooting Checklist if Your Mouse or Keyboard Stopped Working
- How to Fix Both Keyboard and Mouse Not Working
- How to Fix a Wireless Keyboard or Mouse Not Working
- How to Fix USB-Connected Mouse and Keyboard Not Working
- How to Fix a Laptop’s Built-In Mouse or Keyboard Not Working
- Common Reasons Why Mouse and Keyboard Suddenly Stop Working
- Mouse and Keyboard Not Working? Fixed!
- FAQ
One time, I was rushing to meet a project deadline when my external keyboard suddenly stopped working. I had no time to look for fixes, so I had to juggle between my laptop keyboard and the external one. It was chaos.
Now, if my mouse or keyboard suddenly stops working , I know how to deal with it. However, according to numerous questions and complaints from users , not all of them know solutions to fix such issues.
That’s why I’ve put together this guide to help you fix the problem. Let’s begin.
A Quick Troubleshooting Checklist if Your Mouse or Keyboard Stopped Working
Before diving into detailed solutions, try these simple checks on your device. Many common issues can be resolved with these quick fixes:
| Issue | Quick fix |
|---|---|
| Wireless mouse or keyboard |
|
| USB mouse or keyboard |
|
| Laptop touchpad or keyboard |
|
How to Fix Both Keyboard and Mouse Not Working
If your keyboard and mouse stop working at the same time, it could be a more complex issue than dealing with just one malfunctioning device. Regardless, the solutions below can help fix the problem.
However, remember that these are also universal solutions that you can apply whether you’re using wired, wireless, or USB-connected devices:
Method 1: Restart your PC
A simple restart might seem too basic, but it’s often the quickest way to fix unresponsive keyboards and mice. It will clear temporary glitches, reset drivers, and resolve conflicts between hardware and software.
Just hold the power button for 5–10 seconds to force a shutdown and turn the PC back on. Alternatively, press Ctrl + Alt + Delete and restart from the menu.
Also read: Keyboard Magic: How to Shut Down, Restart, or Put Windows PC to Sleep with a Keyboard
Method 2: Try Safe Mode
Booting your laptop into Safe Mode can determine if third-party software or drivers, like antivirus programs or peripheral management tools, are causing the mouse and keyboard issues.
To enter Safe Mode:
- Restart your laptop and press
F8before Windows starts. - In the Advanced Boot Options menu, navigate to Startup Settings and select Safe Mode or Safe Mode with Networking using the arrow keys, then press
Enter.
What to do if the mouse and keyboard work in Safe Mode:If your mouse and keyboard work correctly in Safe Mode, a third-party app or corrupted/outdated driver is likely interfering. To find the app causing problems, try to uninstall recently installed software:
- Open the Control Panel (search for it in the Start menu).
- Under programs, select Uninstall a program .
- Look for recently installed apps. Your best bets are antivirus software (e.g., Norton, McAfee) or peripheral tools (e.g., Logitech Options, Razer Synapse).
- Right-click the program and select Uninstall, then restart your computer and test the mouse and keyboard.
If the mouse and keyboard do not work in Safe Mode, then you should move to the next solution.
Method 3: Update your drivers
If your keyboard or mouse isn’t working properly—maybe it’s unresponsive, lagging, or just not connecting—outdated or corrupted drivers could be the issue. You might also notice that other devices, like your printer, say “offline” despite being connected or that your headphones aren’t working as expected. These problems often come down to device drivers , which help your computer communicate with your devices. If they’re outdated or missing, you can run into all sorts of glitches. If any of this sounds familiar, it’s time to update your drivers. Here’s how to do it:
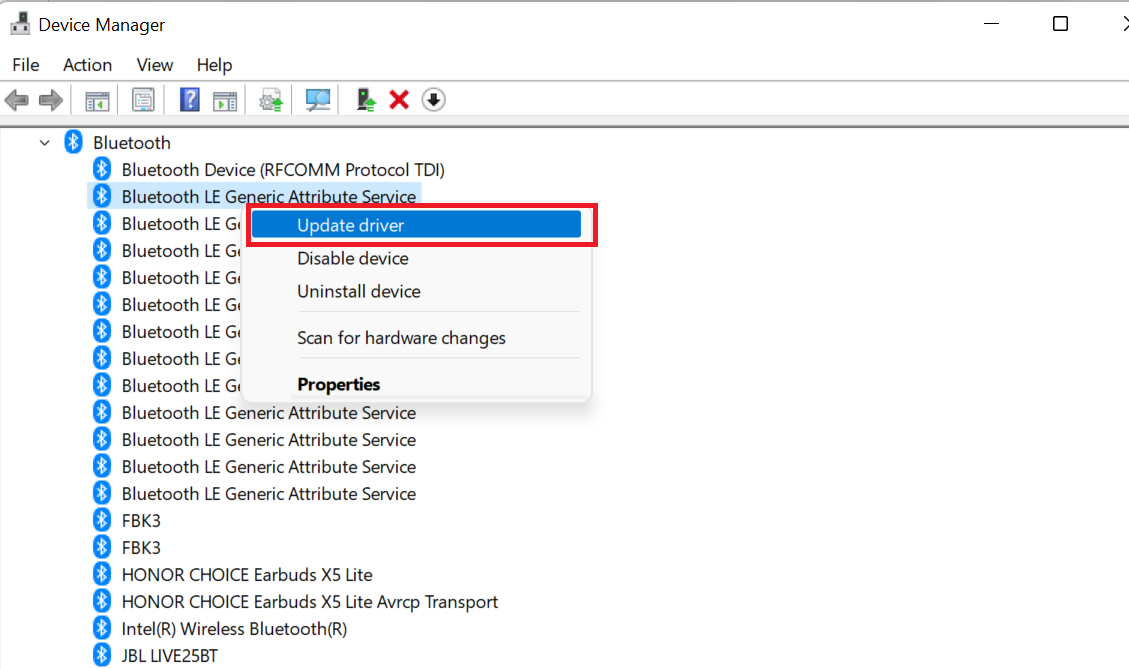
- Open Device Manager.
- Search for the drivers that need updating. In this case, you need to update Bluetooth, keyboard, and mouse drivers, so expand Bluetooth , Keyboards , and Mice and other pointing devices categories.
- Then, right-click on the device and select Update driver.
A tool like Auslogics Driver Updater saves you the hassle by automating the process, providing optimized drivers, and creating backups for safety.
Method 4: Check and adjust BIOS/UEFI settings
Sometimes you might be dealing with a hardware-level detection issue. This means, your system’s foundational software ( BIOS /UEFI) rather than the operating system is the source of the problem.
If certain settings are misconfigured or outdated, your PC might not recognize input devices properly, whether they’re external (like USB mice and keyboards) or built-in (like a laptop’s keyboard or touchpad). For example, USB functionality could be disabled in BIOS/UEFI, preventing your system from detecting any connected peripherals.
Here’s how to adjust the BIOS/UEFI settings to make sure the hardware is correctly set up to communicate with the OS:
Step 1: Restart your laptop and access the BIOS setup menu by pressing the specified key during boot up (usually, F1, F2, F10, F12, Del, or Esc).
Step 2: Search for Integrated peripherals or a similar section.
Step 3: Ensure USB support is enabled and verify keyboard and mouse settings.
Step 4: Save changes and exit the BIOS menu. Restart your laptop to check if it fixed the problem.
Method 5: Perform a system restore
If the mouse or keyboard stopped working after a recent software change, performing a system restore can fix the issue. It will revert your system to a previous state when the keyboard and mouse were functioning correctly
Let’s see how it works:
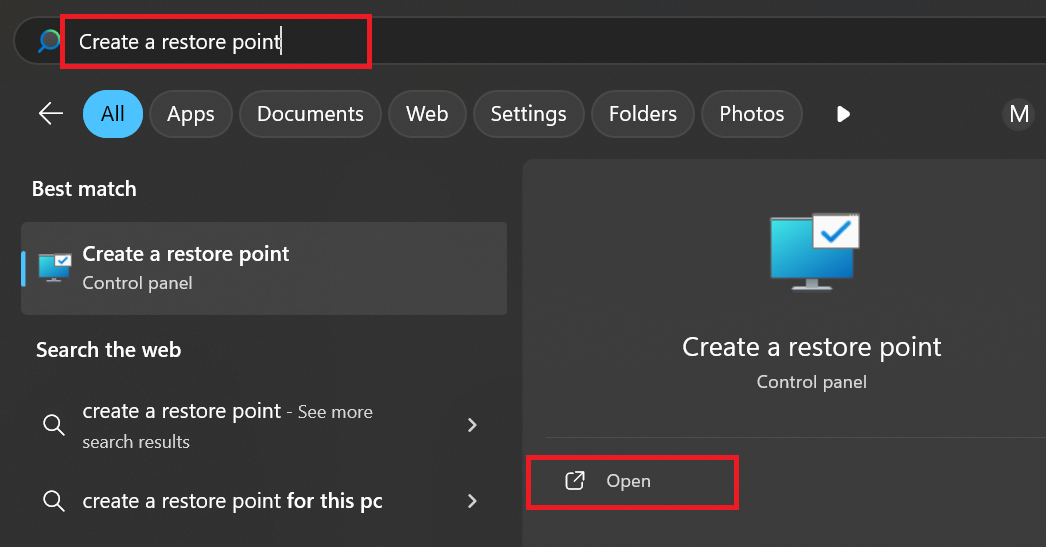
Step 1: Press Windows + S, type Create a restore point , and select it from the search results.
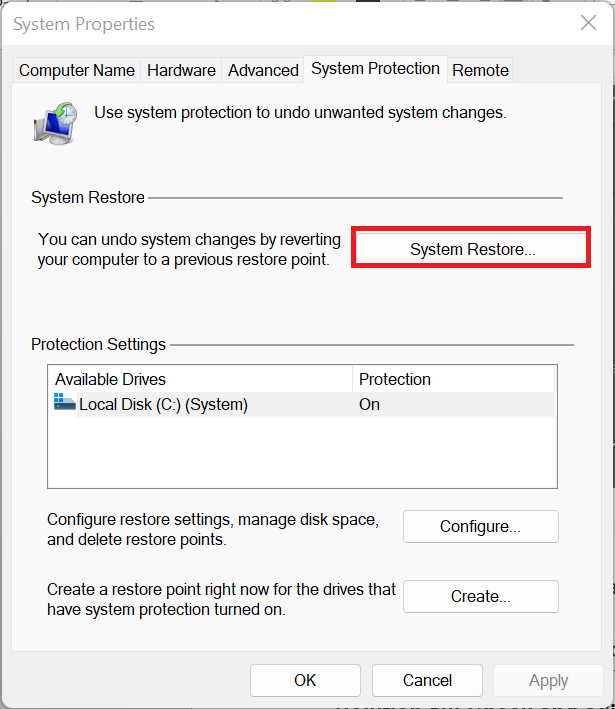
Step 2: In the System Properties window, click System Restore.
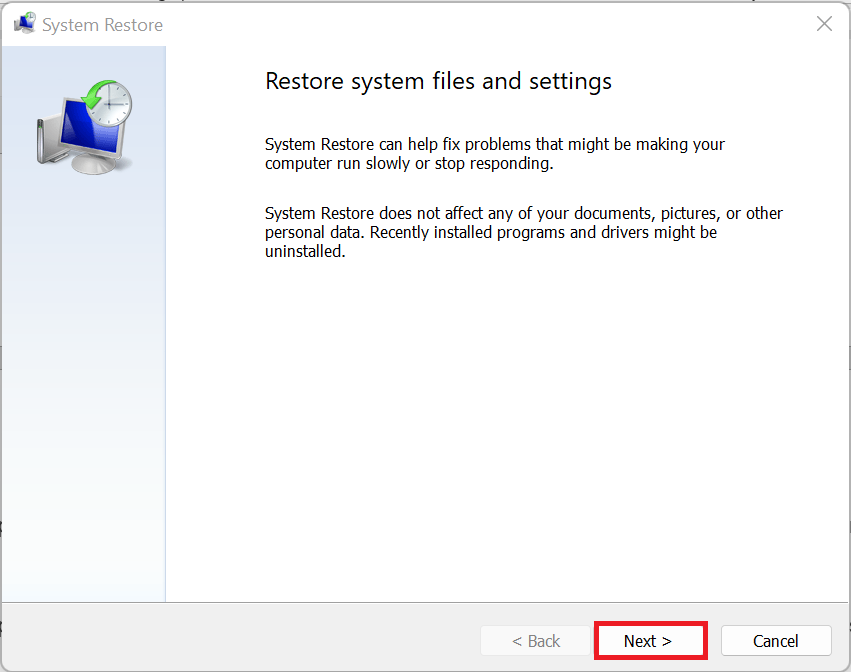
Step 3: Click Next .
Step 4: Choose a restore point from a date when your keyboard and mouse worked, and click Next again.

Step 5: Click on Finish to complete the restore process.

Your PC will restart, and the system will revert to the chosen state.
Method 6: Update your Windows
Windows updates can fix hardware and software issues like driver incompatibility, security vulnerabilities, and system stability that might be causing the problem. Follow these steps to perform a Windows update:
For Windows 11
Step 1: Press Windows + I to open Settings.
Step 2: In the Settings menu, choose Windows Update. Click on Check for updates and allow Windows to install any available updates.
For Windows 10
Step 1: Press Windows + I to open Settings.
Step 2: In the Settings menu, select Update & Security . Click on Windows Update , then hit Check for updates and let Windows install any available updates.
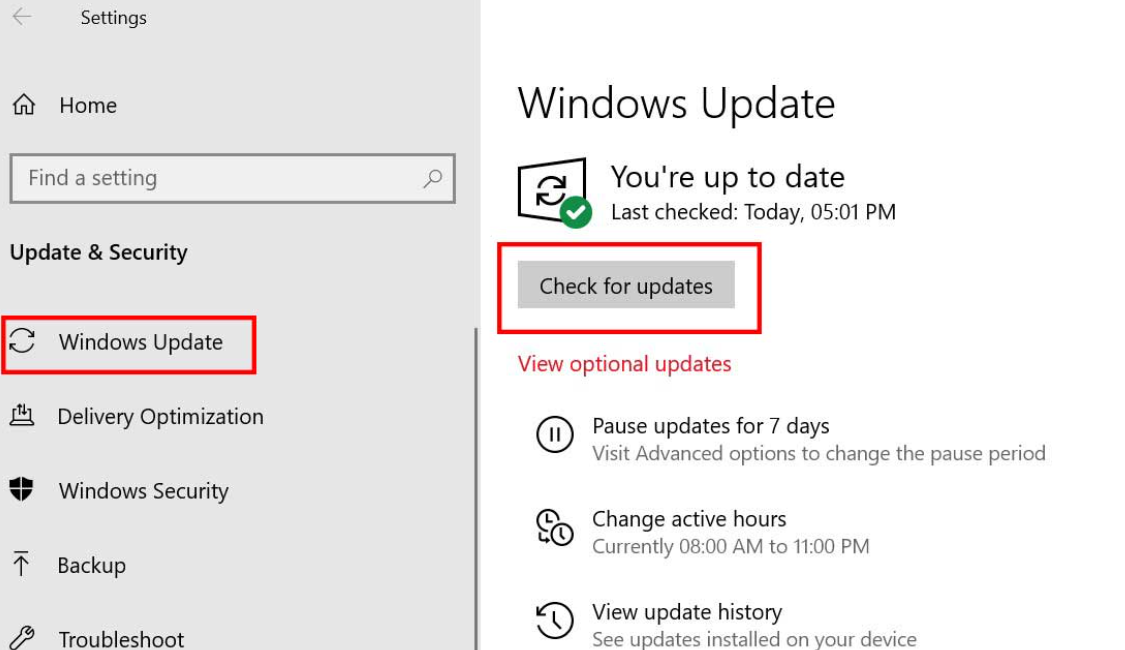
After installation, restart your PC and verify if the mouse and keyboard are functioning properly.
How to Fix a Wireless Keyboard or Mouse Not Working
Fix 1: Replace or recharge batteries
Before diving into other fixes, make sure your device’s batteries aren’t the problem. If it uses regular batteries, try putting in new ones.
While you’re at it, check the battery slots to make sure there’s no dirt or rust messing things up.
If your device has rechargeable batteries, plug it in and let it charge for a bit. Sometimes they lose power even if you haven’t used them for a while.
Fix 2: Ensure proper connection
If you’ve confirmed the battery isn’t the issue, the next step is to check the dongle. Wireless mice and keyboards that use RF (radio frequency) technology require a dongle to connect to your computer. That is the small device that plugs into a USB port and allows the mouse or keyboard to communicate with the computer.
If a wireless mouse or keyboard is not working, it’s likely because the dongle is not securely plugged in. Try unplugging it and then reconnecting it to see if that resolves the issue. If not, insert the dongle into a different USB port to check if that helps.
Fix 3: Check Bluetooth connection
Ensure Bluetooth is enabled on your computer and that both the mouse and keyboard are paired correctly. This is particularly important if your device does not use a dongle because Bluetooth mice and keyboards rely on your computer’s built-in Bluetooth adapter to connect.
Unlike RF devices, Bluetooth devices must be paired with your computer through the operating system’s Bluetooth settings.
So, check your Bluetooth settings to be sure it’s not the problem:
For Windows 10
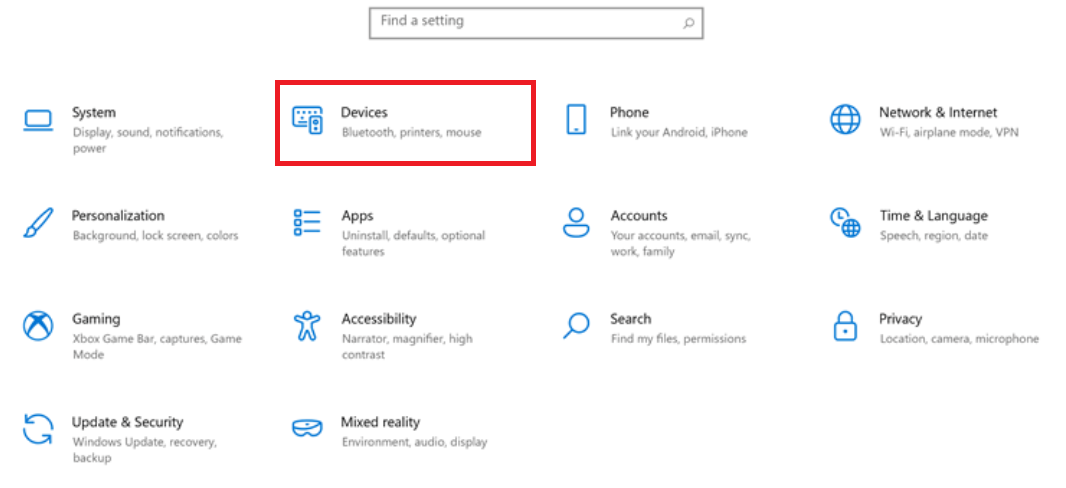
Step 1: Press Windows + I to open Settings.
Step 2: Click on Devices.
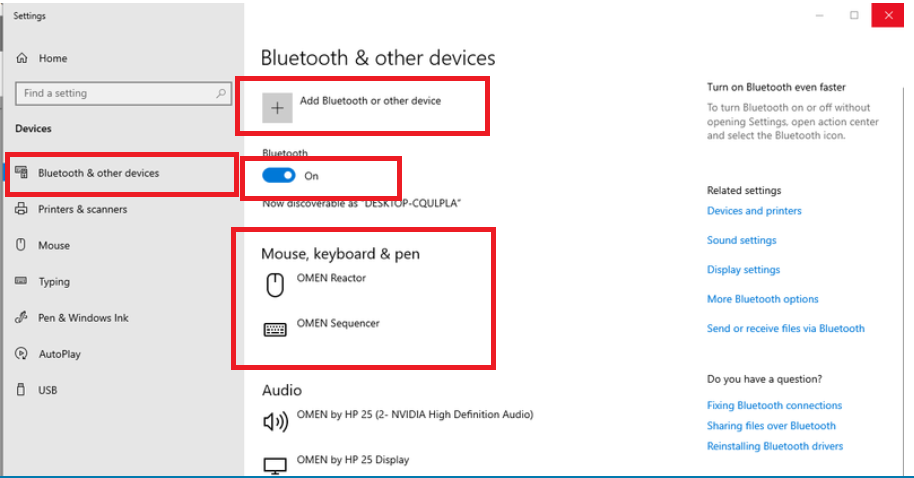
Step 3: On the left, click on Bluetooth & other devices . Ensure the Bluetooth toggle switch is on. Also ensure that your mouse or keyboard is listed among the connected devices. If your device is not listed, you can click on Add Bluetooth or other device and follow the prompts.
For Windows 11
Step 1: Press Windows + I to access Settings.
Step 2: In the Settings menu, select Bluetooth & devices. Under the Bluetooth & devices section, you’ll see the status of Bluetooth. Ensure it’s turned on.
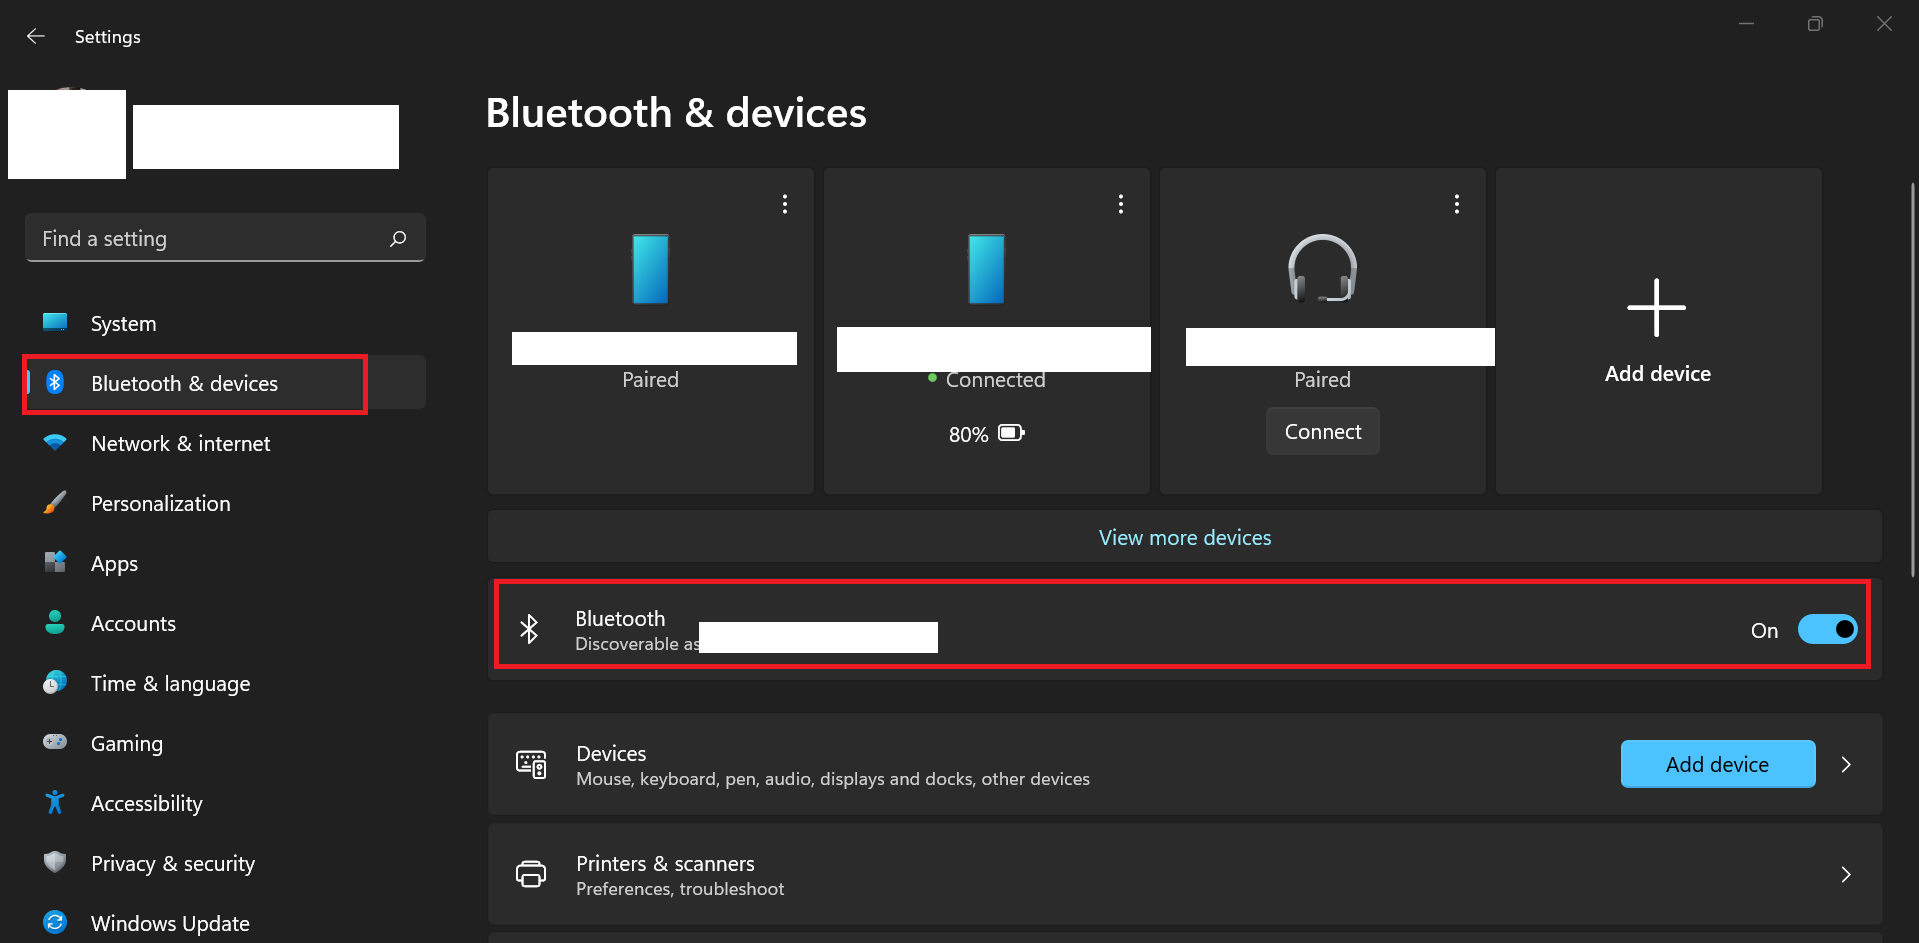
Step 3: Click on Devices below the Bluetooth status to see a list of connected devices. Look for your mouse or keyboard in this list. If your mouse or keyboard is not listed, click on Add device and follow the on-screen instructions to pair your mouse or keyboard.
Fix 4: Re-pair the keyboard or mouse
If Bluetooth is enabled, you can try disconnecting and repairing the keyboard or mouse. Sometimes, connection issues occur due to pairing conflicts or software glitches.
Windows 10
Step 1: Open Settings by pressing Windows + I, then go to Devices > Bluetooth & other devices . Locate your keyboard or mouse in the list of paired devices, click on it, and select Remove device.
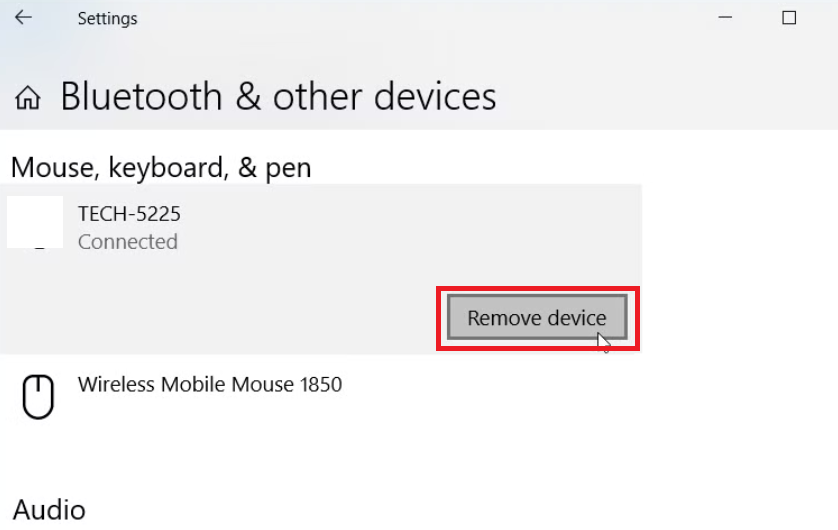
Step 2: Put the keyboard into pairing mode, then click Add Bluetooth or other device and follow the on-screen instructions to reconnect it.
Windows 11
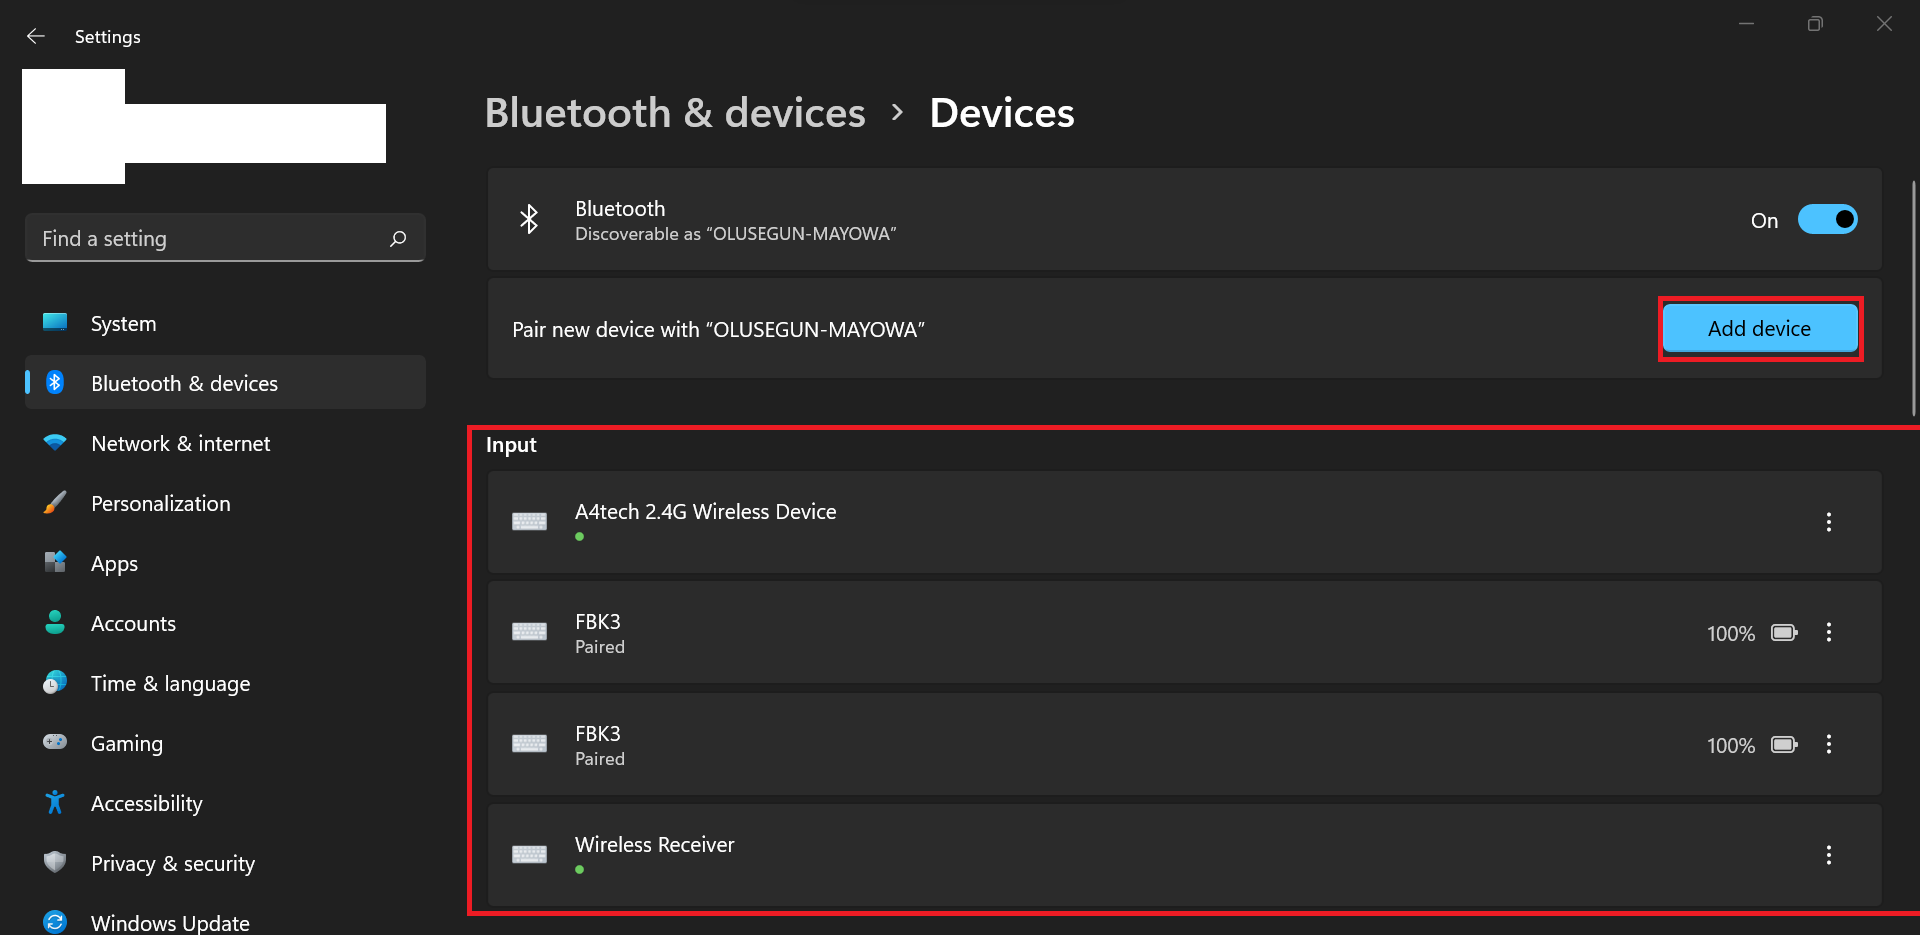
Step 1: Go to Settings > Bluetooth & devices > Devices . Find the keyboard or mouse in the list of paired devices, click the three dots next to it, and click Remove device.
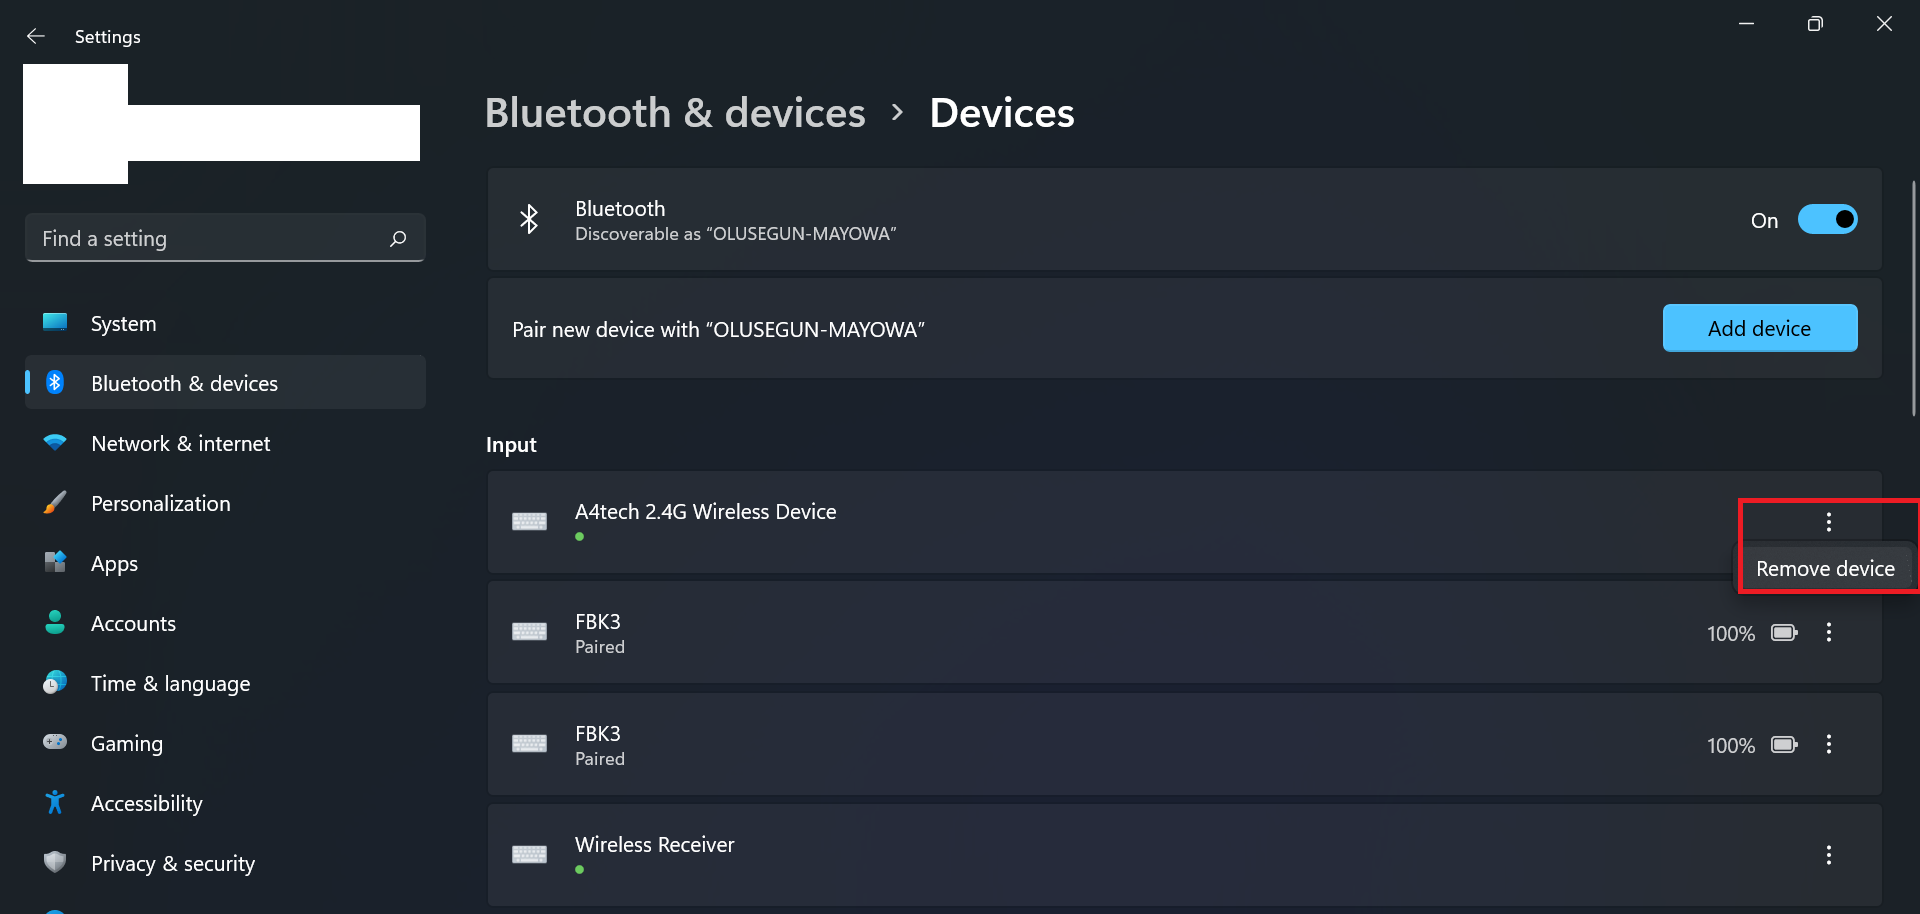
Step 2: Put the keyboard into pairing mode and click Add device to reconnect it.
Fix 5: Test the keyboard or mouse on another device
If your wireless keyboard or mouse is not working, try connecting it to another device. This helps determine whether the issue is with the device itself or your computer.
If your device isn’t showing on the other PCs as well, it may be faulty. In that case, consider having it checked by a technician or replacing it.
However, if it works fine on another device, the issue is likely with your computer. This could be due to outdated Bluetooth drivers, which we’ll cover in the next section.
Fix 6: Update Bluetooth drivers
Updating your Bluetooth drivers can also fix the issue if your keyboard or wireless mouse is not working.
Here’s how to do it manually:
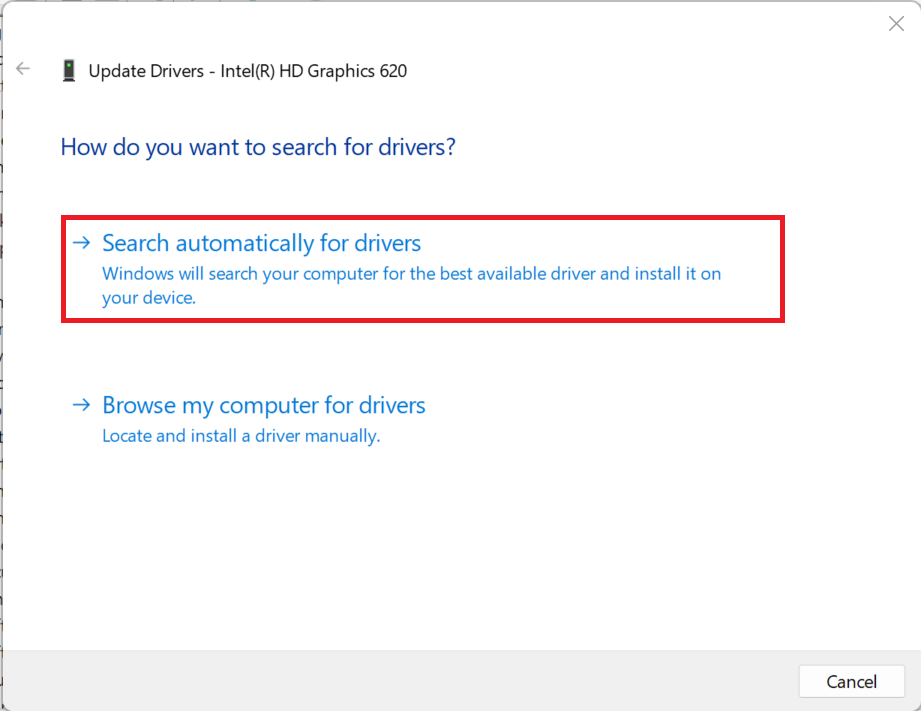
- Open Device Manager and expand the Bluetooth category.
- Right-click on each Bluetooth device and select Update driver.
- Select the Search automatically for drivers option and follow the prompts to complete the update.
On top of that, using Device Manager may not always provide the latest drivers. That’s why for a faster, more efficient solution, consider using Auslogics Driver Updater . This tool automatically scans for and updates all drivers, including Bluetooth, with a single click.
Fix 7: Check for interference from other wireless devices
If your device is lagging, disconnecting, or not responding properly, interference might be the cause. Other wireless devices, such as Wi-Fi routers, cordless phones, or other Bluetooth devices, may be blocking your device.
To fix this, try moving these potential sources of interference away from your computer. Additionally, you could use your mouse or keyboard in a different location.
Another helpful tip is to ensure that your device is within the recommended range and has a clear line of sight to the receiver to improve connectivity.
How to Fix USB-Connected Mouse and Keyboard Not Working
The following are some solutions that can help fix your PC if your USB mouse or keyboard suddenly stopped working:
Solution 1: Reinstall problematic hardware drivers
Step 1: Press Windows + R and type devmgmt.msc to open Device Manager.

Step 2: Look through the list of drivers for warning indicators, like a yellow triangle or exclamation mark beside them.
Step 3: Right-click on such drivers and select Uninstall device.
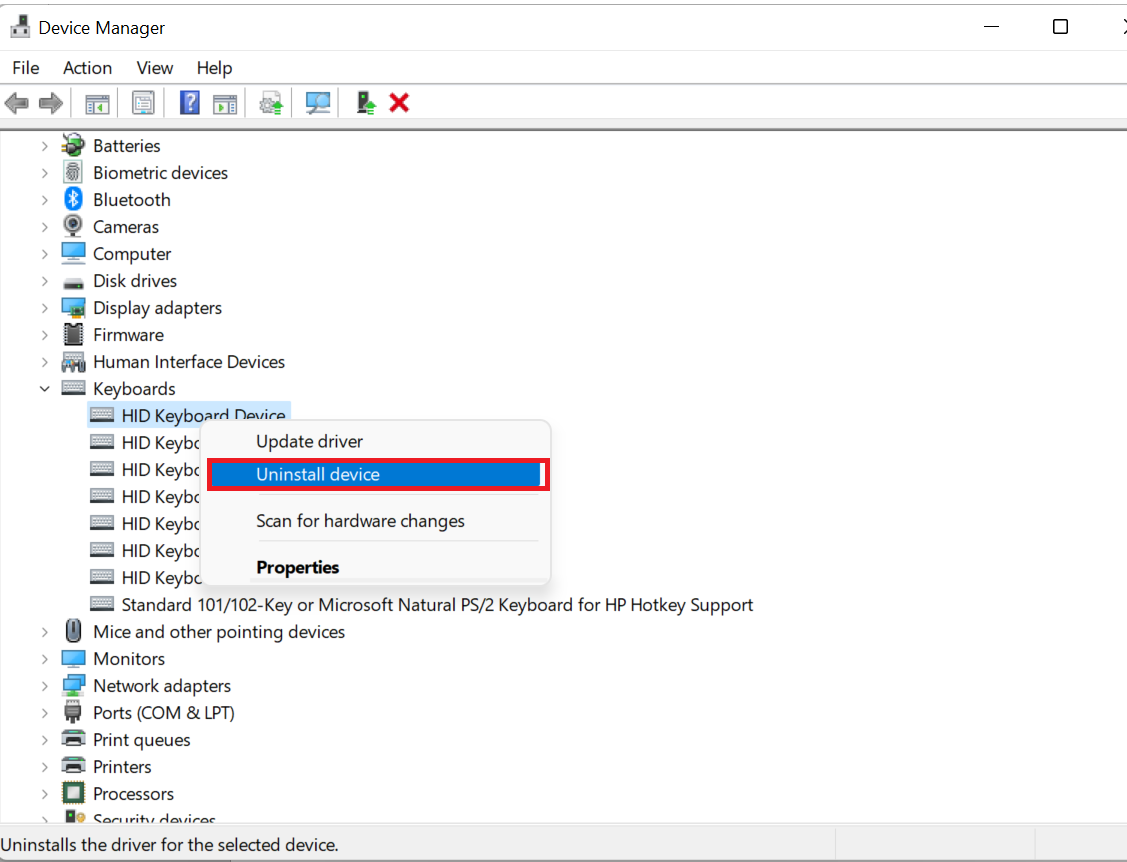
Step 4: When prompted, click Uninstall to confirm.

Step 5: Restart your computer and check if your USB mouse and keyboard are now working. Windows would have already installed the drivers again.
Driver updater tools take the hassle out by automatically scanning your system for outdated or problematic drivers and replacing them with optimized versions.
These tools are not only faster, but they also help prevent errors by ensuring you install the right drivers for your hardware.
Solution 2: Disable power management for the USB root hub
Windows Power Management saves battery by lowering power to idle peripherals, reducing overall consumption. However, if the USB root hub lacks sufficient power, connecting a device like a flash drive can be the reason your USB mouse is not working on Windows 10 or 11.
To fix this, adjust power management settings for the USB root hub. Here’s how:
Step 1: Open Device Manager.
Step 2: Locate the Universal Serial Bus controllers option and double-click it to expand the category.

Step 3: You will find at least one USB Root Hub entry under Universal Serial Bus controllers . Right-click it and select Properties .
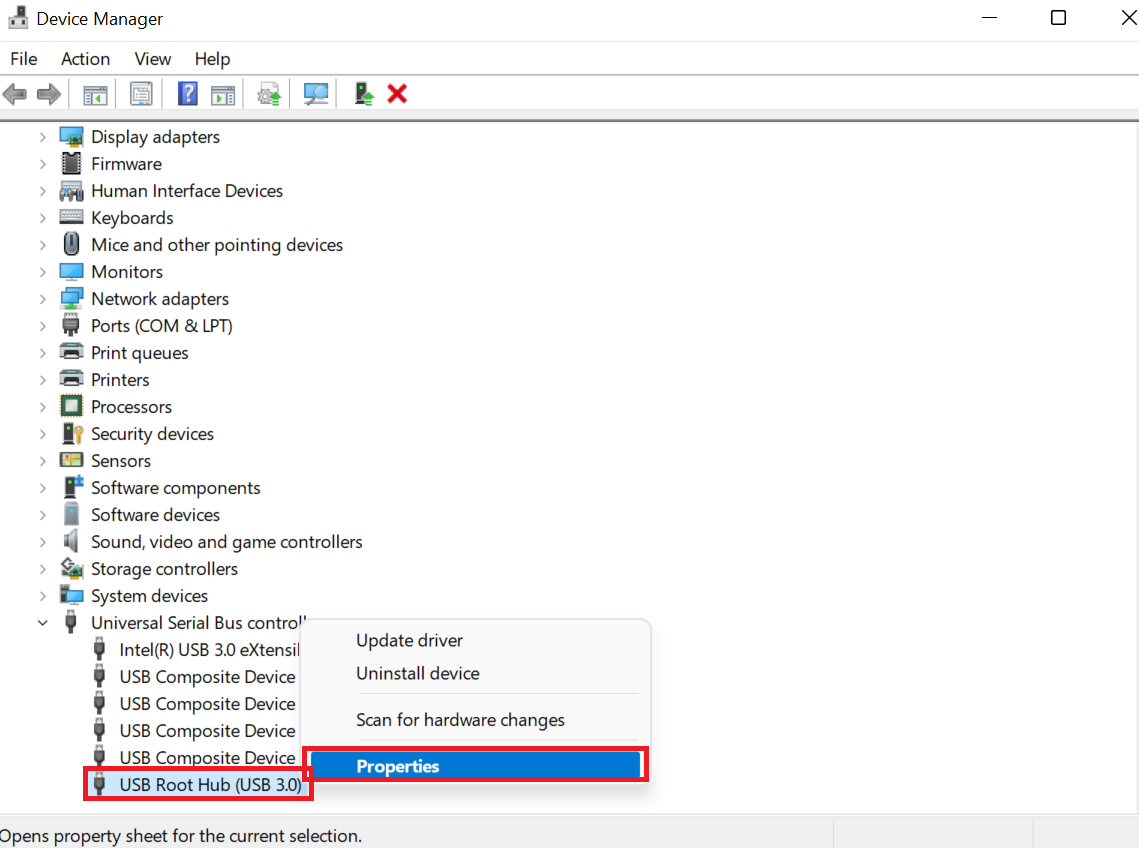
Step 4: In the USB Root Hub Properties window, go to the Power Management tab.
Step 5: Uncheck the checkbox next to Allow the computer to turn off this device to save power.
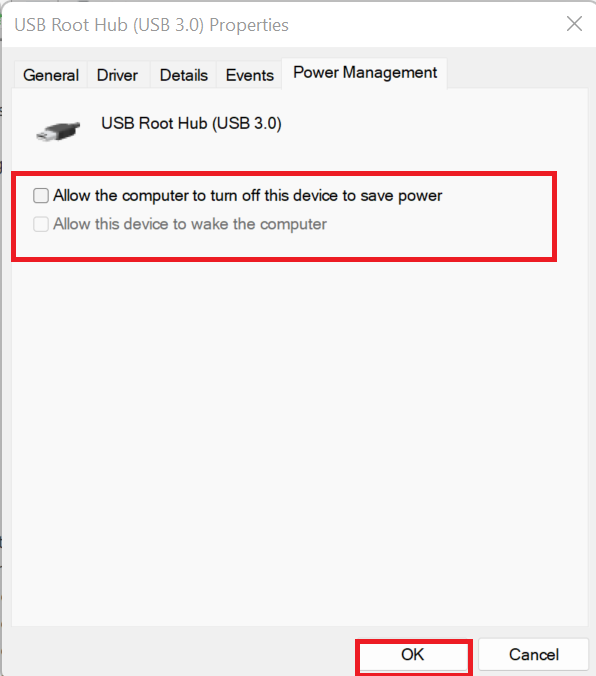
Step 6: Click OK to confirm the change and then reboot the system.
Solution 3: Reinstall the USB root hub driver
If the USB mouse and keyboard still don’t work even after you tried the previous solutions, you can reinstall the USB root hub driver to fix bugs or compatibility issues. This will replace the corrupted or faulty driver, restoring proper communication and power management between the USB root hub and your peripherals.
Here’s how to reinstall the USB root hub driver:
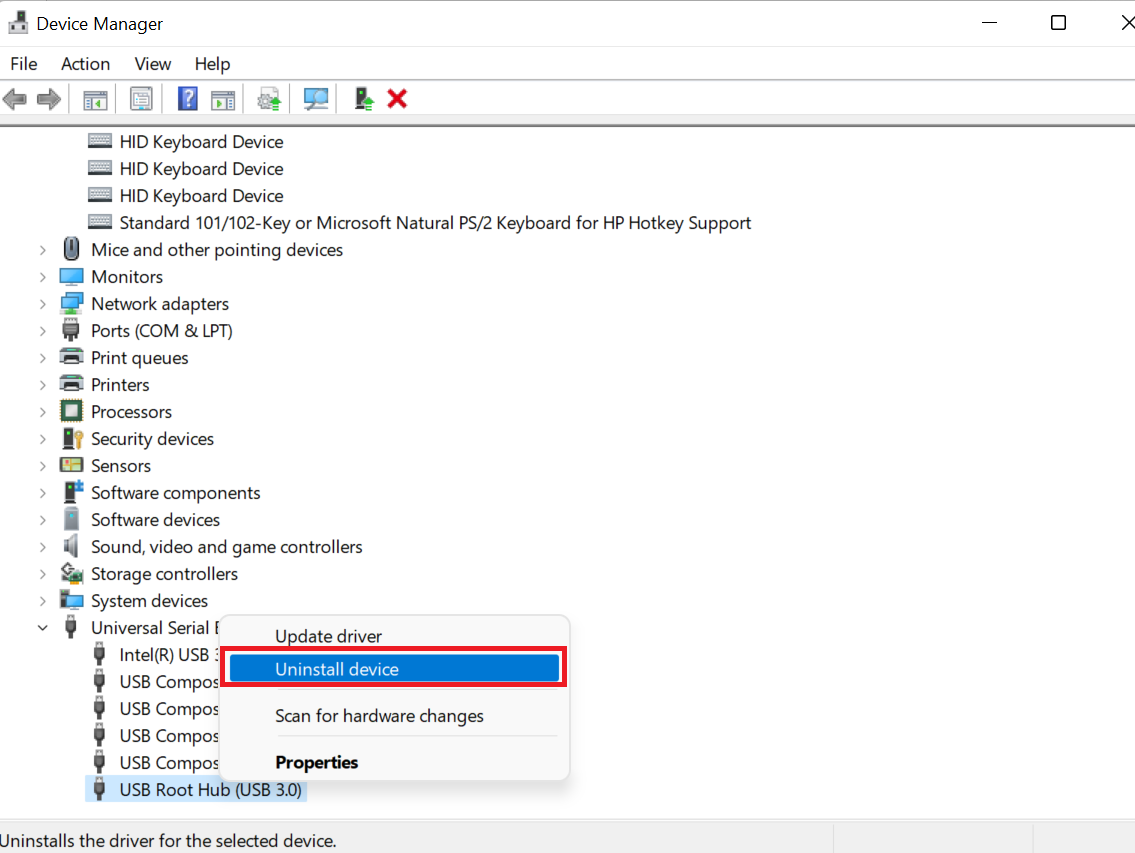
Step 1: Open Device Manager again and go to the Universal Serial Bus controllers node. Double-click it to expand the node.
Step 2: Right-click the USB Root Hub option and select Uninstall device.
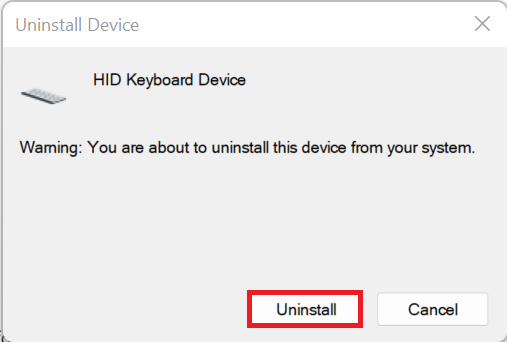
Step 3: A warning message will pop up. Click Uninstall.
Step 4: Reboot the system and check if your mouse or keyboard is working.
How to Fix a Laptop’s Built-In Mouse or Keyboard Not Working
If only your laptop’s keyboard or touchpad isn’t working , try these solutions:
For the keyboard:
- Restart your laptop: A simple reboot can sometimes resolve unresponsive keyboard issues.
- Check for stuck keys: Sometimes a stuck key can cause the whole keyboard to act up. Gently press all keys to ensure none are stuck, as this can interfere with typing.
- Try an external keyboard: If an external keyboard works, the built-in keyboard may have a hardware issue. Plug in an external keyboard to check if the problem is with the built-in one.
- Run the keyboard troubleshooter: Open Windows Settings by pressing
Win + I, then go to System > Troubleshoot > Other troubleshooters > Keyboard > Run (Windows 11) or Update & Security > Troubleshoot > Additional troubleshooters > Keyboard > Run the troubleshooter (Windows 10) and follow the on-screen instructions.
For the touchpad:
- Enable the touchpad in Settings: Go to your laptop’s touchpad settings in Control Panel > Mouse > Touchpad tab (the tab name may vary depending on your laptop’s manufacturer) to ensure it’s turned on.
- Check the function key toggle: Some laptops have a key combination (e.g.,
Fn + F7) to enable or disable the touchpad. Check to be sure the touchpad is not disabled. - Test with an external mouse: Connect a USB or Bluetooth mouse to check if the issue is specific to the touchpad. If the external mouse works, you might need to take your laptop to a technician for repair.
- Run the Hardware and Devices troubleshooter: Press
Win + Rto open the Run dialog box, type msdt.exe -id DeviceDiagnostic, pressEnter, then click Next and follow the on-screen instructions.
Common Reasons Why Mouse and Keyboard Suddenly Stop Working
Now that you know how to fix the problem, let’s figure out the root causes of your keyboard and mouse not working:
- Low battery (for wireless mice and keyboards): Insufficient battery power can lead to erratic behavior like the cursor disappearing or lagging that seems like your computer is freezing . In some cases, you may experience a complete failure of a wireless mouse or keyboard. Some devices feature warning lights, such as a blinking LED, to alert you when the battery is low, so pay attention.
- The signal quality is too low: If your wireless mouse or keyboard is too far from your PC or blocked by obstacles, it may lag or stop working. Signal disruptions can also occur in areas with many wireless devices or interference from electronics like routers or cordless phones. To ensure smooth performance, keep the device within 3–6 feet (1–2 meters) of the receiver and avoid placing it near devices or objects that could interfere with the connection.
- Drivers are outdated, missing, or not compatible: Outdated or incompatible Bluetooth, USB, or other drivers pending an update can be the reason for your keyboard or mouse not working . Try updating your drivers to see if this fixes the problem.
- Hardware conflict: If your mouse and keyboard stop working, it could be due to issues with your hardware, outdated drivers, or even faulty USB ports . These problems can disrupt how your computer communicates with connected devices, making them unresponsive. Updating or reinstalling device drivers can get them working again.
- Power management: Incorrect power management settings may cause USB devices to enter low-power states, leading to the keyboard or laptop mouse not working issue. To fix the problem, disable power management for the USB root hub.
Mouse and Keyboard Not Working? Fixed!
I know how frustrating it is when your mouse or keyboard suddenly stops working—I’ve been there. Most of the time, these problems come down to simple things like loose connections, low batteries, or outdated drivers.
If you’re using an external mouse or keyboard, start with the basics: check the battery, cables, and settings. If those don’t work, try updating your drivers or adjusting the USB hub settings. For laptop users, running the troubleshooter or updating drivers can help fix touchpad issues.
If these fixes don’t do the trick, don’t hesitate to get help from a professional. Have these solutions worked for you? Or do you have a favorite tip that saved the day? Share your thoughts in the comments!