Google Chrome is the most widely used web browser in the world, renowned for its speed and flexibility. But even the best browsers can face issues like the issues with Chrome resolution on Windows 10 .
Many Windows 10 users have experienced scaling issues that interfere with browsing. Have you ever experienced Chrome’s small text, blurry images, or malfunctioning display?
If your Chrome looks pixelated , this guide will help you.
We’ll examine these resolution-related problems in-depth and show you how to fix any issues with the Chrome resolution on Windows 10 .
Let’s dive right in!
Common Chrome Resolution Windows 10 Problems
Before we learn how to disable display scaling, it’s best to look deeper into what causes Google Chrome resolution change and gain a better understanding of what it is.
In general, here are some of the reported issues related to Chrome scaling:
1. Unintentionally zoomed Google Chrome
Some people prefer to have their browsers zoomed in for a better viewing experience. On the other hand, with the update, even those who didn’t need the feature were affected.
You can manually adjust the zoom level or change the scaling in the Settings app.
2. Blurry Chrome scaling
This may be rare, but still possible. There are times when Chrome can get blurry after scaling. This can be resolved by having an up-to-date browser.
3. Chrome scaling is not working
You must add some parameters to ensure that Chrome scaling functions properly. You can try one of our solutions below to resolve the problem.
4. Chrome Scaling Problems
Windows 10 can still experience Chrome scaling problems due to several issues.
In the following sections, we’ll explain how to fix Chrome resolution issues on Windows 10.
Related: How to Completely Reset the Google Chrome Browser to Its Default Settings?
How to Fix Chrome Resolution on Windows 10
If you want to know how to zoom out on Google Chrome and fix other resolution-related issues, go through the methods below:
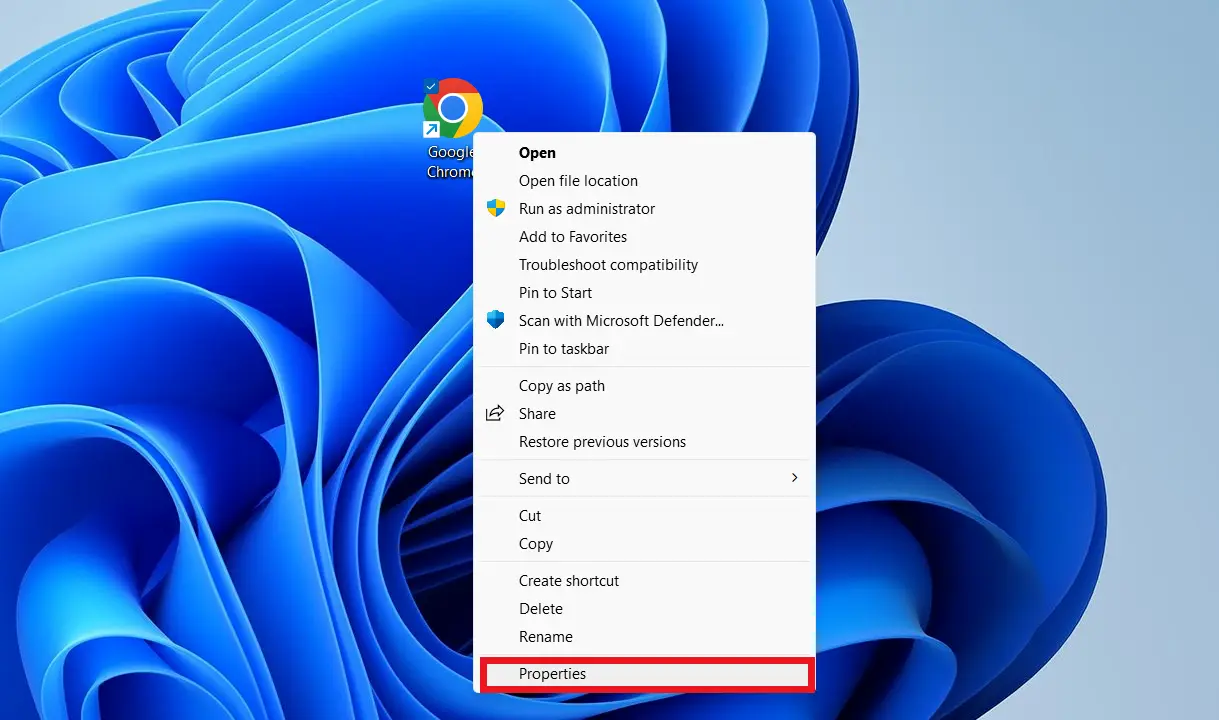
Method 1: Adjust the target field on Google Chrome
One of the ways to fix Google Chrome 4k scaling in Windows 10 is to add a launch parameter on the browser.
The process is simple, and it only requires you to locate the shortcut for Chrome. You just have to make a few changes by following the steps below:
- Go to the Google Chrome shortcut on your desktop and right-click it.
- Choose Properties from the menu.
- Go to the Target section and add the text below to the end of the parameter:
/high-dpi-support=1 /force-device-scale-factor=1
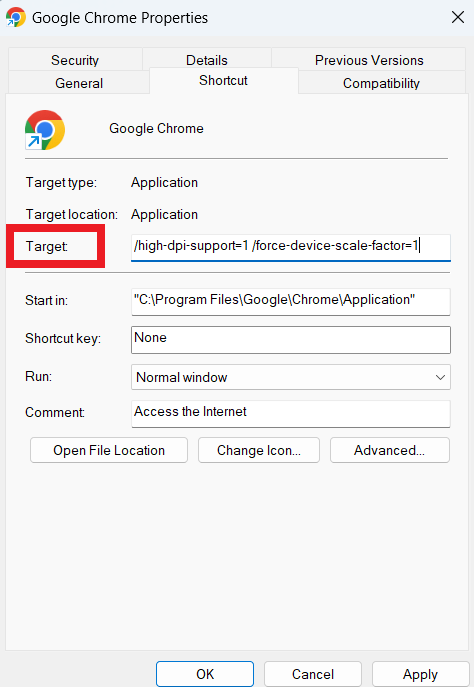
- Save the changes by clicking Apply and OK.
Remember to unpin and re-pin Chrome on your taskbar if you have a shortcut. If Chrome looks blurry on Windows 10 , you can use this method to fix it.
Windows 10/11 (8, 7, Vista, XP)
Also Read: How to Change Location on Google Chrome?
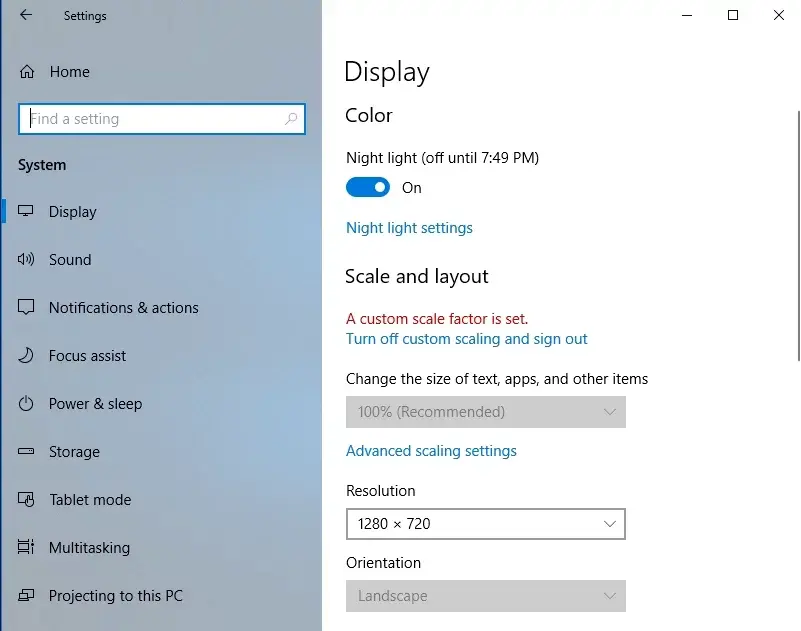
Method 2: Change the settings for scaling
You can also learn how to adjust high-DPI scaling in Windows 10 to fix the problem. You can easily change the scaling size, and Google Chrome will automatically apply the adjustment.
Here are the steps you have to follow:
- On your keyboard, press
Windows Key + IThis should open the Settings window. - Click System and ensure you are in the Display category.
- Go to the Scale and layout section.
- Under that section, you’ll see Change the size of text, apps, and other items.
Change the value to 100%. This works for most cases, but explore other values if you have a larger screen.
Changing the scaling settings should fix Google Chrome scaling issues.
The changes you just made will automatically be applied to Chrome. If Chrome looks zoomed in, this should permanently get rid of the problem.
Also Read: Fix “Google Chrome Is Waiting for Cache” Issue on Windows 10
Method 3: Changing Chrome’s zoom level
If Google Chrome looks zoomed in, you can use this method to correct it. It’s worth noting that this method is just a workaround, and it’ll only change the size of the web pages you visit.
This also means that you wouldn’t do anything with Chrome’s interface. That said, follow these instructions:
- Open Chrome and click the Menu icon on the browser. It should look like three vertically aligned dots at the top right corner.
- Select Settings from the menu.
- Once you’ve opened the Setting tab, scroll down until you see the Page Zoom option.
- Change the current setting to your desired value.
Here’s how to zoom out on a webpage using this method. After following the steps above, you should be able to adjust the size of your web pages accordingly.
As we’ve mentioned, Chrome’s interface will stay the same. So, you might want to try other solutions to change Chrome’s interface intentionally.
Method 4: Make sure that Chrome is up to date
If you’re experiencing Chrome resolution issues on Windows 10, one solution is to update the browser.
After all, this method removes bugs and keeps Chrome stable. Chrome should automatically update itself, but specific problems may prevent it.
Just to be certain, you can manually check for updates by following the instructions below:
- Launch Google Chrome and click the Menu icon.
- Select Help from the menu, then click About Google Chrome.
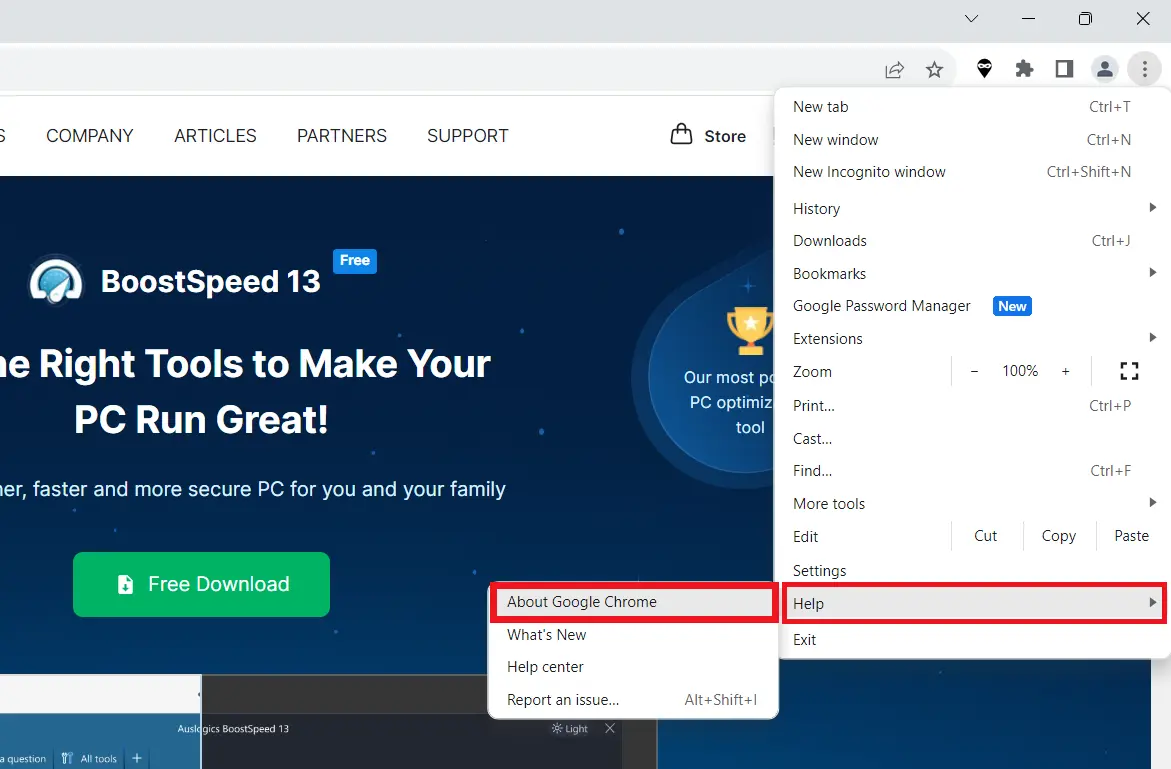
- You will be able to see what Chrome version you currently have. Your browser will also check for updates. If updates are available, the browser will automatically download and install them.
Speaking of updates, it would also help to ensure that your drivers are up to date. In this way, you can be certain that your computer graphics driver is working to its optimum condition.
You can conveniently do that using a reliable tool like Auslogics Driver Updater.
By clicking a button, this program will automatically recognize your system and search for the latest compatible versions of your drivers.
The best part is that it resolves all driver issues. So, after the process, your computer can expect to perform better and faster.
So, if you don’t know what causes the Google Chrome resolution change , try updating Chrome.
Also Read: What is the Best Internet Browser?
Method 5: Bringing back Chrome to its default settings
Changes in the settings and installed extensions can cause scaling problems in Chrome. If so, you must return your browser to its default settings.
This is quite easy to do. Simply follow these instructions:
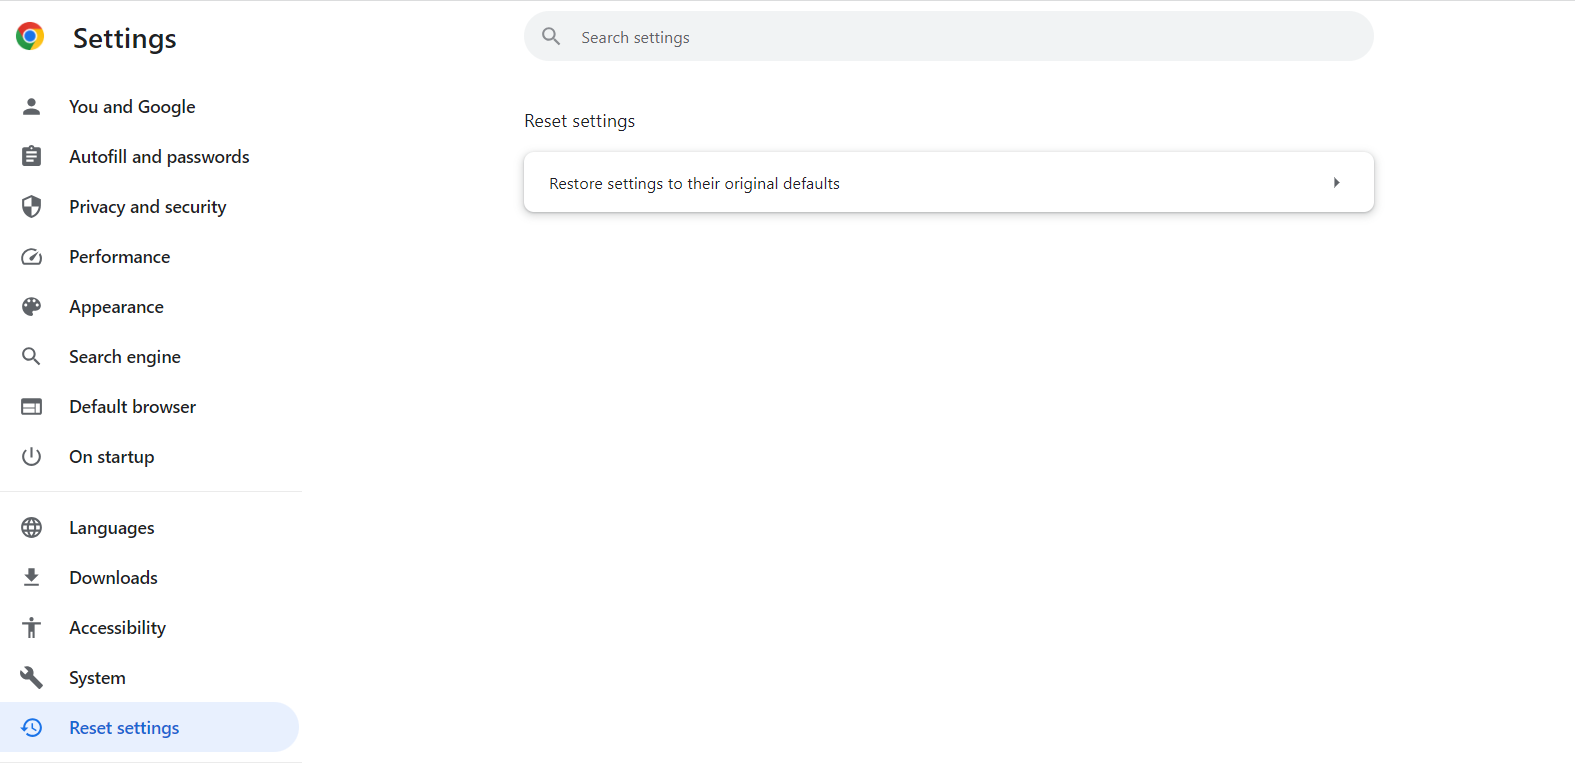
- Click the Menu icon on your browser, then select Settings.
- Click on Reset settings and select Restore settings to their original defaults.
- Click Reset settings. Confirm the change by clicking the Reset button.
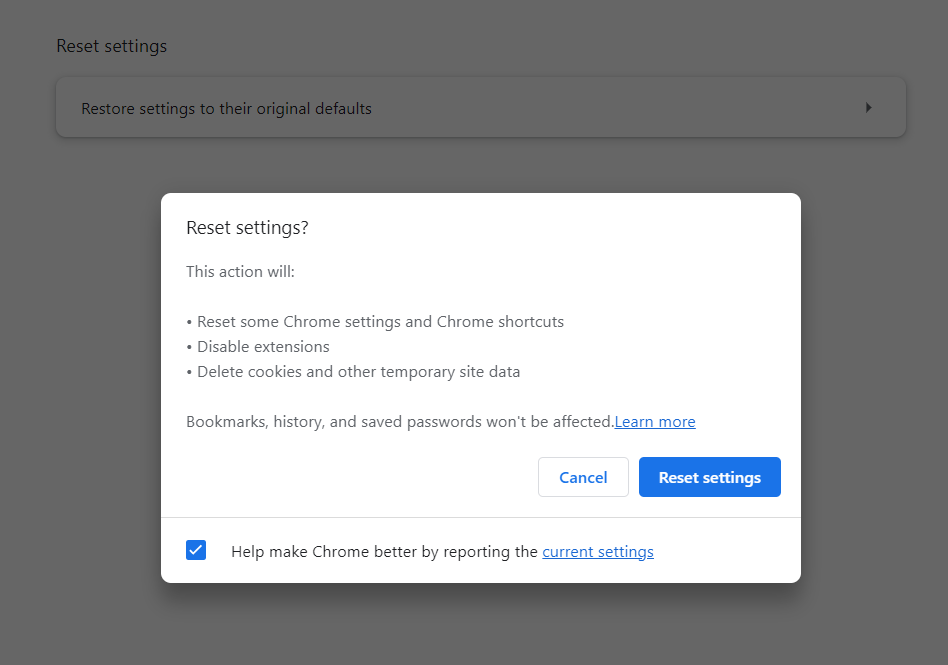
Within a few seconds, Chrome will go back to its default settings. Restart your browser and check if the scaling issue has been resolved.
Related: Ultimate Guide: How to Change Default Browser in Windows 11
Method 6: Turn Off Display Scaling for High DPI Settings
If your Chrome looks pixelated, one way to fix it is to change the high DPI settings.
Learning how to disable display scaling for higher DPI settings is also one of the best solutions to the problem.
Essentially, what you’re going to do is set Chrome to ignore the Windows display settings. To do that, you just have to follow the instructions below:
- Right-click the Google Chrome shortcut on your desktop, then select Properties from the menu.

- Click on the Compatibility tab and select Change high DPI settings.
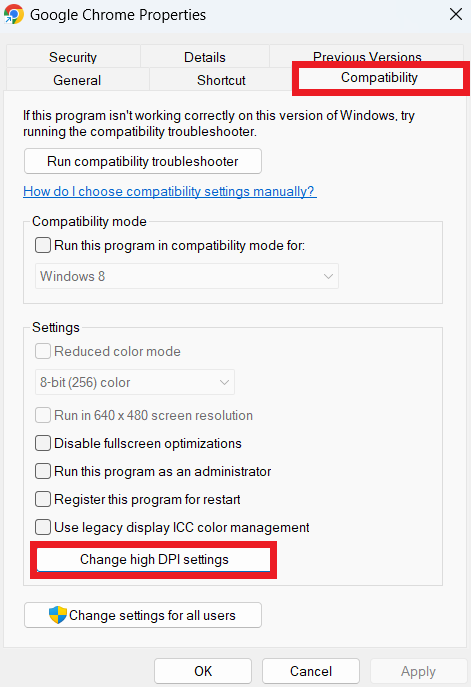
- Enable Use this setting to fix scaling problems for this program and click OK.
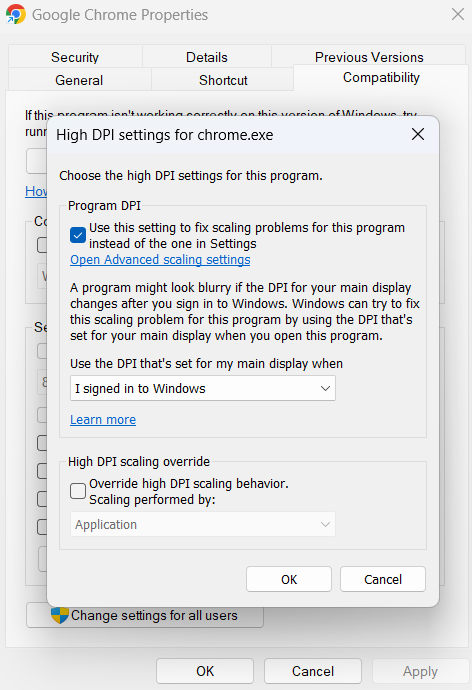
- Restart Google Chrome and check if the resolution issue on Windows 10 has been resolved.
Windows 10/11 (8, 7, Vista, XP)
Conclusion
If you want to fix Chrome resolution issues on Windows 10, go through this guide. We’ve outlined several ways to resolve resolution issues in Chrome.
We’ve discussed how to zoom out on Google Chrome and set the zoom to its default. We’ve also covered how to solve the problem if Chrome looks pixelated.
Go through this guide and choose the method that works for you.
FAQ
There are several reasons why your text appears blurry. First, make sure the screen resolution is adjusted to the recommended value by checking your display settings. Text on web pages may appear less sharp when zoomed in.
If the zoom level is too high, set it to 100%. Another reason for blurry text is changing the default font settings. Reset the font settings to their default levels to resolve this.
Although not required, routinely deleting browser data can improve its functionality and protect your privacy.
Clearing data like cookies and cache can increase website loading times and free up storage space. It can also stop websites from monitoring your internet activity.
Depending on your browsing activities and desired level of privacy, it’s a good idea to delete your browser’s cache every few weeks or months. You don’t have to do this every time.
Click the three vertical dots in the top right corner to access the menu. Then, select “Settings.” Navigate to the “Appearance” area by scrolling down the Settings menu. One of the options there is “Font size.”
Click on the font size you want to change. You can choose between “Very small” and “Very large,” depending on your preferences. As soon as you make the changes, your content will become more comfortable to read.
It’s simple to zoom in on online sites using the keyboard. Press Ctrl and the plus key (+) simultaneously to zoom in. This will enlarge and make it easier to read the material on the page.
Press Ctrl and the minus key (-) to zoom out. Additionally, you can press Ctrl and 0 (zero) to return the zoom level to its default setting of 100%.
By doing this, you’ll turn off any zoom you may have applied by returning the zoom level to its original setting.