
- Why Do I Get the Black Screen with a Cursor Error in Windows 7/10/11?
- Solution 1: Disconnecting all external devices
- Solution 2: Using the last known good configuration feature
- Solution 3: Updating your drivers
- Solution 4: Performing a system restore
- Solution 5: Running an SFC Scan
- Solution 6: Getting rid of malware
- Solution 7: How to fix Windows 11 black screen with Cursor issue by uninstalling updates
- Solution 8: Run the CHKDSK tool
- Solution 9: Rescue your files and perform a clean install
- Solution 10: Perform a clean installation
- Conclusion
One of the issues that many users face is the black screen with cursor problems. It happens on Windows 10 and 11.
However, some users stuck with Windows 7 complained that it also happened to them.
With Windows 11 already in full swing and support for Windows 10 still ongoing, it would make sense to upgrade.
That said, Windows 7 is still usable, and you’ll likely encounter errors from time to time, as in Windows 10 and 11.
So, what if a Windows 7 computer boots to a black screen with a cursor?
It can be frustrating to encounter a problem like this. Thankfully, this is a common issue with operating systems such as Windows 10 and 11, and it can be fixed easily.
In this post, we will teach you how to fix the black screen with a cursor error in Windows 10, 11, and 7.
Why Do I Get the Black Screen with a Cursor Error in Windows 7/10/11?
There are different reasons why this issue shows up. For instance, if there are issues with the graphics card, then Windows gets to a black screen with a cursor and gets stuck there.
It is also possible for this error to appear when there are hardware conflicts in a PC.
Other possible causes include faulty system files, problematic updates, and disk issues.
Whatever the cause of the issue may be, we will help you resolve it with the solutions below.
Solution 1: Disconnecting all external devices
If hardware conflicts are causing the black screen with a cursor problem on your computer, you should try removing the external devices. Doing so will help you identify the piece of hardware causing the issue.
Simply follow the steps below:
- Switch off your PC.
- Remove all the external devices, including your headset, USB drive, and microphone.
- Remove the charger cable and battery if you are using a laptop.
- For about 30 seconds, press and hold the power button. You will notice your computer booting up and turning off during this period.
- If you are using a laptop, put the battery and plug the charger back.
- Now, switch on your computer as you normally would.
If your PC boots without any issue, you can try attaching your external devices individually. After putting back an external device, restart your computer.
If the black screen with a cursor appears again, you know which piece of hardware is causing the problem. In this case, it is best that you replace that item.
Solution 2: Using the last known good configuration feature
When your computer starts to experience serious problems, you can boot into Windows using the Last Known Good Configuration. This will let you load a properly functioning version of your operating system.
This feature is available in Windows 7 and has been replaced in Windows 10 and 11 by Safe Mode, especially if you’re going through the Advanced Startup environment.
If you’re ready to proceed, follow these instructions:
- Turn off your computer, then turn it back on by pressing the power button.
- Once you see the Windows logo screen, press the
F8key on your keyboard. Doing so will bring up the Advanced Boot Options menu. - Once you’re inside the Advanced Boot Options menu, use the arrow keys on your keyboard to choose the Last Known Good Configuration.
- After making the selection, hit
Enter. After a minute or less, Windows 7 will restart.
Solution 3: Updating your drivers
One reason your Windows PC’s black screen gets stuck is that your computer may have missing or outdated device drivers.
So, we recommend updating your device drivers to their latest versions. If you cannot boot into Windows, try starting your PC via the Safe Mode with Network feature.
You can manually update your drivers by visiting the manufacturer’s website. You need to find the versions of the drivers that are compatible with your processor type and operating system.
Be cautious when installing drivers because adding the wrong version may cause system instability issues on your computer.
As you can see, manually updating your drivers can be risky. Moreover, it can consume a lot of your time.
Related: How to Check if My Drivers Are Up to Date on Windows 10 PC?
If you prefer an easier yet more reliable option, we suggest using Auslogics Driver Updater. With this tool, you can update all your drivers in one go.
Once you install it, it will recognize your processor type and operating system version automatically. You only need to click a button, and Auslogics Driver Updater will do the rest.
Learn more: Auslogics Driver Updater: Update Your Drivers in One Click!
Solution 4: Performing a system restore
You can also roll back your computer to a previous state where the issue did not exist.
To do that, you need to use the System Restore feature. Do not worry about losing your personal files and data because this method will only affect system files.
It is also worth noting that Windows creates restore points automatically. So, you can still perform a System Restore even if you do not consciously save restore points.
To begin, follow the instructions below if you run Windows 7:
Boot your PC into Safe Mode in Windows 7.
Here’s how to enter Safe Mode:
- Press and hold your power button down to turn off your system.
- After your computer powers down, turn it back on.
- Once you see your system’s manufacturer’s logo, hit the
F8key repeatedly. - Now, choose a Safe Mode option. If you want to use the Internet, choose Safe Mode with Networking.
- Go to the lower-left corner of your screen, then click the Start button.
- Type
recovery, then select Recovery from the results. - Launch the System Restore wizard by clicking Open System Restore.
- Follow the instructions on the wizard to bring your system back to an earlier restore point.
Once the process is complete, restart your PC to see if the problem is gone.
Boot into the Advanced Startup on Windows 10 and 11
If you’re on Windows 10 or Windows 11, you can boot your system into the Advanced Startup menu instead and use the System Restore utility. You can also boot into Safe Mode and run the System Restore utility.
Follow these steps to enter the Advanced Startup environment:
- Since your computer only shows a black screen, press and hold your power button to shut it down.
- Once your system displays the Windows logo, press and hold the power button again to interrupt the boot process and shut down the system.
- Repeat step two twice until you see the Please wait or Preparing automatic repair message. You could also see a message saying, Diagnosing your PC.
- When you see the Automatic Repair screen, click on the Advanced Options button.
- You’ll now see the Choose an option interface.
- Click on Troubleshoot.
- Select Advanced options.
- Now, click on System Restore.
- Windows will now restart your computer and boot up to the System Restore utility. You may be prompted to choose your account and provide your password.
- Click on the Next button once you see the restore wizard.
- Choose a restore date and click on the Next button. Make sure you choose a point before you started seeing the black screen.
- Once you get to the Confirm your restore point page, you can click on the Scan for affected programs link under the Drives box to check which apps will be uninstalled or rolled back.
- Click on the Finish button to start the restore process.
- After the restore point, Windows will remove the apps and settings that were introduced to your system.
If the above method doesn’t work for any reason, you can boot your system in Safe Mode and use the System Restore option.
Boot in Safe Mode in Windows 10 and 11
Follow these steps to open Safe Mode in Windows 10 and Windows 11:
- Go to the Choose an Option page and select Troubleshoot > Advanced options > Startup settings.
- Once the Startup Settings page opens, click on Restart.
- Your computer will reboot to the Startup Settings page, where you can choose the Safe Mode option by pressing the
F4or4keyboard button. You can also select5orF5to boot to Safe Mode and use the Internet. - Once your computer boots Safe Mode, open the Start menu and search for
Recovery. - Once the Recovery window opens, click on Open System Restore.
- Click on Next after System Restore opens.
- Choose a restore date and click on the Next button. Make sure you choose a point before you start seeing the black screen.
- Click on the Finish button to start the restore process.
- After the restore point, Windows will remove the apps and settings introduced to your system.
Also Read: [FIXED] System Restore Not Working in Windows 10
Solution 5: Running an SFC Scan
When Windows gets stuck at a black screen with a cursor, it is likely caused by corrupted system files on your computer.
One of the best ways to fix this is to use System File Checker (SFC). This tool looks for corrupt system files and repairs them accordingly.
To begin, follow the steps below:
- Boot your PC via Safe Mode.
- Click the search box, then type
cmd. - Right-click Command Prompt, then select Run as Administrator.
- Run the command below:
sfc /scannow
- Wait for the SFC scan process to complete.
- Exit the Command Prompt by typing
exit. PressEnteron your keyboard to execute the command. - Restart your PC as you normally would.
Sometimes, the SFC command may not work because the system files required for the repair to run successfully may be corrupt or missing.
In such a situation, you’ll have to use the deployment image servicing and management (DISM) tool.
It’s a built-in command-line application to service Windows images and system files. You can use it to fix or provide the files the SFC tool needs.
When you run the tool, it uses the Windows Update client to provide the repair files for the SFC utility.
That said, you may need bootable media or Windows installation DVD to act as the source of the repair files if Windows Update isn’t available or is malfunctioning.
First, let’s show you how to create a bootable USB drive for Windows 10 and 11.
The things you’ll need to create the drive include:
- A different working Windows 10 or 11 computer
- A USB flash drive with at least 8 GB of free storage space
- A working Internet connection
Now, follow these steps:
- Go to Microsoft’s download center for Windows 11 or the download page for Windows 10 on the working PC’s browser.
- Go to the Create Windows 11 (or Windows 10) Installation Media section and click on the Download Now button.

- After the file is saved to the PC, run it.
- Click on the Yes button in the UAC prompt.
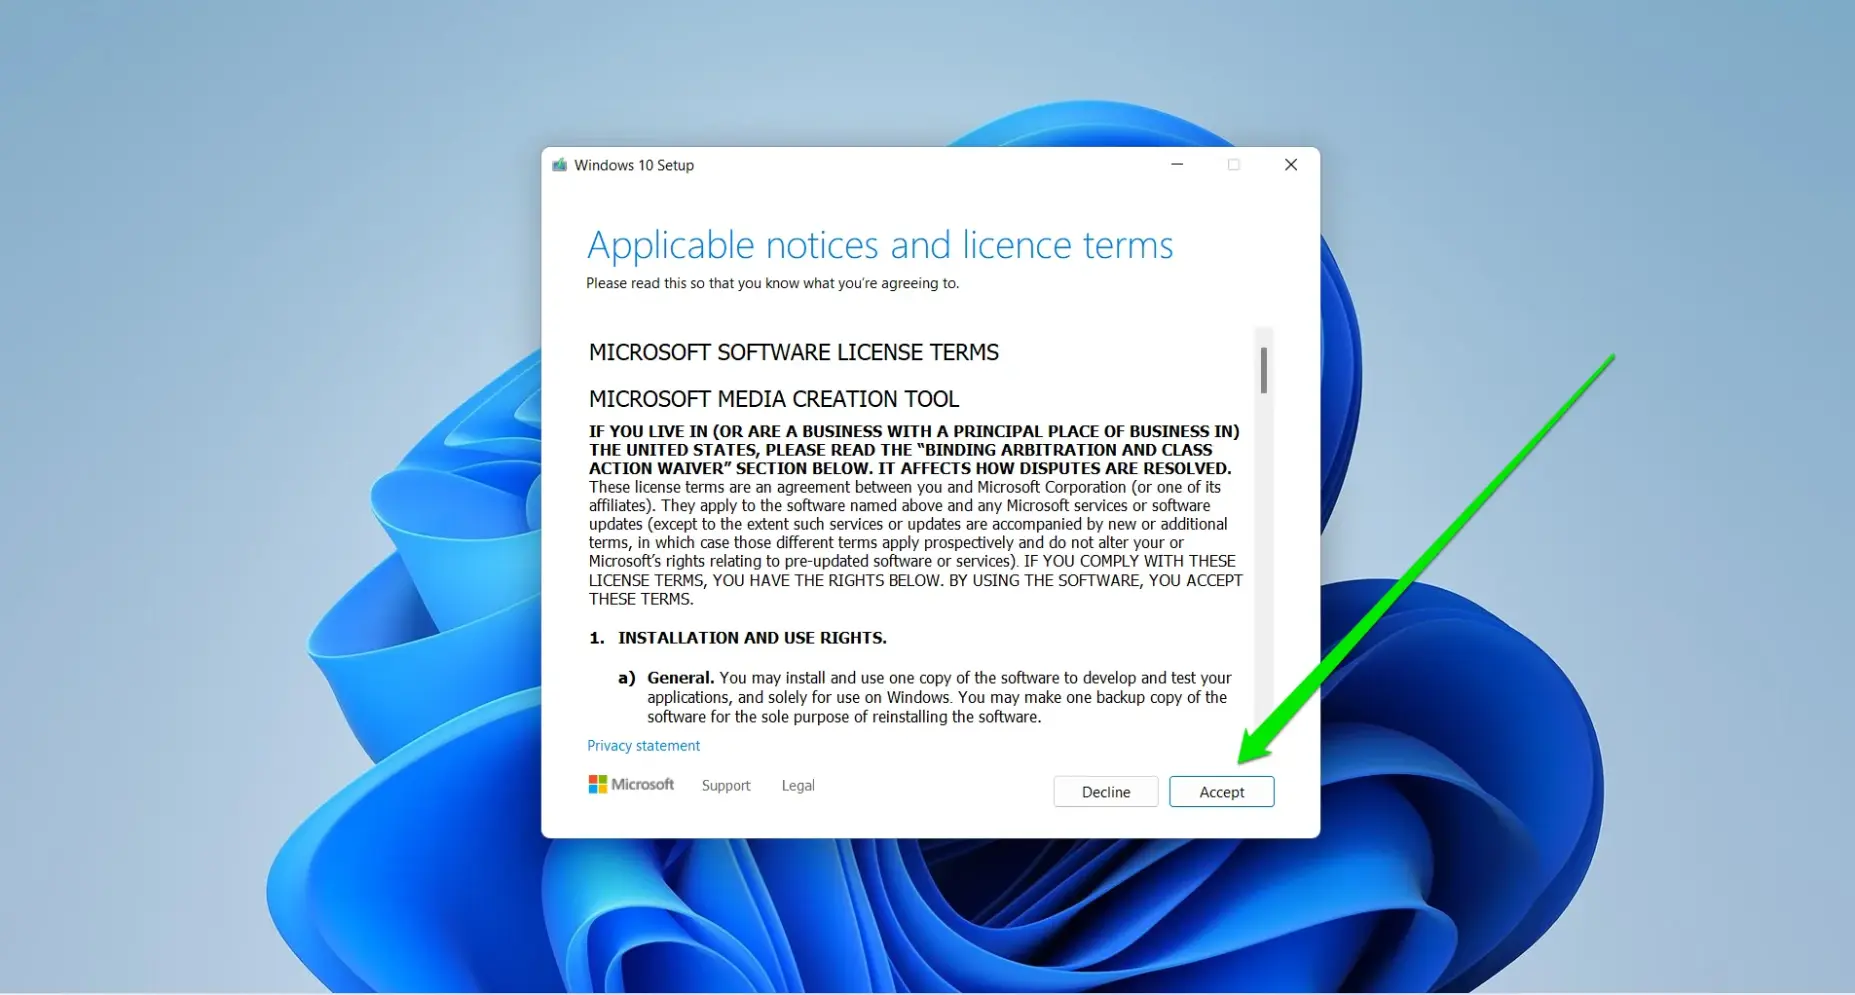
- Accept the notices and license terms once the Windows 10/11 Setup wizard appears.
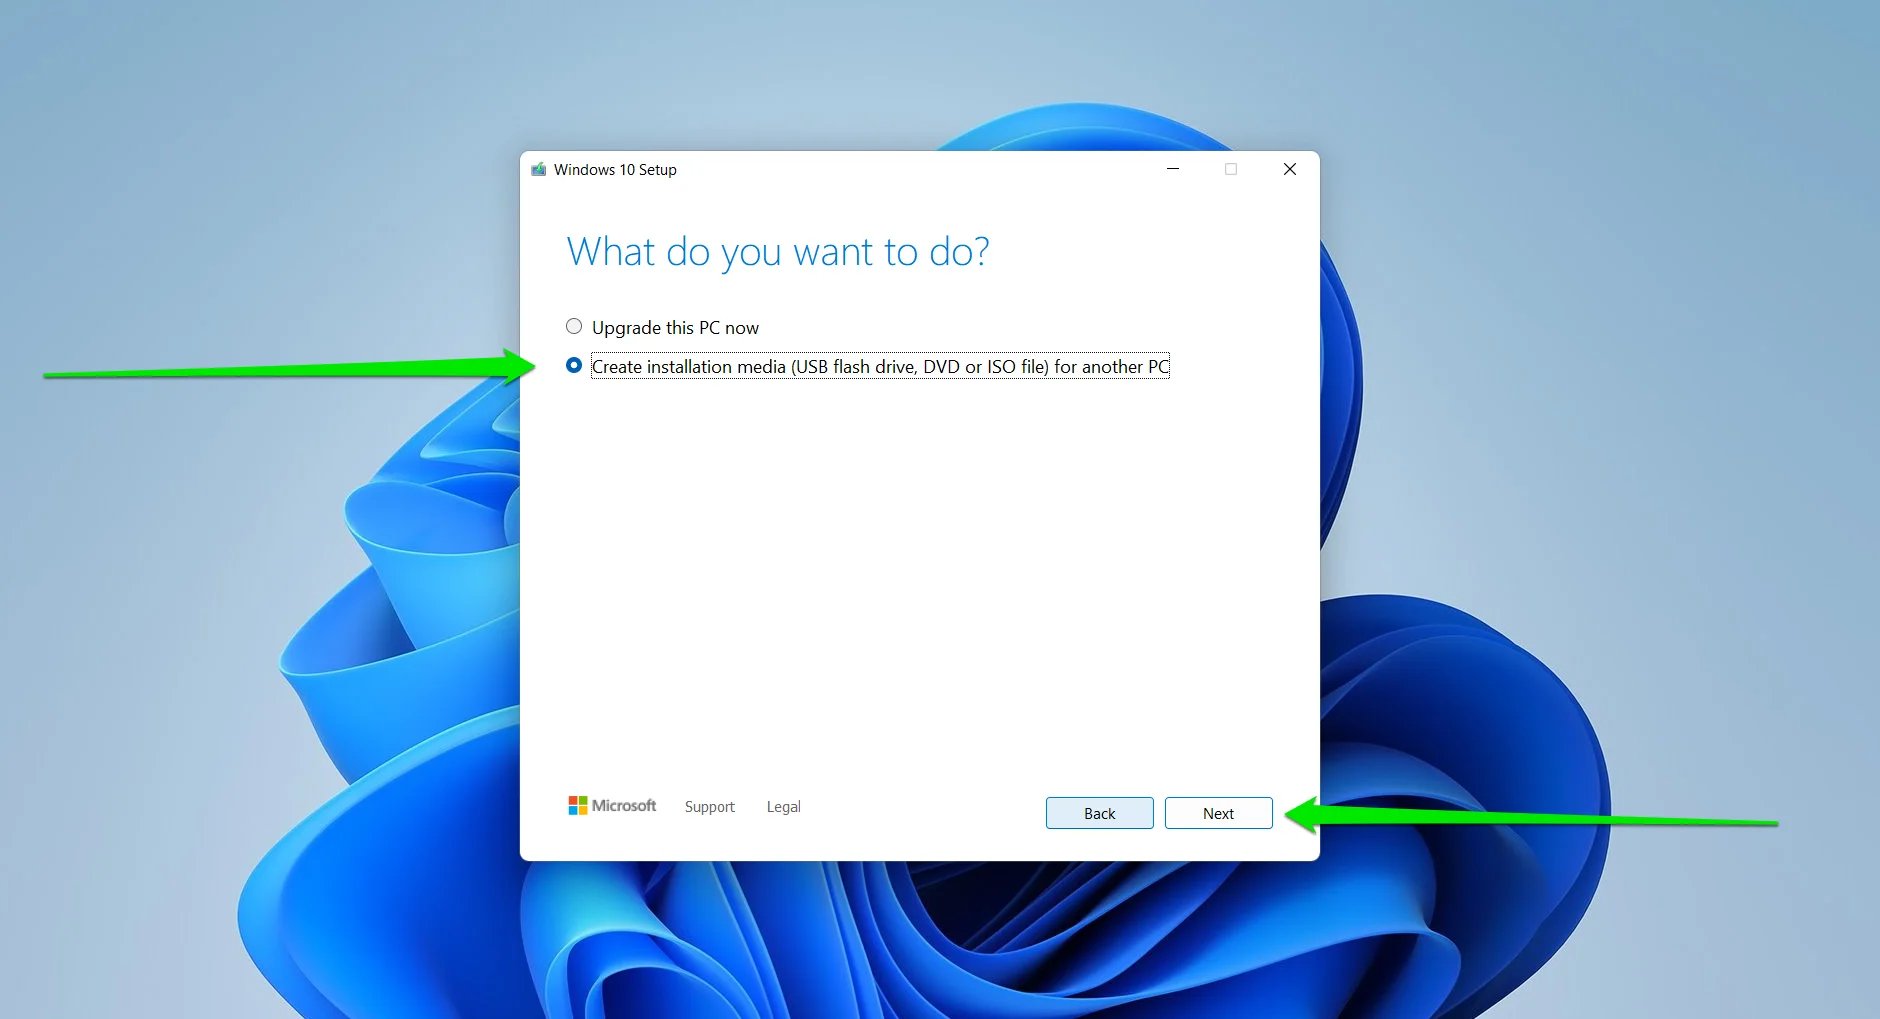
- Choose the Create installation media for another PC option and click on the next button.
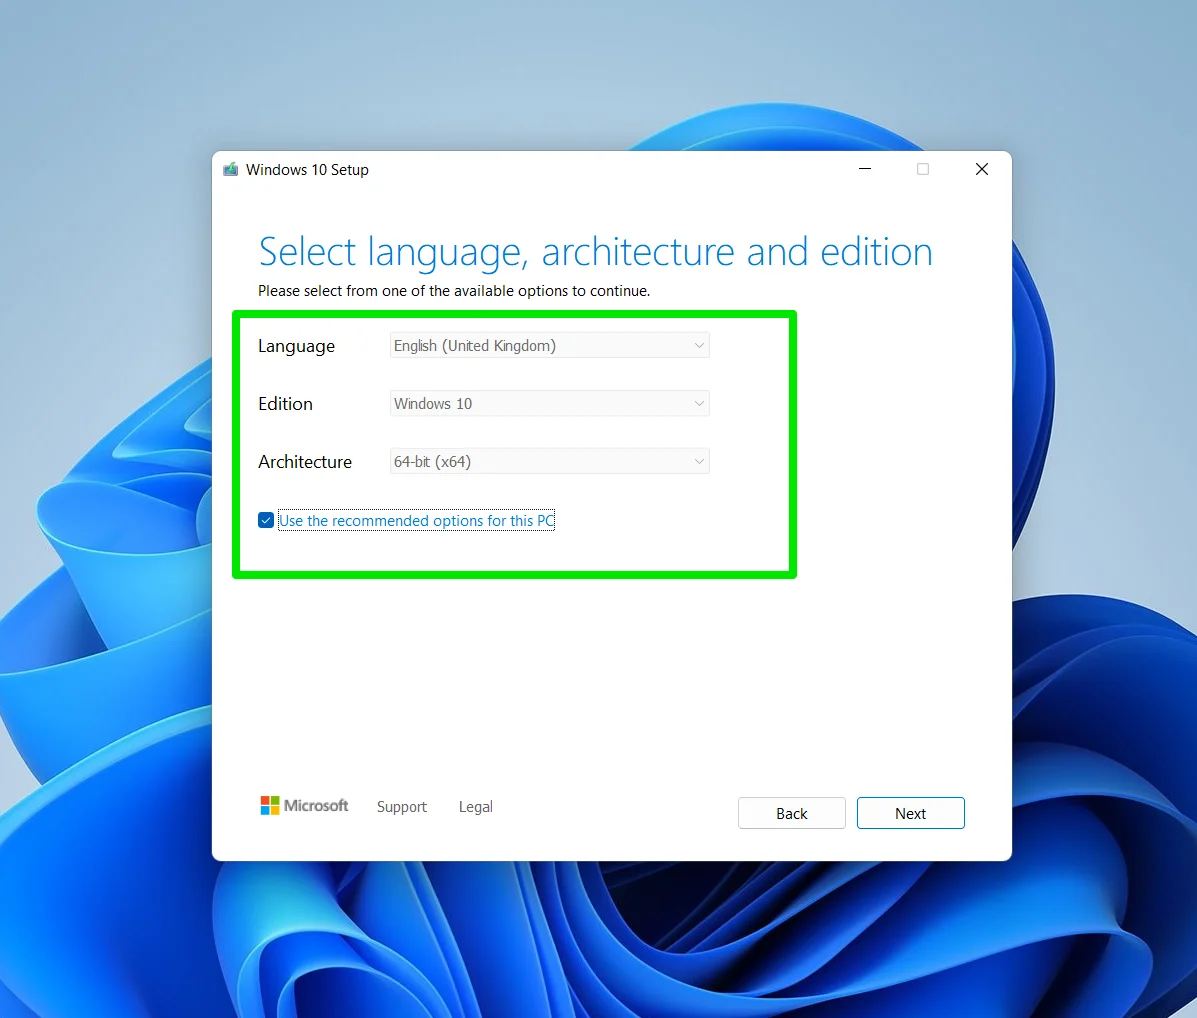
- Choose the language, edition, and Architecture of the PC you want to repair. Uncheck the box beside Use the recommended options for this PC if it doesn’t have the same configurations as the one you want to fix.
- Click on the Next button.
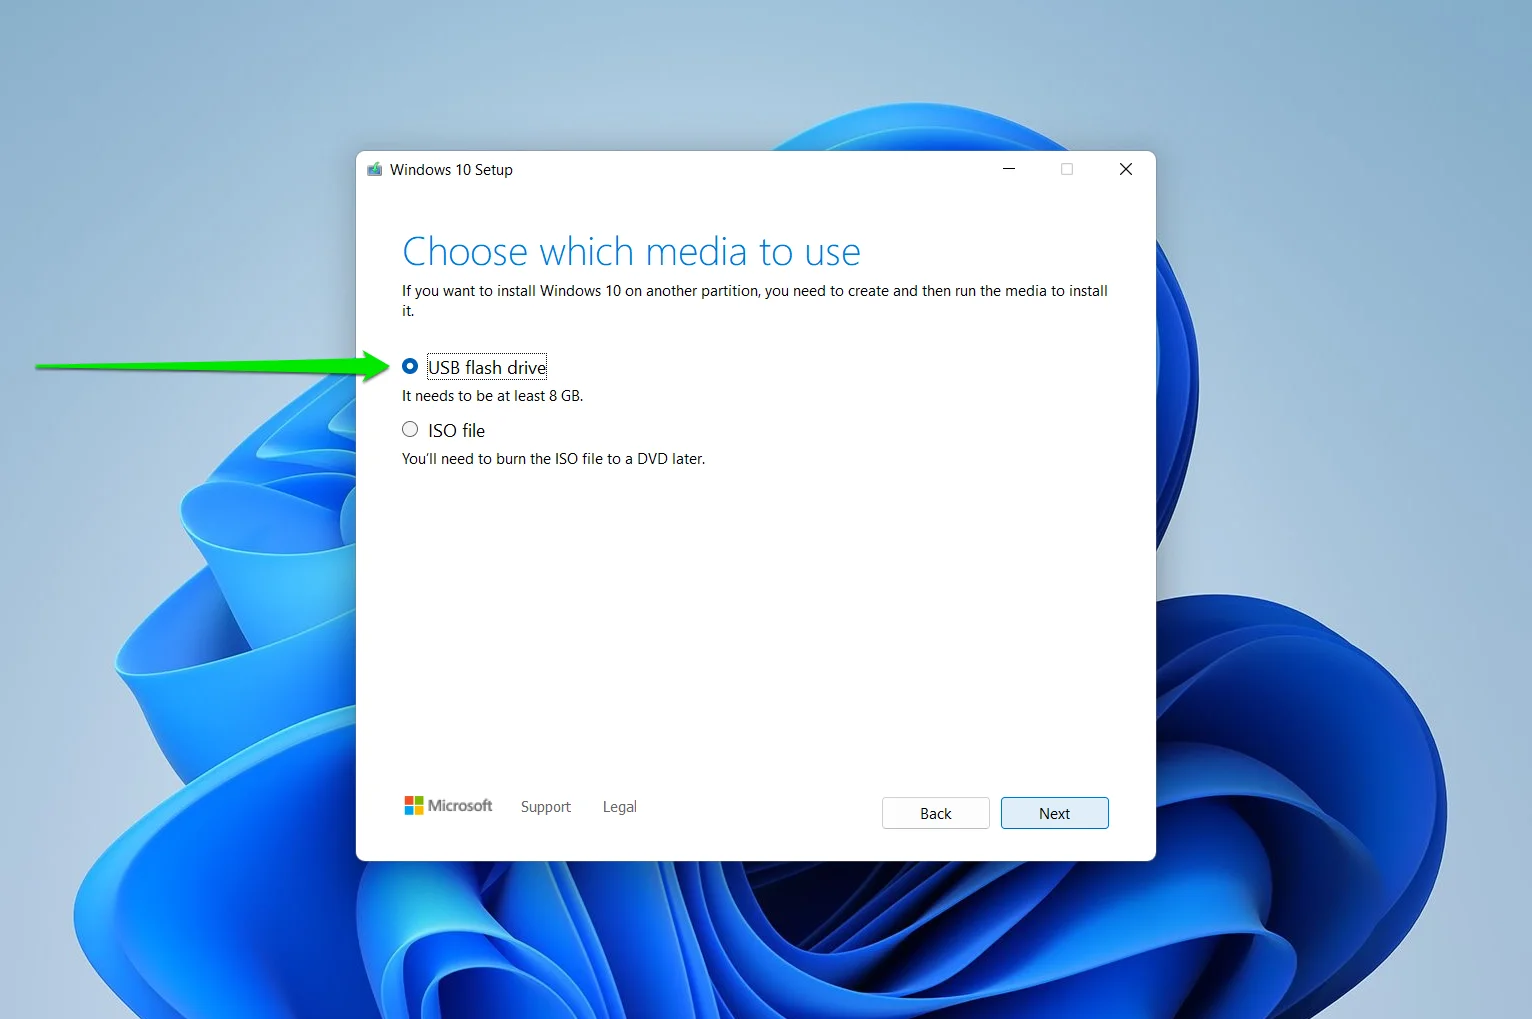
- Choose the USB Flash Drive option when you see the Choose which media to use page and insert the drive. Choosing the ISO file option means you’ll download the ISO file to the computer and download it later.
- Now, click the Next button and select the USB device, then click Next and Finish to start the process.
You’ll see a message that says, “Your USB flash drive is ready” once the process is complete.
Now, insert the drive into the PC you want to repair, then open the Command Prompt in admin mode and enter the following command to run the DISM tool:
DISM.exe /Online /Cleanup-Image /RestoreHealth /Source:C:\Source\Windows /LimitAccess
Make sure you replace the C:\Source\Windows part of the command with the path to the Windows folder in the drive.
After that, run the SFC command and allow Windows to repair the system files.
That’s how to fix Windows 10 black screen with cursor issue. Those steps also work for Windows 11.
Solution 6: Getting rid of malware
Another possible reason your computer cannot start normally is malware infection. So, we recommend using Auslogics Anti-Malware to run a full system scan.
You can run the scan for the malware if you can get Windows to start after rebooting it several times. If the operating system doesn’t boot up, move on to the next fix.
Related: Auslogics Anti-Malware: Features and Reviews
Solution 7: How to fix Windows 11 black screen with Cursor issue by uninstalling updates
Some Windows Updates may come with bugs or may not be compatible with your PC. Any of those scenarios could possibly cause the black screen error.
You can uninstall Windows updates through the Advanced Startup page if you’re running a Windows 10 or 11 PC.
The process is simple:
- Get to the Choose an Options page of the Advanced Startup environment by forcing a restart multiple times.
- Go to Troubleshoot > Advanced options.
- Once the Advanced options screen appears, click on Uninstall updates.
- Choose the most recent update installed and allow Windows to remove it.
Related: Ultimate Guide: How to Manually Check and Install Windows Updates
Solution 8: Run the CHKDSK tool
If uninstalling updates don’t fix the problem, then you can try running the CHKDSK utility to scan for unhealthy sectors on your hard drive and fix them.
Here are the steps you should take.
- Get to the Choose an Option menu and select Troubleshoot > Advanced option.
- Click on Command Prompt once the Advanced options page appears.
- Your computer will now reboot to the Command Prompt screen.
- Now, you need to confirm the drive letter of the disk where Windows is installed. To do that, type
BCDEDITand hitEnter. Now, note the letter assigned to the drive. - After that, enter the following command and press the
Enterkey:
chkdsk X: /f /r
Solution 9: Rescue your files and perform a clean install
If nothing works, you’d have to reinstall Windows. You can start by using the Reset this PC option on the Troubleshoot page of the Advanced Startup environment, then tell Windows to keep your files.
That said, it’s recommended that you attempt to rescue your files before attempting the reset.
That’s because anything could happen. You may be left with the option to reinstall Windows by cleaning up your hard drive and getting rid of your files.
So, here’s a neat trick on how to copy personal files to an external drive:
- Get to the Choose an Option menu and select Troubleshoot > Advanced option.
- Click on Command Prompt once the Advanced options page appears.
- Your computer will now reboot to the Command Prompt screen.
- Insert your external drive.
- Now, type
notepad.exeand hit theEnterkey. - After Notepad opens, click on File, then select Open.
- Once the file browser shows up, go to where your personal files are stored and transfer them to the external drive.
You can also use the xcopy command if the notepad mini explorer doesn’t work.
Type the following and press Enter:
xcopy C:\users /h D:\
The above command will copy all the files in the user directory of the C drive (including hidden files) into the D drive.
So, replace the C:\users part of the command with the path to your personal files and D:\ with the drive letter of your external drive.
You can now reset your PC.
Related: CMD Navigation: How to Change Directory in CMD (Command Prompt)
Solution 10: Perform a clean installation
If your PC refuses to reset because your system files are damaged, you can use the installation media you created to reinstall Windows.
Here’s how:
- Insert the USB flash drive or DVD and restart your PC.
- Once your computer turns on, hit the button that takes you to the BIOS or UEFI. You can refer to your OEM’s website to find out which key to press and how to boot into your BIOS.
- You can also head to the Advanced Startup page and go to Troubleshoot > Advanced options > UEFI Firmware Settings.
- Once you get to the BIOS, go to your boot options and make the USB drive your first boot device. You can check your PC manufacturer’s website to find out how to change your boot order.
- Restart your computer.
- Once your PC starts, Windows will load its files from the USB drive and the setup environment will appear.
- Choose your language, time, and keyboard method, then click Next.
- Click Install Now.
- Windows may ask for your product key. Enter it and click Next.
- Choose your Windows edition on the screen that follows and select Next.
- Accept the license term and click Next.
- You can now choose the custom or upgrade option, which allows you to keep files and apps. The upgrade option will likely not work, so it’s recommended that you choose the custom option.
- Now, choose where to install Windows.
- You can create a new partition and format it to preserve your files. If nothing works, consider formatting the entire drive. You should avoid formatting or deleting the recovery drive if you have one.
- Click on Next after choosing a drive.
- Allow Windows to complete the installation, then follow the setup prompts that come up later.
Conclusion
That’s how to fix the Windows 11 Black Screen with mouse cursor problem. The fixes above also show how to resolve the problem in Windows 10 and Windows 7.
If you have a recovery drive, you can visit your computer’s manufacturer’s support page to learn how to use it to restore your PC to factory settings. However, this option will erase all your files.
What other Windows issues would you like us to fix?
Join the discussion below and ask your questions!