![[SOLVED] “This Device Doesn’t Support Receiving Miracast”](https://www.auslogics.com/en/articles/wp-content/uploads/2023/03/SOLVEDThis-Device-Doesnt-Support-Receiving-Miracast-568x359.png)
- How Does Miracast Work?
- What Devices Support Miracast?
- Why Do You See the “This Device Doesn’t Support Receiving Miracast” Error?
- How to Resolve the “This Device Doesn’t Support Miracast” Error
- Solution 1: Check if your computer supports Miracast
- Solution 2: Make sure that Wi-Fi is enabled on both devices
- Solution 3: Verify that the device has wireless display functionality
- Solution 4: Disable third-party VPN solutions
- Solution 5: Update or reinstall the wireless network adapter driver
- Solution 6: Tweak wireless mode parameters
- Extra Tips to Resolve “Device Doesn’t Support Miracast”
- This Device Doesn’t Support Miracast: Solved
- FAQ
The error message “This device doesn’t support Miracast ” can feel like a brick wall when you want to mirror your screen wirelessly. Whether you’re on Windows 10 or Windows 11, this issue often comes down to compatibility or configuration problems—usually with your hardware, drivers, or settings.
Don’t worry—this guide walks you through the reasons behind the error and offers proven fixes tailored for both Windows 10 and Windows 11 users.
Error meaning: Your PC or display either lacks Miracast support or has it disabled, outdated, or blocked by drivers, settings, or third-party software.
Quick fixes that work on Windows 10 & 11:
🧰 Use DxDiag and PowerShell commands to check support.
📶 Ensure Wi-Fi is enabled on both devices, even if using Ethernet.
🧩 Install the Wireless Display feature from Windows optional features.
🛡️ Disable interfering VPNs and firewalls temporarily.
🖥️ Update your graphics card and Wi-Fi drivers from manufacturer sites.
📡 Adjust wireless mode to Dual Band 802.11 a/b/g in Device Manager.
🧠 Enable integrated graphics (iGPU) in the BIOS if the dedicated GPU lacks Miracast support.
💡 Still not working? Try a Miracast adapter like the Microsoft Wireless Display Adapter—great for adding wireless display support to TVs and older PCs.
How Does Miracast Work?
Miracast works like a wireless HDMI cable.
Unlike Chromecast or AirPlay, which stream through the cloud, Miracast connects devices directly using Wi-Fi Direct—a peer-to-peer connection that works even without a shared Wi-Fi network.
To simplify setup, Miracast may use WPS (Wi-Fi Protected Setup), allowing quick pairing without passwords. Once connected, it secures your content using WPA2 encryption (AES-128), so your mirrored data stays private and protected.
WPA2: A security protocol that encrypts your Wi-Fi network and protects data.
WPS: A setup shortcut that makes it easier to connect devices to a WPA2 network—often via a button or PIN.
⚠️ WPS is convenient but can pose security risks if left enabled on open networks.
What Devices Support Miracast?
After its introduction in 2012, Miracast has gained a huge following, including tech companies. Numerous devices support Miracast, and more are being certified daily. Windows 10 and 11 support it natively, and many Android phones running Android 4.2+ include it—though some brands use different names like Samsung Smart View or Huawei Cast.
Smart TVs from LG, Sony, Philips, and others often come with built-in Miracast support. If not, you can add it with an external dongle like the Microsoft Wireless Display Adapter or ScreenBeam.
Here’s a quick Miracast compatibility table that can give you a general idea of whether your device supports Miracast by default.
| Device | Miracast compatible | Notes |
|---|---|---|
| Windows 10/11 PCs (laptops and desktops) | ✅ Depends | Most Windows 10/11 laptops support Miracast, provided they have a compatible Wi-Fi adapter and graphics driver. However, desktop PCs often lack built-in Wi-Fi. If they’re connected via Ethernet only and don’t have a Wi-Fi adapter that supports Wi-Fi Direct, Miracast won’t work without adding compatible wireless hardware. |
| Intel Gen 6 CPUs (Skylake) and newer | ✅ Yes (sender) | Works with Intel HD Graphics 520+ and a compatible Wi-Fi adapter that supports Wi-Fi Direct. |
| Intel HD Graphics 3000 and older | ❌No | Older Intel GPUs (like HD 3000 or earlier) do not support Miracast, even with a compatible Wi-Fi adapter. |
| AMD Radeon RX 400 series and newer | ✅ Yes (sender) | Can send Miracast signals when paired with a compatible Wi-Fi adapter and up-to-date drivers. |
| NVIDIA GeForce GTX 10 series and newer | ✅ Yes (sender) | Requires latest drivers + compatible Wi-Fi. |
| Wi-Fi adapters (Intel Dual Band Wireless AC 7260 and newer) | ✅ Yes (both) | Must support Wi-Fi Direct, essential for establishing Miracast connections. |
| Broadcom 802.11n adapters (older models) | ❌ No | Typically lack Wi-Fi Direct support, which is required for Miracast. |
| Microsoft Surface devices (Pro 3 and newer) | ✅ Yes (both) | Fully supports Miracast out of the box—can both send and receive screen mirroring. |
| Android phones (Android 4.2 and newer) | ✅ Yes (varies by brand) | Native support from Android 4.2, but some manufacturers disable or replace it with branded features. |
| Samsung Galaxy (S6 and newer) | ✅ Yes | Use Smart View to mirror the screen via Miracast. |
| Huawei devices | ✅ Yes | Look for Wireless Projection or Cast in settings. |
| Google Pixel phones | ❌ No | Google removed native Miracast support—Pixel uses Chromecast only. |
| Amazon Fire TV Stick | ✅ Yes | Can receive screen mirroring via Miracast. |
| LG smart TVs | ✅ Yes (most models) | Check for Screen Share in TV input options. |
| Sony Bravia smart TVs | ✅ Yes (most models) | Often listed as Screen Mirroring in settings. |
| Apple devices (iPhone, Mac) | ❌ No | Use AirPlay instead. Miracast is not supported on iOS/macOS. |
| Chromebooks | ❌ No | Google uses Chromecast, not Miracast. |
| Miracast dongles (e.g., Microsoft Wireless Display Adapter) | ✅ Yes | Plug into any HDMI port to add Miracast support to a TV or projector. |
Always double-check your device’s cast settings under Connected Devices or Display to confirm what protocol it uses. If Miracast isn’t available, a Chromecast or Google TV dongle may be your best bet for screen sharing.
📌 Tips
- ✅ Your device must support both Wi-Fi Direct and hardware-accelerated screen mirroring for Miracast to function properly.
- ✅ Make sure you have compatible graphics and wireless drivers installed. Missing or outdated drivers are a common reason Miracast doesn’t work—even on supported hardware.
- ✅ Miracast requires compatibility on both ends. The device sending the content and the one receiving it must both support Miracast for the connection to be successful.
Why Do You See the “This Device Doesn’t Support Receiving Miracast” Error?
There are several reasons why this error might appear—some related to hardware, others to settings or software.
🚫 The device doesn’t support Miracast
You may face the “This device doesn’t support receiving Miracast” error because your device actually doesn’t support Miracast. Not all devices are Miracast-compatible, especially older PCs, entry-level laptops, or newer devices that prioritize Chromecast or AirPlay instead.
So, your first step should be to check if your device actually comes with Miracast support..
🔄 Outdated graphics or network drivers
Even if your device is technically compatible, outdated drivers—especially for your GPU or Wi-Fi card—can break Miracast functionality. Make sure you have the latest graphics and wireless drivers installed from the manufacturer’s site (not just via Windows Update).
📴 Wi-Fi is disabled
Miracast relies on Wi-Fi Direct, so even if you’re not connecting through a router, Wi-Fi must be enabled on both the sending and receiving devices.
📶 The wireless adapter is forced to 5 GHz only
Your wireless adapter may have been changed to the 5 GHz mode, which is why you’re facing this Miracast error. Switching your wireless adapter settings to Auto or enabling support for 2.4 GHz can help re-establish compatibility.
🖥️ Incompatible screen resolution or display configuration
It may also be that Miracast won’t work because the screen resolution you’re using is too low, or if you have multiple displays in an unsupported configuration (e.g., daisy-chained monitors or virtual display drivers).
So, you’ll have to change the resolution to fix the error. Try setting a standard resolution like 1920×1080 and disable any external displays temporarily.
🚫 VPN or third-party network tool interference
Some VPNs, firewall tools, or network optimizers can interfere with Wi-Fi Direct. Disable them temporarily when testing Miracast.
⚙️ Group Policy or registry restrictions (enterprise devices)
On corporate or school-issued devices, Group Policy or registry settings may restrict wireless display features. Check with your IT admin or ensure that Miracast hasn’t been disabled at the system level.
🧩 Missing Windows features or system components
Miracast support requires certain Windows features to be installed. On Windows N editions or systems that have had core components removed, you may need to install the Media Feature Pack or re-enable Wireless Display support via Windows optional features.
How to Resolve the “This Device Doesn’t Support Miracast” Error
If you’ve been experiencing the error message “This device doesn’t support Miracast, so you can’t project to it wirelessly,” below is a list of proven methods to fix it.
Solution 1: Check if your computer supports Miracast
Before trying to use Miracast, you need to make sure your device supports it. Two components are essential for a successful connection: your graphics card and Wi-Fi (network) adapter. So, you need to check if your network adapter and graphics drivers can support the connection.
Follow these steps to do so:
➡️ To test the graphics driver:
- Open the Run dialog by pressing the
Windows logo key + Ron your keyboard. - Type dxdiag in the text box and click OK or press
Enteron your keyboard.
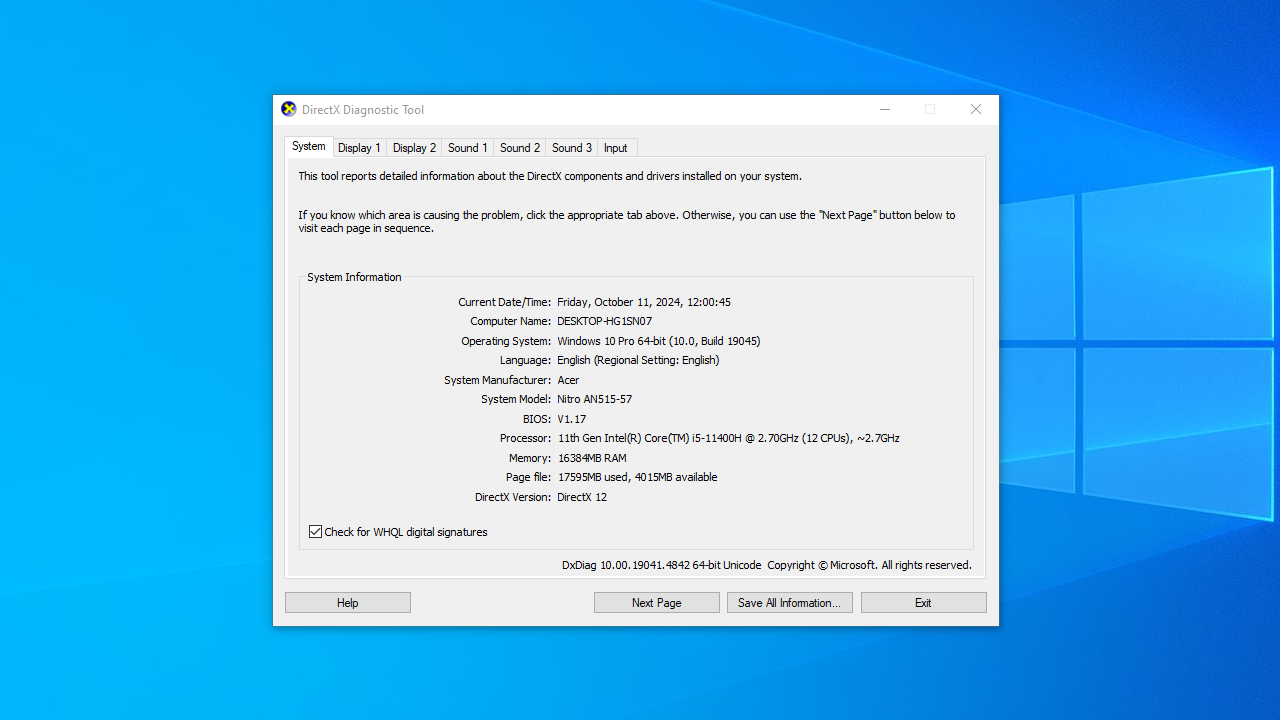
- On the DirectX Diagnostic Tool window, click on the button that says Save All Information.
- Select a folder to save the text file. Click OK.
- Press the
Windows key + Q.
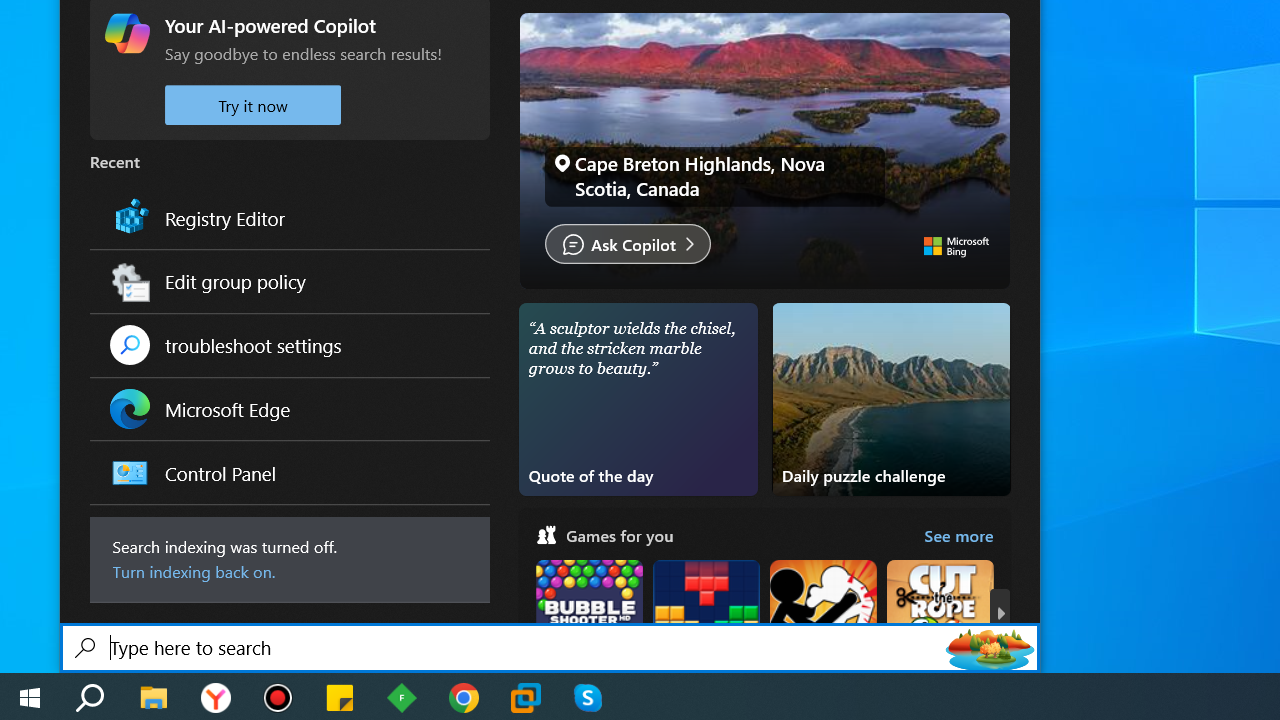
- Search for Notepad in Cortana.

- In Notepad, click on File > Open.
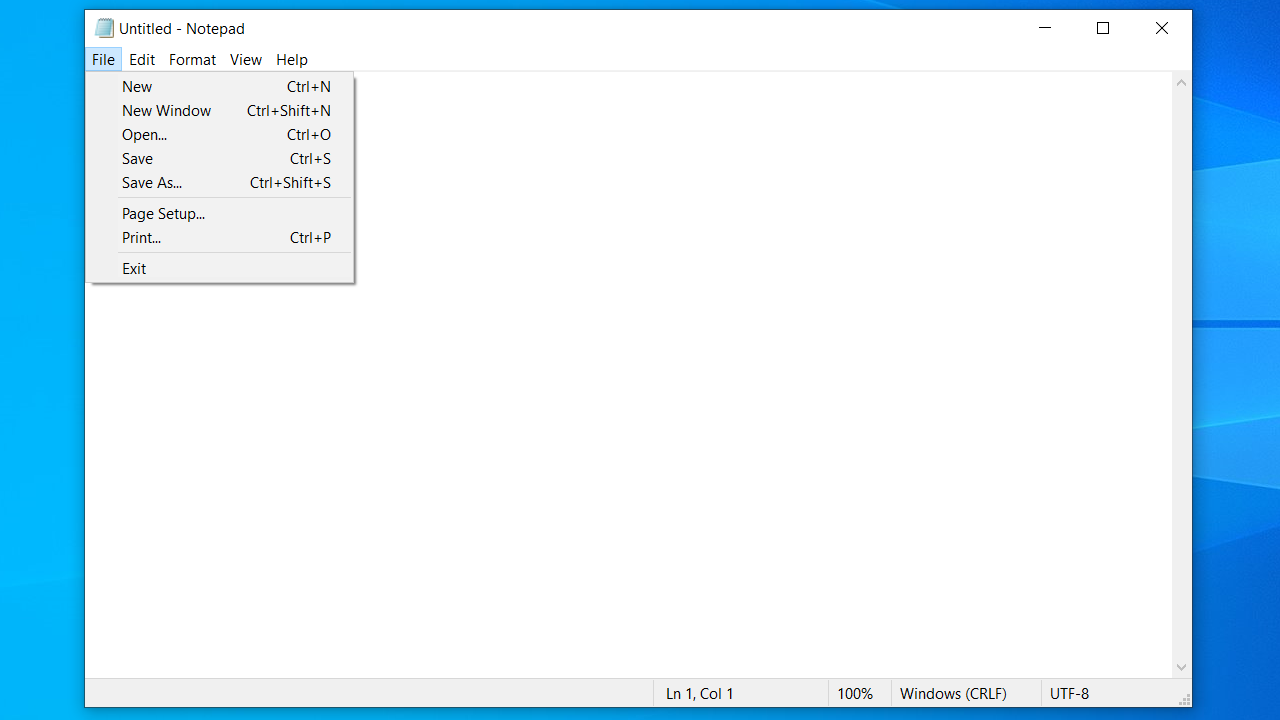
- Open DxDiag.txt to see your system information. If you see the Available, with HDCP message next to Miracast under System Information, the connection is supported on your device.
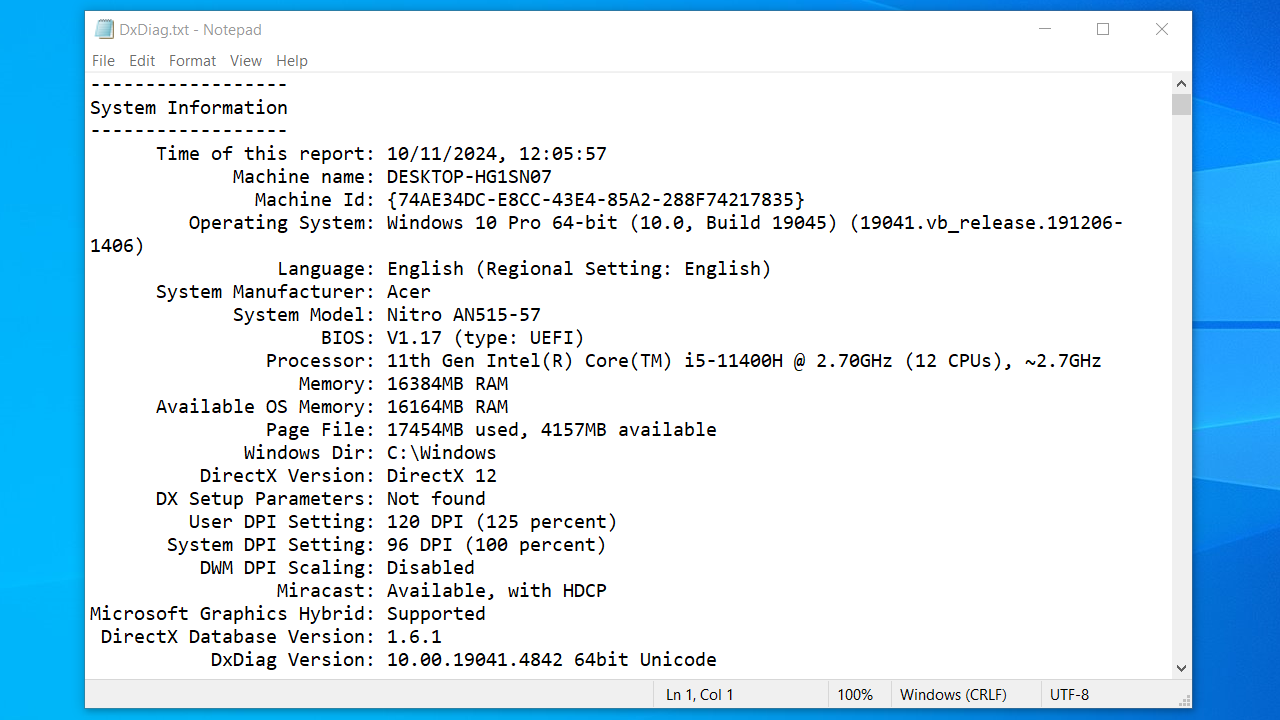
Alternatively, on the DirectX Diagnostic Tool window, click on the Display tab and check your graphics driver model. You’ll find it at the bottom of the Drivers column. If the Driver Model value is equal to or above WDDM 1.3, it means your system supports Miracast.

After you’ve seen that your graphics driver can support Miracast, the next thing to do is check the compatibility of your network adapter.
➡️ To check network adapter compatibility:
- Hit the
Windows key + Xon your keyboard and select Windows PowerShell (Admin).
- Copy the following command in the PowerShell window and press
Enter:
Get-netadapter|select Name, ndisversion
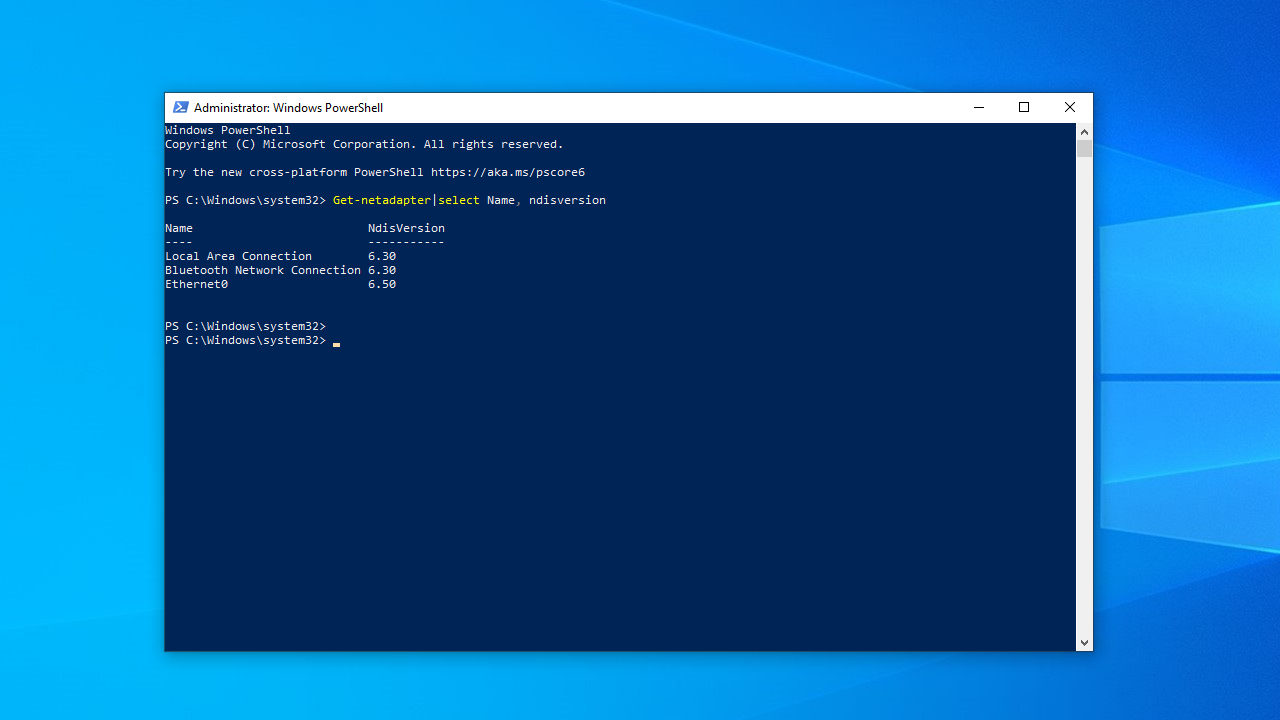
For your PC to support Miracast, NdisVersion should be equal to or above 6.30. If it is under that value, you should try updating your wireless network adapter’s driver.
f your PC does not support Miracast, you will need a wireless display adapter. Microsoft’s Wireless Display Adapter is a good choice for Windows devices.
⚠️ However, there’s a catch.
If your graphics card doesn’t support hardware-accelerated screen mirroring, then even a Miracast dongle won’t help—because your PC won’t be able to send the Miracast signal in the first place.
Miracast requires GPU support from one of the following:
- ✅ Intel HD Graphics 4200 or newer
- ✅ AMD Radeon RX 400 series or newer
- ✅ NVIDIA GeForce GTX 10-series or newer
📌 Also read: Most Useful Powershell Commands: Cheat Sheet with Examples
Solution 2: Make sure that Wi-Fi is enabled on both devices
If you have confirmed that your devices actually support Miracast but you still get the error message insisting that your device doesn’t support Miracast, check if both devices have Wi-Fi enabled. Even if you’re using Ethernet, Wi-Fi must be turned on for Miracast to function.
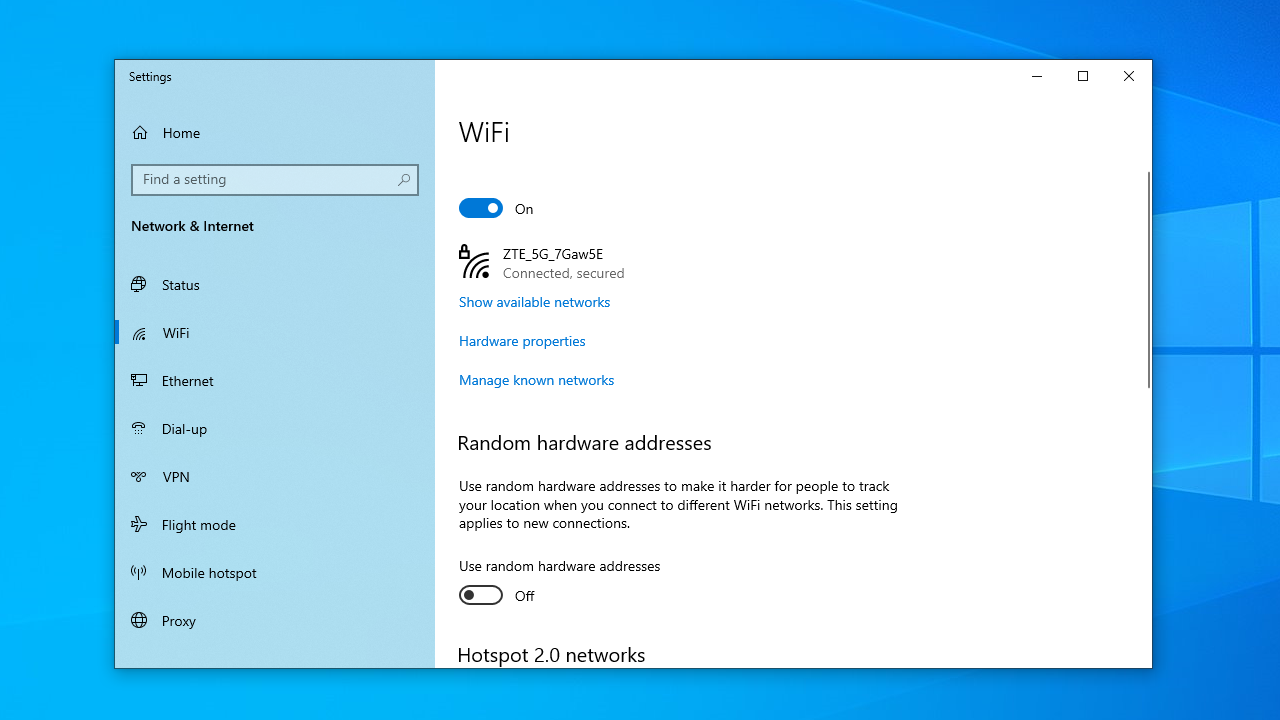
🔹 On Windows 10:
- Press the
Windows logo key + Rto open the Run dialog.
- Type ms-settings:network-wifi in the text box. Press
Enteror click OK. - You’ll be led to the Wi-Fi tab of the Network & Internet menu in Settings. Click on the toggle to activate Wi-Fi if it is deactivated.
🔹On Windows 11
- Press the
Windows logo key + Ito open the Settings app. - Go to Network & internet from the left-hand menu.
- Click on Wi-Fi on the right panel.
- Make sure the Wi-Fi toggle is set to On. If it’s off, click to turn it on.
- Also, check if Wi-Fi is activated on the other device.
How to do so depends on the device in question. On Android and iOS platforms, you can enable Wi-Fi through the Settings app:
For example:
- Android: Go to Settings > Network & Internet > Wi-Fi and ensure it’s on.
- iOS: Go to Settings > Wi-Fi and enable it.
📌 Related: Why Does My Internet Keep Going In and Out?
Solution 3: Verify that the device has wireless display functionality
Make sure the wireless display functionality is enabled on the computer you’re trying to project to. Here are the steps to do that:
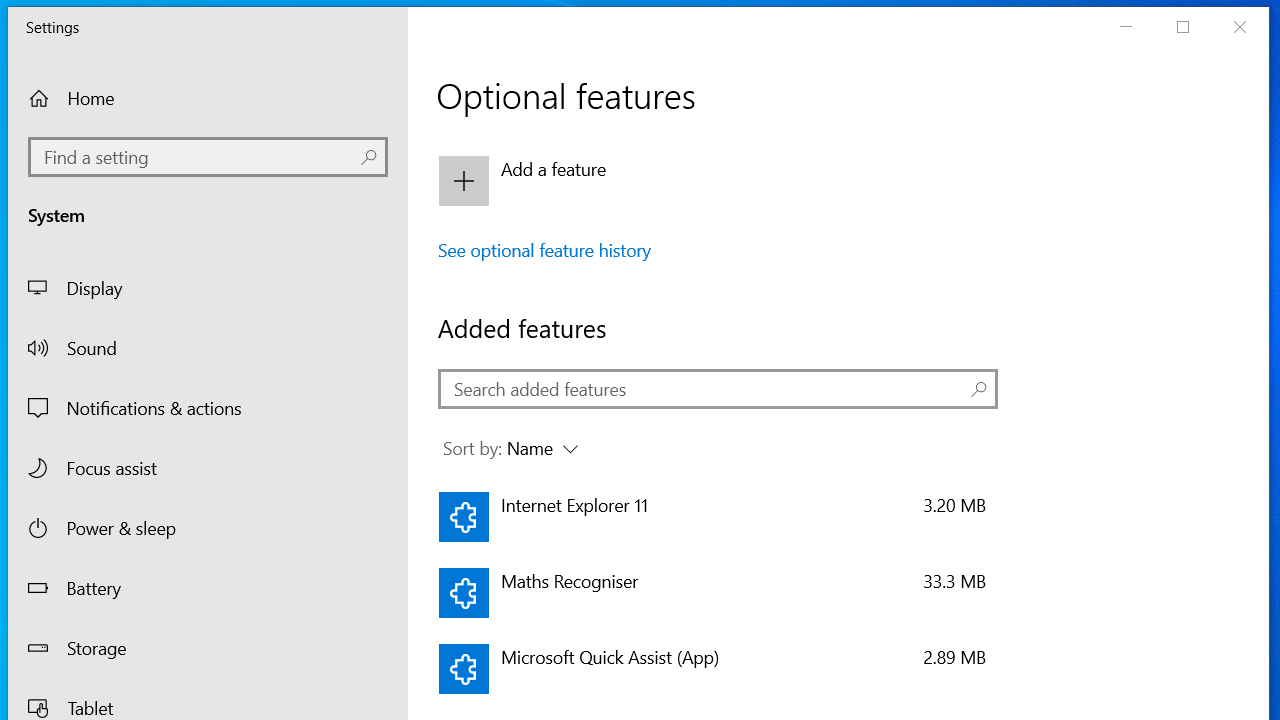
- First, type manage optional features (or just optional features for Windows 11) in the search bar and hit
Enter.
- Look for Wireless Display, or click Add a feature and add the Wireless Display option. For Windows 11, click View features and check the box next to Wireless Display.
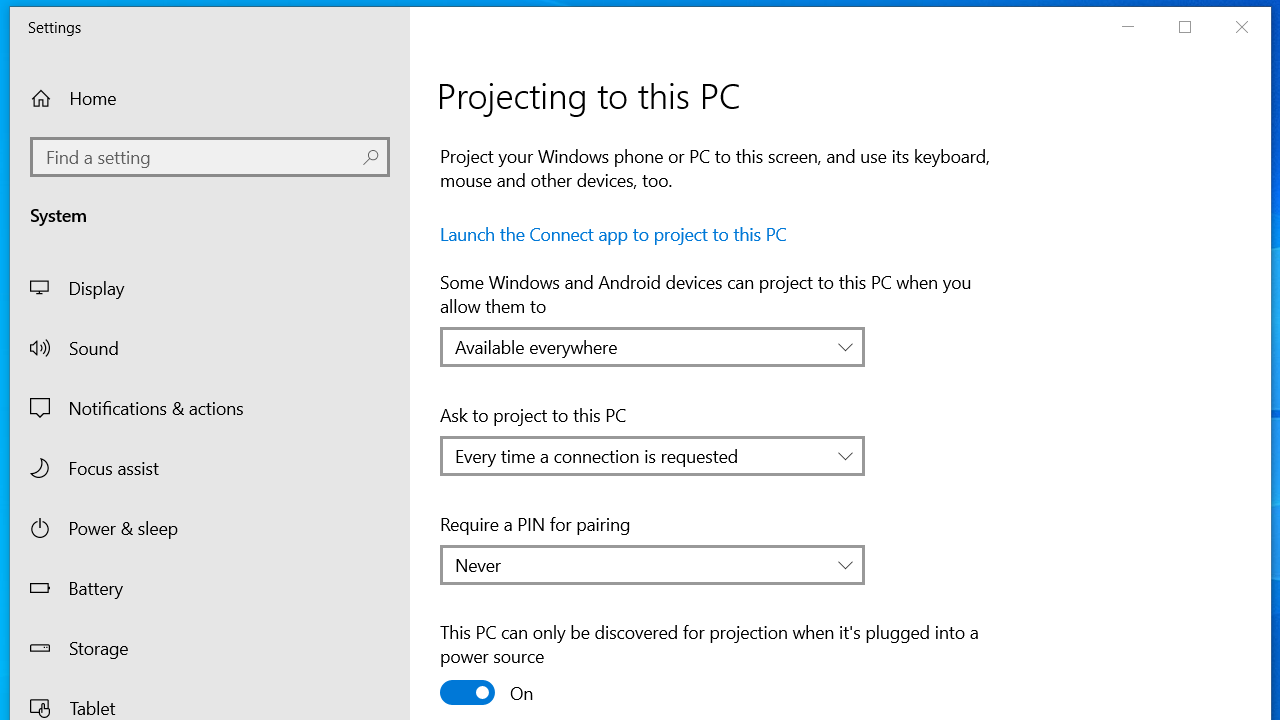
- After that, type project in the Settings search bar and click the Projection settings option.

- Select Available everywhere from the drop-down menu under Some Windows and Android devices can project to this PC when you allow them to.
Solution 4: Disable third-party VPN solutions
If you have third-party VPN software on your PC, it will most likely identify Wi-Fi Direct (the Miracast technology) as a split tunnel connection that poses security risks and will not allow establishing a connection.
To fix it, disable any such third-party software and restart your PC.
Solution 5: Update or reinstall the wireless network adapter driver
Updating or reinstalling the wireless network adapter driver has proved effective for many users.
Follow these steps to update it manually:
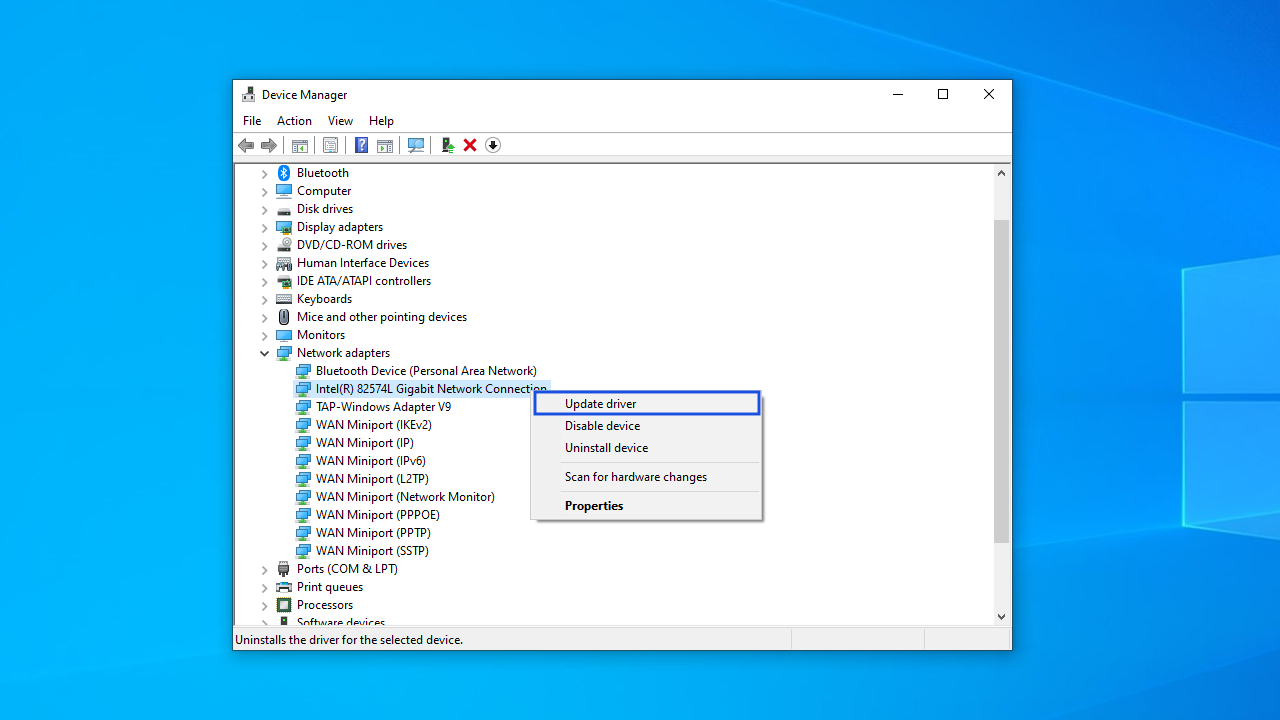
- Open the Run dialog by pressing the
Windows logo key + Ron your keyboard. - Type devmgmt.msc in the text box and click OK to open Device Manager.
- Expand Network adapters.
- Right-click on your wireless network adapter and select Update driver.
- Click Search automatically for drivers.
- Update the driver and check if Miracast works now.
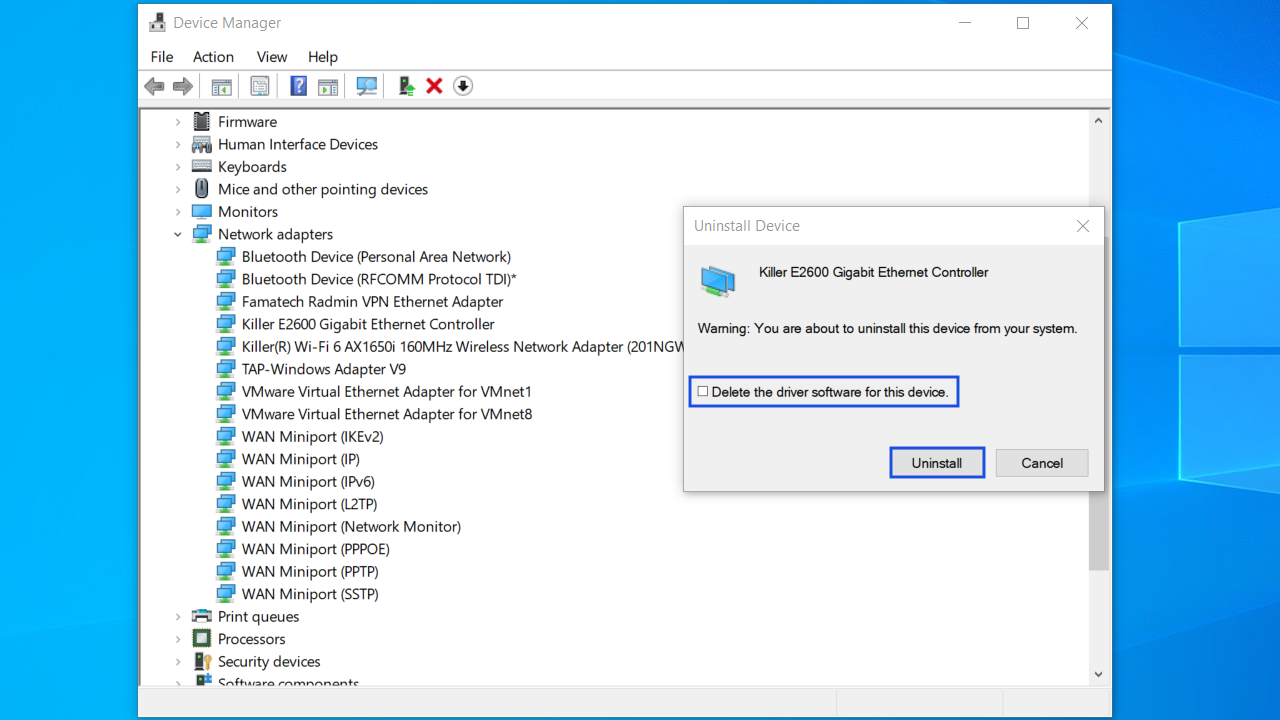
If you still get the “This device doesn’t support Miracast” error message, try reinstalling the driver. Here’s how:
- Repeat steps 1–3 from the previous list.
- Select Uninstall device from the menu.
- Check the Delete the driver software for this device box and click the Uninstall button in the Uninstall Device window.
- Restart your computer, and Windows will reinstall the driver automatically.
📌 Related: How to Fix the “Windows Could Not Find a Driver for Your Network Adapter” Error
However, manually updating the drivers doesn’t guarantee that the system will install the latest available driver.
If you want to keep all your drivers up to date, you can use Auslogics Driver Updater, a reputable tool that automates the process. It scans your system for all missing and outdated drivers and allows you to install the newest ones with a click of a button.
Solution 6: Tweak wireless mode parameters
If your wireless adapter is set to 5 GHz or 802.11blg, then you are likely to run into the “This device doesn’t support Miracast, so it can’t project wirelessly” error.
Setting the wireless mode to Dual Band 802.11 a/b/g gives your device the compatibility it needs to work smoothly with Miracast. To apply this setting, follow the steps below on Windows 10/11:
- Right-click on the Start button. Select Device Manager.
- Go to the Network adapters drop-down and expand it.
- Right-click on your wireless network adapter and select Properties.
- Go to the Advanced tab.
- Under the Property list, select 802.11 a/b/g Wireless Mode.
- Click on the Value drop-down menu on the right-hand side and select 6. Dual Band 802.11 a/b/g.
- Click the OK button.
Restart your computer to see if the problem with Miracast has been resolved.
Extra Tips to Resolve “Device Doesn’t Support Miracast”
Tip 1: Temporarily disable the firewall
If your firewall, for some reason, recognizes your device as suspicious, it may prevent this device from projecting. Disabling your firewall will allow you to check if that’s the case.
Here’s how:
- Click on the search icon in the taskbar, type Windows Defender Firewall, and hit
Enter. - Click on Turn Windows Defender Firewall on or off in the left-side panel.
- Turn Windows Defender Firewall off for both private and public networks.
- Check if Miracast works now. If it does, you can try to add the Wireless Display feature to the list of apps and features allowed by Defender Firewall. Follow these steps:
- Click on the search icon in the taskbar, type Windows Defender Firewall and hit
Enter. - Click on the Allow an app or feature through Windows Defender Firewall option in the left-side panel.
- Finally, tick the boxes in both the Private and Public columns next to Wireless Display and click OK.
- Click on the search icon in the taskbar, type Windows Defender Firewall and hit
Tip 2: Enable integrated graphics in the BIOS
Miracast requires your system to support hardware-accelerated screen mirroring, which depends on your graphics hardware. If your system has a dedicated graphics card (GPU)—like an NVIDIA or AMD card—it might not support Miracast due to driver incompatibility or lack of Wi-Fi Direct support.
On the other hand, integrated graphics (iGPU)—such as Intel HD/UHD Graphics—usually support Miracast natively. That’s why enabling your iGPU can sometimes bypass display-related issues and get Miracast working again.
Here is how to enable integrated graphics (iGPU) in the BIOS:
- Restart your computer.
- As soon as the manufacturer’s logo appears, repeatedly press the designated key to enter the BIOS or UEFI settings. This key varies by brand but is often
F2,Del,Esc, orF10. - Inside the BIOS/UEFI menu, navigate to the Advanced, Chipset, or Configuration tab.
The exact name may vary depending on your motherboard.
- Look for an option labeled Integrated Graphics, iGPU, Internal Graphics, or Primary Display.
- Set it to Enabled or Auto. On some systems, you may also need to enable something like iGPU Multi-Monitor if you’re also using a dedicated GPU.
- Press the
F10key to save and exit.
This Device Doesn’t Support Miracast: Solved
The first thing to do is make sure that your device supports Miracast in the first place. Check our Miracast compatibility table to see if your device supports Miracast out of the box. Next, look into the two essential components for a Miracast connection: your graphics card and Wi-Fi adapter. Then, move on to the solutions listed in the article—most users suggest updating your graphics drivers first, as this tends to be the most effective solution.
- Tech support (Reddit): “PC tells me ‘Device doesn’t support Miracast,’ but it actually does…?
- Microsoft Community: “This device doesn’t support receiving Miracast, so you can’t project to it wirelessly”
- TP-Link Community: “AC600/Archer T2U Plus and Miracast in Windows 10 (x64)”
FAQ
To bypass the “This device doesn’t support Miracast” error, first check if your PC supports Miracast by using the DxDiag tool and PowerShell as shown in this article. If it does, you can try these steps:
- Update your Wi-Fi and graphics drivers.
- Enable the Wireless Display feature in Windows Settings.
- Turn on Wi-Fi on both devices—even if one uses Ethernet.
- Disable VPNs or firewalls that might block Wi-Fi Direct.
- Enable integrated graphics in the BIOS if your dedicated GPU lacks Miracast support.
If your device still can’t connect, consider using Google Cast, AirPlay, or an HDMI cable as alternatives. You can also use a Miracast adapter, like the Microsoft Wireless Display Adapter, if your hardware doesn’t support it natively.
To support Miracast, your device must meet these requirements:
- Windows 8.1, 10, or 11 (or Android 4.2+, though some brands now favor Google Cast)
- A Wi-Fi adapter that supports Wi-Fi Direct (check if NdisVersion ≥ 6.30 in PowerShell)
- A graphics card that supports WDDM 1.3 or higher (check in DxDiag)
- Wi-Fi enabled, even if using Ethernet
- The Wireless Display feature installed in Windows Settings
If any of these are missing, Miracast won’t work properly—even if the device seems modern.
To get your PC to support Miracast, you’ll need to meet a few key requirements:
- Wi-Fi support with Wi-Fi Direct (your wireless adapter must support it).
- A compatible graphics card that supports hardware screen mirroring (most Intel HD/UHD graphics do).
- Windows 8.1 or later (Windows 10/11 work best).
If your PC doesn’t support Miracast out of the box, try the following:
- Update your Wi-Fi and graphics drivers.
- Enable integrated graphics in the BIOS if you’re only using a dedicated GPU.
Consider using a Miracast adapter, like the Microsoft Wireless Display Adapter, to add compatibility.
If your phone won’t connect to your TV via Miracast, it could be due to one of the following reasons:
- Your phone doesn’t support Miracast—newer Android phones may use Google Cast or Smart View instead.
- Miracast is disabled on your TV—check your TV settings and make sure wireless display or screen mirroring is turned on.
- Wi-Fi is off on either device—both need Wi-Fi enabled, even if they’re not on the same network.
- Compatibility issues—some devices require specific Miracast certifications to work together.
💡 Tip: If Miracast isn’t supported, consider using a Miracast adapter or switching to Chromecast, AirPlay, or another casting method.