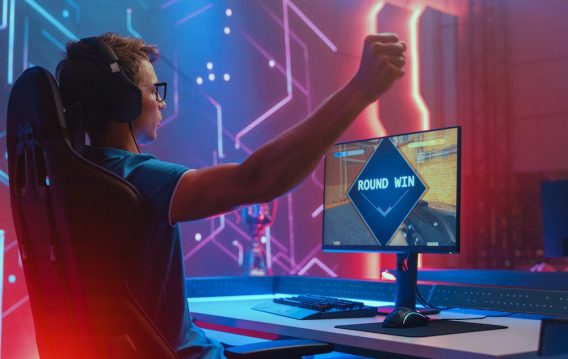
Having high frames per second (FPS ) isn’t just for boasting.
When you have a low FPS, it can negatively impact your gameplay. But a high FPS allows you to increase your settings and enjoy a visually appealing gaming experience.
This guide will show you how to check FPS on your Windows PC and improve your gaming experience.
Let’s begin.
What is FPS in Gaming?
Frames per second refer to how many individual frames or images are shown on the screen each second during gameplay. In simpler terms, FPS measures how fluidly and smoothly a game’s visuals are.
The graphics card and your computer’s processing capability generate and display these frames when playing a game. So the higher the FPS, the better the visuals in the game, which gives you an immersive gaming experience.
📌 Related: Upgrade GPU on Laptop: All You Need to Know
How to Check FPS on PC
Here’s how to check for FPS on your computer using the Windows shortcut:
- Press “ Windows key + G” and click on “ Performance.”
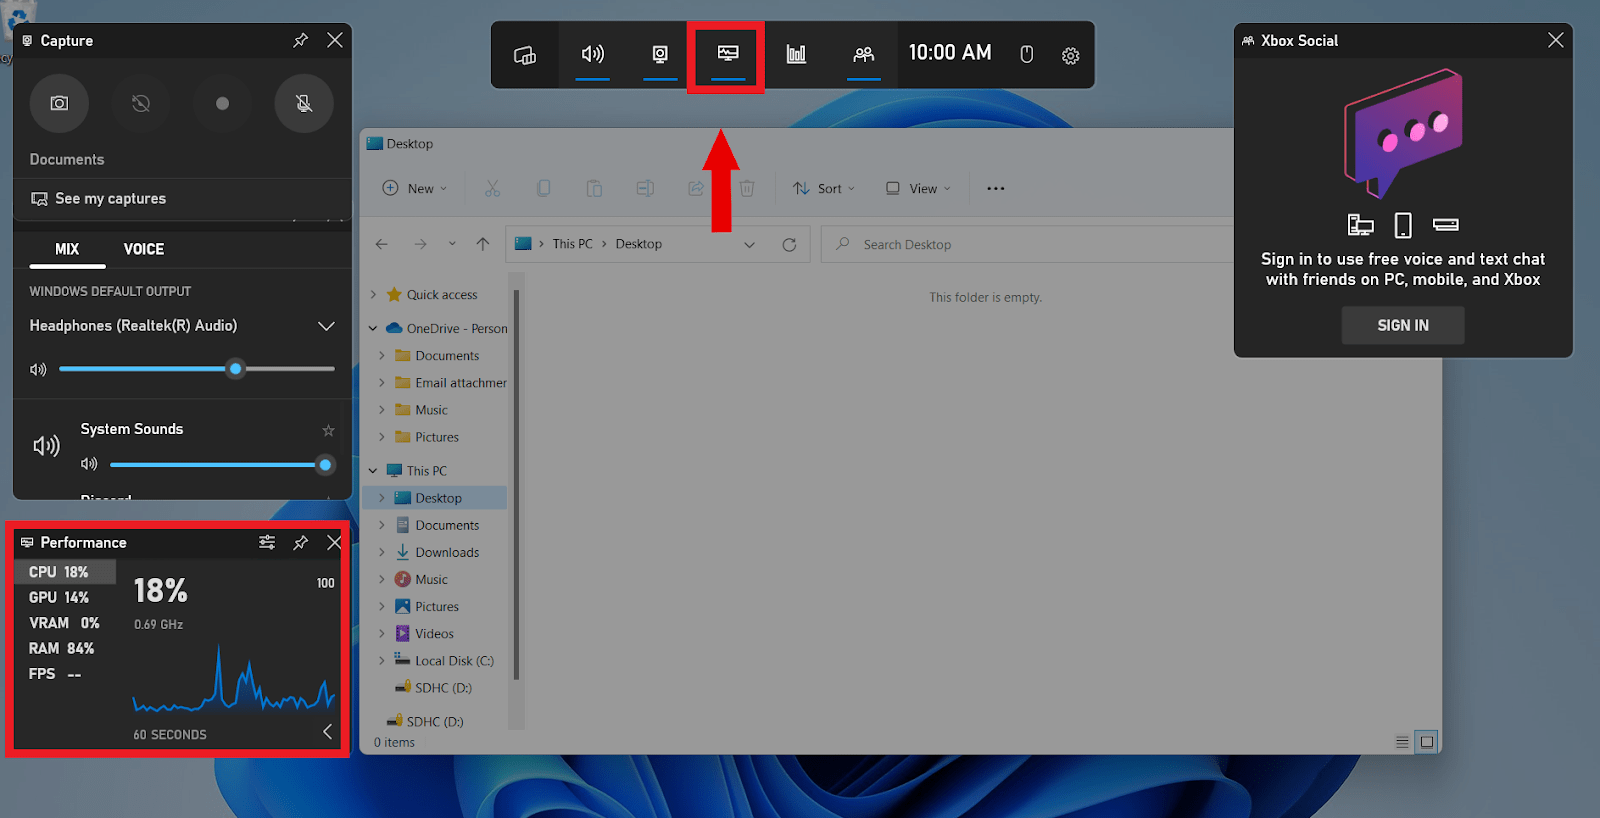
- Select “ FPS” to check the results.
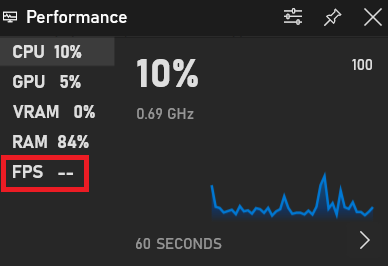 Read the number shown beside the FPS. Remember that if you don’t have a game opened, the FPS won’t show, just like the screenshot above. However, you can use Steam to open a game and see the FPS on the screen. The ideal frame rate is 60 FPS. It’s the highest FPS standard TVs and monitors can display.
How to Show FPS in Games
In this section, we’ll show you how to check FPS on PC when you play games like Minecraft, Fortnite, Overwatch, and more.
How to Show FPS in Minecraft
Here’s how to show Minecraft FPS using the debug screen:
- Start the game and click the ” Esc” key to open the “ Options” menu.
- Click on “ Options…” and select “ Video Settings.”
- Search for “ Show Debug Screen” and enable the setting.
- Now, go back to the Minecraft game.
- Press the “ F3” key and search for FPS on the Debug screen. It’ll show you the current Minecraft FPS.
How to Show FPS in Fortnite
- Click “ Menu,” then go to “ Settings.”
- Select “ Video.”
- Scroll to the bottom of the screen until you find the “ Show FPS” option.
- Turn the “ Show FPS” option on.
How to Show FPS in Overwatch 2
- Click on “ Menu” at the right corner of your screen below or press “ Esc.”
- Three different categories will appear. Select “ Details” and search for “ Show Framerate.”
- Turn it on.
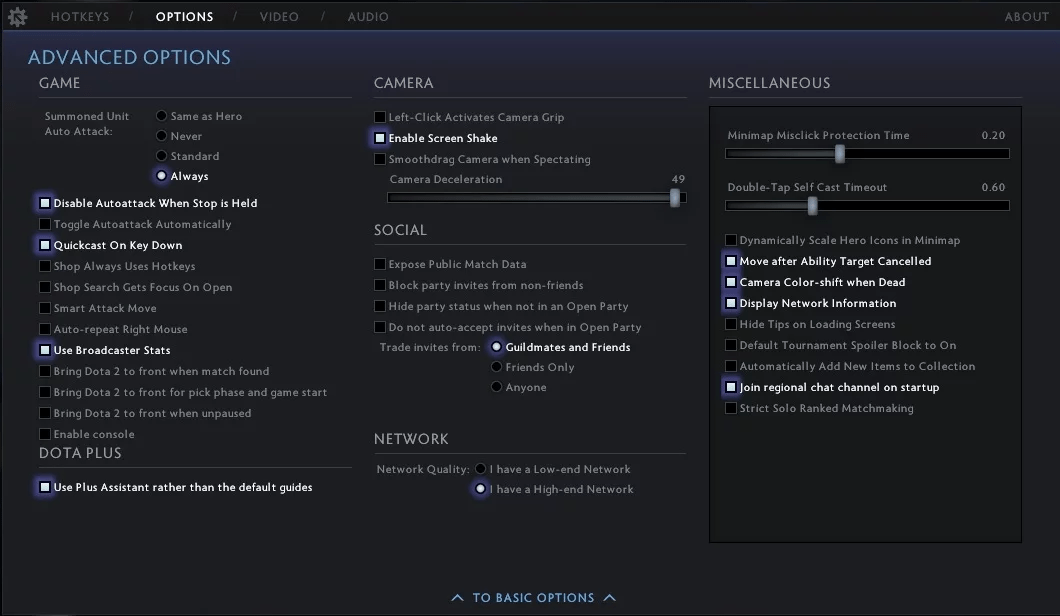
How to Show FPS in DOTA 2
- Start the game and click on “ Settings.”
- Click on “ Options.”
- Go to “ Advanced Options” below the screen.
- You’ll find a “ Miscellaneous” section at the right. Click the “ Display Network Information.”
- You’ll see the FPS information when you restart the game.
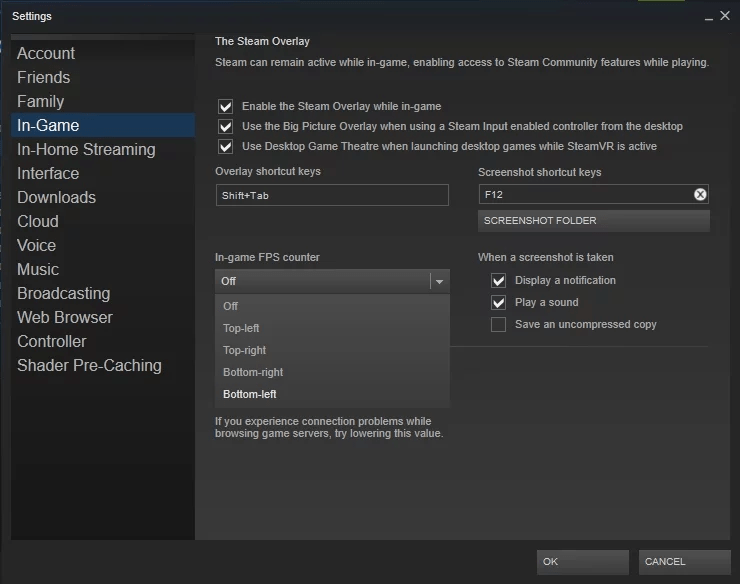
How to Show FPS on Steam
Steam has an FPS counter for any game in your library. Here’s how to show FPS Steam:
- Click “ Steam,” then go to “ Settings.”
- Select “In-Game,” then click the box below the In-Game Steam FPS counter .
- Choose where you want to place the FPS counter on your screen.
How to Increase FPS on Windows PC
You’ll generally need at least 30 FPS if you want smooth gameplay. However, you’ll notice that games perform better and smoother with 60 FPS. Now that you’ve learned how to check FPS on pc , it’s time to try the methods that will bring them to a higher level.
Also Read: Windows 11 Gaming: How to Fix Ping Issues
Quick Fixes on How to Get Better FPS
1. Update Your Graphic Drivers
Avid video gamers know the importance of having the latest drivers for their PC’s graphics hardware or GPU. NVIDIA, AMD, and other graphics processor manufacturers regularly release updated versions of their drivers.
They optimize these new versions to ensure new games can be played efficiently. When you’re playing newer games, it’s important to keep your graphics drivers up to date for optimum gaming performance.
Two Ways to Update Your Graphic Drivers
There are two ways to update your graphics drivers. You can do it manually or use a one-click solution like Auslogics Driver Updater.
The first choice is quite complicated and tedious. This is why we recommend automating the process instead. To give you a better understanding of why you should avoid manually updating your graphics drivers, let us explain to you how it’s done.
You begin by taking note of your computer’s GPU. If you don’t know what it is, just follow the instructions below:
- Right-click the taskbar, then choose “ Task Manager” from the list.
- If the Task Manager window is small, click “ More Details.”
- Go to the “ Performance” tab.
- On the left pane, search for GPU. You should now see what type of GPU your system has.
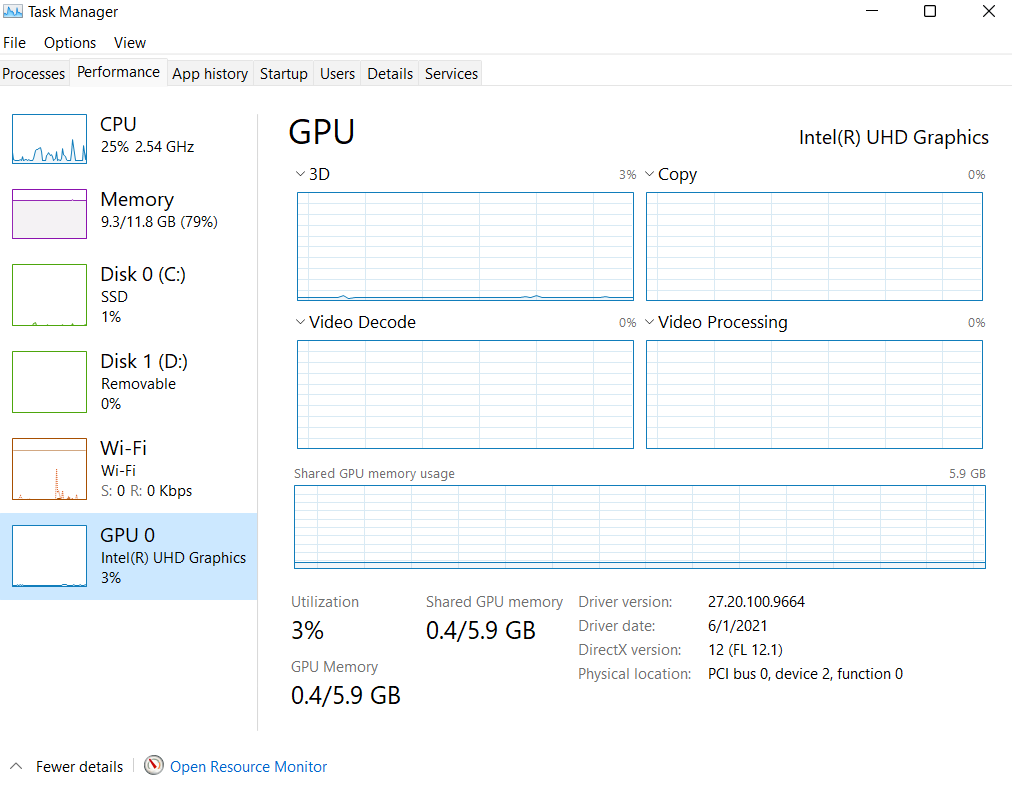 You might see an Intel GPU alongside an AMD or NVIDIA GPU. This means that your AMD or NVIDIA GPU will be dedicated to gaming while the power-efficient Intel GPU will be used for other tasks. How to View the GPU on Windows 7
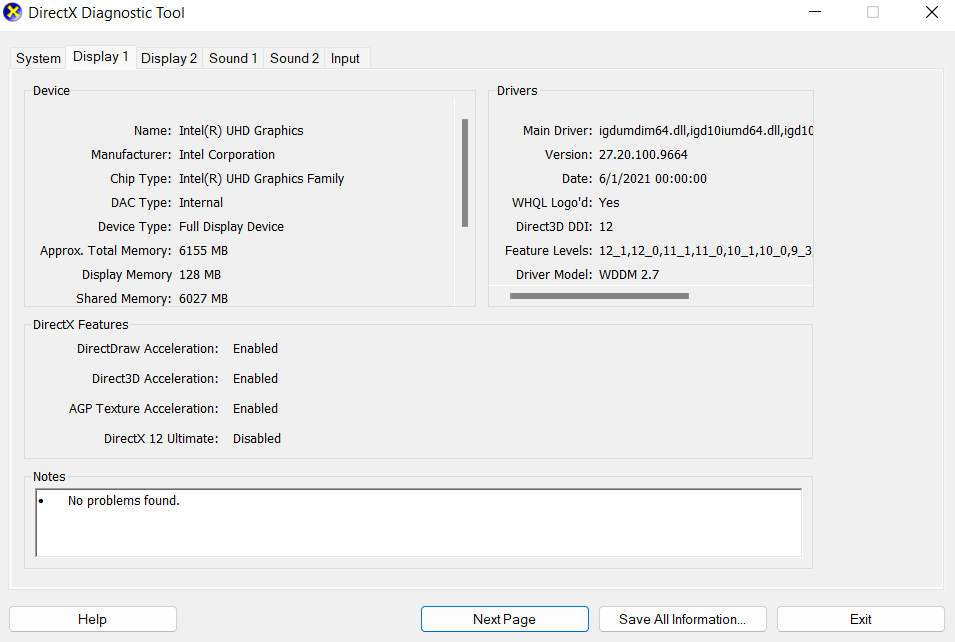
If you’re using Windows 7, you can learn about your system’s GPU in the “dxdiag” tool. Simply follow the steps below:
- On your keyboard, type “ Windows + R.” This should open the run dialog box.
- Type “ dxdiag” (no quotes), then hit “ Enter.”

- Go to the “ Display” tab.
- Go to the “ Device” section and look to the right of the “Name” entry.
 Once you’ve noted what GPU your computer has, you have to go to the manufacturer’s website and find the latest versions for your graphics drivers. Make sure that the version you download and install is compatible with your computer. Otherwise, you would experience more problems when playing video games. Automate Your Graphic Drivers Update As you can see, the manual process can get complicated and may even consume a significant amount of your time. So, we suggest using Auslogics Driver Updater to automate the process.
 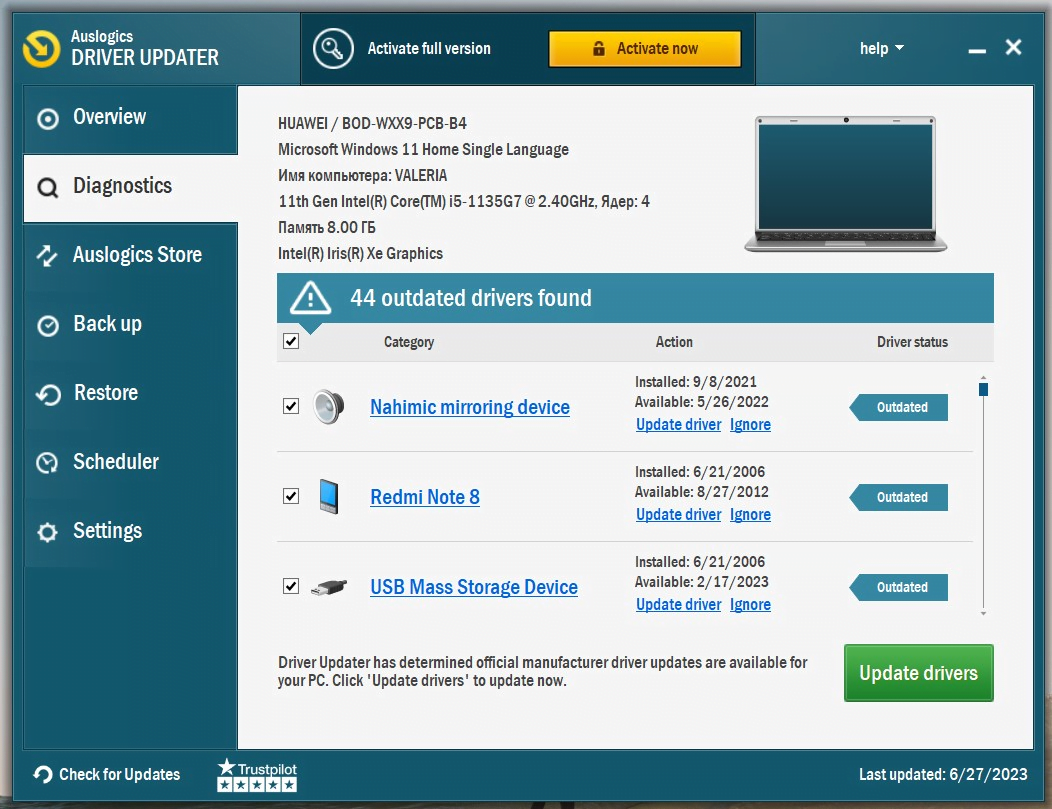 With one click of a button, this program will automatically detect your system and GPU. It’ll search for the latest manufacturer-recommended versions of your drivers. The best part is that it covers all outdated drivers, not just graphics drivers. After the process, you can expect an overall improvement in your computer’s speed and performance.
Related: Auslogics Driver Updater: New Drivers in One Click!
2. Optimize In-Game Settings
As you use higher graphics settings, the lower the FPS becomes. You can lower your graphical fidelity if you want higher FPS in a game. This wouldn’t make your game look crisp. However, it’ll make it run more smoothly and faster.
To tweak the individual settings, you must find the Graphics or Video section in a game’s Options menu. You must change the graphics settings from High to Medium or Low to improve your FPS. Another good option would be to lower the display resolution of the game.
This may make the image less sharp, but it would boost the FPS. On the other hand, you may also try setting the game to a Windowed view instead of a Full-Screen view. Some users have reported that this slightly improved the game’s FPS.
Related: How to increase FPS in Call of Duty: Black Ops Cold War on Windows 10?
3. Adjust Windows Power Options
Most PC gamers are familiar with the issue of decreased performance and a darker screen when the battery is low. When this happens, Windows automatically reduces performance, which can affect your gaming experience.
The game loses frames, takes longer to respond, and is less enjoyable. This low-performance mode continues to operate in the optimal battery-life mode even when the laptop is plugged in. So you have to change it back to get the best performance manually.
Related: Power Options in Windows 10: Advanced Guide
4. Close Unnecessary Background Processes
Some applications are resource-hungry, regardless of whether they’re running in the background or not. This can affect the CPU usage and the FPS. Press “Ctrl + Shift + Esc” to close unnecessary background apps to open the Task Manager.
Then, right-click on the programs you don’t need running in the background and click “End Task.”
Related: How to Optimize Your PC for High-Performance Gaming
5. Clean Your PC and Remove Malware
Malware can install on your PC without permission and can damage your system by running in the background, which can consume resources. It can also interfere with drivers and even consume your PC resources.
That’s where we suggest trying Auslogics Anti-Malware. This tool thoroughly scans your device to find and remove malware from your Windows.
Related: Auslogics Anti-Malware: Features and Reviews
Advanced Methods to Increase FPS on PC
1. Overclock Your GPU
Overclocking your PC means pushing your computer and graphics card beyond their default settings for higher performance. However, even though it can boost PC performance, it generates heat. So you need a cooling system to maintain the system’s temperature. However, you need to be careful when overclocking your computer. Otherwise, you can damage your hardware components. You can use tools like HWMonitor to monitor your system’s heat levels when pushing your hardware to its limits.
2. Upgrade Hardware Components
Upgrading your hardware components can significantly improve your gaming performance. For example, low FPS and dated performance can occur over time as graphics cards struggle to keep up with the most recent games.
If that’s the case for you, consider upgrading your graphics card. You can also upgrade your solid-state drive to reduce gaming loading times and provide faster data delivery, resulting in smoother gameplay.
3. Monitor and Control System Temperature
Overheating can negatively affect performance and reduce FPS. You can use programs like MSI Afterburner or CPU-Z to regularly check your computer’s temperature. Ensure your computer is effectively cooled using liquid cooling or fans. You can avoid thermal throttling. By doing that, you can improve your PC performance by maintaining ideal temperatures.
Related: Dust-Free PC: Expert Tips How to Clean a Computer
4. Utilize Game Optimization Software
Take advantage of the game optimization software to enhance your gaming experience. Features like automatic game setting optimization, driver upgrades, and performance tracking are available with programs like NVIDIA GeForce Experience or AMD Radeon Software. They can help to adjust your games for your particular hardware setup. If you’re using NVIDIA hardware, we suggest you use NVIDIA GeForce Experience. This is already included with your graphics drivers, and you can conveniently launch it from the Start menu. Once you’ve opened the application, you can see the games you’ve installed. Simply choose a game and click the Optimize button. This will automatically apply the settings NVIDIA recommends for that game and your system’s hardware. Optimizing GeForce Experience is always a good starting point when you want to tweak your settings manually.
5. Reduce Screen Resolution and Graphics Quality
You can improve your FPS by changing graphics settings and screen resolution. So try reducing the graphical details in your game or lowering your game resolution, such as
- the texture quality,
- shadow quality, or
- anti-aliasing.
This eases the load on your system and enables more fluid gameplay.
6. Disable V-Sync
The vertical sync (V-Sync) setting synchronizes your game’s frame rate with your monitor’s refresh rate. Even though it stops screen tearing, it can limit your FPS and cause input lag. However, disabling V-Sync can increase FPS but may also cause screen tearing. So play around with this setting to find the spot between a fluid gaming experience and high-quality graphics.
7. Allocate Sufficient System Resources
If you want to know how to increase fps on PC, make sure your system has enough resources set aside for a good gaming experience. Prioritize the performance of your game while closing unneeded background programs and limiting resource-intensive operations.
And as we have mentioned before, You can Adjust your Windows Power Options and change the power settings to “High Performance” mode to give your games access to higher resources.
Conclusion
A seamless and enjoyable gaming experience depends on keeping a high FPS. So you need to know how to increase FPS on PC , and that’s what we’ve done in this guide. For example, you can boost FPS by easing the strain on your PC’s graphics card. You can also upgrade hardware parts and optimize in-game settings to increase FPS. It’s also essential to update your graphics drivers. Auslogics Driver Updater can automatically identify and update out-of-date drivers, including graphics drivers.
FAQs
Does Lowering Resolution Increase FPS?
Yes. Lowering the resolution can boost FPS since it eases the strain on your computer’s graphics card and enables it to render frames more quickly.
How to Improve FPS on PC?
You can upgrade your PC’s hardware, update drivers, log out of background programs, and ensure your system is properly cooled to increase FPS.
How to Get Better FPS in Fortnite?
You can try decreasing the graphics settings, turning off unnecessary visual effects, updating the graphics drivers, and quitting background programs. You can also ensure your computer satisfies Fortnite’s minimum hardware requirements to improve your frame rates.