
- Before Anything Else…
- Restart your PC
- Restore the missing .dll files from the Recycle Bin
- Method 1: Scan for malware
- Method 2: Use System Restore
- Method 3: Run an SFC scan
- Method 4: Apply Windows updates
- Method 5: Reinstall the program that uses the DLL file
- Method 6: Update drivers
- Method 7: Repair your Windows system
- Method 8: Clean install Windows
- Method 9: Fix your hardware
- Conclusion
DLL files are crucial for various apps and services in Windows. With that in mind, stumbling upon DLL errors may be disturbing, but fear not, as we’re here to help you deal with them.
We’ll explore how to fix DLL errors in Windows 10 and 11, restore missing DLL files, and tackle other common DLL-related issues. From simple solutions to advanced measures, by the end of this article, we’ll equip you with necessary tools to resolve your DLL errors once and for all.
Note: DLL stands for Dynamic Link Library, and you can compare a .dll file to a real-life library book, which any reader can get certain knowledge from. Each .dll file contains code and data crucial for operation of various apps and services.
Before Anything Else…
Before you proceed to the troubleshooting methods, we recommend trying a few simple fixes outlined below.
Restart your PC
In some cases, a simple reboot may fix .dll errors on your PC. However, it may only work if you can launch Windows.
Restore the missing .dll files from the Recycle Bin
One of the possible causes of “.dll was not found” and “.dll is missing” errors is that you accidentally deleted them. In this case simply go to your Recycle Bin, search for and restore missing dynamic link library files. If your OS can’t launch normally, enter Safe Mode to perform this step.
Also read: How to add Safe Mode to the Boot menu in Windows 10?
Now, if after trying these simple solutions the DLL error still persists, move on to the methods below.
Method 1: Scan for malware
One of the possible reasons for a “.dll not found” error is that your system was compromised by malware. Consider using reliable antivirus software, such as Auslogics Anti-Malware, to fix DLL errors and keep your system secure. This tool can work alongside your primary antivirus, strengthening your protection against cyberthreats.
Also read: Auslogics Anti-Malware: Features and Reviews
Method 2: Use System Restore
It is possible that a recent update or change in your system configuration or registry caused the DLL error. If this is the case, it’s advisable to roll back your system to a restore point where everything was working fine. However, you need to have a previously created restore point to roll back to. Here’s a brief instruction on how to fix DLL errors by restoring your system:
- Enter “Control Panel” in the search bar and click on the top result.
- In the upper right corner, find the “View by” section and choose “Large icons.”
- Click on “Recovery,” then click on “Open System Restore,” and follow the prompts in the new window.
- Finally, click on “Finish” to run System Restore.
Make sure to read our comprehensive guide to learn about this process in more detail.
Also read: What if System Restore Not Working
Method 3: Run an SFC scan
Windows 10 and 11 come with the built-in System File Checker (SFC) tool that you can use to troubleshoot common problems, including “corrupt DLL” or “missing DLL” errors. Try performing an SFC scan to make sure that all damaged or affected Microsoft-supplied DLL files are replaced properly.
Here’s how to fix missing DLL files by running the System File Checker:
- On your keyboard, press “Windows key + S.”
- Type “cmd” (no quotes).
- From the results, you will see “Command Prompt.” Right-click it, then select “Run as administrator.”
- Once the Command Prompt is open, type “sfc /scannow” (no quotes), and press Enter.
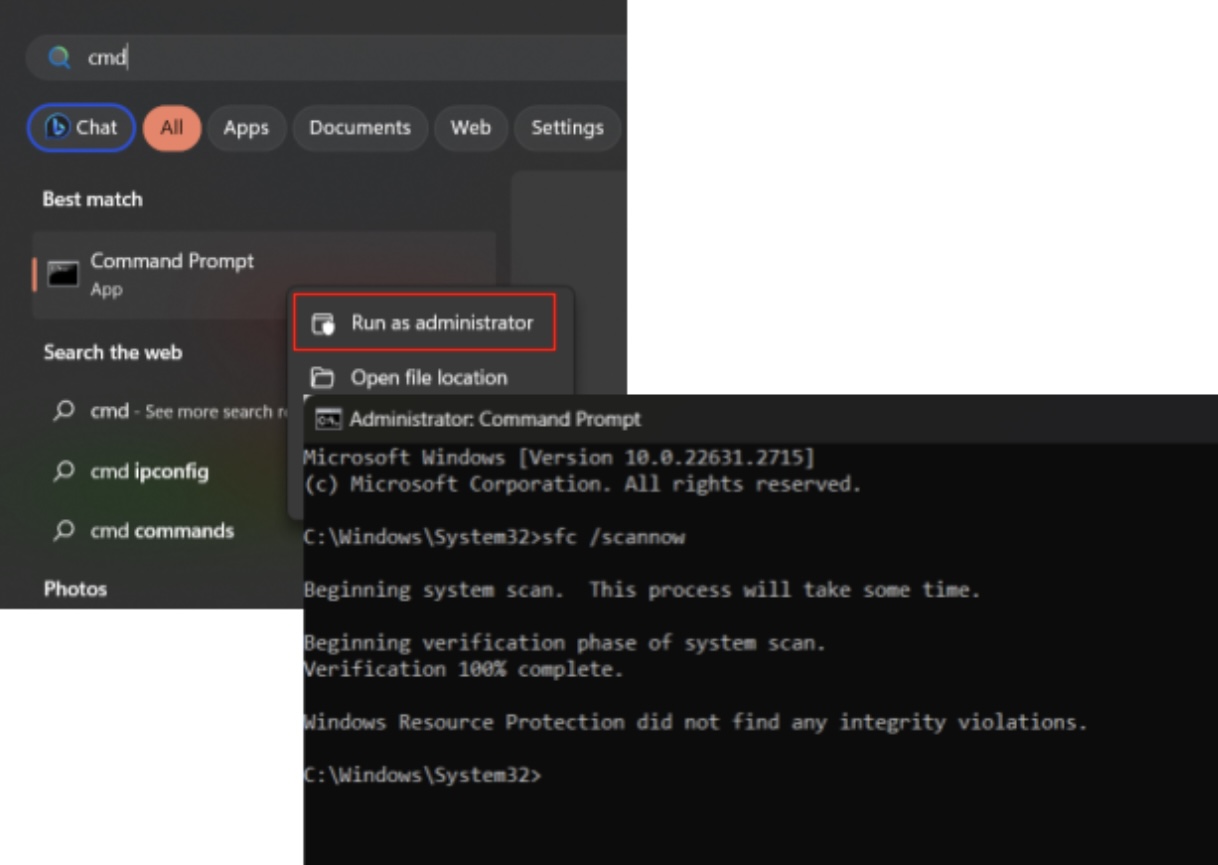
The process will take several minutes to complete. Stay patient and avoid interrupting it. Once it is done, check if DLL errors are gone.
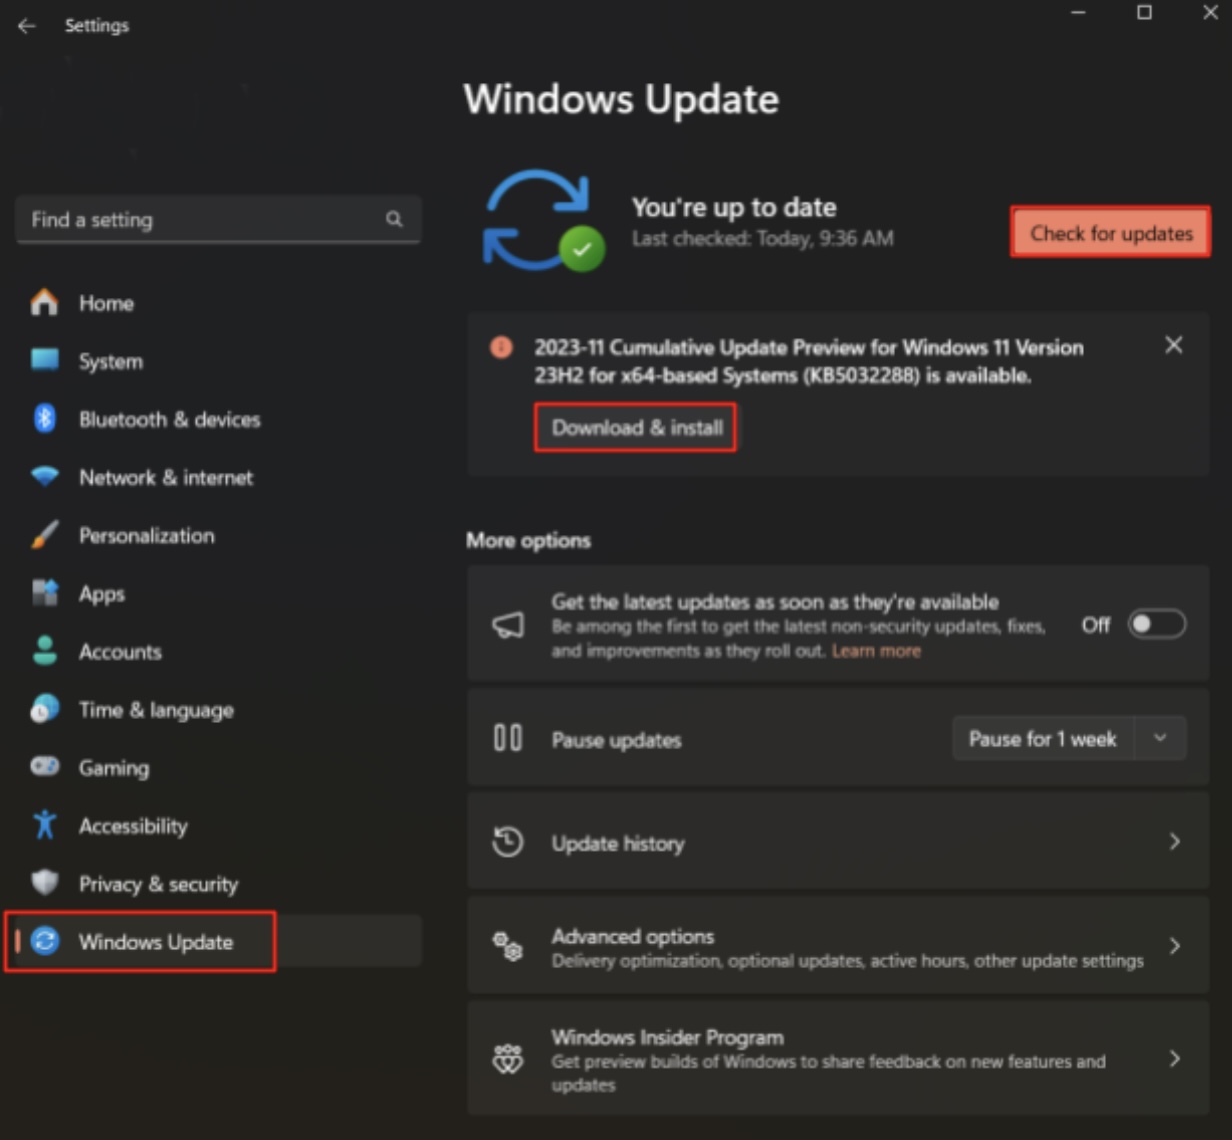
Method 4: Apply Windows updates
Windows updates and service packs generally come with hundreds of Microsoft DLL files that will replace or update your missing DLL files.
Here’s how to fix DLL errors in Windows 10 by applying Windows updates:
- Open the Start menu and select “Settings.”
- Click on “Update & Security.”
- Navigate to the “Windows Update” section, then click on “Check for updates.”
- If updates are available, click “Install” to update your system.
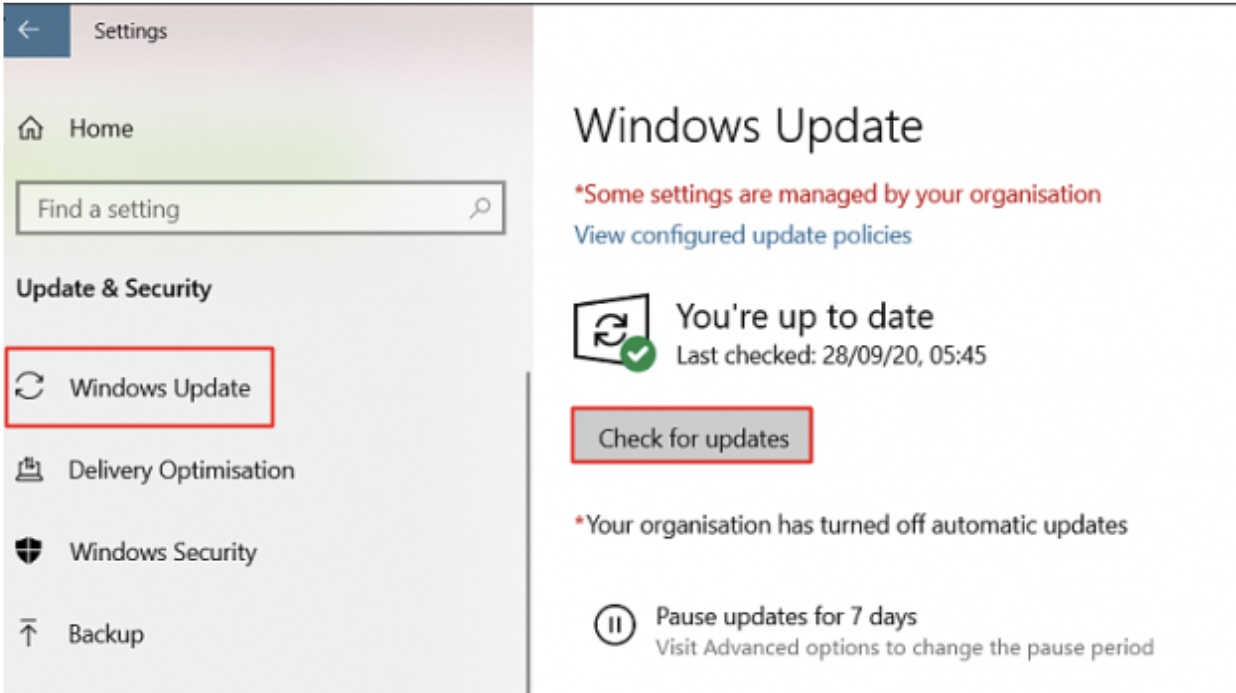
Image: tenforums.com
Here are the steps to take in Windows 11:
- Open the Start menu and select “Settings.”
- Navigate to the “Windows Update” section, then click on “Check for updates.”
- If updates are available, click “Download & install” to update your system.
Method 5: Reinstall the program that uses the DLL file
If you face a “.dll not found” error when trying to run a certain program, consider reinstalling it. This should properly install and register the problematic file, ultimately fixing .dll errors. Here’s how to do it:
- Enter “Control Panel” in the search bar and click on the top result.
- Click on “Uninstall a program” under “Programs.”
- Right-click the problematic program and select “Uninstall.”
- Follow the instructions to delete the program.
Finally, visit the official website or a trusted source, download, and install the program from scratch.
This should help you fix the DLL errors triggered by a certain program.
Don’t forget to read our full guide on how to Uninstall Programs and Delete Unnecessary Files in Windows 10 PC.
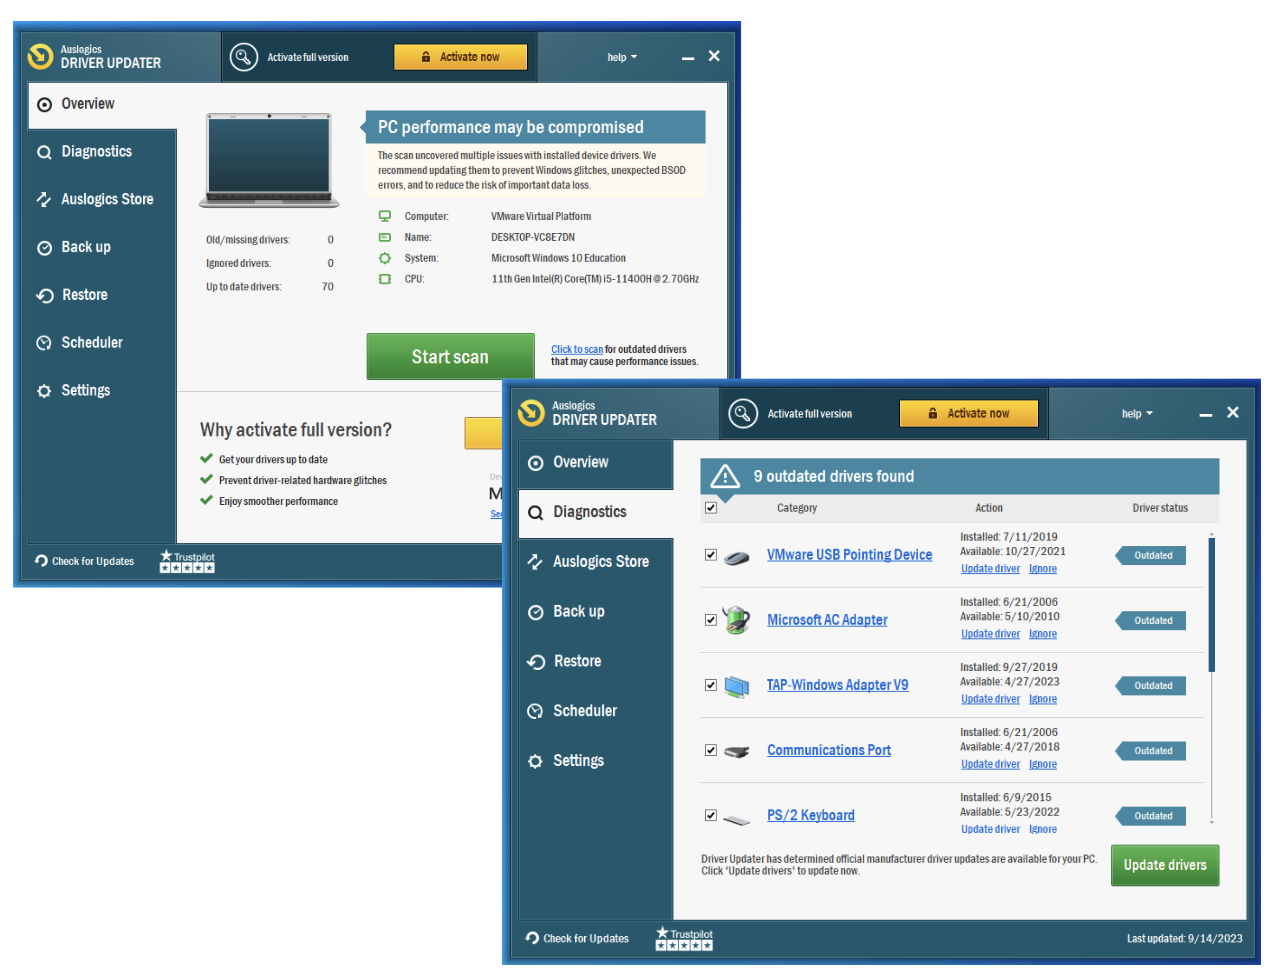
Method 6: Update drivers
Faulty or outdated drivers sometimes may cause “.dll was not found” and other DLL-related errors. To rule out this possibility, you need to update your drivers.
Since you don’t know which driver is to blame, you’ll need to check and update all your devices’ drivers. Doing this manually will be excessively time-consuming, while not guaranteeing the positive outcome. Thankfully, there is a way to update your drivers automatically with their latest official versions.
Auslogics Driver Updater is a reputable tool that will scan your system, locate outdated or problematic drivers, and install the most current version for each with a click of a button. The program backs up your drivers before installing new ones, ensuring your system security. All in all, Auslogics Driver Updater is a reliable solution to help keep your PC performing at its best.
If this method didn’t help and you’re still wondering how to fix DLL errors, let’s dive into solutions requiring more serious actions. Make sure to back up your PC before you proceed with any of the following methods.
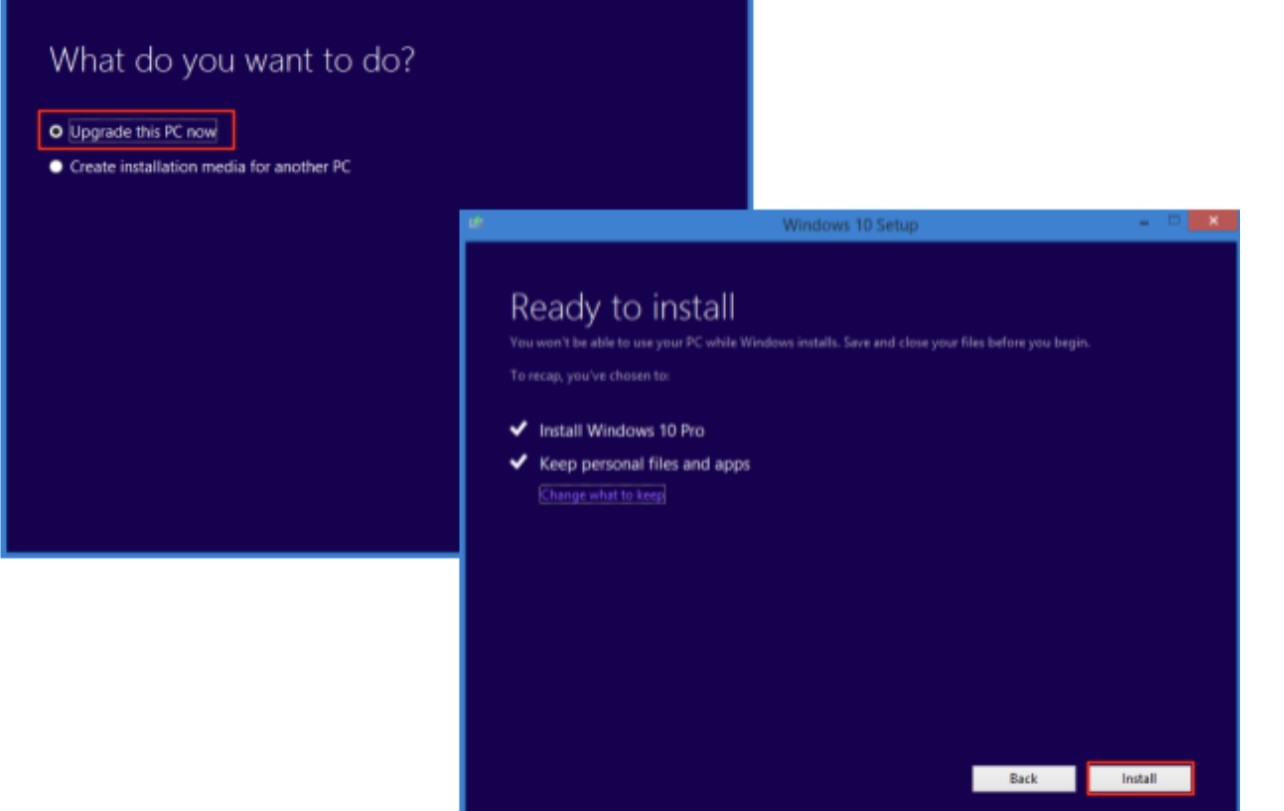
Method 7: Repair your Windows system
The first option is to perform a repair installation of your Windows OS by using the Media Creation Tool. The repair installation will keep your personal files and apps while reinstalling system files. Here’s how to do it:
- Download the tool for Windows 10 or Windows 11 from the Microsoft website.
- Run the downloaded file, choose the “Upgrade this PC now” option, and click “Next.”
- Follow the prompts, make sure to check the “Keep personal files and apps” option, and click “Install.”
Images: answers.microsoft.com
Should this method not prove effective and you still face DLL errors, move on to the next one.
Method 8: Clean install Windows
Well, if nothing worked up to this point, this is your last resort. Performing a clean installation will erase all the data from your hard drive and install a fresh copy of Windows on your PC. We strongly recommend against turning to this solution unless you have already tried all the previous ones.
Follow the instructions on the Microsoft website to clean install Windows 10 or Windows 11.
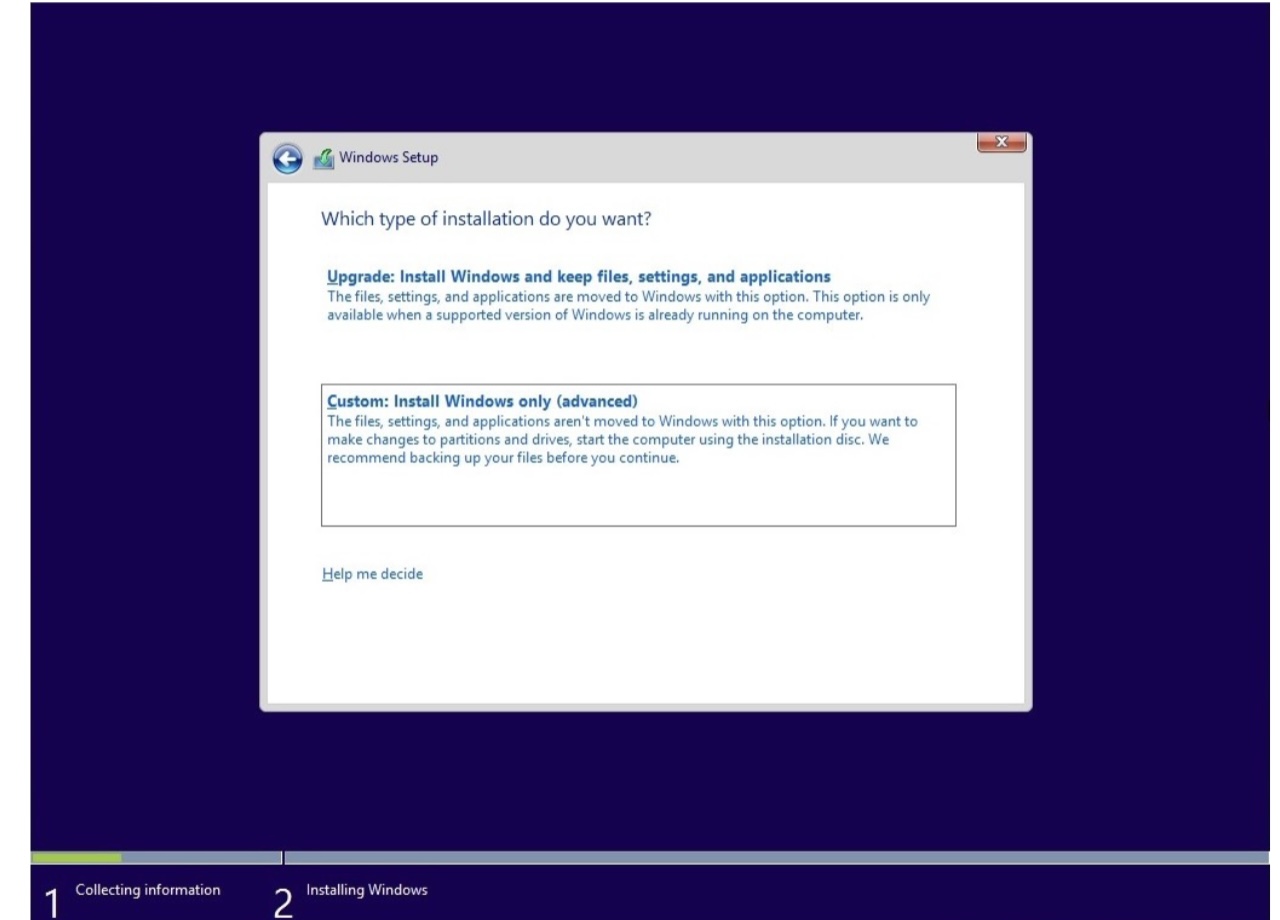
Image: answers.microsoft.com
Also read: How to Install Windows 11
Method 9: Fix your hardware
If you’re still encountering DLL errors after the clean installation, the problem can only be hardware-related. At this point, your best bet is to reach out to the repair service or tech support for help.
However, if you’ve just installed a component and started facing the “.dll not found” or similar error, here are a few things you can try yourself:
- Reinstall the hardware component.
- Substitute it with the known functioning one.
- Update the device’s firmware.
- Ensure the hardware is listed on the Windows Hardware Compatibility List.
Check if the error still shows. Again, if you don’t feel confident to perform these actions yourself, we recommend seeking professional help.
Conclusion
Well, that’s how to fix DLL errors in Windows 10 and 11. We’ve explored all major reasons behind and fixes to DLL-related issues and, hopefully, helped you resolve the problems you faced. Feel free to share your thoughts and success stories, or ask further questions in the comments section below.