![[SOLVED] Laptop Camera Not Working in Windows 10/11](https://www.auslogics.com/en/articles/wp-content/uploads/2023/04/shutterstock_1707201190-1-568x359.jpg)
- Causes of a Laptop Camera Not Working
- How to Fix the Laptop Camera Not Working Issue?
- Advanced Solutions for Your Laptop Camera Not Working Issue
- Solution 1: Update the webcam driver
- Solution 2: Reinstall the webcam driver
- Solution 3: Roll back the webcam driver
- Solution 4: Update your Windows
- Solution 5: Check your webcam’s configuration in the settings app
- Solution 6: Disable and re-enable the device in the device manager
- Solution 7: Reset your PC
- How to Fix Laptop Camera Not Working for Specific Brands
- Conclusion
- FAQ
Laptop cameras have become vital for video conferencing, online classes, and other online communications. But sometimes, you can run into the “laptop camera not working” issue on your computer, which can leave you scrambling to find a solution before the next meeting starts.
The problem with your laptop camera could be due to several reasons, such as driver problems, privacy settings restricting camera access, recent system updates, or hardware-related issues.
So, if your laptop camera is not working, this guide will help you. We’ll explore the common causes of the issue and provide troubleshooting tips to get your camera working again.
Let’s dive right in!
Causes of a Laptop Camera Not Working
There are several reasons why your camera is not working, which could be hardware and software issues and other related factors.
1. Software-related issues
One of the main reasons your webcam may not function is that it may be missing drivers due to corrupted device drivers or an update. In addition, the software may be outdated or incompatible if you have an external webcam.
2. Hardware-related issues
Sometimes, you may have a bad laptop camera or external webcam and need to replace it. A damaged camera or cable can prevent the device from working properly.
3. Camera software not compatible with antivirus program
The laptop camera can stop working due to an antivirus program you’ve installed. If that’s the case, you may have to use the Windows antivirus or other antivirus software compatible with Windows 10/11.
4. Issues with the system settings
Sometimes apps don’t have permission to use the camera. You may have to change the settings for the webcam to work.
Similarly, software issues such as outdated drivers can cause the camera to malfunction, even if there is no problem with the physical components.
So, it’s crucial to identify the underlying cause to troubleshoot and resolve these issues. This may involve:
- checking for physical damage to the camera or cable,
- checking the USB port,
- updating drivers and software, and
- disabling conflicting software.
By systematically troubleshooting, you can usually resolve these issues and get the laptop camera working again.
How to Fix the Laptop Camera Not Working Issue?
In this section, we’ll walk you through basic, advanced, and specific solutions to fix a camera that is not working on your Windows laptop. You don’t have to go through all of them necessarily.
Just go through the list and find the troubleshooting step that works for you.
Fix 1: Restart your laptop

First, restart your computer before you do anything else. It may sound simple, but it could be the answer. So give it a try if you haven’t already.
Fix 2: Check for an on and off switch
Some laptops and external cameras have a physical camera switch. However, you can’t use the camera if you flip the switch off. Look for a physical button or switch to activate the camera on your computer. If so, check to make sure it’s turned on.
Fix 3: Use a different USB port
If you’re using an external camera, check if it is properly connected. You can unplug and replug it in another USB port. Connecting the camera to a different USB port is one possible solution to this problem.
Fix 4: Check if the operating system detects the camera
Before moving to advanced solutions, you must ensure your Windows detects the camera. You can do that by checking the list of all connected devices on your laptop.
Follow the below steps to check if the integrated camera is working or not:
- Click on the search bar and type in Device Manager.
- If you see Cameras, you can move on to the advanced solution. Remember, sometimes, you may find the camera in the Sound, video, and Game Controllers section. So check that section if you can’t find the Cameras.
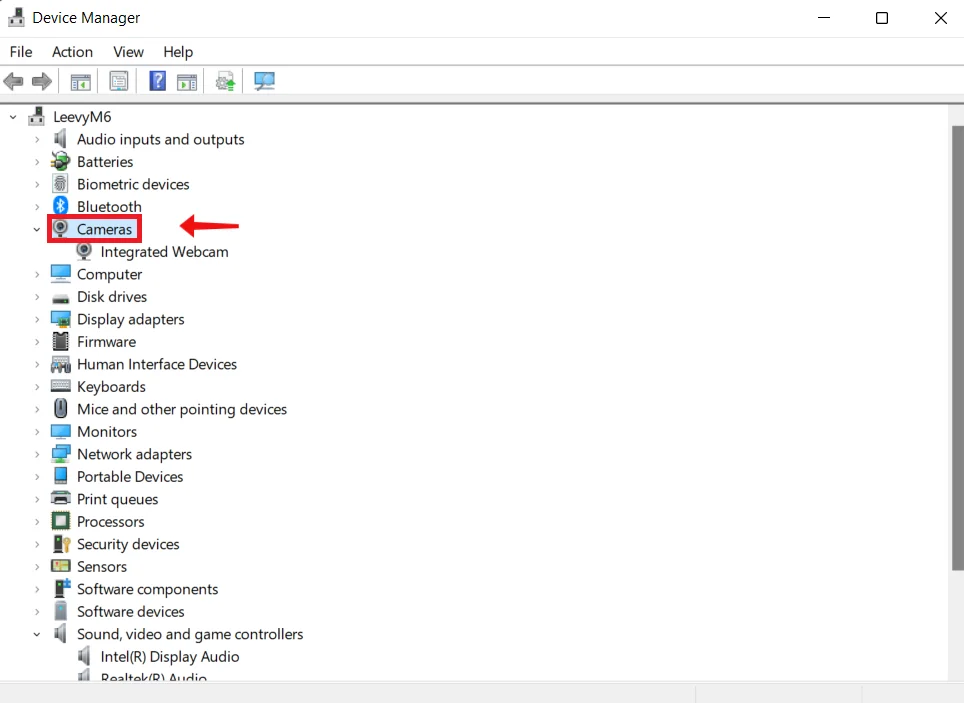
- If you still can’t find Cameras, open the Actions menu and choose the Scan for Hardware Changes option. It’ll scan all connected devices and detect your camera, if any.
Advanced Solutions for Your Laptop Camera Not Working Issue
Solution 1: Update the webcam driver
Missing, outdated, incorrect, or faulty device drivers can often cause hardware issues while using your PC.
For example, your webcam won’t work if the required driver is not installed on your PC. Although Windows 10 and 11 can automatically install the required drivers when you connect to a device, the function might not go through successfully.
Even when the necessary device driver is present, the version could be an outdated one or might be corrupt.
Therefore, to try and get your integrated webcam working again, you have to visit the official website of your device manufacturer and download the latest driver package to get your device drivers up to date.
You can also perform an update through Device Manager by following these easy steps:
- Turn on your internet connection.
- Go to the Start menu.
- Type Device Manager in the Search bar and click on the option when it appears in the search results.
- Once the Device Manager window opens, look for your webcam device under Cameras, Imaging Devices, or Sound, Video, and Game Controllers.
- Right-click on your webcam device and select Update driver from the context menu.
- Select the Search automatically for updated driver software option. Windows will search your computer and the web for the latest driver software for your device.

You’ll then have to manually select the location where the driver is saved on your computer and install the driver.
- Once the driver has been successfully downloaded and installed, restart your PC and check whether your integrated webcam is now functional.
Doing so not only ensures that you don’t get the wrong drivers but also helps you keep your PC working optimally at all times since you will always be notified anytime there is an issue with any of your device drivers.
Auslogics Driver Updater will run a full scan of your computer, locating all outdated, missing, corrupt, and incorrect drivers.
Once the scan is complete and you give the go-ahead, it downloads and installs the latest manufacturer-recommended version of the required driver software.
Solution 2: Reinstall the webcam driver
Try uninstalling and reinstalling your webcam driver and see if that will fix the issue. Follow these easy steps:
- Go to the Start menu (press the Windows logo key).
- Type Device Manager in the Search bar and click on the option when it appears in the search results.
- In the window that opens, double-click Imaging devices, Cameras, or Sound, video, and game controllers to reveal the items under it.
- Right-click on your integrated webcam device and click the Uninstall device” option from the context menu.
- You’ll get a warning that says, You are about to uninstall this device from your system. Click the Uninstall button.
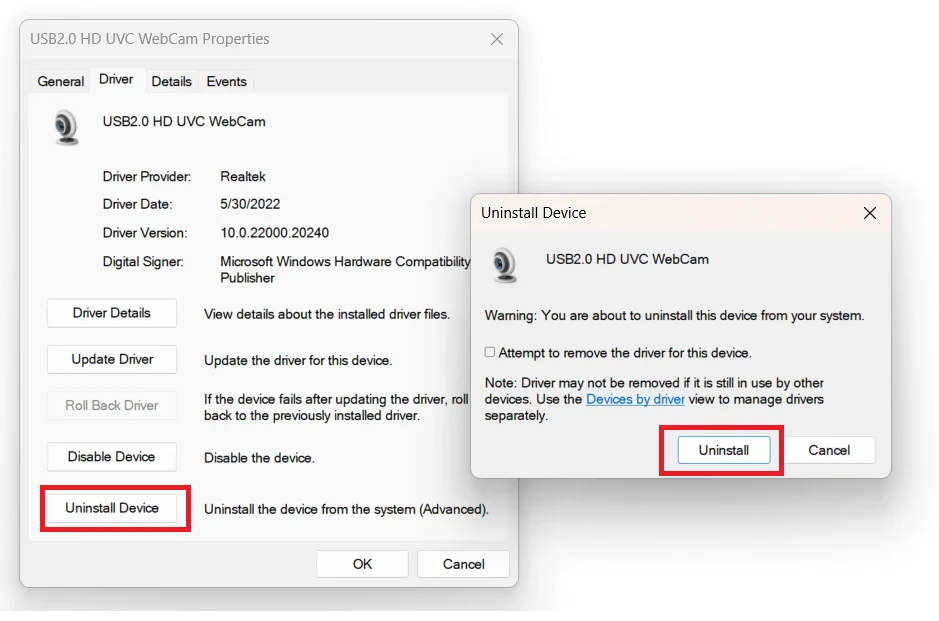
- After you restart your computer, Windows will automatically install the missing webcam driver.
- After reinstalling the driver, check if your apps can detect the webcam.
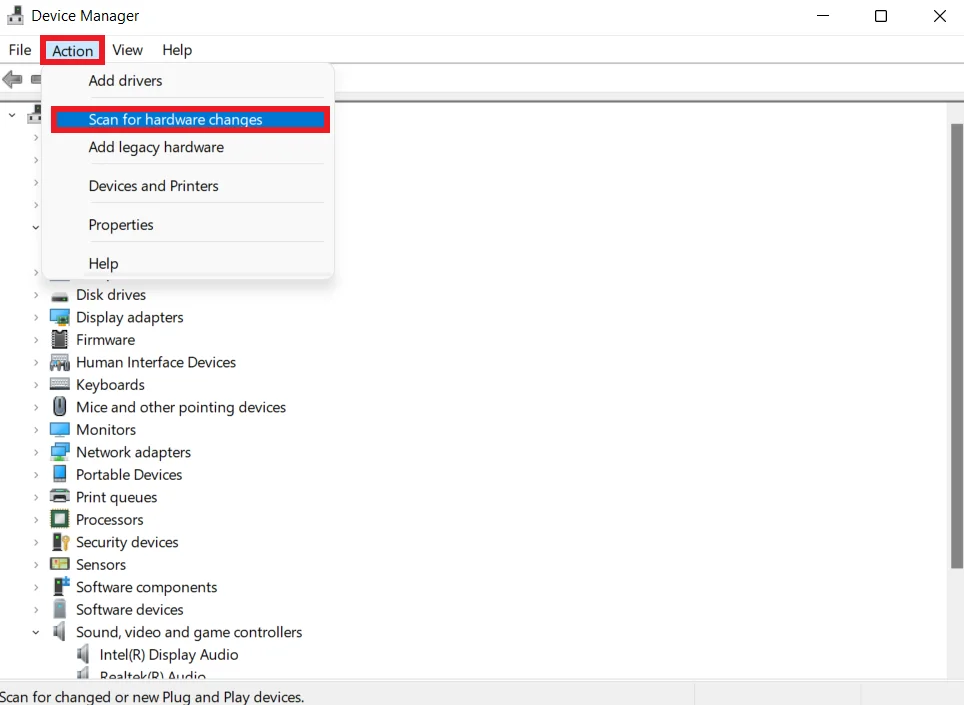
If Windows fails to install the webcam driver automatically after you’ve uninstalled it, here’s what you have to do:
- Go to Device Manager.
- Right-click on your computer (it is the first item on the list) and click Scan for hardware changes.
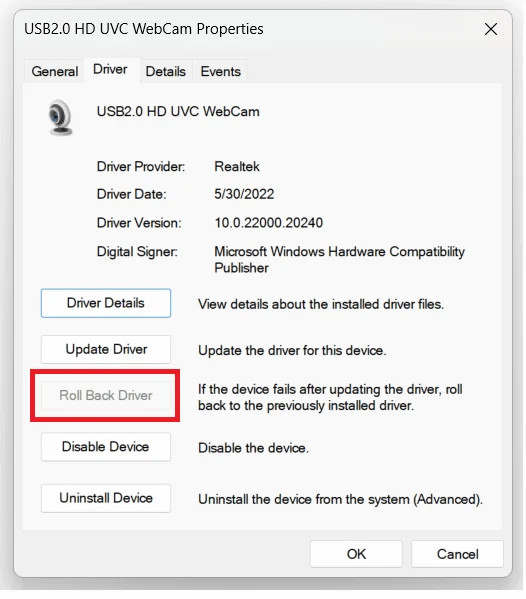
Solution 3: Roll back the webcam driver
Device Manager has an option that enables you to uninstall the existing driver of any hardware device and install the previous version of the driver instead. This option exists because the latest drivers can sometimes be faulty.
Follow the steps below to roll back your built-in (integrated) webcam driver:
- Press the
Windows key + Xshortcut to open the WinX menu. - Locate Device Manager in the list and click on it.
- Click the arrow beside Imaging Devices to reveal the items under it.
- Right-click on your webcam device and select Properties from the context menu.
In the webcam’s Properties window, click on the Driver tab.
Click the Roll Back Driver button and follow the on-screen instructions.
Solution 4: Update your Windows
Ensure that Windows is up to date. Downloading the latest updates might resolve the webcam issue. Follow these steps to check for Windows updates:
- Go to the Start menu by pressing the Windows logo key.
- Click on Settings (displayed as the gear icon).
- On the main page of the Settings app, click on Update & Security.
- Click on Windows Update in the left pane.
- Now click the “Check for updates” button in the right pane. If there are available updates, download and install them.
- Reboot your PC and then check if the integrated webcam issue has been taken care of.
Also Read: Windows Update Troubleshooter: Easily Fixing Windows Update Issues
Solution 5: Check your webcam’s configuration in the settings app
In the Windows 10/11 Settings app, there are options that, when disabled, deny all applications on your PC access to the webcam. These options affect apps from the Microsoft Store and other sources.
So if your built-in webcam isn’t working, you must ensure camera access is enabled. Follow the easy procedure below:
- Right-click the Start button or press the Windows key + X on your keyboard to display the WinX menu. Then click on Settings from the list.
- Once you are in the Settings app’s main window, click Privacy. It’s displayed at the bottom of the page.
- In the left pane of the open page, click Camera under App permissions.
- On the right-hand side of the page, you’ll find an option that says, Allow access to the camera on this device. Ensure it’s set to Camera access for this device is on. Otherwise, click the Change button and flip the toggle to turn camera access on.
- Now, make sure that Allow apps to access your camera is also toggled on.
- Under Choose which apps can access your camera, toggle on all the apps on the list or those you want to permit to access your webcam. Keep in mind that apps that are not from the Microsoft Store will not be listed here. However, such apps will have access to your webcam if you have toggled on the following options: Allow access to the camera on this device and Allow apps to access your camera.
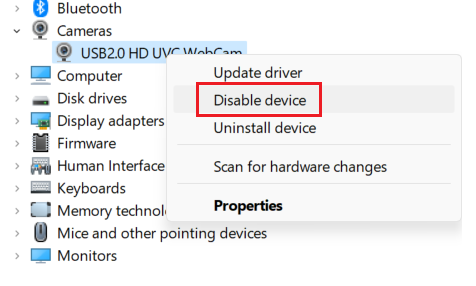
Solution 6: Disable and re-enable the device in the device manager
The webcam device might be disabled in Device Manager. If so, you’ll have to enable it before using your webcam. However, the device may be on. Some users say that disabling and re-enabling helped them fix the “webcam not working” issue. Follow these easy steps to get it done:
- Right-click the Start icon or press the
Windows key + Xcombination on your keyboard to open the WinX menu. Next, locate Device Manager in the list and click on it. - In the window that opens, you’ll find a list of all devices on your computer. Click the arrow beside Cameras or Imaging devices to expand the item.
- Right-click on the webcam device. In the context menu that opens, seeing Enable device means that your webcam has been disabled. So click on the option to make your webcam functional. However, if you right-click on the webcam device and see Disable device instead in the context menu, it means it’s already active. So to troubleshoot the issue, click Disable device, then right-click on the webcam device again and click Enable device.
Solution 7: Reset your PC
If you have tried all the above solutions and your PC’s built-in webcam is still not operational, and Windows and apps can’t detect it, the next option you have is to reinstall your Windows OS.
Once you have backed up your files, follow these steps to reset your PC:
- Open the Settings app by holding the
Windows logo key + I. - Click on “Update and Security.”
- On the left pane of the page, click on Recovery.
- On the right pane of the page, click Reset this PC.
How to Fix Laptop Camera Not Working for Specific Brands
Sometimes, the laptop camera not working could be due to the specific PC brand you’re using. If you are trying to fix the camera on a Lenovo laptop, go through the below steps.
1. First, turn your camera on.
The camera lens on recent Lenovo laptops (2018 and later) may have a switch close to the camera that covers or opens the lens. Make sure your camera is on by checking this button.
2. Check the settings of the program that wants to access the camera
If you’re using a program like Google Meet, you may have to check the settings to see if it has access to your camera. For example, a Lenovo laptop camera may display as an Integrated Camera.
If it’s not selected, choose that as the default camera.
3. Check software conflicts.
Check to see if the camera’s use indicator light is on. If so, a program may be using the camera. If you want to use the camera in another program, you’ll need to discover the one already using it and then close it.
These steps should help you resolve the issue of the integrated webcam not working. If the problem with the integrated webcam driver in Windows 10/11 continues, it’s probably due to a hardware failure in the camera.
You may have to contact the company’s support team. If you need a camera for an urgent meeting, consider getting an external webcam.
Conclusion
Your laptop camera not working shouldn’t stop your work activities.
This guide shows several common causes of laptop brands, such as an MSI laptop camera not working.
Some of these causes are hardware issues, such as damaged cables or faulty drivers, and software issues, such as outdated software or conflicts with other programs.
You can solve these issues by updating your Windows and webcam driver, rolling back the webcam driver, etc.
However, if these basic solutions don’t work, you may need professional help to diagnose and fix the issue.
Finally, to maintain the health of your laptop camera, it’s essential to handle the device carefully and update drivers and software regularly.
FAQ
Type reset this pc in the Windows search box. Then, select Reset this PC. Next, click Keep My Files to save your files. Click Next, then select Reset. That will reinstall your operating system.
Check this guide for more in-depth information: How to Factory Reset an HP Laptop?
To update your drivers on Windows PC, search for Device Manager from the search bar. Then choose a device to update. Right-click your selected device, and click on Update Driver.
If you want a detailed explanation, which we recommend, check out this guide: How to Update Drivers on Windows 10 PC? [Easy Guide]
If you want the best driver updater, consider Auslogics Driver Updater. It’s a cutting-edge tool that can help you maintain always-up-to-date drivers.
It scans for updated drivers and makes it simple to apply them with a single mouse click! After downloading and starting the software, it will check itself for updates automatically.
Check out this guide for an in-depth review: Auslogics Driver Updater: Update Your Drivers in One Click!