
Some Windows 10 users reported getting the error code 0xA00F4243 (0xC00D3704) while trying to use their webcam.
Usually, the following error message accompanies the error code: “Close Other Apps. It looks like another app is using a camera already. If you need it, here’s the error code: 0xA00F4243(0xC00D3704).”
Do you want to learn how to fix the webcam error 0xc00d3704? If yes, please read through this Windows 10 guide.
What is the 0xa00f4243 (0xc00d3704) Error Code?
The 0xa00f4243 or 0xc00d3704 error code is a Windows error that prevents users from using the Camera app. It restricts access to picture taking, video recording, and other functions.
The issue often comes up when conflicting apps are trying to use the app together.
What Causes the 0xA00F4243 (0xC00D3704) Error?
We examined the error through various user reports and repair strategies commonly used to fix the issue. It turns out that several culprits could trigger the error message.
- File corruption. Several factors can lead to file corruption. The main culprit is malware. It creates malicious scripts that disrupt system operations. It also causes system and app conflicts. You need to use a reliable anti-malware tool to get rid of the malware. In some other cases, you can repair corrupt files by reinstalling the affected program.
- A disabled camera. Some laptop keyboard configurations (especially Lenovo models) include a physical shortcut that enables users to disable the camera with functional (Fn) keys. Attempting to use the camera when it’s disabled via such shortcuts may cause the error. It’s best to check if your computer has such a shortcut and enable your camera to resolve the issue.
- Bad Windows updates. Some Windows updates could corrupt registry files, leading to the instability or malfunction of the affected programs. The best fix is to correct the corrupt registry values or, better still, reinstall the problematic updates.
- An outdated or incompatible camera driver. An outdated or incompatible camera driver causes most camera-related issues. You can resolve that by updating or reinstalling your camera driver.
- A disabled camera service. A common practice among many users is disabling or terminating all services running in the background. They often do that to boost their system’s performance. If you’ve disabled the service associated with your camera, you need to enable it for the camera to work.
- A third-party security app conflicting with the Camera app. Some third-party antivirus programs shut down or restrict the Camera app for security reasons. You can temporarily disable or uninstall your third-party antivirus program if you’re certain there’s no security threat.
How to Fix the Camera Error Code 0xa00f4243
Fix 1: Run the hardware and devices troubleshooter
The Hardware and Devices troubleshooter is a Windows utility that resolves hardware-related errors.
It scans your system for such issues and recommends repair strategies that might resolve them. Several users reported that they had resolved the problem with this method.
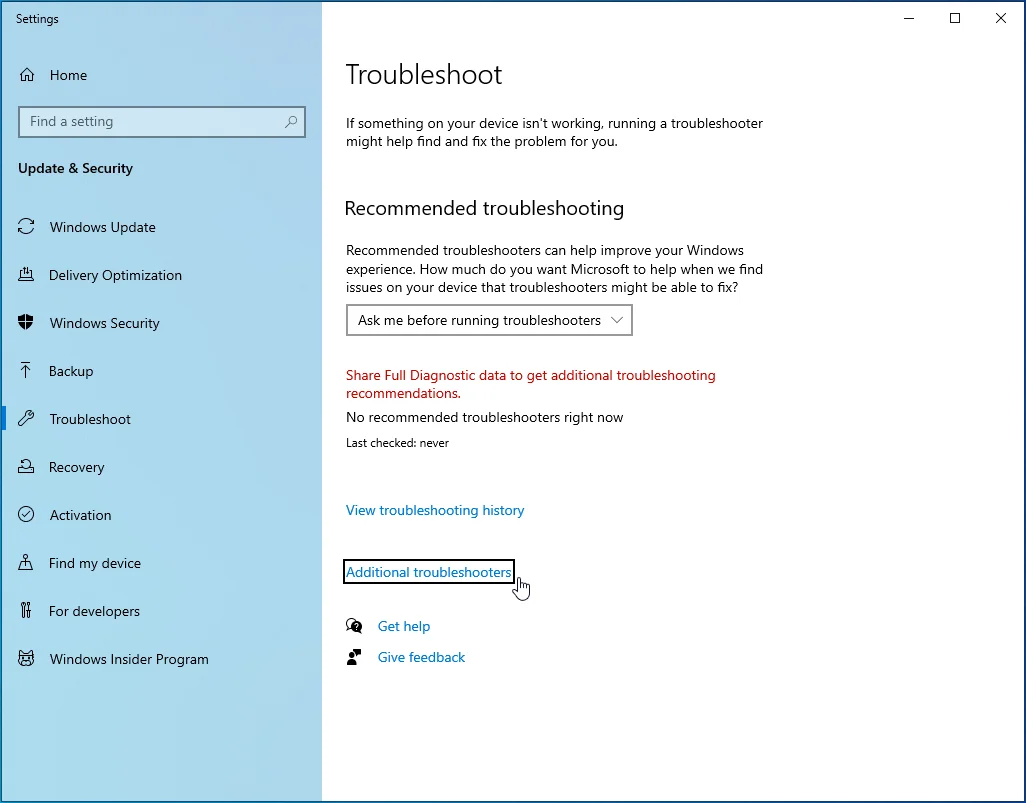
Follow the steps below to run the Hardware and Devices troubleshooter:
- Press the
Windows key + Sshortcut.

- Type troubleshoot and hit the Enter key to launch the Troubleshoot window of the Settings app.

- Click on Additional troubleshooters.
- Navigate to Hardware and Devices and select Run the troubleshooter.
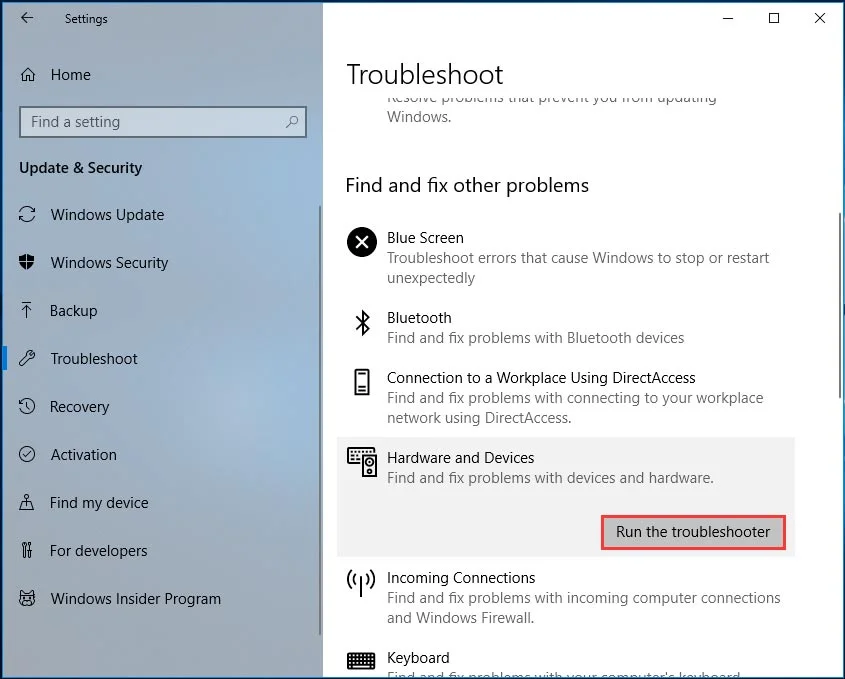
- Wait for the initial diagnostic phase to complete. Then select Apply this fix to initiate a suitable repair strategy.
- Afterward, restart your computer and check if this method has fixed the issue.
If you encounter the same error message, try the next fix.
Also Read: Windows Update Troubleshooter: Easily Fixing Windows Update Issues
Fix 2: Enable the camera (if applicable)
Some laptops have keyboard shortcuts to enable or disable the camera. If you’re using a Lenovo product, then this fix might work for you.
However, the same shortcut might work for other laptops with similar functions.
To try this fix, press the Fn + F8 shortcut. Then open the Camera app to check if this method has worked for you. If the issue persists, try the next method.
Fix 3: Reinstall/update your camera driver
Running an outdated or incompatible camera driver often makes the Camera app fail or misbehave. A corrupt camera driver can also result in system conflicts, causing the app to malfunction.
Some affected users were able to resolve camera-related issues by updating or reinstalling their camera drivers. Here’s a quick guide to reinstalling the camera driver:
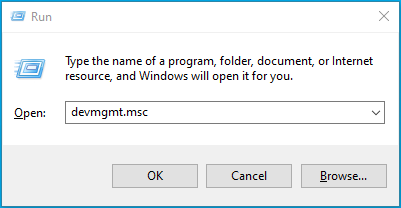
- Press the
Windows key + Rsimultaneously to launch the Run dialogue box. - Type
devmgmt.mscand hit the Enter key to launch the Device Manager. Select Yes to grant administrative privileges if prompted.
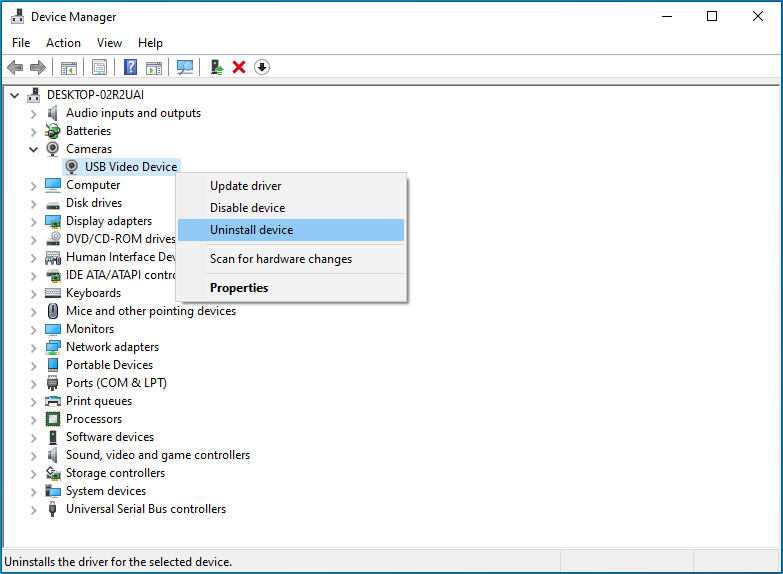
- In the Device Manager window, expand the Imaging Devices (or Cameras) drop-down menu.
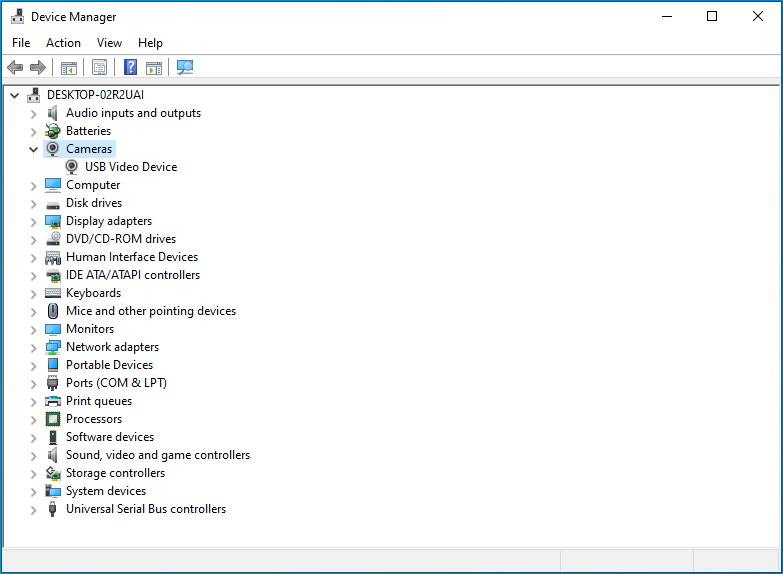
- Right-click your camera and select Uninstall Device.
- Click Uninstall to confirm and initiate the uninstallation process.
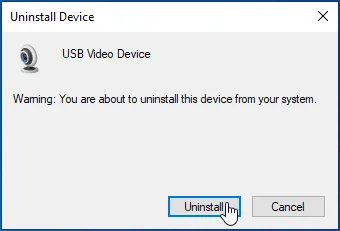
- Wait for the process to complete, and then restart your computer. The system will automatically reinstall the camera driver on startup.
We highly recommend using Auslogics Driver Updater in this case. It’ll scan all your device drivers for errors and compatibility issues, resolve them automatically and update all your driver software if need be.
Afterward, open the Camera app to see if this method has resolved the issue. If not, proceed to the next fix.
Fix 4: Create the EnableFrameServerMode value with the Registry Editor
If the error started to appear after a recent Windows update, it could be due to installation errors. Installation errors lead to corrupt or missing registry files, resulting in system conflicts and app failures.
Adding a specific value to the registry may help resolve the issue. Follow the guide below to do so:
- Press the
Windows key + Rsimultaneously to launch the Run dialogue box. - Type
Regeditand hit the Enter key to launch the Registry Editor.
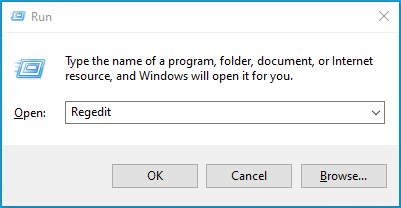
- Select Yes to grant administrative privileges if prompted.
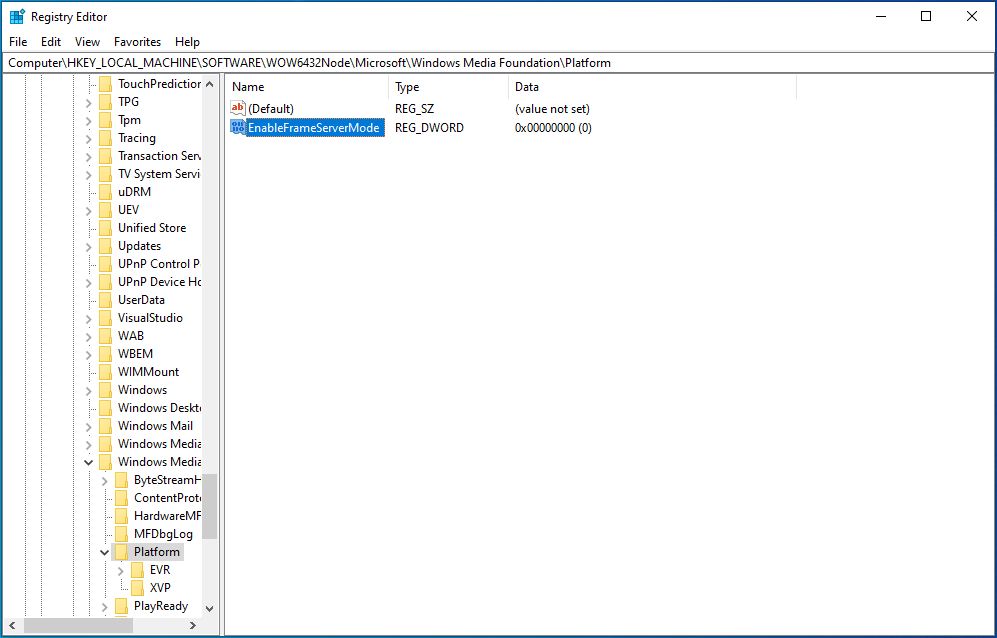
- Navigate the path below using the left window pane: Computer\HKEY_LOCAL_MACHINE\SOFTWARE\WOW6432Node\Microsoft\Windows Media Foundation\Platform.
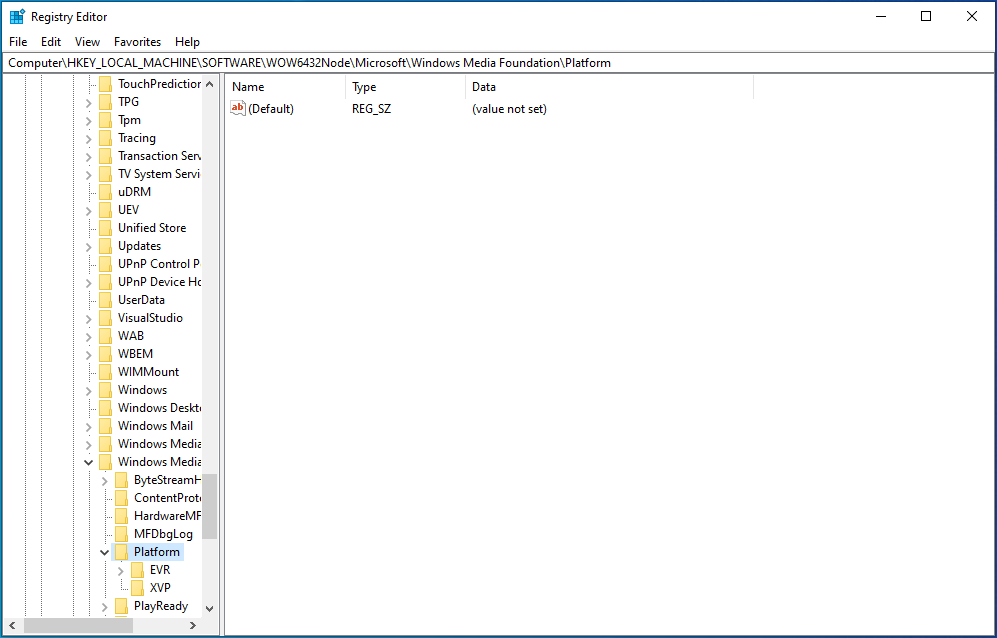
- On the right window pane, right-click and select New > DWORD > (32-bit) Value.

- Name the newly created DWORD EnableFrameServerMode. Then press Enter to save all changes.
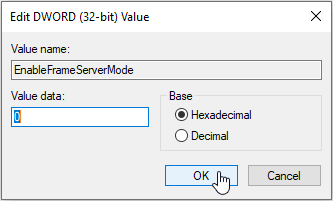
- Open the EnableFrameServerMode value and set Value data to 0 and Base to Hexadecimal. Then, select OK to save the changes.
- Exit the Registry Editor and then reboot your computer.
Afterward, open the Camera app and see if the error reoccurs. If it does, try the next fix.
Fix 5: Run a System File Checker (SFC) scan
Many users reported that they had been able to resolve the issue with an SFC scan. The SFC is a Windows utility that repairs corrupt system files by replacing them with cached copies.
You can use the following steps to initiate a System File Checker scan:
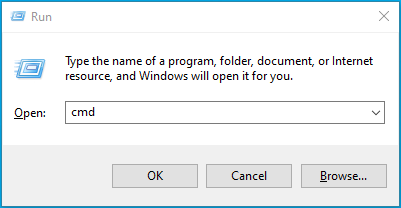
- Press the
Windows key + Rshortcut to launch the Run dialogue box. - Type cmd and then press the
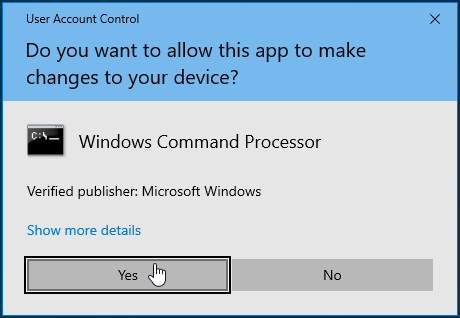
Ctrl + Shift + Entershortcut to initiate an elevated (admin) Command Prompt.
- Select Yes to grant administrative privileges if prompted.
- Type and run the following command in the elevated Command Prompt to start an SFC scan:
sfc /scannow.

- Wait for the scan to complete, and then reboot your computer.
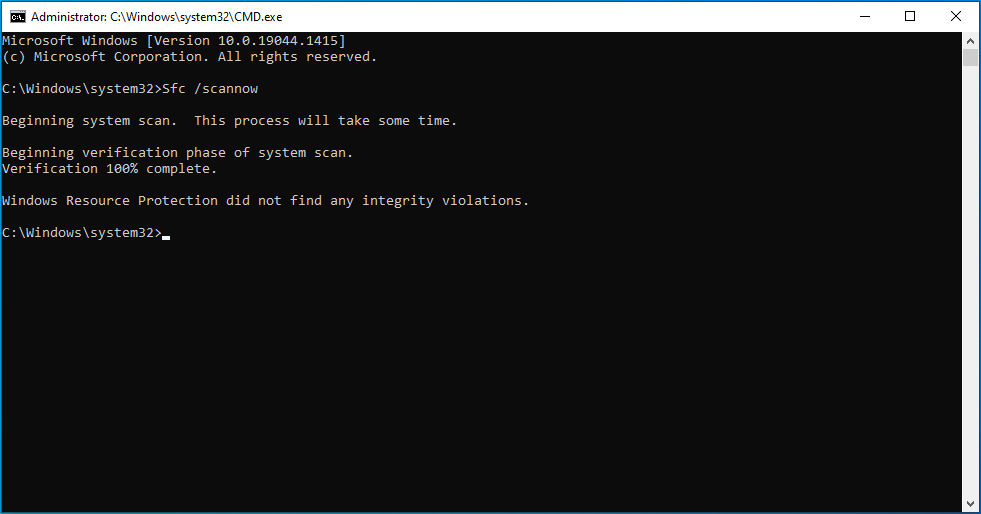
- Afterward, launch the Camera app to see if the issue persists. If it does, try the next fix.
- Uninstall your third-party antivirus software.
Overprotective security suites could unnecessarily restrict the Camera app, resulting in the issue. If you’re certain there are no security threats, you can uninstall such third-party antivirus software.
However, it’s essential to note that uninstalling your security software could expose your computer to malicious items.
Instead, we highly recommend using Auslogics Anti-Malware, a security app that won’t conflict with your software, to secure your device.
Related: Auslogics Anti-Malware: Features and Reviews
Fix 6: Enable the Intel RealSense Depth service
Some users reported that the 0xA00F4243 (0xC00D3704) error had started to appear after disabling the Intel® RealSense™ Depth service. The Camera app can’t work without its associated service.
If you suspect the same scenario, you can follow the steps below to resolve the issue:
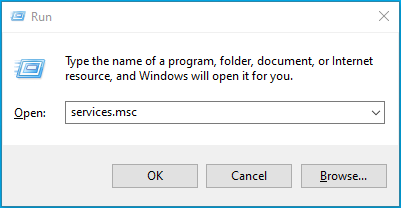
- Press the
Windows + Rkeys simultaneously to launch the Run dialogue box. - Type
services.mscinto the Run box and hit the Enter key to open Services.
- Navigate to the Intel(R)RealSense(TM)Depth service.
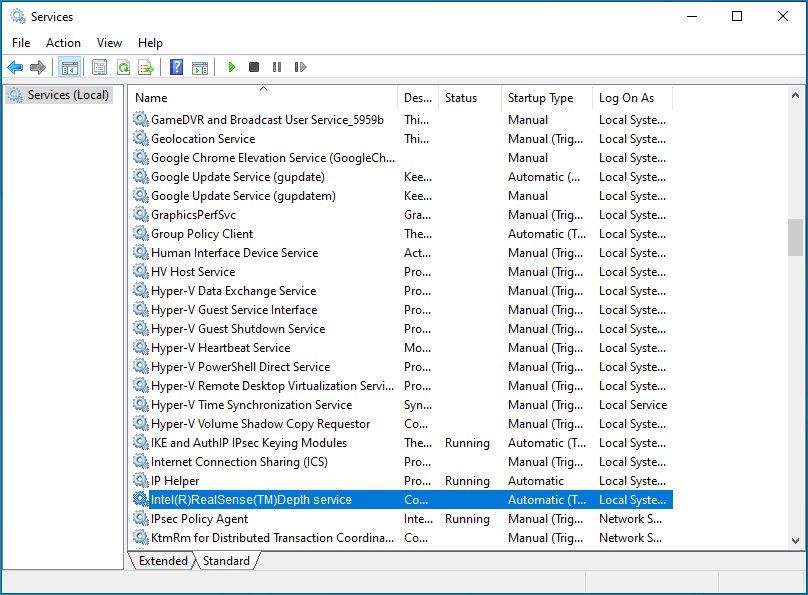
- Right-click the service and select Start.
You can now check to confirm that the app functions well.
Conclusion
We hope you were able to resolve the issue with the fixes mentioned above. Please leave a comment below; we’d love to hear from you. Need any further assistance? Please contact us.
Also, you can visit our blog for more solutions to Windows 10 issues.