
Optimizing your computer’s performance is essential in the constantly changing world of PC gaming and graphics-intensive apps. Setting your graphics processing unit (GPU) as the primary graphics source is one way to accomplish this.
Knowing how to change what GPU is used can improve your gaming experience, resulting in smoother gameplay and better performance.
This guide will show you how to set the default GPU in Windows 10.
We’ll explain why making sure you make the most of your computer’s graphical capabilities matters. Let’s begin.
Why Setting the GPU as Primary Matters
You can significantly improve the efficiency and user experience of your computer by using your graphics processing unit (GPU) as the primary graphics source. Here is why it’s important to know how to change what GPU is used :
1. Enhanced Performance
You can fully use your GPU when you make it the default option for apps and games. This helps improve visuals, quicker loading times, and the capacity to run more demanding software without noticeable lags.
In other words, it gives your PC a turbo boost. It’s the best way to optimize your PC for high-performance gaming.
2. Reduced Lag and Stutter
When playing games on your PC or using graphically demanding software, lag and stutter can be annoying. You can reduce these annoyances by making the GPU the primary. Your graphics card takes the lead to make sure everything runs smoothly and offers a better, more pleasurable experience.
3. Better Resource Management
Although Windows tries its best to allocate resources effectively, it falls short in some situations. Your computer can dedicate additional resources to graphics-related tasks by setting the GPU as the primary.
Thanks to this better resource management, your computer can handle multitasking and demanding programs more effectively and without stuttering.
📌 Related: Upgrade GPU on Laptop: All You Need to Know
When And How to Use a Dedicated GPU
When you’re running programs and apps that perform a lot of tasks at once, such as handling many tasks simultaneously, you should use a dedicated GPU (the graphics card).
This will require parallel processing.
However, if a program only needs one processing core to process its data, using a GPU will reduce its performance.
This is so because the CPU cores are the main part of a computer and are more powerful than the GPU cores.
📌 Also read: CPU Cores Explained: Does the Number of Cores Affect CPU Performance?
Remember that using a dedicated GPU also consumes more energy. So, avoid using the dedicated GPU for any apps if you use your computer on a battery and want it to last longer. This way, you save power.
📌 Related: How to Install a New Graphics Card in a PC?
“What Graphic Card Do I Have”: The Two Types of GPUs
There are primarily two kinds of GPUs: integrated and dedicated (or discrete). Integrated GPUs, which are present on your CPU or motherboard, are economical and suited for routine activities.
The performance of discrete GPUs, independent processing units with their RAM, is higher, but they use more energy and produce more heat. While Intel and AMD now offer improved integrated choices, NVIDIA and AMD still play a significant role in designing high-end GPUs.
Even though they are less potent than discrete GPUs, they perform better. In the next section, we’ll show you how to set a GPU as primary.
📌 Related: How to Find Out a Motherboard Model I Have on My PC?
How to Set a GPU as Primary: Step-by-Step Guide
You can improve your computer’s performance by making your GPU the default option. Here’s how to set a default graphics card :
Step 1: Check Your GPU
First, confirm that your system has a dedicated GPU installed.
Most computers have integrated and discrete GPUs. Here’s how to check your GPU. It’ll help you answer the question, “What graphic card do I have?”:
- Open Settings (
Windows key + I). - Go to System.
- Select Display.
- Click Advanced display.
- Search for GPU information under Adapter.
You can use this simple process to get information about your GPU, such as its name and model. It’s useful for checking system requirements and resolving graphics issues.
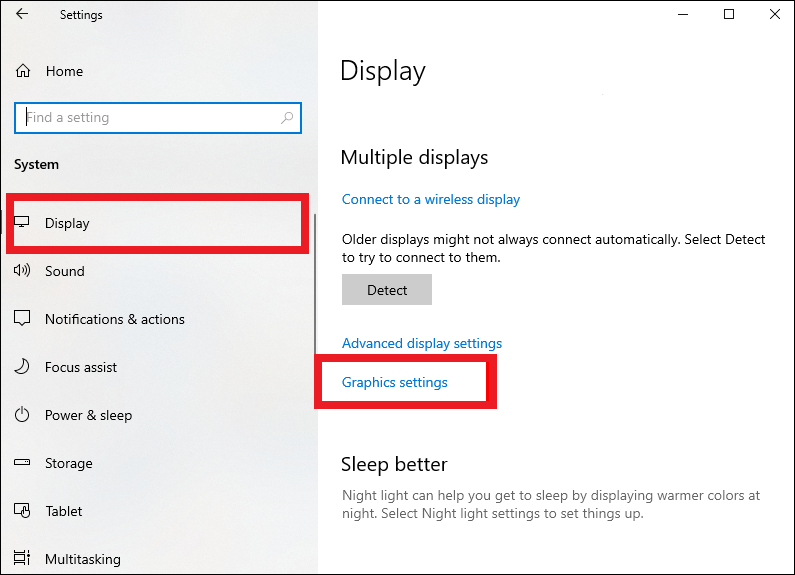
Step 2: Open Graphics Settings
To go to the graphics settings menu, open the Settings window (press Win + I), go to System, and click on Display.
Step 3: Choose the Application
Search for Graphics Settings and choose the app or program you want to configure.
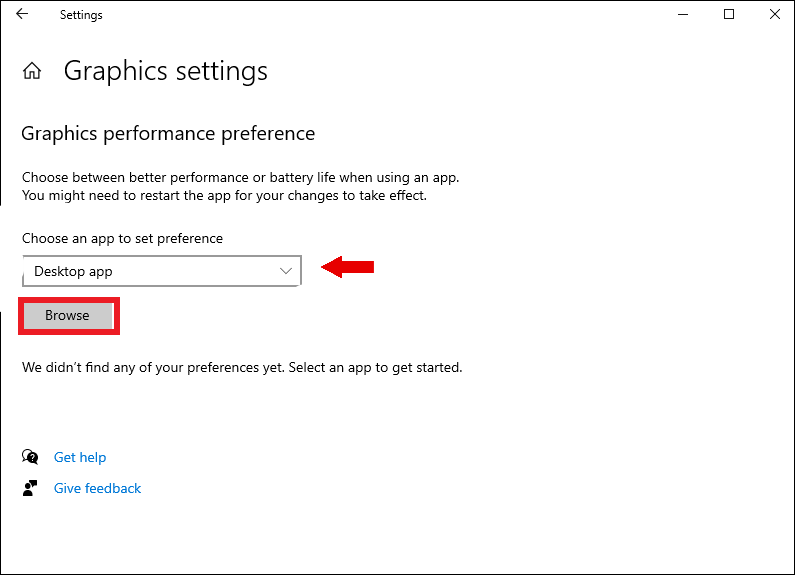
Step 4: Select Application Type
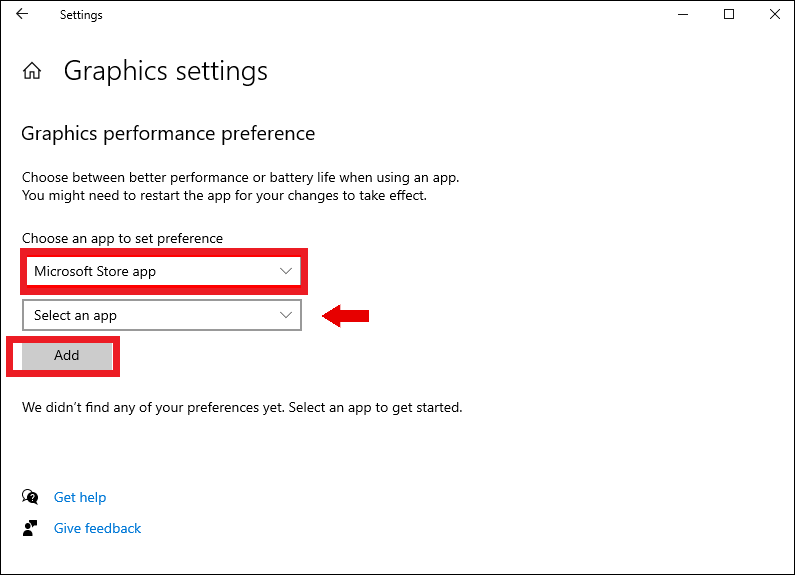
Choose Classic app, click Browse, and find the .exe file if the program is a traditional desktop application with an .exe extension. When adding a new-style Universal app, choose Universal App, choose the app from the list, then click Add. They usually come through the Microsoft Store and don’t have .exe extensions in their names.

The apps or programs you’ve added will display in a list on the Graphics Settings page. Choose the apps you’ve added.
Step 5: Choose a GPU
Select the GPU you want to assign by clicking the “Options” button. There are three options:
- System default (which serves as every app’s default GPU),
- Power saving (which typically uses integrated graphics), and
- High performance (which typically uses a standalone graphics card).
Step 6: Save Your Settings
If you look at the GPUs listed, you’ll see that the same name appears under both “Power saving GPU” and “High performance GPU” if you just have one GPU. Save your options, and if the app is already running, restart your PC to apply the changes. That’s how to change which graphics card is being used.
📌 Also read: How to Fix No Suitable Graphics Card Found Error?
How to Change What Graphics Card a Game Uses
Sometimes, you might want to set a game to use a particular graphics card, such as your dedicated GPU for faster performance or the integrated GPU for power efficiency. This is how you do it:
- Type
Settingsin the search bar and click to open. - Click on System.

- Next, click on Display and select Graphics Settings.
- Select the app using the drop-down menu. If you select Classic app, click Browse to find the executable file (.exe) to specify the app.
- If you select Microsoft Store app, select the app from the drop-down menu that appears and click Add.
- Click Options and choose your preferred option from the Graphics preference.
- You’ll have three options: System default (Let Windows decide), Power saving, and High performance.
- Select the GPU you want for the game, then click Save.

- Start the game to verify that the selected GPU is being used.
Restart your computer to apply the changes. That’s how to choose what graphics card to use.
Pro Tip: Use Auslogics BoostSpeed

Auslogics BoostSpeed is a comprehensive system optimization tool that can help improve your computer’s performance.
This software has features like system optimization, registry repair, and real-time resource management that all help to make computing more seamless.
Auslogics BoostSpeed helps ensure optimal GPU performance by deleting unused files, enhancing system settings, and keeping your registry in good shape.
A well-tuned system can maximize your graphics card’s capabilities. This is especially helpful if you want your GPU to be the primary graphics source for apps and games.
📌 Also read: Speed Up Slow Computer as a Pro – Introducing Auslogics BoostSpeed 13
Conclusion
Knowing how to set a default graphics card can change your PC or gaming experience. You won’t face any lags, and resources are managed more effectively.
This guide helps you maximize your hardware, whether you’re a gamer looking for a competitive edge or a professional needing quick graphics rendering.
So, remember to check your GPU, explore your system settings, and adjust your preferences. You’ll appreciate the performance improvement if you know how to set a dedicated GPU as default.
FAQ
Click on “Graphics options” under “Related settings.” Select “Desktop app” under “Choose an app to set preference.” Click “Browse” to find your installed apps and games folder.
Click “Add” after choosing the executable files for your programs and games. After adding all the games and apps, select “High performance” under “Options,” then click “Save.” That’s how to use a GPU instead of a CPU.