![[FIXED] NVIDIA Control Panel Not Opening on Windows](https://www.auslogics.com/en/articles/wp-content/uploads/2025/10/FIXED-NVIDIA-Control-Panel-Not-Opening-on-Windows-568x359.webp)
- What Is the NVIDIA Control Panel?
- How to Open the NVIDIA Control Panel?
- Why Is the NVIDIA Control Panel Not Opening?
- Method 1: Restart the NVIDIA Control Panel
- Method 2: Restart the NVIDIA services
- Method 3: Update your NVIDIA driver
- Method 4: Quit the NVIDIA Container process
- Method 5: Update Visual C++ Redistributable and .NET Framework
- Method 6: Disable Fast Startup in Windows
- Method 7: Check your antivirus program
- Method 8: Edit your Windows registry
- How to Open the NVIDIA Control Panel: Explained
- FAQ
Is your NVIDIA Control Panel not opening ? You’re not alone.
Many users run into this problem, and it can be frustrating when you need to adjust your display or graphics settings.
In this guide, we’ll look at the common reasons why the NVIDIA Control Panel won’t open and show you easy ways to fix it.
Let’s begin.
🔍 Quick overview
The NVIDIA Control Panel lets you fine-tune your display, manage multiple monitors, and tweak 3D settings or G-SYNC for smoother gaming visuals.
⚠️ Common causes of the error
- Missing or outdated NVIDIA driver
- Conflicting software or antivirus interference
- Fast Startup preventing a full restart
- NVIDIA Container process hanging in the background
- Corrupted .NET Framework or Visual C++ Redistributable components
- Missing registry entries
🧩 Fix that works best
- Update or reinstall the NVIDIA driver (via Device Manager, GeForce Experience, or NVIDIA’s website).
You should also try:
✅ Restarting the NVIDIA Control Panel from Task Manager
⚙️ Ending the NVIDIA Container process and let it restart
📦 Updating Visual C++ Redistributable and .NET Framework
⚡ Disabling Fast Startup (Windows 10/11)
🛡️ Checking your antivirus for conflicts
📝 Editing the Windows registry to restore missing entries
What Is the NVIDIA Control Panel?
Using the NVIDIA Control Panel, you can configure and adjust various settings related to your NVIDIA graphics card. It offers a user-friendly interface for fine-tuning graphics and display settings on a computer with an NVIDIA graphics processing unit (GPU).
The NVIDIA Control Panel allows you to customize features, such as screen resolution, refresh rate, 3D settings, and image quality. It also gives you access to advanced features like G-SYNC.
G-SYNC synchronizes the monitor’s refresh rate with the graphics card to lessen screen tearing in games and particular settings for controlling multiple monitors. The following sections discuss why the NVIDIA Control Panel won’t open and how to fix it.
📌 Related: You Are Not Currently Using a Display Attached to an NVIDIA GPU
How to Open the NVIDIA Control Panel?
Seeing the “NVIDIA Control Panel is not found” message? Let’s first check whether this could be a simple matter of looking in the wrong place. There are several ways you can open the NVIDIA Control Panel:
➡️ Access the NVIDIA Control Panel from your desktop:
- Right-click anywhere on your desktop.
- Select NVIDIA Control Panel from the context menu.
➡️ You can also open the NVIDIA Control Panel from the Windows search bar:
- Type NVIDIA Control Panel in the Windows search bar.
- Click the result to open it.
➡️ You can also use the system tray to access the NVIDIA Control Panel:
- Look for the green NVIDIA icon in the system tray (bottom-right corner of your screen).
- Right-click the icon and choose NVIDIA Control Panel.
If you are repeatedly running into the NVIDIA Control Panel error, let’s see why this may be happening.
Why Is the NVIDIA Control Panel Not Opening?
Understanding the causes of NVIDIA Control Panel issues will help accurately diagnose and fix the problem. Below are the usual causes:
- Missing or outdated driver. The NVIDIA Control Panel not opening is usually caused by an outdated or missing graphics driver. This problem is frequently fixed by updating your driver to the latest version or reinstalling it.
- Conflicting software. Conflicting applications or background services can also be a problem. These conflicts can interfere with the NVIDIA Control Panel’s smooth operation. You can fix this by closing unnecessary programs and, if necessary, reinstalling incompatible software.
- Fast Startup option in Windows. Because Windows Fast Startup puts the device in a hibernation state instead of a complete shutdown, it might occasionally cause issues. The issue could be resolved by disabling the Fast Startup option.
- NVIDIA Container process. The NVIDIA Container process can prevent the NVIDIA Control Panel from launching. The NVIDIA Control Panel might start operating correctly if you end this task in Task Manager.
Below, we will cover several effective fixes for the error, starting with the ones that are easiest and quickest to implement. We will then move on to the more complex and time-consuming solutions.
Method 1: Restart the NVIDIA Control Panel
If the NVIDIA Control Panel won’t open, the first step is to stop the NVIDIA Control Panel task and reopen the program. Here’s how to restart the program:
- Right-click on your taskbar and select Task Manager.
- Click on NVIDIA Control Panel and select the End task button at the window’s bottom right.
- After a few seconds, open the NVIDIA Control Panel again.
Check if you can now access the NVIDIA Control Panel.
Method 2: Restart the NVIDIA services
Certain services NVIDIA installs on your computer are essential for adequately operating your applications. So, your software might malfunction if these services are not running. Follow the steps below to fix the issue of the NVIDIA Control Panel crashing or not opening:
- Press the Windows key + R to open the Run dialog box.
- Type services.msc and press Enter to open the service window.
- Search for the NVIDIA Display Container LS service from the list. Right-click on it, and choose Restart.
- Repeat the above steps for the NVIDIA NetworkService Container, NVIDIA LocalSystem Container, and NVIDIA Telemetry Container services.
After restarting the NVIDIA services, check if the NVIDIA Control Panel is still not opening.
Method 3: Update your NVIDIA driver
If the NVIDIA Control Panel is missing or won’t open, an outdated or corrupted driver is often the culprit. Updating your graphics driver can refresh the connection between your GPU and Windows, clearing up glitches and restoring access to the NVIDIA Control Panel. Here’s how to do it:
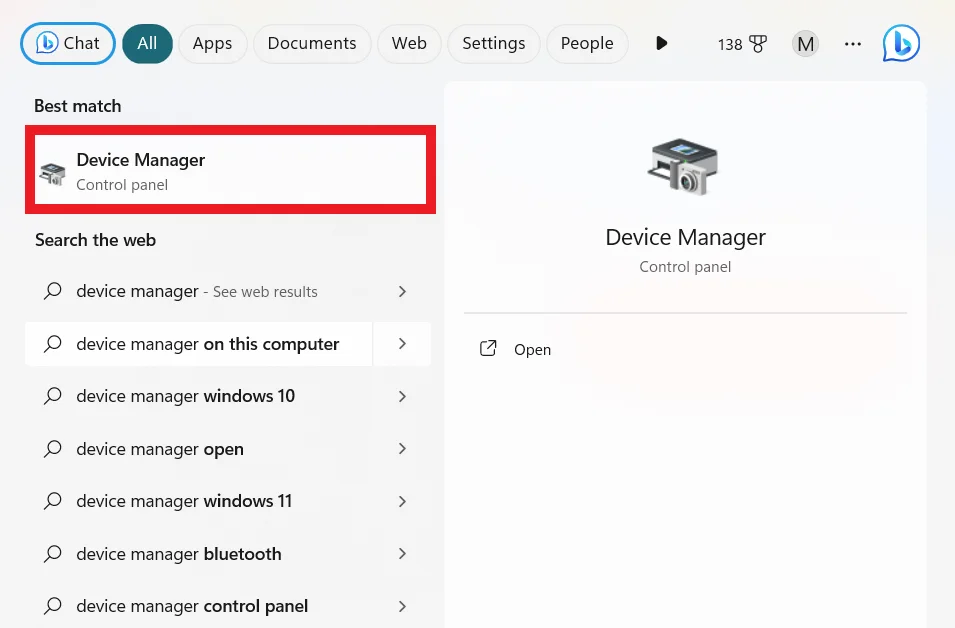
- Right-click Start and select Device Manager. Alternatively, type Device Manager in the search bar and click to open it.
- Expand the Display adapters category.
- Right-click your NVIDIA graphics card and choose Update driver.

- Select Search automatically for drivers.
Windows will look for available updates and install them if found. If Windows doesn’t find anything, try using NVIDIA’s official tools to update the driver:
- Go to NVIDIA’s official website.
- Enter your GPU model and operating system details, then download the latest driver.
- Run the installer and choose Custom (Advanced) → check Perform a clean installation. This removes old driver remnants that might cause conflicts.
You can also update your graphics driver via GeForce Experience:
- Download NVIDIA GeForce Experience, then install and open it.
- Go to the Drivers tab and check for updates.
- Install the latest driver directly from there.
If updating didn’t help, reinstalling your driver ensures a completely fresh setup. Here’s how to do that:
- Press Windows + R, type appwiz.cpl, and press Enter.
- In Programs and Features, find NVIDIA Graphics Driver → right-click → Uninstall.
- Restart your PC.
- Download the latest driver from NVIDIA’s website and install it using the Perform a clean installation option.
If the issue began after a recent update, rolling back your driver can often fix it:
- Open Device Manager → expand Display adapters.
- Right-click your NVIDIA GPU → select Properties.
- Open the Driver tab and click Roll Back Driver.
- Follow the on-screen instructions and restart your PC once complete.
Method 4: Quit the NVIDIA Container process
The NVIDIA Container process may be the cause of why you can’t open the NVIDIA Control Panel.
Its main role is to support functions of the NVIDIA Control Panel, such as managing display settings, system tray icons, and certain driver-related tasks.
If the process hangs or malfunctions, the NVIDIA Control Panel may fail to open. Restarting it forces Windows to relaunch the service, often resolving the issue.
You might be able to fix the issue if you close the program. Here’s how to do it:
- Right-click on your taskbar and select Task Manager. Click on More details if the Task Manager window appears in compact mode.
- Select the Details tab and search for the NVIDIA Container process. Right-click on it and select End task. Be sure to end every instance of this process because several of them may exist.
- Wait for the process to restart and open the NVIDIA Control Panel again.
Method 5: Update Visual C++ Redistributable and .NET Framework
For NVIDIA to run smoothly without issues, you must update .NET Framework and Visual C++ Redistributable. Here’s how to do it:
- Type Windows Update in the search bar and click on the best match.
- Click Check for updates.
- Allow Windows to install any available updates, including .NET Framework updates (they often come bundled here).
- Open your browser and go to the official Microsoft Visual C++ Redistributable download page.
- Download both the x64 and x86 versions (most systems need both).
- Run the installers and follow the prompts. If you already have them, they will update automatically.
Method 6: Disable Fast Startup in Windows
The NVIDIA Control Panel may not work as intended if Fast Startup is enabled because several crucial files and services may not load properly at startup. If this is the case, disabling Fast Startup can be helpful. Here’s how to do it:
- Press the Windows logo + R to open the Run dialog box.
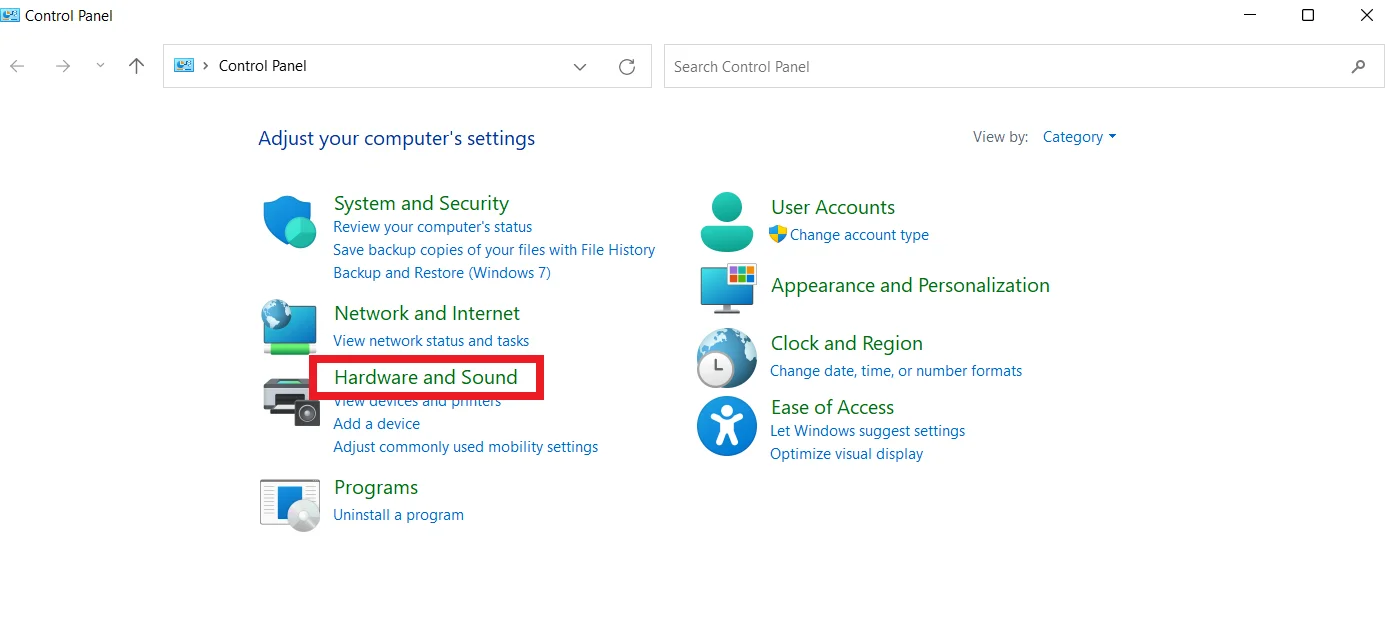
- Type control into the Run dialog box, then click the OK button. Windows Control Panel will open after this step.
- Ensure View by is set to Category. Then, click on Hardware and Sound.
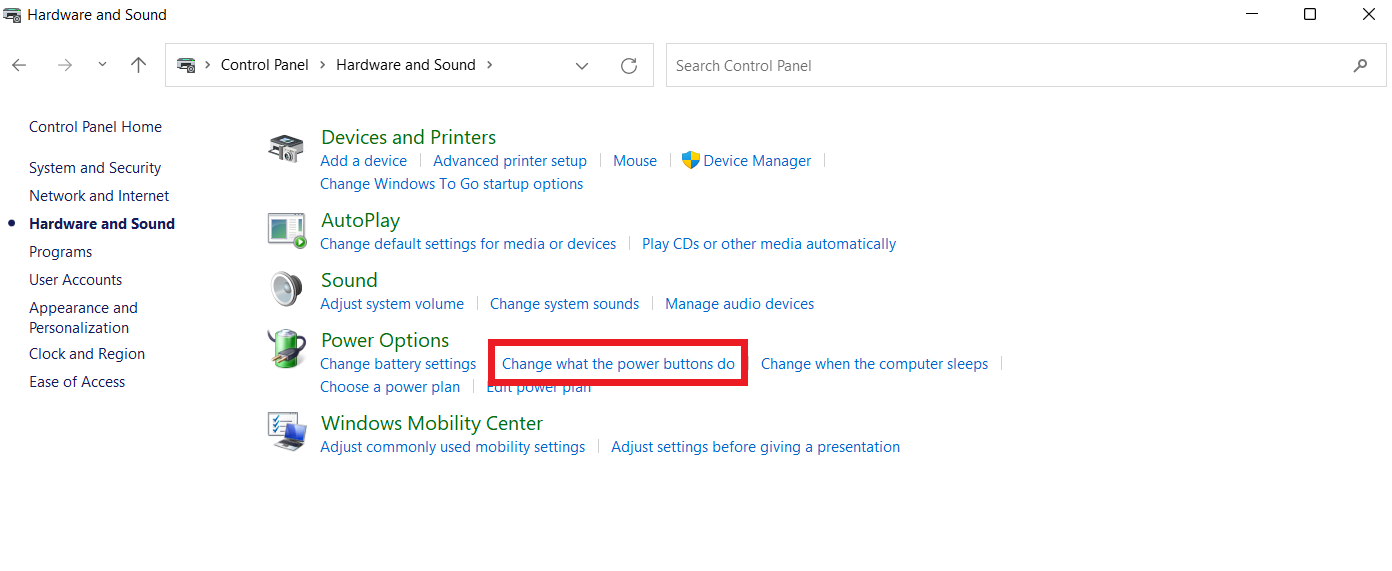
- Next, click Choose what the power buttons do under the Power Options section.
- You can change how your PC starts up using the available settings. Click on the Change settings that are currently unavailable option to get access to and adjust these settings.
- Uncheck the Turn on fast startup option and click Save changes.
Restart your computer to check if the issue with the NVIDIA Control Panel crashing or not opening has been resolved.
Method 7: Check your antivirus program
Sometimes, the NVIDIA Control Panel won’t open because of your antivirus program. Some antivirus products may unintentionally make the NVIDIA Control Panel unusable.
To fix the problem, check your antivirus settings to make sure it isn’t preventing you from accessing the NVIDIA Control Panel. If there is no such blockage, temporarily disable every feature of your antivirus program before trying to re-access the NVIDIA Control Panel.
You might need to disable your antivirus program entirely or, in the worst-case scenario, uninstall it if the problem persists.
After, try to access the NVIDIA Control Panel again.
Method 8: Edit your Windows registry
Here’s how to edit your registry:
- Press Windows + R to open the Run dialog box.
- Type regedit and press Enter to open the Registry Editor.
- If you get a UAC prompt to grant access, click Yes.
- Go to HKEY_CLASSES_ROOT\Directory\Background\ContextMenuHandler. Then, navigate to NvCplDesktopContext, right-click on it, and select Delete.
- Go to HKEY_CLASSES_ROOT\Directory\Background\shell and right-click on shell. Click New → Key and add a new key with the name NVIDIA ControlPanel. After, right-click on it, click New → Key again, and add a new key named Command.
- Next, double-click on (Default) in the right pane, enter C:\Windows\System32\nvcplui.exe under Value data, and click OK.
Restart your PC and check if you can now access the NVIDIA Control Panel.
📌 Related: Ultimate Guide: How to Fix Broken Registry Items in Windows
How to Open the NVIDIA Control Panel: Explained
If your NVIDIA Control Panel won’t open, try any solutions discussed in this guide. We suggest you start by restarting your NVIDIA Control Panel and NVIDIA services. If this doesn’t work, you can move on to updating/reinstalling/rolling back your NVIDIA driver. You can also try quitting the NVIDIA Container process and updating Visual C++ Redistributable and .NET Framework.
For some users, disabling Fast Startup and antivirus programs has proved helpful. If none of the above fixes have worked, consider editing (with caution) your Windows registry and reinstalling the NVIDIA Control Panel app from the Microsoft Store.