
So, if you are looking at the Windows update error 0x800f0922 on your screen, you will want to solve it right away. I’ve dealt with my share of Windows update errors. Some are easy to solve, some can take a while. But what you need here is the right strategy. Here are several workable fixes for the 0x800f0922 Windows update error.
Why Are You Getting the Windows Update Error 0x800f0922?
There may be several reasons why you’ve run into the 0x800f0922 update error. If I were you, I’d look into the following:
- Do you have enough disk space?
Update errors often come up when there isn’t enough free space on the reserved partition. Windows updates require a certain amount of space to download and install, and if this space is not available, the update process won’t happen.
- Are you experiencing .NET Framework issues?
A Windows update may stall if there are problems with .NET Framework on your system. This could happen because of a corrupted .NET Framework installation or conflicts between multiple versions. Since many Windows features and applications depend on .NET Framework, issues with it can affect system updates.
- Are Windows Update components working properly?
If the components that support the update process become corrupt or outdated, you might see this error. This can include the Windows Update service itself, but also related services and temporary files that “help” with the downloading and applying of updates. Resetting these components often resolves issues related to corruption or glitches.
Let’s Get Ready to Fix the Update Error 0x800f0922
Before we get to resolving the error, it’s a good idea to do a few things.
First, back up important data. This is a good first step before attempting any troubleshooting. This way, should anything go wrong, you will always be able to restore important files.
Here’s a detailed guide to backing up:The Ultimate Guide to Windows 10 Backup and Restore
Next, check your connection. You need a stable internet connection to download Windows updates. If your internet is going in and out , there is a strong chance that the update won’t complete. Check your connection to make sure it doesn’t interfere with the update. Now, let’s fix the error.
How to Fix the Windows Update Error 0x800f0922
Fix one: Run the Windows Update troubleshooter
Let’s not start by reinventing the bike. Windows already has built-in tools that are specifically designed to help you manage update errors. And running the Windows Update troubleshooter is a great place to start. Here’s how:
- In the Windows search box, type “troubleshoot.”
- Click “Troubleshoot settings.”
- Go to “Additional troubleshooters.”
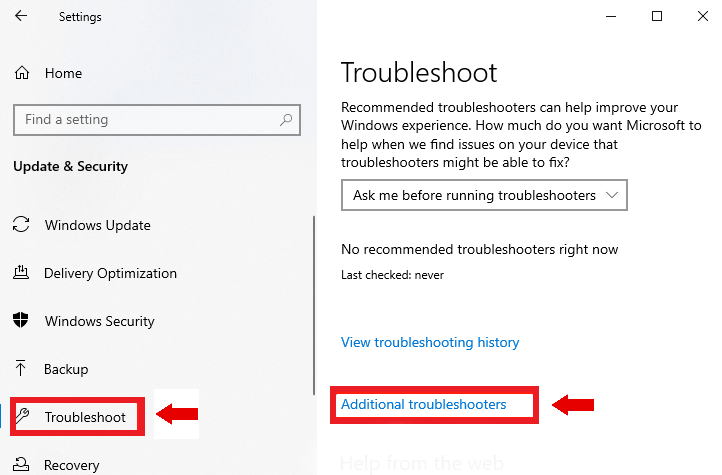
- Select “Windows Update” and then “Run the troubleshooter.”
Now, you give the troubleshooter some time to find and resolve any issues. Once the search is complete, check if the error has been resolved. If it’s still there, let’s move on to the next fix.
Fix two: Check and repair .NET Framework
As I’ve mentioned above, one of the possible culprits behind this problem is .NET Framework. So, one of the ways to get rid of the Windows update error 0x800f0922 is installing the latest version of .NET Framework. Moreover, you should activate it in Windows features. You can do those by following these instructions:
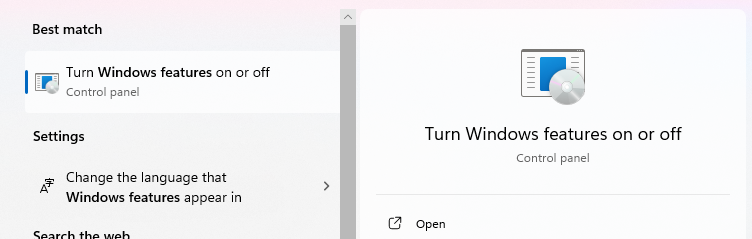
- On your keyboard, press
Windows key + S. - Type “Windows features” (no quotes).
- Select “Turn Windows features on or off” from the results.
- Select the options related to .NET Framework.
- Click OK to save your selection.
- Restart your computer.
Make sure that you perform these actions with caution because there are crucial features you might touch. If the error persists, try our next solution.
Fix three: Adjust the partition size
To install an update, Windows needs a minimum 500 MB space in the partition reserved for the update. If the partition size is too small, the update won’t install. The solution? You will need to extend the partition size.
- Go to search and type “disk partitions.”
- Select “Create and format hard disk partitions.”

- In the pop-up window, check if the reserved partition meets the space requirements.
If there is enough space, then this is not what’s causing the update error. Move on to the next fix. But if there isn’t enough space on the partition, you will need to extend it.
Fix four: Turn off the firewall
Windows Defender Firewall has been designed by Microsoft to keep your PC safe from unapproved access and malware. But sometimes, like most of us, it can “overreact” and block a valid PC action. So, turning off the firewall may sometimes help you get rid of a Windows update error.
To switch off your firewall, follow the steps below:
- Press
Windows key + Son your keyboard. - Type “Firewall” (no quotes), then select Windows Defender Firewall from the results.
- Go to the left-pane menu, then select “Turn Windows Defender Firewall on or off.”
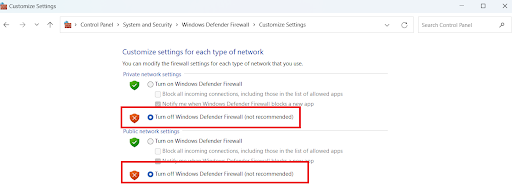
- Disable your firewall for both Private and Public network settings.
- Click “OK” to save the changes.
- Try downloading the updates again.
Do not forget to enable your firewall after you install the updates. You would not want to endanger your security, so make sure you perform this step first.
Also read: Does Windows 10 Need Antivirus?
It is worth noting that your third-party antivirus may also cause the error to show up. To resolve the problem, we recommend disabling certain features of your antivirus. If the issue persists, we advise removing your antivirus entirely. If you are able to get rid of the Windows 10 update error 0x800f0922 using this method, then we recommend switching to a different security program.
Fix five: Repair system files
If any essential files on your system are missing or corrupted, they may get in the way of a Windows update. So, make sure to check your system for corrupt files, fix them, and see if the update error goes away.
Here’s a step-by-step guide:How to Find and Fix Corrupted Files in Windows 10?
Fix six: Reset Windows Update components
You may be running into the Windows update error 0x800f0922 because there is an issue with the Windows Update service itself. In this case, you will need to reset the Windows Update components. This may seem a bit complicated at first, but just bear with these steps:
- Press
Win + Rto open the Run dialog box. - Type
services.mscand press Enter. - In the Services window, scroll down and locate the following services:
- Windows Update
- Background Intelligent Transfer Service (BITS)
- Cryptographic Services
- Right-click on each of these services and select “Stop.”
- Next, open File Explorer and navigate to the following location:
C:\Windows\SoftwareDistribution
- Right-click on the SoftwareDistribution folder and select “Rename.”
- Change the name to SoftwareDistribution.old.
- Navigate to this location:
C:\Windows\System32\catroot2
- Right-click on the Catroot2 folder and select “Rename.” Change the name to Catroot2.old.
- Now, go back to the Services window.
- Right-click on each of the services (Windows Update, BITS, Cryptographic) and select “Start.”
- Next, open Command Prompt as an administrator.
- Type the following command and press Enter:
DISM /Online /Cleanup-Image /RestoreHealth
- After the DISM scan completes, run the System File Checker (SFC) scan by typing the following command and pressing Enter:
sfc /scannow
Now, restart your PC so that all these changes can take effect.
Fix seven: Delete certain registry values
Some registry values can also cause the error 0x800f0922 to appear. Look for these entries and remove them. But here’s the catch: the registry is a sensitive database. Even the smallest error can cause system instability issues. So, you must only try this solution if you are confident with your tech skills and have made registry edits before.
Also read: How to Back Up and Restore the Windows 10 Registry
To stay on the safe side, it’s a good idea to create a system restore point on your PC before proceeding with registry edits. Here’s how:
- Press
Win + Rto open the Run dialog box. - Type
sysdm.cpland press Enter to open the System Properties window. - In the System Properties window, click on the “System Protection” tab.
- Under the “Protection Settings” section, you’ll see a list of available drives.
- Select the drive where Windows is installed (usually the C: drive).
- Click on the “Create” button.
- In the dialog box that appears, enter a descriptive name for the restore point. This will help you identify it later.
- Click “Create” to proceed.
Windows will now create the system restore point. This process may take a few moments. Once the restore point is created successfully, you’ll see a confirmation message.
- Click “Close” to exit the System Properties window.
Now, if anything goes wrong as you edit the registry, you will be able to come back to this point in time on your PC—right before you attempted registry edits.
When ready, proceed with these steps:
- Open the Run dialog box by pressing
Windows key + R. - Type
regedit, then press Enter. - Navigate to this path:
HKEY_LOCAL_MACHINE\SOFTWARE\Microsoft\Windows\CurrentVersion\WINEVT\Publishers
- Right-click “Publishers,” then select “Export” from the menu.
- Choose the location for exporting this key, then type your preferred file name. Click “Save.” If you make any mistakes, you can run this file to restore the key to its original state.
- Look for the following keys, then remove them:
HKEY_LOCAL_MACHINE\SOFTWARE\Microsoft\Windows\CurrentVersion\WINEVT\Publishers\{e7ef96be-969f-414f-97d7-3ddb7b558ccc}
HKEY_LOCAL_MACHINE\SOFTWARE\Microsoft\Windows\CurrentVersion\WINEVT\Publishers\{8c416c79-d49b-4f01-a467-e56d3aa8234c}
Once you’ve deleted those keys, check if the error persists.
Windows Update Error 0x800f0922: Fixed!
It’s never fun to run into update errors. But with the right strategy, you should be able to clear the error in no time.
First, figure out why you’re getting the error. Maybe your computer is low on space, or there’s something funky with .NET Framework, or the Windows Update components aren’t working right.
Before you jump into fixing, do a couple of simple things: back up your important files and make sure your internet is steady.
Start simple: run the Windows Update troubleshooter first.
If that doesn’t work, check and repair .NET Framework. Sometimes, it just needs a little tune-up. If your computer is running low on space, you might need to make some room by adjusting the partition size. Sometimes your firewall can also be too strict and block the update. Temporarily turn it off and see if that helps.
More advanced solutions include editing the registry. But remember—if you’re not comfortable messing with the registry, it’s best to leave it alone.
Lastly, always create a system restore point before making any big changes. That way, if anything goes wrong, you can easily go back to how things were.