As some PC users would say, if you want to learn how long you can hold your breath, try updating your BIOS firmware. The statement is mostly true because a BIOS update, when done incorrectly, could brick your motherboard and render your PC inoperable.
There are various reasons why one would consider updating their BIOS, such as when upgrading a hardware, installing a new OS, or fixing stability issues and security vulnerabilities.
This guide, therefore, has been specially and carefully curated to provide you with the best practices and step-by-step procedures required to safely and successfully complete the task without fear. Discover how to update your motherboard BIOS the right way.
What Is BIOS?
BIOS stands for basic input/output system. It is a low-level software, otherwise known as firmware, that is embedded in a flash memory chip on your PC’s motherboard.
What does the BIOS do?
The BIOS manages the flow of data between your operating system and hardware devices. This means that you can modify system behavior and performance from within the BIOS interface.
It also plays a crucial role in the system startup process. When you power on your computer, the BIOS firmware is the first piece of code that springs to life, initializing the storage drive on which your operating system is stored and triggering the MBR (Master Boot Record) to start the bootloader and load your operating system.
Before your OS is able to boot, the BIOS first runs a Power-On Self-Test (POST), which is a series of diagnostic tests that check the hardware components of your PC to ensure that they are functioning properly.
During the process, the BIOS detects, tests, and initializes your memory modules, hard drive, fan, CPU, input/output devices, and peripherals.
Should the BIOS detect faults during the POST, the test fails, and depending on the severity of the problem found, the OS is either prevented from booting or, when allowed to boot, displays an error message for the user to see. The system may also let out a series of beeps that signify a specific error code.
In modern computers, which have now shifted from the BIOS to UEFI (Unified Extensible Firmware Interface), the Power-On Self-Test completes within split seconds.
The BIOS is legacy. UEFI is the new standard. While they both perform the same basic role, UEFI has improved features, greater speed, and better security and can handle larger hard drives and high-level devices. It is not uncommon for people to refer to UEFI as the BIOS.
Should You Update Your BIOS? How to Know If Updating the BIOS Is Necessary
A BIOS update is not something you should venture to do unless the occasion calls for it. As long as your PC is working fine and you haven’t noticed any stability issues, you are better off without it.
If you’re not a tech or gaming enthusiast that likes to build computers—tinkering with overclocking, installing new CPUs, GPUs, memory, and storage drives—then you probably don’t need to flash your BIOS.
So, when is it actually necessary to update your BIOS? The only reasons you might have to justify seeking answers to the question, “How to update my BIOS,” include:
Compatibility requirements: An update becomes necessary when you want to install new hardware that won’t work with your current BIOS or when you learn that a certain app or software requires an updated BIOS.
Security concerns: A new update might be made available to disarm threat actors and discourage exploits. When you head to the manufacturer’s website, you might find a new BIOS release labelled “recommended.” But that doesn’t mean you should jump right into it, especially if there’s nothing wrong with your PC. Instead, you should read the description. If it shows that the update contains a new security patch that deals with potential vulnerabilities, then you should probably go for it.
Stability improvements: Certain glitches and, oftentimes, system crashes could be traced back to the motherboard BIOS. In that case, it becomes imperative to run an update.
Optional features: Your new hardware might have capabilities that can only be enabled with a specific BIOS version. For example, you could achieve improved power management and better use of system resources. But you have to weigh the pros and cons to determine whether said features are worth the effort.
The conclusion is that you need to have a strong reason to go for a BIOS update, and if you must update, only choose a version that’s listed on the manufacturer’s official website as addressing known bugs or security vulnerabilities.
How to Update Your Motherboard BIOS
We will cover the general process for updating BIOS using a USB drive. Afterwards, consult the table below to find the specialized process for your specific PC brand or motherboard.
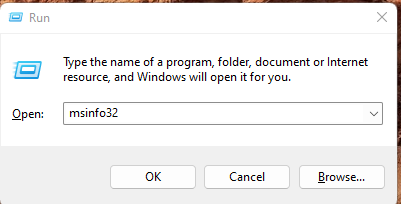
Step 1: Identify your BIOS details
First things first, you have to identify your current BIOS version and motherboard manufacturer. Here’s how:
- Open the Run dialog. Use the
Windows + Rshortcut. - Type msinfo32 and hit
Enterto open the System Information window.
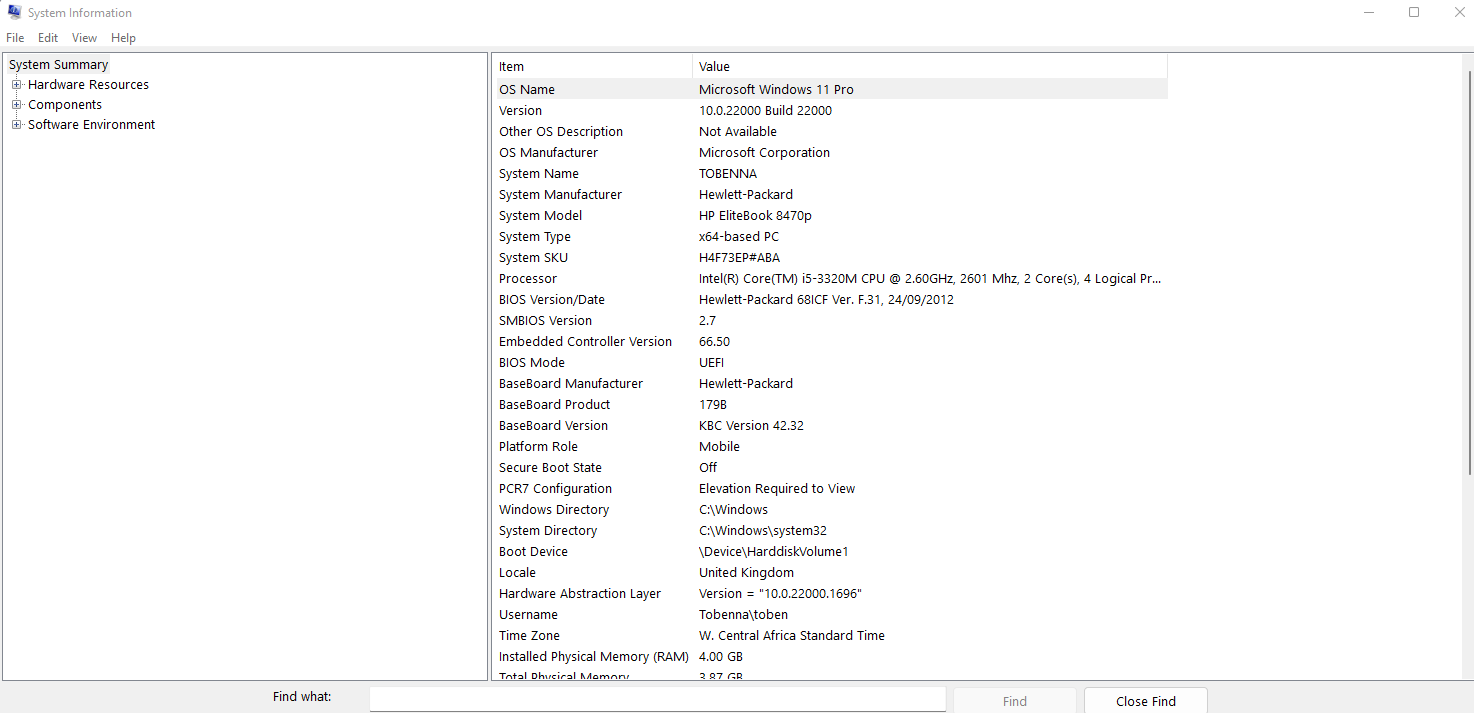
- Under the Item column on the right-hand side of the window, locate BIOS Version/Date and write down the details. This includes the name of the manufacturer, the BIOS model, version, and date.
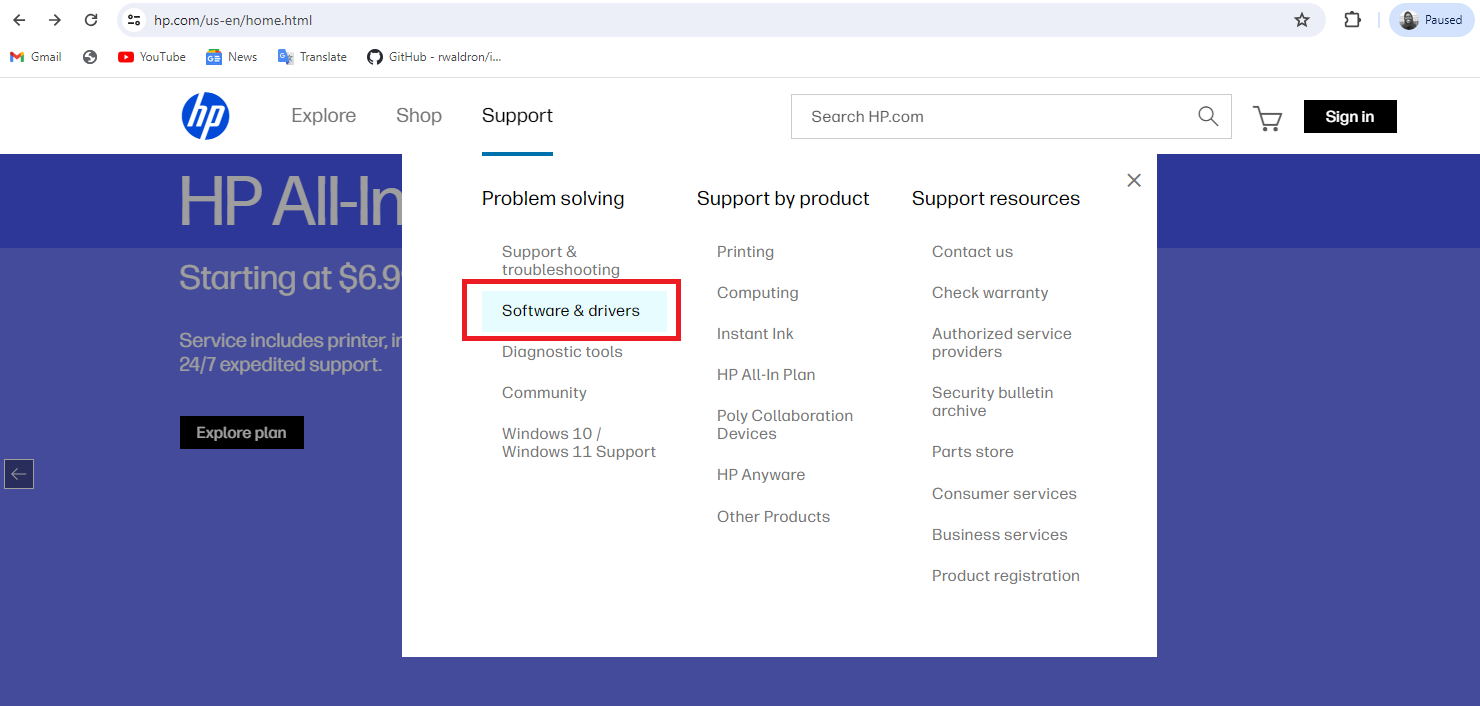
Step 2: Visit the manufacturer’s official website
On the website, go to the Support section or the Download section and type in the model of your motherboard. You will now see a page that lists all available updates. Download the latest one. Make sure that it’s not a beta version, and double-check to ensure you are downloading a compatible version.
Here’s an example from HP:
After you’ve completed the download, double-click on it to run the setup tool and choose whether you want to do a direct install or whether you prefer to copy the installation file to a USB drive so that you can initiate the update via the BIOS interface of your computer.
If you choose the latter, ensure that you format your USB drive to the FAT32 file system as shown in Step 3 below.
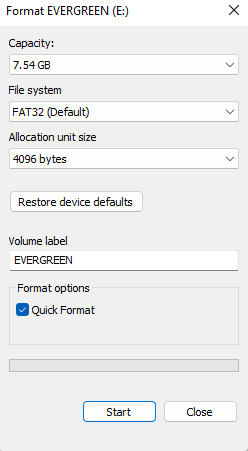
Step 3: Prepare the USB drive
Ready your USB drive for the update. Preferably, it should be an empty drive with at least 1GB storage capacity. Follow these steps:
- Insert the drive in your USB port and go to File Explorer.
- Right-click on the drive, and then click Format.
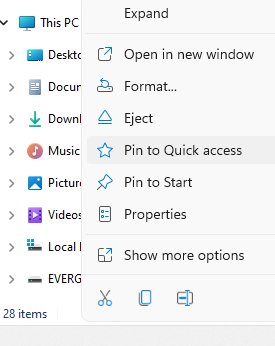
- Select FAT32 in the File system menu. Then click the Start button to format the drive.
- Go to the download location of the BIOS file you downloaded and locate the file. It is a ZIP file. Right-click on it and click Extract All.
Select the root directory of your formatted USB drive as the location for the extracted files to be saved, and then click Extract.
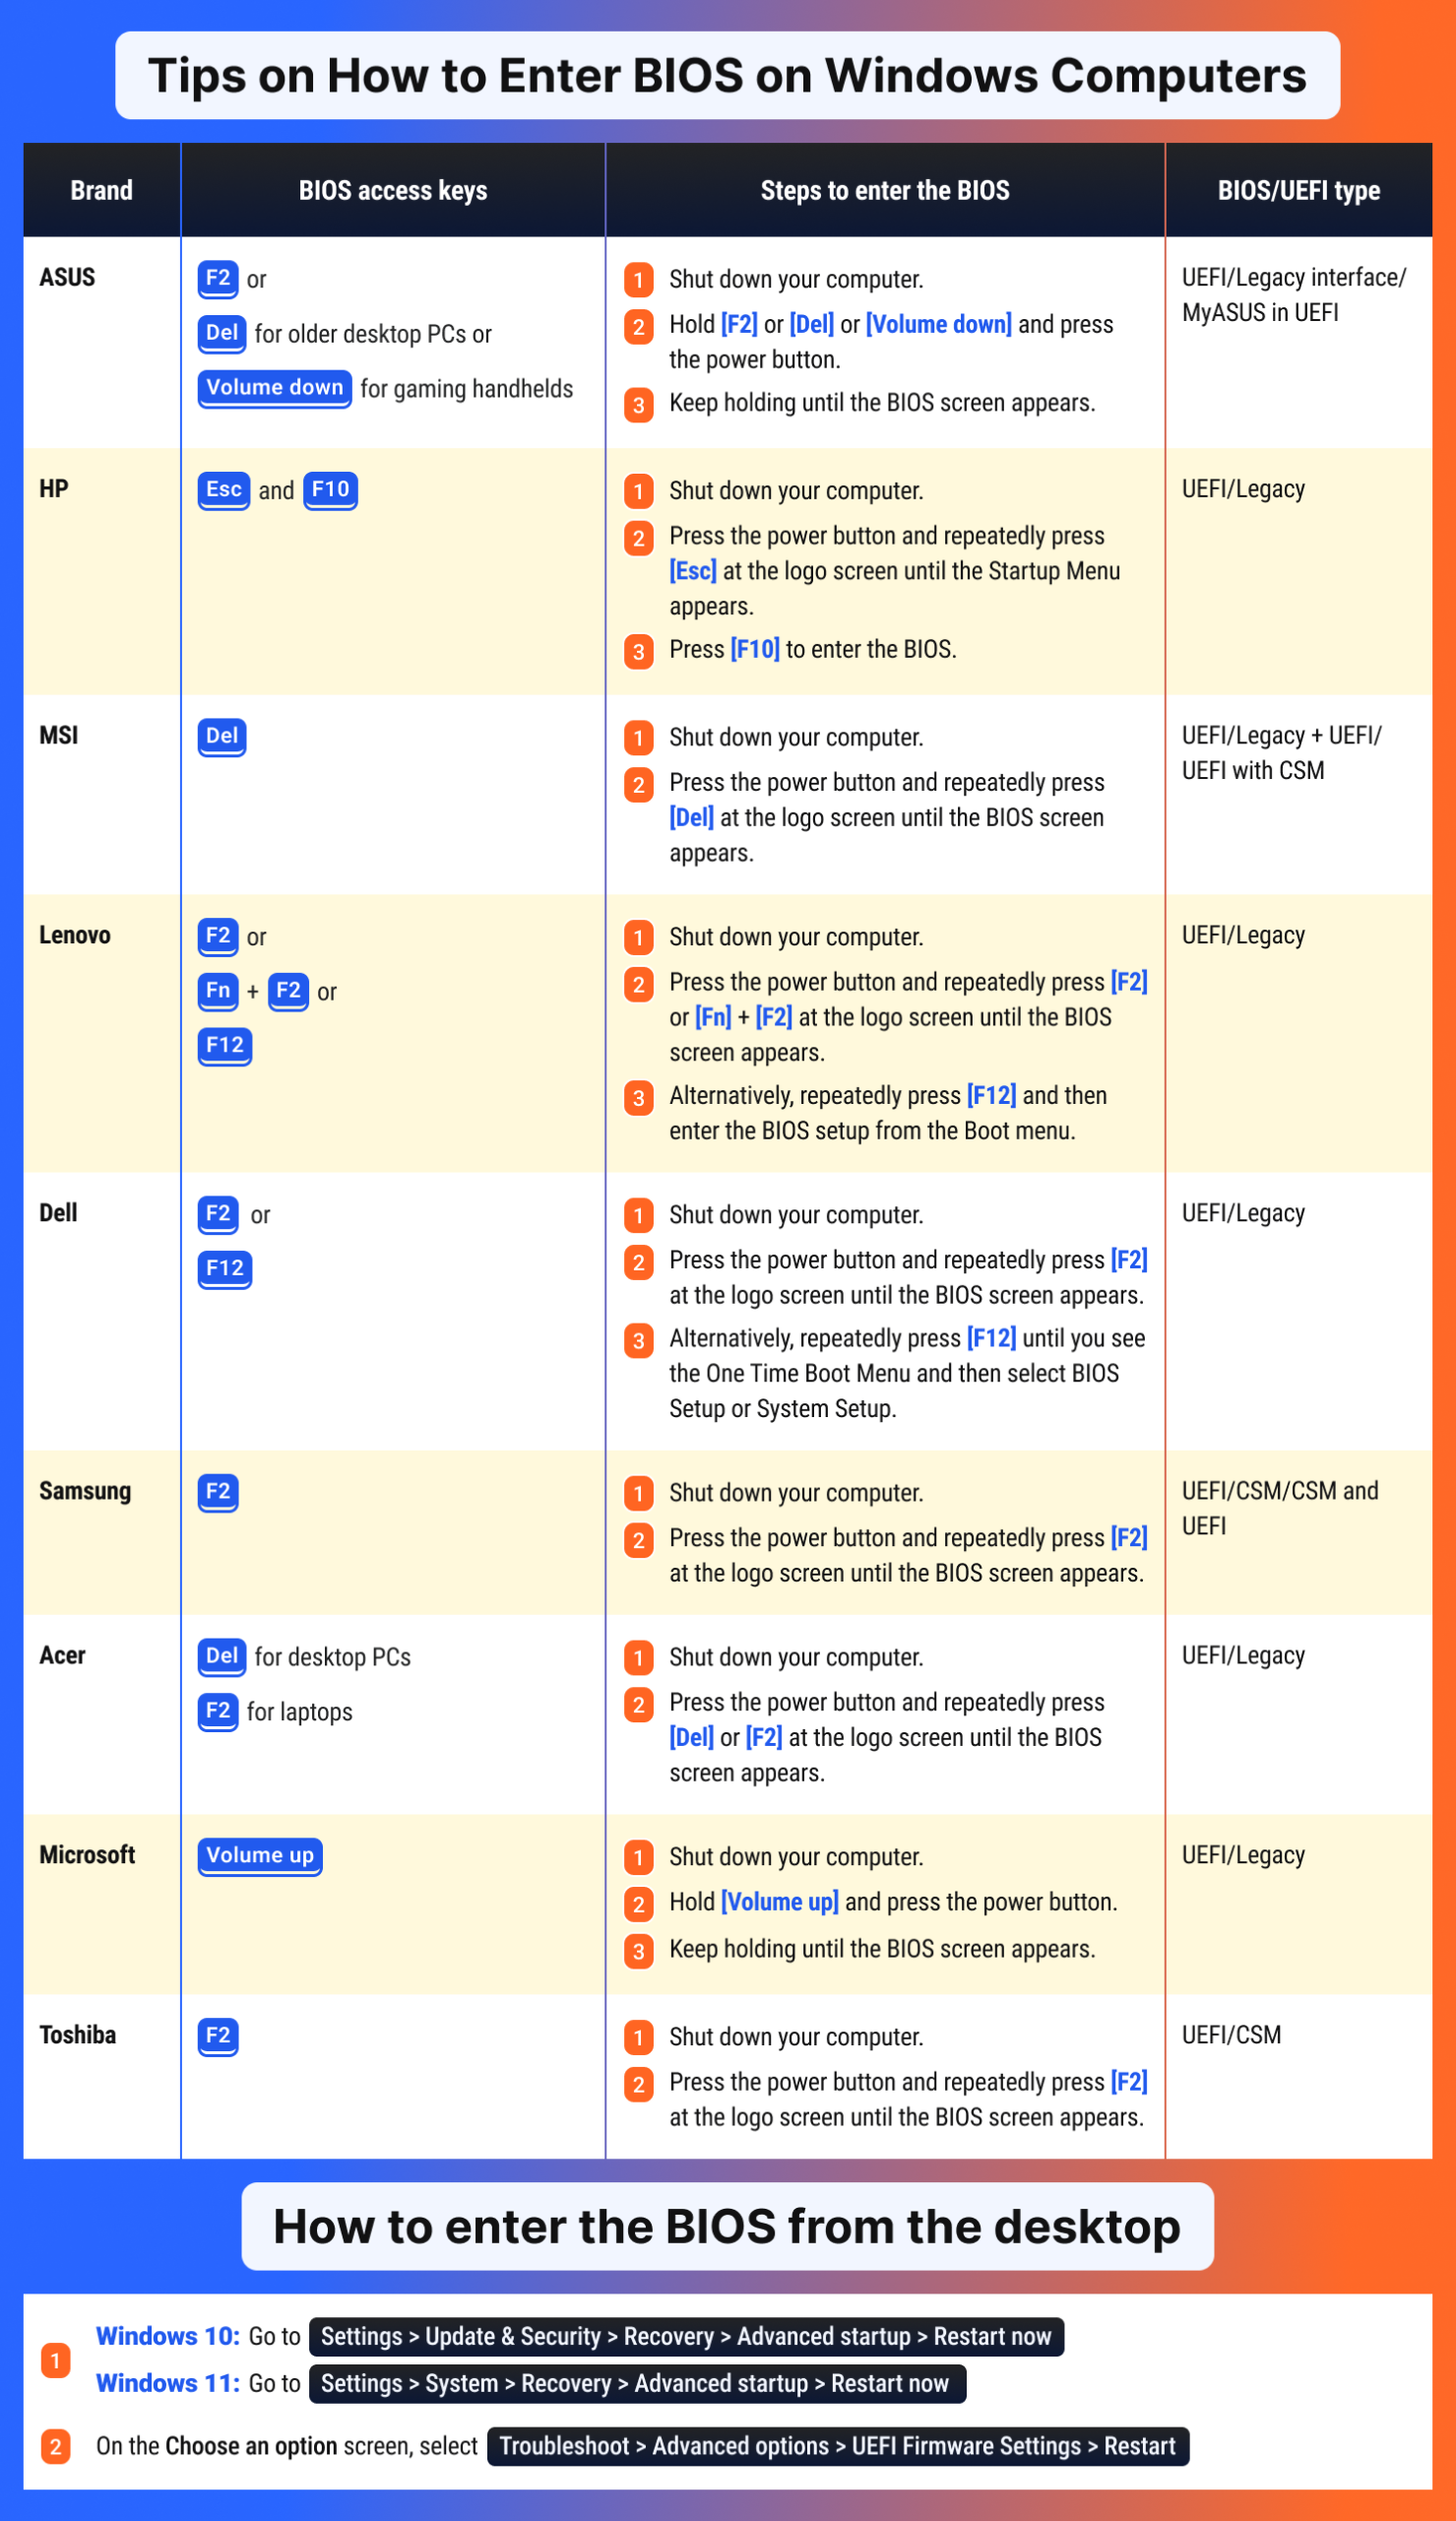
Step 4: Enter the BIOS environment
First of all, close all open applications on your PC. And most importantly, plug in your charger and confirm that the PC is charging.
Afterwards, depending on your device, use any of the methods in the image below to enter into the BIOS environment while keeping your USB drive plugged in:
Step 5: Install the update
Once you’re on the BIOS screen, follow this general process to start the update:
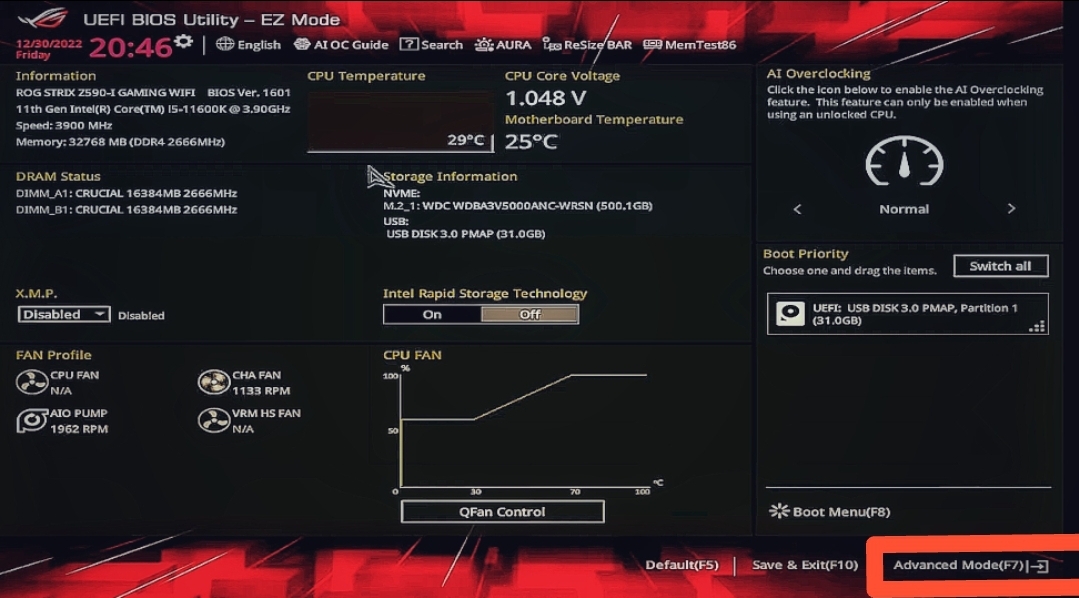
- Use the arrow keys on your keyboard to navigate the BIOS menu. What you’re looking for is the BIOS update utility, otherwise known as the flash utility tool. This differs depending on your motherboard manufacturer. But once located, you’ll find your USB drive and the file it contains.
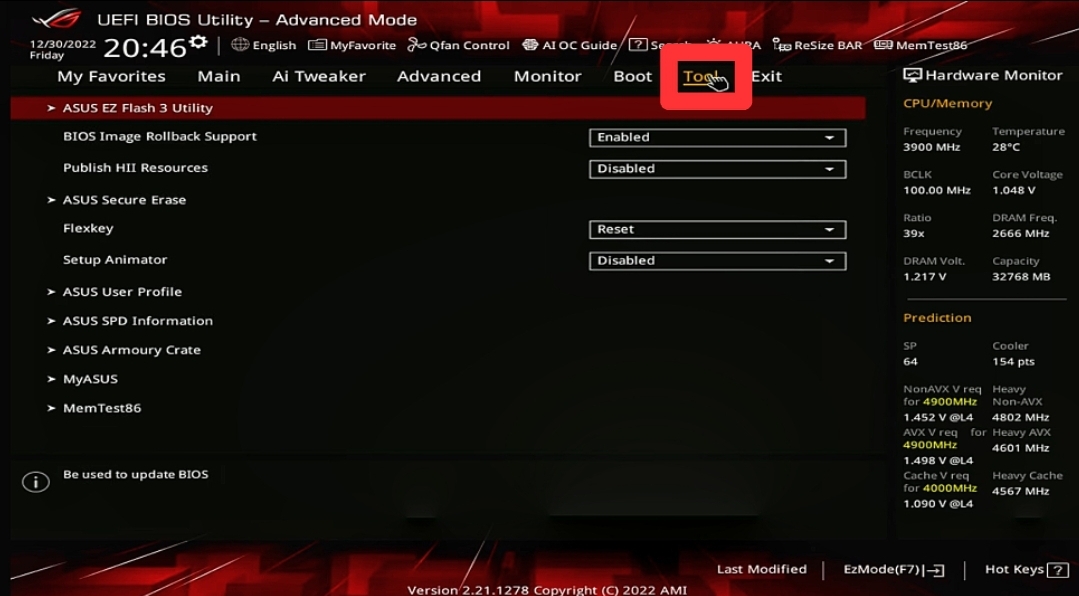
For example, on ASUS, the flash utility tool is called EZ Flash. To find it, once you’re in the BIOS environment, switch to Advanced Mode and go to Tools.
(to be in swiping format)
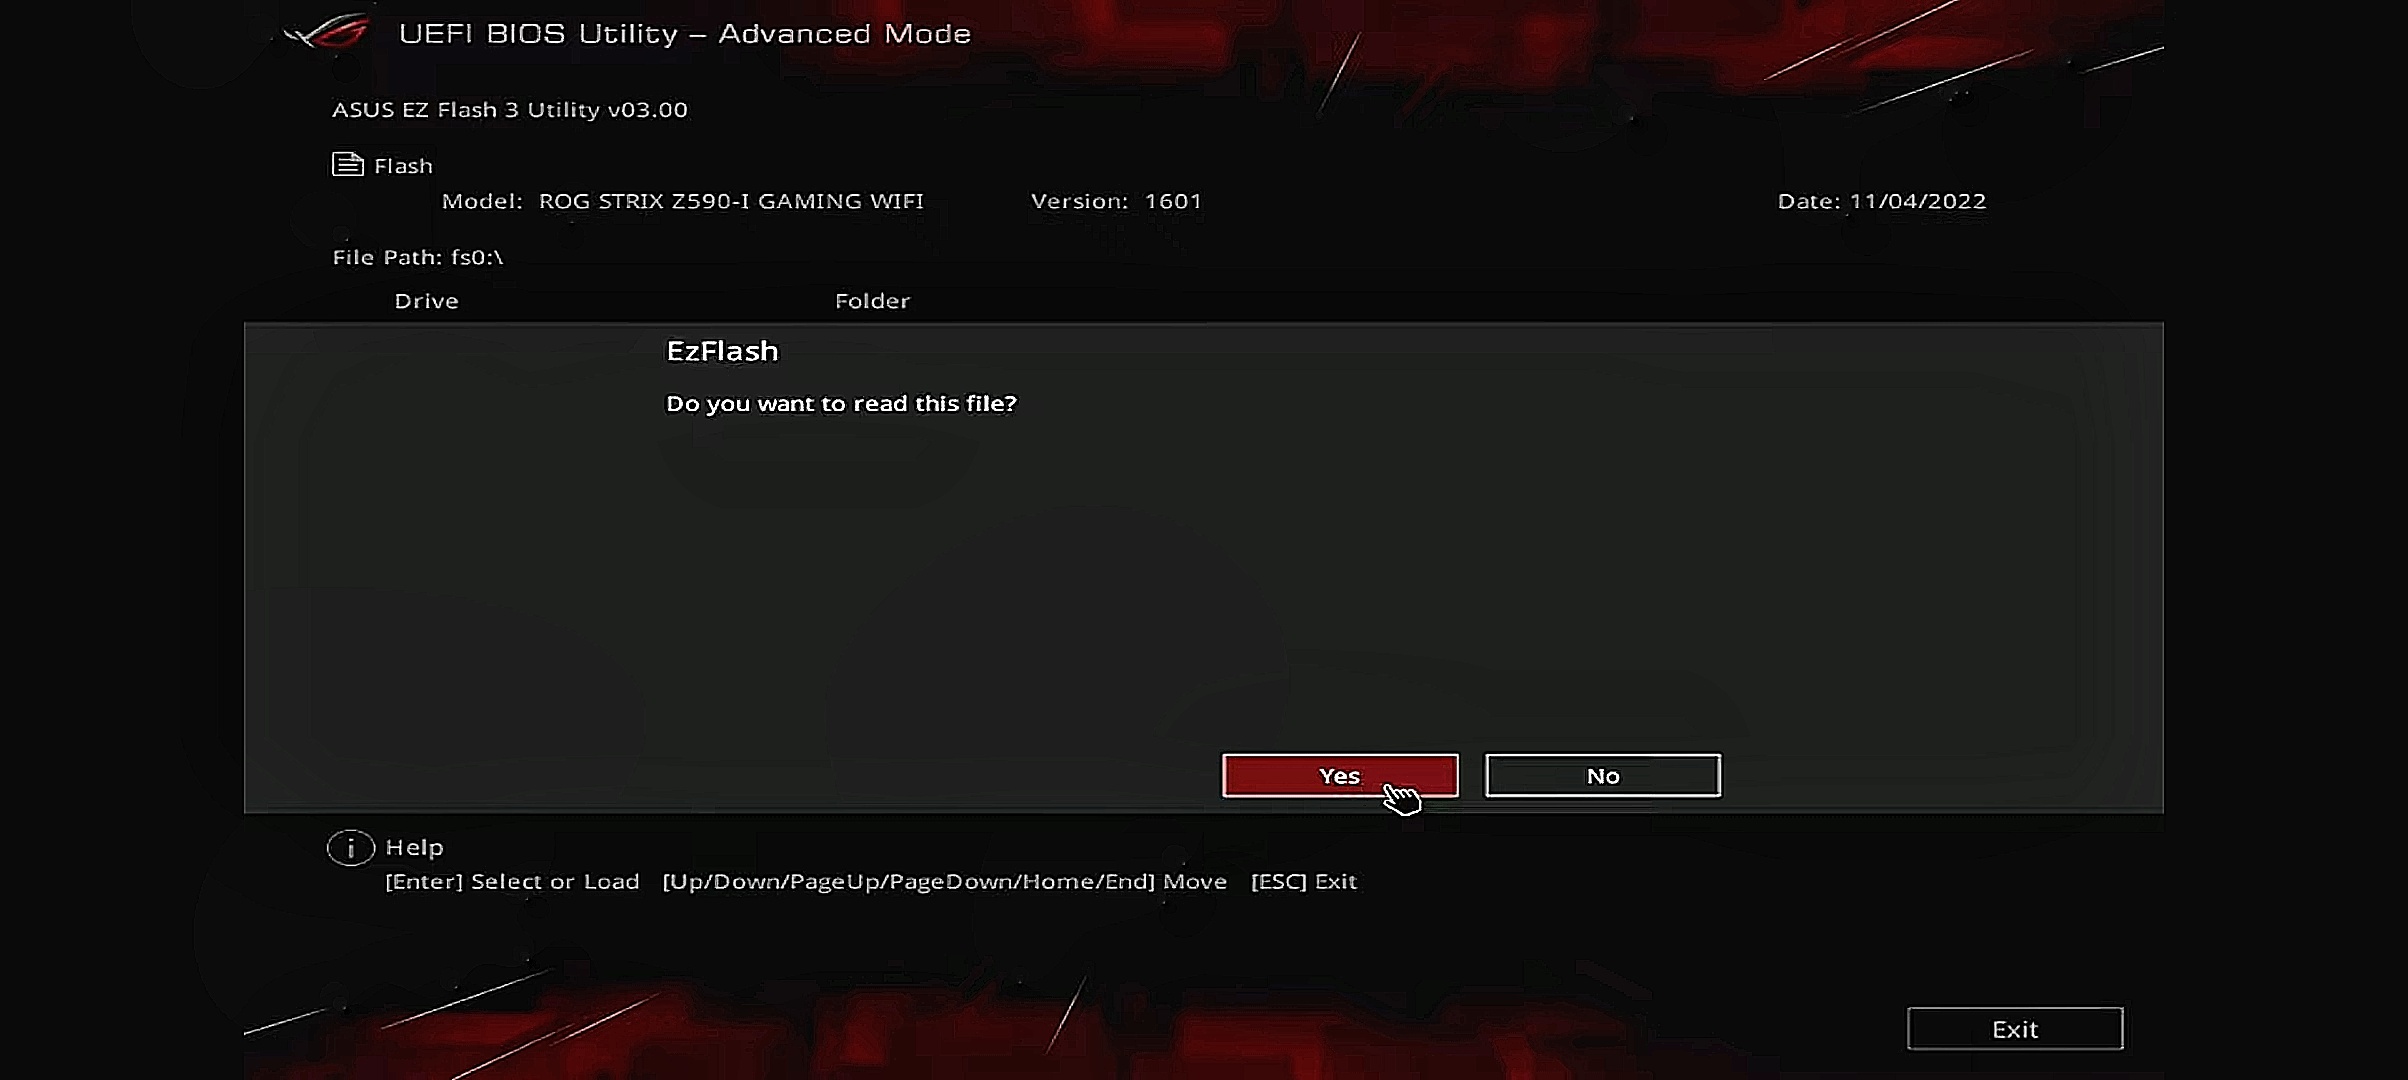
- Select the update file, which you saved earlier on your USB drive.
Here’s an example from ASUS EZ Flash:

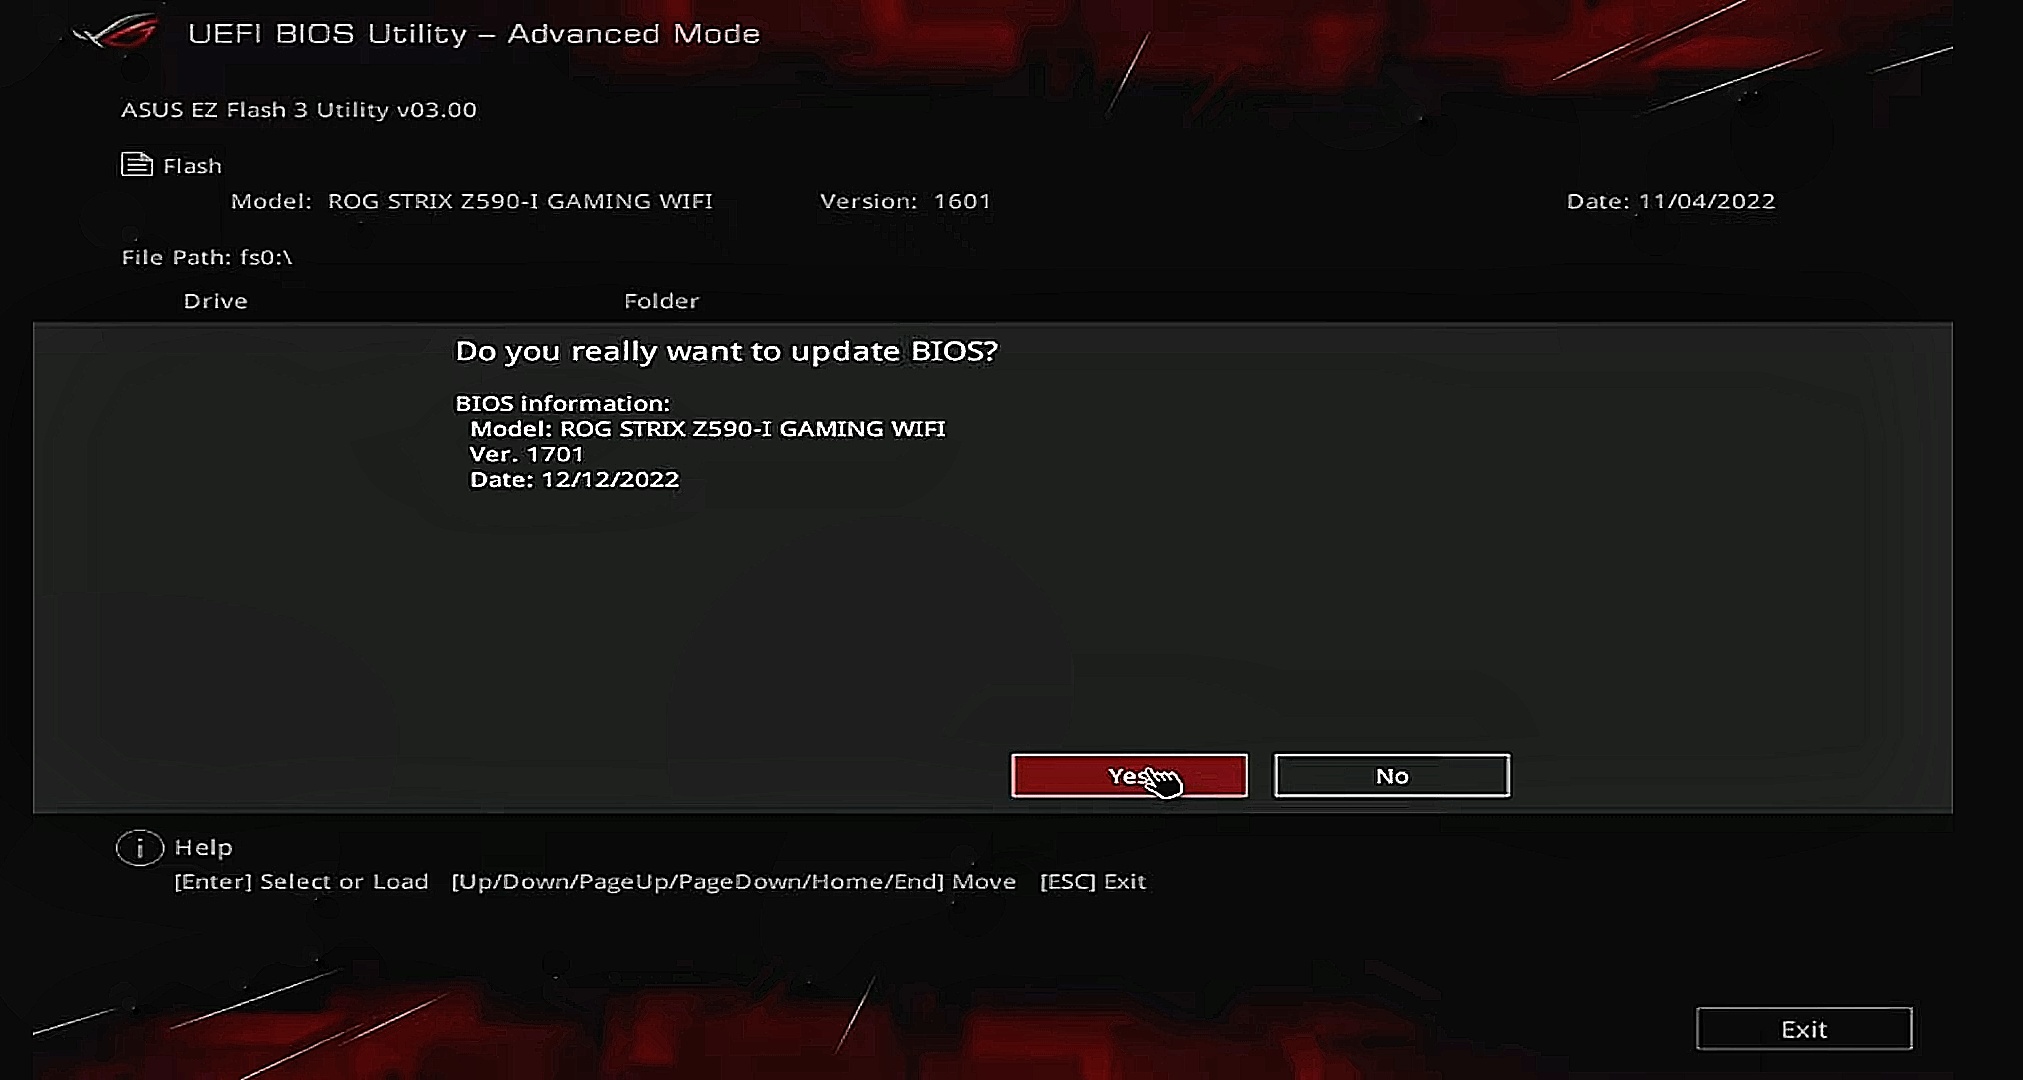
- Follow the onscreen prompts to confirm and start the update. Once the update begins, do not disturb the PC. Keep it plugged in and charging until the update completes.
Here’s an example from ASUS EZ Flash:
(To be in swiping format)
The following table will now show you how to do a BIOS update for your specific device or motherboard:
| Brand | How to update your BIOS |
|---|---|
| HP |
PRO TIP
You can also use HP Support Assistant to automatically u pdate BIOS on Windows 11 or 10, which usually comes pre-installed on most HP systems.
|
| Dell |
The BIOS interface may be different depending on the model. Some newer models support BIOS updates directly through Windows Update or Dell SupportAssist. However, if SupportAssist doesn’t work for your system, use your service tag to check Dell’s support website for specific instructions for your model.
|
| Lenovo |
|
| ASUS |
ASUS motherboards often support multiple BIOS update methods, including EZ Flash and USB BIOS FlashBack for ASUS desktops. So, make sure you download the correct BIOS file for your motherboard.
If your system is working properly and you can access the BIOS interface, go with EZ Flash, as explained above. However, if you’re using a desktop PC and you can’t access the BIOS (boot failure) or the update failed, use USB BIOS FlashBack. |
| MSI |
|
| Gigabyte |
|
Always verify that the BIOS file matches your system model to avoid compatibility issues. If the update is still not successful, contact the manufacturer’s support team.
What to Do After Updating Your BIOS
Once the update is complete, it is usually signaled by the automatic restarting of your computer. All you now have to do is to check whether everything is in order:
Verify the BIOS version if it’s successfully updated
Go back to the System Information page (by typing msinfo32 into the Run box and hitting Enter) to check your BIOS details and verify that the update was indeed successful.
Restore or adjust BIOS settings
After an update, BIOS settings will usually revert to default. So if you had previously made certain configurations, you will have to enter the BIOS environment and set them again or restore the backup.
Update hardware drivers
To achieve maximum stability after updating your BIOS, ensure that all your hardware drivers, such as the peripherals and ports, are up to date as well. You can do this easily via Windows Update or by using trusted third-party tools.
Auslogics Driver Updater is designed to keep you from experiencing such embarrassing moments. You won’t have to worry about driver problems ever again.
Test system stability
Start using your PC to ensure that it is functioning well and determine whether there are any noticeable changes. You could also consider doing a stress test.
Update firmware for other components
If you had to update your BIOS firmware to facilitate compatibility with some apps or software, you may also want to check for updates for other components like GPUs and SSDs.
Always Double-Check Before Updating Your BIOS
Always err on the side of caution when a BIOS update is concerned. If you must learn how to update the motherboard BIOS, you have to be vigilant. Ensure that the new BIOS version is obtained from the official source and that it matches the model and revision number of your motherboard.
Also make sure that you format your USB drive to the FAT32 file system. Furthermore, see that you have a stable power supply to avoid interrupting the update once it starts.
If you are experiencing any form of hardware issues, be absolutely certain that the problem can only be fixed by updating your BIOS. A BIOS update is often used as a last resort.
If you found this article helpful, feel free to leave a comment, bookmark this page, and share it with others who might benefit from it.
FAQ
It is safe to update your BIOS only if you observe all the safety measures before and after initiating the update process. The safety measures include:
- Backing up your files. Although a BIOS update won’t affect the contents of your hard drive, it’s still advisable to take that precaution nonetheless.
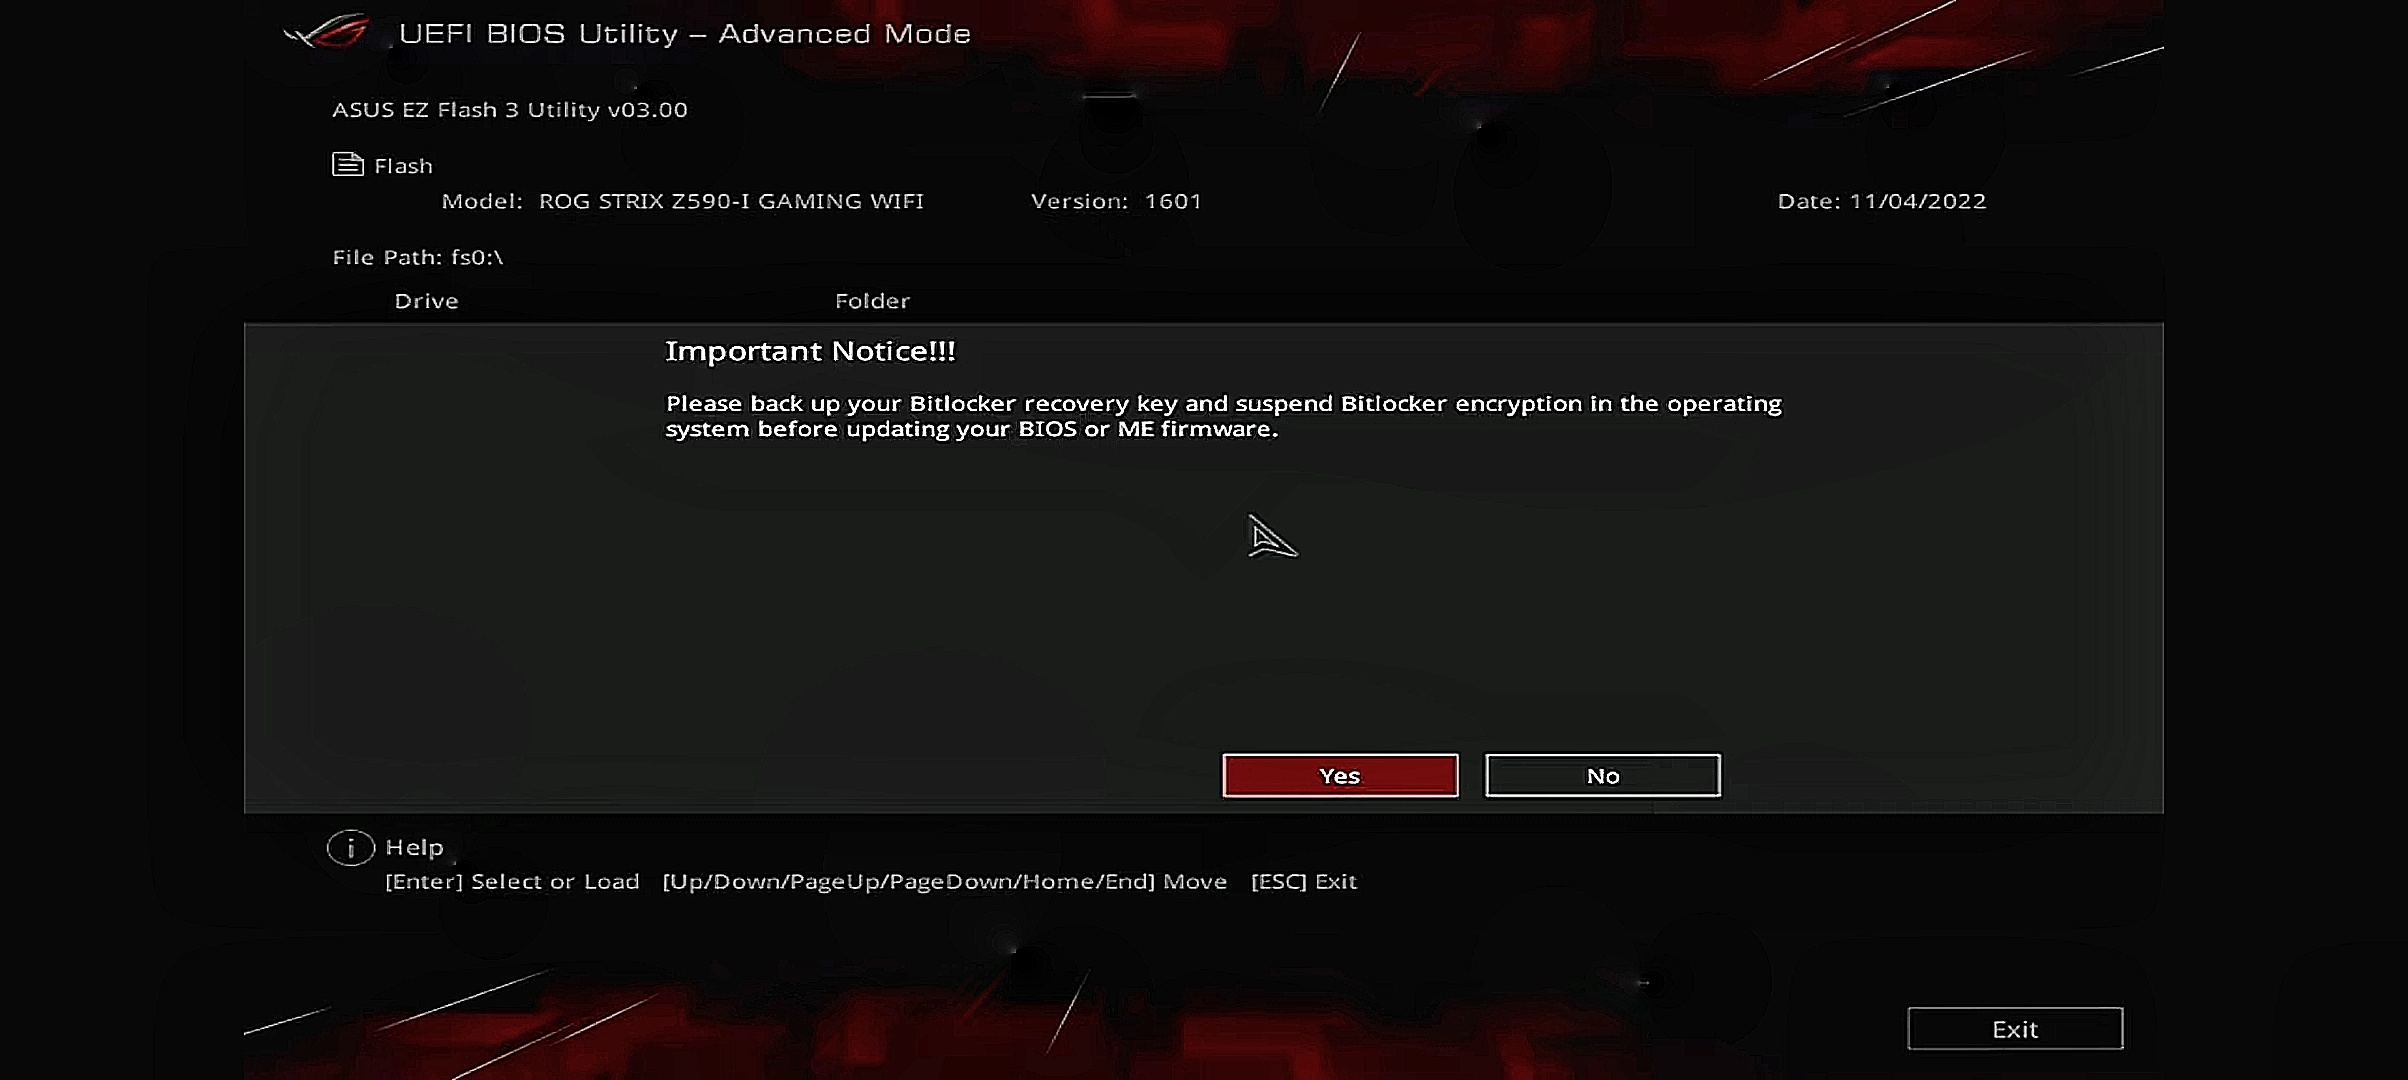
- Disabling BitLocker before you start the BIOS update.
- Ensuring that the update matches your motherboard model.
- Ensuring that you are using a USB drive that’s no more than 32GB so that you can format it to the FAT32 file system.
- Plugging in your PC to a stable power source to prevent interruptions once the update starts.
- Disconnecting external devices such as printers and scanners.
Also, you may want to familiarize yourself with BIOS settings backup and recovery. Check and carefully follow the manufacturer’s instructions for a smooth and secure process.