Whether you want to create a how-to video, capture your screen for presentation, or make YouTube videos, this guide will help you. We’ll show you how to use built-in and third-party tools for screen recording, give you tips to make better videos, and everything in between.
Let’s dive right in!
How to Screen Record on Windows with Audio Using Built-In Tools
Before you learn how to screen record on a PC, remember that you can use several built-in tools. We’ll go through each of them in this section.
How to screen record on computer with Xbox Game Bar
The Xbox Game Bar is a Windows 10 and 11 feature that allows you to record your computer screen. It can record various screen activities, so it’s not just for gaming. You can easily record your screen, add sounds with the microphone, and save the recording to your PC with the Xbox Game Bar.
The Game Bar arranges all the recorded clips for easy access and playback at any time. Since the video is stored in MP4 format, you can use any video editor to improve or modify it.
So, you’ll have to record several videos if your recording involves several programs. You can’t also record Windows 10 and 11’s interface, like the Start menu.
Here’s how to screen record on Windows 11 and 10:
Setting up the Xbox Game Bar
Whether you’re a Windows 10 or 11 user:
- Press
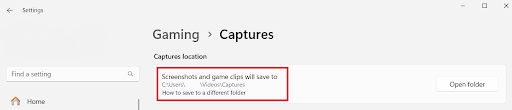
Windows key + Ito open Settings. - Click Gaming and select Captures.

- You can change the default location of your screen recordings in this window. By default, all recordings are kept under C:\Users\YourUsername\Videos\Captures.
- You can also record previous activities. To do that, turn on “Record in the background while I’m playing a game” for Windows 10. For Windows 11, turn on “Record what happened.” You can set the time from 15 seconds to 10 minutes.
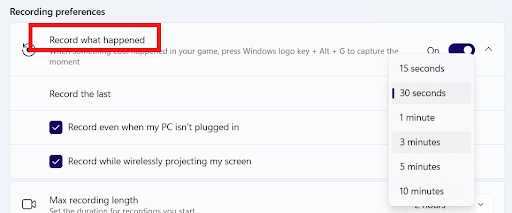
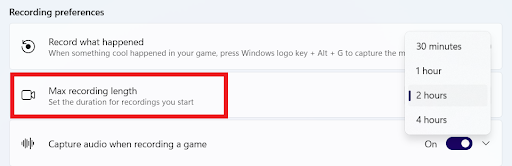
- Set the duration for the recording by clicking the dropdown menu beside “Max recording length.”
Enabling the audio for screen recording
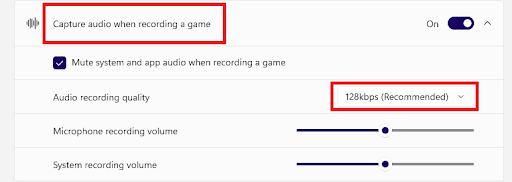
Scroll down and turn on “Capture audio when recording a game” (Windows 11) or “Record audio when I record a game” (Windows 10).
You can set the recording volume from your microphone and system and the quality of your audio recording.
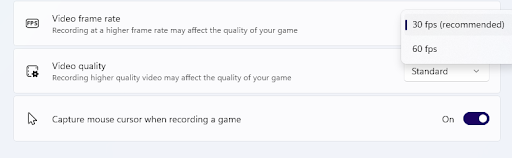
Adjusting the video frame rate
Another crucial factor to consider when learning how to screen record on your laptop is the video frame rate.
The recommended frame rate is 30 frames per second (fps). Even though you can choose 60fps, 30fps usually works well for most recordings.
You can adjust the video quality to high if necessary. But by default, it’s set to standard.
How to screen record on Windows using the Game Bar
Here’s how to screen record on Windows 10 with audio:
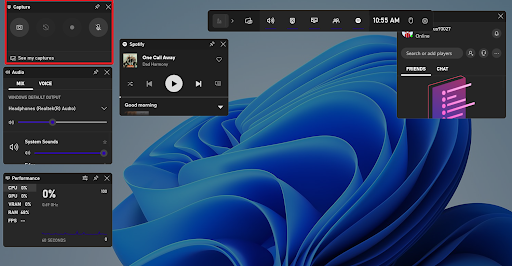
- First, prepare whatever it is you want to record and press
Windows + G. This will open the Game Bar’s toolbar. - Search for the Capture pane and tap the recording button to begin the screen recording. Alternatively, press
Windows key + Alt + Rto start recording instantly.
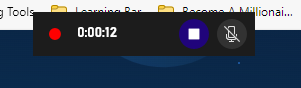
- When you complete the recording, click the stop button. You’ll receive a message showing the video has been recorded.
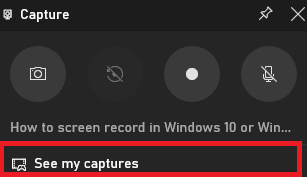
- Press “Windows key + G” or the message you received to return to the Game Bar interface. Click “See my captures” in the “Capture” box.
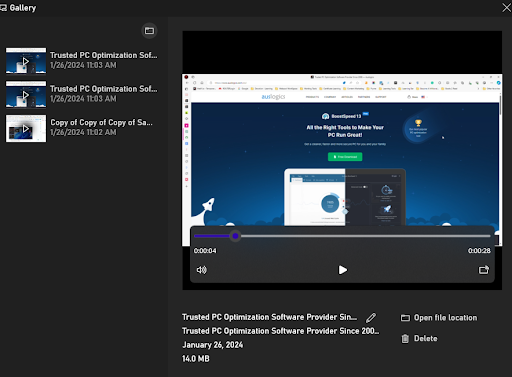
- A Gallery window will display the recording’s date, name, and time. You can play the video in the displayed window.
How to screen record on your PC with the Snipping Tool
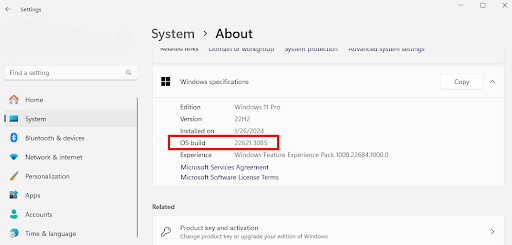
Before you learn how to screen record on Windows 11 , make sure your operating system has the right build if you want to record your screen with the Snipping Tool.
To verify if you have the right build, go to Settings by pressing “Windows + I,” clicking “System,” and selecting “About.”
The build number in the Windows specs should be 22621.1344 or higher. Open your Windows update and check for the latest updates if it’s lower.
You can also download it from the Microsoft Store. It’ll show you if your system is required to run the application.
Here’s how to screen record on your laptop with the Snipping Tool:
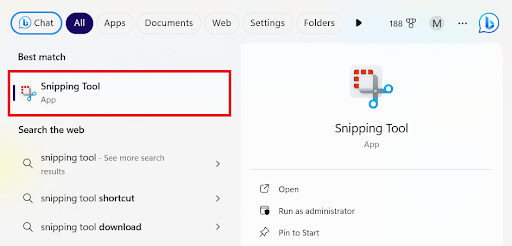
- Type snipping tool in the search bar and click to open.
- Click the camera icon and select New.
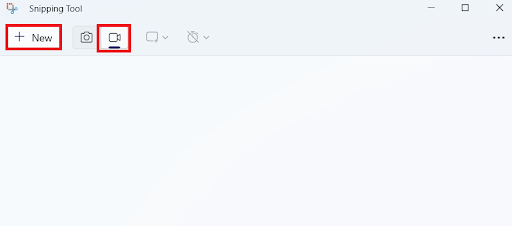
- Snip or select the area you want to record and click Start.
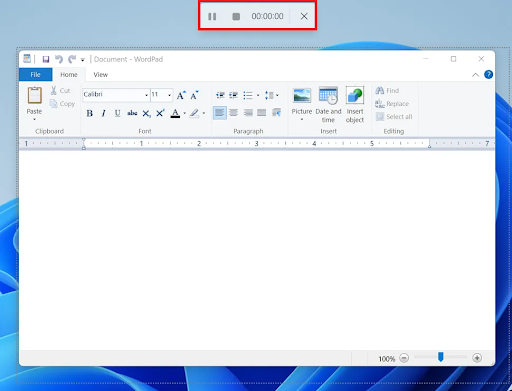
- Snip or select the area you want to record and click Start.
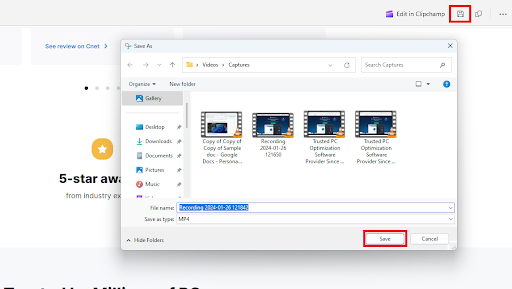
- Click the stop button after the recording and save the video.
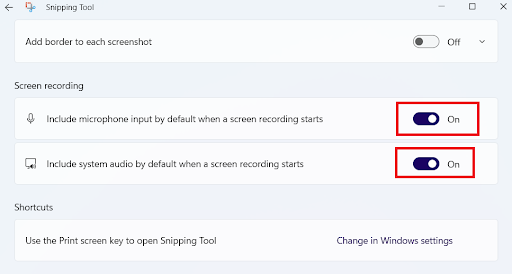
Adjust Snipping Tool’s audio recording
With the latest version of the Snipping Tool, you can customize the audio before recording a screen capture.
- To do this, click the ellipsis icon in the top right corner and select Settings.
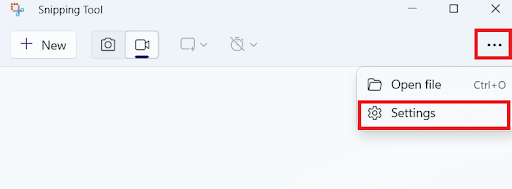
- Scroll to the Screen recording area and enable the “Include microphone input by default when a screen recording starts” button.
- Turn on Include system audio by default when a screen recording starts. You can mute the microphone or system audio while recording your screen.
Windows key + G– Open the Xbox Game Bar.
Windows key + Alt + R– Start or stop recording.
Windows key + Alt + PrtScn– Take a still screenshot of your screen activity.
Windows key + Alt + G– Record the last 30 seconds of screen activity.
Windows key + Alt + B– Turn HDR on or off.
How to Screen Record on Computer in Windows Using Third-Party Tools
There are several ways to learn how to screen record on Windows 10 and 11, whether online, in an extension, or software. You can find numerous alternatives for each option. We’ll go through each alternative and use popular applications as an illustration.
How to record your screen using a third-party software (OBS Studio)
If you want to learn how to record on Windows but also want more features compared to the built-in screen recorders, try using OBS Studio. OBS Studio is free and has excellent streaming features on Twitch and other platforms, that’s why it’s popular for game streaming.
But you can also use OBS Studio to capture the whole screen and save it as an MP4 file, so you can still utilize it even if you don’t intend to stream videos.
Here’s how the OBS Studio works:
- Download the software from the official website and install it.
- If this is your first time installing the application, you’ll receive a prompt asking whether you’ll use the OBS Studio for streaming or only for recording. Choose your preference.

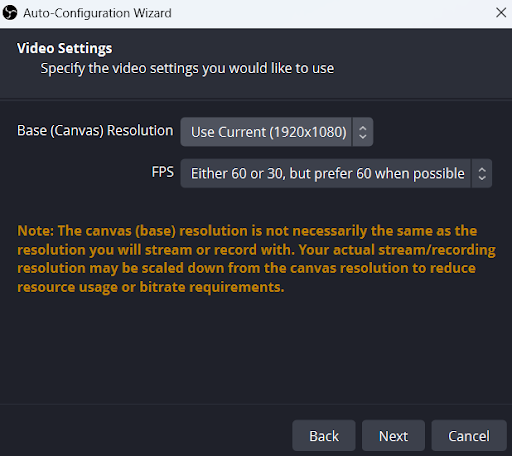
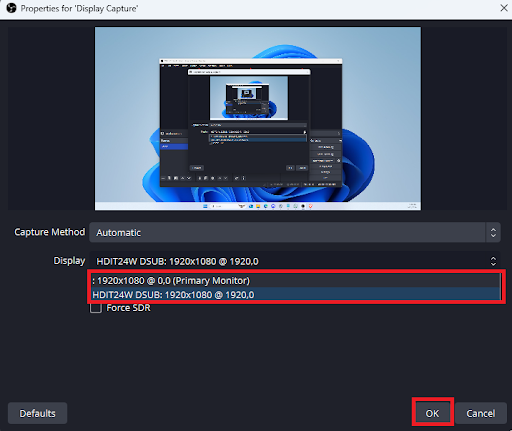
- Another prompt will appear to choose the base (canvas) resolution and frame rate. We recommend choosing the screen resolution you want to record, which may be set to 1080p by default. You won’t be able to capture the complete screen if the resolution of your capture screen is higher than the size of your canvas.
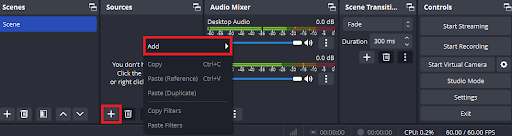
- Right-click the Source section and select “Add” or click the plus icon.
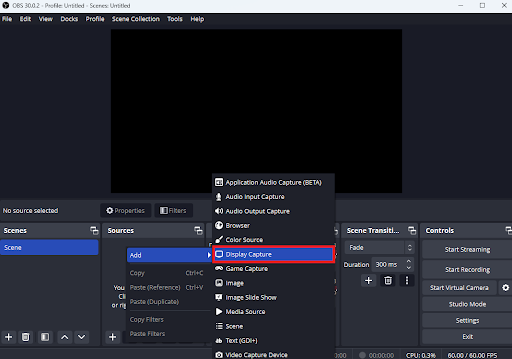
- Choose Display Capture.
- Type a name under Create new and click OK.
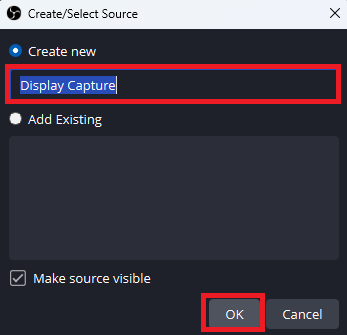
- Next, click OK to start the recording.
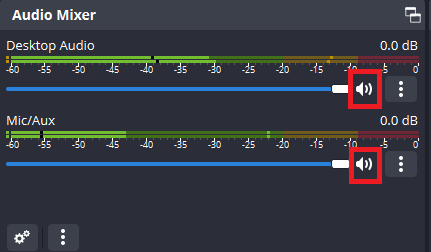
- If you don’t want to record the microphone or desktop audio, you can mute them. Just click on the speaker icons in the audio mixer.
- Start the recording by clicking Start Recording at the lower right corner of your screen.
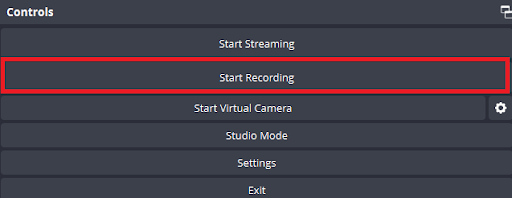
- Click Stop Recording when you’re done recording.
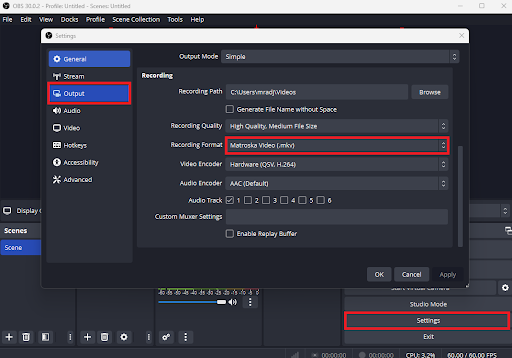
- The videos will be recorded in the .mkv format and stored, by default, in the Videos folder.
But you can change the file format to MOV or MP4 files by clicking on “Settings” and selecting “Output” in the OBS Studio menu.
To fix this, go to “File,” click on “Settings,” and select Video. There, you can also adjust the output resolution.
OBS Studio will resize the output while keeping everything inside the frame if the base resolution is higher than the output.
How to screen record on PC online
If you don’t want to install a screen recorder but prefer a third-party tool, you can record online. You can use Screen Capture to record your videos. Here’s how to do it:
- Visit screencapture.com.
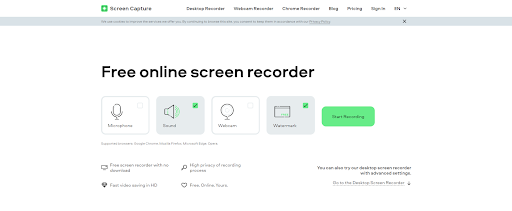
- Click on “Start Recording” to begin the screen recording.
- Select the section or area you want to screen record, whether your current tab, the entire screen, or an open window.
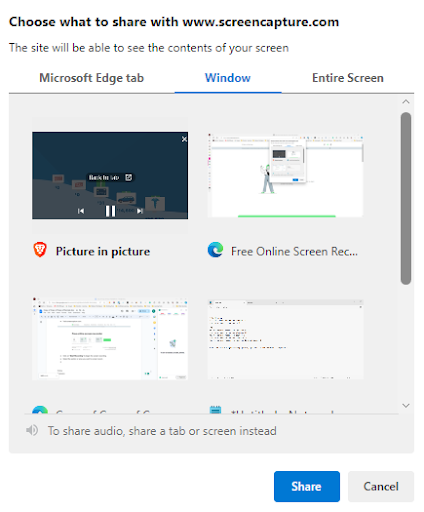
- Click “Share” to start the recording.
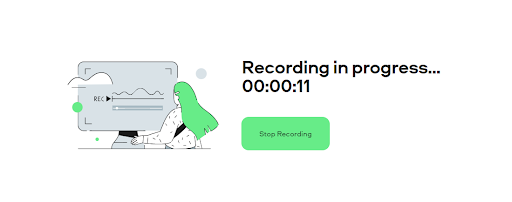
- After the recording, click Stop Recording and download the video file to your computer.
How to screen record on Windows using an extension
Another way to learn how to screen record on your computer is to use a screen recorder extension.
One of the best extensions you can use is Awesome ChatGPT Screenshot & Screen Recorder. Here’s how to use it:
- Download the extension.
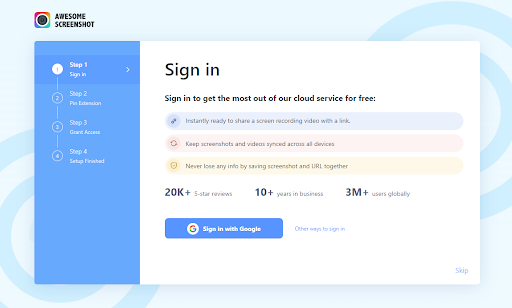
- Create an account to sync or store your screen recordings. This video extension lets you download recordings to your PC without logging in. So, if you don’t like signing in to your account, this is a great option.
- Click the Awesome ChatGPT Screenshot & Screen Recorder icon, click Record, and select the desktop or tab you want to record. This tool lets you simultaneously record yourself using your PC camera and the screen.
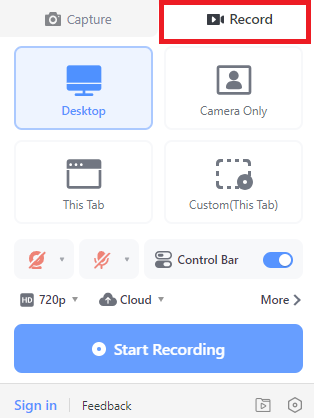
- Choose the audio to use and the video quality.
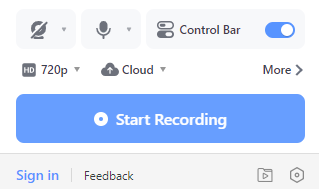
- After setting your audio and video quality, click Start Recording.
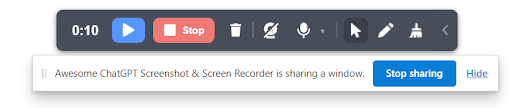
- After recording, you can download the screen recording to your computer. You also have the option to share on various platforms.
Tips for Effective Screen Recording
Now that you know how to screen record on Windows, you must know how to do it effectively. Follow the steps below:
1. Record in a quiet place
Nothing is more frustrating than starting a recording and having it cut short after five minutes due to various background noises, like door slamming.
So, record in a quiet environment to ensure high-quality sound.
2. Practice once or twice before recording
No one can produce a perfect screen recording the first time. It’s crucial to review your talking points to help you speak smoothly.
3. Close out all other tabs and apps
Closing all programs will pause notifications that might affect the screen recording. It’ll also free up your computer’s processing power so your screen recording software can function more smoothly.
4. Test your recording software
Doing a test run before proceeding with the screen recording is important. This ensures that you don’t lose any recordings. So, always test the microphone, video, etc., to ensure you produce quality videos.
Conclusion
If you want to know how to screen record on your Windows, go through this guide.
This guide has provided all the information you need to create how-to videos and presentations on your screen.
You have many options for recording, ranging from the built-in Xbox Game Bar and Snipping Tool to OBS Studio, a feature-rich tool for users who want more. You can also use a specialized extension or record online for more options.
Share your thoughts or tips in the comment section below, and let’s continue the conversation! We’d love to hear what you have to add!