- Why Should I Use Auslogics Disk Defrag?
- Is Auslogics Disk Defrag Compatible with My Windows Computer?
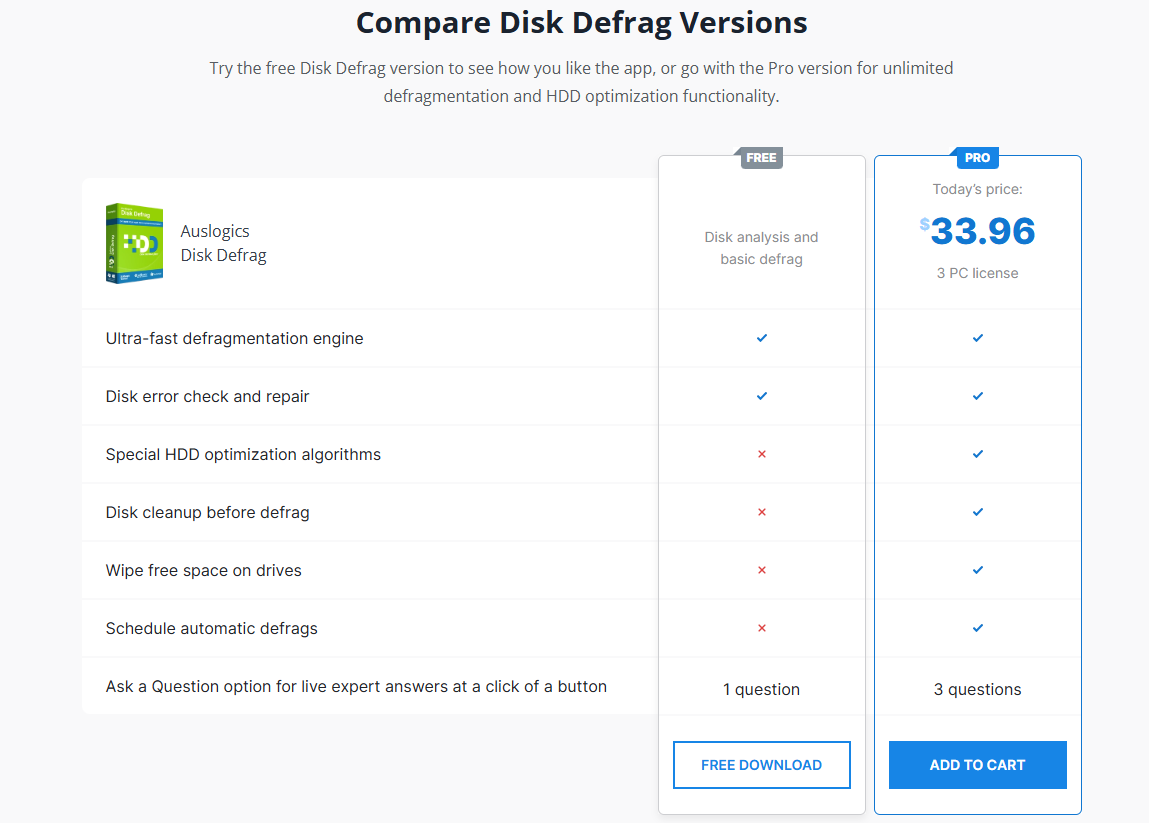
- How Much Does Auslogics Disk Defrag Cost?
- Which Drives Does Auslogics Disk Defrag Work On?
- What Are The Program’s Standout Features?
- User interface and experience
- Accurate analysis and fast defragmentation
- Automatic maintenance
- Offline defragmentation
- Customizable defragmentation algorithm
- Defrag individual files and folders
- Windows Explorer context menu integration
- Defrag priority
- Ignore lists
- HDD error checking
- HDD optimization
- Resource usage reports
- Portable version
- Ask a Question
- Is Auslogics Disk Defrag Better than Other Tools?
- What Do Users Think About Auslogics Disk Defrag?
- My Verdict: Auslogics Disk Defrag Is Straightforward and Easy, but Offers More than Traditional Defragmentation
- FAQ
While HDDs are no longer the dominant computer storage devices, they are still quite prevalent. Forbes reported that companies shipped about 364.4 exabytes of storage in the first quarter of 2025. To put that in context, it is 364,400,000 TB of storage.
That’s a lot of hard disk drives in need of defragmentation. If you’re one such user and need more functions than Microsoft’s built-in defragmenter offers, Auslogics Disk Defrag is a popular option.
I’ll break down the tool’s notable features and show you how to use them to help you decide whether it is right for you.
💽 Auslogics Disk Defrag offers faster and more efficient disk defragmentation than Windows’ built-in tool.
🔍 The tool runs a better fragmentation analysis than Windows’ built-in defragmenter and displays a cluster map that shows file placement.
🆓 The free version allows users to analyze and optimize hard disk drives, run offline defragmentation, and defragment files and folders.
⏰ Auslogics Disk Defrag allows you to pick the exact time for scheduled defragmentation.
⚙️ You can use the tool to run offline defragmentation to rearrange certain system files for startup and overall system optimization.
🎛️ The program’s customization options allow you to tweak the disk defrag process, from specifying the size of fragments to move to optimizing file placement.
🧹 Additional HDD features like disk cleanup, error checking, VSS-compatible mode, and HDD optimization improve hard drive performance and longevity.
Why Should I Use Auslogics Disk Defrag?
To keep file fragments on your HDD lined up together instead of scattered across the disk. This arrangement makes your hard drive read and write files faster. It improves the drive’s health and boosts Windows performance, since the disk no longer works too hard, and your operating system will access files quickly.
Auslogics Disk Defrag is one of the most popular disk defragmenters around. It is part of an impressive portfolio from a known Windows developer and beats Windows’ built-in tool on many fronts.
In addition to actual defragmentation, Auslogics Disk Defrag offers more features. You can use it to monitor drive health, check disk errors, and activate or disable various Windows features to optimize drive health.
Here’s a quick look at its pros and cons:
- Super fast analysis and defragmentation
- The interactive cluster map allows users to locate defragmented files
- File and folder fragmentation
- Granular controls for scheduled optimization
- Detects SSDs and prevents users from running defragmentation on these drives
- Additional features like error checking, disk cleanup, and HDD optimization
- Offers a portable option
- Certain nice-to-have features, like Automatic Maintenance, are only available to Pro users
- SSD optimization is only available with sister apps like Auslogics Disk Defrag Ultimate and SSD Optimizer
Is Auslogics Disk Defrag Compatible with My Windows Computer?
Yes. The program works on just about any system by today’s standards. I used it on a pretty old Dell Inspiron 14 (3000 series) powered by a 6th Generation Intel Core i3. The technical specifications say you can run it on Windows 7 and up, with only 256 MB of required RAM and 61 MB of free hard disk space.
How Much Does Auslogics Disk Defrag Cost?
It depends on your region. For example, the program costs $33.96 in the U.S., €35.95 in most parts of Europe, and 254.96 HKD in Hong Kong.
However, the tool’s free version provides access to most of the features you’ll need unless you want to schedule optimization and run advanced tasks like boot-time defrag and algorithm customizations.
Additionally, you get a 30-day money-back guarantee if you go for the full package. That way, you can test every feature without restrictions and decide whether the product checks your boxes.
Here’s what to expect with the free version vs. the paid tier:
Which Drives Does Auslogics Disk Defrag Work On?
Hard Disk Drives. HDDs benefit the most from defragmentation because fragmentation affects performance and threatens drive health. The tool checks your hard disk drives (internal and external) by default.
However, it automatically disables disk defragmentation for SSDs. If you select an SSD, it shows a warning and recommends that you use SSD Optimizer instead.
What Are The Program’s Standout Features?
Numerous features make Auslogics Disk Defrag better than Windows’ built-in drive optimizer and other notable defragmenters.
📌 Also read: Microsoft Drive Optimizer vs. Third-Party Alternatives: Which Is Better for Defragmentation?
![IMG]() User interface and experience
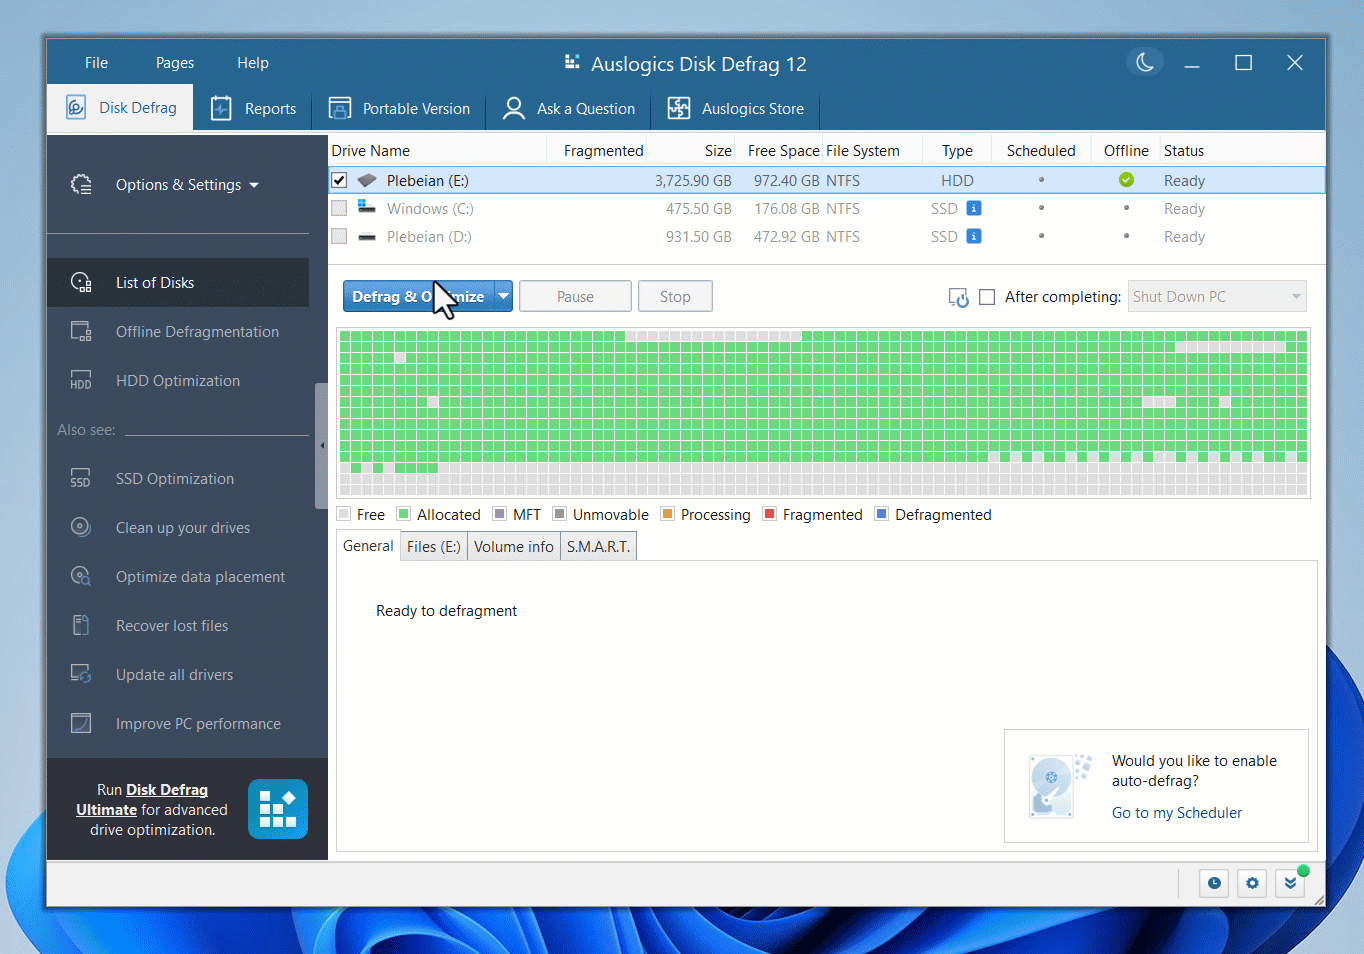
User interface and experience

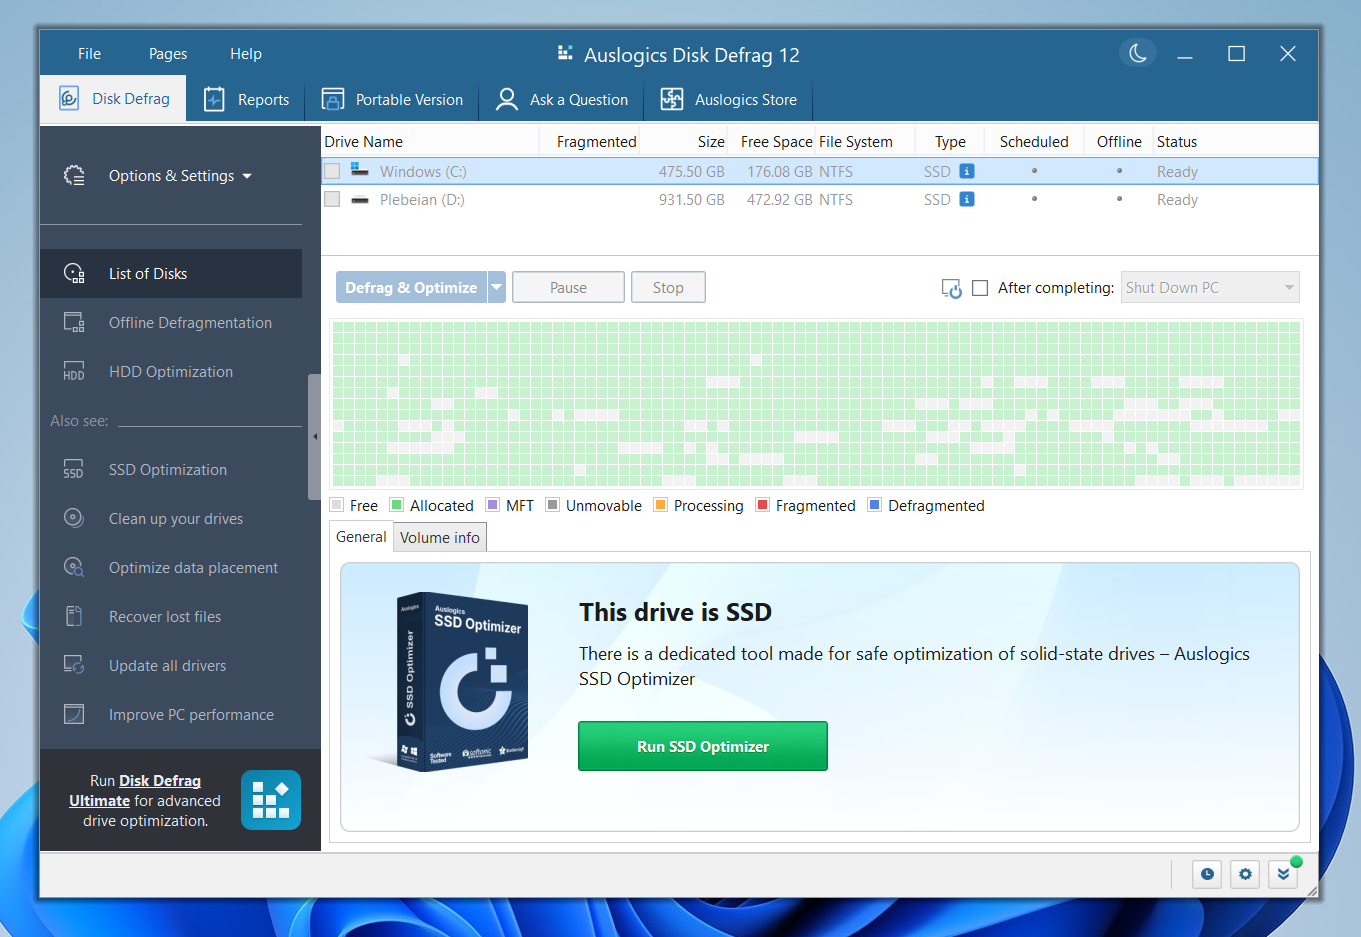
Auslogics Disk Defrag presents a simple-to-use interface from installation to the full window. After downloading and running the setup file, you can only choose a few preferences and click the Install button.
The first window welcomes you to the Disk Defrag main page, where you can run analysis, view fragmented files, defragment specific files, and check out drive health. Clicking the drop-down menu beside the Defrag & Optimize button allows you to perform most of the operations you need.
Clicking the Options & Settings menu in the left pane shows a host of other options. One can also navigate to the Offline Defragmentation and HDD Optimization tabs in this pane.
The tool’s different pages are neatly arranged at the top for easy access to system reports, the program’s portable version, Ask a Question, and Auslogics Store (to view other products from Auslogics).
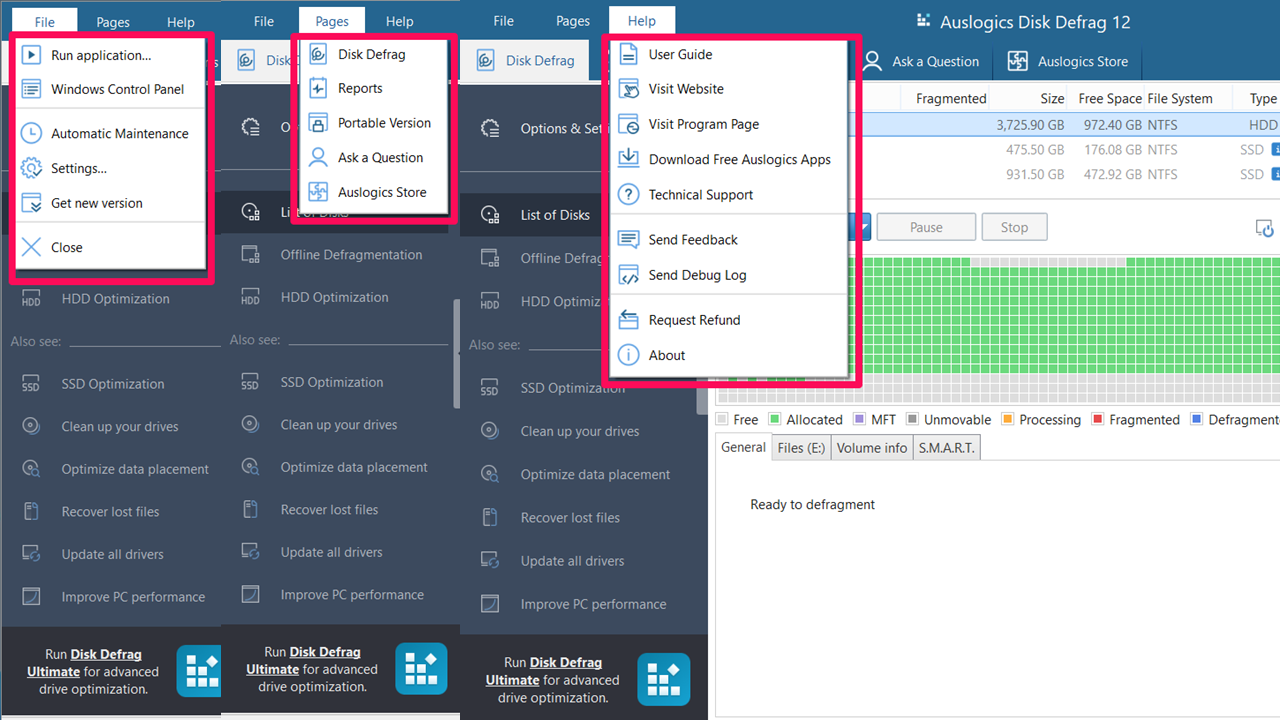
Like regular Windows applications, its menu bar allows access to even more features and options. While the Pages menu mirrors the tabs, the File and Help menus contain exclusive options like Run application, Windows Control Panel, and certain product-specific links.
![IMG]() Accurate analysis and fast defragmentation
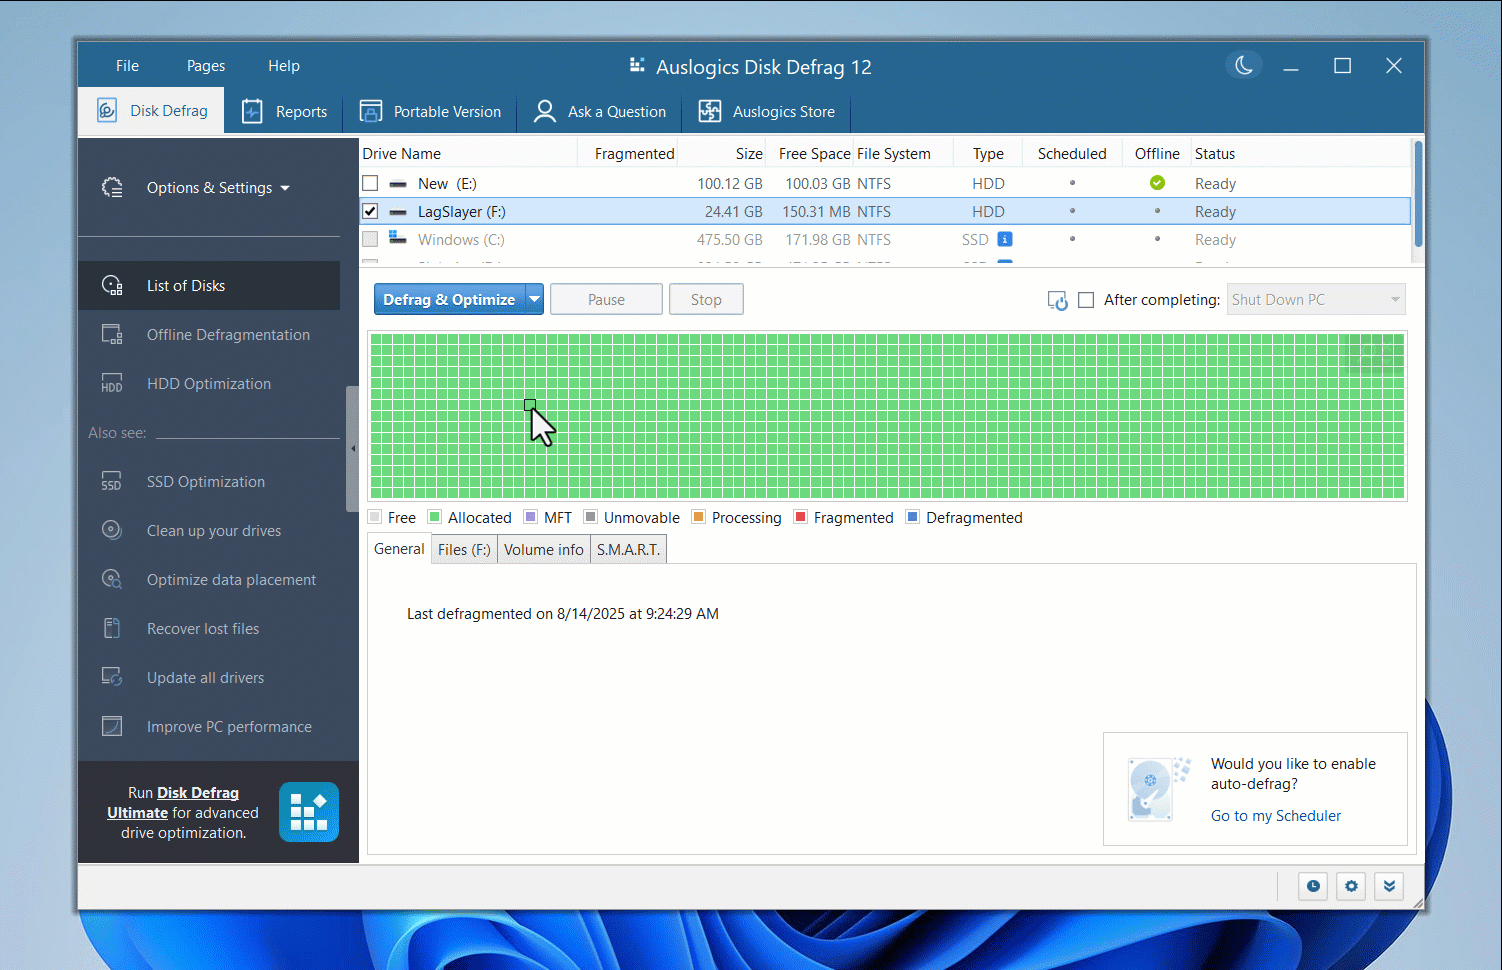
Accurate analysis and fast defragmentation

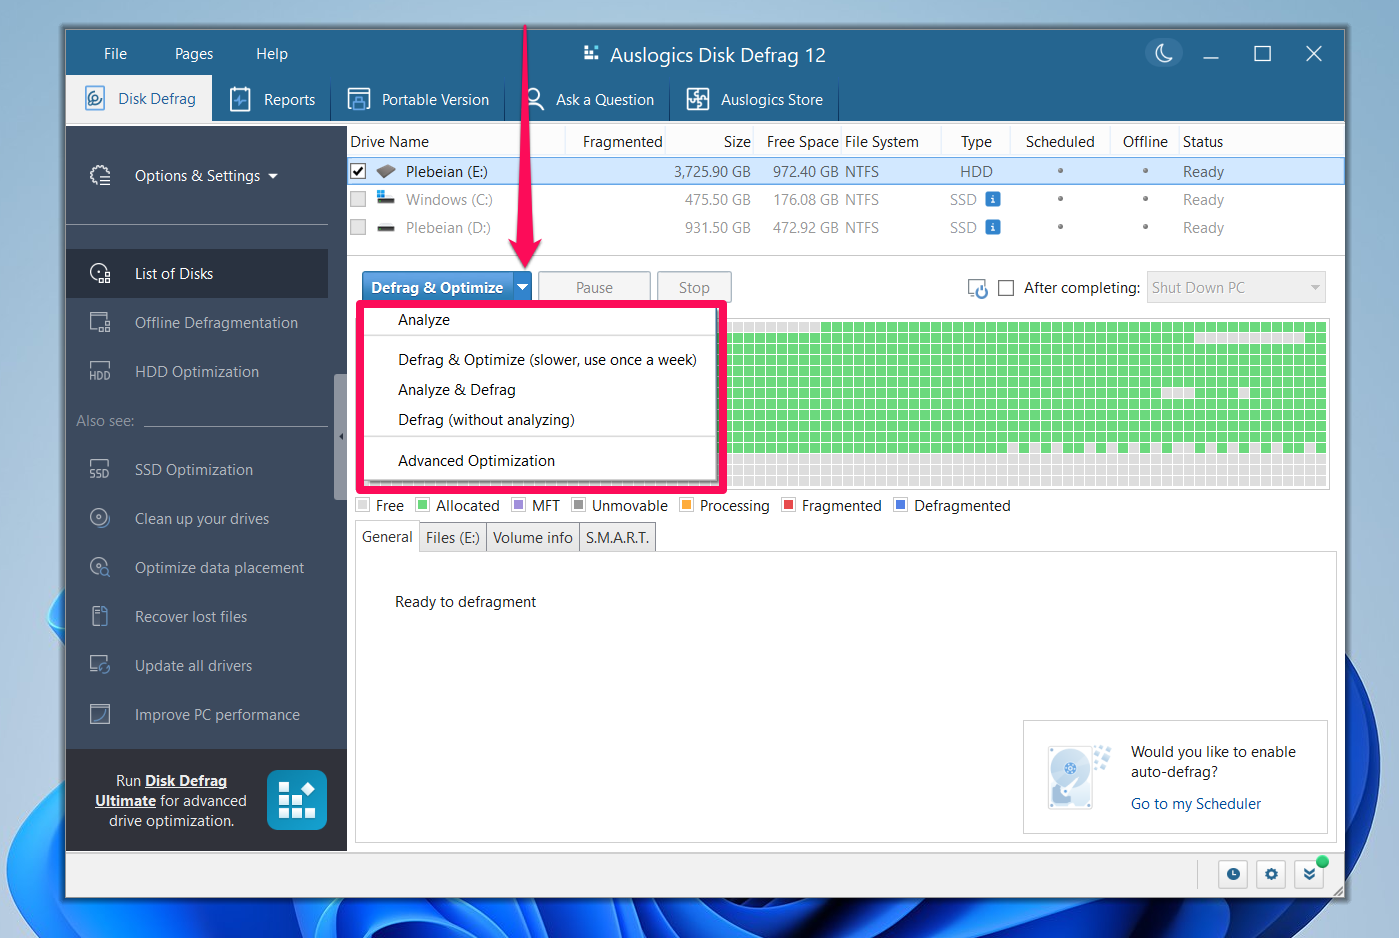
Auslogics Disk Defrag displays your fragmentation level on the right side of the drive name, and you’ll see an interactive map that visualizes how fragmented files are arranged on the disk. Defragmentation is also relatively faster than Microsoft’s built-in tool.
The following are straightforward steps to analyze and then defrag your hard drive using the program:
- Launch the program.
- Right-click the drive and select Analyze.
- You should now see your drive’s level of fragmentation alongside the interactive map. Clicking each block displays the associated file under the Selected Files tab. The Files tab also shows a list of fragmented files in descending order of fragmentation.
- If you’re positive that your drive should be defragmented, click the Defrag & Optimize button to begin. Before that, you can check the After completing box right on top of the cluster map and choose the action to perform from the drop-down after the process finishes.
After clicking the Defrag & Optimize button, the app shows your files being arranged in real time, indicated by the blue blocks. You can click each block to see a list of defragmented files. While a progress bar appears under the Progress column, you can see more details under the General tab.
![IMG]() Automatic maintenance
Automatic maintenance

Automatic maintenance is also known as scheduled defragmentation. The program allows you to select specific dates and times to run routine defrag processes. That way, your drives will be defragmented when you’re not running heavy tasks.
You can choose whether to defrag your drive whenever the computer is idle, daily, weekly, or monthly.
Unlike Microsoft Drive Optimizer, which only offers daily, weekly, and monthly schedules without defined dates and times, you can also determine exactly when the tool automatically defragments your drive.
Here’s how:
- Click File at the top of the window, select Settings, and click Scheduler in the left pane of the Settings page.
You can also select Automatic maintenance under the File menu.
- Check the box for Defragment automatically.
- Now, go to How often? to choose a schedule. Depending on what you pick, you should see more menus allowing you to select more preferences.
- If it’s daily, select the time; if it’s weekly or monthly, choose the day and time.
After setting your schedule, the tool also allows you to choose a hard disk drive and other options, such as preventing defragmentation when your laptop is on battery, stopping the process whenever you launch a program in full-screen mode (like a game), and creating a report after defragging.
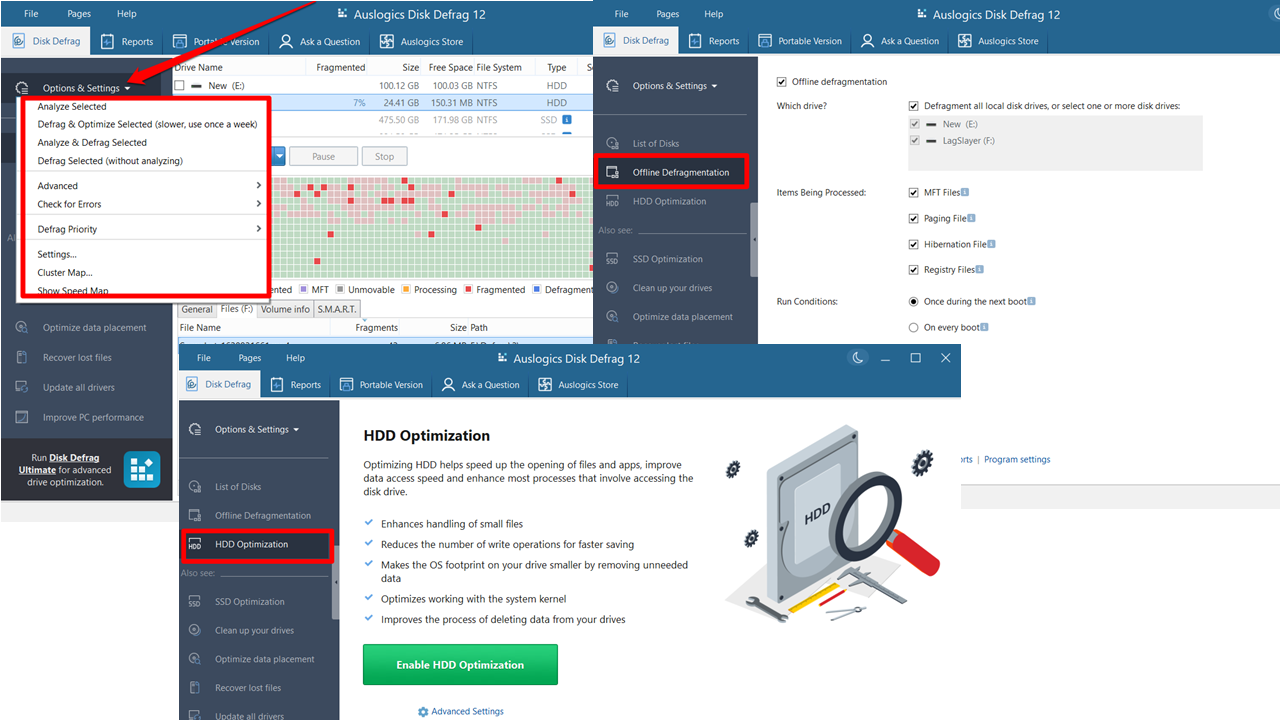
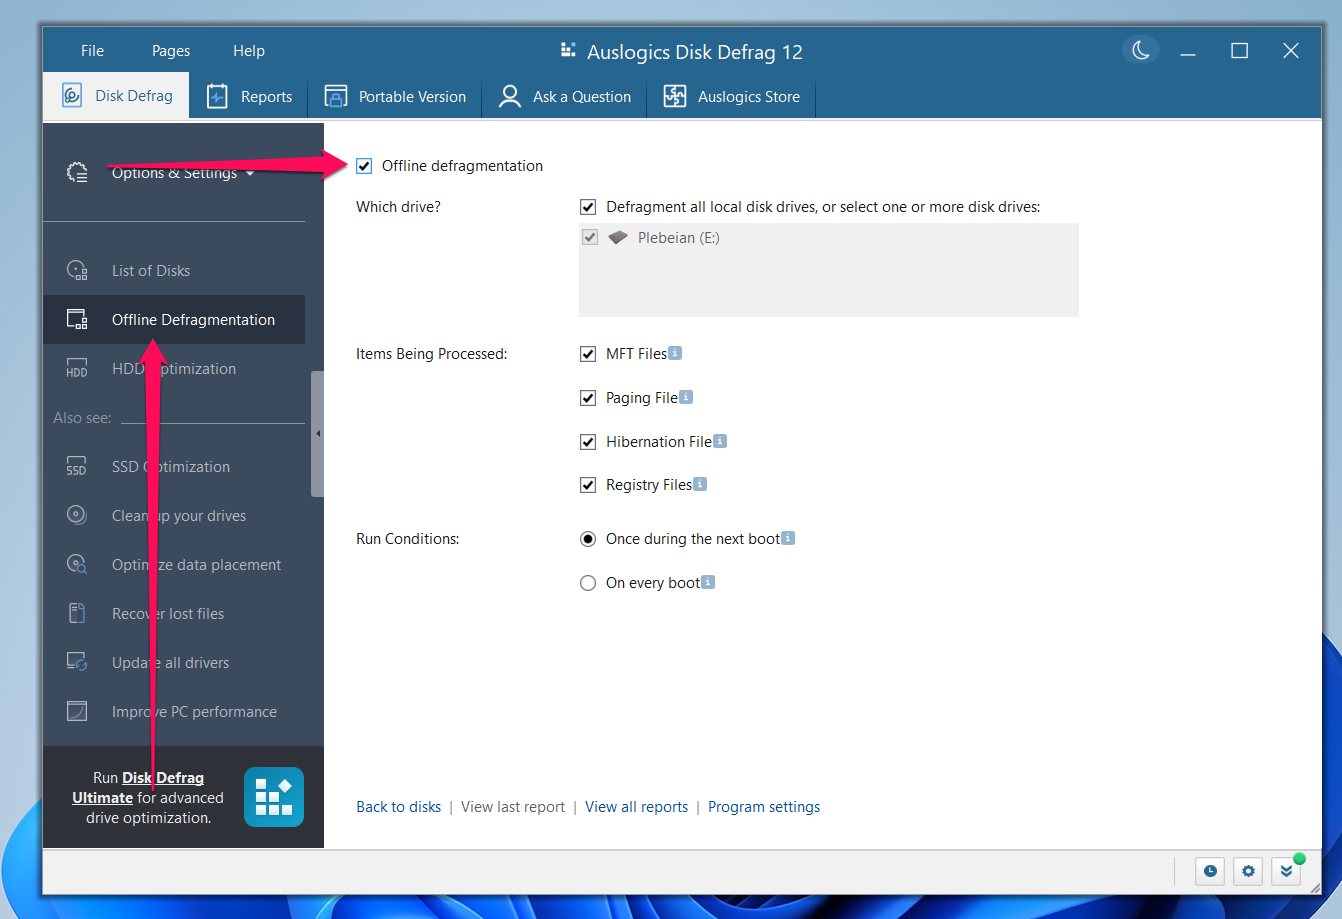
![IMG]() Offline defragmentation
Offline defragmentation

Offline defragmentation runs before Windows starts up. It allows you to defragment boot files that may not be accessible when Windows is running. Running this type of disk defrag is simple.
Click Offline Defragmentation in the left navigation pane.
Then check the Offline defragmentation box, select the drive, and choose the type of files you want to defragment.
What do the files in the list do?
- MFT Files: Master File Table (MFT) files hold information about file arrangements on the disk. They tell the drive head where to locate file fragments. Defragmenting these files further improves data accessibility.
- Paging File: Your system’s paging file is Windows’ virtual memory. It is stored on your hard drive and complements your main memory, especially when it’s full. A fragmented paging file causes virtual memory management to slow to a halt. This defrag process can speed things up by lining up paging file fragments closer to each other.
- Hibernation File: Offline defragmentation optimizes access to the file used to hibernate and wake up your computer. That way, you no longer have to wait too long to get your computer running again.
- Registry Files: Badly fragmented registry files can slow down the system boot process and application launches. Offline defragmentation helps reverse this issue.
You can also choose the frequency for the offline defragmentation.
![IMG]() Customizable defragmentation algorithm
Customizable defragmentation algorithm

Defragmentation algorithms are sets of rules and strategies used by the defrag tool to detect and rearrange file fragments on hard disk drives. Auslogics Disk Defrag offers you more control over how your drives are defragmented, as it allows you to dictate the types of files to ignore and where files are placed.
Here’s how to use this feature:
- Go to File and select Settings.
- Click the Algorithm in the left pane of the Settings page.
- You can now select the options you need and click OK.
Choosing which fragment size to skip affords you the type of control you don’t get with Microsoft’s built-in tool, since the program has a default preset that you cannot change. You can also:
- Move system files to the beginning of the disk to optimize your operating system.
- Enable the VSS-specific algorithm to ensure that previous VSS snapshots are not overwritten and the area allocated for the feature does not expand. Stopping VSS during defragmentation also speeds up disk defragging.
- Select various Disk Cleanup options to free up storage space and reduce the number of files that will be moved around. That way, the defragmentation process will take less time to complete.
- Use free space wiping algorithms to wipe remnants of deleted files.
![IMG]() Defrag individual files and folders
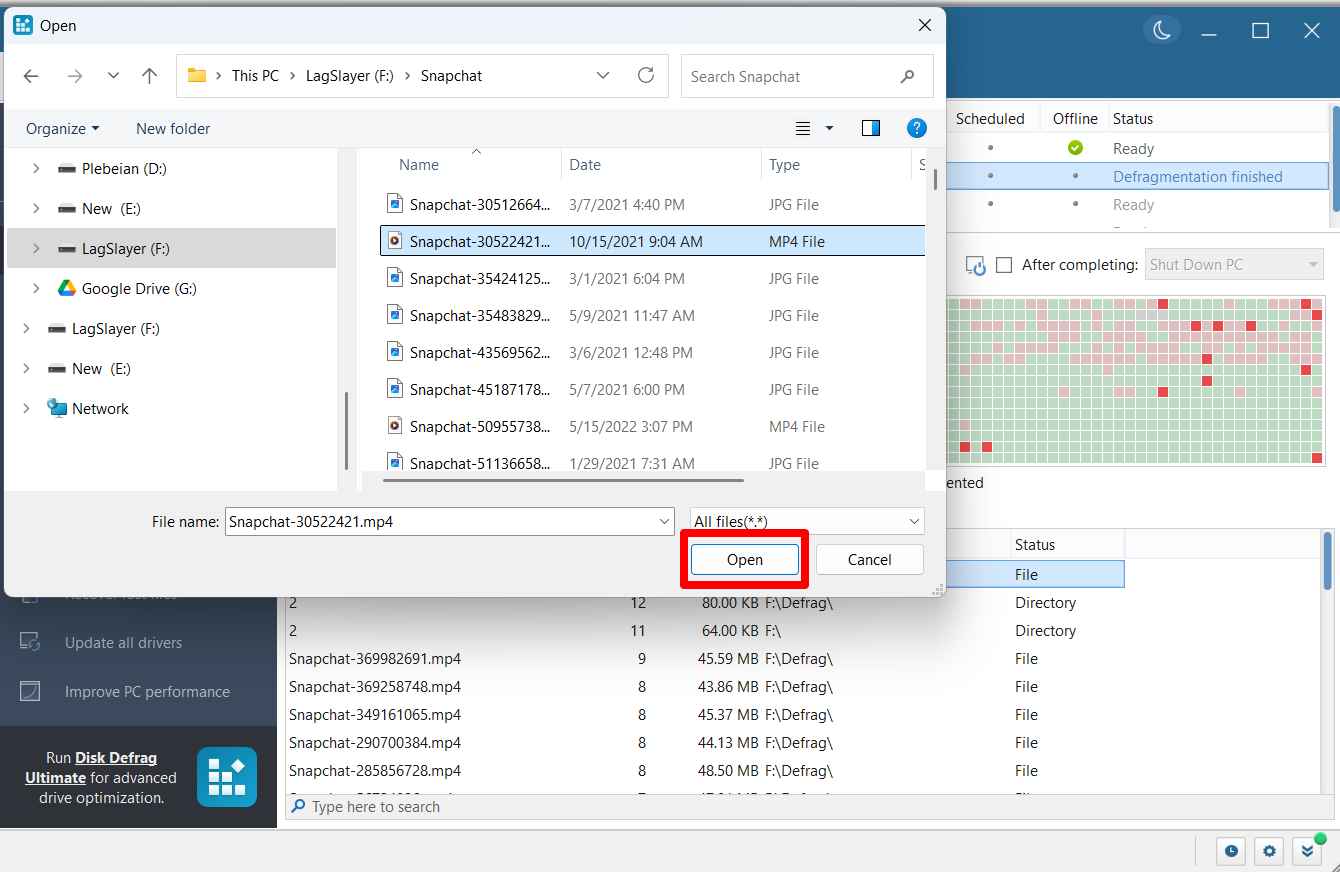
Defrag individual files and folders

Defragmenting individual files allows you to specifically optimize frequently used files, instead of defragging the entire hard drive. The option is useful in cases where you don’t want to go through the long process of defragmentation.
There are two ways to defragment specific items in Auslogics Disk Defrag. The first method involves selecting the file from the Disk Defrag main page. Here’s how:
- Right-click the drive and click Analyze.
- The analysis process populates the Files tab with a list of fragmented files. You can right-click any file or folder and select Defrag Selected.
- You can also select multiple items by holding the Ctrl button and clicking your preferred file or folder. After that, right-click any selected item and choose Defrag Selected.
Here’s the second method:
- Select your drive in the main window.
- Go to the left navigation pane, click Options & Settings, select Advanced, and choose the Defrag File or Defrag Folder option.
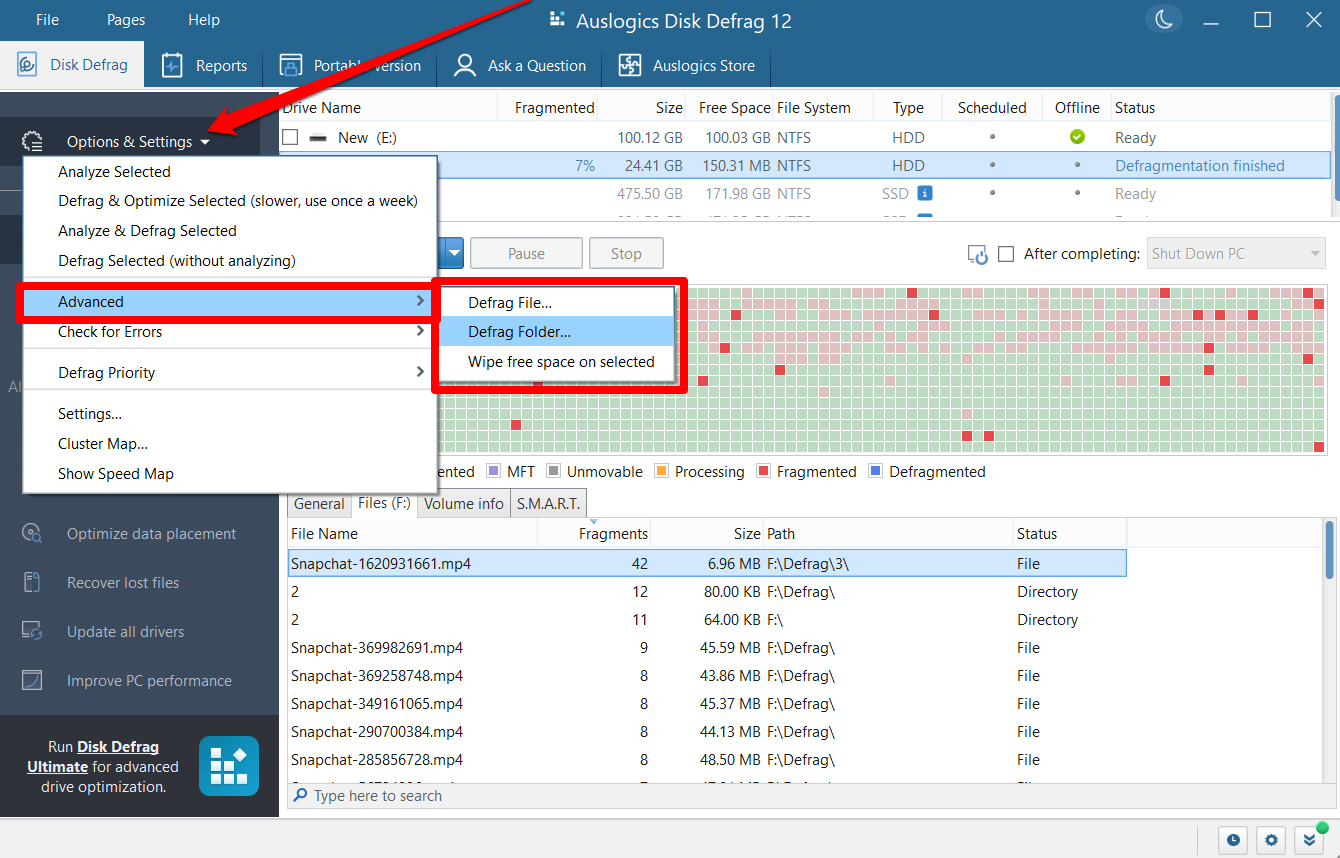
- Now, browse to the file or folder you want to defragment. Select the item and click the Select Folder or Open button, depending on what you want to do.
![IMG]() Windows Explorer context menu integration
Windows Explorer context menu integration

Thanks to Disk Defrag’s context menu integration feature, you don’t have to open the app to defragment files and folders. If you notice that a file or folder is causing significant slowdowns or takes time to load, you can right-click it and select Defragment with Disk Defrag from the context menu with the feature turned on.
The following steps will show you what to do:
- Launch Auslogics Disk Defrag and click File > Settings.
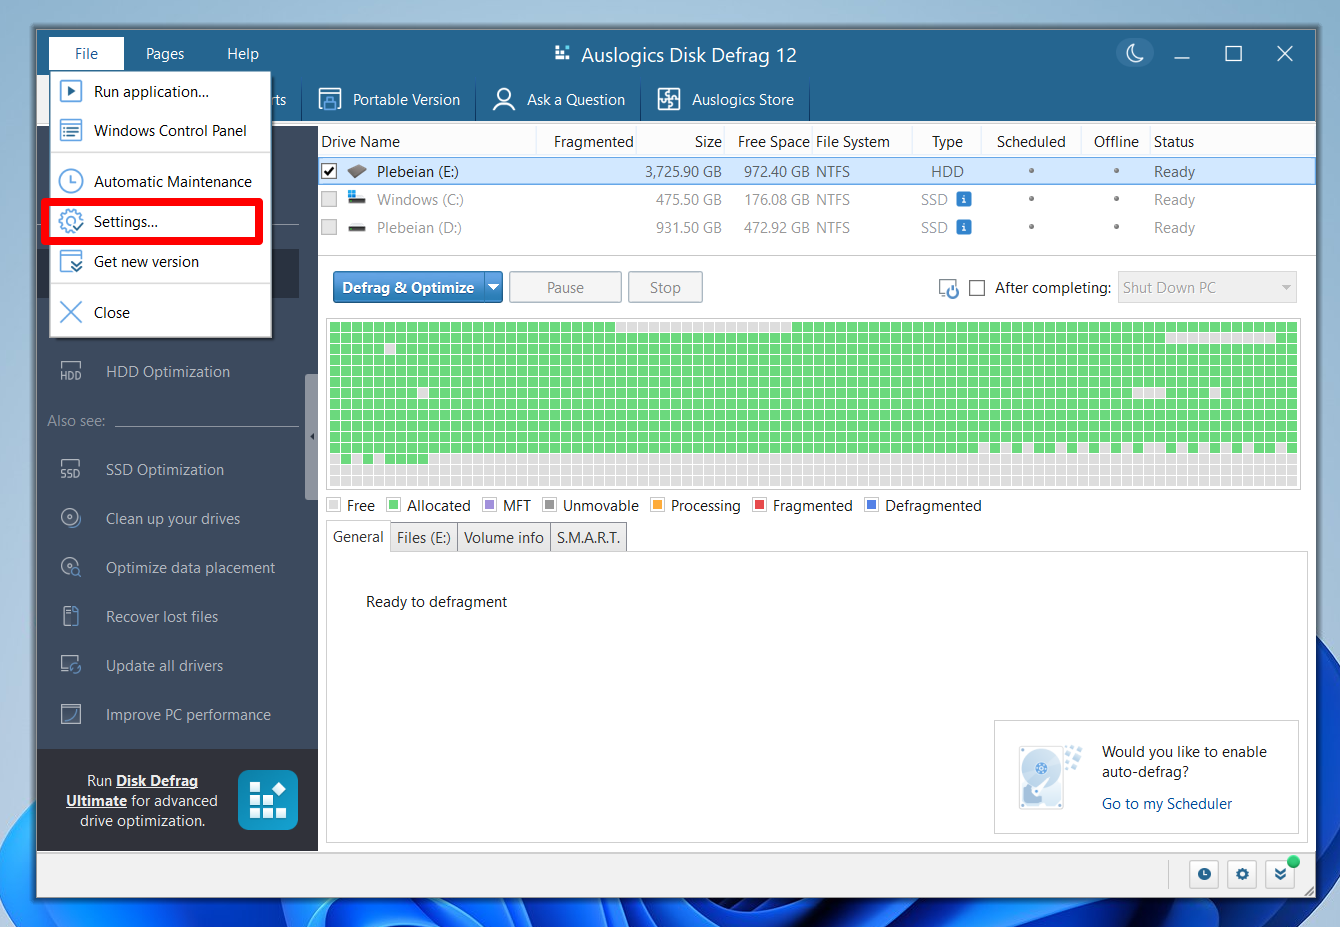
- Click Integration in the left pane of the Settings page.
- Next, check the box for Integrate Disk Defrag into the Windows Explorer context menu.
- Click the OK button.
You can now right-click any file and select the option to start the defrag process.
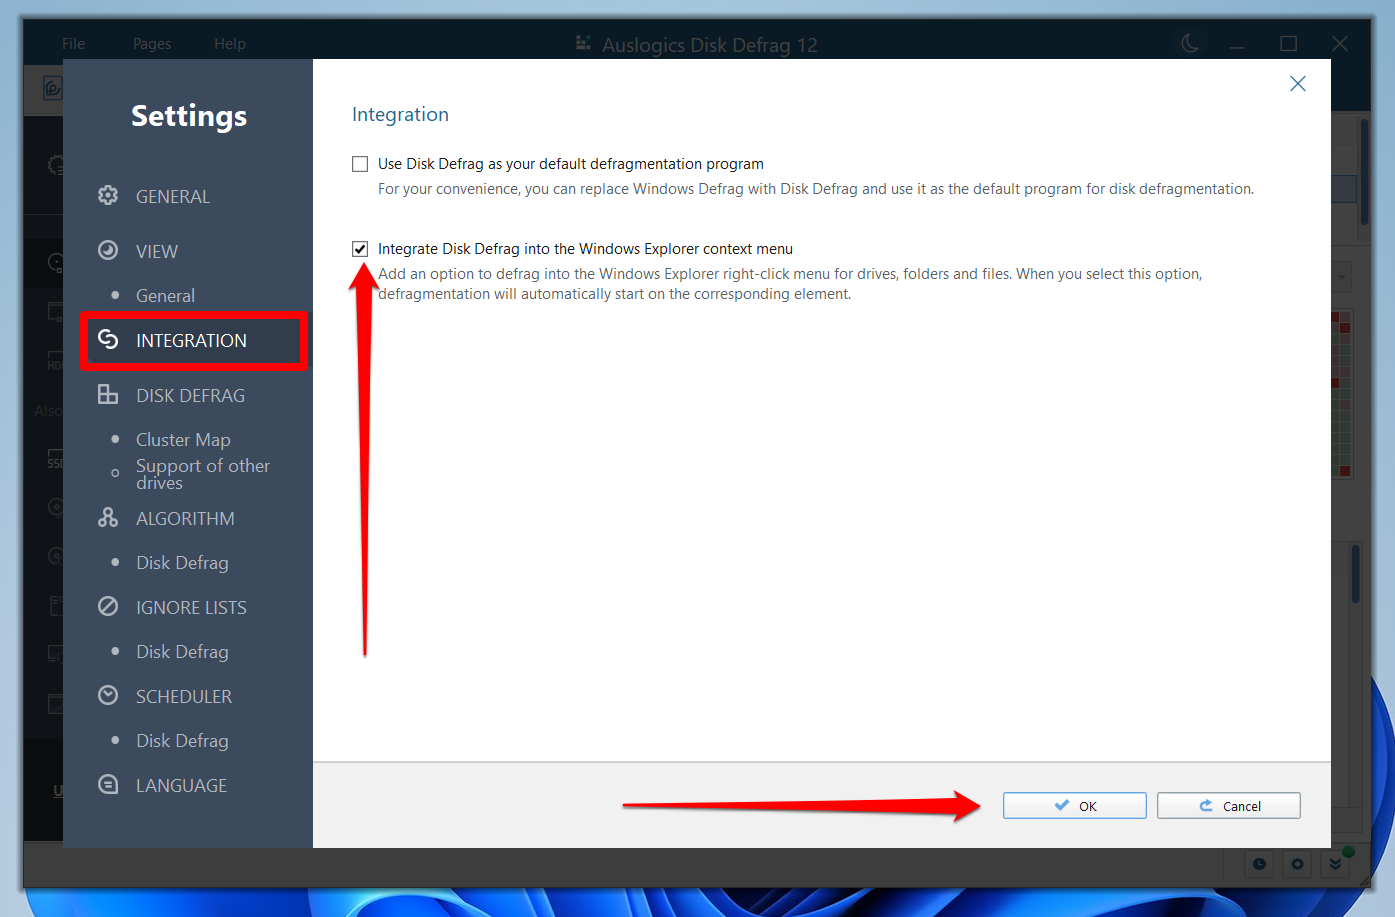
![IMG]() Defrag priority
Defrag priority
As I mentioned, defragmentation uses a lot of system resources. However, Auslogics Disk Defrag allows you to choose how much it uses, especially if you want to run the process in the background while doing other things. The tool’s defrag priority options include low, normal, and high.
Choosing high ensures your disk will be defragmented with as many CPU, RAM, and disk resources as possible. However, low priority reduces the number of system resources it can manage. Normal is a fair balance of both.
To select a priority, click Options & Settings in the left navigation pane, hover your mouse pointer over Defrag Priority, and choose a priority level.
It is best to use the low-priority option if you need to defragment your drive while doing other things. However, this option increases the time it takes to complete the defragmentation. If you don’t intend to use your system, choose High Priority to speed up the process.
![IMG]() Ignore lists
Ignore lists

You may have files and folders you’d rather leave alone, regardless of their fragmentation status. Auslogics Disk Defrag empowers you to do that, using its Ignore Lists feature. Here’s how to use it:
- Click the Options & Settings menu in the left pane.
- Select Settings.
- Go to the left pane of the Settings page and click Ignore Lists.
- Now, head to the Ignore Lists page on the right and click Add Folder or Add File, depending on the type of item you want the tool to ignore.
- Navigate to the file or folder in the dialog window, select the item, and click the Select Folder or Open button.
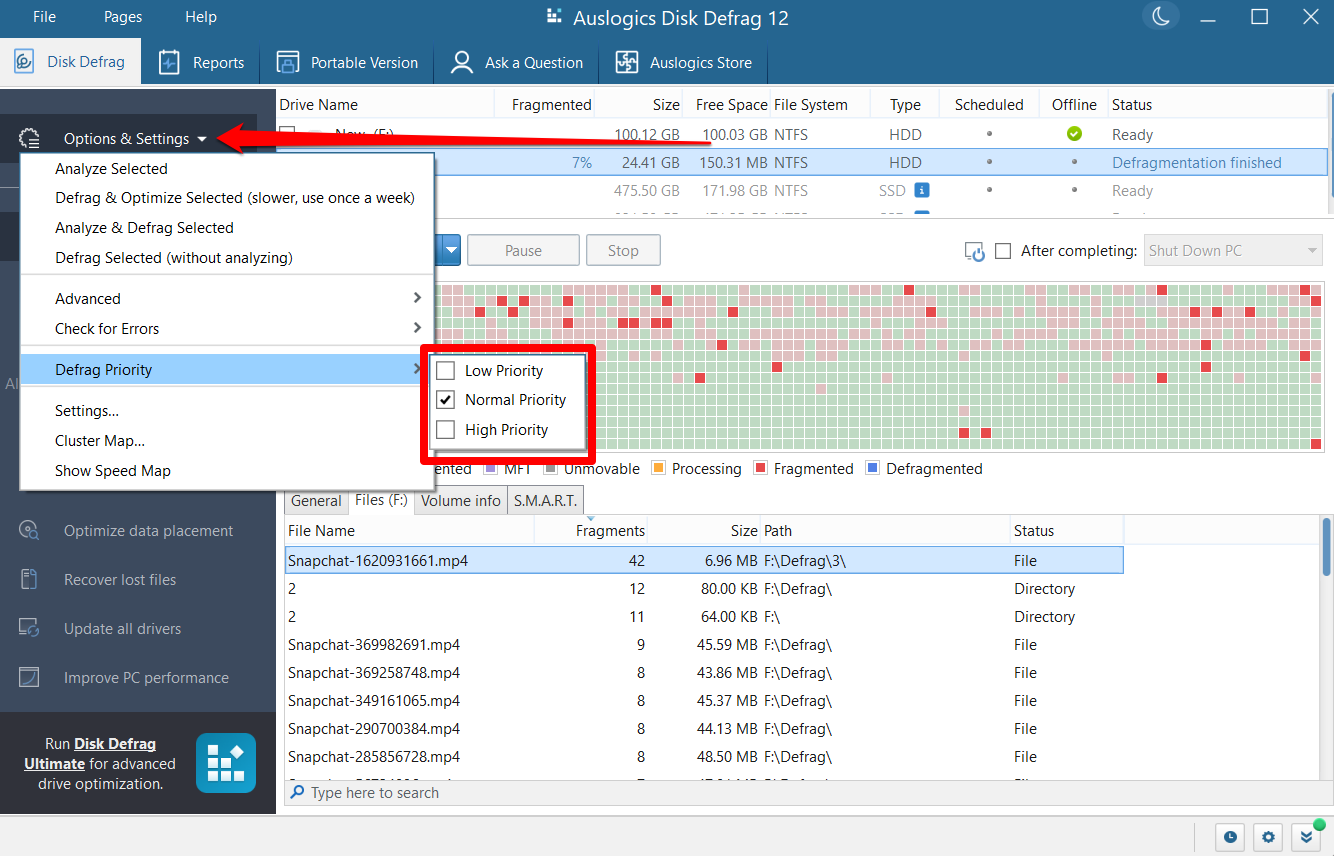
![IMG]() HDD error checking
HDD error checking

I had a drive that didn’t support disk defragmentation until I used Windows’ CHKDSK command to fix its logical errors. I always saw its status labelled as Optimization not available in Windows’ built-in defragmenter.
Even when I tried using Auslogics Disk Defrag and other programs like Defraggler, the process failed. Thankfully, you can launch the error checking straight from Disk Defrag’s window, whether you only want to test the drive or test and fix issues.
Follow these steps:
- Select the hard disk you want to check on the main Disk Defrag page.
- Click Options & Settings in the left pane and place your mouse pointer on the Check for Errors option.
- When the options fly out, choose one option depending on what you want to do:
- Check Selected runs the chkdsk C: command (the drive letter depends on the drive you selected) to only check for errors.
- Check & Correct Selected runs the chkdsk /f C: command to check for and fix errors.
- Once the command completes, restart your system (if it fixed errors) and try running the defrag process again.
![IMG]() HDD optimization
HDD optimization

You get more than disk defragmentation with Auslogics Disk Defrag. The program comes equipped with other customizable disk optimization functions designed to speed up your drive’s performance and improve its health beyond what defragmentation offers.
Per the tool’s description in the HDD optimization tab, the feature enhances how small files are handled, speeds up write operations, reduces the size of Windows on your drive, improves Windows’ system kernel operations, and fine-tunes how data is deleted.
It uses different techniques to achieve these outcomes. The good part is that you can customize those techniques since some of them are best left disabled if you use a certain system configuration.
- First, make sure a hard disk drive is selected on the main Disk Defrag page.
- Click HDD Optimization in the left navigation pane.
- Click the Enable HDD Optimization button.
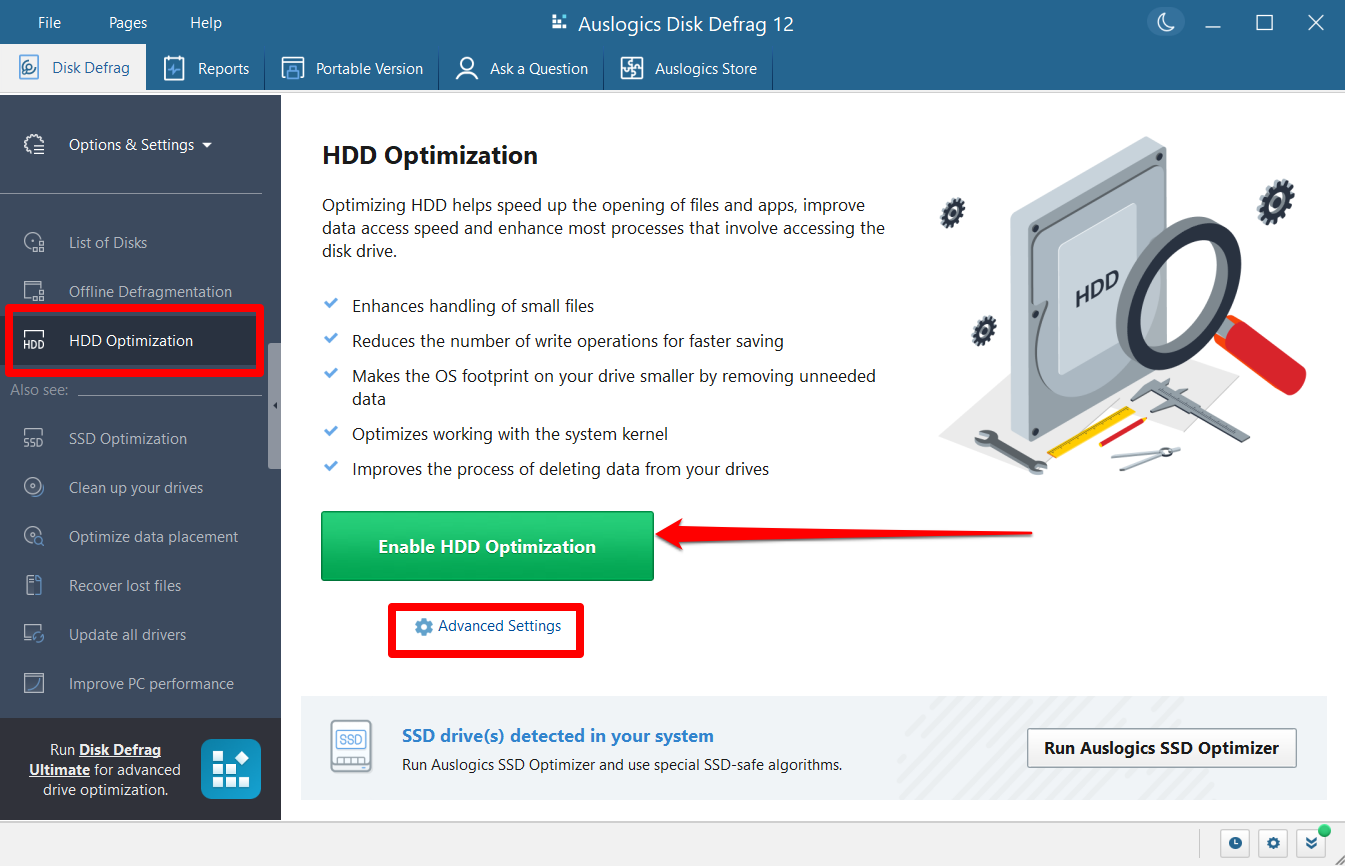
- Click Advanced Settings to enable and disable optimization tweaks as you please.
Here’s a quick overview of what each tweak does and whether it’s right for you:
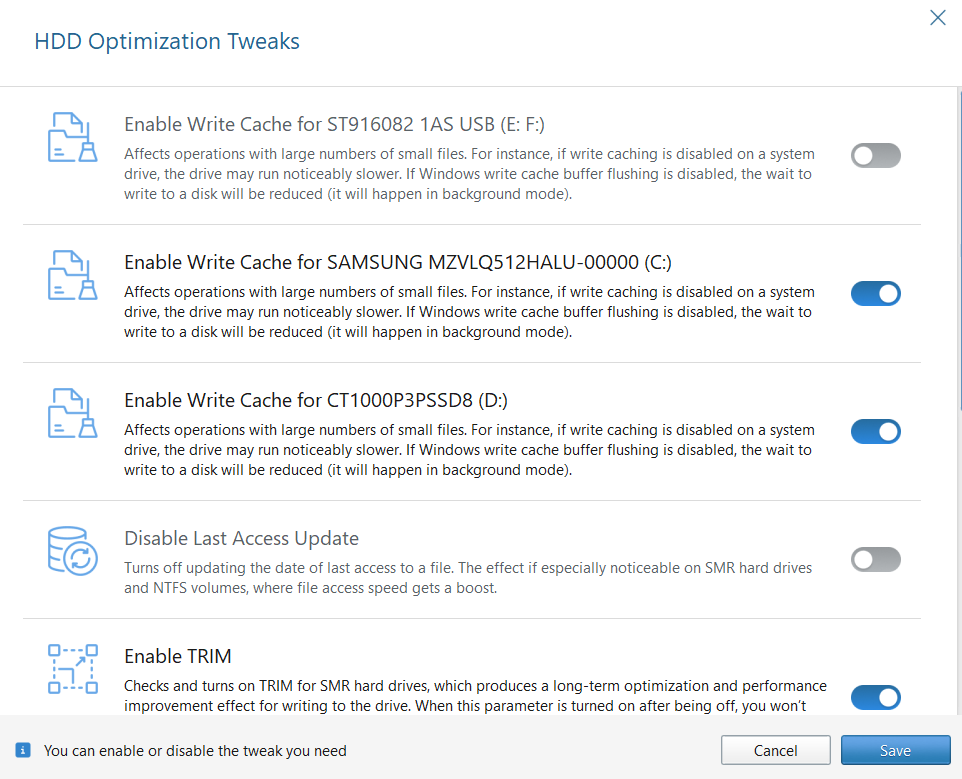
| Tweak | Description | When you should use it | Why you should disable it |
|---|---|---|---|
| Enable Write Cache | Saves write operations for later | You have reliable backup power for your computer | Your system can fall victim to sudden power loss or sudden shutdowns |
| Disable Last Access Update | Stops Windows from updating file access timestamps to reduce unnecessary writes | You use SMR and NTFS drives as primary internal storage devices | Your apps or scripts require access times (advanced users) |
| Enable TRIM | Helps SSDs and SMR hard drives to efficiently erase invalid blocks and sectors | You use an SMR hard drive or SSD as your primary drive | You only use a traditional hard disk drive |
| Enable Prefetcher | Loads frequently used data into memory in advance | You use an HDD as your primary Windows drive | An SSD is your primary Windows drive, while your HDD is your secondary or external drive |
| Disable Paging Executive | Permanently keeps the system kernel and drivers in the RAM instead of swapping between the drive and memory | Windows is installed on an HDD, and you have ample RAM (from at least 16 GB) | Windows is installed on an SSD |
| Enable Compact OS | Compresses system files to reduce Windows’ storage footprint | Your hard drive has little free storage space | You have a large hard disk drive |
| Increase File System Cache | Allocates more memory to caching frequently accessed files | Your system has a large amount of unused RAM | You have a low-memory computer |
➡️ Enable Write Cache: A Windows feature that saves write operations as scheduled tasks in the system memory. The files will then be written to the drive at a later time as one write operation. For example, if you use an autosave feature on any app, instead of the app writing to the drive repeatedly, these save tasks will be stored for later, when your drive is less idle.
The problem with this option is that those files will never be written if your computer loses power or abruptly shuts down before the write operations take place. So ensure you only enable this option on a computer with reliable backup power.
➡️ Disable Last Access Update: This update serves as a timestamp that helps Windows to track when a file was last accessed. Turning it off further reduces the operations on the disk and leads to better performance.
➡️ Enable TRIM: TRIM is an important feature for SSDs and SMR drives because it tells the drive which data pages to mark for deletion. This process allows better file arrangements and space management. However, according to the description on Auslogics Disk Defrag, the program appears to only support TRIM on SMR hard drives.
➡️ Enable Prefetcher: This option activates the prefetch command, which caches frequently used applications to the system memory. That way, Windows does not always have to read the hard disk drive to load application files from scratch, since cached versions already exist.
➡️ Disable Paging Executive: The Windows paging executive is responsible for using a portion of the hard disk, called a paging file, as virtual memory. It saves specific Windows kernel and driver tasks to the hard drive and returns them to the main memory when needed.
Disabling the paging executive means freeing the hard disk drive from its role as your computer’s virtual memory. That means everything will be saved to your memory, which provides faster access to your CPU, and your hard drive will have less work to do.
However, you should only apply this setting if you have ample RAM. I recommend doing this on computers with 16 GB of RAM or more.
➡️ Enable Compact OS: The Compact OS feature compresses Windows system files to reduce the operating system’s disk space usage. It saves valuable drive space and can also improve application launch times.
However, like other tweaks, there are two sides to this coin. Since Windows has to decompress files to read them, the burden now rests on the CPU. So, this feature is recommended for computers with fast CPUs and smaller hard disk drives. Turn it off if your hard drive has ample space.
➡️ Increase File System Cache: As mentioned earlier, specific tasks are cached in the memory to reduce write operations on the hard disk. The system can also cache frequently accessed files in the system memory to save time and improve file access.
Increasing the file system cache expands the number and size of files that can be committed to memory for extended periods. That means more and more operations will run faster. This option is ideal for systems with higher RAM capacity.
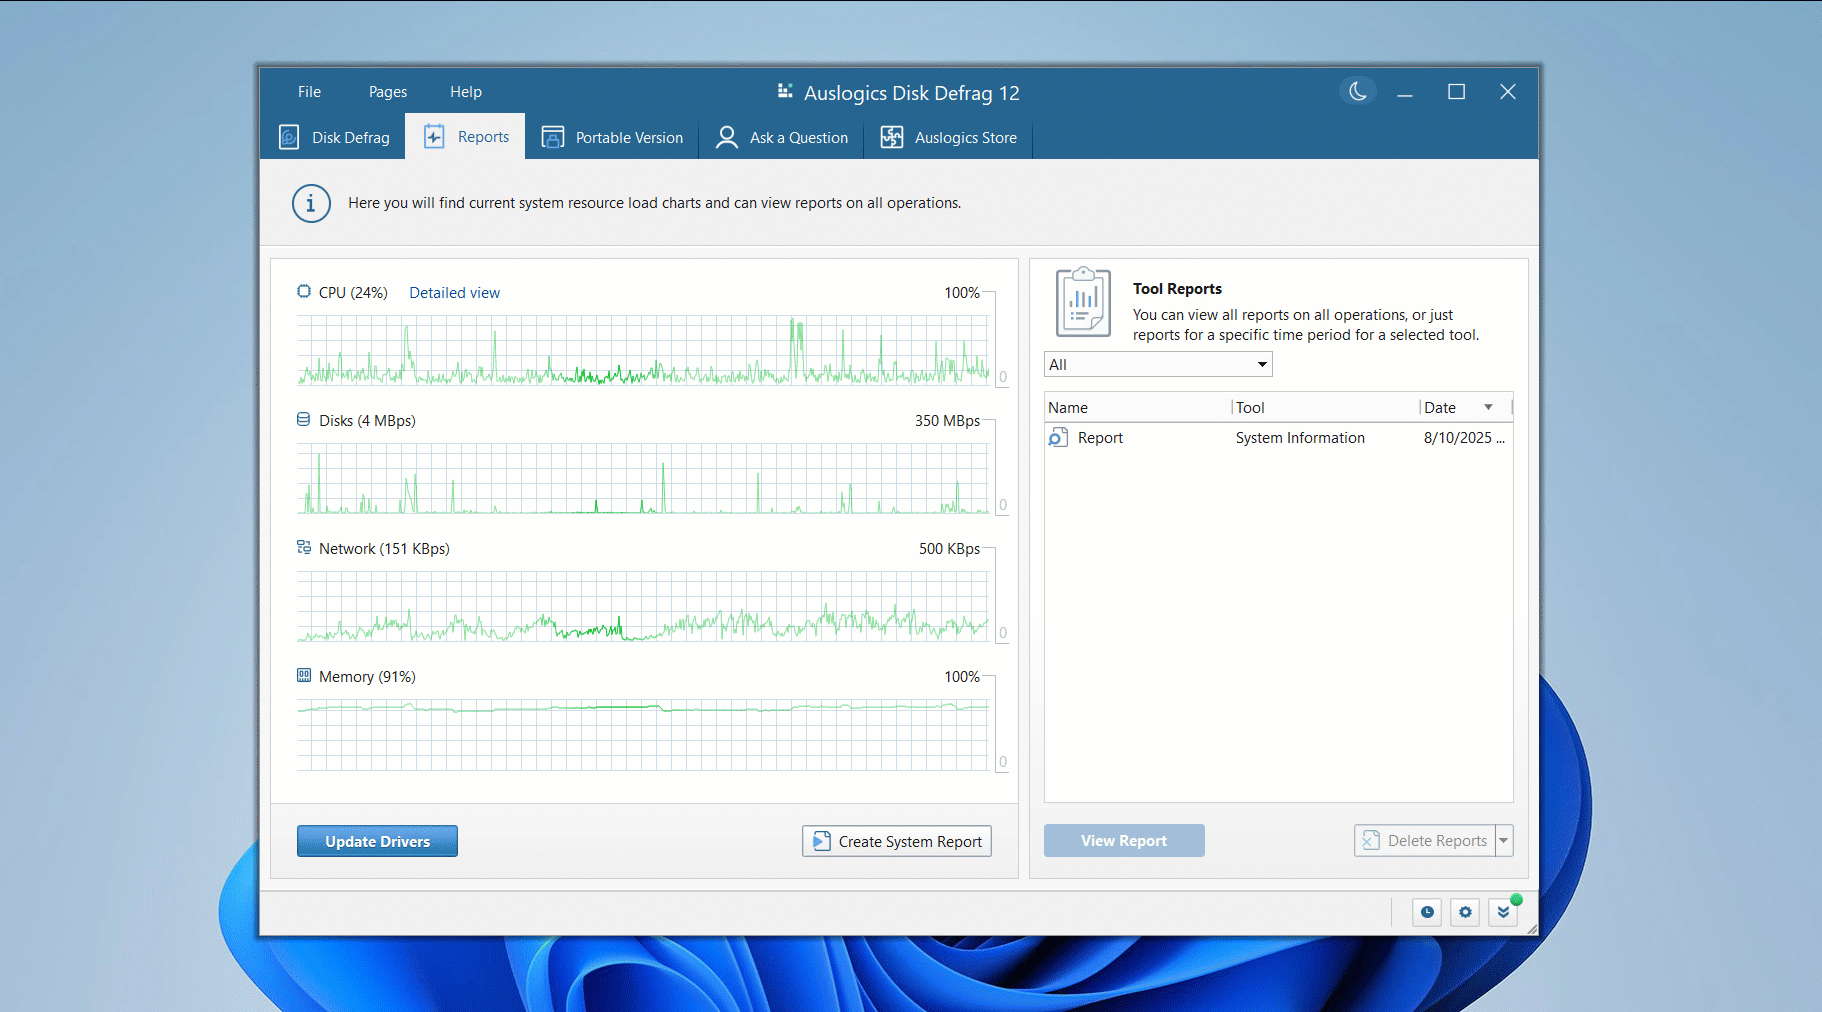
![IMG]() Resource usage reports
Resource usage reports

The tool’s Reports page allows you to see real-time usage graphs of your CPU, storage drives, network, and memory. You can also click the Create System Report button to see a detailed breakdown of your computer’s specifications. This report automatically shows up in your default web browser and shows everything from your CPU’s model and core counts to your system folders.
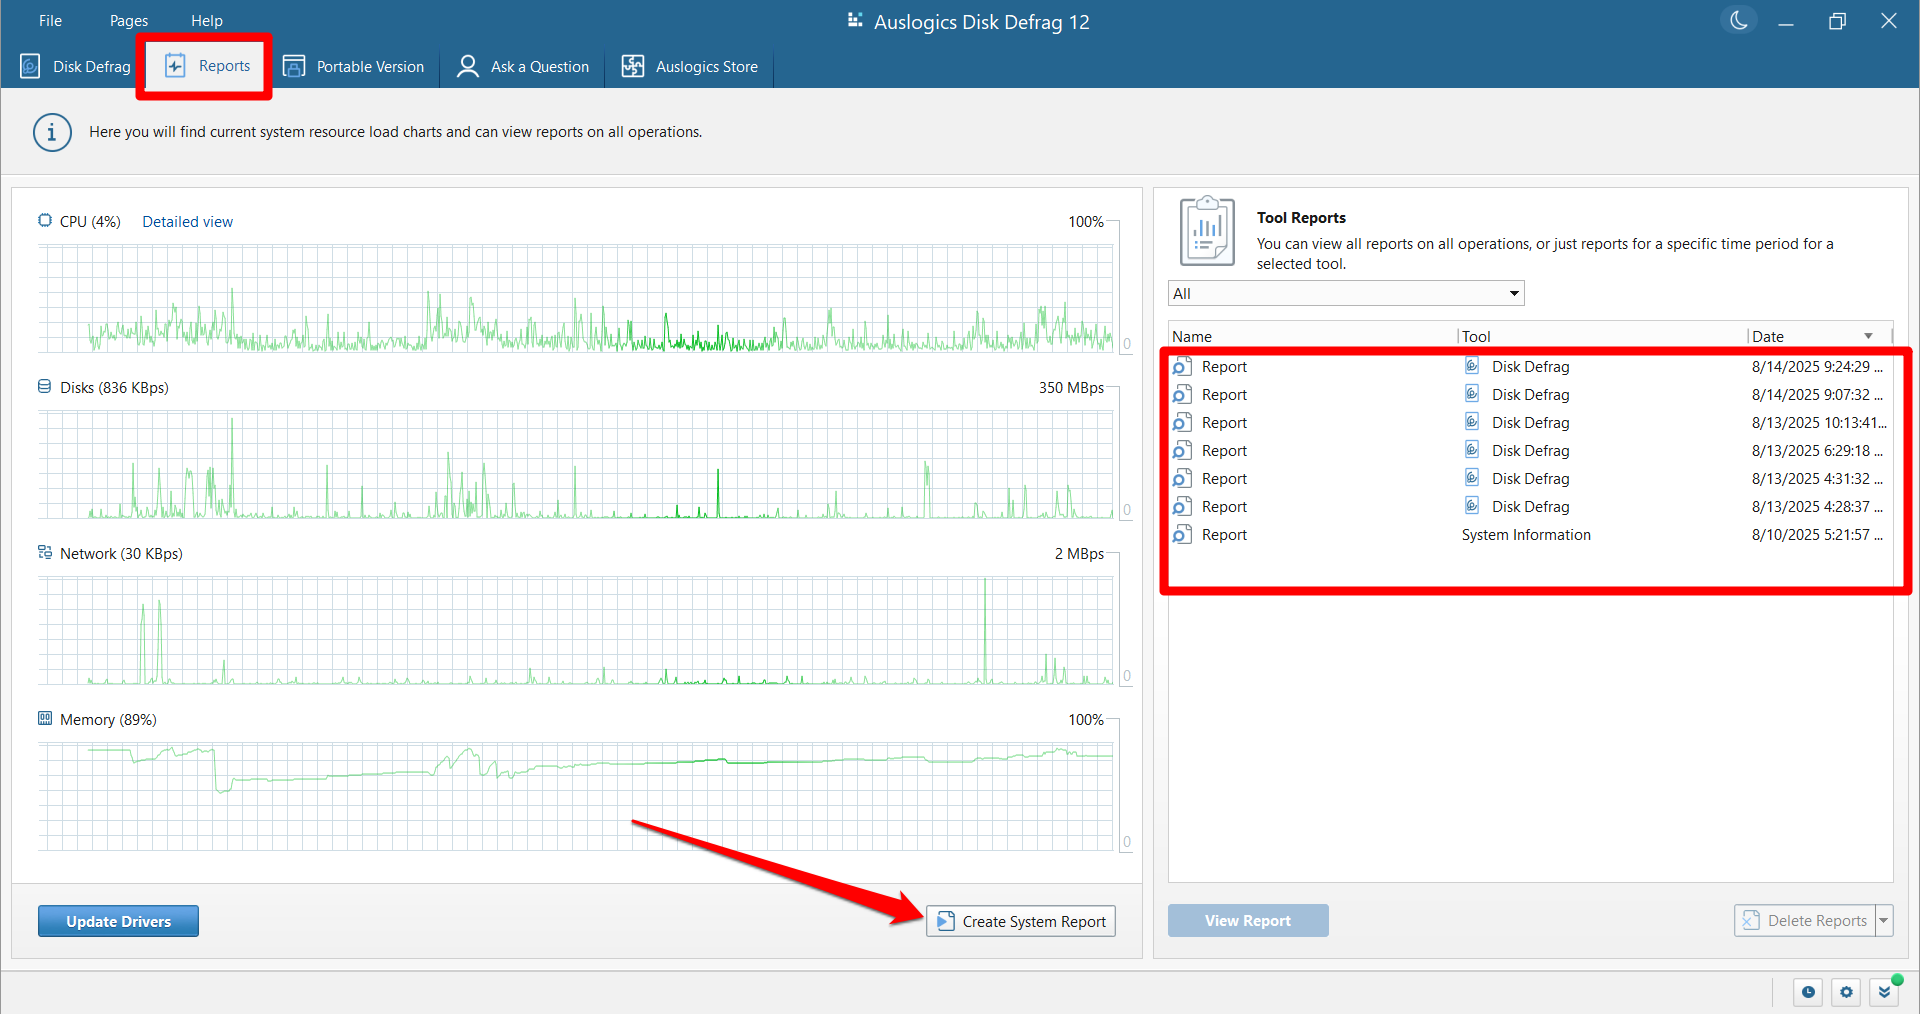
Additionally, if you’ve run any defrag process using the program, whether scheduled or manual, you will see reports in the right pane under Tool Reports. Double-clicking a report shows you details of the defragmented drive, including the files that were processed and skipped.
The following is a report from my last defragmentation:
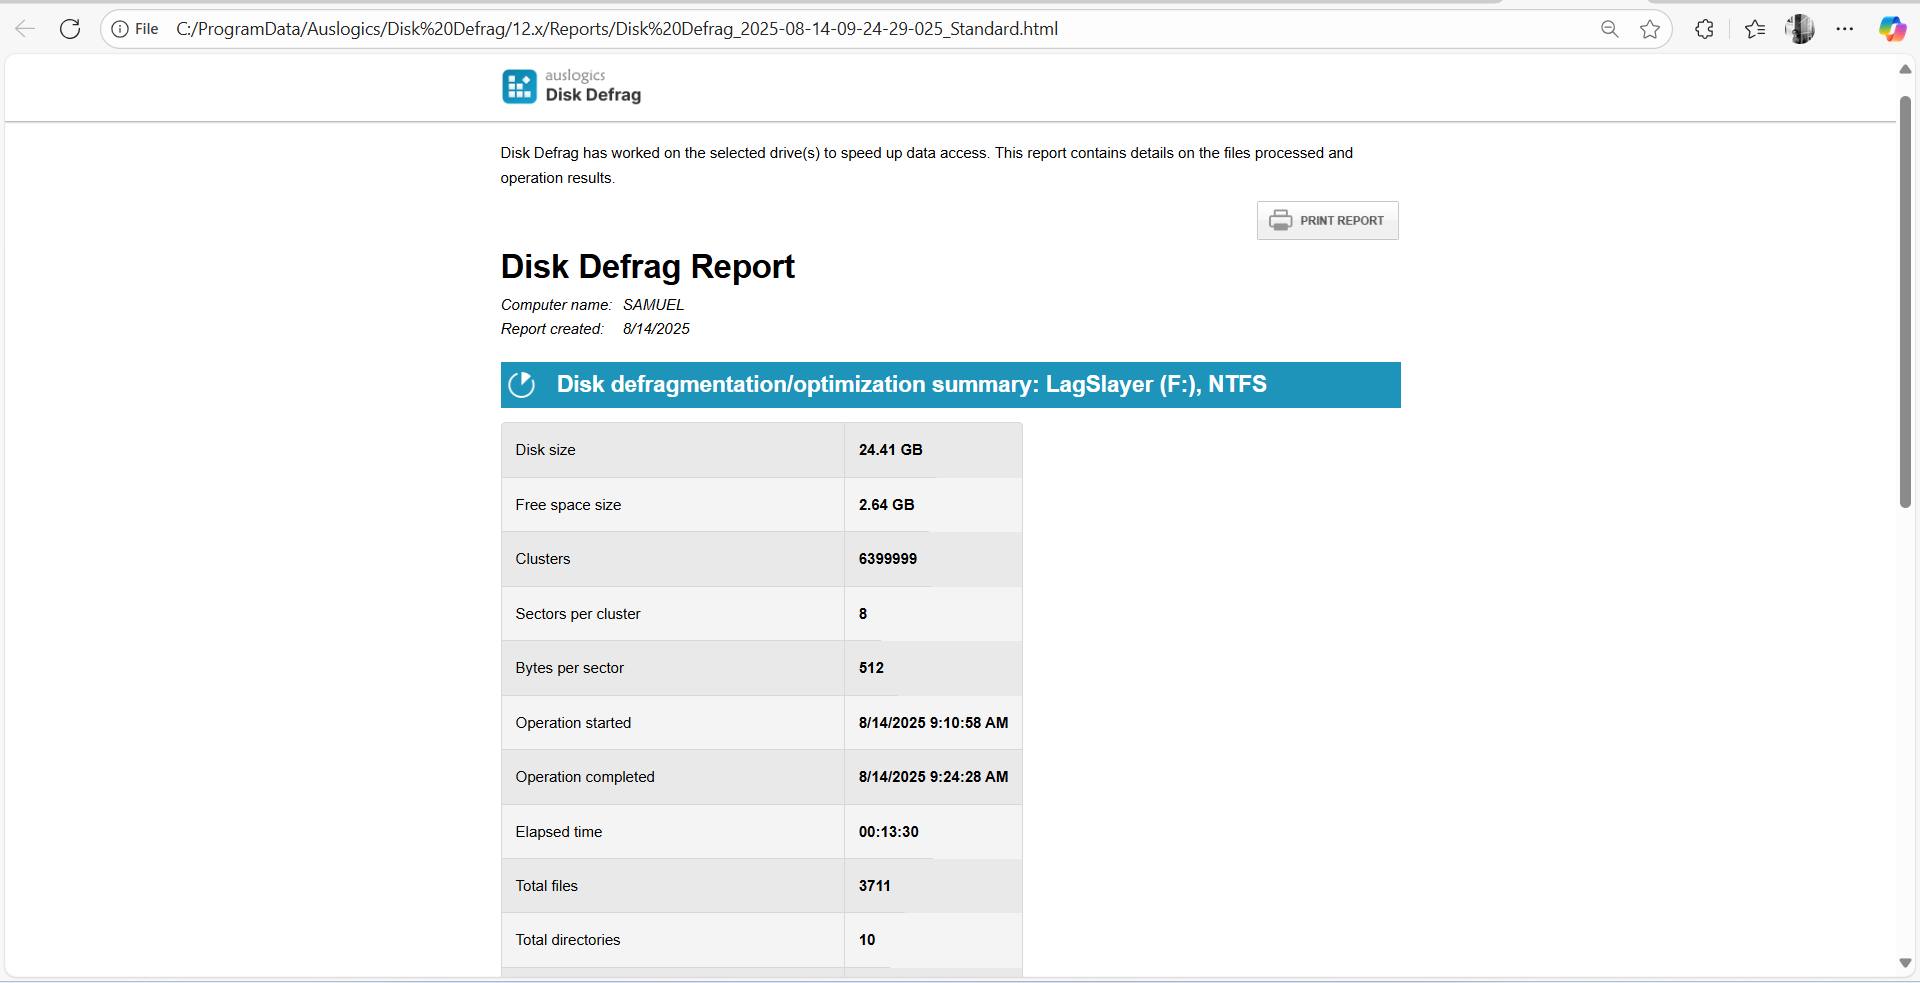
You’ll see more details when you scroll down.
![IMG]() Portable version
Portable version

You can create a portable version of the program to use it with removable storage devices on various computers. The process is simple:
- Go to the Portable Version page and click the Create portable version button.
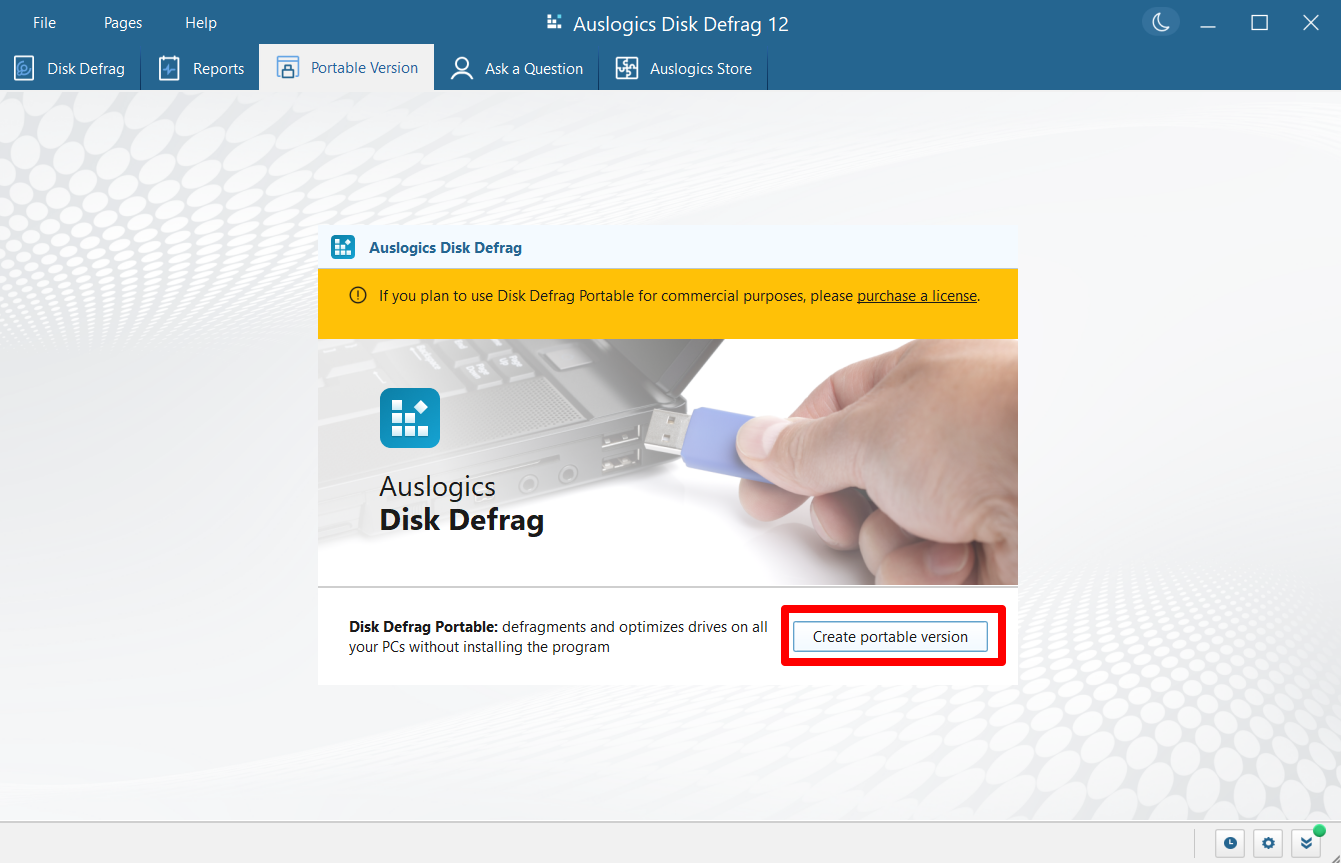
- Select the removable device and choose any folder where you wish to save the tool.
- Click the Save button.
Once you open the portable version, you’ll notice the following features missing:
- Offline defragmentation
- Automatic defragmentation (defrag schedules)
- The Portable Version page

![IMG]() Ask a Question
Ask a Question

The Ask a Question page allows you to send questions to professionals and receive answers about any PC-related issue. You get three free questions with the Pro version and one free question with the free version.
However, all users can ask as many questions as they need for free regarding Disk Defrag and other Auslogics software.
However, you need to sign up with an email address to get started. Here’s how you can set it up:
- Go to the Ask a Question page at the top of the window.
- Click the Sign Up button.
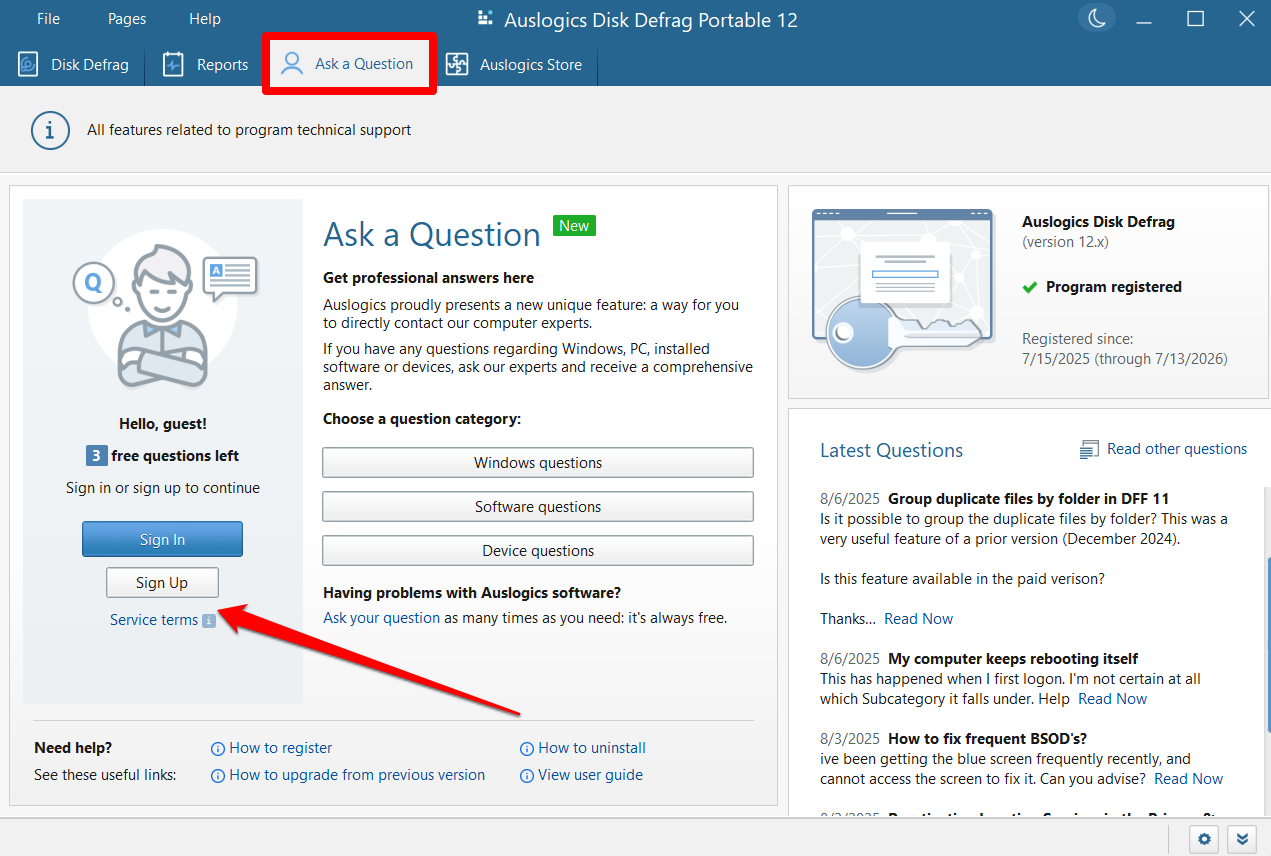
- Enter a name and your email address when the Ask a Question – Registration window appears.
- Click Register.
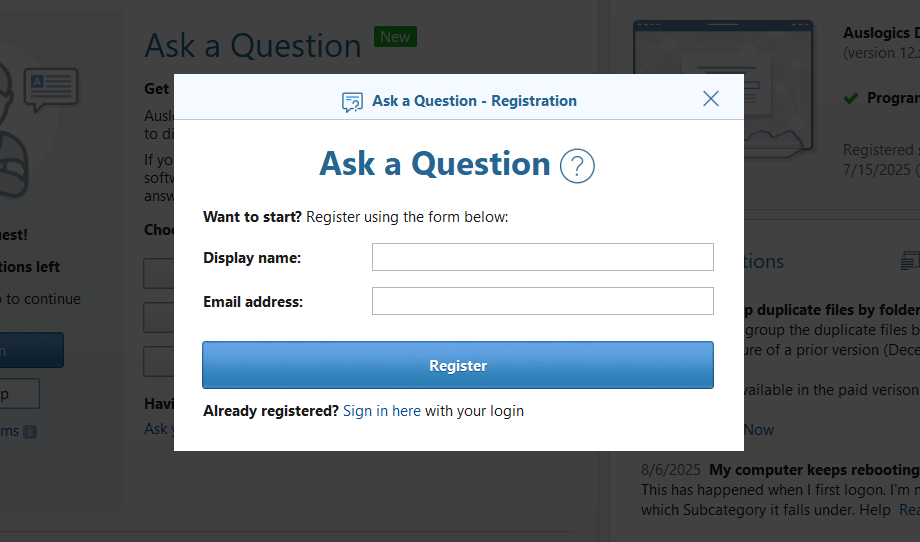
- Go to your email address and use the generated password in the inbox to log in to the platform from the app.
- Once you’re logged in, click a category to ask your question.
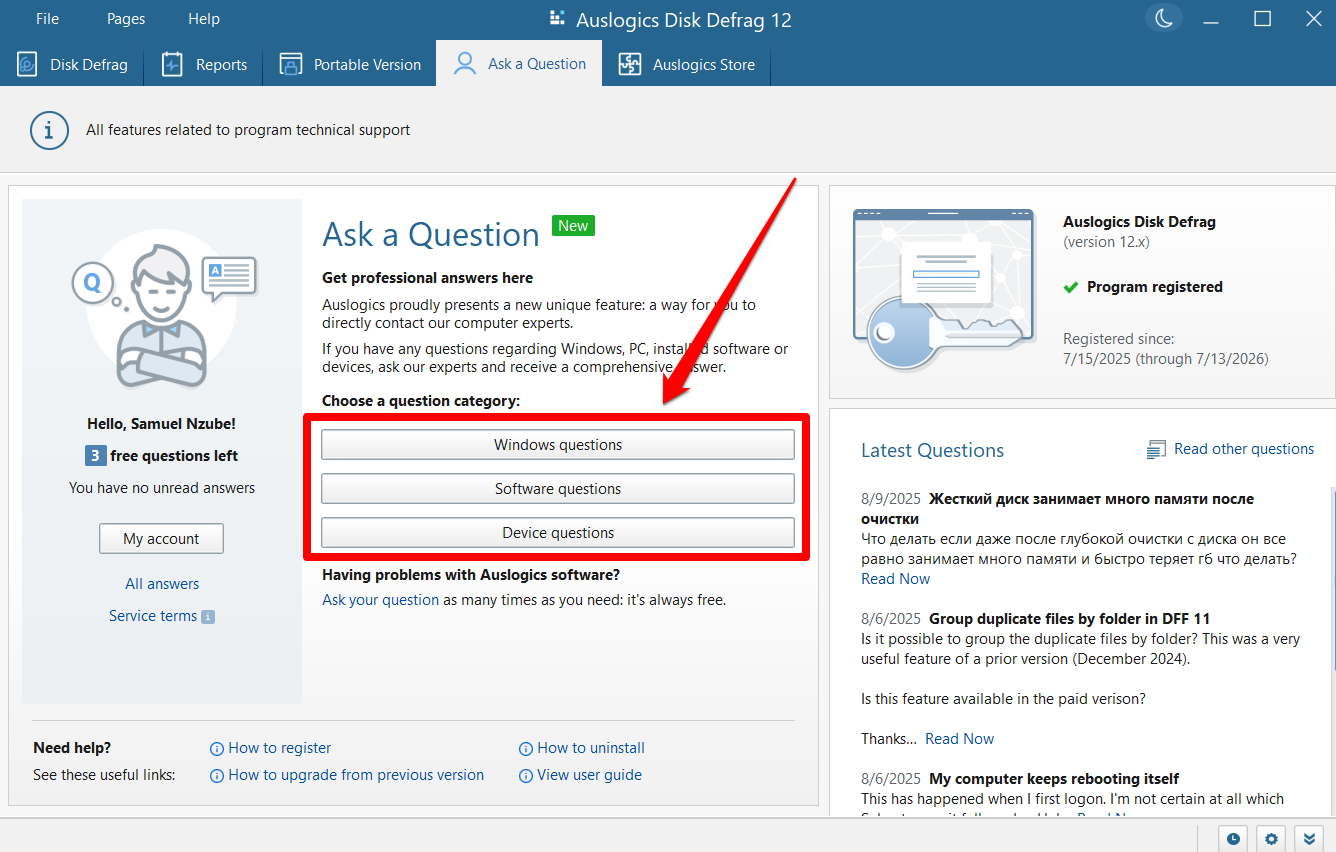
- Once the window opens, select a subcategory, enter your message subject, and then type out your issue in the main body.
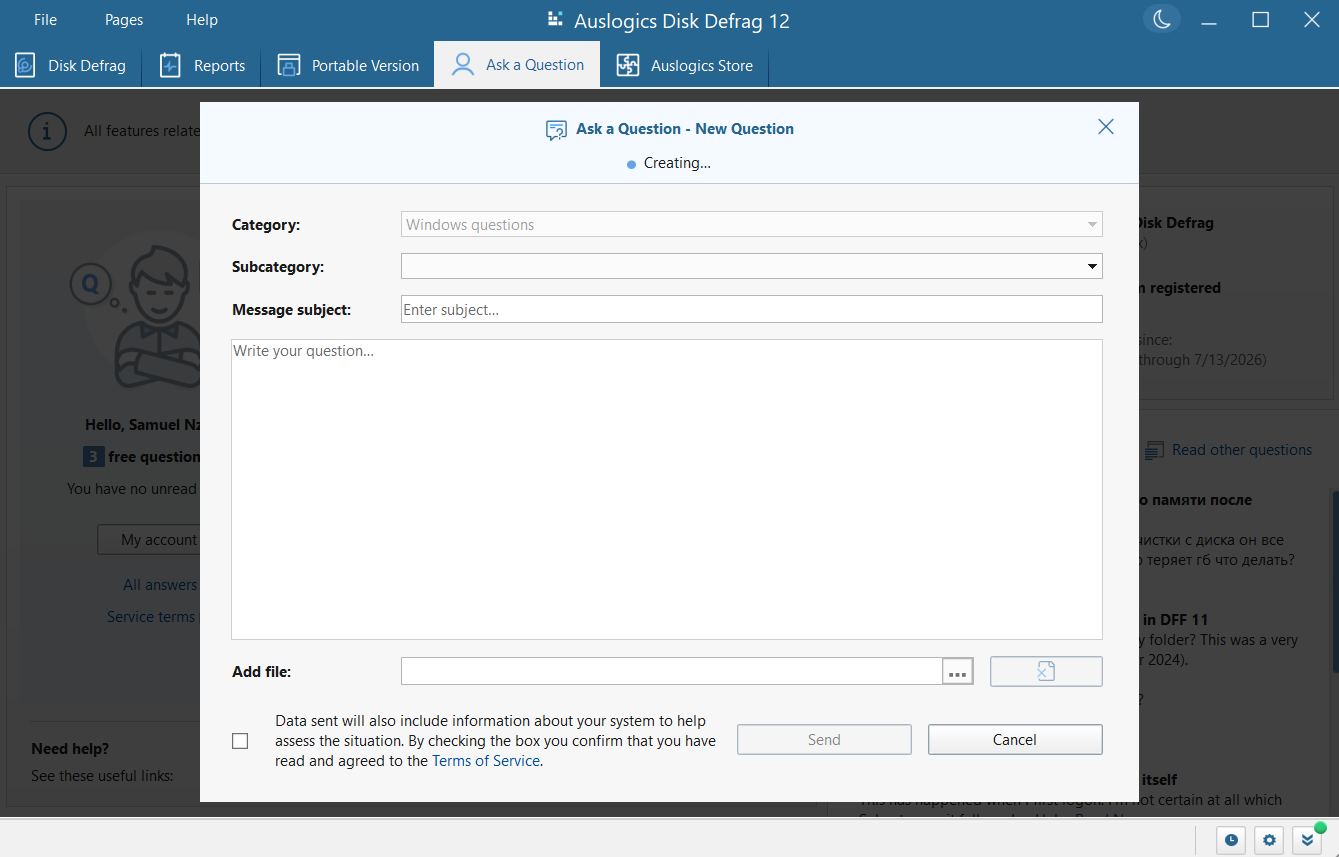
- You can also add an attachment by clicking the three dots beside the Add file menu and selecting a screenshot or other file.
- Check the box to accept the Terms of Service and click the Send button.
Is Auslogics Disk Defrag Better than Other Tools?
| Auslogics Disk Defrag | Microsoft Drive Optimizer | Defraggler | Smart Defrag | |
|---|---|---|---|---|
| Price |
|
Free | Free |
|
| SSD detection | Yes | Yes | Yes | Yes |
| Cluster map | Yes | No | Yes | Yes (not interactive) |
| Scheduled defragmentation | Yes | Limited | Yes | Yes |
| Offline defrag | Yes | No | Yes | Yes |
| Portable version | Yes | No | No | No |
| Additional features | ✅ Disk cleanup
✅ Free space wiping ✅ HDD error checking ✅ HDD optimization ❌ Windows app optimization ❌ SSD optimization (offered with sister program) |
✅ SSD optimization
❌ Disk cleanup ❌ HDD optimization ❌ HDD error checking ❌ Free space wiping |
✅ SSD optimization
✅ Disk cleanup ❌ HDD optimization ❌ HDD error checking ❌ Free space wiping |
✅ SSD optimization
✅ Disk cleanup ❌ HDD optimization ❌ HDD error checking ❌ Free space wiping |
What Do Users Think About Auslogics Disk Defrag?
The following are reviews from real users who rely on disk defrag to keep their hard drives going:
⭐⭐⭐⭐⭐ “Auslogics Defrag is my No. 1 essential.
Hoping to register it as an emotional support animal one day so I can annoy people at airports.
Again, design-wise, the line between free tools and Pro features is entirely sensible.
Having the standalone products to back you up in specific situations is also handy to have and easy to find. I have purchased products in the past and have never had a problem…” — Breaneainn D.
⭐⭐⭐⭐⭐ “It is the best and fastest defrag program I have used in my 30+ years using a PC. I love it.” — Barry.
⭐⭐⭐⭐⭐ “Disk Defrag is great! It performs as promised. It is easy to use.” — Danton Grube.
⭐⭐⭐⭐⭐ “Terrific defrag and very easy to understand. It’s a great app.” — S. D. Good.
My Verdict: Auslogics Disk Defrag Is Straightforward and Easy, but Offers More than Traditional Defragmentation
Auslogics Disk Defrag remains a mainstay among top-tier defragmentation tools. Go for it if you want a free tool that’s easy to use, designed for beginners, and offers extra functions like file and folder fragmentation, error checking, and HDD optimization.
Its free tier is enough to fulfill my day-to-day defragging needs, but you may need a small token to access features like additional HDD optimization and scheduled defragmentation.
However, if you want more advanced tweaks, like customizable disk defrag profiles and SSD optimization tweaks, use Auslogics Disk Defrag Ultimate instead.
On the other hand, you can pair Auslogics SSD Optimizer with Disk Defrag if you need to optimize solid-state drives and HDDs. Let us know your best features in Auslogics Disk Defrag!