
Getting a new drive is great—but to get the most out of it, it also needs to be set up right. And the path to top performance starts with initializing your disk properly.
In this article, I’ll show you how to initialize an SSD and walk you through steps to confirm your drive is detected correctly, select the right mode for your drive, update firmware and drivers, and decide whether to clone or clean install Windows so your SSD runs fast and lasts longer.
🔧 Confirm the SSD is detected in the BIOS and enable AHCI.
✅ Initialize the disk in Disk Management so Windows can create partitions and format the drive.
🛠️ Update SSD firmware and drivers.
🔁 Make sure TRIM is enabled and schedule optimization via Defragment and Optimize Drives.
⚙️ Optimize your SSD using vendor tools and SSD-aware third-party utilities like Auslogics SSD Optimizer.
🔍 Do a quick SSD health check using a vendor tool or CrystalDiskInfo.
🚫 Avoid defragging, overheating, and filling the drive completely.
Confirm SSD Detection in the BIOS
Let’s start with the basics. Before you get to initialize your disk, make sure your motherboard actually sees the drive and that the controller mode is set correctly in the BIOS.
- Shut down the PC and connect your SSD into the correct slot.
- Power on and press the BIOS key (usually F2, Del, Esc, or F10) before the Windows logo shows up.
- Open the Storage/SATA Configuration/NVMe Configuration (or similarly named) menu.
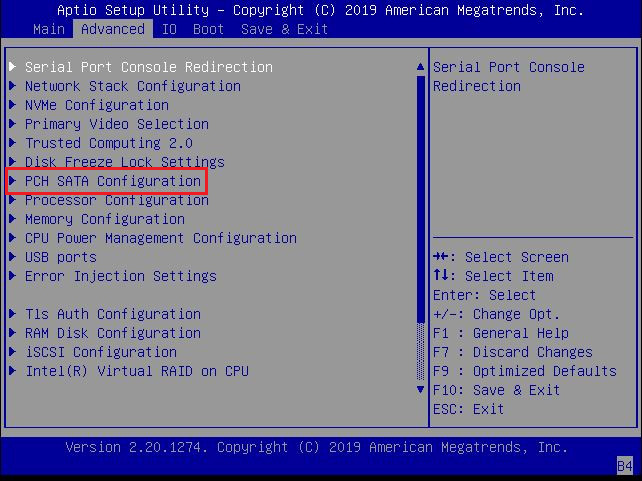
- Confirm your SSD model appears in the list.
- If it’s listed, you’re good to proceed.
- If it’s not listed: power down, reseat the drive, try another M.2 slot or SATA cable, and retry.
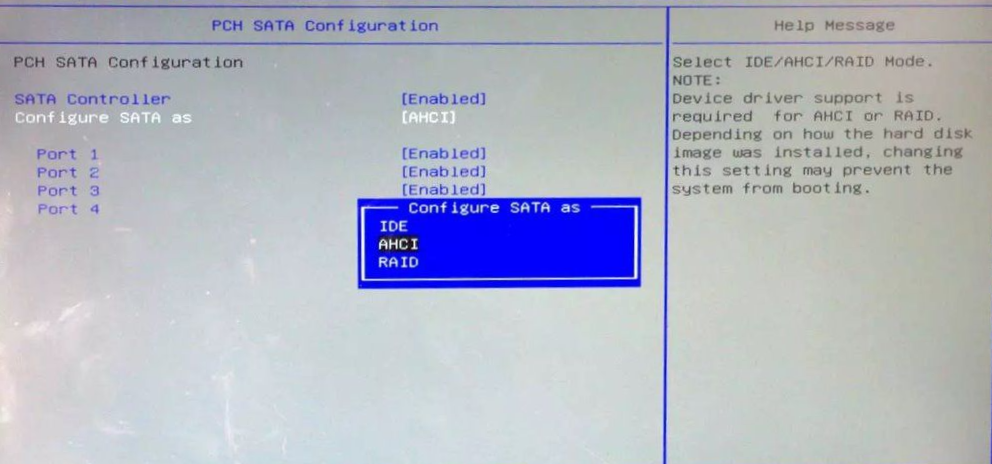
- Check the controller mode and set it to AHCI if it’s on IDE (this enables TRIM on SSDs).
- IDE is the old legacy mode for very old systems.
- AHCI is the modern single-drive mode that enables NCQ and TRIM—use this for most SSD setups.
- RAID combines multiple drives for speed or redundancy (RAID 0, 1, 5, etc.) and needs a RAID controller or motherboard support.
⚠️ Warning!
Switching the controller mode after Windows is installed may cause the system to fail to boot.
- Save and exit the BIOS and boot to Windows.
Initialize the SSD in Windows
Getting your SSD detected in the BIOS is the first step. However, it won’t show up under This PC until it’s initialized. So let’s see how to initialize your SSD on Windows 11 /10 to let the OS create partitions and format the drive.
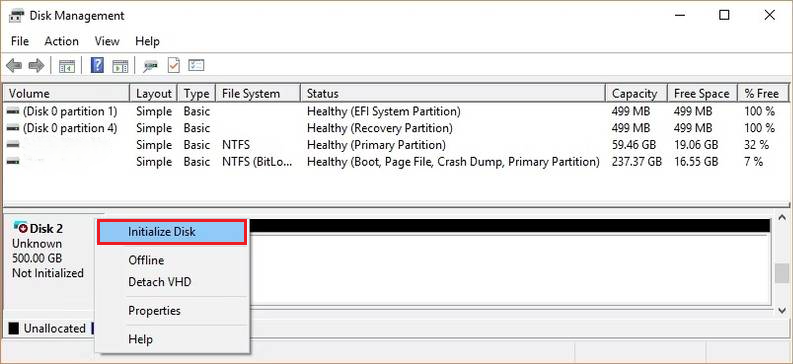
- Right-click Start and select Disk Management.
- Find your new drive (it will usually show as Unknown/Not Initialized), right-click the disk label on the left (Disk 1/Disk 2), and select Initialize Disk.
The process for how to initialize a hard drive and SSD is essentially the same once you select Initialize Disk and create partitions.
Now you need to select the partition style— MBR or GPT—for your SSD. For almost all new SSDs and UEFI systems, pick GPT. Pick MBR only if you must support an old PC or legacy OS that won’t boot from GPT.
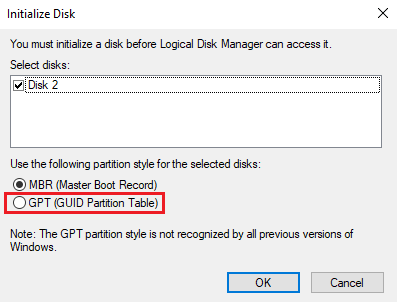
MBR (Master Boot Record) is the older partition scheme with a ~2 TB size limit and a maximum of four primary partitions—it’s mainly for legacy BIOS systems and older OS compatibility.
GPT (GUID Partition Table) is the modern standard: it supports drives larger than 2 TB, virtually unlimited partitions, and is required for UEFI boot on Windows 10/11.
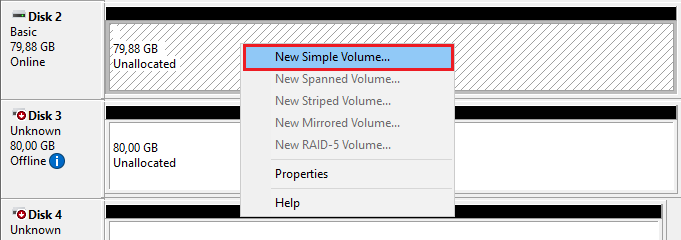
- Next, right-click the now Unallocated space, select New Simple Volume, and click Next.
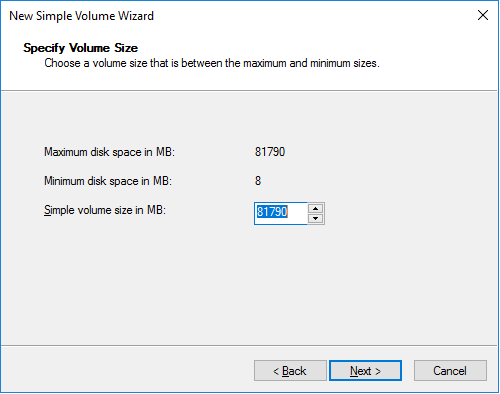
- Set the size and click Next.
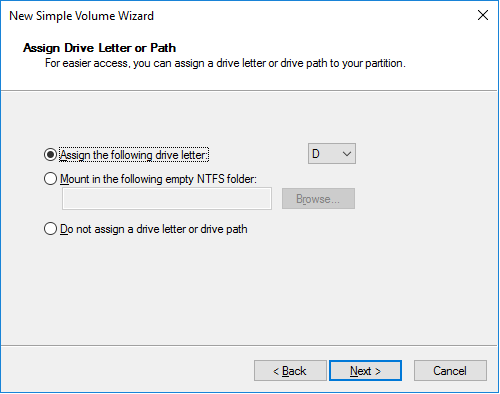
- Assign a drive letter and click Next.
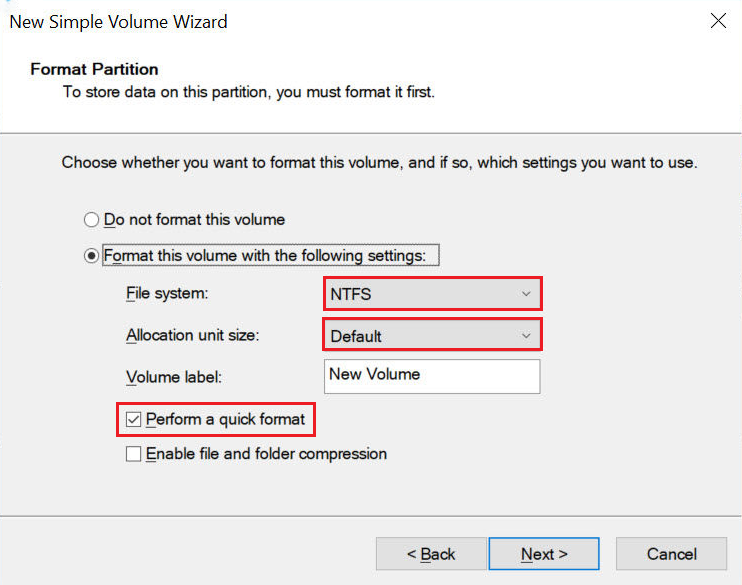
- When prompted to format, choose NTFS next to File system select Default next to Allocation unit size, and check the Perform a quick format box. You can also name the volume label as you wish. Click Next when you’re ready.
- Confirm all the settings are correct and click Finish.
- Your drive is now initialized and should be visible under This PC in File Explorer.
What if the SSD doesn’t appear in Disk Management?
If you can’t see your SSD in Disk Management, follow these steps:
- Right-click Start and select Device Manager.
- Expand Disk drives.
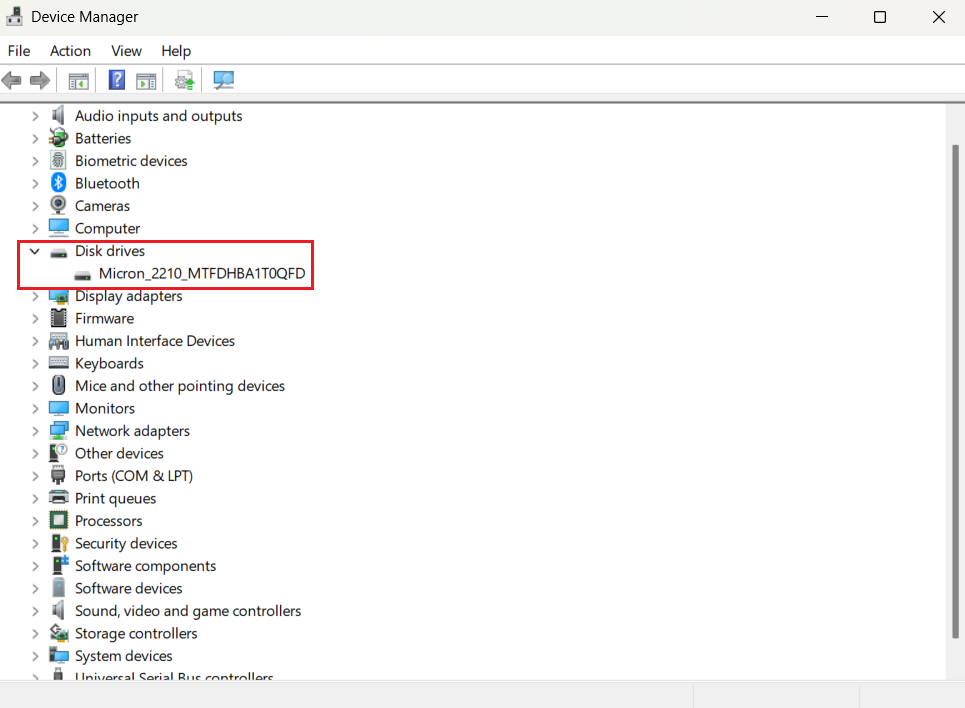
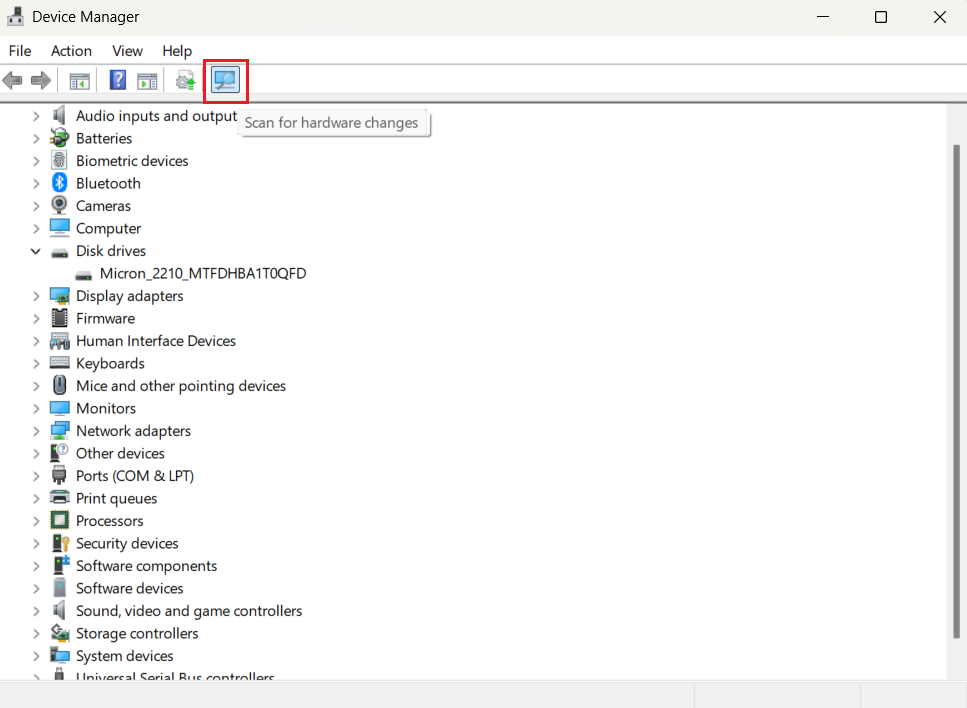
- If you see your SSD here, click Scan for hardware changes and update storage and chipset drivers (see how to do it below).
- If you can’t see your SSD in Device Manager either:
- Check the BIOS again—sometimes a BIOS misconfiguration hides NVMe drives behind particular M.2 slots or shared PCIe lanes.
- Replace the cable or try the drive in another PC to rule out hardware faults.
Install the latest firmware and driver
The final step is to ensure you have the latest firmware and chipset driver installed. Firmware fixes bugs and improves the drive’s internal controller, while storage and chipset drivers make sure Windows talks to the SSD efficiently.
➡️ How to install firmware
- Get the official utility: Download the vendor tool from your SSD manufacturer’s support page and install it.
Check what SSD you have and make sure you download the correct tool:
- Samsung Magician for Samsung drives
- Crucial Storage Executive for Crucial and Micron drives
- Kingston SSD Manager for Kingston drives
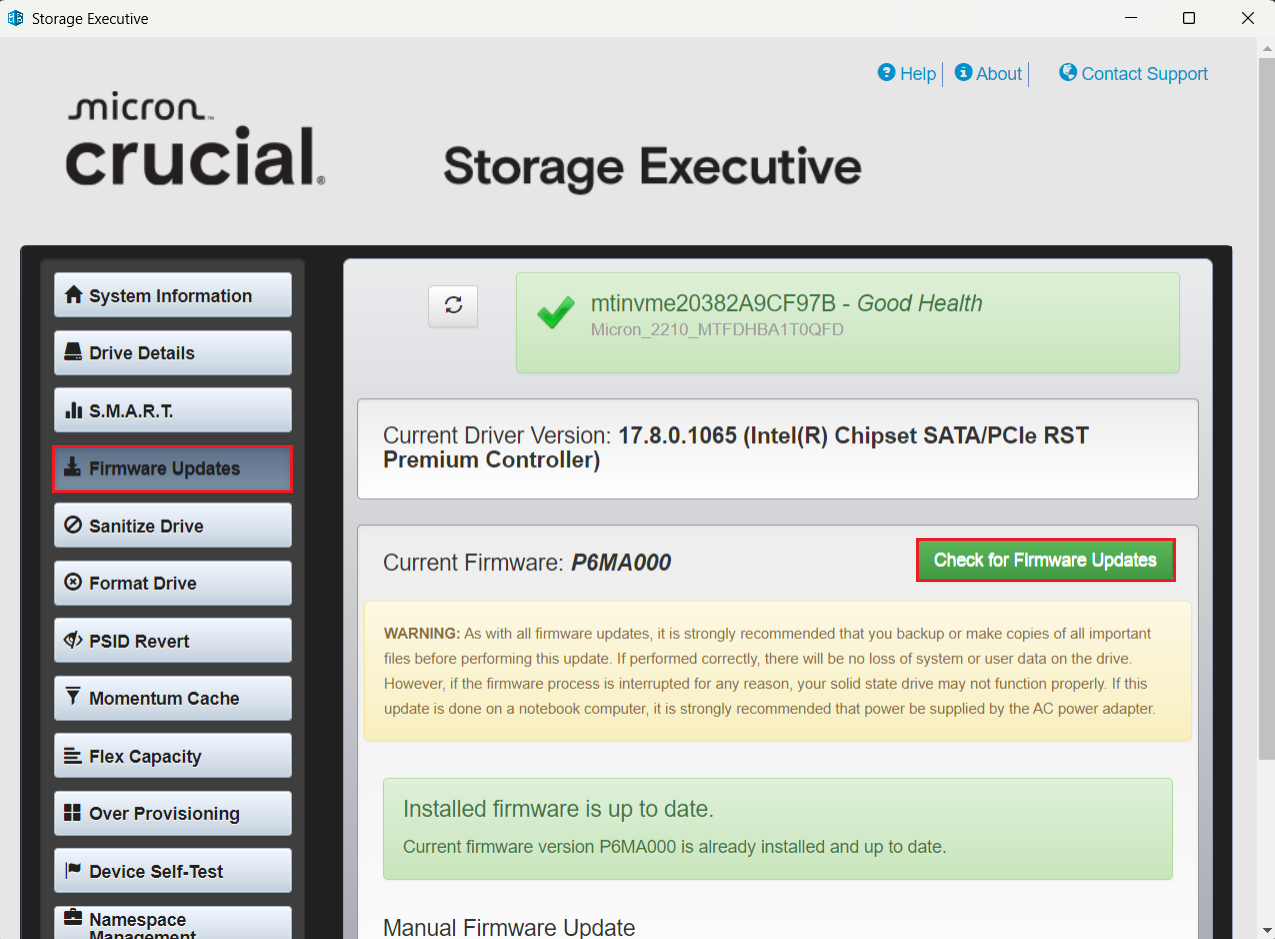
My drive is from Micron, so I’ll be using Crucial Storage Executive as an example.
- Run the tool as an administrator: Right-click the EXE file, click Run as administrator, and click Yes on the User Account Control prompt.

- Check for firmware updates: Go to the Firmware Updates (or similarly named) section, click the Check for Firmware Updates (or similarly named) button, and follow the on-screen prompts to install. If the vendor provides a bootable ISO, follow their exact instructions.
- Reboot and confirm: When prompted, restart your PC, then reopen the utility to confirm the firmware version changed.
➡️ How to install drivers
By default, drivers for your SSD and chipset should install automatically. However, you still need to check if they are up to date. There are several ways to do it:
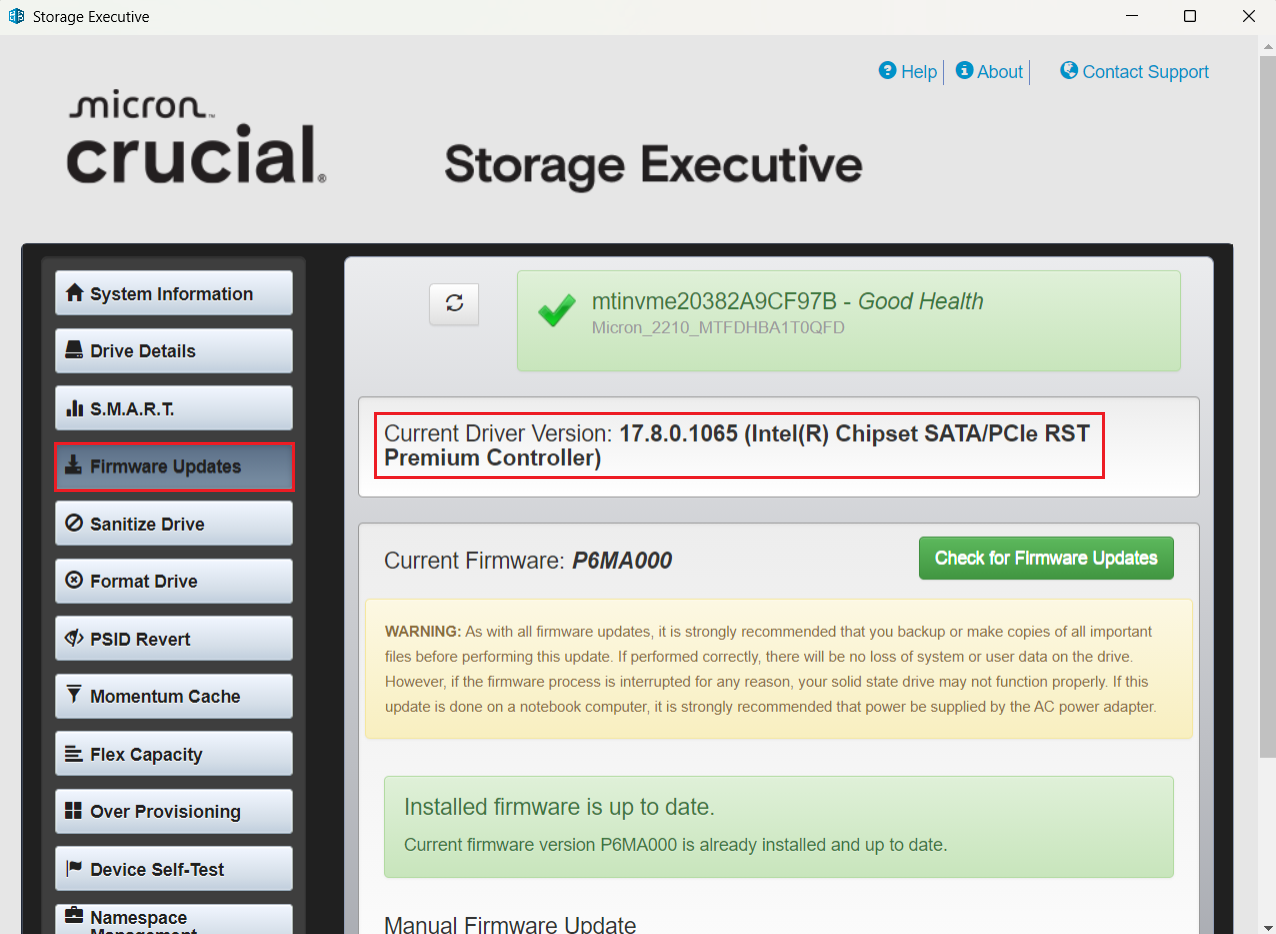
- Using the vendor tool: Most SSD utilities will show you the installed driver version next to the firmware info. In my case, it’s shown under Firmware Updates. Note the driver version and check it against the latest available version on the driver vendor support page. If the vendor’s website features a newer driver, download and install it.
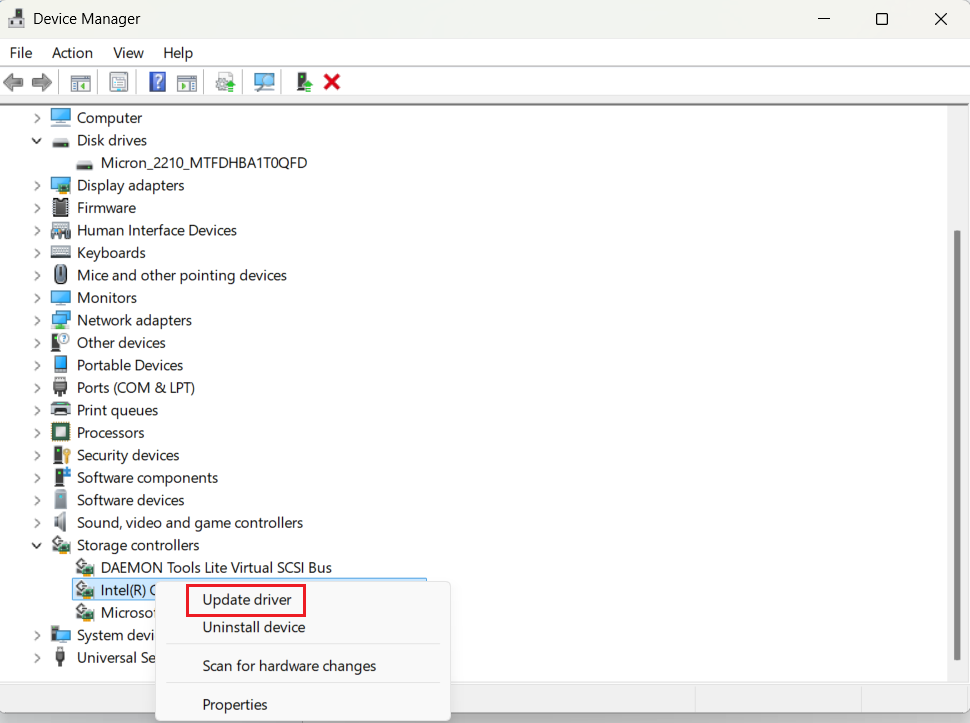
- Via Device Manager: Right-click Start, select Device Manager, expand Storage controllers, right-click your controller, select Update driver, and click Search automatically for drivers. Repeat the same for your SSD under Disk drives.
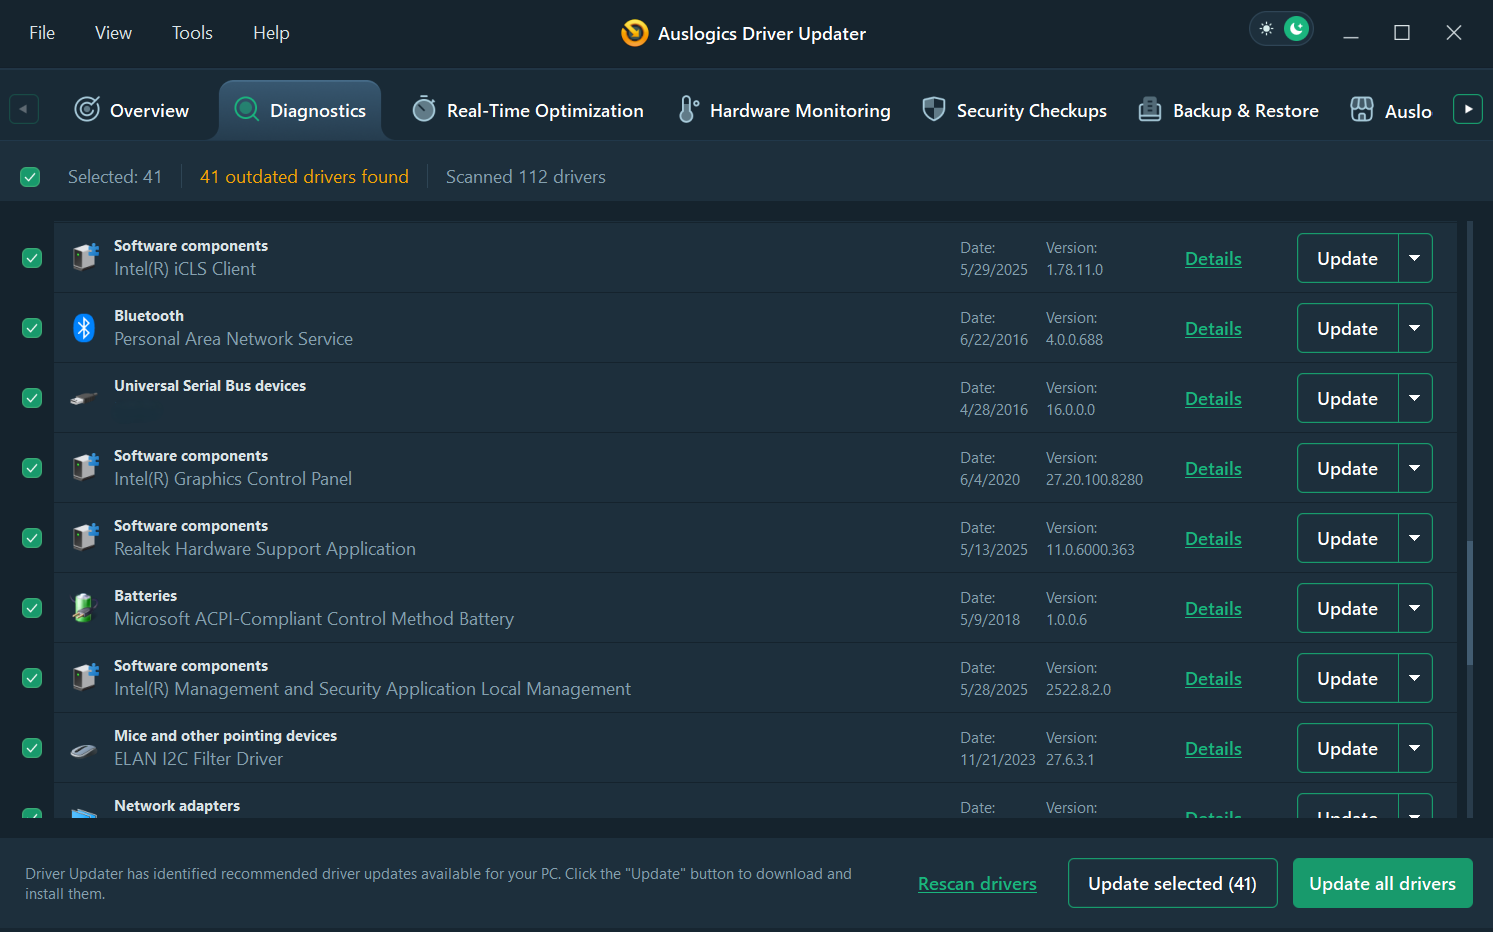
- Using a reputable third-party driver updater: The optimal option, since it scans your PC, ensuring you get the right drivers for your hardware, and installs the latest, manufacturer-approved ones that Device Manager may not yet have, so you don’t need to hunt them down manually one by one.
I recommend using Auslogics Driver Updater—the utility from the well-established vendor trusted by millions worldwide. It has a vast 60 million+ driver database, allows you to update all drivers in one go, backs them up before updating for safety, and offers additional features like real-time optimization, hardware monitoring, and more.
➡️ Run a health check to confirm
Once your drive is initialized and drivers are set, it’s smart to do a quick health check of your SSD. This helps confirm the drive is working properly from the start and that there are no hidden issues like bad sectors or controller errors.
Here’s how you can do it:
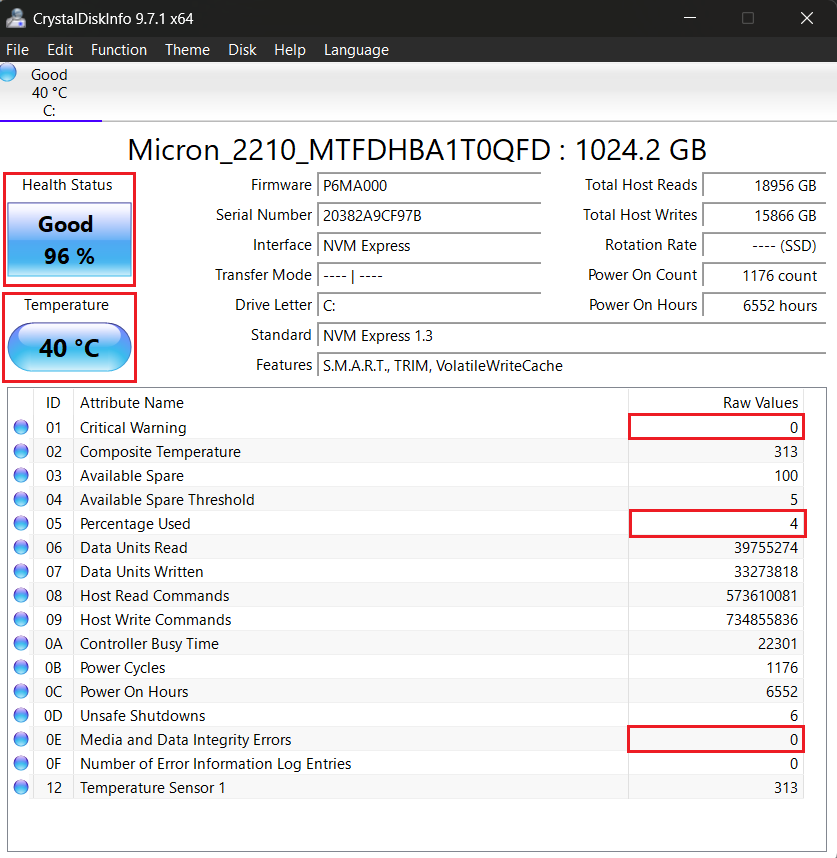
- Open the vendor utility or a third-party tool like CrystalDiskInfo and look for the drive health status and SMART attributes such as percentage used, temperature, critical warnings, and errors.
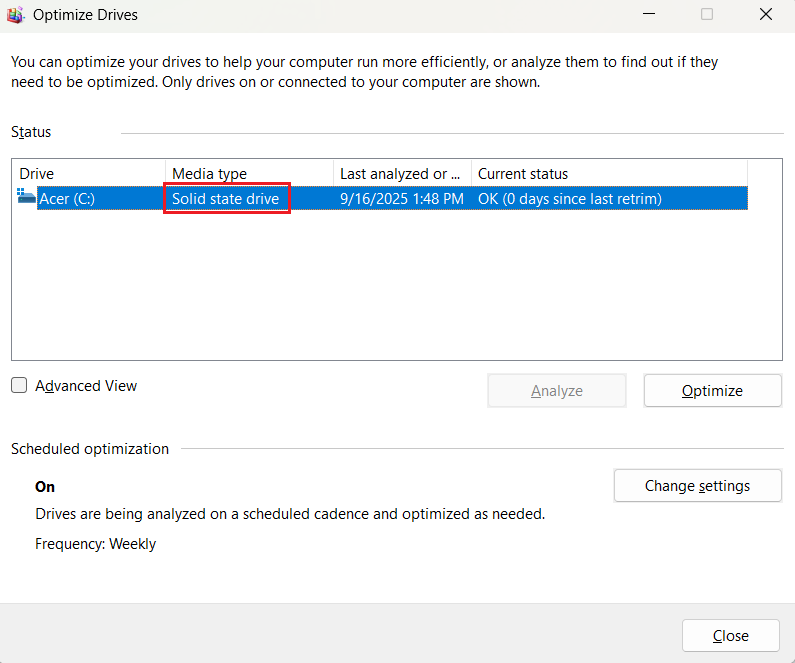
- Next, click Start and type Optimize. Open the Defragment and Optimize Drives tool and make sure it recognizes your SSD as a solid-state drive, not an HDD.
📌 Also read: SSD vs. HDD: What’s the Difference and How to Choose the Right One
If your drive is recognized correctly, the health status says Good, the temperature is within normal limits (~30–50°C when idle or under light load), and there are no critical warnings or errors, you’re ready to move on.
Set Up Your SSD as a Boot or Storage Drive
Now you know how to initialize an SSD on Windows 10 and 11, but one question is still pending before you’re ready to use it: Will this new SSD become your system (boot) drive or a secondary one for apps and files? Both are simple to set up, but the steps differ.
How to set up a new SSD as a boot drive
First, you need to decide how you want to move your system: clone or clean install.
| Method | Pros/Cons |
|---|---|
| Cloning | Pros:
Cons:
|
| Clean install | Pros:
Cons:
|
👥 How to clone your SSD
Before you start, you need to prepare your source drive:
- Uninstall apps you don’t use and remove large temporary files (downloads, temp folders).
- Run a one-off cleanup: empty the Recycle Bin, run Disk Cleanup, and remove old restore points.
- Back up your user data: copy documents, pictures, and any game saves to an external drive or cloud.
- Create a system image: use Windows System Image or a third-party solution to make a full image on an external drive—this is the safety net if cloning fails.
Once you’re ready, pick your cloning tool. Popular options include:
1️⃣ Macrium Reflect. The app now offers only a paid version, but there’s a 30-day trial, which is more than enough for one-time cloning. You can also create a system image using the app.
2️⃣ Samsung Magician. Previously known as Samsung Data Migration, this tool is now integrated into a larger suite. The app is absolutely free. The only downside—it only works with Samsung SSDs.
Since I don’t have a Samsung SSD, I’ll use Macrium Reflect as an example. Here’s how to clone your SSD using this app:
- Download, install, and run the app.
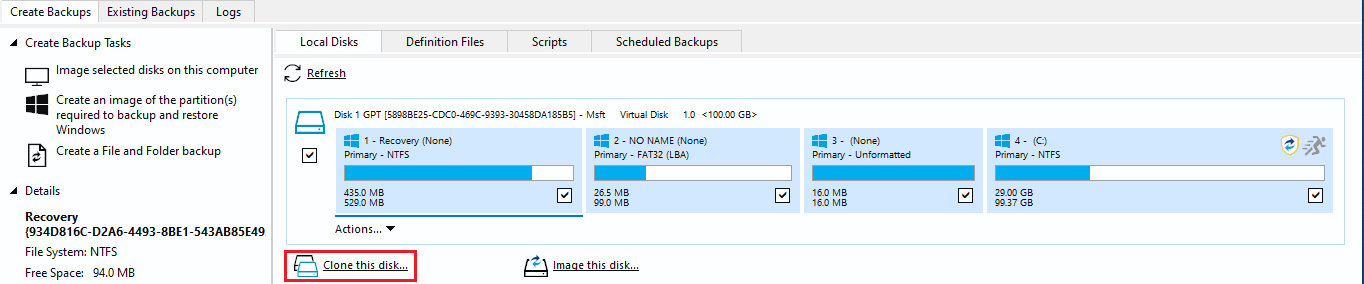
- On the main screen, select your source drive and click Clone this disk.
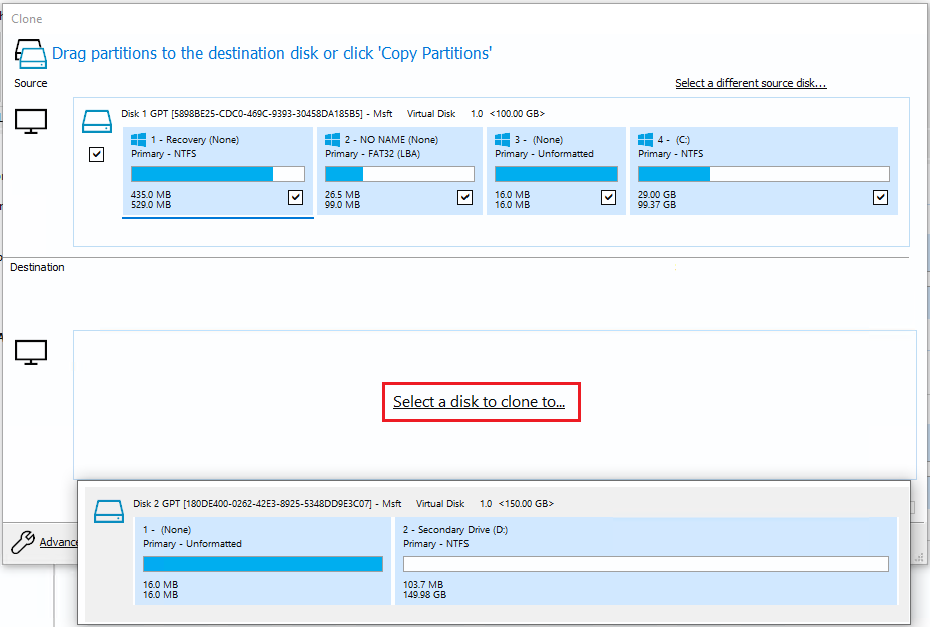
- Click Select a disk to clone to and choose your new SSD as the destination drive.
- Drag partitions from the source drive manually (for customized cloning), or simply make sure that the Copy selected partitions when I click ‘Next’ box in the bottom right corner is checked.
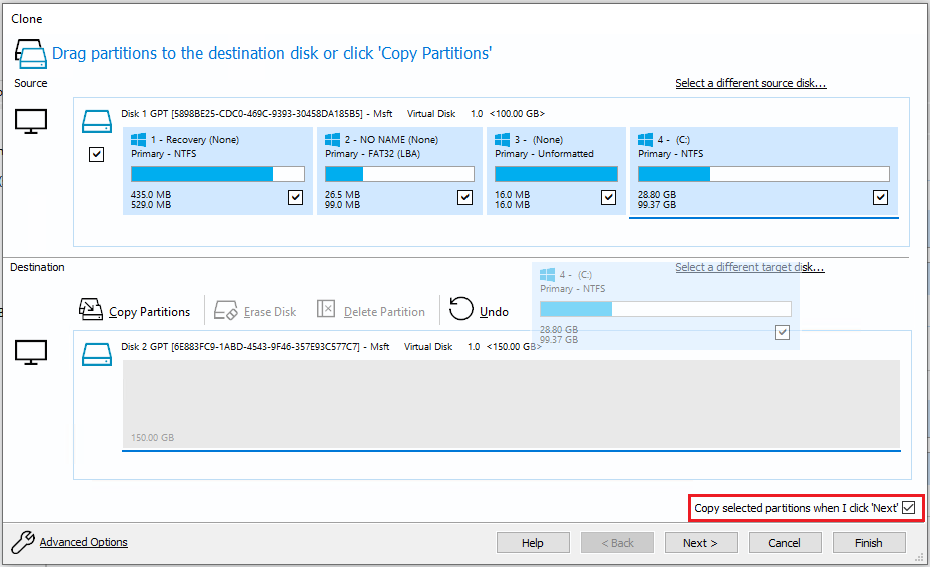
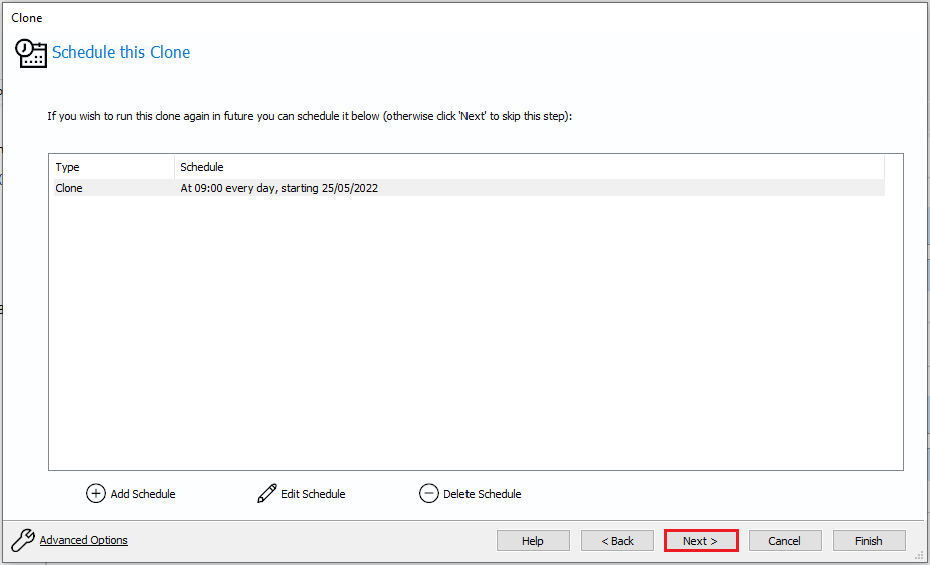
- Click Next and then Next again. Or, if you wish to clone the same source drive again in the future, set the cloning schedule.
- Verify settings and click Finish to clone the drive.
- When the process is complete, physically set the new SSD as the boot device (swap cables or move to the primary M.2 slot) and/or set the boot order in the BIOS.
🆕 How to clean install Windows on your SSD
Cloning is convenient, but if you don’t have a source drive or just want a fresh start, it may not be an option. Plus, it can carry over bloat, old drivers, and hidden problems—that’s why a clean install is often preferred.
Before you wipe the target SSD and install Windows from scratch, make a quick checklist so nothing important gets left behind:
- Take inventory of apps & subscriptions—note installers and license keys for paid apps.
- Save important stuff—copy documents, photos, game saves, and large media to an external drive or cloud.
- Back up drivers—download chipset, LAN/Wi-Fi, and storage drivers from your motherboard or laptop vendor and save them to a USB drive.
Export system settings—back up Wi-Fi networks, passwords, language preferences, and other settings using Windows Backup.
Here’s how to clean install Windows:
- Create Windows installation media with the Microsoft Media Creation Tool on a USB stick.
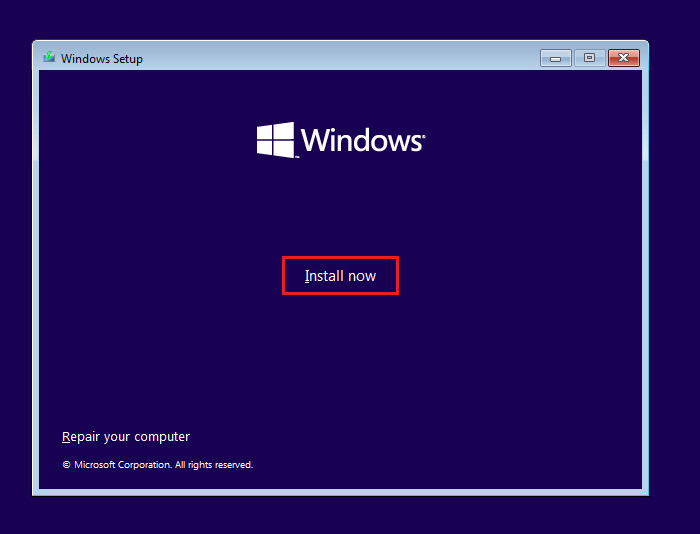
- Boot from the USB, select your language, time and currency, and keyboard format, then click Install now.
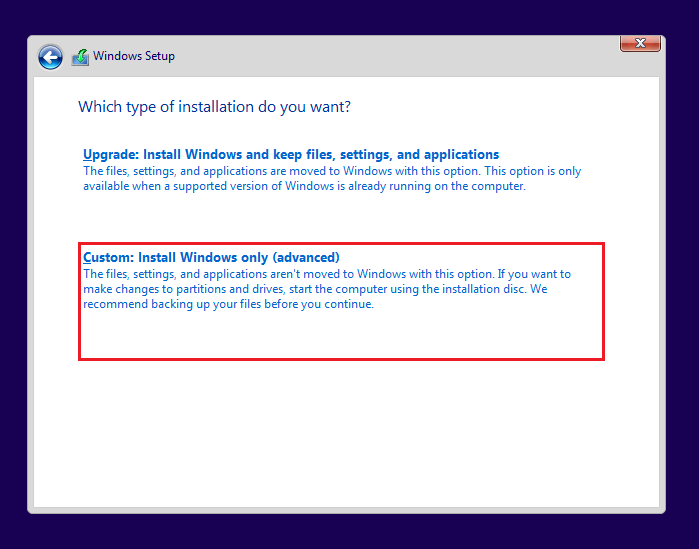
- Enter your license key, select the OS you want to install, and accept the license terms. When asked which type of installation you want, choose Custom: Install Windows only.
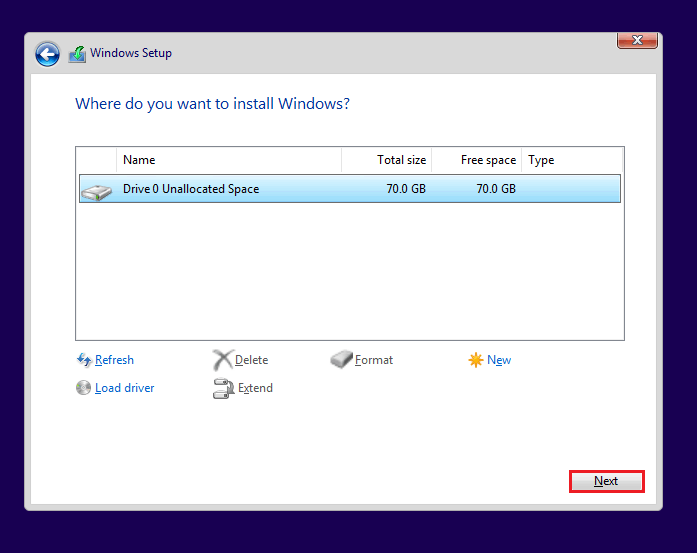
- Select your SSD and click Next.
- Let the installation complete. Your PC will automatically restart.
- Wait a bit for Windows to get devices ready. When it’s done, all that’s left is to customize the Out of Box Experience (OOBE).
How to set up a new SSD as a storage drive
If you’ll be using the SSD as a secondary storage drive, the goal is much simpler: let’s make sure Windows sees it, give it a clear place in your file system, and move big files over so your system drive stays roomy. Here’s your checklist:
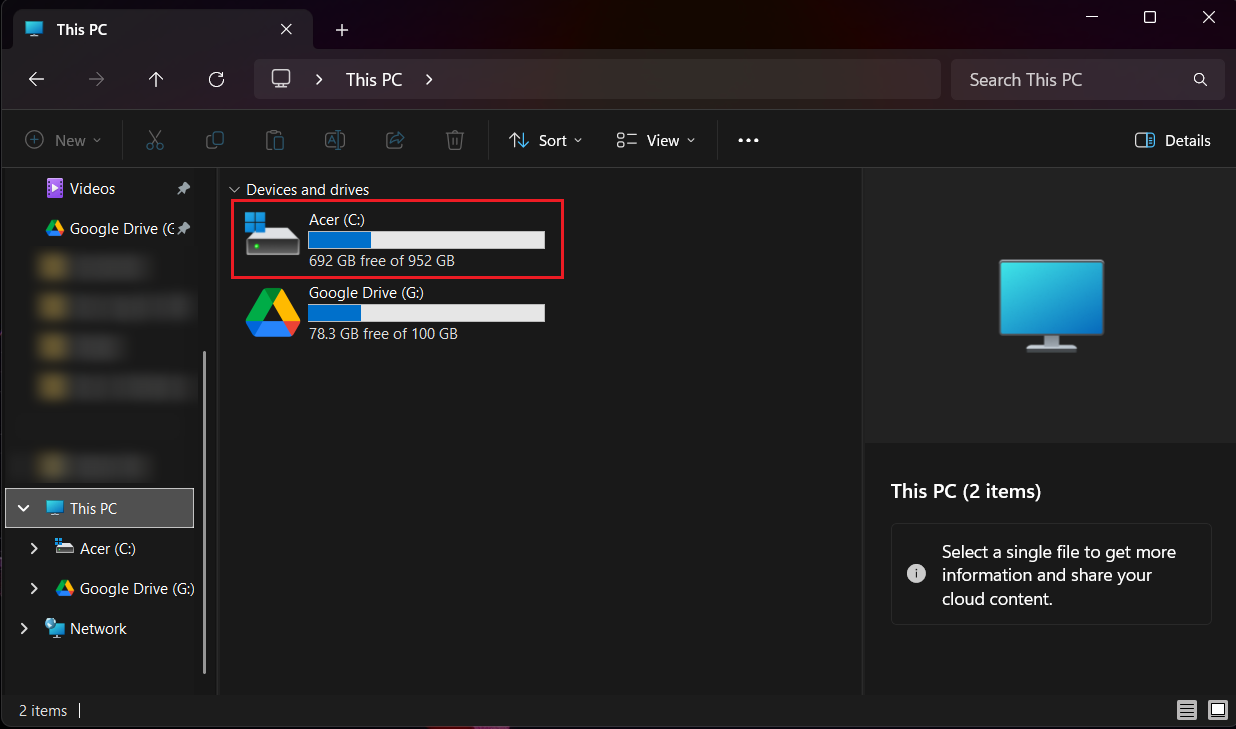
✅ Confirm your drive is recognized: Open File Explorer → This PC and check the drive letter (you assigned it in Disk Management) and free space.
- Create a tidy folder structure: Enter the drive, right-click the free space, select New → Folder, and add top-level folders like Games, Apps, Media, Projects, Backups. Keep names short and consistent to maintain well-structured file organization.
- Move large installs and libraries: For games (Steam, Epic, Origin), use each launcher’s settings to add a library folder on the new SSD and move or install games there. For large apps that support relocation, use their settings or reinstall to the new path.
- Move personal files: Transfer your personal files like photos or videos to the relevant folders of your new SSD so they don’t occupy valuable space on your OS drive.
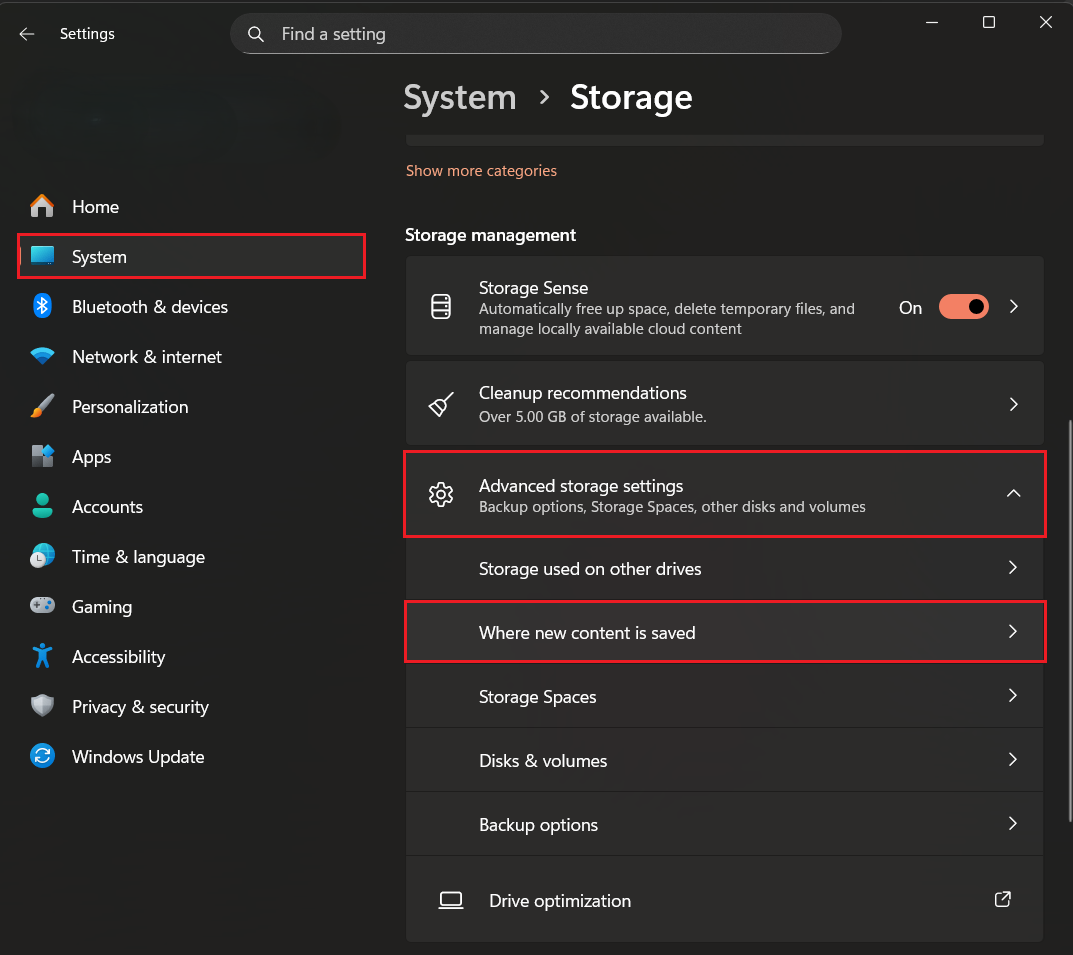
- Set default save/install locations: Open Settings, go to System → Storage, expand Advanced storage settings under Storage management, select Where new content is saved, and point large categories (new apps, documents, music, photos) to the SSD so that new items land there by default.
- Think of a backup plan: Set up regular backups to an external drive or cloud for irreplaceable data.
Enable SSD TRIM
TRIM is a Windows command that tells the SSD which blocks are no longer in use so the controller can erase and reuse them. That keeps write speeds high and helps the drive live longer. Windows normally handles TRIM for you, but it’s worth a quick check:
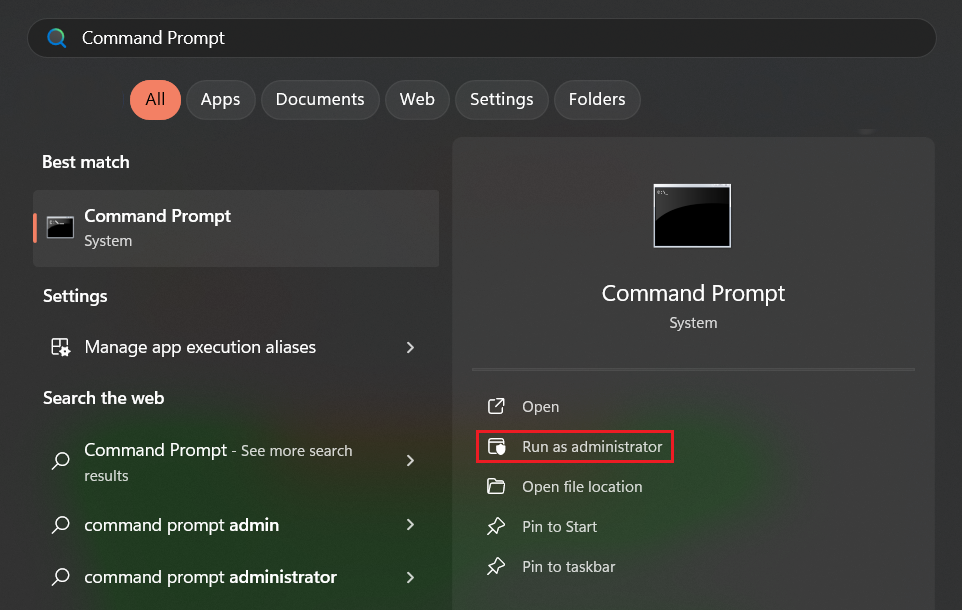
- Click Start, search for Command Prompt, and select Run as administrator.
- Run the following command and note the result (0 means TRIM is enabled; 1 means it’s disabled):
fsutil behavior query DisableDeleteNotify

- If TRIM is disabled, run the following command in the same elevated Command Prompt window:
fsutil behavior set DisableDeleteNotify 0

- Rerun the query to confirm it now returns 0.
Optimize Your SSD
SSD optimization can make your drive more efficient and last longer if applied right. Here’s how to make sure Windows and your SSD play nicely together:
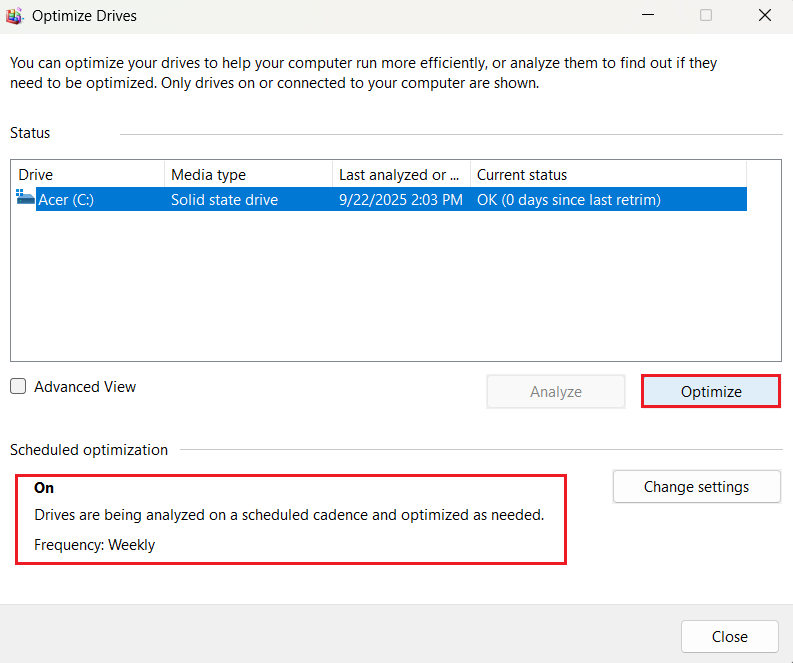
- Make sure optimization is on and scheduled: Open the Defragment and Optimize Drives tool. Click Optimize to run TRIM commands and garbage collection. Check if scheduled optimization is on. Set it up if it’s not—weekly is fine for most drives.
- Use vendor tools for SSD-specific tasks: Use your SSD vendor’s utility to check for options like firmware updates, overprovisioning, secure erase, or performance modes for safe, targeted tweaks.
- Utilize reputable third-party tools: Specialized SSD-aware utilities like Auslogics SSD Optimizer, designed specifically for solid-state drives, can keep most optimization tasks running in the background automatically, relieving you of this routine.
Things to Avoid
Looks like you’re all set up, but if you also want to extend your SSD’s lifespan and maintain top performance, keep these simple rules front of mind:
- Don’t defragment an SSD. Defragging was built for HDDs—it forces unnecessary writes on flash memory, causing wear without performance gains. Use Windows Drive Optimizer or SSD-aware tools, not third-party defraggers that don’t respect media type.
📌 Also read: What Does Defragging Do: Easy Explanation of Disk Defragmentation
- Avoid overheating. High temps throttle performance and accelerate wear. For NVMe drives, add a proper heatsink or use the motherboard’s M.2 heatsink, improve case airflow, avoid cramped M.2 slots near hot GPUs, and prefer metal M.2 covers with thermal pads where needed. Monitor temps with vendor tools or CrystalDiskInfo—sustained idle temps above ~50–60°C are a red flag.
- Don’t fill the drive to the brim. Leaving ~10–20% free space helps the controller manage blocks and keeps performance steady—this is a simple and effective hack.
- Avoid constant, unnecessary write-heavy jobs. Large, repetitive write tasks (excessive benchmarks, constant disk imaging, torrenting to the SSD) add wear. For heavy writes, use external drives.
- Don’t skip firmware and driver updates—but only use official vendor files. Old firmware can contain bugs that affect performance or stability.
- Avoid cheap adapters or enclosures that don’t support UASP or proper cooling—they can bottleneck speeds or cause thermal issues.
- Don’t treat the SSD as your only backup. Fast storage is great—but always keep important data backed up elsewhere.
How to Set Up a New SSD for Best Performance: Explained
Whether you’ll be using your drive for Windows or just for storage, you now know how to initialize an SSD on Windows 11/10. Remember that just like other hardware, it will only benefit from your TLC. Initialize the disk correctly, enable TRIM, and avoid the pitfalls outlined above—and your SSD will stay faster and healthier for years.
How long did it take to set up your SSD? Share in the comments!
FAQ
GPT is the modern standard: it supports drives > 2 TB, more partitions, and UEFI boot. You should pick this option for almost all new SSDs.
MBR is legacy (≈2 TB limit, four primary partitions), so only use it if you need old BIOS or Windows compatibility.