
- Why Should I Check My SSD’s Health?
- What Does an SSD Health Check Show Me?
- What Metrics You Should Monitor
- How to Check Your SSD’s Health in Windows
- How to Check an External SSD’s Health
- How Often Should I Run SSD Health Checks?
- How Can I Preserve My SSD’s Health?
- Run an SSD Health Check to Stay Ahead of Drive Failure
- FAQ
Few would argue that SSDs are better than hard disk drives. They are faster, quieter, more power-efficient, and more durable. The only upside for HDDs is lower purchasing costs, but the gap is shrinking steadily.
However, being more durable than HDDs doesn’t mean SSDs last forever.
They have limited write cycles and are vulnerable to certain risks. That is why running an SSD health check occasionally and cultivating good SSD optimization habits are so important.
This article will show you how to check SSD health on Windows using various diagnostic tools and the best ways to maintain it to prolong your SSD’s lifespan.
🔍 Check regularly: Run a quick health check every few months (more often for heavy users).
🛑 Watch for signs: Slowdowns, overheating, read/write errors, or slow boots mean check now and back up.
🧰 Tools to use: Start with Windows built-ins, then Auslogics SSD Optimizer/CrystalDiskInfo, and the vendor tool for diagnostics and firmware updates.
🌡️ Key metrics: Monitor SMART flags, temperature, percentage used, reallocated/pending sectors, and error counts.
🧮 Estimate wear with TBW: Convert Total Host Writes to TB and compare with rated TBW to get TBW used percentage.
⚡ Do a speed check: Run CrystalDiskMark—big, sustained drops vs. spec often point to throttling, interface, or controller problems.
🔌 External SSDs: SMART over USB isn’t guaranteed—if SMART is missing, test speeds and, when possible, connect internally or use another enclosure.
💾 Back up first: Always back up before firmware updates, big changes, or if SMART reports warnings or errors.
🔁 When to replace: If you see a rising SMART error count, Pred Fail status, rapid rise in reallocated/pending sectors, or >90% TBW used—back up and replace the drive.
Why Should I Check My SSD’s Health?
Regular checks allow you to spot problems early, protect your data, and plan replacement before you face performance or data loss. Because whatever SSD you have, its age is limited by the number of writes—or terabytes written (TBW)— the amount of data it can write over its lifetime. Most consumer SSDs last about 5–10 years in typical home and office use.
Write-heavy workloads like video editing and constant large file transfers can wear your SSD down in 2–4 years. In any case, remember that your drive’s lifespan depends on a number of factors like workload type, firmware behavior, and thermal exposure rather than raw calendar age.
And TBW is only part of the story: bad pages and blocks, firmware failures, and overheating can quietly erode your drive’s health over time. But what is SSD health? It refers to the overall condition of your drive—its ability to read, write, and store data reliably.
It’s a measure of how much life the SSD has left before wear, failures, or other issues begin to affect performance.
📌 Also read: How to Initialize an SSD: Set Up Your New SSD for Best Performance
And how do you know it’s high time to check your SSD’s health ? Here are the signs to watch for:
- Slow performance: You’ll notice apps take longer to open, file folders and searches respond slowly, and large file transfers stall or crawl while disk usage stays high even when you’re idle.
- Overheating: The drive runs hotter than usual, fans spin up more often, and thermal throttling can cause sudden slowdowns or unexpected shutdowns.
- Read/write errors: Saving or copying files may fail with I/O errors, files can become corrupted or unreadable, and SMART (Self-Monitoring, Analysis, and Reporting Technology) reports may show rising error counts.
- Slow boot: Windows takes much longer to reach the desktop, startup programs lag, or the system hangs at the BIOS or Windows logo during boot.
That said, if you know how to test SSD health, you can anticipate these lurking issues before they get out of hand and respond quickly to minimize potential risks.
What Does an SSD Health Check Show Me?
A health check pulls together several indicators like temperature, SMART status, read/write speeds, and errors that tell you whether the drive is operating within safe limits or starting to fail. Let’s take a closer look at the key things you’ll typically see and what they mean.
🌡️ Temperature readings
A health check reports current and historical temperatures so you can spot sustained heat under normal load. Most consumer SSDs are designed to run between about 0°C and 60°C (some vendor specs allow up to ~70°C). If your SSD operates near the top end or with frequent thermal spikes, it can cut performance and shorten life, so persistent high temps are worth investigating.
💡 SMART status
SMART continuously tracks attributes such as reallocated sectors, program/erase failures, power-on hours, and similar metrics that act as early warning signs. When one or more attributes exceed safe limits, the drive’s SMART flag flips from OK to a failing state (labels like Pred Fail, FAILED, or NOT OK)—that’s the drive saying it predicts an imminent problem, which means you should back up your data immediately and start planning a replacement.
📊 Third-party app reports
Third-party tools like CrystalDiskInfo read these SMART values and translate them into a “health” or “life left” percentage.
However, since vendors format and weigh attributes differently, tools may show slightly different values. Moreover, they can misread SMART data and rob you of a couple of nerve cells like this Reddit user.
All in all, if numbers look odd, compare SMART attributes using various tools.
⚡ Performance indicators (read/write speeds)
SSD speed tests show current throughput and can reveal sudden drops compared with what your model should deliver. If you notice a steady, unexplained fall in read/write numbers, it’s a strong sign the drive needs checking.
⚠️ Drive errors
An SSD health check can reveal critical warnings, uncorrectable errors, and reallocated sectors—each of these is a concrete sign of failing blocks or controller problems and often precedes data loss. When warning, error, and bad sector counts climb, treat them as urgent: back up immediately and replace the drive before you lose data.
What Metrics You Should Monitor
When you open a vendor tool or a third-party SMART reader, you’ll see a long list of attributes, but not all of them are directly related to drive health. Here are the ones you need: SMART metrics displayed can vary between SATA and NVMe drives.
Moreover, some metric names themselves may also vary depending on the tool.
- Critical Warning: A simple pass/fail indicator the drive reports. Any number higher than 0 is urgent: back up now and replace the drive.
- Composite Temperature: Shows current SSD temps. Occasional spikes are normal, but sustained temps near the vendor max are a sign to check cooling or workload.
- Available Spare: The percent of reserve blocks left for remapping bad pages. Values near 0% (or a falling percentage) mean the drive is running out of spare blocks—meaning you likely need to replace your SSD soon.
- Health Used/Percentage Used: A vendor-calculated percentage that estimates remaining lifespan. If it falls below 50%, it’s time to start thinking about a replacement.
- Reallocated Sector Count: Number of blocks the controller has remapped from bad to spare. While a small non-zero value can occur, a rising or rapidly increasing count is a clear failure signal.
- Current Pending Sector Count: Blocks waiting to be reallocated because reads failed. Pending sectors often turn into reallocated sectors on the next write. Just like in the previous case, rising counts mean trouble.
- Media & Data Integrity Errors/Uncorrectable Errors: Errors that couldn’t be fixed by the drive. Any non-zero values here are serious—they indicate data loss risk.
- Interface Errors/CRC Error Count: I/O communication errors between the drive and the controller (including through USB enclosures). Frequent CRC errors can point to cabling/enclosure faults or failing hardware—don’t ignore them.
- Power-On Hours & Power Cycle Count: How long and how often the drive has been powered. High hours alone aren’t fatal, but combined with other failing attributes, they help estimate real-world wear.
- Wear Leveling Count/Average Erase Count: Shows how evenly the drive is using NAND blocks. Large imbalances or unusually high erase counts suggest heavy wear on parts of the NAND.
How to Check Your SSD’s Health in Windows
You can check your SSD’s health in a number of ways: from built-in tools for a quick status check to your drive vendor’s utility and third-party tools for a deeper readout. Together, they will help you see the full picture of your SSD’s state.
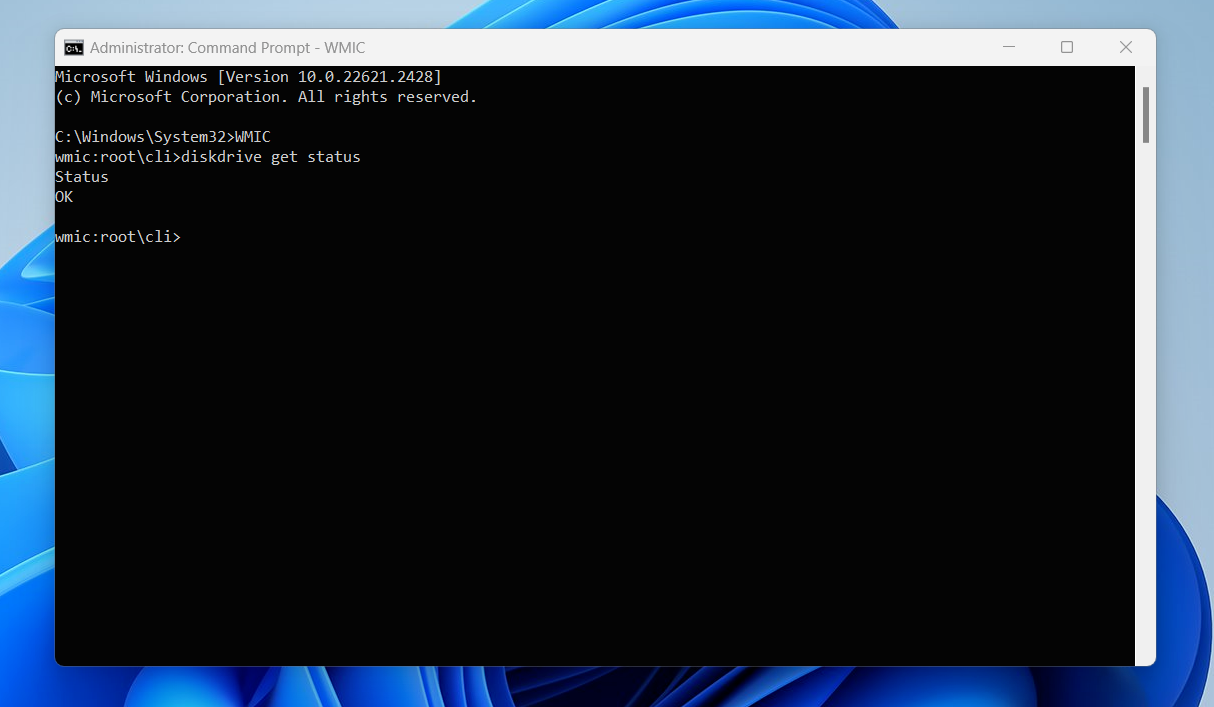
![IMG]() Using built-in Windows tools
Using built-in Windows tools

Use the Command Prompt or PowerShell when you need a quick, no-install check. These commands read basic SSD health flags and give a fast yes/no on whether Windows sees a problem.
➡️ Command Prompt
- Go to the Start menu, type Command Prompt, and click Run as administrator.
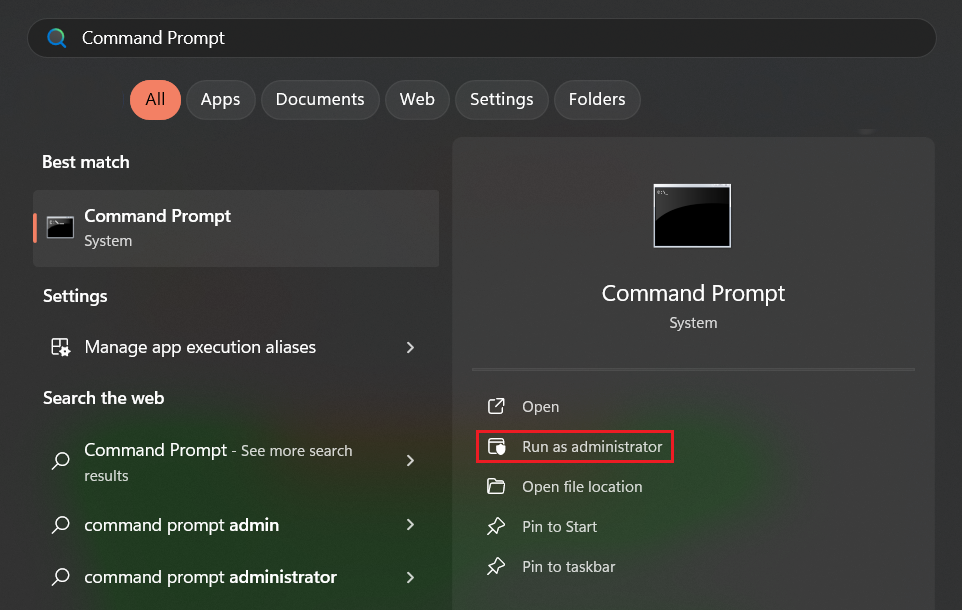
- Click Yes in the User Account Control prompt.
- After the window opens, type WMIC and hit Enter.
- Next, type diskdrive get status and hit Enter.
- If the Command Prompt shows OK, your drive is healthy. However, if it shows Pred Fail, it’s time to back up your drive.
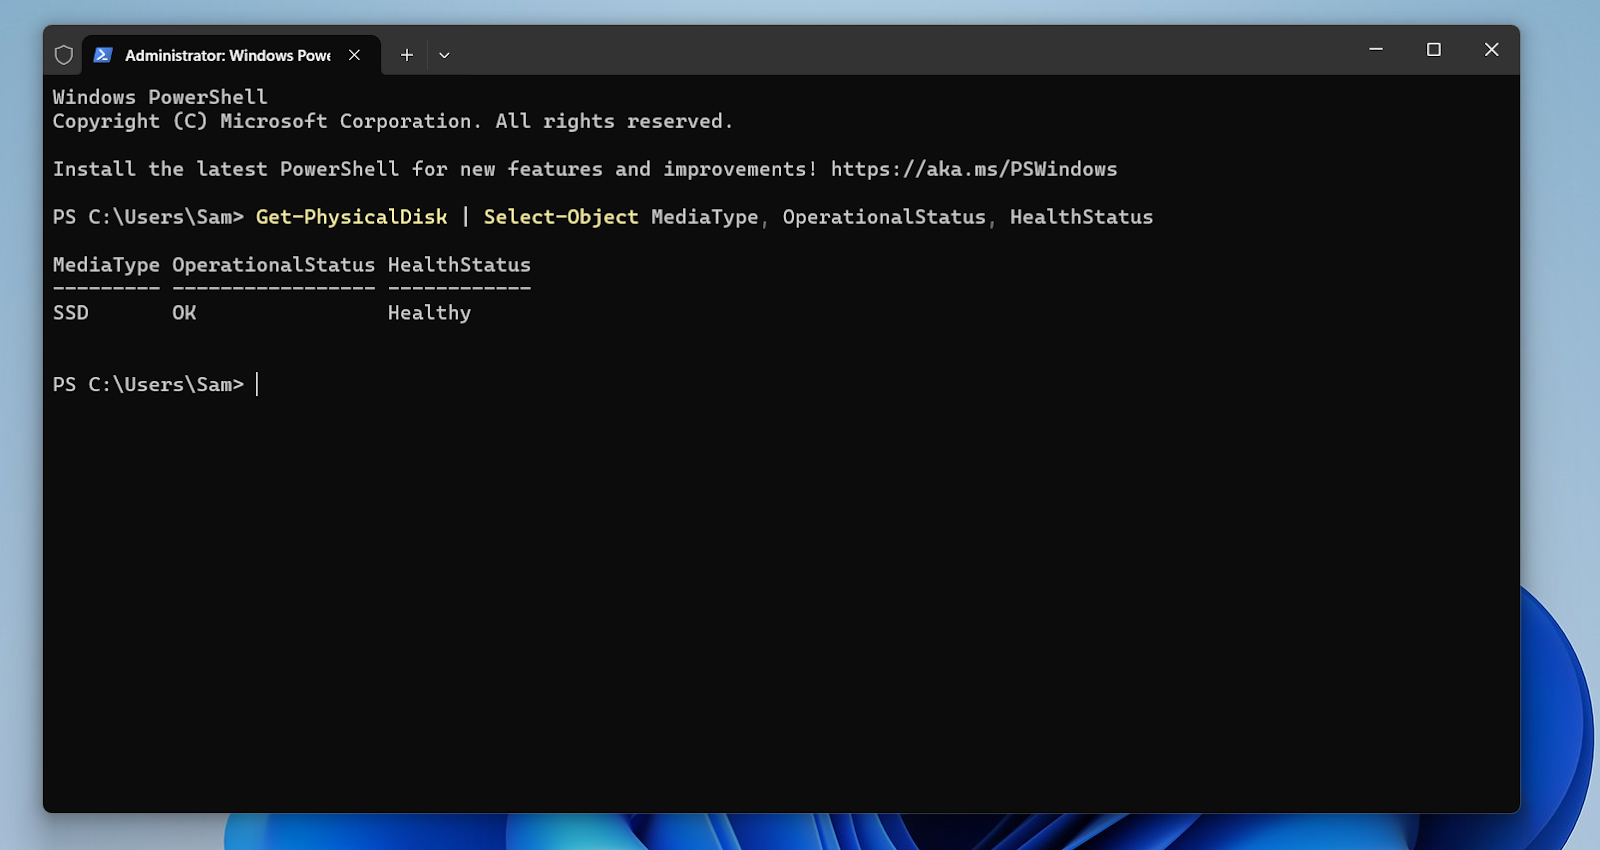
➡️ Windows PowerShell or Terminal
- Right-click Start or tap Win + X and click PowerShell (Admin) on Windows 10 or Terminal (Admin) on Windows 11.
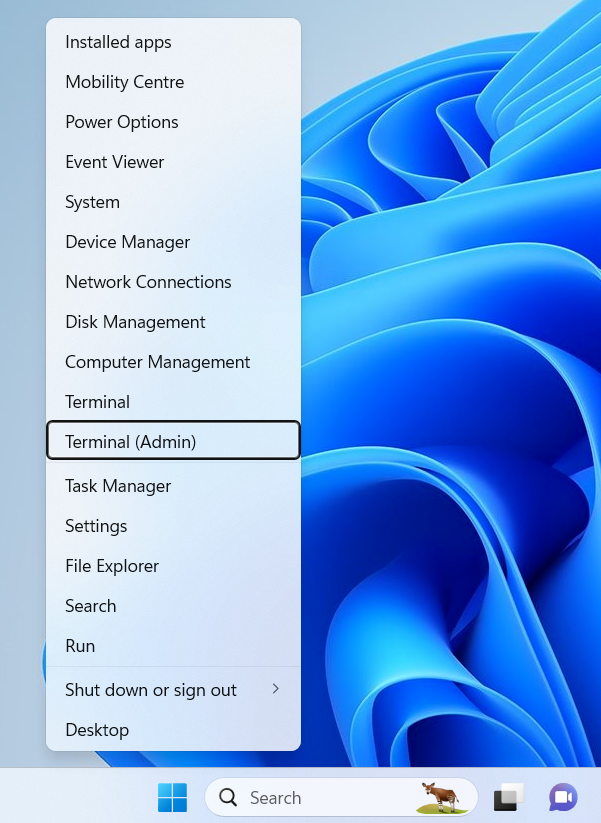
- Click Yes in the UAC prompt.
- Now, type the following and hit Enter:
Get-PhysicalDisk | Select-Object MediaType, OperationalStatus, HealthStatus
- The tool will now check your SSD and provide the following results:
- The MediaType result should indicate SSD for your solid-state drive.
- The OperationalStatus result should state if the drive is OK or not.
- The HealthStatus column reflects your SSD’s health. If it shows Healthy, you’re OK. If the result is Warning/Unhealthy, back up your data and follow up with a SMART tool.
![IMG]() Using SSD manufacturer tools
Using SSD manufacturer tools
It’s best to use utilities developed by SSD manufacturers, as they not only read SMART metrics but also offer diagnostic features and firmware updates for your drive.
The most popular tools include Samsung Magician, which works with Samsung SSDs; Crucial Storage Executive, which works with Crucial and Micron drives; and Seagate SeaTools, which is designed for Seagate drives but supports SSDs from other vendors as well.
➡️ Samsung Magician
- Download, install, and run Samsung Magician.
- Note the Drive Health and Temperature readings.
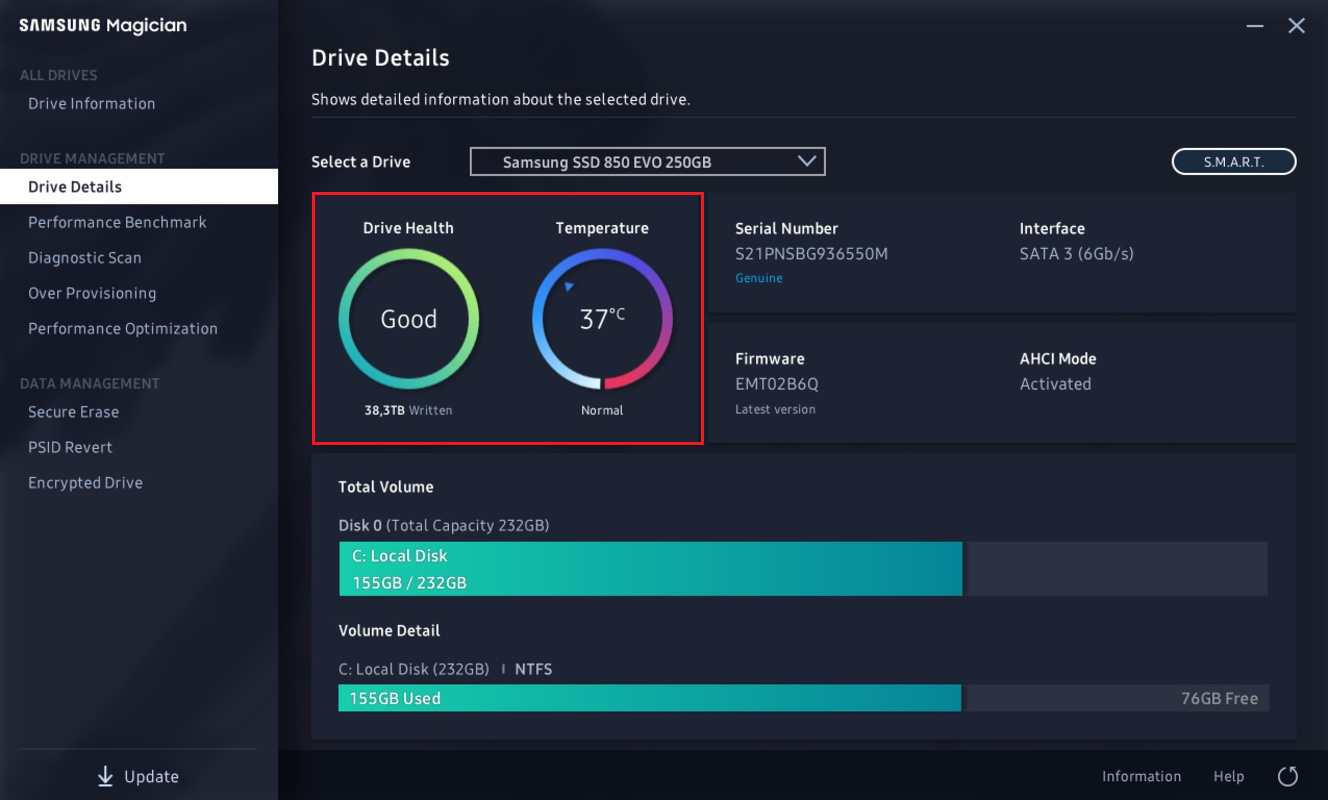
- Click S.M.A.R.T. on the right side of the app’s main window.
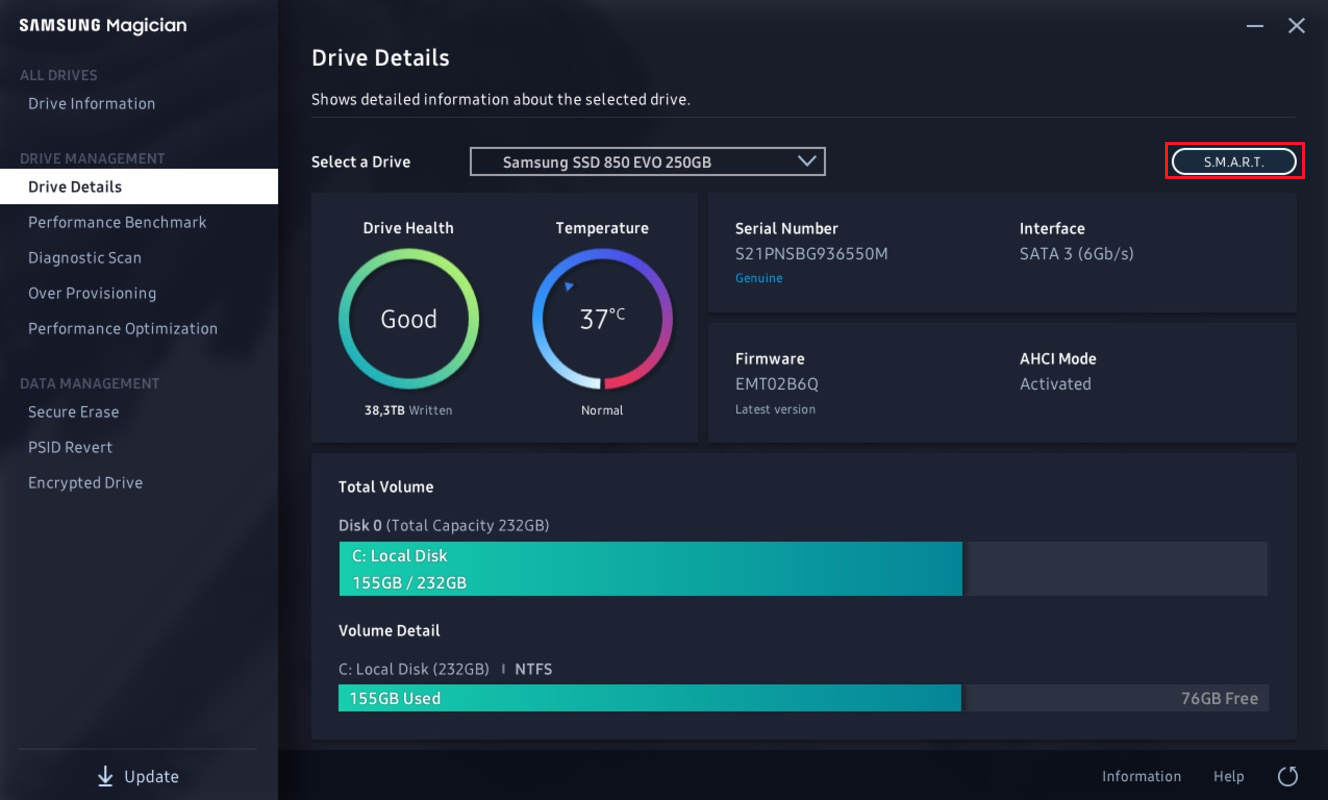
- Take note of health metrics.
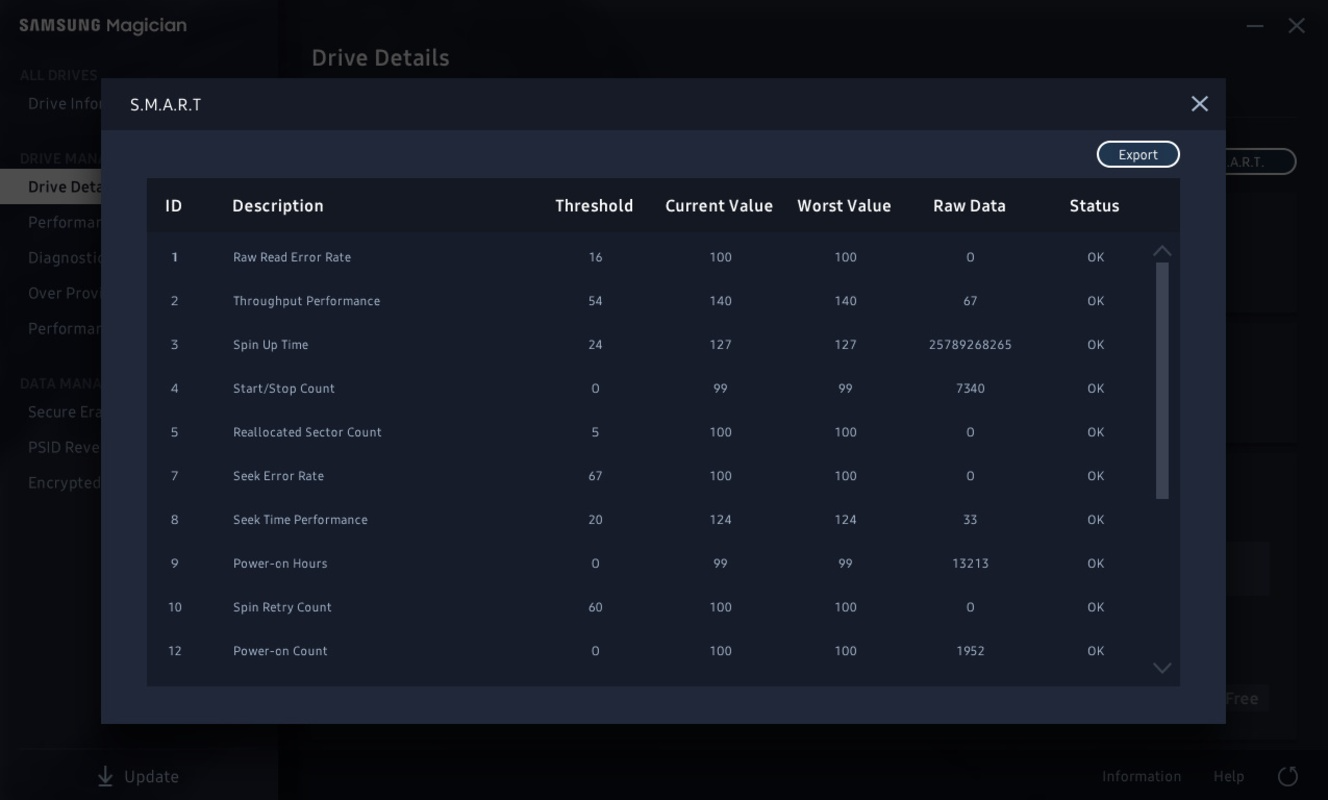
- If Drive Health is Good, Temperature is Normal, and all SMART metrics show OK under Status, you’re likely fine. If Drive Health is Critical, temps consistently exceed safe limits (see the numbers above), or any metric exceeds the threshold, back up immediately and start planning a replacement.
➡️ Crucial Storage Executive
- Download, install, and run the utility.
- Go to the S.M.A.R.T. tab and check your drive’s health status and SMART metrics.
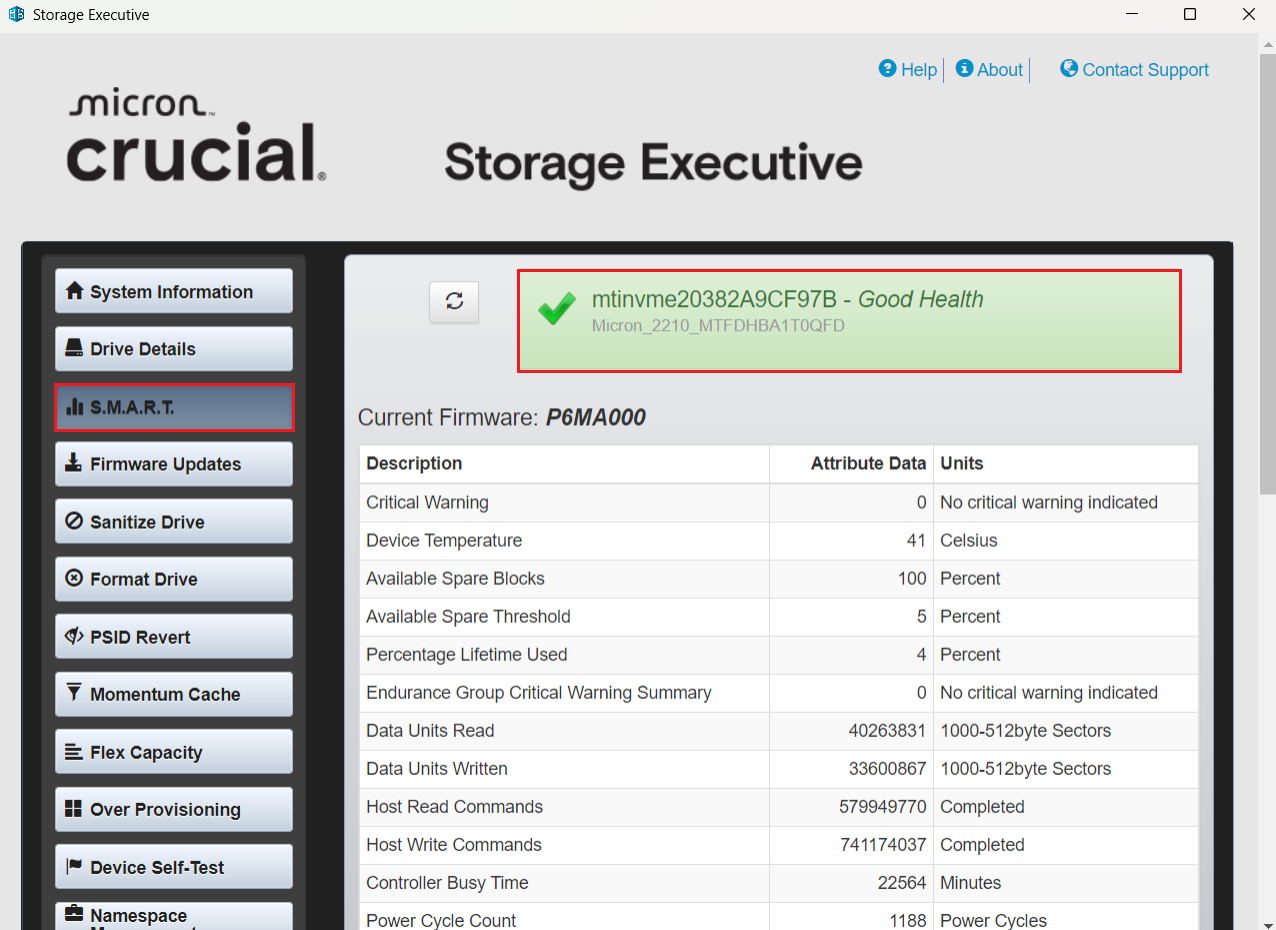
- If the tool shows Good Health, the temperature is within the safe ranges, and there are no errors or critical warnings, there’s nothing to worry about. If you see any warnings or a decline in health status, back up now and start thinking about a replacement.
➡️ Seagate SeaTools
- Download, install, and run the utility.
- Under the Health tab, note the life percentage and the mark under Status.
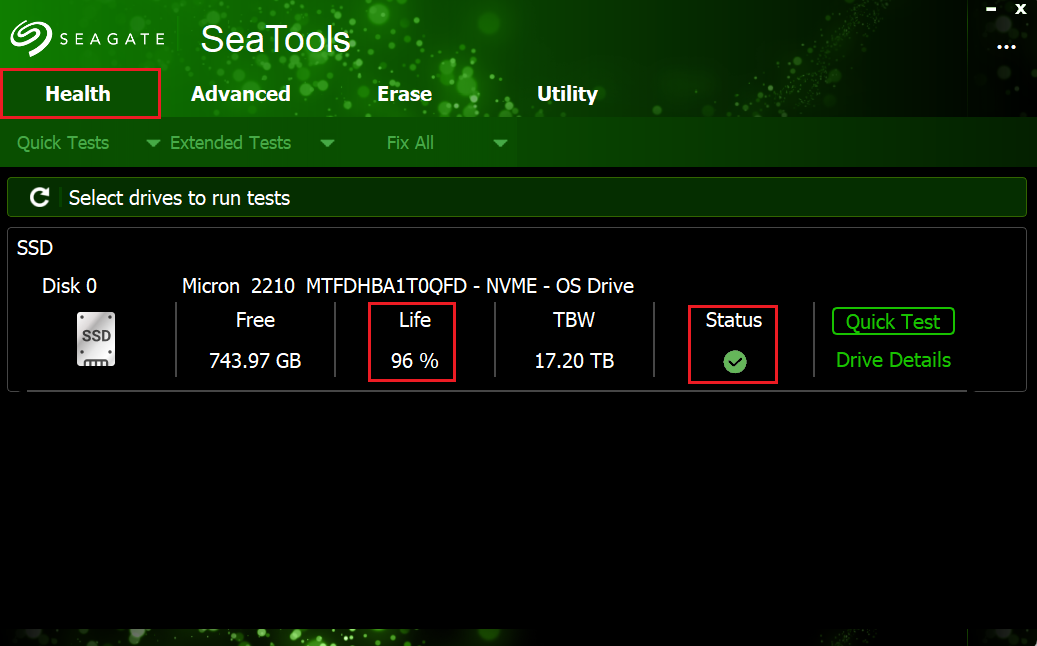
- Click Drive Details on the right.
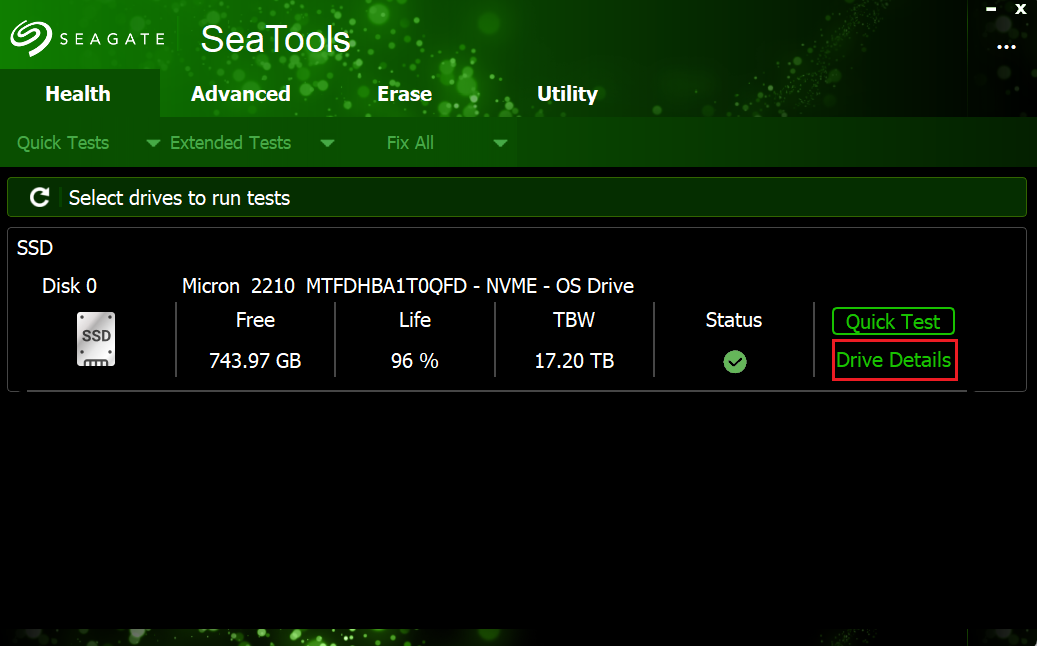
- Go to the SMART tab and check your drive’s health metrics.
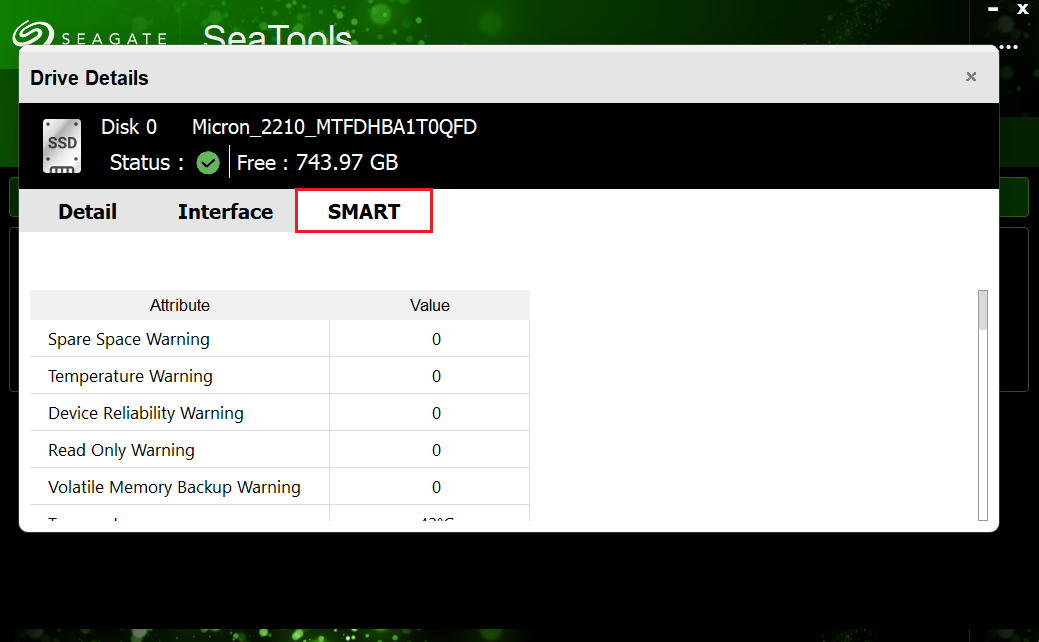
- If your drive’s life percentage is over 50%, the mark under Status is green, and there are no errors or warnings, you’re likely safe. If the life percentage is lower than 50%, monitor and back up more often.If the percentage drops lower than 20%, sustained temps regularly exceed safe limits, the status is not OK, or there are any errors or warnings, back up immediately and replace the drive.
![IMG]() Using third-party tools
Using third-party tools
Vendor tools’ interfaces may sometimes seem dated or inconvenient, plus not all SSD manufacturers have their own utilities. That’s why optimization apps like Auslogics SSD Optimizer, SMART readers like CrystalDiskInfo, and benchmarking tools like AIDA64 Extreme are good for a comprehensive SSD health check —they work with all drives, read SMART attributes, and translate them into clear metrics in a clean UI.
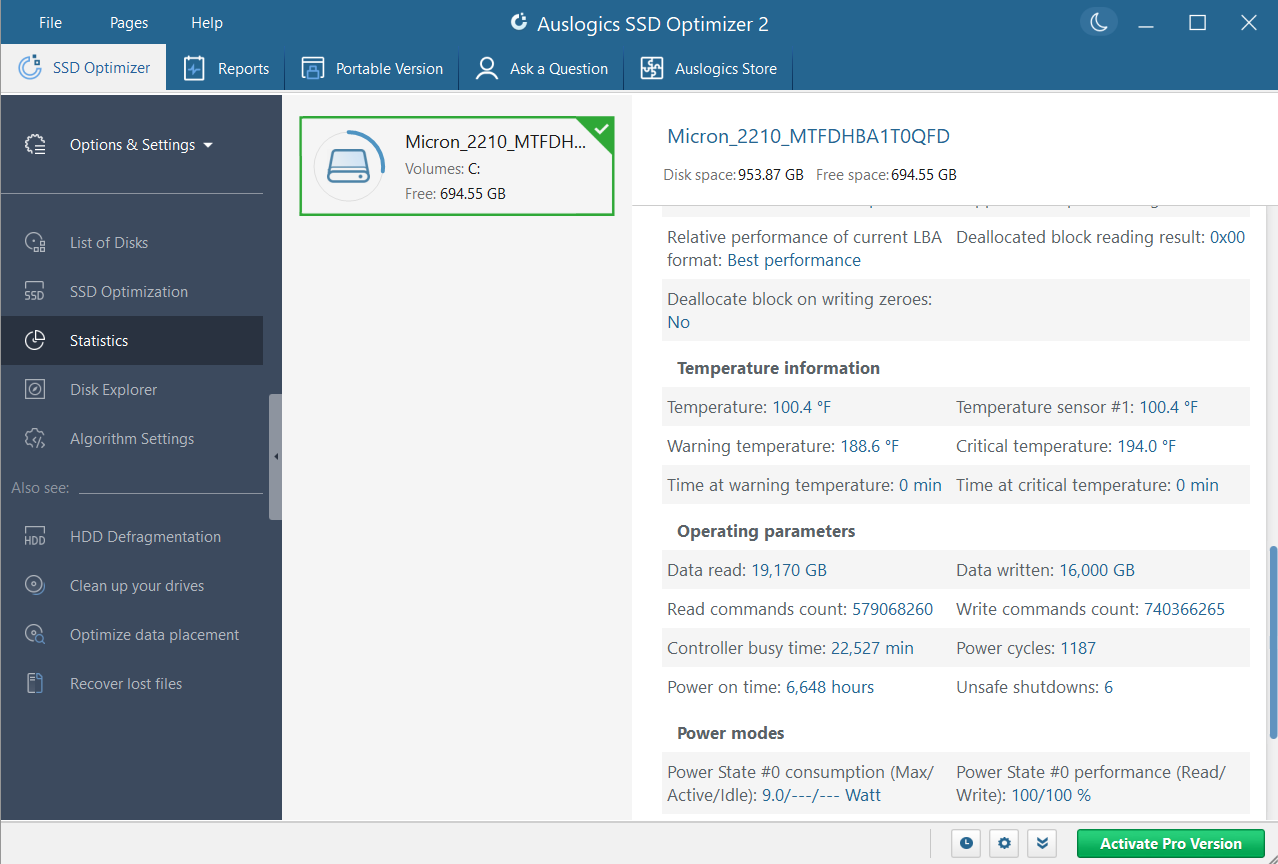
➡️ Auslogics SSD Optimizer
Auslogics SSD Optimizer offers dedicated automatic maintenance and scheduled optimization for solid-state drives so they stay fast and last longer. It also reads SMART data and shows health, temperature, and life percentage. Here’s how to check your SSD’s health using the tool:
- Download, install, and run SSD Optimizer.
- On the main screen (the List of Disks tab), select Drive Health. Here, you can see your drive’s estimated lifetime, temperature, and other attributes related to SSD health.
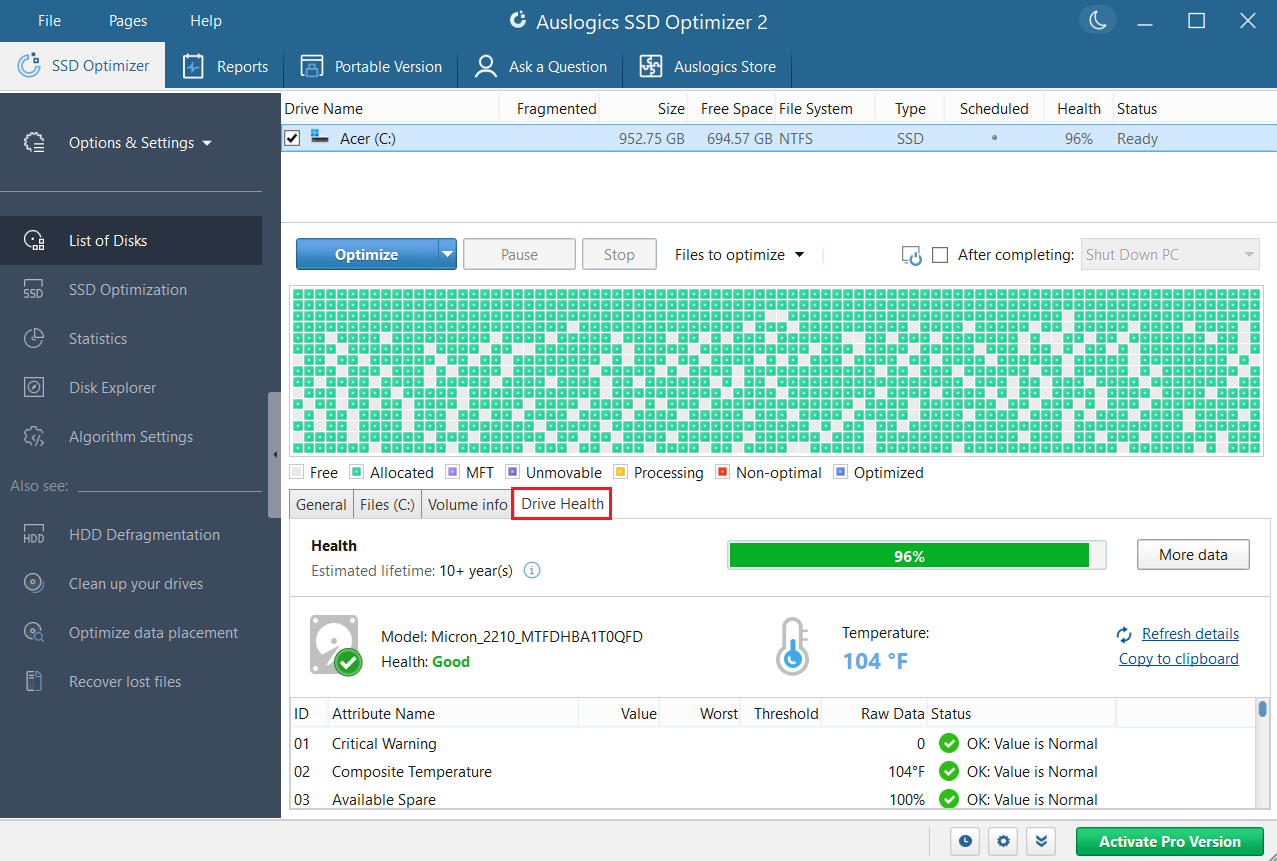
- If Health says Good and all attributes under Status are marked green, your drive is OK. If Health says Caution, one or some of the attributes is getting close to the vendor threshold—monitor further and back up more often. If Health says Bad or any attribute is red, your drive’s health is low—back up now and start planning a replacement.
- Click More data.

- This will take you to the Statistics tab, where you can see more structured info about your drive and its health.
➡️ CrystalDiskInfo
CrystalDiskInfo is a lightweight SMART viewer that lists health status, temperature, and the raw SMART table in a simple UI. Here’s how to use it:
- Download, install, and run the app.
- On the main screen, you can see your drive’s health status, temperature, and SMART data.
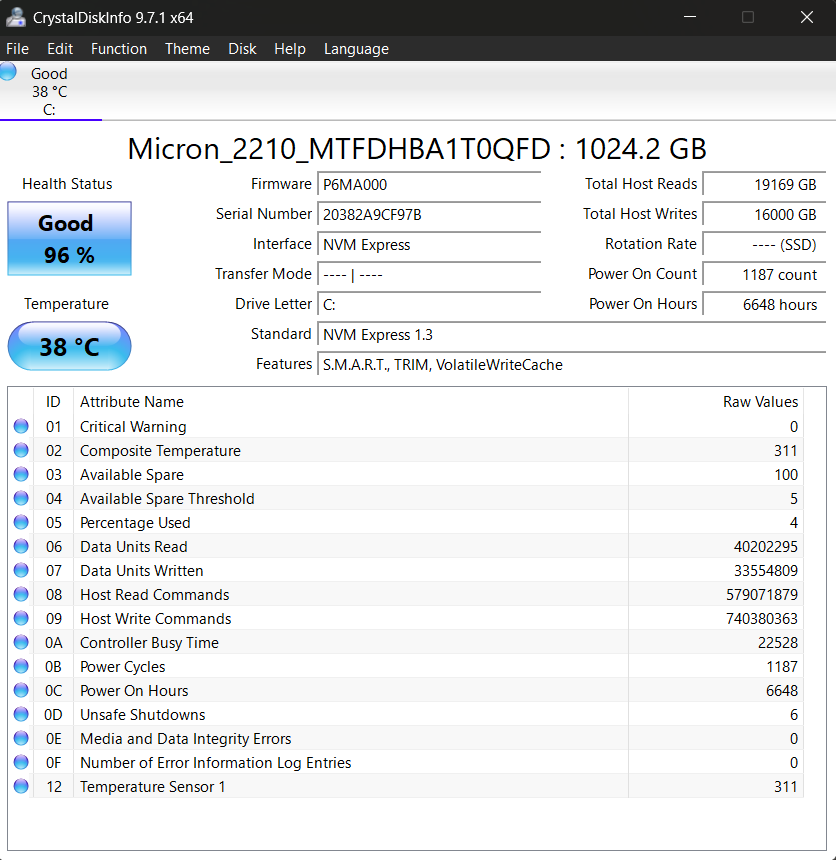
- If Health Status says Good, you’re likely safe. If it says Caution, note the problematic attributes and start backing up and checking more often. If Health Status is Bad, back up immediately and get ready to replace the drive.
➡️ AIDA64 Extreme
AIDA64 Extreme is a full system info and diagnostics suite for performance benchmarking that includes a SMART viewer. The tool is not free but offers a 30-day trial. Here’s how it works:
- Download, install, and run the app.
- Expand Storage in the left-side pane and click SMART.
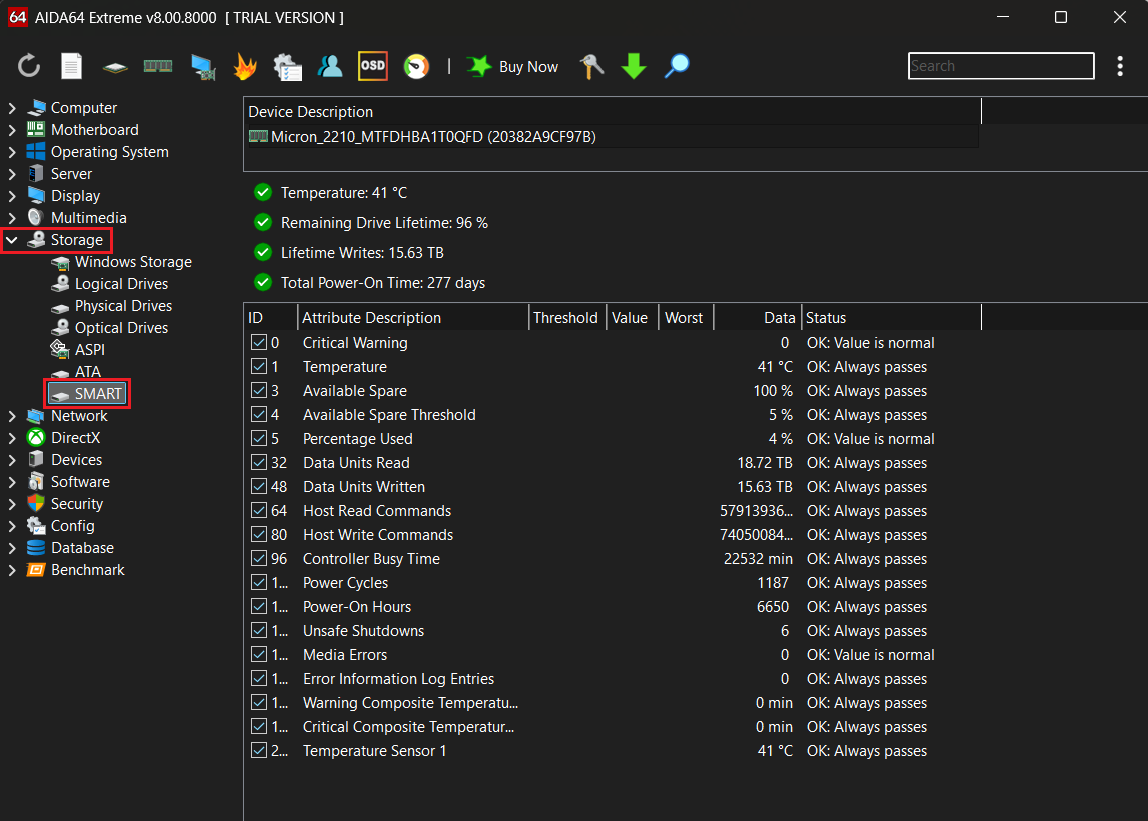
- Watch for any warning signs and note values under Status. If there are no warnings and the status is OK, you’re likely fine. Any other outcome = increase backup frequency, monitor health more often, and start planning a replacement.
![IMG]() Check your SSD’s lifespan
Check your SSD’s lifespan
Endurance is a core part of SSD health, as every drive’s life is limited by its rated TBW—how many writes an SSD can handle. And the closer you get to your drive’s rated TBW, the fewer spare program/erase cycles remain and the higher the risk of remapped blocks or uncorrectable errors.
You can find the TBW number in your drive’s manual or specs on the vendor’s page. But how do you know how much of this TBW your drive has already used up? This metric is represented by Total Host Writes. I’ll use CrystalDiskInfo for demonstration.
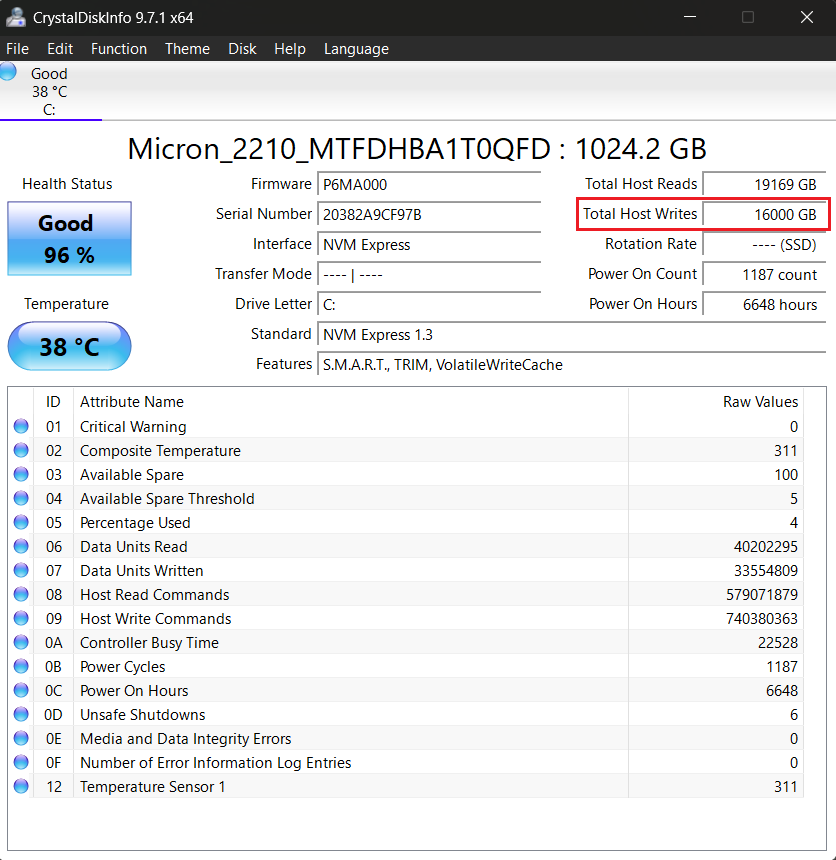
As you can see in the screenshot above, my Total Host Writes shows 16,000 GB (or 16 TB). I checked my drive’s TBW, and it’s 360 TB. With these numbers in hand, I can now calculate my TBW used percentage:
TBW used (%) = Total Host Writes (16 TB) ÷ manufacturer TBW (360 TB) × 100 = 4.44%
👍 < 20% TBW used. Your drive is comfortably healthy.
👌 20–70% TBW used. Your drive is likely OK, but you should monitor more often and keep regular backups.
👎 70–90% TBW used. Your drive is at risk—you need to back up even more often and prepare a replacement.
🆘 > 90% TBW used. Your SSD is worn, and the failure is likely imminent, so you should replace your drive as soon as possible.
Sometimes, tools may read Total Host Writes data incorrectly, showing unreal numbers in petabytes, so it’s worth double-checking with another tool if results seem doubtful.
These bands aren’t absolute, as vendor ratings vary, but they give a good overview of your drive’s state. Check out our article on how long SSDs last for more details.
![IMG]() Check your SSD’s speed
Check your SSD’s speed
If your drive runs slower than it should, it may signal issues with your SSD. And though throughput alone doesn’t prove the drive’s internal health, running a speed test can help isolate whether a slow SSD is caused by the drive itself, the interface, firmware, or thermal throttling.
Here’s how to run a test using CrystalDiskMark:
- Download, install, and run the app.
- Make sure your SSD is selected, set the test size (1 GiB is fine), and click All.

- Check your drive’s rated sequential read/write speed specs and compare your drive’s actual results against them.
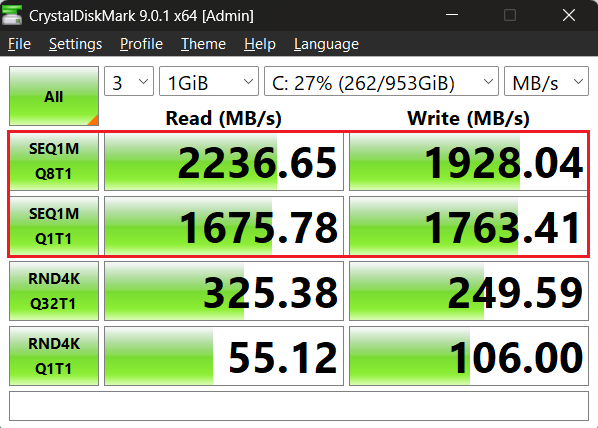
I checked my drive’s specs, and they say that my drive’s sequential read speed is rated at 2,200 MB/s and sequential write speed is rated at 1,800 MB/s. That said, my test results are even a bit better, which means my SSD still got it.
👍 Within ~10% of the drive’s spec. Your drive’s interface and controller are likely working normally.
⚠️ About 20–50% below the drive’s spec. This may signal issues with the connection, drivers, or firmware. Try a different port/cable, update storage and controller drivers, and check for firmware updates using the vendor’s tool, then check again. If results don’t improve, back up more often and prepare a replacement.
👎 More than 50% below the drive’s spec. A serious sign that something is wrong. Back up now and run SMART diagnostics. If SMART is clean, try the steps above and monitor temperatures during testing. If temps spike while speeds fall, you’re seeing thermal throttling. If there’s no speed–temp correlation or SMART shows errors, replace the drive
Remember that you shouldn’t rely on speed alone as a measure of good SSD health. Even when speed looks fine but SMART shows warnings, always trust SMART.
How to Check an External SSD’s Health
SMART over USB isn’t guaranteed—many USB enclosures simply don’t pass full SMART data to the host. That means a SMART reader may show little or nothing, even though the drive itself supports diagnostics. Don’t assume unreadable SMART means your SSD is healthy—it’s always smart to double-check.
Follow these steps:
1️⃣ Connect your SSD via USB and run the manufacturer’s utility, CrystalDiskInfo, or Auslogics SSD Optimizer first—if SMART shows up, just read it as usual.
2️⃣ If SMART is unavailable, try a different port/cable or temporarily connect the drive internally to SATA/M.2 and check your SSD’s health using the methods above. If SMART remains inaccessible via USB or connecting the drive internally is not an option, skip to the next step.
3️⃣ Run a speed test with CrystalDiskMark over USB.
- If you see very low sequential speeds, that’s a strong sign something is wrong: bad firmware, throttling, a failing controller, or a slow enclosure/port.
- If speeds match expectations, it tells you the connection and controller are at least working as they should.
In any case, a full check is highly advised, so try to compare results in another enclosure, as lack of SMART data is not a reason to ignore the drive.
How Often Should I Run SSD Health Checks?
It depends on how you use the drive and what condition it’s in. A brand-new SSD used for light web browsing needs far less attention than a workstation or external drive that sees heavy writes or travels with you. Find what matches your usage in the table below and use it as a baseline.
| Routine | User type | Why |
|---|---|---|
| Every 2–3 months | Casual users, office PCs, backup-only drives | Good balance for drives with light everyday use—quarterly checks help catch slow wear and early warnings without fuss |
| Monthly | Power users, gamers, creators with moderate writes | Regular checks spot growing reallocated sectors or temp issues before they affect performance Write-heavy workloads change SMART attributes fast; weekly checks help catch trends before data is at risk |
| Weekly | Content creators, database hosts, dev machines, heavy writers | Write-heavy workloads change SMART attributes fast; weekly checks help catch trends before data is at risk |
| Automated checks (daily/real-time) | Servers, NAS, critical workstations, IT admins | Continuous monitoring with vendor tools helps detect health or firmware issues immediately |
| Immediately | Any user who sees errors, CRCs, slowdowns, or unusual temps | Don’t wait—back up and run diagnostics the moment something looks off |
| Before major changes | Anyone doing firmware updates, OS upgrades, or big migrations | Check SSD health and back up before running operations that risk data or stress the drive |
How Can I Preserve My SSD’s Health?
It’s often the small habits that make a big difference. Following these steps will help you prolong your drive’s lifespan and ensure you’re not putting it at risk:
💾 Back up regularly. The single best protection against unexpected failure. Use a backup drive or a reliable and secure cloud service to save critical data.
⚙️ Enable TRIM. TRIM reduces unnecessary writes by telling the operating system which unused data blocks are safe to delete. Here’s how to check if it’s enabled:
- Click Start, type Command Prompt, and click Run as administrator.

- Click Yes in the UAC prompt.
- Type fsutil behavior query DisableDeleteNotify and hit Enter.

- 0 means TRIM is enabled; 1 means it’s disabled.
- If TRIM is disabled, type fsutil behavior set DisableDeleteNotify 0 and hit Enter to enable it.

You can learn more in our article on how TRIM and garbage collection work.
🌡️ Watch temperatures. Heat is bad for SSDs. If you use a high-performance laptop or desktop (e.g., for gaming), consider improving cooling by adding a heatsink or moving the drive if temps regularly approach vendor limits.
🧹 Avoid filling the drive. Leave ~10–20% free to preserve spare blocks and wear leveling. You can use software like Auslogics BoostSpeed to clean up unnecessary temporary files that may be taking up space.
✂️ Reduce unnecessary writes. Disable defrag on SSDs, limit sync and backup settings, move virtual memory to another physical drive, and avoid constant temporary file churn.
🔄 Keep firmware updated. Most SSD manufacturers release updates for their SSDs to improve performance and security and fix known issues. Make sure you install these updates once they become available.
🔌 Prevent sudden power outages. Ensure you always shut down your computer correctly, as sudden power cuts, especially during read/write operations, can harm your SSD’s health. Ideally, you should use a reliable uninterruptible power supply (UPS) device to ensure you don’t rely solely on the power grid.
Run an SSD Health Check to Stay Ahead of Drive Failure
Knowing how to check your SSD’s health allows you to anticipate issues before they start affecting your drive’s performance. Use built-in Windows tools for a quick state check, your vendor’s tool for deeper analysis and firmware updates, and Auslogics SSD Optimizer for both SMART metrics and drive health maintenance.
Your storage device is one of your system’s most critical components, so be sure to always take measures to keep it functioning optimally and never forget to back up important files.
How do you maintain your drive’s health? Share in the comments below.