
- How to Fix the Error 0x80244019
- Method 1: Check the features of your antivirus software
- Method 2: Use the troubleshooter for Windows updates
- Method 3: Change the settings for your Windows Update
- Method 4: Reset the Windows Update components
- Method 5: Perform a clean boot
- Method 6: Manually install the updates
- Method 7: Installing optional updates
- Method 8: Perform an in-place upgrade
- Conclusion
- FAQ
Have you experienced theWindows update error 0x80244019 ? This guide will help you resolve the problem. As you know, keeping your Windows updated is important to protect your system from cyber threats. However, the error number 0x80244019 can be problematic if it is not resolved early. This article will show you how to resolve the 0x80244019 error. Let’s begin.
How to Fix the Error 0x80244019
Follow the methods below to fix the 0x80244019 error:
Method 1: Check the features of your antivirus software
If you’re using a third-party antivirus program, it can interfere with your system and cause the error 0x80244019 to appear.
You can eliminate this problem by disabling certain features in your antivirus.
If you’ve tried that solution and yet the error persists, you should try removing your antivirus. This just might permanently fix the problem.
If so, we recommend switching to a different antivirus program.
It is designed not to interfere with your main antivirus while detecting threats and attacks you’d never suspect existed.
You can remove the error and still get the protection your computer needs.
Learn more at: Auslogics Anti-Malware: Features and Reviews
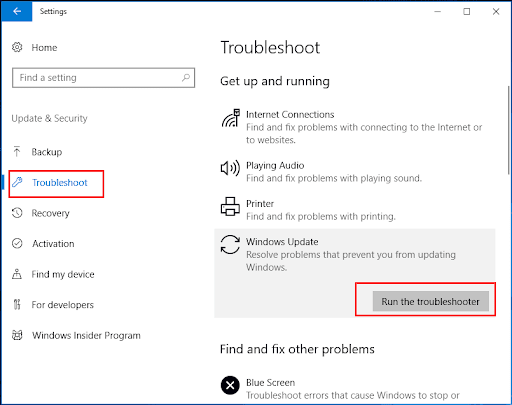
Method 2: Use the troubleshooter for Windows updates
Windows 10 has different troubleshooters dedicated to repairing specific programs and processes.
Users who tried to find methods to fix Windows 10 error code 0x80244019 discovered that using the Windows update troubleshooter helped them resolve the problem.
You can also use that tool to get rid of the error. Simply follow these instructions:
- On your keyboard, press
Windows key + I. This should open the Settings app. - Select Updates & Security , then go to the left pane and click Troubleshoot .
- Go to the right pane and click Windows Update .
- Click Run the troubleshooter .
- Once the troubleshooter has completed the scanning and repair process, check if the problem persists.
Related:Windows Update Troubleshooter: Fixing Windows Update Issues
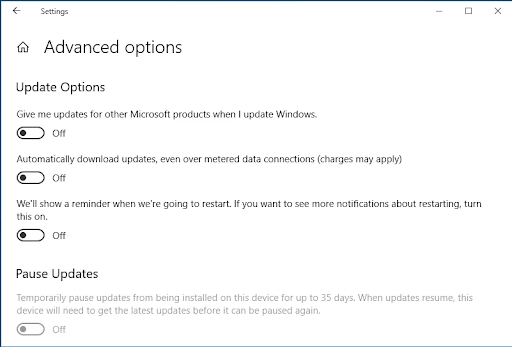
Method 3: Change the settings for your Windows Update
Certain settings of your Windows Update client may be causing the error 0x80244019 to show up. You can tweak the options to see if this fixes the issue.
Simply follow the steps below:
- Click the Search icon on your taskbar.
- Type
settings, then hitEnter. - Go to Update & Security .
- Scroll down until you reach the Update settings section.
- Click on Advanced options .
- Switch off the Give me updates for other Microsoft products when I update Windows option.
Related:How to Fix Windows Update Error 0x80073712?
Method 4: Reset the Windows Update components
You have to ensure that all the important components of Windows Update are running correctly. You can’t successfully download and install the updates if they aren’t.
You might even see the error 0x80244019. Thankfully, this can be resolved by resetting certain components.
To do that, you just need to follow these instructions:
- Right-click the Windows logo on your taskbar.
- Select Command Prompt (Admin) or Powershell (Admin) from the menu.
- Run the following commands:
net stop wuauserv

net stop cryptSvc

net stop bits

net stop msiserver

ren C:\Windows\SoftwareDistribution SoftwareDistribution.old

ren C:\Windows\System32\catroot2 Catroot2.old

net start wuauserv

net start cryptSvc

net start bits

net start msiserver
These commands should reset the necessary components for Windows Update. Try downloading and installing the updates again and see if the error persists.
Related:[EXPLAINED] Does Windows 10 Need Antivirus?
Method 5: Perform a clean boot
The error 80244019 can show up due to certain third-party applications interfering with your system. You can fix this by performing a clean boot.
By doing this, your computer will start without any third-party services or applications. That said, here are the steps you need to follow:
- On your keyboard, press
Windows key + R. This should open the Run dialog box. - Type
msconfig, then hitEnter. - Go to the Services tab and select the Hide all Microsoft services box.
- Click Disable all .
- Go to the Startup tab, then click Open Task Manager .
- Right-click every startup item, then select Disable .
- Exit Task Manager, then click OK to restart your PC.
After performing a clean boot, try installing the update and check if the error is gone.
Method 6: Manually install the updates
Resolving the Windows update error 0x80244019 on Windows 10 sometimes requires manual installation. The process is not too complicated.
The first step is to get the update’s KB number. To do so, search for that number in the Windows Update section.
- Once you’ve taken note of the KB number, follow the steps below:
- Visit the Windows Update Catalog website.
- Click the search field and submit the KB number.
- You will see a list of matching updates. Choose the update that is suitable for your system architecture.
- Download and install the update, then check if the error persists.
It is worth noting that this method is just a workaround for the error. It lets you avoid the error but does not fix the core problem. If you find the time, try performing an in-place upgrade as laid out in Method 8.
Method 7: Installing optional updates
Some users who had become tired of problematic updates opted to use a special tool that blocked the installation process.
Of course, this method can help you avoid specific update issues. However, hiding optional updates can cause the error 0x80244019 to appear.
So, it would be best to unblock and install them. Doing this should help you install the rest of the updates without hassle.
Method 8: Perform an in-place upgrade
You can also get rid of the error 0x80244019 by performing an in-place upgrade. This allows you to install and update the latest Windows version.
Don’t worry, because this method still allows you to keep all your files and applications. You just have to follow the instructions below:
- Go to Microsoft’s website and download the Media Creation Tool .
- Run the program, then select Upgrade this PC now . The setup will now download all the necessary files.
- Select the Download and install updates (recommended) option.
- Wait while the setup is downloading the updates.
- Follow the on-screen instructions until you reach the Ready to install screen.
- Click the Change what to keep option.
- Don’t forget to select the Keep personal files and apps option. Click Next to proceed.
After completing the process, your PC should have the latest Windows version. This should also help you resolve the error 0x80244019 .
This ensures that you will be able to perform the in-place upgrade with no problems. You can manually do that, but an easier option would be to use Auslogics Driver Updater.
This tool fixes and updates all your problematic drivers, ensuring you can use your USB flash drive and other peripherals without hassle.
Conclusion
Now that you have the methods to rectify the annoying Windows update error 0x80244019, you can take on the problem.
By properly troubleshooting and resolving errors, you can keep your system updated and safe from cyberattacks.
Let us know which solution works best for you in the comments section below, and don’t let this error stop you from moving forward.
Share this information with friends who may be having similar problems.
FAQ
Check your antivirus software and disable any features causing the error. If that doesn’t work, remove your antivirus program, as it may conflict with system updates.
An additional tool for identifying and resolving update-related issues is the Windows Update troubleshooter.
Additionally, you can resolve the issue by changing the settings or restarting the Windows Update components.
First, make sure your internet connection is reliable and stable. Then, restart your computer and attempt to install the Windows update once more.
If the error continues, you can use the Windows Update troubleshooter to find and fix any update process problems.
The error 0x80244010 can also be fixed by manually applying the updates or looking for any pending updates that may be interfering with the process.