![[FIXED] BSOD Error FAT FILE SYSTEM (fastfat.sys) on Windows 10](https://www.auslogics.com/en/articles/wp-content/uploads/2023/06/FIXED-BSOD-Error-FAT-FILE-SYSTEM-568x359.png)
- What Is Fastfat.sys in Windows 10?
- What Is Causing the FAT FILE SYSTEM Error (Fastfat.sys)?
- Essential Steps to Take Before Trying the Solutions
- How to Fix the FAT FILE SYSTEM BSOD Error
- Solution 1: Remove All Faulty Hardware from Your Computer
- Solution 2: Launch the ChkDsk Command
- Solution 3: Run Driver Verifier to Locate the Malfunctioning Driver
- Solution 4: Update and Repair Your Drivers Automatically
- Solution 5: Uninstall Any Folder Encryption App
- Solution 6: Reset Windows 10 to Its Default State
- Conclusion
- FAQs
Windows is a versatile operating system designed by Microsoft. With each new upgrade, it gets increasingly better and more efficient. However, it is not perfect, and technical problems pop up from time to time. Some of these issues can prevent you from using your computer. You might even get interrupted midway through a task, and this can be frustrating.
Windows 10 users have been reporting the FAT File System blue screen error. If you are reading this article, chances are you have encountered this error message as well and would like to know how to fix it.
There are several possible reasons for the fastfat.sys error. Some of the causes include an outdated Windows operating system, corrupted hard drives, obsolete system drivers, and broken or damaged system files. Other factors include a third-party antivirus tool giving false positives, conflicts between the OS and encrypted applications or protected folders, and a corrupt Windows installation.
This guide will explain how to fix the fastfat.sys blue screen on Windows 10.
Let’s begin.
What Is Fastfat.sys in Windows 10?
FastFAT is an acronym for Fast File Access Table. It’s a device driver on Windows systems. Drivers are software the system uses to communicate with your computer’s hardware and other connected devices. They have direct access to the internal functions of your operating system and play a vital role in accomplishing many tasks. The fastfat.sys file is a system driver that allows your computer to read and write to FAT-formatted devices, such as USB sticks, digital cameras, and external drives. So, is the fastfat.sys safe? Absolutely! Not only is it safe, but your PC also needs it to work correctly. If you delete this file from your computer, the FAT File System BSOD error will occur.
What Is Causing the FAT FILE SYSTEM Error (Fastfat.sys)?
Several factors can cause your computer to produce the FAT File System error . This means that there is no universal solution to apply when looking to resolve this problem. However, by knowing what can make this error message appear on your PC, you better understand what needs to be done. The FAT File System Windows 10 bug check has a value of 0x00000023. This indicates that the problem is with the FAT File System . Here are some of the established causes of the fastfat.sys file error on Windows 10: 1. An outdated OS
An outdated operating system can lead to blue screen errors. Whenever Microsoft releases a Windows update, you should install it in order to fix security loopholes and improve your system’s performance.
Therefore, if your computer is running an old OS, it is exposed to attacks and likely to encounter errors, including the FAT File System error.
2. A Corrupt Or Broken System Disk
If your computer’s hard drive has corrupt sectors, the system can’t properly read or write to the affected disk. The BSOD error can occur in such instances, putting your personal data at risk.
3. Damaged Hardware
When parts or components of your hardware are damaged, it may affect system function and lead to the error in question on your Windows 10 computer.
4. Outdated System Drivers
Drivers play an essential role in the core function of your Windows system. Without these useful tools, your computer can’t perform essential functions.
Many problems can occur on your Windows 10 PC when your device drivers are outdated, including the BSOD error .
5. Corrupt System Files
System files contain information needed by your computer for optimum operation. If access to this data is unavailable because of corrupt or missing data, you’ll encounter the fastfat.sys error on your Windows device.
6. Conflicting Folder Encryption Applications
Some applications run on encryption technology. These apps have encryption methods that can interfere with the functionality of your system.
In such cases, they can damage or restrict essential files that your computer needs to perform basic tasks. This malfunction can give you the FAT File System Windows 10 error.
7. False Positives By a Third-party antivirus
Antivirus programs can sometimes block access to core system files. This happens when the antivirus app mistakenly detects them as malware, preventing the computer from using these files.
You can resolve this by whitelisting the blocked system files or uninstalling the antivirus.
8. A Corrupt Windows Installation
When Windows installations are not completed correctly, several errors can pop up. One of them is the FAT File System problem.
Essential Steps to Take Before Trying the Solutions
You must meet certain conditions before you implement the FAT File System error fix . For starters, ensure you have ”
Administrator” access to the system with this error. Disconnect your computer if your system is connected to a network or domain.
This is because certain domains have policies that can restrict you from carrying out specific operations on your Windows 10 device. So remove your PC from the network and rejoin when you resolve the error.
Also, ensure you boot your PC in Safe Mode. Here is how to do this:
- Go to the Start.
- Then go to the bottom left pane and click the Power.
- Now press and hold the
Shiftkeyon your keyboard while clicking the Restart button. - From the list of options, choose Troubleshoot to go to the next page.
- Select Advanced options from the list in the next window and click Startup Settings. From here, you can restart your computer.
- Once your computer is done rebooting, you’ll see a list of options to select using the
F1 to F9function keys. To boot into Safe Mode, press theF4. You can also pressF5 or F6, depending on what extra options you require. Your PC will now launch in Safe Mode. - Ensure you create a backup of all essential data you don’t want to lose. For example, you can back up to an external drive or the cloud.
Check If the Error is Hardware or Software Related
Knowing if the FAT File System error is related to hardware or software failure is essential. BSOD is a safety mechanism that Windows uses to protect itself from damage. This feature causes your PC to shut down abruptly to prevent data loss if it senses a threat or malfunction. BSOD errors occur because of hardware, driver, or other related software malfunction. Therefore, before you proceed to the solutions, you should determine whether the problem is software- or hardware-related. Common Causes of Hardware ErrorsCommon causes of hardware errors include bad blocks or sectors within the system’s disk. They can also occur because of a depletion of nonpaged pool memory. You must check if your computer’s HDD and memory work properly. There should be HDD- and memory-testing tools embedded in the BIOS or setup of your computer. In this guide, we’ll use HP’s Startup menu to describe how to test for hardware function.
Also Read: Factors That May Cause Hard Drive Failure
How to Test HDD and Memory in BIOSHere’s how to check the hard drive and memory using the BIOS. You can check your system’s manufacturer guide for steps on how to use this feature on your PC:
- Turn off your computer and then turn it back on.
- Immediately it turns on, start pressing the
Esckey on your keyboard. This will open the Startup menu of your system. - Once the Startup menu comes up, go to your keyboard and press the
F2. - From here, select the Component Tests.
- Run a hard disk test on the next list of options by selecting Hard Drive.
- Wait patiently for Windows to complete the hard drive test. Once done, run a memory test by repeating steps 1 to 4 and then choosing Memory from the options.
If Windows reports errors after completing the memory and hard drive tests, the FAT File System error is from a hardware problem. We recommend taking your computer to a trusted repair shop to have it checked. However, if no errors have been reported, it indicates the fastfat.sys problem is software-related.
How to Fix the FAT FILE SYSTEM BSOD Error
Here’s how to implement the FAT File System error fix:
Solution 1: Remove All Faulty Hardware from Your Computer
One of the most common causes of the FAT File System error is damaged or malfunctioning hardware. If you have any removable peripherals connected to your computer, you must figure out which is to blame.
To identify the culprit, you should unplug all of them and reconnect them once again until you can recreate the problem. This allows you to pinpoint the problematic hardware.
Here are the steps to follow:
- First, shut down your system.
- Remove all devices plugged into your computer’s USB ports and SD card slots. Also, unplug any external HDDs.
- If you’re using a detachable mouse and keyboard, remove them and plug them back in when they are needed to communicate with the computer.
- If you use more than one RAM stick, leave just one of them and remove all the others.
- Disconnect any external storage drives ( SSDs and HDDs). Simply unplug their cables from the system. However, leave the one that has the system’s OS on it.
- Any additional graphics cards should also be removed, except the integrated one.
- When you are done, power up your PC to check if the FAT File System Windows 10 error has been resolved. If the problem has been cleared, shut down your system again.
- Now, plug back in one of the removed devices and restart the system. Check if the problem pops up again. Repeat this for each of them until you find the device causing the issue. Your PC will show the error once you connect the faulty device and boot the system.
Now that you have identified the faulty peripheral test the device on a different computer to see if it is truly damaged. If yes, then replace it with a new one.
Solution 2: Launch the ChkDsk Command
A hard disk drive that has undergone prolonged use might malfunction over time. This happens because of accumulated damage and errors following computer misuse and issues such as improper system shutdowns, bad sectors, and corrupt software and metadata.
These repeated factors can cause numerous system malfunctions, including the popular FAT File System error seen on Windows 10 PCs.
Fortunately, Microsoft designed a built-in tool that allows users to check for and repair any corruption or damage within the HDD. This utility is known as CHKDSK.
You can use the CHKDSK tool to solve the fastfat.sys file error on your PC:
- First, boot your PC in Safe Mode following the steps described in this guide.
- Once your computer is in Safe Mode, go to the Windows search box and type in:
cmd
- Select Command Prompt.
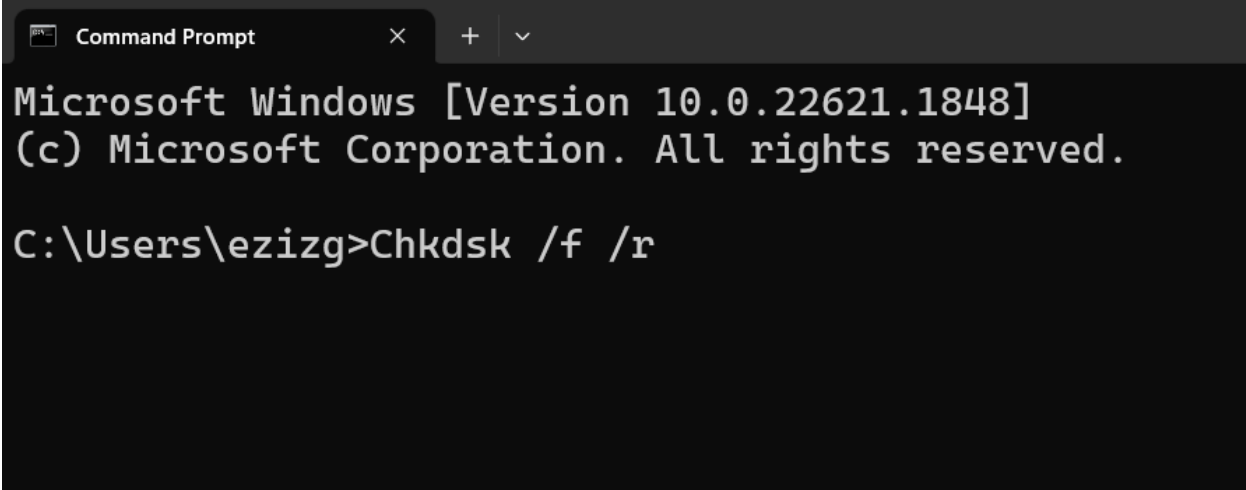
- In the Command Prompt window, type the following command line and then press the
ENTERkey:
Chkdsk /f /r
- When prompted to schedule this volume to be checked the next time the system restarts, press the
Ykey on your keyboard. - If Windows doesn’t reboot your system automatically, you should manually restart your computer. Now, wait patiently while Windows checks your HDD for damage or corruption.
After running the ChkDsk tool, restart your system in normal mode to see if the error has been resolved.
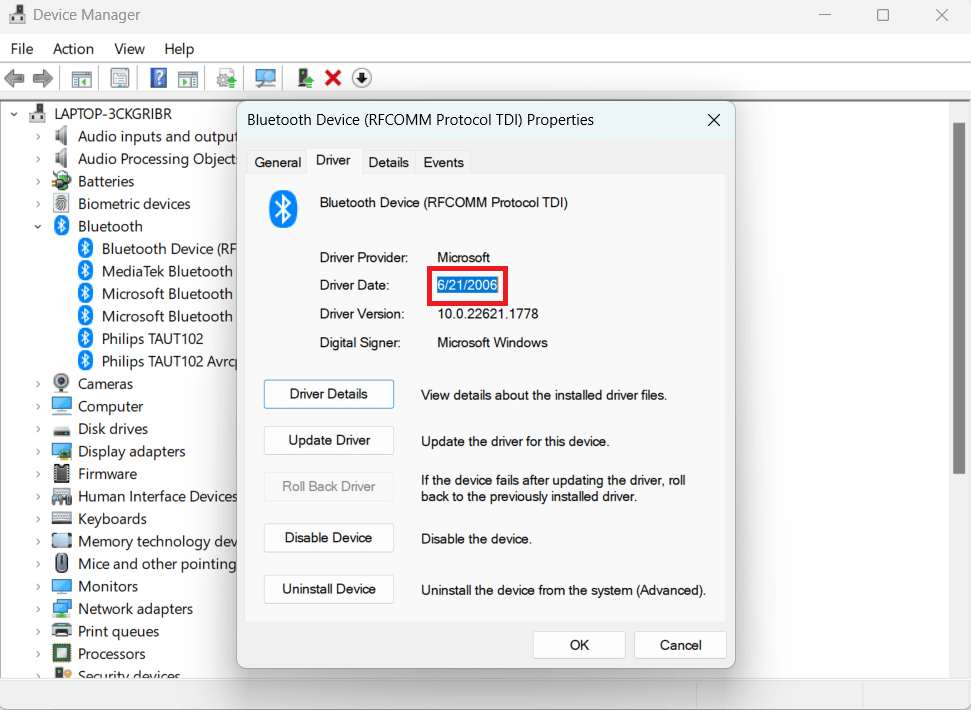
Solution 3: Run Driver Verifier to Locate the Malfunctioning Driver
Device drivers allow your operating system to communicate with its hardware. When there is a missing, corrupt, or faulty driver, this connection is broken, causing malfunctions, such as the FAT File System Windows 10 error to occur.
Fortunately, Windows has a built-in tool that allows users to verify which drivers must be repaired. This utility is called Driver Verifier. You can use it to pinpoint faulty drivers, after which you can update them to the latest version to resolve the fastfat.sys file error.
Here is what you should do:
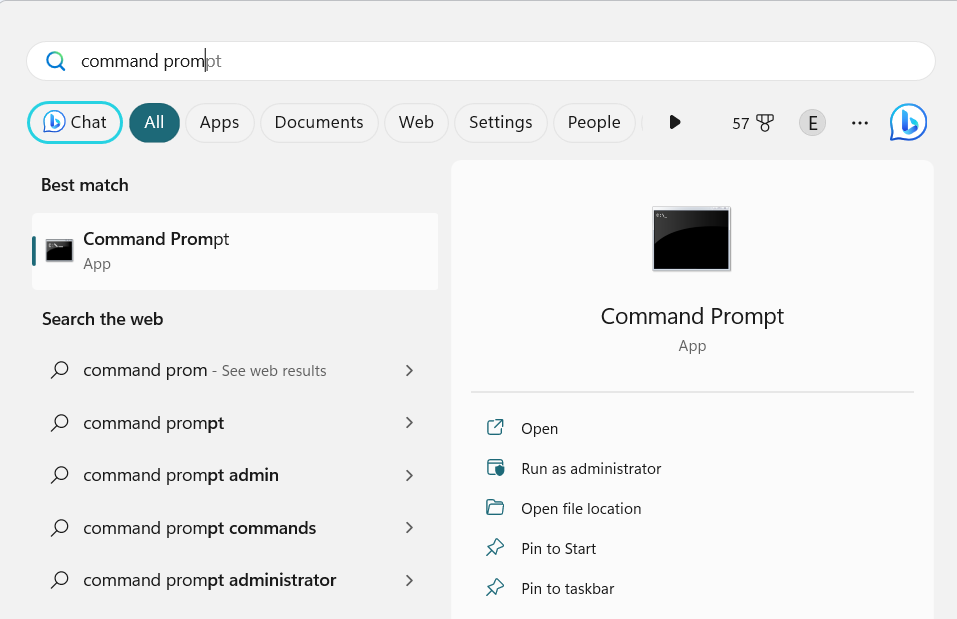
- Press the
Windows keyon your keyboard and then typecommand prompt. Right-click on the Command Prompt option from the search results displayed to bring up its menu list.
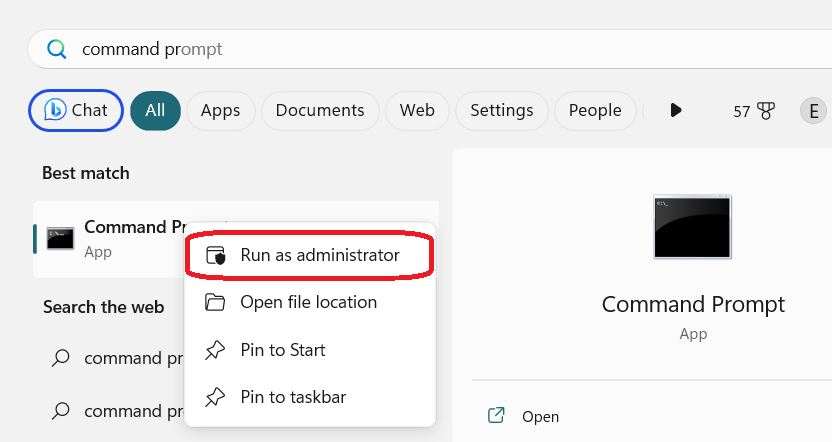
- Select Run as administrator to open an elevated Command Prompt. Type in the following command and press the
ENTERkey on your keyboard:
verifier
- In the Device Verifier Manager window, select Create standard settings and then choose Next to continue.
- Choose the Automatically select all drivers installed in this computer option, and select Finish.
- Wait patiently while Windows scans the drivers for errors. When the process is complete, restart the system when you are prompted to do so.
- As soon as Windows restarts, it’ll thoroughly analyze every driver installed on your computer. You’ll receive a notification if it identifies errors with any of them. This may take several minutes to complete. So, be patient and give it time.
If there are damaged drivers on the system, you can update them. Once you are done, restart your PC to see if the error has been resolved. Proceed to the next solution for steps on how to update and repair any missing or broken drivers automatically.
Solution 4: Update and Repair Your Drivers Automatically
While you can update or repair your drivers manually, doing so is sometimes risky. You might install the wrong driver mistakenly and cause further damage to your system. Besides, the long process of finding the authentic website and appropriate driver version can be stressful.
Also Read: [EASY GUIDE] How to Update Device Drivers on a Windows 10 PC?
Some tools allow you to automatically identify, repair, and update any missing or broken drivers with just a button. This is both convenient and time-saving.
Auslogics Driver Updater is a handy tool designed for just this purpose. You can use this app to resolve device conflicts, restore smooth hardware operation, and keep your Windows 10 computer free from BSOD errors related to driver malfunction.

It performs an analysis of all drivers installed on your PC, providing you with a report on all outdated, corrupt, or missing drivers. It then proceeds to update them to the most recent manufacturer-recommended versions.
In addition, it creates backups of all your existing drivers before performing any repairs or updates. This allows you to revert to previous driver versions if you don’t like the updated ones.
Auslogics Driver Updater has been tested by multiple PC manufacturers and certified safe and effective.
If the FAT File System BSOD error persists after updating and repairing all damaged or missing drivers, proceed to the next solution.
Solution 5: Uninstall Any Folder Encryption App
Some folder encryption and protection applications can disrupt system operations and cause the FAT File System error on Windows 10. This is because their encryption method interferes with the core aspects of your hard drive.
If you’re using any of these programs, you need to uninstall them to see if they are responsible for the BSOD on your computer:
- Power on your system in Safe Mode using the method previously described.
- Once the computer is done booting, press the
Windows keyon your keyboard and typecontrol panel. From the search results, select Control Panel.
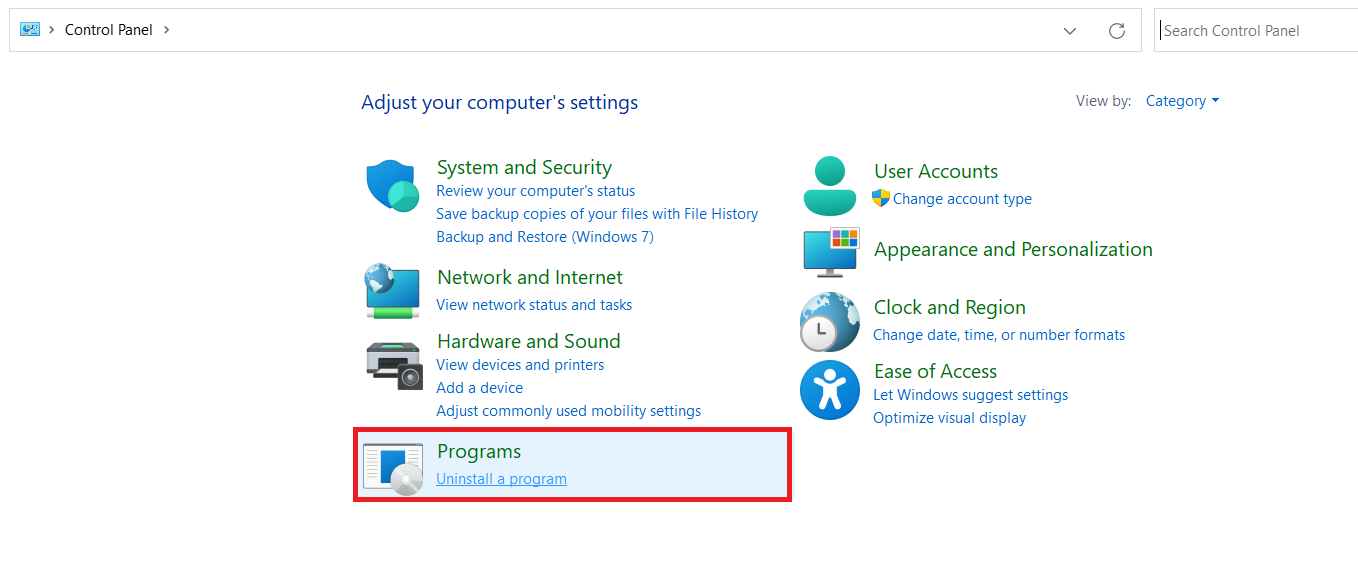
- In the Control Panel window, choose Uninstall a program.
- On the Programs and Features page, locate and right-click on the Protection/Encryption software you are using, and choose Uninstall.
- From here, follow the on-screen instructions to complete the uninstallation process.
Restart your system in normal mode after uninstalling the encryption/protection app. Then check to see if the FAT File System BSOD error has been cleared from your Windows 10 computer. If the problem persists, this indicates that there might be an issue with your Windows operating system.
Solution 6: Reset Windows 10 to Its Default State
If you have tried all the solutions listed above and none helped, you might need to reset Windows to its factory or default settings. You can do this by using the built-in Windows Recovery utility. Be sure to back up any important files you do not want to lose before using this method. Here are the instructions to follow:
- First, launch the Start menu and select
- In the Settings window, choose Recovery.
- On the right pane, under Reset this PC, select the option Reset PC.
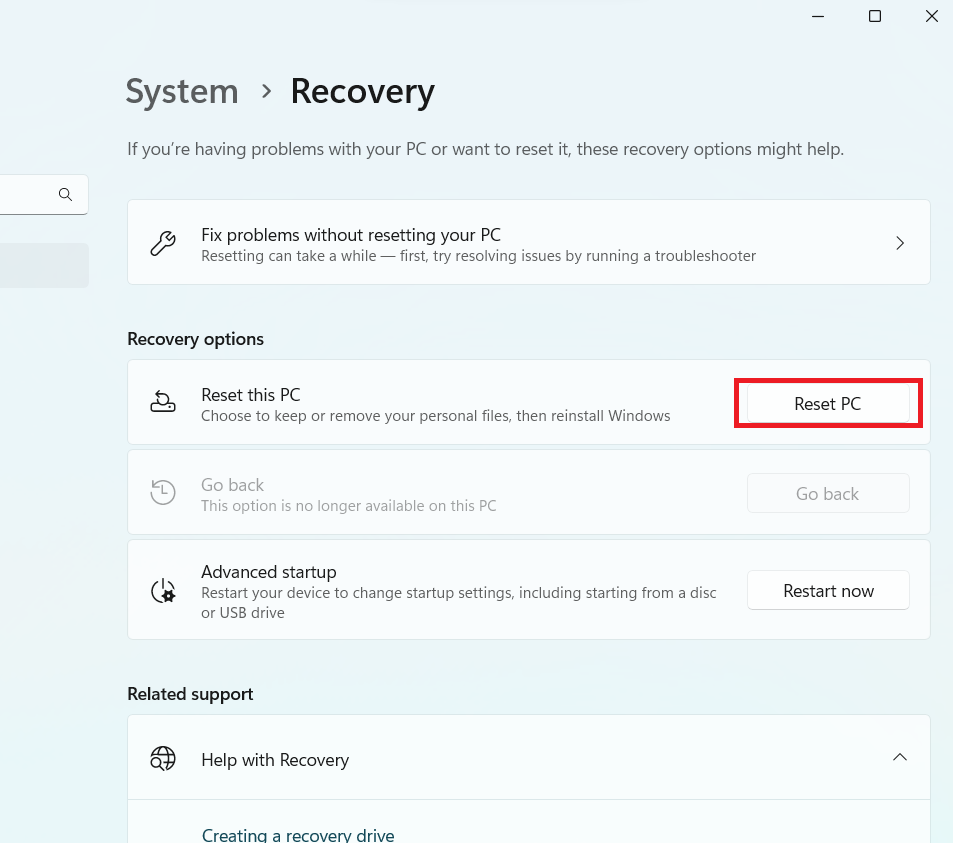
- From there, choose Keep my files. Choosing this option will instruct Windows to reset the system without deleting the files stored on your computer. Alternatively, you can choose to Remove everything. If you select this option, Windows will reset your PC and delete all the stored data.
- If you have chosen to Keep my files, simply proceed to the next step. On the other hand, if you have selected the option Remove everything, then select either Just remove my files (to delete your files only) or Remove my files and Clean the Drive (to delete your data and clean your hard disk as well). Keep in mind that the second option takes longer to complete.
- If a warning prompt appears, select
- In the next window, look through the information to ensure everything is in order, and then select Reset to start the process.
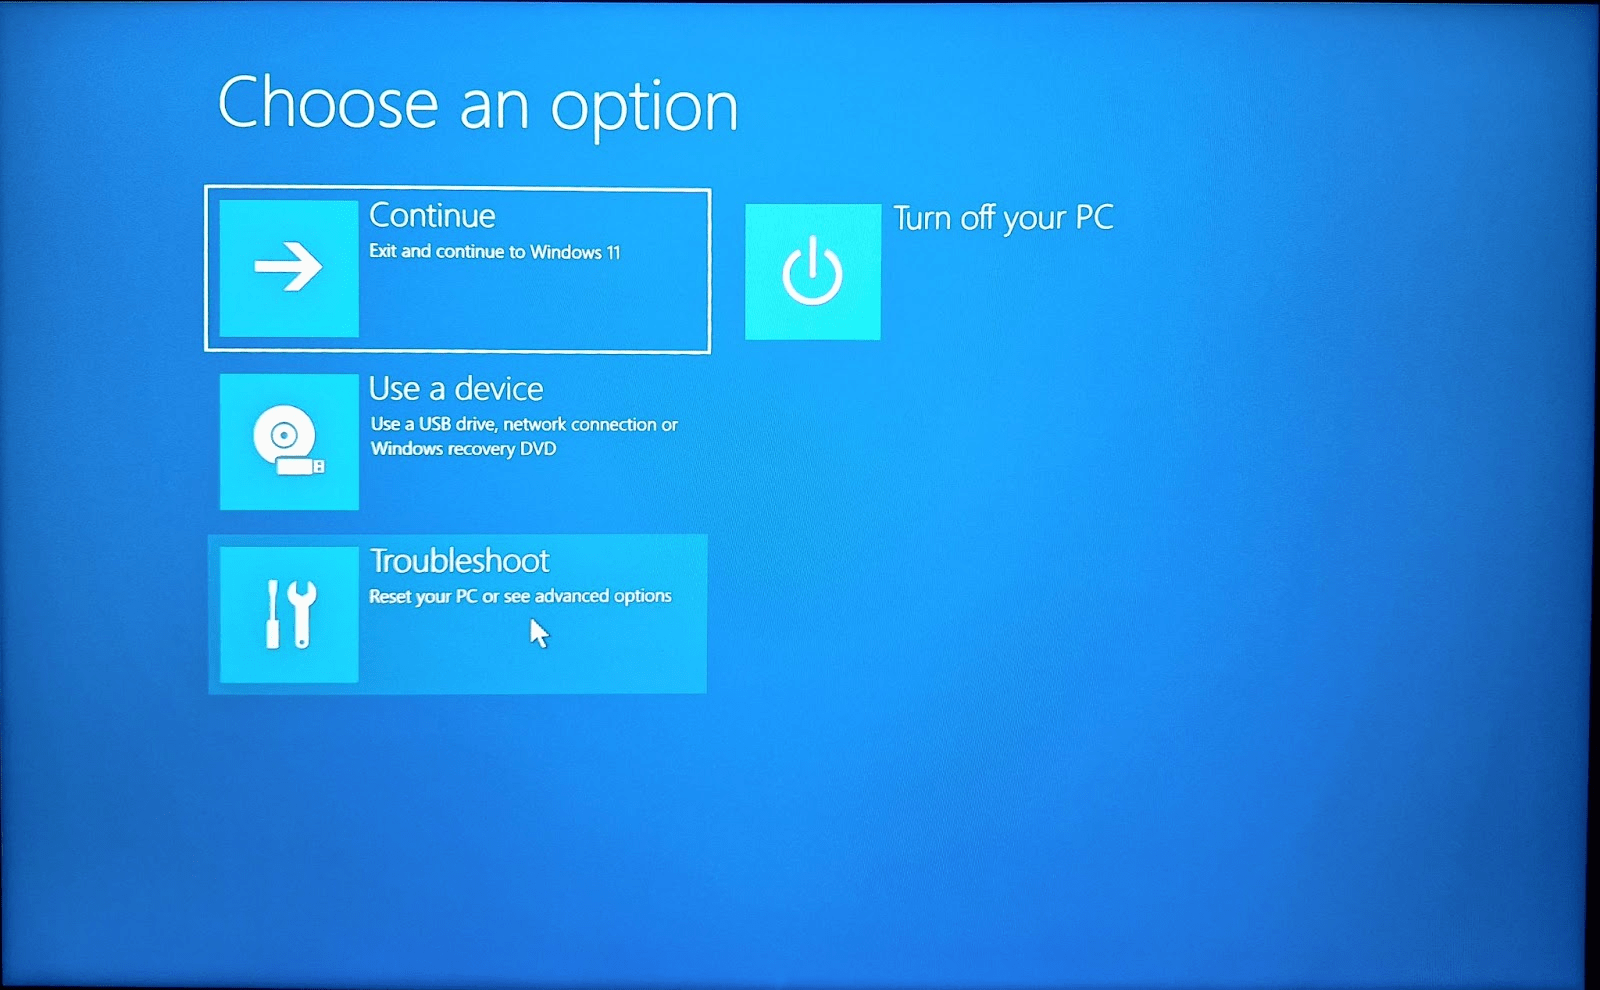
At this point, your PC will restart. Wait patiently, as this can take a few minutes. When presented with options on the screen, click Continue to complete the reset.
Conclusion
We believe the solutions discussed in this article will help resolve the FAT File System error on your Windows 10 computer.
Share this article with your friends and colleagues if you find it helpful. Are there other solutions that we did not list in this guide? You can share them with us in the comments section below.