![[REVIEW] Auslogics Disk Defrag Ultimate—How to Defrag the Right Way](https://www.auslogics.com/en/articles/wp-content/uploads/2023/01/DDU-568x359.png)
- Why Do I Need Auslogics Disk Defrag Ultimate?
- Is Auslogics Disk Defrag Ultimate Compatible with Your PC?
- Which Types of Drives Does Auslogics Disk Defrag Ultimate Optimize?
- How Does Auslogics Disk Defrag Ultimate Optimize SSDs?
- How Much Does Auslogics Disk Defrag Ultimate Cost?
- Auslogics Disk Defrag Ultimate Pros and Cons
- How Effective Is Auslogics Disk Defrag Ultimate?
- What Are the Notable Features of Auslogics Disk Defrag Ultimate?
- What Makes Auslogics Disk Defrag Ultimate Stand Out?
- How to Use Auslogics Disk Defrag Ultimate to Defragment Your Hard Drive
- How Does Auslogics Disk Defrag Ultimate Compare Against Windows’ Built-In Optimizer and Other Third-Party Tools?
- What Do Users Say About Auslogics Disk Defrag Ultimate?
- Auslogics Disk Defrag Ultimate: Final Thoughts
- FAQ
Hard disk drives require regular defragmentation, just as humans need regular dental checkups.
Defragmentation promotes quick access to saved files and helps safeguard the natural life of your hard drive.
n this review article, we will show you how to use Auslogics Disk Defrag Ultimate, the advanced version of Auslogics’ defrag utilities, to make your drives healthier and your PC lightning-fast!
💽 Defragmentation is a critical maintenance process for hard disk drives.
🧠 Auslogics Disk Defrag Ultimate is designed for more advanced users, while the regular Auslogics Disk Defrag is suited to beginners.
🧰 The tool offers smart defrag profiles and algorithms that give you full control over HDD defragmentation and SSD optimization.
⚙️ The tool uses the TRIM feature, write caching, and SSD-specific algorithms to run SSD optimization.
🖥️ Disk Defrag Ultimate is available on Windows 7, 8, 8.1, 10, 11, and Windows Server 2008, 2012, 2016, 2019, and 2022.
🆓 The free version of the app offers drive optimization, simple defrag, and scheduling.
💼 The professional version gives unlimited access to all advanced features.
Why Do I Need Auslogics Disk Defrag Ultimate?
You need Auslogics Disk Defrag Ultimate if the following applies to you:
- You use a hard disk drive alongside an SSD and need a tool with specialized SSD algorithms
- You want to use advanced customization options
- You are a power user who needs defragmentation processes tailored to how you use your computer
Since HDDs have moving parts namely the magnetic spinning platters and the actuator arm, file fragmentation inevitably slows down file access times and causes wear and tear.
Auslogics Disk Defrag Ultimate works with the HDD’s file system to reorganize and rewrite fragmented files contiguously for faster access. This process reduces the distance the drive’s actuator arm has to travel to read and write files.
And what about SSDs? Since SSDs have a limited number of write cycles, you’d agree that optimization is of prime importance.
But should you defrag SSDs to achieve optimization? The simple answer is no. However, Auslogics Disk Defrag Ultimate provides specialized smart algorithms for running maintenance on these drives.
Is Auslogics Disk Defrag Ultimate Compatible with Your PC?
Auslogics Disk Defrag Ultimate is made for use on Windows PCs and Windows Server systems. It is compatible with Windows 7, 8, 8.1, 10, 11, and Windows Server 2008, 2012, 2016, 2019, and 2022.
Which Types of Drives Does Auslogics Disk Defrag Ultimate Optimize?
Auslogics Disk Defrag Ultimate provides easy-to-use professional features, ideal for optimizing and defragmenting SSDs and HDDs. The app is designed to detect the kind of drive you have, making it possible to select HDDs for defragmentation while excluding SSDs from this process.
SSDs are identified automatically, enabling the app to take a different approach for their optimization.
How Does Auslogics Disk Defrag Ultimate Optimize SSDs?
SSDs and HDDs require different kinds of maintenance. For an SSD, it involves improving write speeds and reducing the total number of write operations on the drive. This can be achieved through various optimization techniques, such as write caching and SSD TRIM.
How Much Does Auslogics Disk Defrag Ultimate Cost?
Auslogics Disk Defrag Ultimate
offers a 3-PC license, and the price depends on the region. For example, the price for U.S. users is $39.95. The app also has a free version. Here’s how it stacks up against other tools:
| Price (USD) | Free version features | |
|---|---|---|
| Auslogics Disk Defrag Ultimate | 3-PC license: depends on the region, e.g., $39.95 for U.S. users |
|
| Piriform Defraggler | Free to use |
|
| WinContig | Free to use |
|
Auslogics Disk Defrag Ultimate Pros and Cons
- Available on Windows 7 through 11 and Windows Server
- Easy and safe to use on both HDDs and SSDs
- Provides useful hints for achieving the best outcome from using the app
- Gives succinct descriptions of all features
- Can be used for disk analysis
- Highly customizable defrag options
- Optimal use of system resources
- Provides exhaustive reports and helps keep track of disk health and defrag sessions
- Active customer support and user guides
- Regular app updates
- Offers a free version
- The full version comes at a highly-affordable price
- The free version only offers simple defrag
- Packs so many functionalities that it may take time getting used to
How Effective Is Auslogics Disk Defrag Ultimate?
Auslogics Disk Defrag Ultimate is very effective at defragging and optimizing your drives, which can be proven by many users who have already been using this tool for a while.
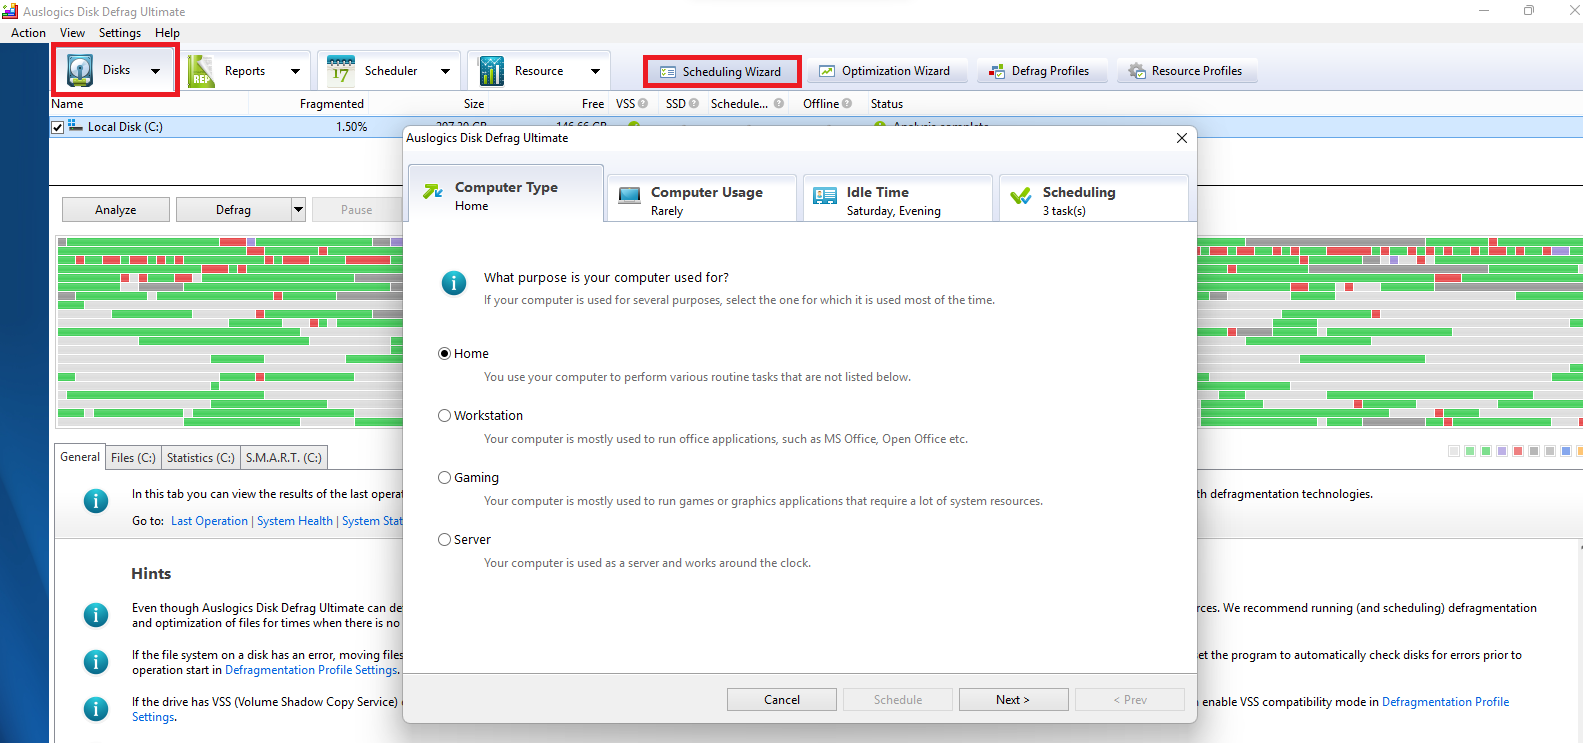
The core part of the setup process involves asking users specific questions about their PC to determine which defragmentation or optimization algorithm will be employed for best results. This also helps determine how frequently defragging should be carried out. Some of the questions include:
- The type of PC—whether a laptop, desktop with UPS, or a desktop without UPS.
- The purpose the PC usually serves, for example, whether it is used as a server or for document processing, gaming, graphics designing, etc.
- The frequency of PC usage.
- The idle times.
Furthermore, Scheduling Wizard, Optimization Wizard, Defrag Profiles, and Resource Profiles make it easy for you to select and fine-tune the working methods that will be employed by the app, ensuring that you achieve only the desired results.
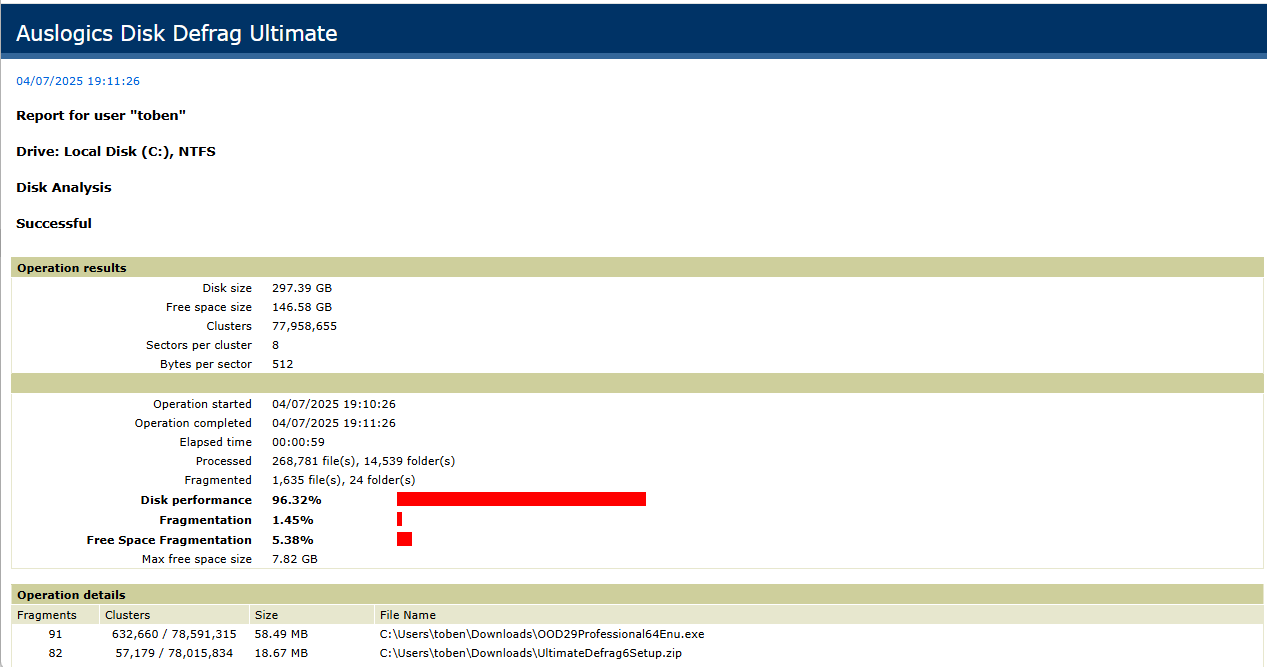
Finally, detailed reports highlight the improvements made after a defrag session and the resulting effects on the health of your PC.
What Are the Notable Features of Auslogics Disk Defrag Ultimate?
➡️ Beginner-friendliness and ease of use
➡️ Resource usage monitoring and control
➡️ Drive optimization and file system fine-tuning
➡️ SSD-friendly algorithms
➡️ Helpful actions before and after disk defrag
➡️ File, folder, and drive exclusion
➡️ Smart profiles for defrag optimization
➡️ Individual file and folder defrag
➡️ VSS compatibility mode
➡️ Robust scheduling options
➡️ File fragmentation prevention
➡️ In-depth performance reports
➡️ File Explorer integration
What Makes Auslogics Disk Defrag Ultimate Stand Out?
Here are the notable features for your enjoyment:

You don’t have to search too long to find the right way to proceed. From the moment you launch the app, Auslogics Disk Defrag Ultimate presents a streamlined approach for starting and completing your first defrag successfully.
The app also provides succinct descriptions for every available feature.
To top it all off, you will find useful hints enumerated in the bottom segment of the home page. They reveal best practices and the most suitable approach for running a defrag with the app.

Via Resource Profiles, you can keep track of how the app is utilizing system resources when defragging your disks. Set automatic actions for stopping, minimizing, or adjusting resource usage.

Auslogics Disk Defrag Ultimate improves the condition of your drive’s file system, helping to:
- Speed up data reading and writing to the drive
- Reduce the frequency of disk access requests
- Achieve faster access time to folders containing a large number of files
- Facilitate concurrent launching and running of multiple applications
All these sum up to better drive health and a faster and smoother PC.

Drives formatted with the NTFS file system typically reserve about 12.5% of the total disk volume for storing MFT records. But as disk space gets low, the MFT reserved zone becomes available for storing regular files.
Therefore, part of the optimization process carried out by Disk Defrag Ultimate is moving these regular files away from the MFT reserved zone and into the rest of the disk space. This creates more contiguous space for the MFT, preventing its fragmentation.
Furthermore, Disk Defrag Ultimate optimizes your drives by providing options for enabling write caching, disabling NTFS file compression and encryption (if enabled), and disabling Windows Search Indexing.

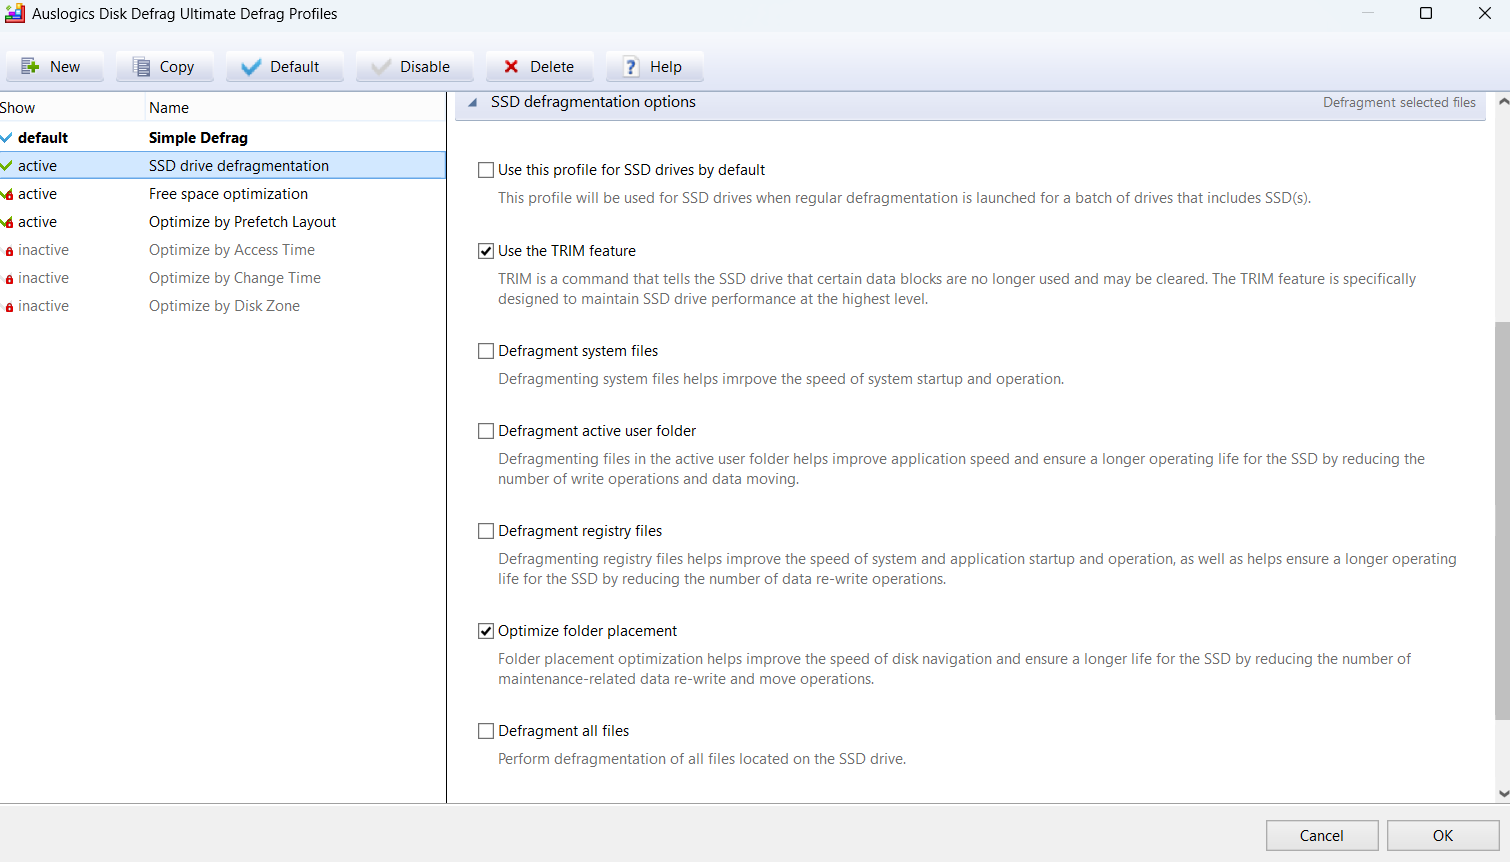
Special algorithms help run maintenance on your SSD drives for improved performance. There’s a TRIM feature, write caching, and folder-placement optimization, all designed to prolong the life of your drive.

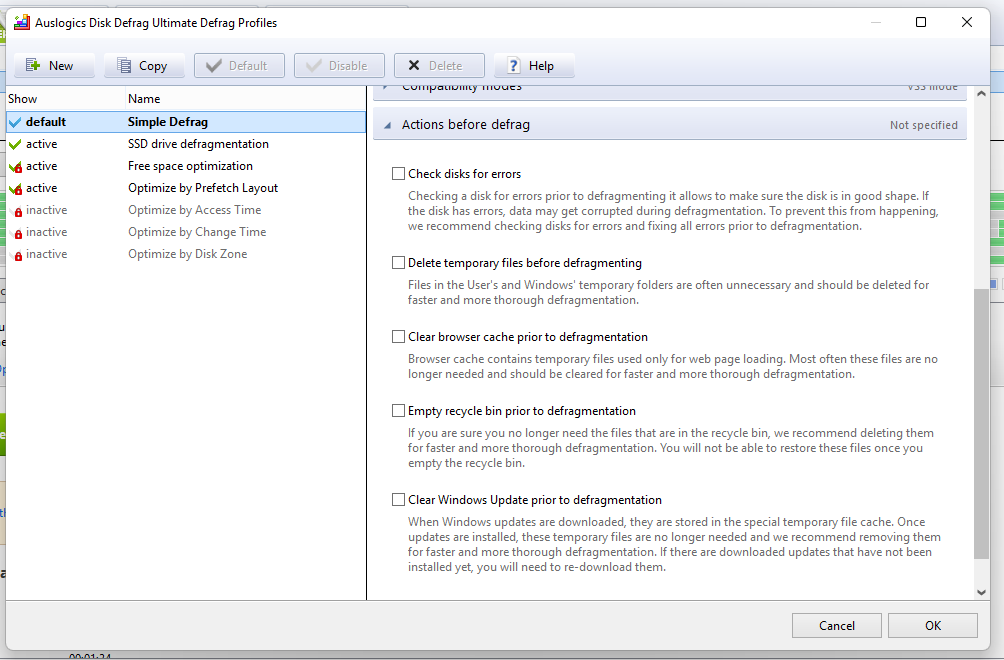
To ensure a fast and hitch-free defragmentation process, the tool lets you specify prior actions to be carried out before starting defragmentation, including:
- Checking for and correcting disk errors
- Deleting temporary files
- Deleting browser cache
- Emptying the Recycle Bin
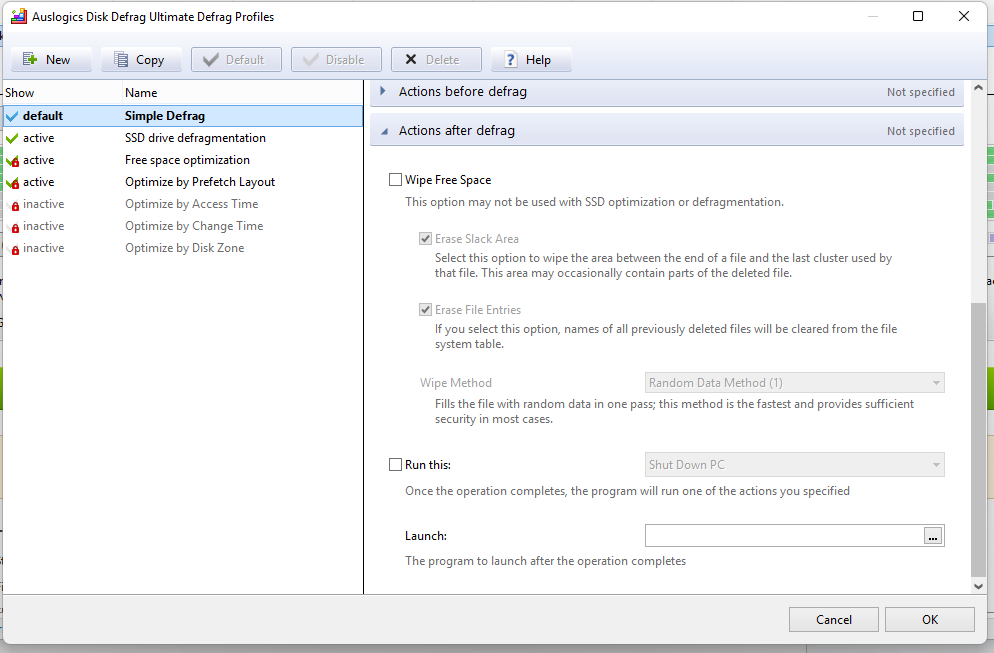
You can also specify actions for when the defrag is complete, including:
- Wiping free space
- Closing the Auslogics Disk Defrag Ultimate app
- Launching a specified app on your PC
- Shutting down the PC or putting it into sleep mode or hibernation

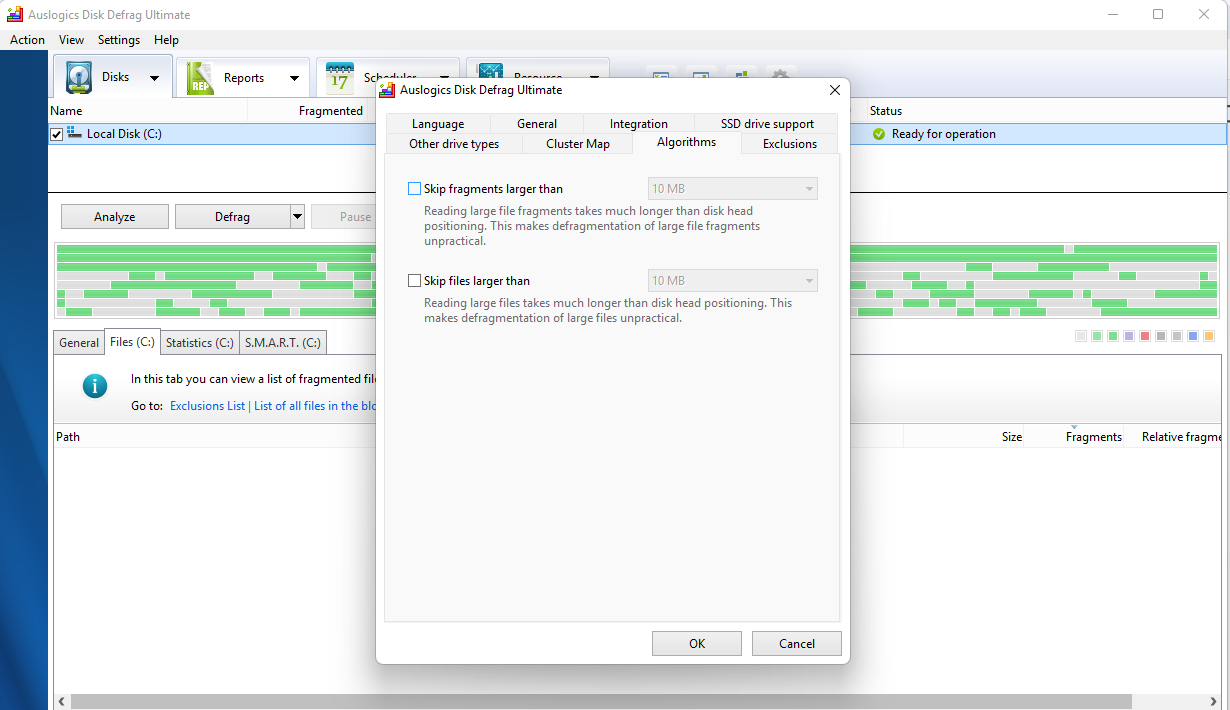
Not interested in defragging certain files and folders? You can add them to an exclusion list so that they will not be included in the defrag process.
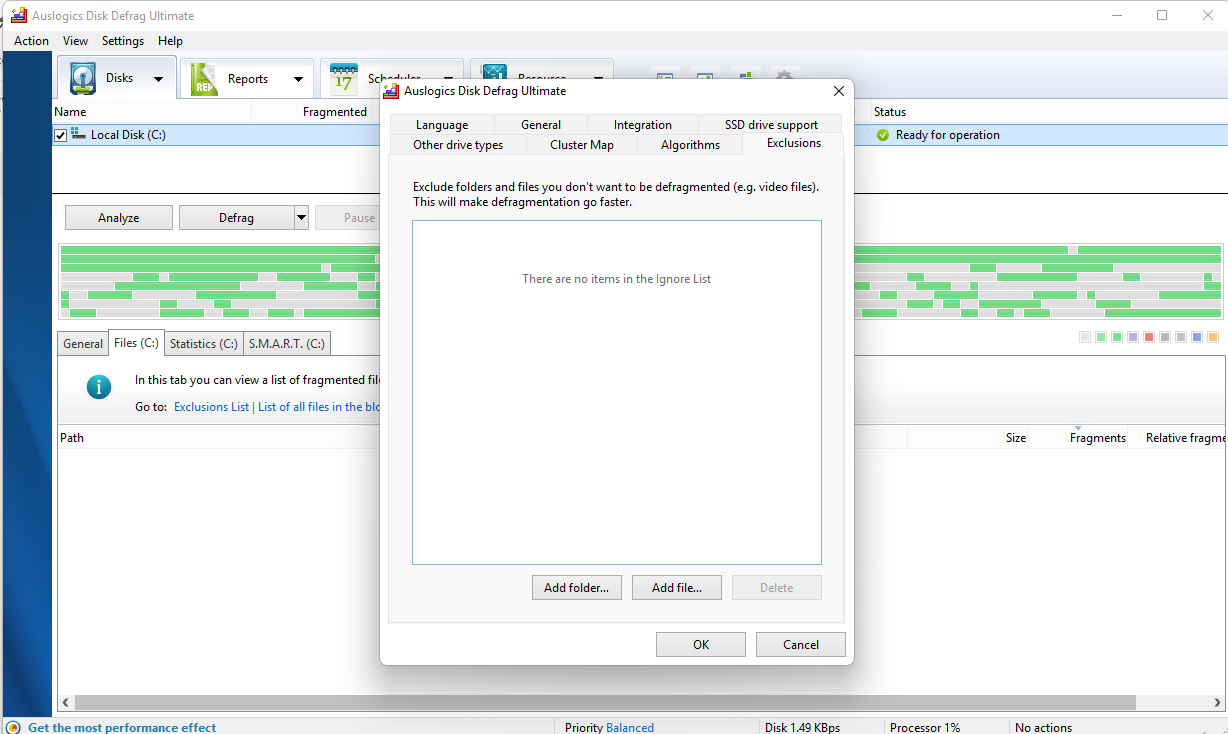
These may also include files or fragmented files that are larger than the sizes you indicate (in MB).
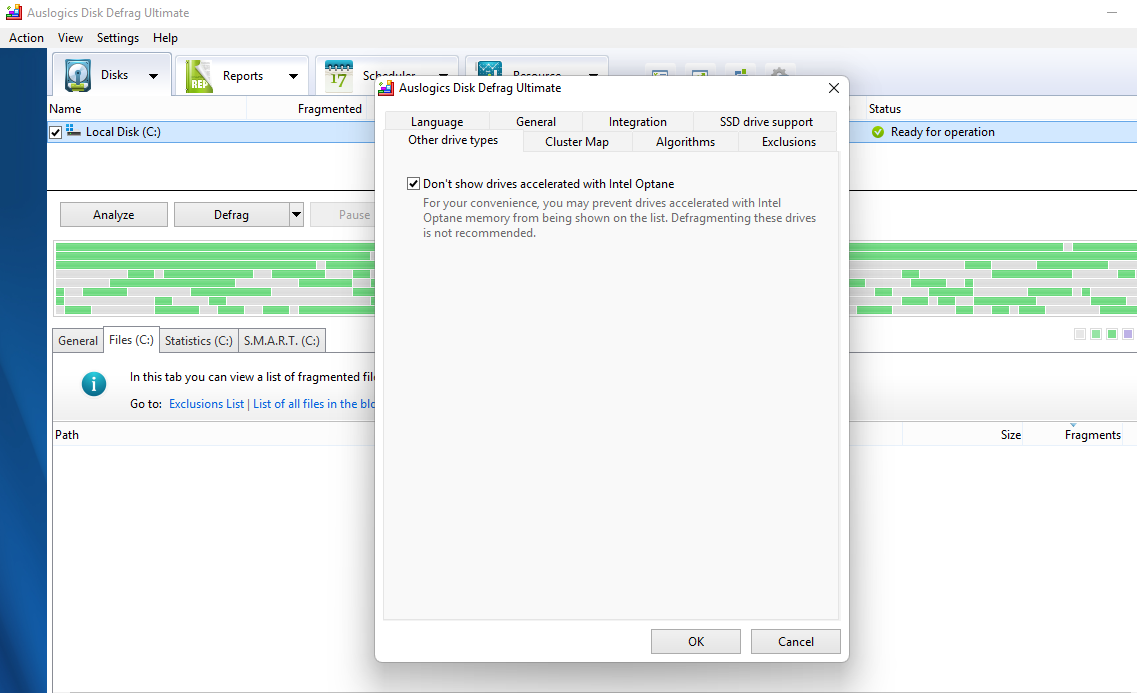
You can also indicate drive types (such as SSDs and drives accelerated with Intel Optane) that you want the app to ignore.


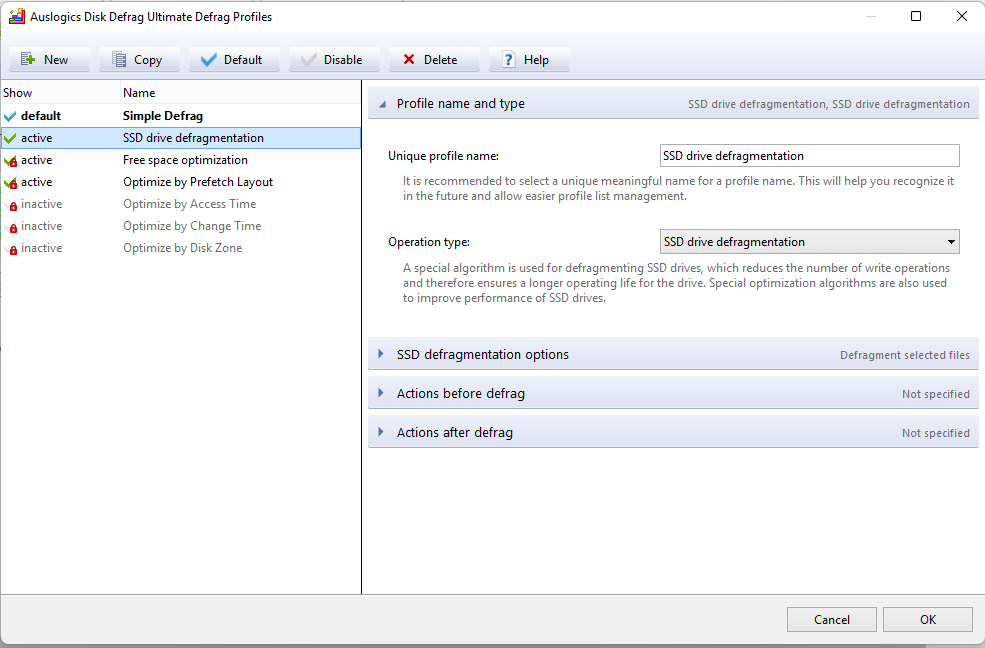
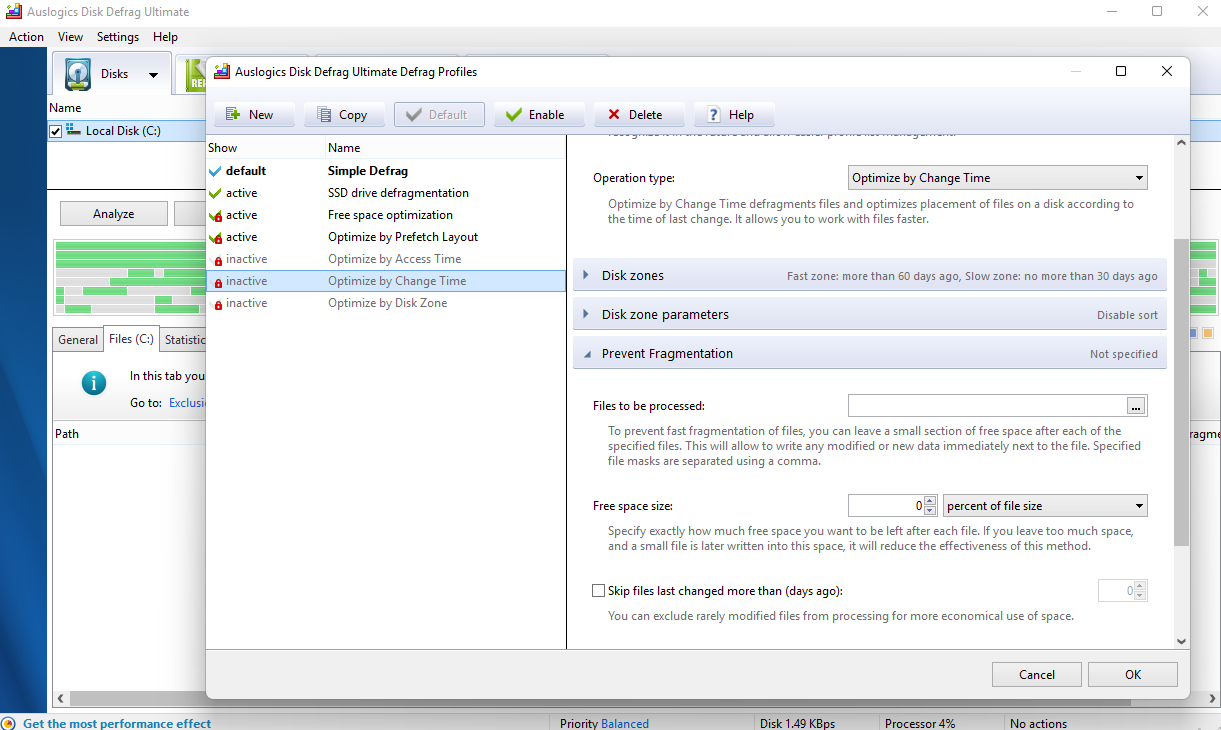
There are defrag profiles for customizing and activating smart algorithms, enabling you to achieve specific results based on your needs:
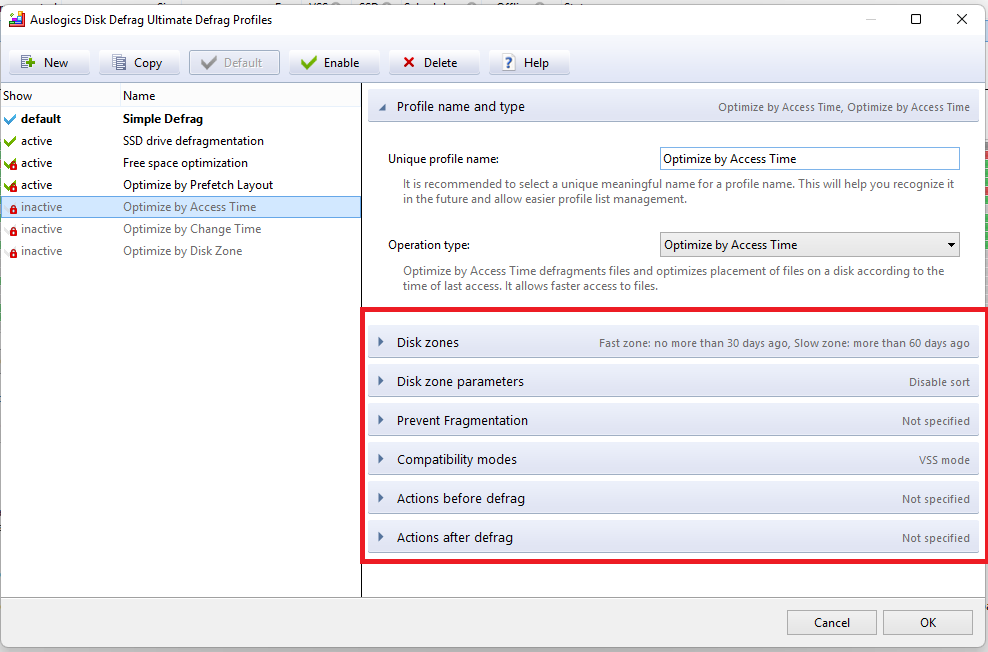
- Optimize by Access Time: Defrag files and optimize their placement on the disk based on the time of last access. Files that haven’t been accessed in a long time are placed in the slow zone of the disk so that those that were accessed lately will be in the fast zone.
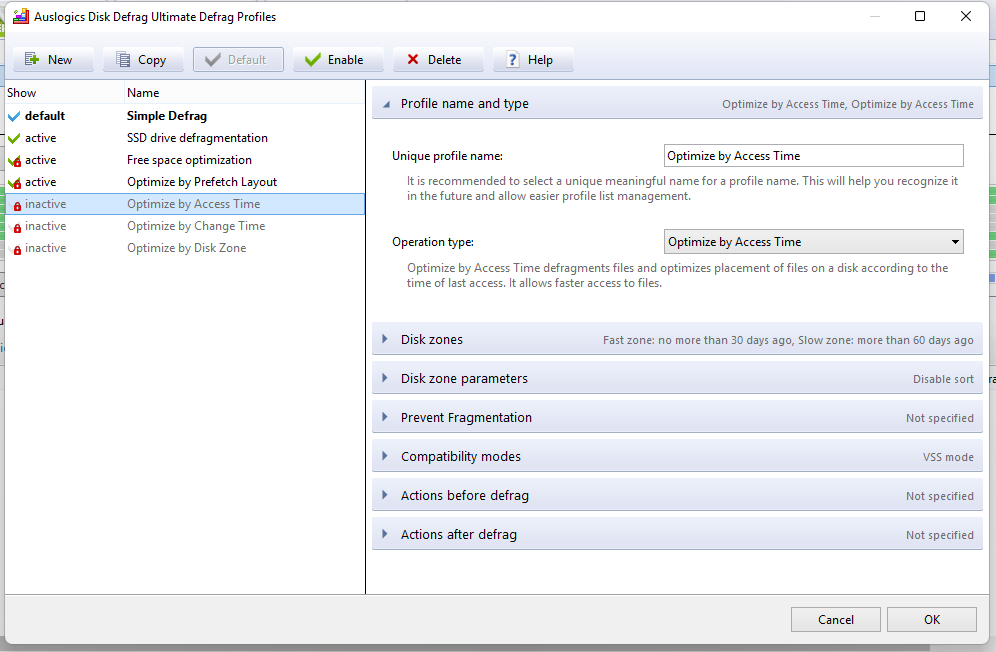
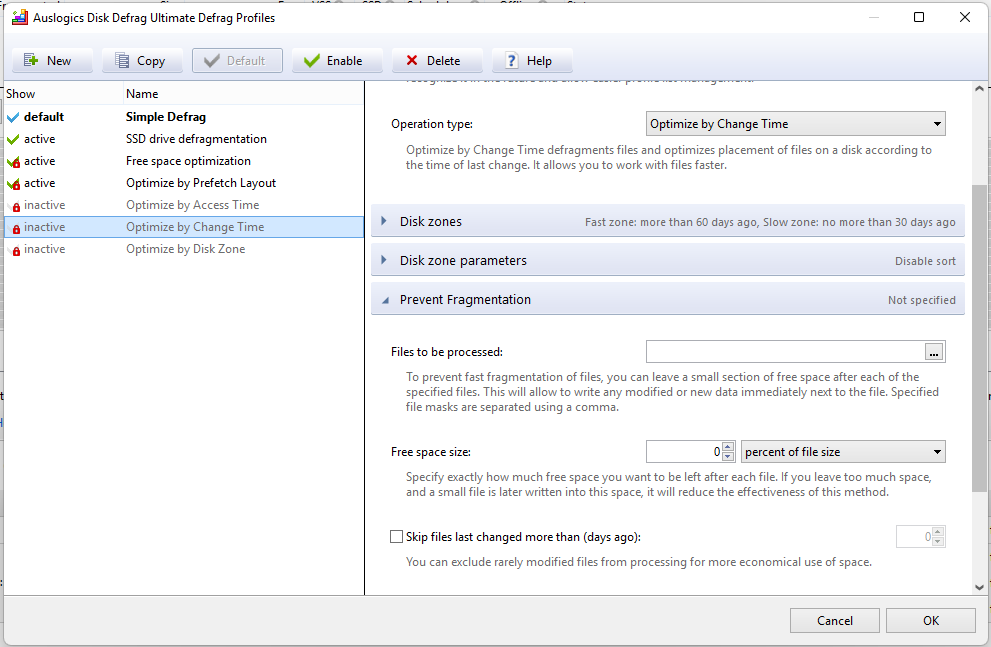
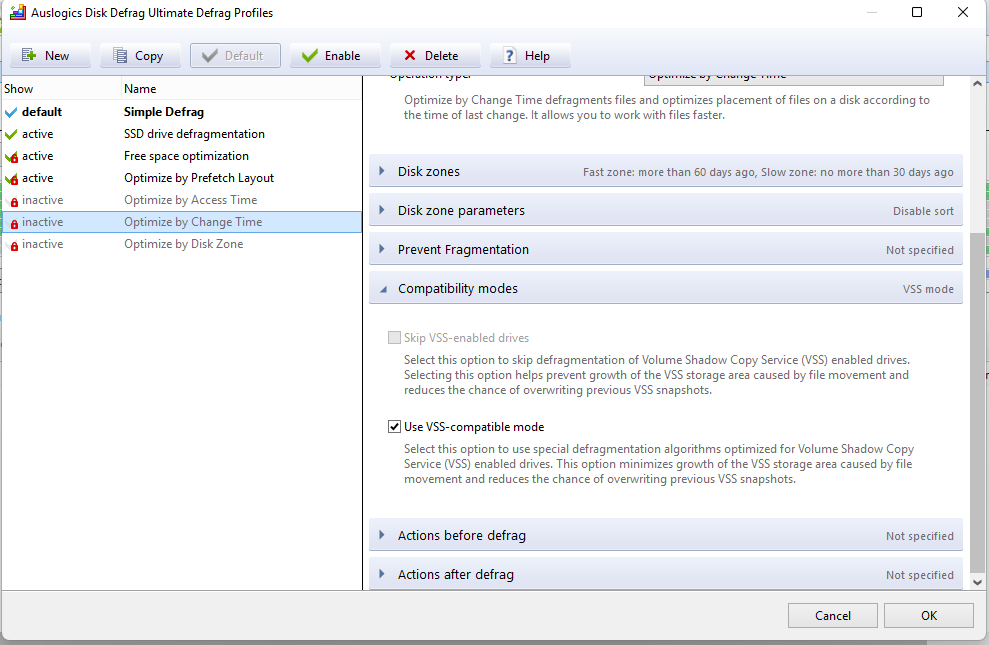
- Optimize by Change Time: Defrag files and optimize their placement on the disk based on the time of last modification. It places recently modified files in the slow zone of the disk to prevent quick fragmentation, while those that haven’t been changed lately are placed in the fast zone.
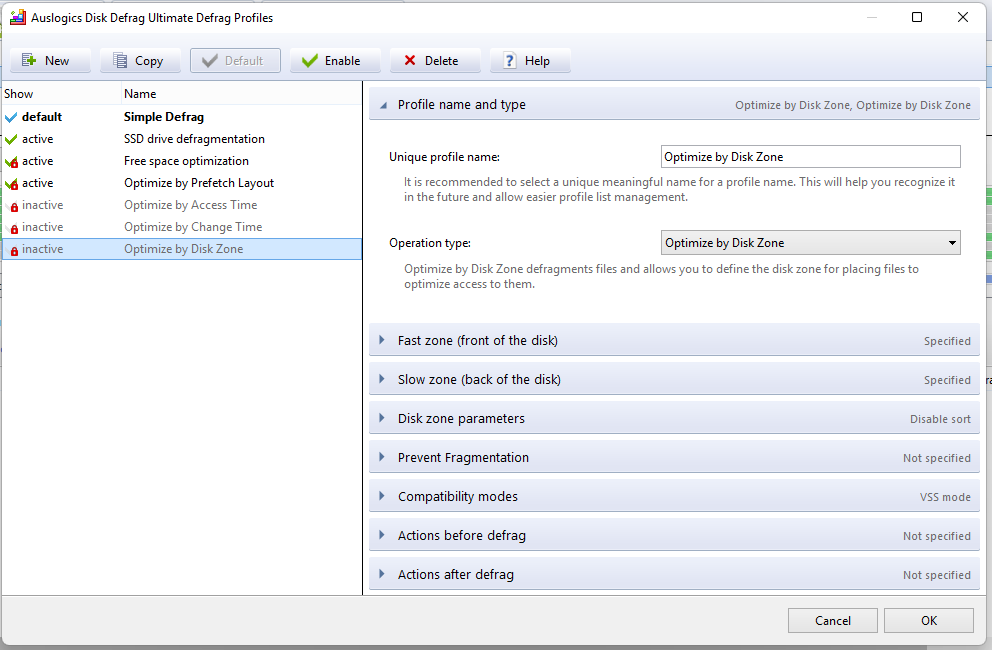
- Optimize by Disk Zone: Defrag files and specify those that will be placed in the fast or slow zone of the disk. Folders, system files, registry files, and frequently used files will be placed in the fast zone by default.
Also read: Ultimate Guide: Why and How to Defrag Windows Registry
- Optimize by Prefetch Layout: Achieve faster system and application startup by optimizing file placement based on data received from the prefetch module.
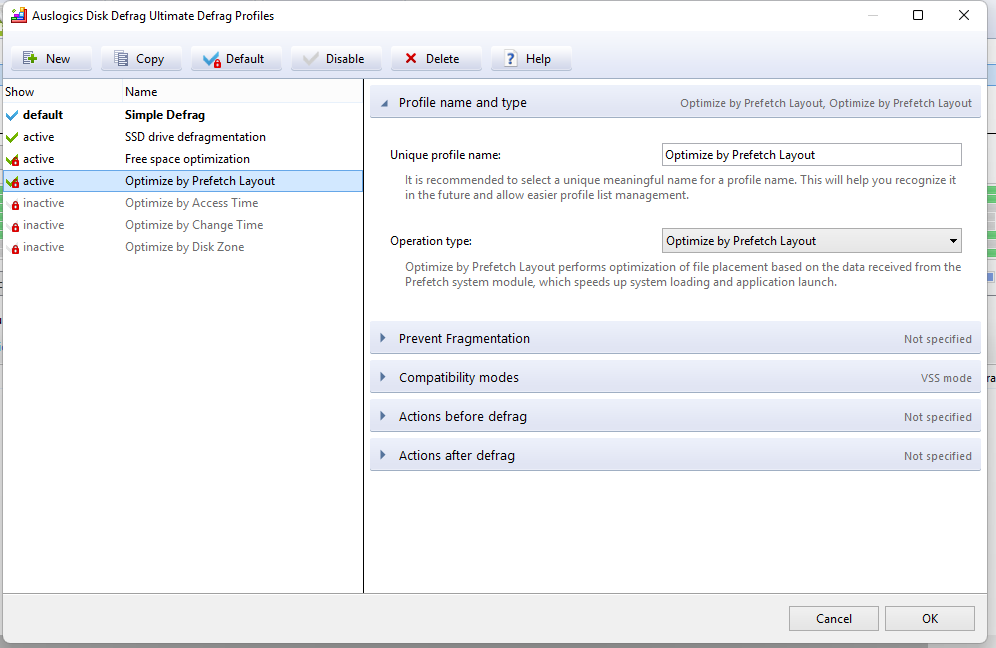
Windows stores information about frequently opened programs and your system’s boot behavior in files called prefetch files. It refers to these files the next time you turn on your computer to load those applications faster.
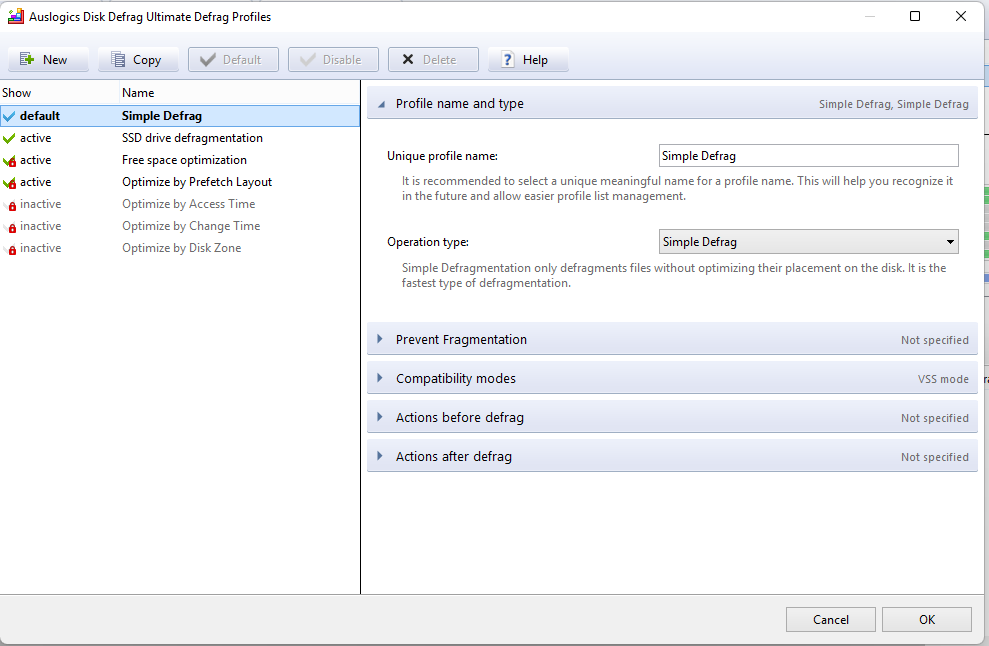
- Simple Defrag: Defrag files, paying no mind to their placement on the disk.
- Free space optimization: Defrag your files and neatly arrange the available free space on the drive into a single contiguous block.

- SSD drive defragmentation: Offers a safe way to defrag specified files on SSD drives.

Not interested in defragmenting the entire drive? No worries. Analyzing selected drives provides you with a list of fragmented files and folders so that you can select them for defrag.


Disk Defrag Ultimate employs special defragmentation algorithms for VSS-enabled drives.
The Volume Shadow Copy Service (VSS) manages the creation of system snapshots for data backup and restore.
The VSS compatibility mode, therefore, helps ensure that system snapshots do not grow excessively.

If you use your PC for high-demand processes such as gaming, graphics designing, video editing, software downloads, and updates, then it stands to reason that you should defragment on a regular basis.
Auslogics Disk Defrag Ultimate provides convenient scheduling options, namely:
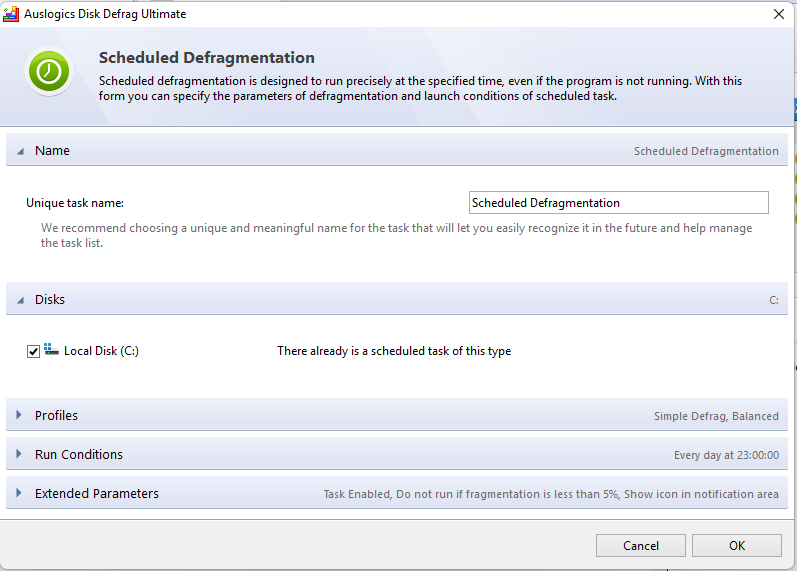
- Scheduled Defragmentation: Set a specific time when the app will launch automatically to defragment your drives.
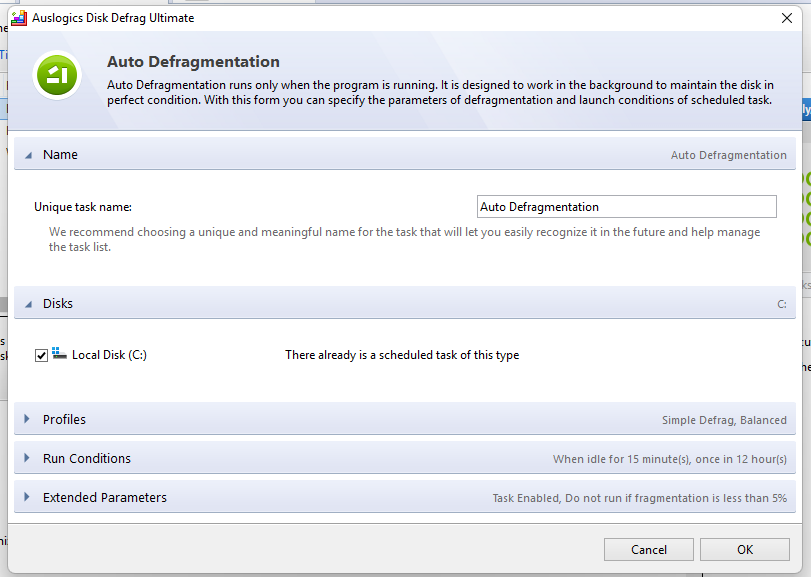
- Auto Defragmentation: With Auto Defragmentation enabled, the app is left active in the background to monitor your PC, starting a defrag when certain preset conditions are met.
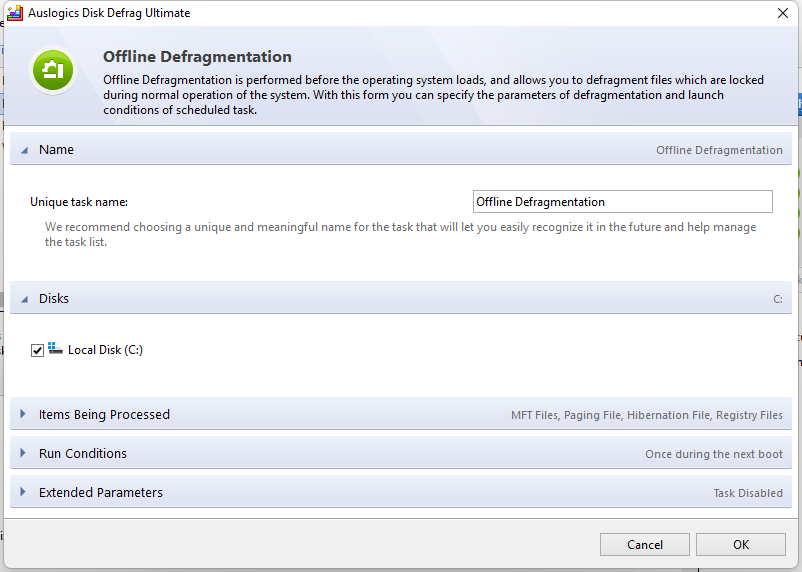
- Offline Defragmentation: Starts defragging during PC startup, making it possible to defragment system files that are typically inaccessible after the system is done booting, such as the MFT, paging files, hibernation files, and registry files. Defragmenting these files helps achieve faster system performance.
Not sure how often you should defrag? Let the Scheduling Wizard help you out. All you have to do is provide it with the details of your computer usage and let it schedule a scan according to your unique situation.

One of the reasons why fragmentation happens is because files are written close together without leaving any free space. But with Auslogics Disk Defrag Ultimate, you can actively prevent fragmentation by specifying the exact amount of free space that should be left after a particular file is written. This is especially helpful for files that you know will keep growing in size due to continued modification.

Keep track of completed defrag sessions—detailed performance reports give you a complete overview of the defrag process and achieved results. You can save the report to a document or even print it out.

Integrating with File Explorer via the app settings enables you to defrag files and folders on the go. You can quickly launch defrag from within the File Explorer window.

How to Use Auslogics Disk Defrag Ultimate to Defragment Your Hard Drive
Let’s now get down to the good stuff and see how to actually use the tool. That’s what we came for after all.
STEP 1: Downloading, installing, and setting up
- Visit the official Auslogics website and download Disk Defrag Ultimate.
- Double-click on the downloaded file to launch the installer.
- Choose your language and tap Click to install.
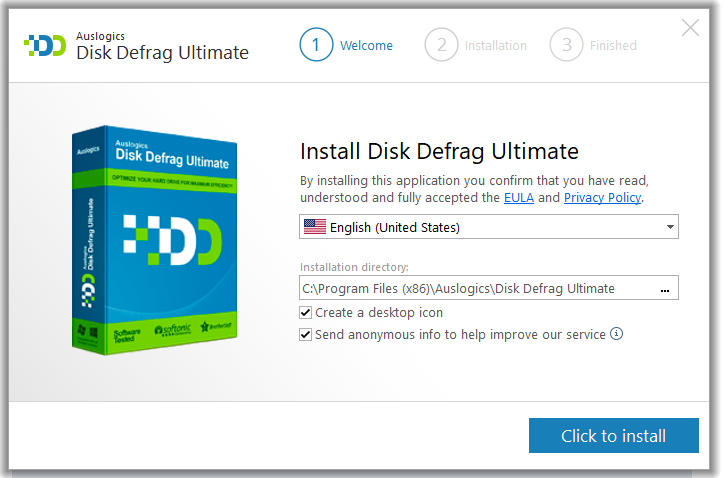
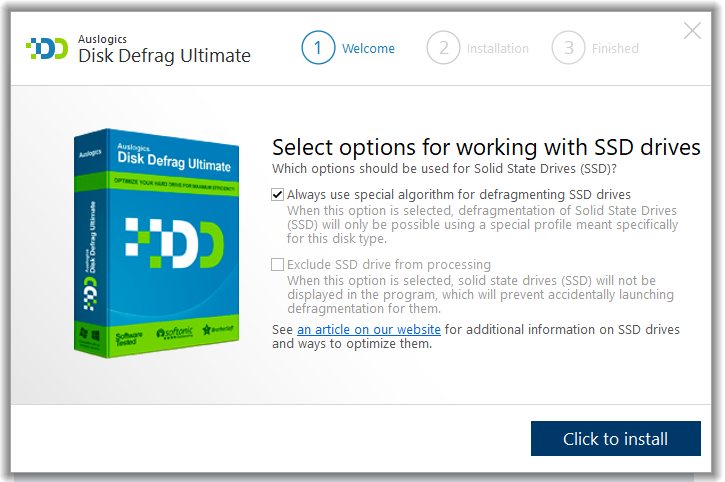
- On the Welcome page, you can choose to exclude SSDs from being read by the program to avoid defragging. Or you can choose to allow SSDs to be defragged using a very particular defrag profile designed specially for SSDs.
- Next, tap the Click to install button. The app will launch automatically after the installation is complete.
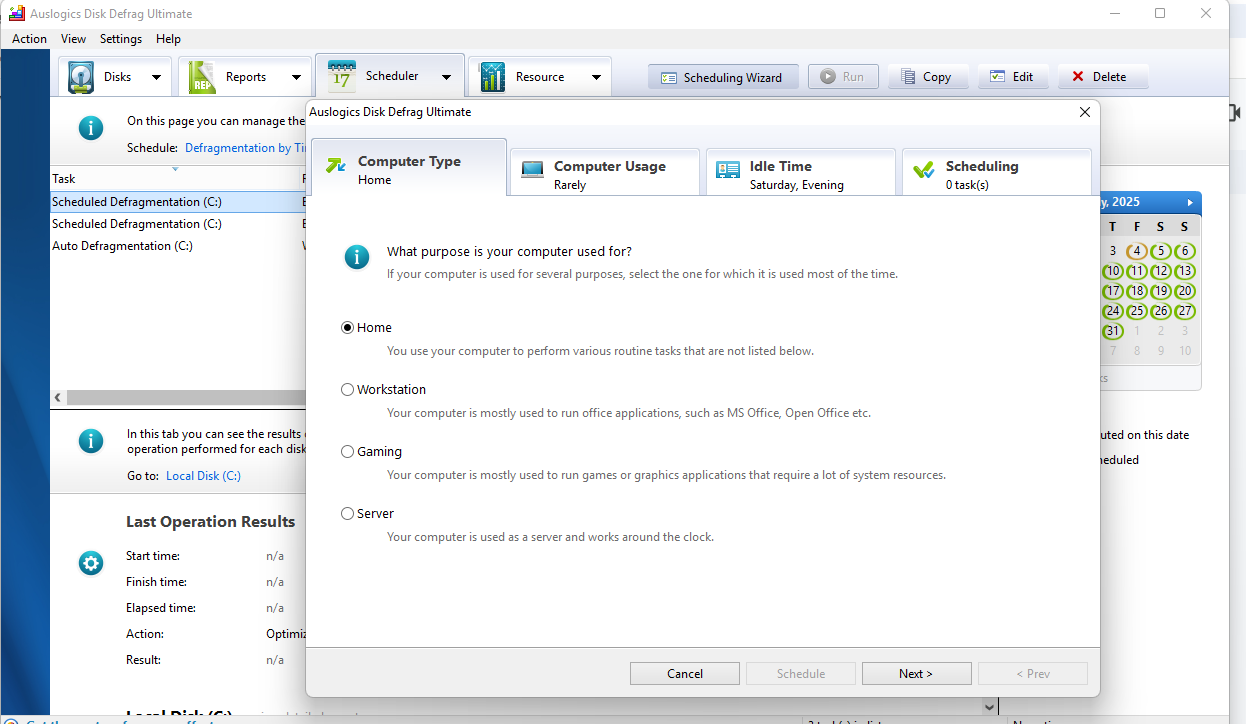
- You will now be presented with the Scheduling Wizard window, where you can indicate your PC type, the frequency of use, and the idle time.
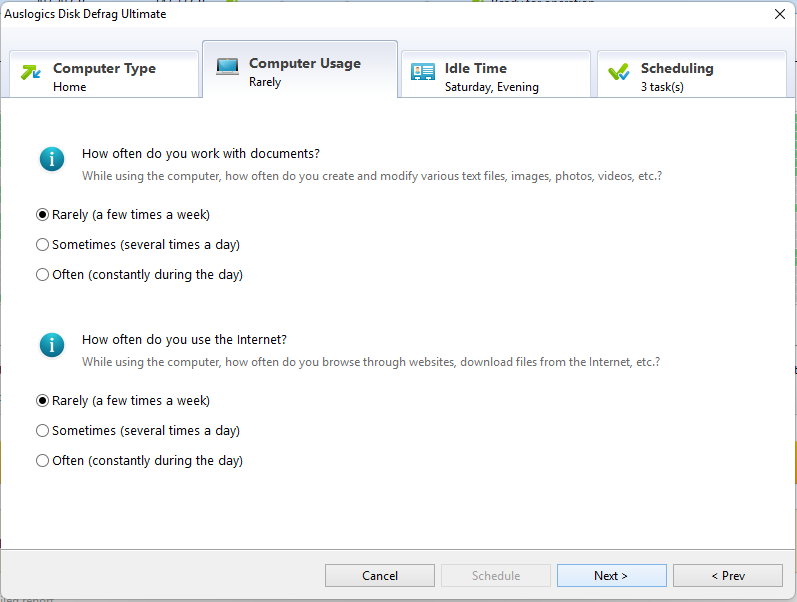
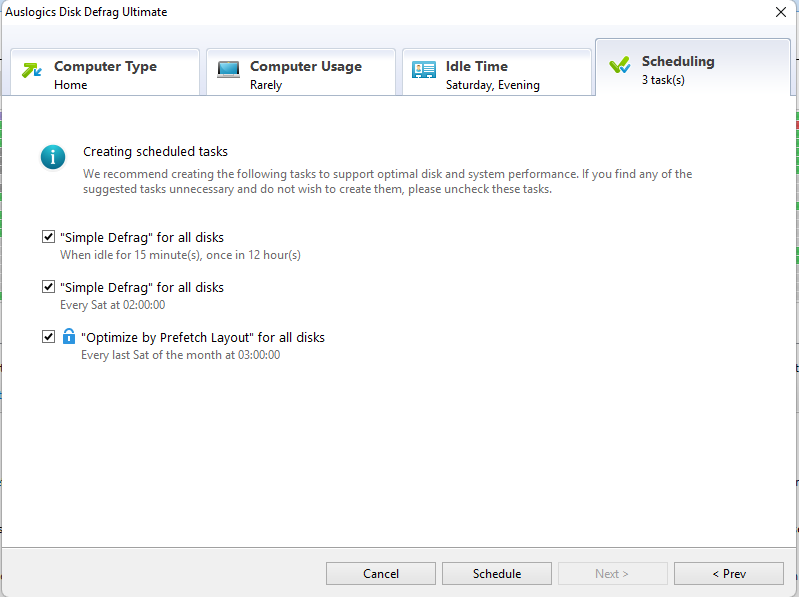
Afterward, the tool will recommend scheduling options based on the information you provided. If you are satisfied with the recommendations, click the Schedule button. Or click Cancel if you are not interested in scheduling just yet.

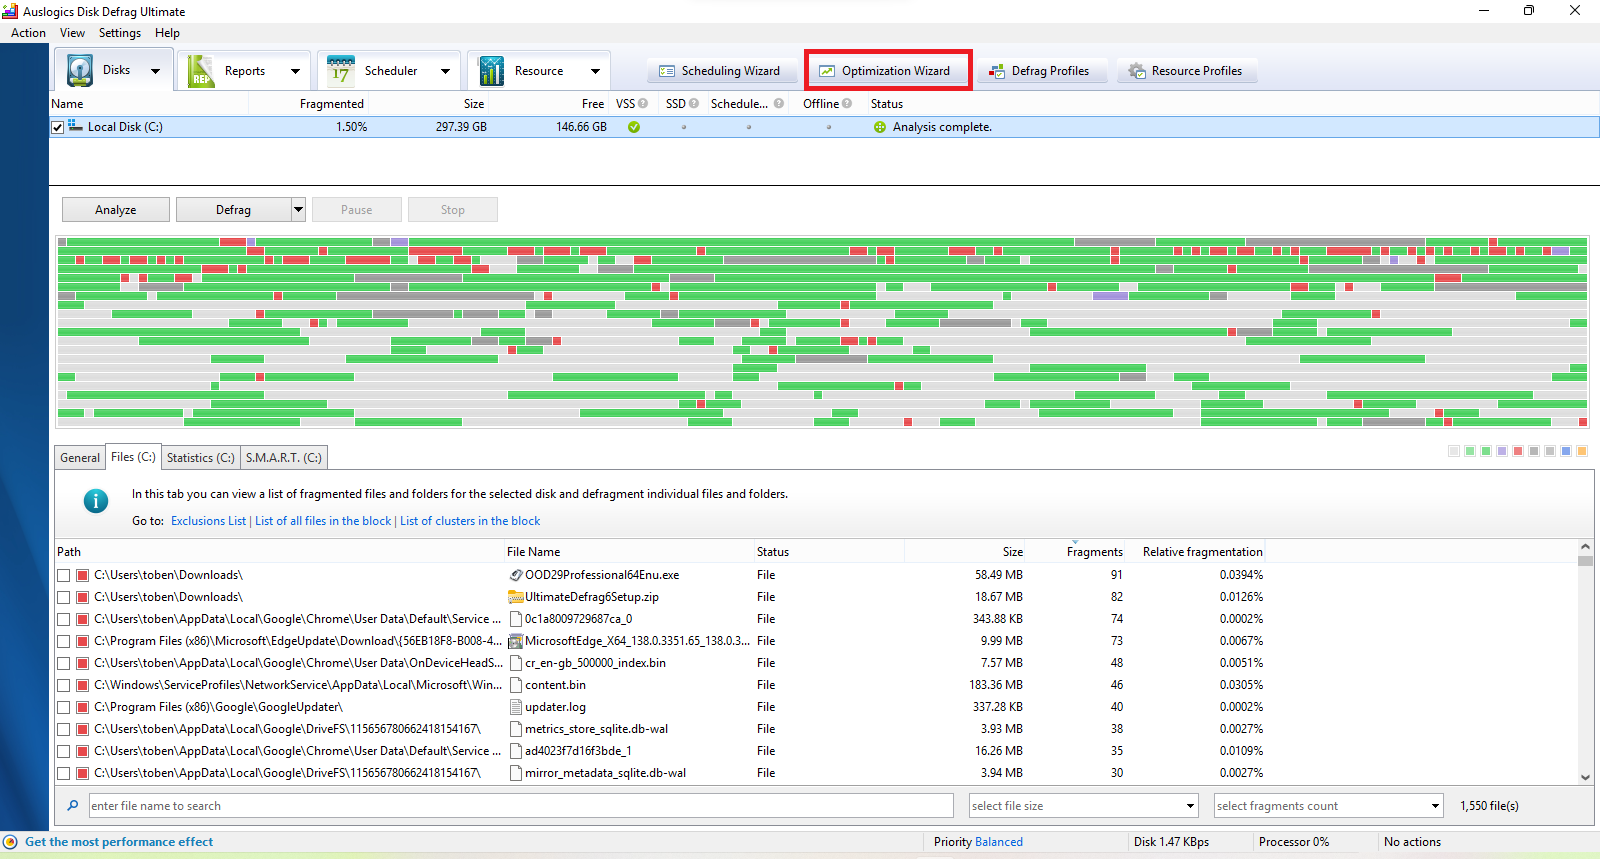
STEP 2: Analyzing selected drives—checking drive health and adding files, folders, and drives to an exclusion list
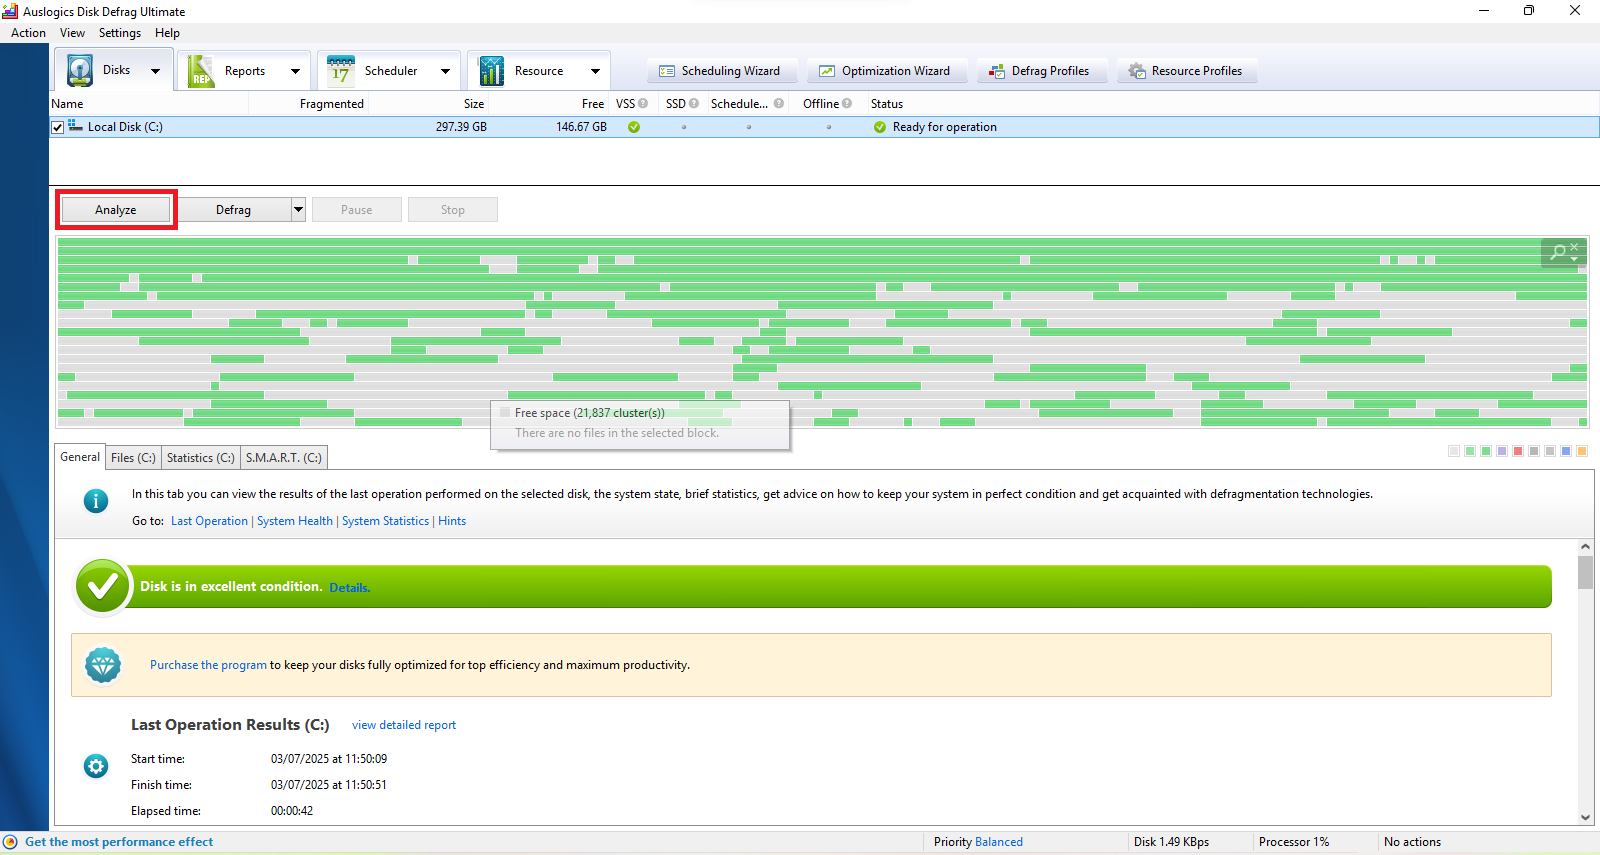
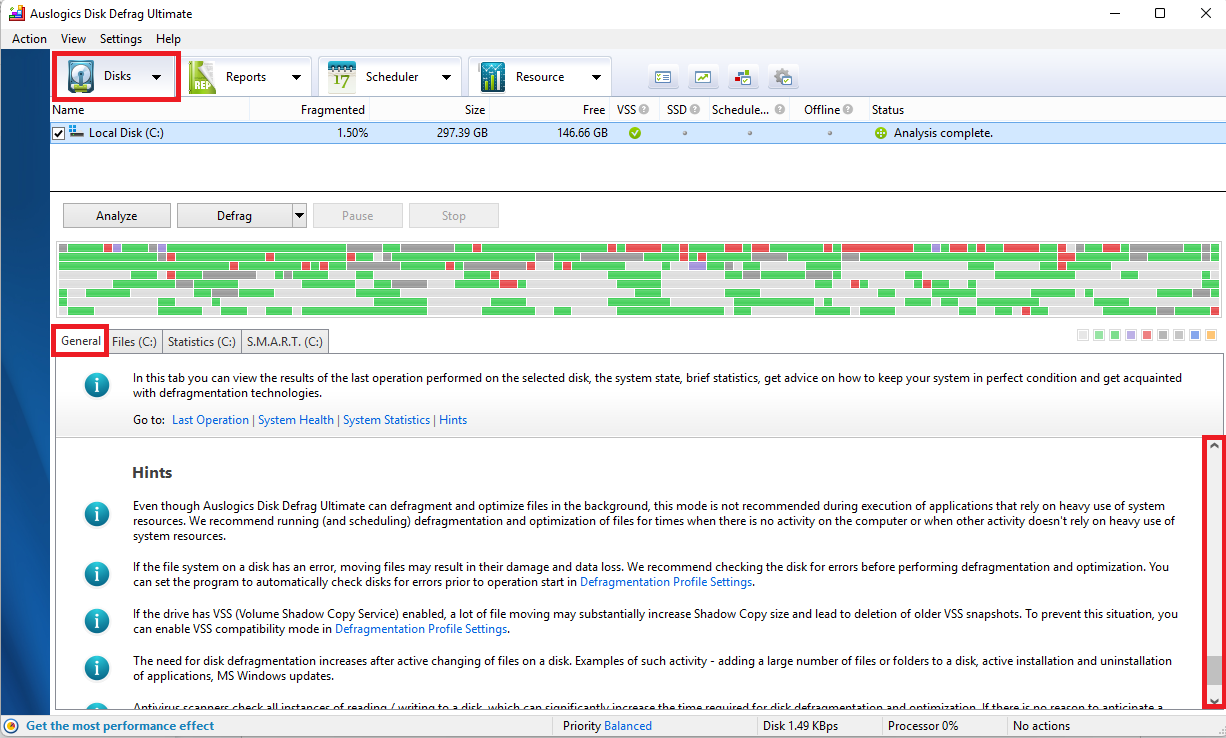
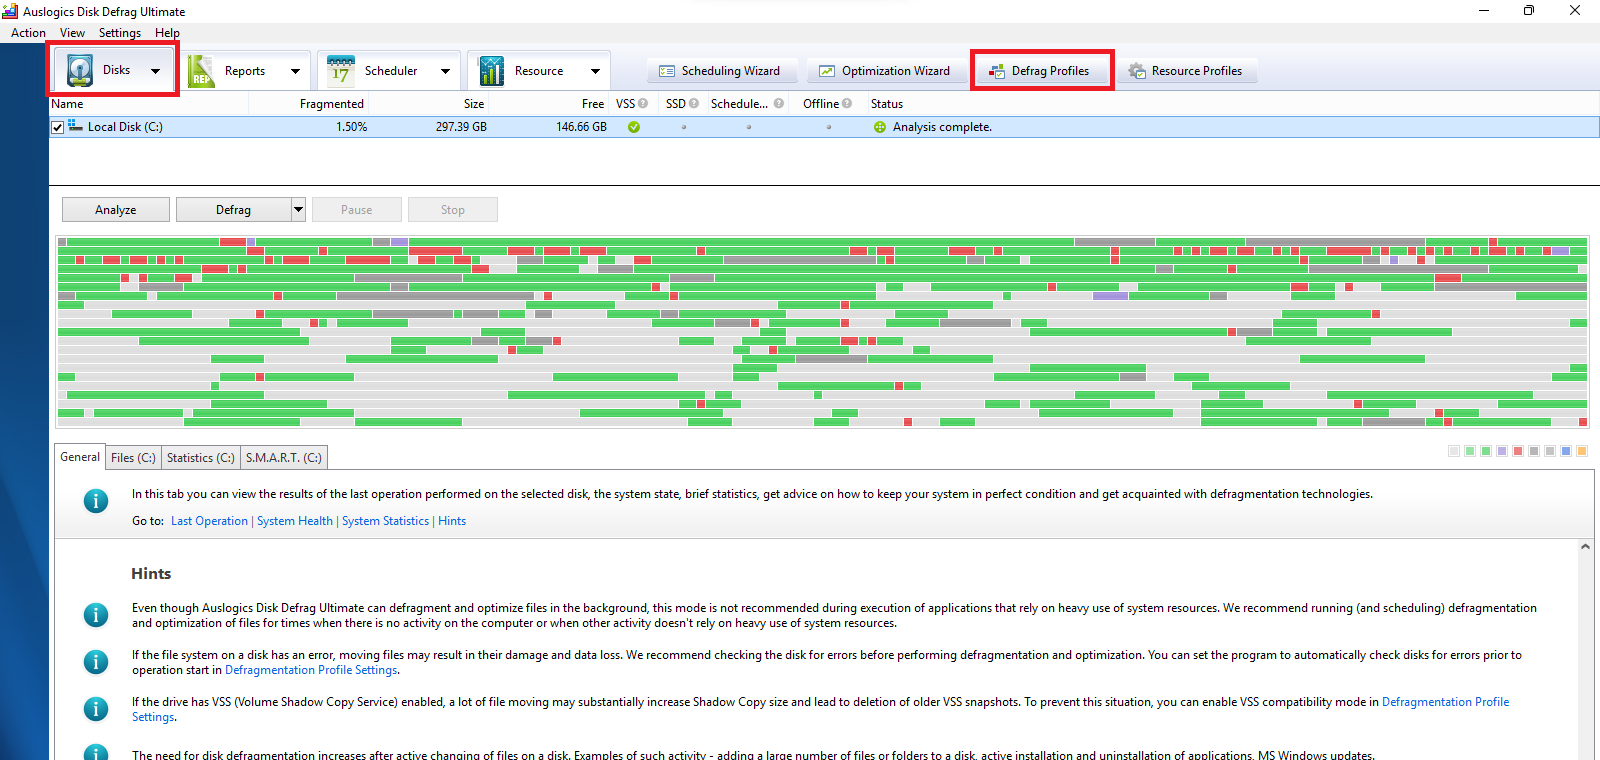
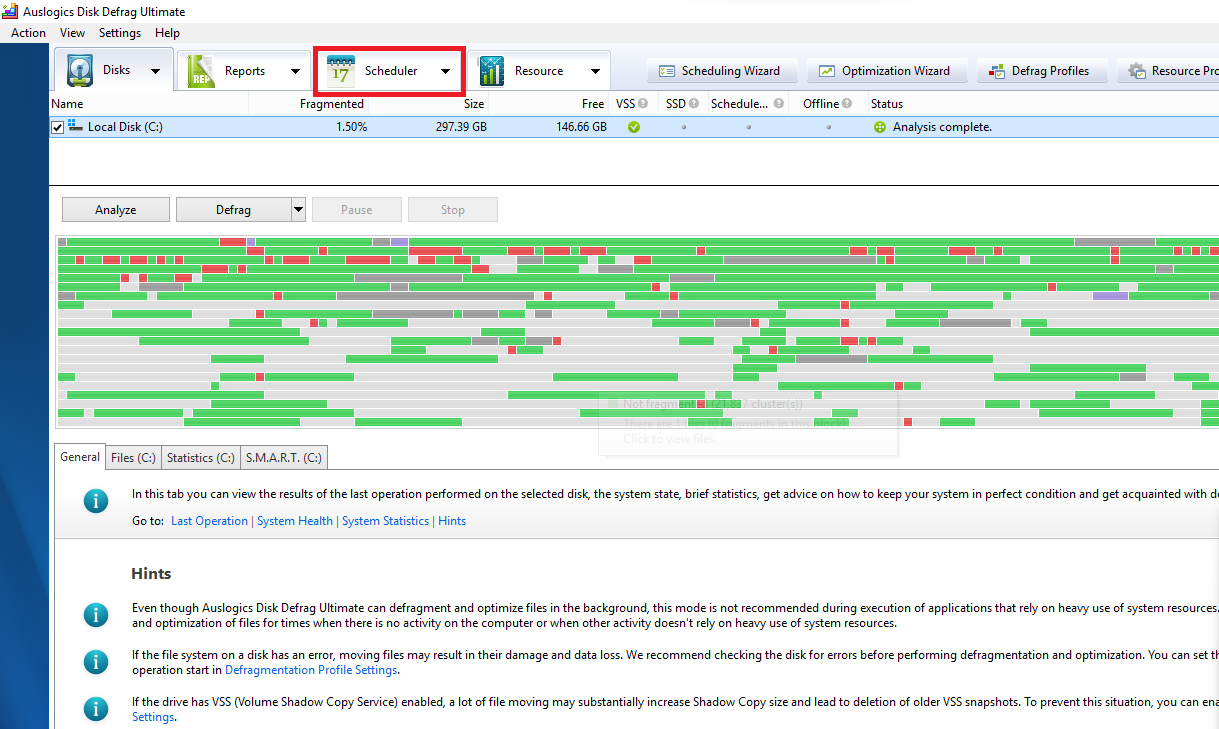
- The home page of the app begins with the Disks tab. All detected drives are listed here along with their attributes. And you can deselect any drive you don’t want to include for optimization and defragging.
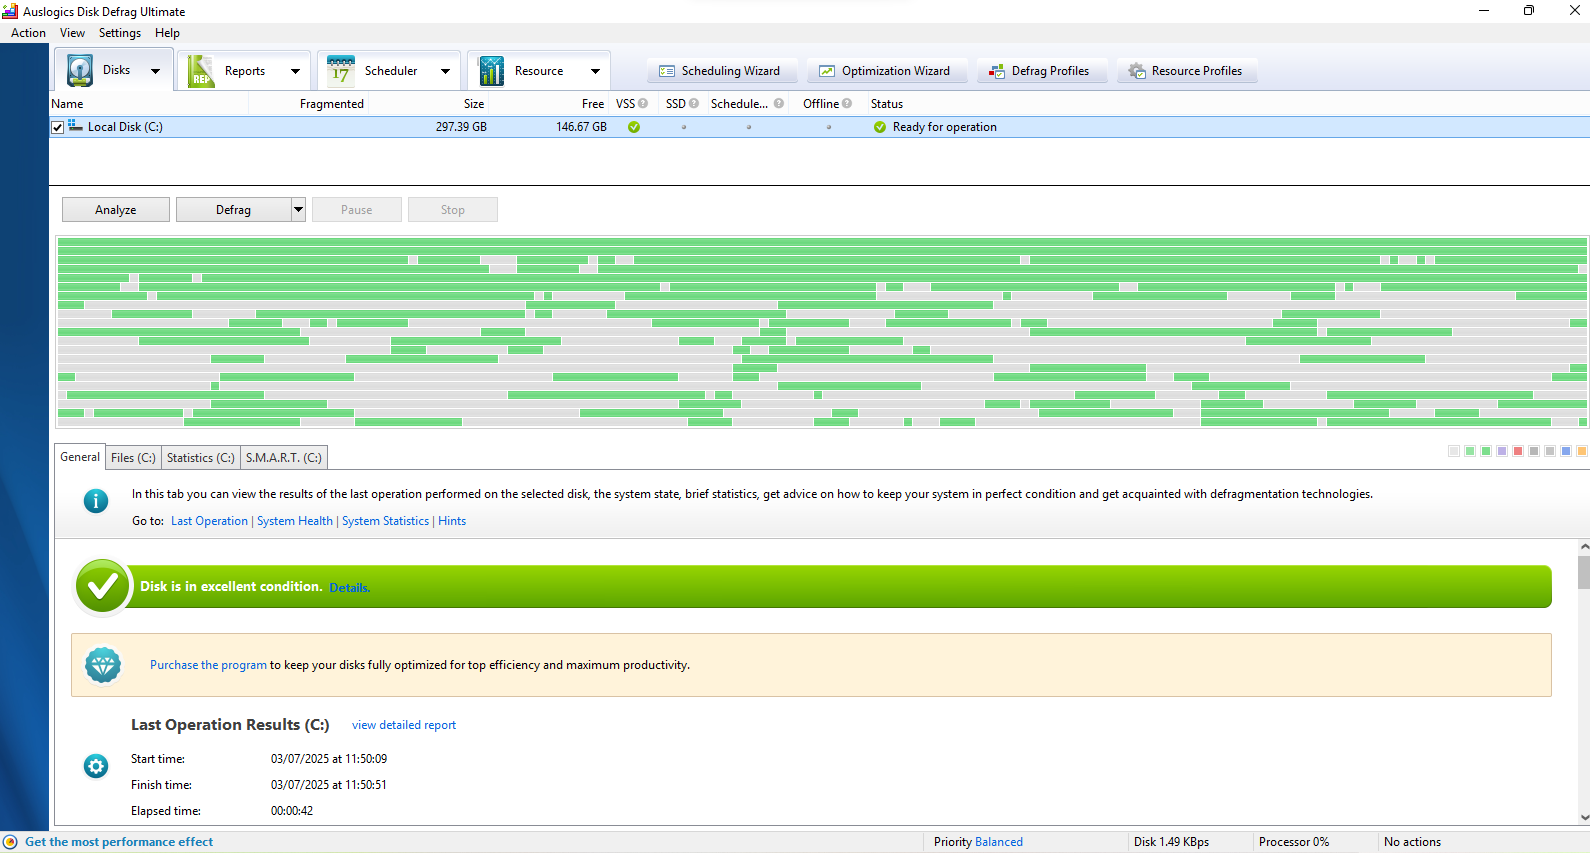
- Before starting optimization and defrag, you may first want to find out the condition of your selected drives. In that case, click the Analyze button.
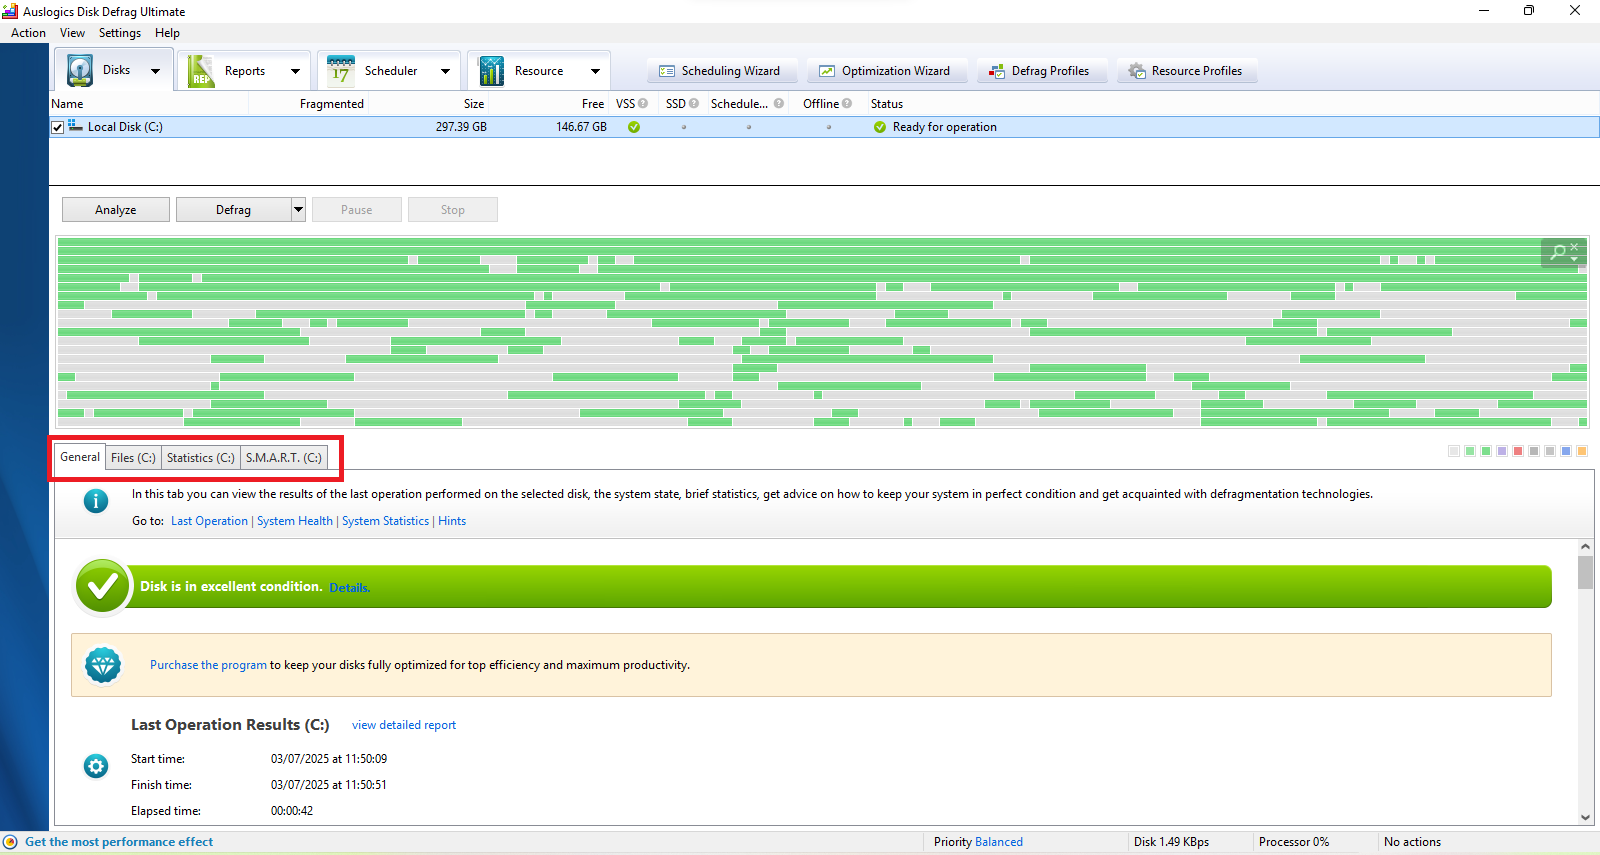
- After the analysis is complete, view the detailed results in the General, Files, Statistics, and S.M.A.R.T. tabs.
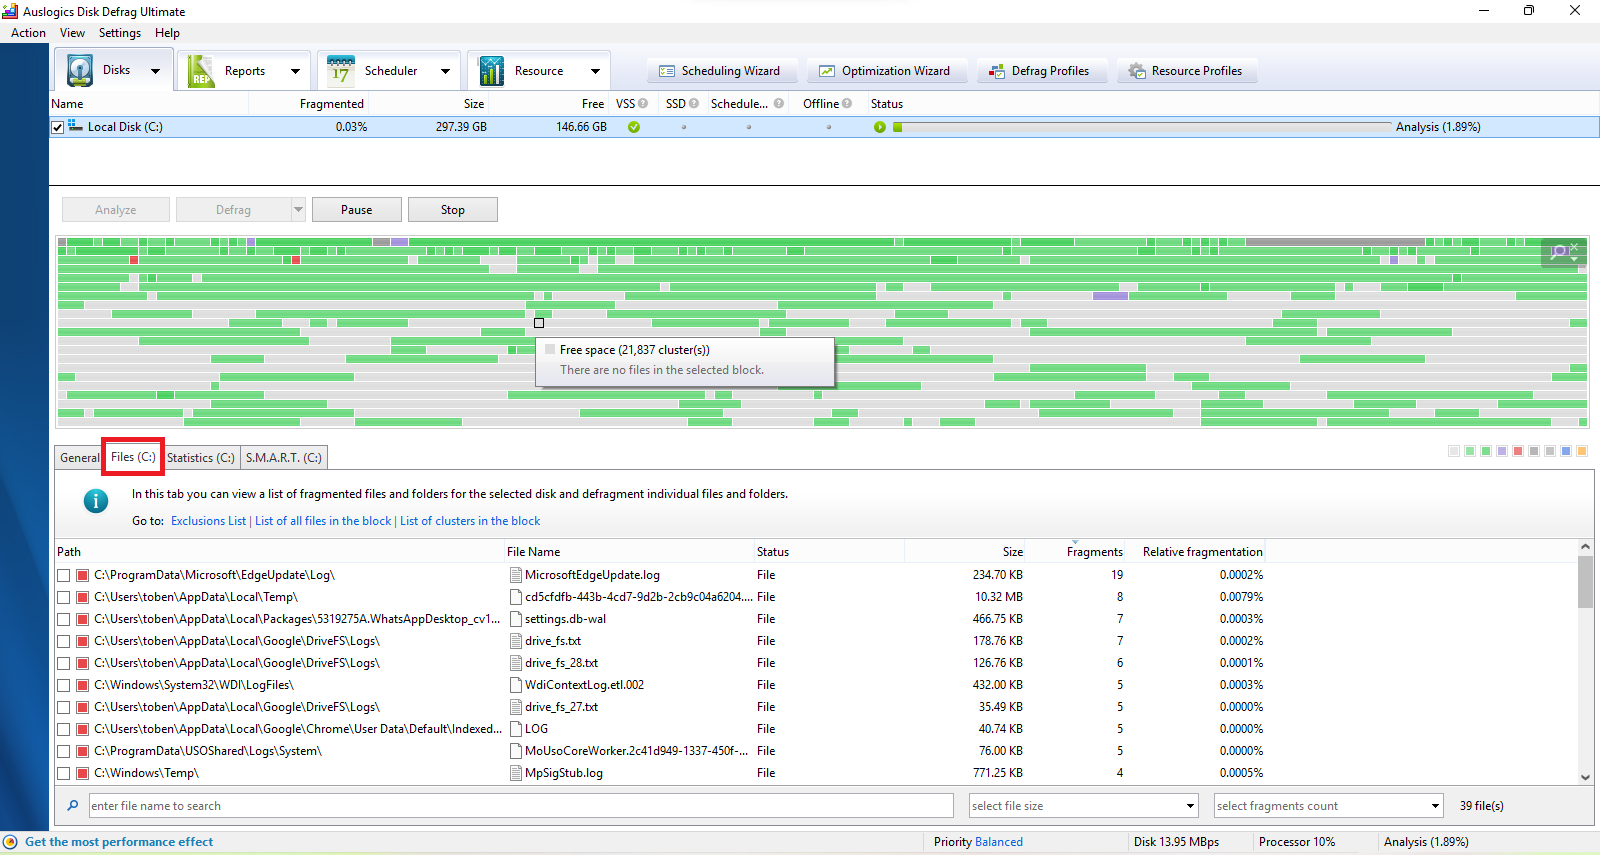
- Switching to the Files tab shows a complete list of all fragmented files and folders present on your drive.
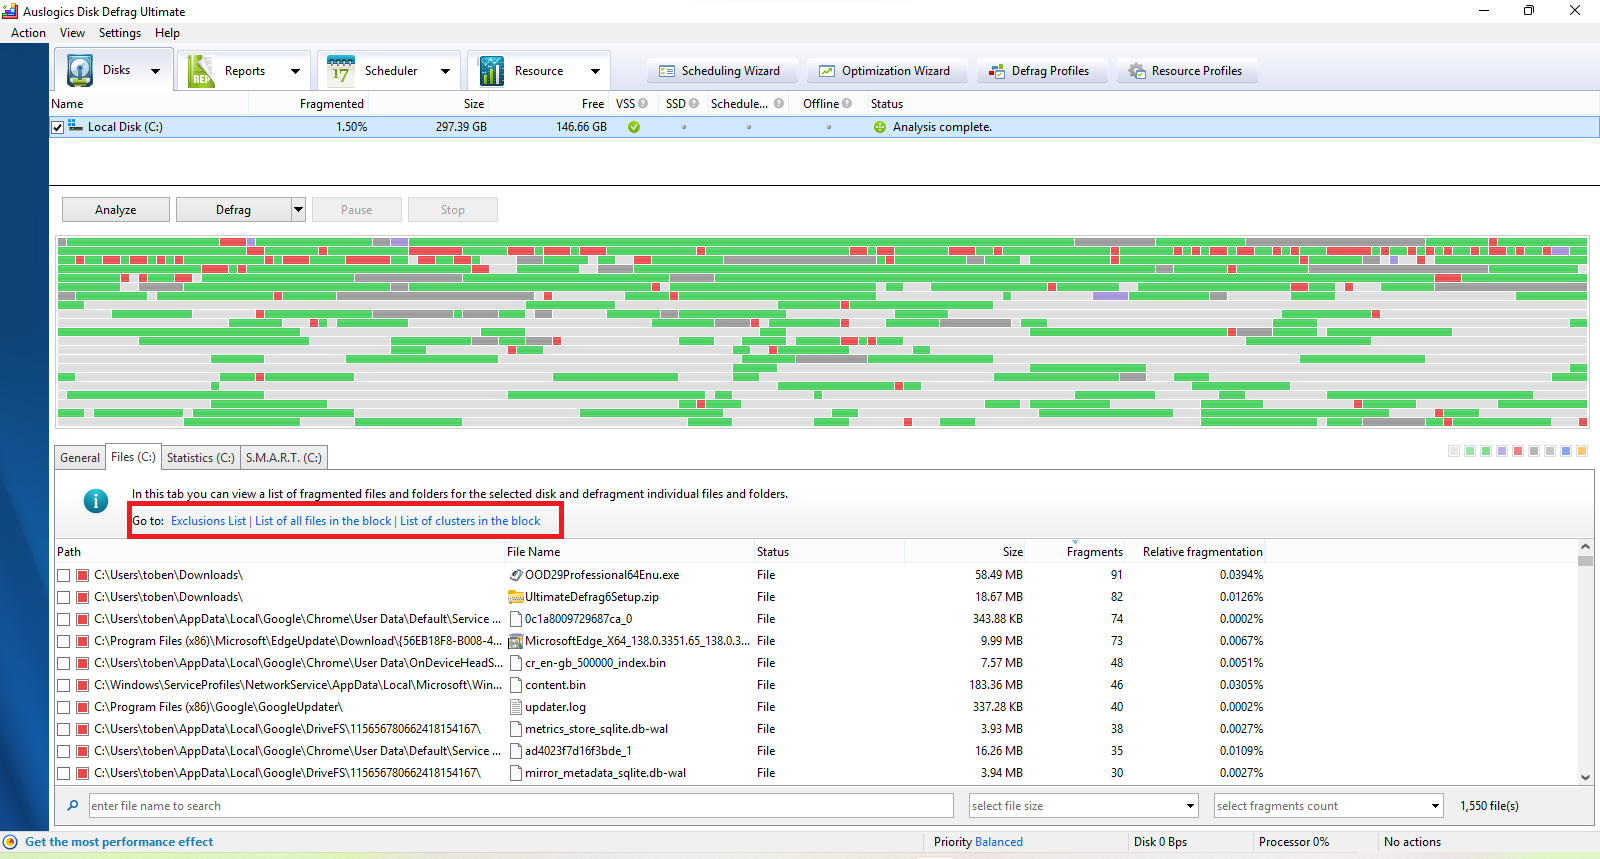
- Click on the Exclusion List link to open a dialog box where you’ll find various tabs that provide options for adding files, folders, and drives to the exclusion list so that they will not be available for defragmentation.
STEP 3: Optimizing your drive
- Next up, head to Optimization Wizard to get started with drive optimization.
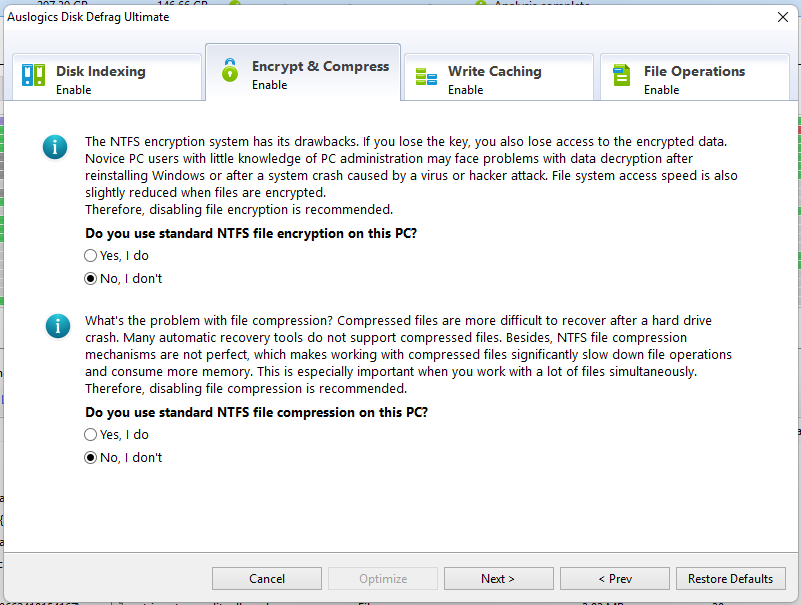
- You can choose to disable Windows Search to stop search indexing and reduce file-processing operations on your PC.
- You can choose to disable NTFS file encryption and compression to improve file system access speed and reduce memory usage.
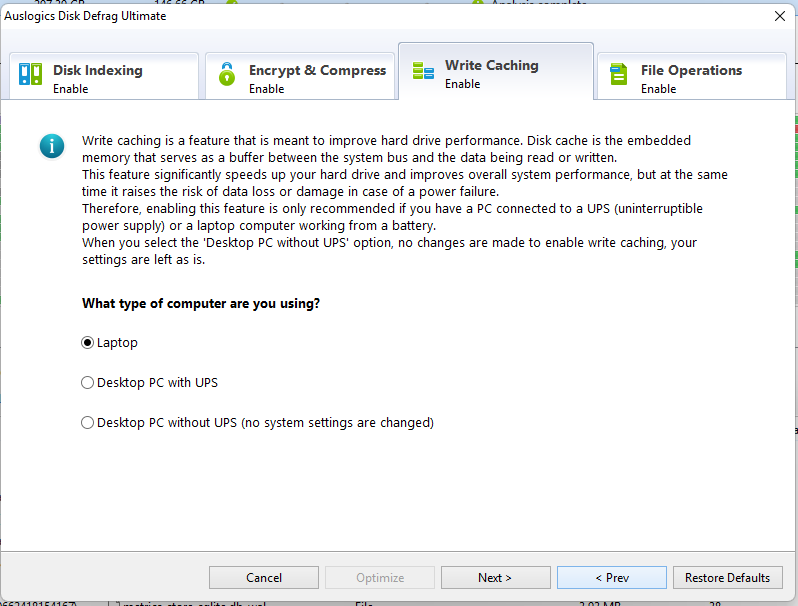
- Indicate your computer type to enable write caching.
- Allow file system fine-tuning to speed up access to files and folders and improve PC performance.
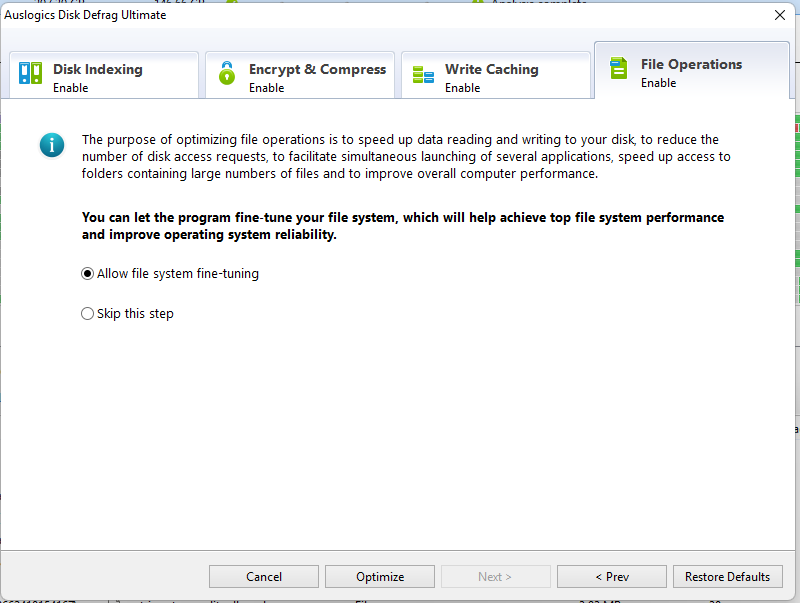
- Now, click the Optimize button. The selected changes will take effect the next time you restart your PC.
- Come back and click the Restore Defaults button if you ever wish to revert the settings.
STEP 4: Activating automation options
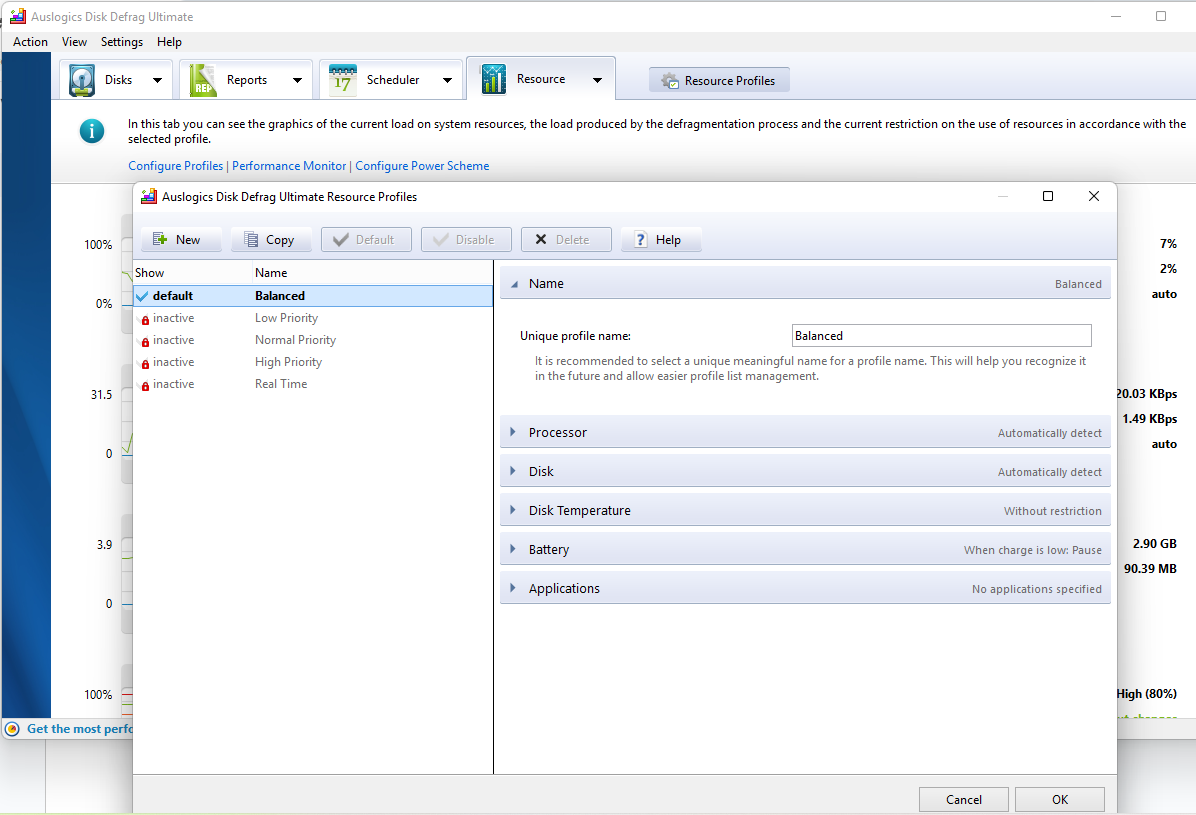
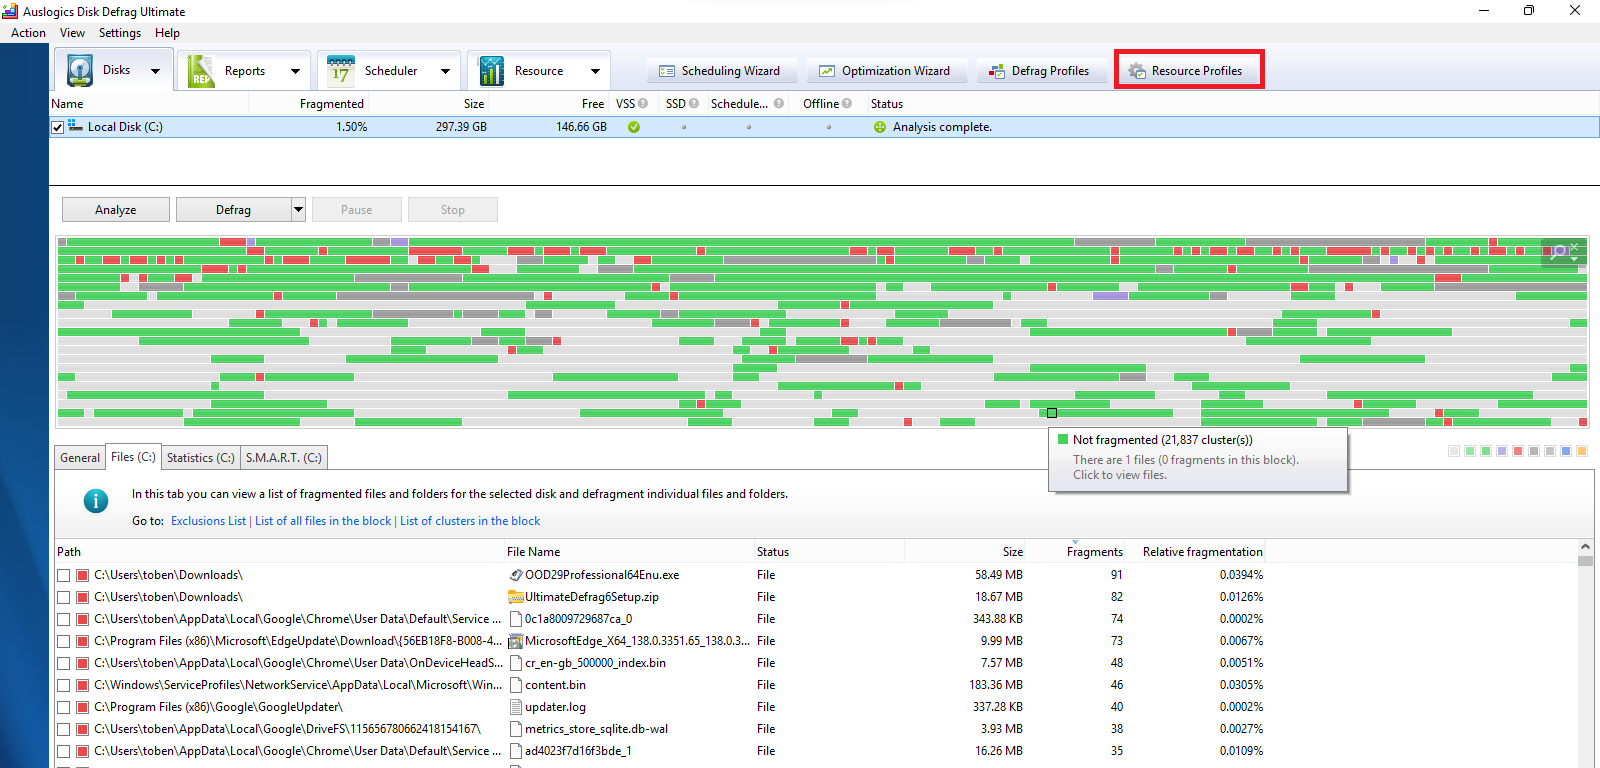
- Go to Resource Profiles on the home page and select from the four available profiles for optimizing system resource usage during defragmentation sessions.
- On the left pane, enable the five profiles for resource management during disk defrag. And then set one of them as default.
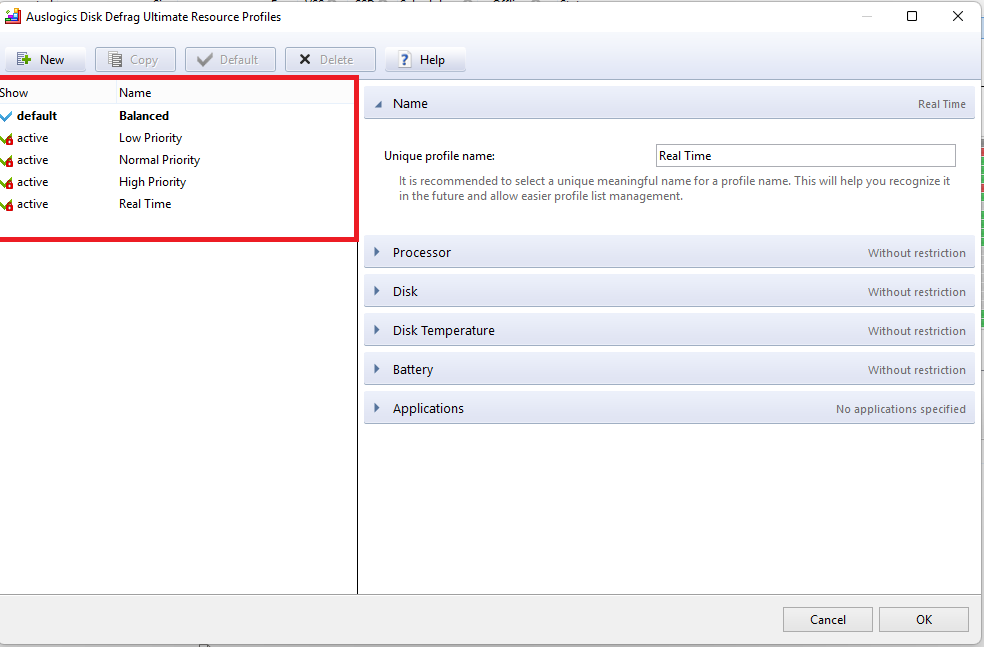
- On the right-hand side, expand and customize the Processor, Disk, Disk Temperature, Battery, and Applications options.
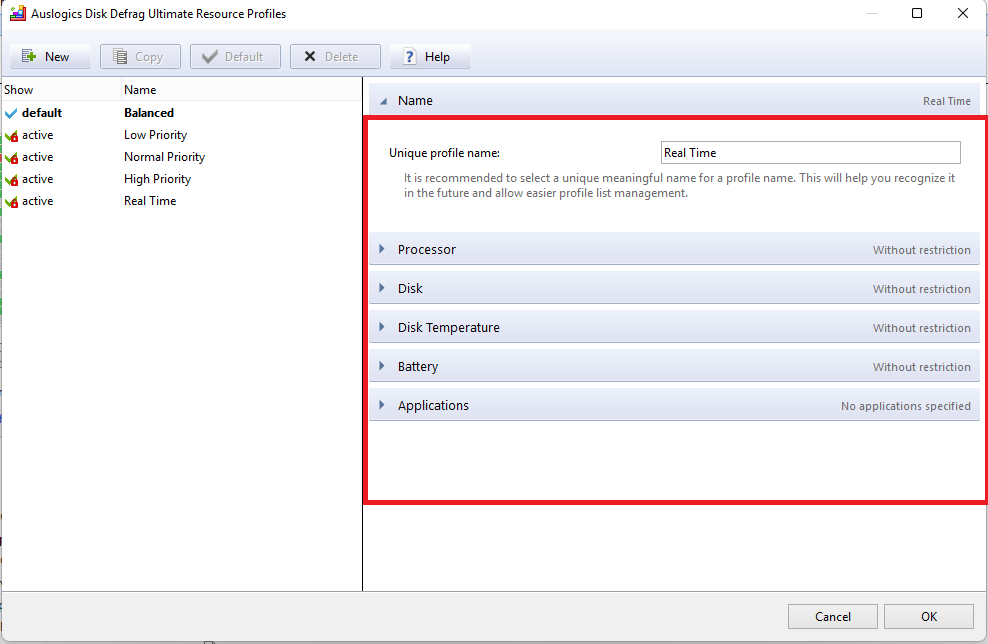
- Click OK when done.
STEP 5: Starting your first defrag
- Before you start your first defrag, drag the scroller on the General tab to the very end to find useful hints on how to make the best use of the app.
- Next, proceed to the Defrag Profiles menu to select a suitable defragmentation profile for your selected drives.
- Enable the available profiles on the left pane and set one as default.
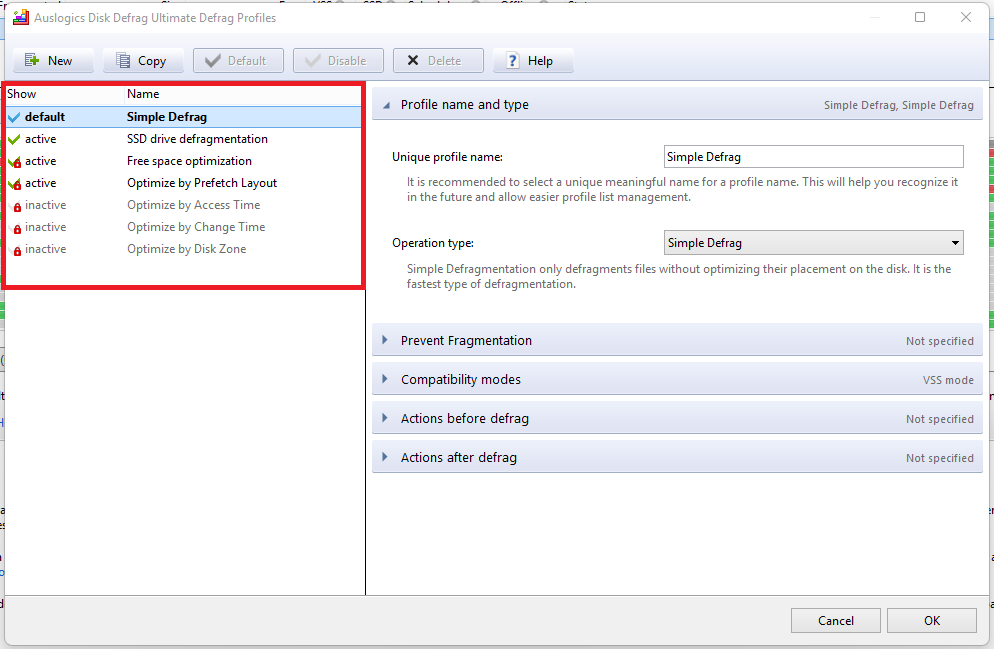
- Expand the options on the right-hand side to customize the parameters of your chosen profile. Click OK when done.
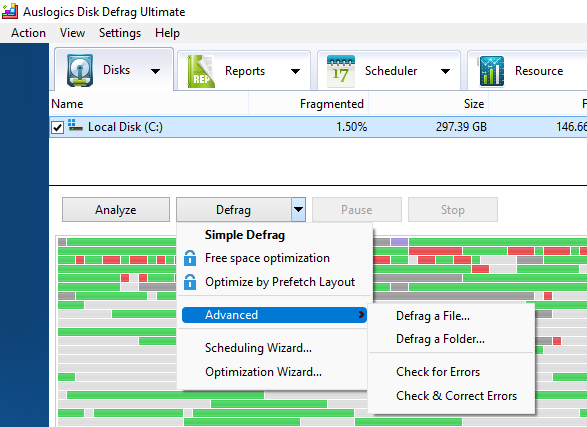
- Now, click the Defrag button to start the defragmentation process using your default profile. Or click the drop-down to get started with one of the other available options.
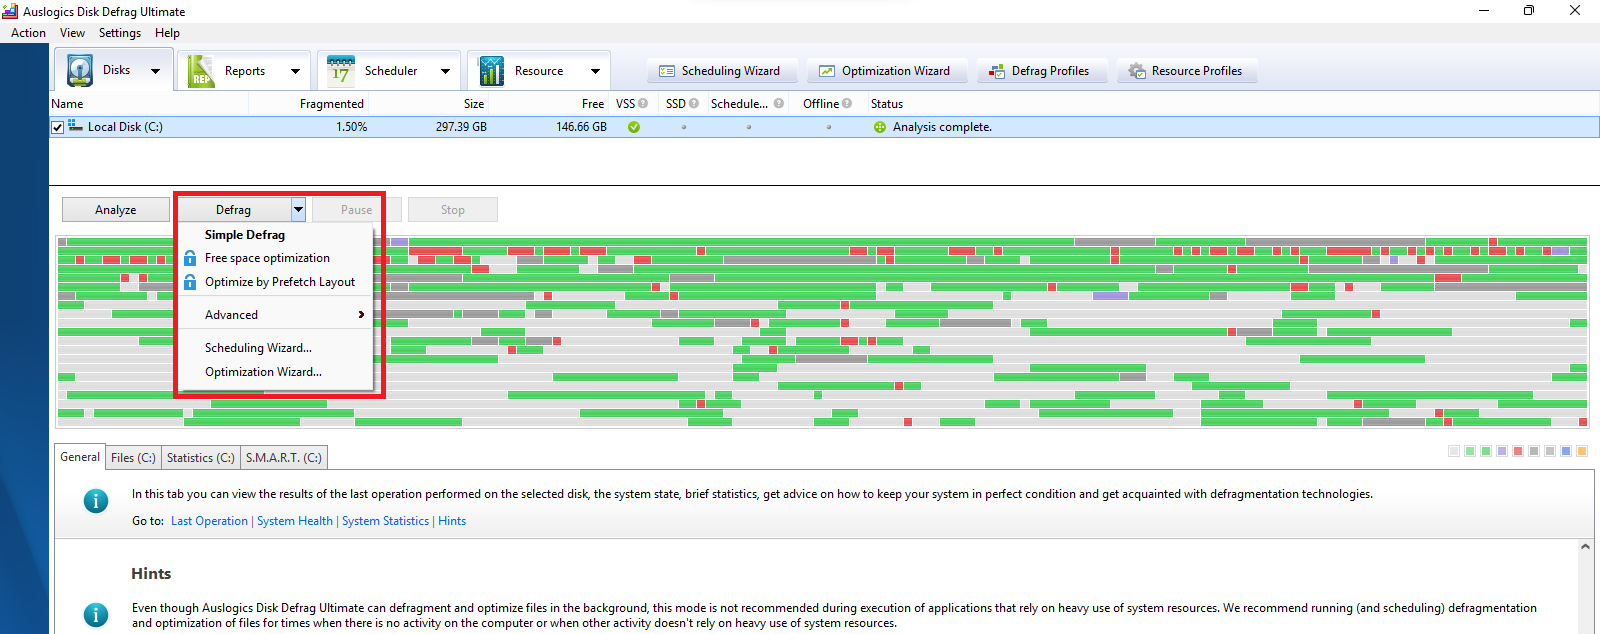
- Expanding the Advanced context menu shows options for defragging a file, defragging a folder, checking for disk errors, and checking for and correcting disk errors.
STEP 6: Scheduling scans
- Click Scheduling Wizard to let the tool recommend and activate the best scheduling options for you based on your computer type, usage pattern, and idle time.
- Review the recommended scheduling options and click the Schedule button to schedule defragmentation.
- For a more hands-on approach, go to the Scheduler menu on the homepage of the app, where you can select and set up one of three available scheduling options and manage your active defrag schedules.
- Active tasks are listed here along with all their details. And you can edit or delete a defrag schedule by right-clicking on them.
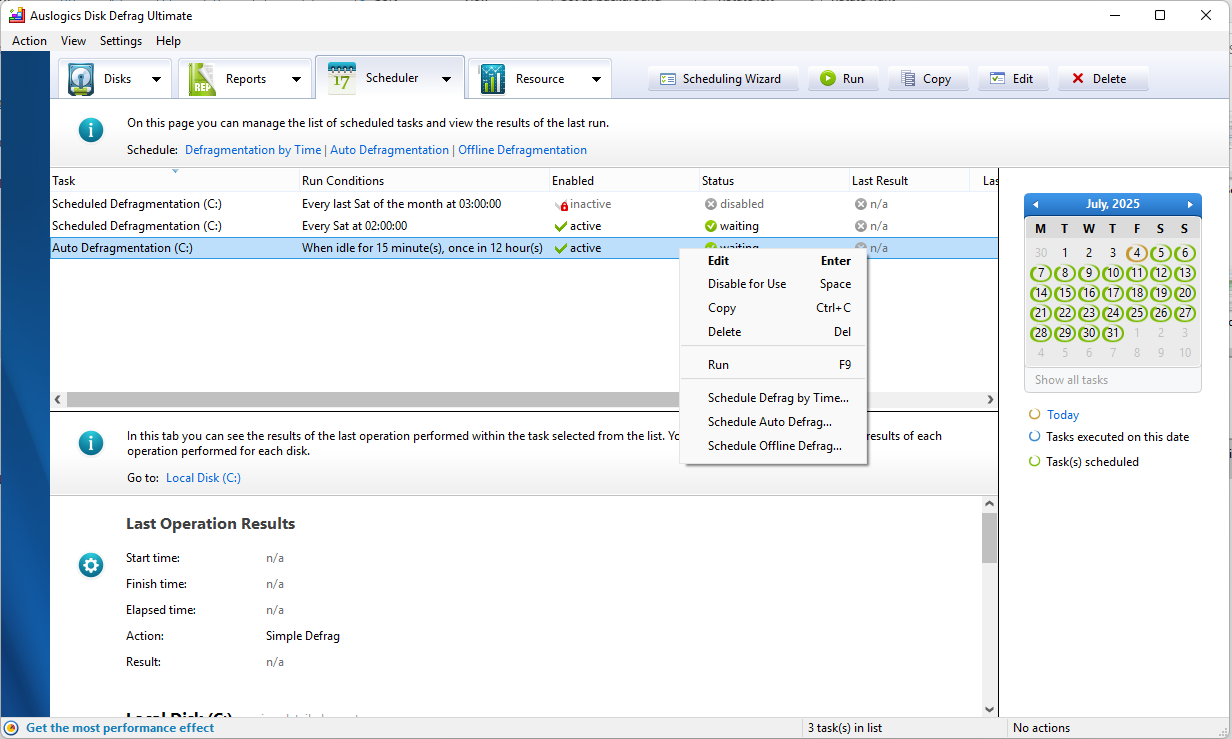
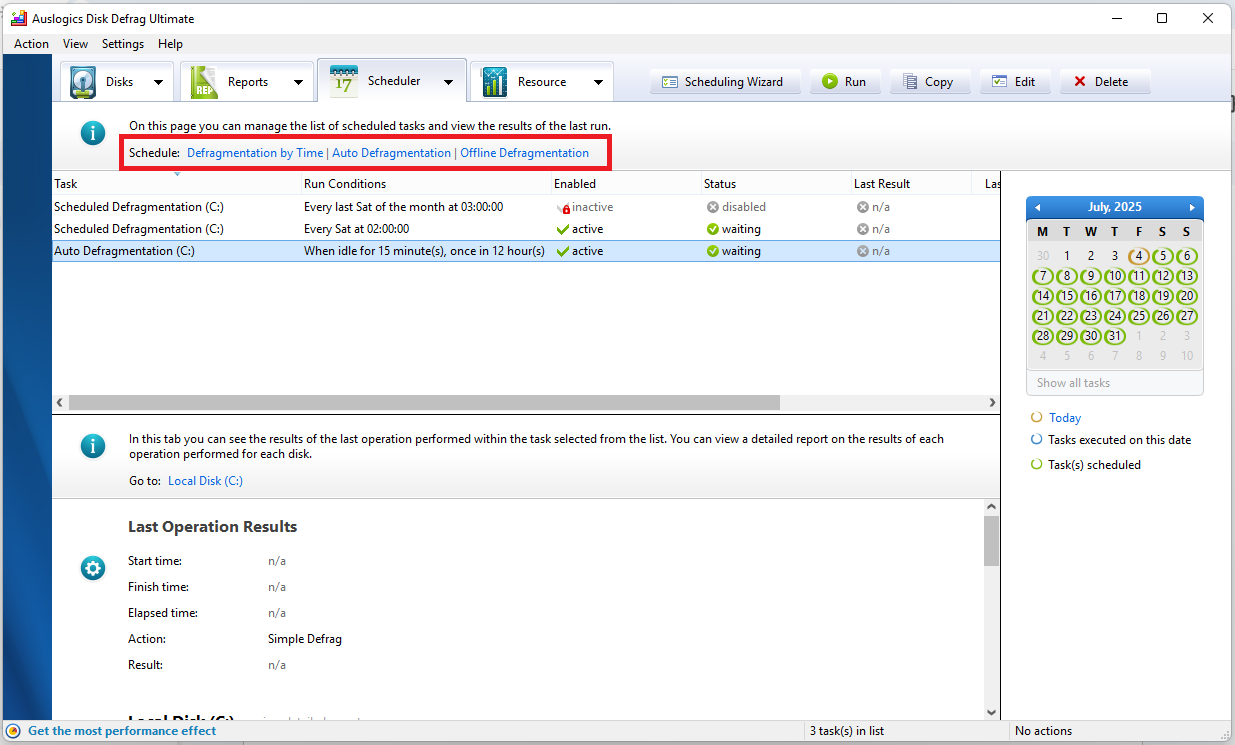
- Click the associated link to customize one of the three available scheduling options: Defragmentation by Time, Auto Defragmentation, and Offline Defragmentation.
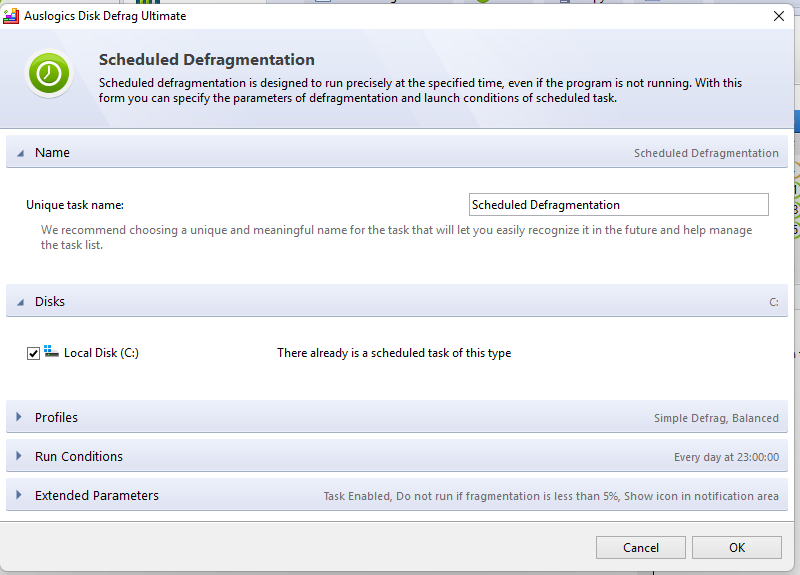
- Each scheduling option provides parameters that you can customize, including the defrag profile that will be used, run conditions, and extended parameters. Click OK when done.
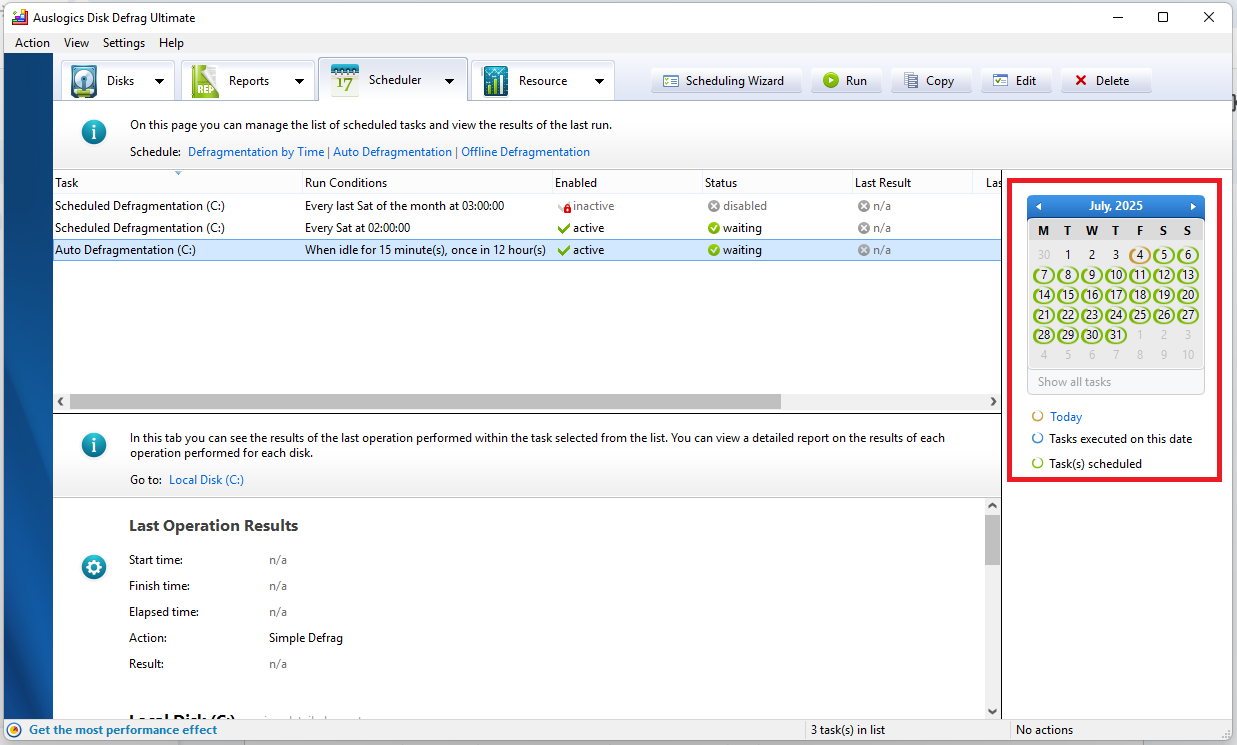
- Use the calendar to get a general glance at scheduled defrag sessions based on the days they are set to happen.
How Does Auslogics Disk Defrag Ultimate Compare Against Windows’ Built-In Optimizer and Other Third-Party Tools?
Here’s what Auslogics Disk Defrag Ultimate offers compared to other third-party tools and the built-in Drive Optimizer utility available on Windows:
| Scheduling scans | Smart defragmentation profiles | Preventing fragmentation | Special algorithms for SSDs | Checking and fixing drive errors before defrag | Deleting temporary files before defrag | Fine-tuning the drive file system | Managing system resources during defrag | Individual file and folder defrag | Saving drive analysis reports | Boot time/offline defrag | |
|---|---|---|---|---|---|---|---|---|---|---|---|
| Windows Optimize Drives utility | ✅ | ❌ | ❌ | ✅ | ❌ | ❌ | ❌ | ❌ | ❌ | ❌ | ❌ |
| Auslogics Disk Defrag Ultimate | ✅ | ✅ | ✅ | ✅ | ✅ | ✅ | ✅ | ✅ | ✅ | ✅ | ✅ |
| Piriform Defraggler | ✅ | ❌ | ✅ | ✅ | ✅ | ❌ | ❌ | ✅ | ✅ | ❌ | ✅ |
| WinContig | ❌ | ❌ | ❌ | ❌ | ✅ | ✅ | ❌ | ✅ | ✅ | ✅ | ❌ |
| Glarysoft Disk SpeedUp | ✅ | ❌ | ❌ | ❌ | ❌ | ❌ | ❌ | ✅ | ✅ | ❌ | ✅ |
What Do Users Say About Auslogics Disk Defrag Ultimate?
Let’s see what users on Trustpilot have to say about Auslogics Disk Defrag Ultimate.
Auslogics Trustpilot rating: 4.2 / 5
Number of reviews: 1,948
Comments:
👤 Eratas: “Literally the BEST defrag program I’ve ever used. I’ve tried open source and paid ones, I was using O&O Defrag for a long time, and I enjoyed their SSD defrag technology, which Auslogics also has. I will not use anything else, the zone defrag is amazing too. So yeah, overall: 8/10.”
👤 Breaneainn D: “Yay! Auslogics Defrag is my No. 1 essential.”
👤 Barry: “It is the best and fastest defrag program I have used in my 30+ years using a PC. I love it.”
👤 S.D. Good: “Best defrag evah. Terrific defrag and very easy to understand. It’s a great app.”
Auslogics Disk Defrag Ultimate: Final Thoughts
Whether you are a novice or professional user, Auslogics Disk Defrag Ultimate provides you with all the features you’d ever need.
It gives you full control over HDD defrag and optimization so that you can achieve exactly the results you are after.
With Auslogics Disk Defrag Ultimate, easily overcome the mechanical limitations of your hard disk drives and achieve faster file access times while also improving write operations on your SSD.
Your hard drives, SSDs, and PC are about to get a whole lot healthier. Let us know what you think. Share your experience with us in the comments section below. Don’t forget to like and share this article.
FAQ
How often you should defrag your computer depends on how you use your computer. If you use your PC for high-demand tasks that involve modifying large files or frequently creating, deleting, and downloading files, then you should consider defragging at least once a week. Otherwise, defragging once a month should be sufficient.
Before you get started, you can run a drive analysis to check the health of your drive and determine whether a defrag is necessary. This can be done using the built-in Optimize Drives utility on Windows PCs.
You can also make use of professional third-party tools such as Auslogics Disk Defrag Ultimate to analyze your drives and schedule a defrag.