
Since you saw the “This plug-in is not supported” error message, we can safely infer that the content on the site involved failed to load.
Thus, you may be wondering, “How to fix the ‘this plugin is not supported’ issue.”
In this guide, we intend to examine the issue associated with this particular notification and even show you how to fix the “This plug-in is not supported” error. Let’s go.
What Does It Mean When a Plugin is Not Supported in Chrome for Windows 10 and 11?
So, what does “This plugin is not supported” mean exactly? And why does a website say “plugin not supported?”
Since Google implemented HTML 5 technologies in Chrome, the browser stopped providing support for all plugins on its platform except Flash.
That said, Google waved goodbye to the Flash plugin when Adobe announced it will no longer support the player.
Therefore, when you see the ‘This plug-in is not supported’ message, then the issue probably involves the absence of the plugin in Chrome.
Moreover, the error could show up whenever Chrome doesn’t support a plugin that a website requires to run. For example, “Microsoft .NET Plug-in not supported.”
When you visit a website that needs Flash to work for the first time, you are supposed to see the prompt about allowing Flash to run, especially if you hover your cursor around the area where the Flash content should be or if you click on the media content.
In any case, you will have to click on the Allow button to proceed. The Click to play setup is now the default behavior in Chrome.
Once you give Chrome permission to allow the website to run its content using Flash, then the site will become capable of playing Flash content automatically in the future (when you visit it again).
But you can’t do all that right now because Chrome no longer has a flash option.
Well, if you see the ‘This plug-in is not supported’ error, then it’s because your browser doesn’t have the required plugin.
How to fix “This Plug-In is Not Supported” on Chrome
Having taken all the events due to which the error message comes up into account, we came up with a comprehensive list of solutions to the problems.
With the procedures described below, you will be able to fix the issue.
So, here are your answers to “How do I fix plugin is not supported in Chrome?”
Fix 1: Clear the browsing data in Chrome
Here, we are considering the possibility that plugin issues have something to do with corrupted data being used by your browser.
If the assumptions (made here) hold true, then you will be able to fix the ‘This plug-in is not supported’ error by clearing Chrome browsing data.
When you force Chrome to clear its browsing data, the application gets rid of bad files, entries, and packages that define your experience on the web.
Moreover, a good number of users reported that media on the sites affected by the plugin issue started loading up and playing after they cleared Chrome browsing data.
Hopefully, you too get the same result with the task here. These are the instructions you must follow to clear the browsing data in Chrome:
- Click on the Chrome icon on your taskbar or the application shortcut on your desktop to fire up the browser.
- Assuming you are now on the Chrome window, you have to use this keyboard shortcut to access the needed function:
Ctrl + Shift + Delete.
You will be directed to the Settings screen or window. The Clear browsing data window or dialog will be brought up automatically.
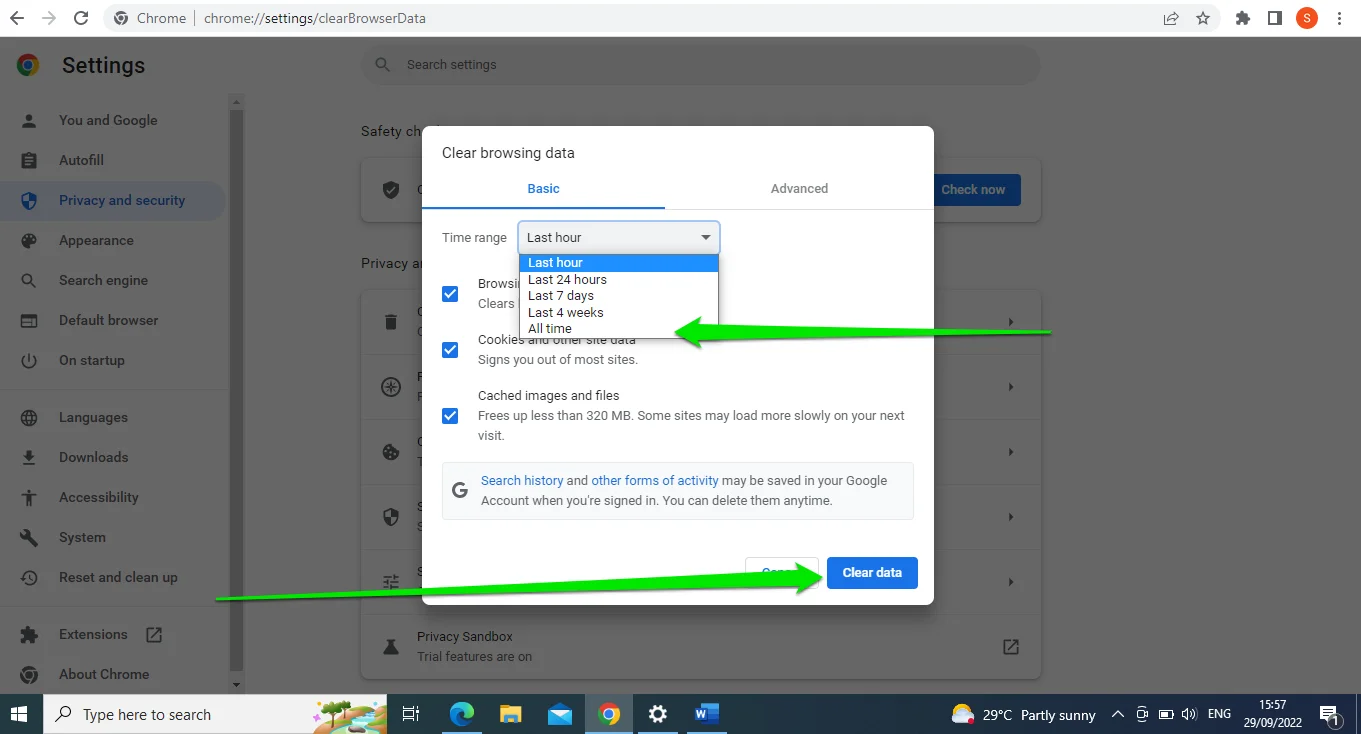
- Ensure that the Time Range parameter is set to All time. Click on the drop-down menu to make the necessary changes – if you have to.
- Now, you must click on the checkboxes for the relevant categories or data forms that you want Chrome to clear.
Ideally, you should select all the categories to ensure that nothing gets left out in the clearing operation.
However, we understand that you might want Chrome to retain certain categories to make your browsing experience smooth.
- In any case, you will do well to select these categories for the data removal operation: Browsing history, Cookies and other site data, Cached images and files, Autofill form data, and Site Settings.
- Confirm your selections. Click on the Clear browsing data button.
Chrome will obliterate all the unwanted items and then restart the browser application automatically.
- After Chrome comes up, you have to test the site on which you experienced the plugin issues to see if things have gotten better.
If you realize that nothing has changed, you will do well to restart your computer and then check again.
Fix 2: Use another browser to test things (preferably Internet Explorer):
Since you are yet to resolve the problem, it is time you considered the possibility that the problem is down to Chrome’s lack of support for a different plugin and maybe flash.
The site on which you encountered the ‘This plug-in is not supported’ error might have displayed the notification to inform you that your browser cannot play its media content because it is not running the Java plugin, for example.
In that case, since Chrome does not support the needed plugin, you will have to use a browser that still allows sites to use the plugin in view.
Internet Explorer is probably the best browser in that regard because it still provides support for the vast majority of plugins that are not supported on modern browsers (Chrome, Firefox, and others).
Follow these instructions to use Internet Explorer:
- Give the
Windows logobutton on your machine’s keyboard a tap to see the objects, options, and programs that make up the Windows Start menu screen (or click on the Windows icon in your taskbar). - Input Internet Explorer into the text box (that appears the moment you begin to type) to perform a search task using those keywords as the query.
- Once Internet Explorer (App) comes up as the main (or single) entry on the results list returned, you have to click on it to launch the application.
- Assuming you are now on the Internet Explorer window, you have to fill the text field (close to the top of the window) with the URL of the site or webpage on which you experienced the plugin issues and then hit
Enterto go there. - Wait for the web page to load completely.
- Check the page to confirm that the relevant media is now visible. Confirm that you can play media on the page.
Microsoft released the new Edge browser to replace and make up for the limitations of Internet Explorer. As a result, you may not find Internet Explorer by searching for it in the Start menu.
Follow these steps if you’re on Windows 10:
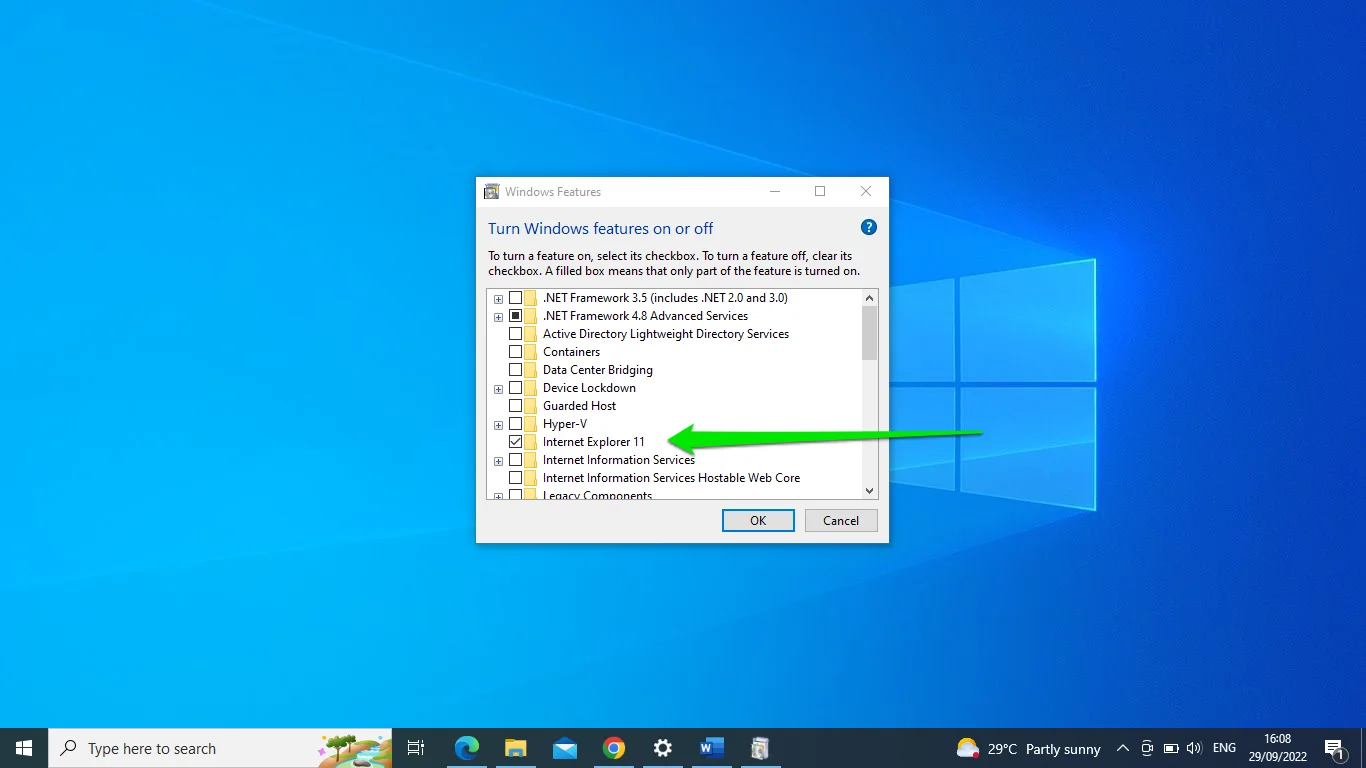
- Launch the Start menu and search for Windows Features.
- Click on Turn Windows features on or off.
- Once the Windows Features dialog window opens, scroll to Internet Explorer 11 and check the box next to it.
- Click on the OK button.
- Now, you can launch Internet Explorer.
Follow these steps on Windows 11:
The Internet Explorer is missing from the Windows Features dialog. That’s because Microsoft ceased support for the browser in June 2022. That said, the browser still exists within the OS.
You’ll have to use a script in this case. Here are the steps you have to follow:
- Open the Start menu, search for Notepad, and launch the app.
- After the Notepad shows up, copy and paste the following text into the new note:
CreateObject(“InternetExplorer.Application”) ie.Visible = True.
- After that, go to the top-left corner of Notepad and click on File > Save As.
- Next, enter a name for the new file and use the VBS extension. For example, you can name the file “InternetExplorer.vbs.”
- Save the file to your preferred folder.
- The internet explorer will open whenever you double-click the file.
You can also use Microsoft Edge and allow it to load sites that require Internet Explorer support. Here’s how to do that:
- Go to the Start menu and launch Edge.
- After the browser opens, head to the top-right corner and click on the three dots.
- Select Settings from the menu that drops down.
- Next, head to the left side of the Settings app and click on Default Browser.
- Select Allow beside Allow sites to be reloaded in Internet Explorer mode (IE mode).
Fix 3: Use the IE tab extension in Chrome
If you somehow managed to find out that the plugin error is down to Chrome’s lack of support for the needed plugins on its platform, then you can make an addition to Chrome setup to fix things.
Here, we want you to add or install a special extension (IE tab extension) that simulates the Internet Explorer environment in Chrome.
With the IE tab extension, you will be able to access websites as if they were being loaded up in the Internet Explorer application.
Since the plugin problems are nonexistent in Internet Explorer, you will no longer experience them in Chrome after you visit the affected websites using the IE tab extension.
These instructions cover almost everything that you need to do:
- Open Google Chrome by clicking on the browser icon on your taskbar or the application shortcut on your desktop.
- Assuming the Chrome window has been brought up, you have to input the following text into the URL box (close to the top of the window): IE tab extension.
- Give the
Enterbutton on your machine’s keyboard a tap to perform a search task on Google using the inputted keywords as the query. - Once the Google Search results page comes up, you have to click on IE Tab – Google Chrome, which is usually the first or second entry.
You will be directed to the page for the IE tab extension in the Chrome web store.
- Click on the Add to Chrome button.
Chrome will now work to install the extension on its application on your computer.
After the installation operations reach completion, you are likely to see a small IE logo in the top-right corner of your browser window (the icon is usually close to the address bar).
You can click on the IE logo (at any time) to force Chrome to load the webpage you are on into a tab in Internet Explorer.
- Now, you have to visit the website or webpage where you encountered the ‘This plug-in is not supported’ error earlier. Once you get there, you have to click on the IE logo to proceed to the same webpage in an IE tab (where the media content should play fine).
You can also set Chrome to allow the IE tab extension load specific websites automatically. If you want to do that, then you must continue with the instructions below:
- Right-click on the IE icon (in the top-right corner of the Chrome window or close to your address bar) to see the available context menu.
- Click on IE Tab options and then select Options (from the sub-list).
- Now, you must navigate to the end of the settings screen. Locate the Auto URLs option.
- Input the website or webpage URL into the text box (under Auto URLs) and then click on the Add button.
Chrome will now receive specific instructions to always load the website or page in Internet Explorer tabs on the platform.
- Restart Chrome to ensure the browser takes all the relevant changes into account.
Fix 4: Use the NoPlugin Extension
NoPlugin is an incredibly useful extension through which browsers get to play multimedia content even when support for the plugins (needed to play the content) is lacking on their platforms.
In other words, the extension enhances browsers’ compatibility with old websites (that still use outdated plugin technologies like Flash).
NoPlugin works by converting the plugin code to HTML5 and then renders the result so that the media content plays right in the browser.
With the NoPlugin extension, you can easily resolve the issue with videos or animations that refuse to play, especially after the ‘This plug-in is not supported’ error message has been displayed.
The NoPlugin extension is available for all the major modern web browsers (Chrome from Google, Firefox from Mozilla, and others).
These are the instructions you must follow to download and install the NoPlugin extension in Chrome on your computer:
- First, you have to click on the Chrome icon on your taskbar (or the shortcut on your desktop) to bring up the browser application window.
- Type the following text into the URL or address box (close to the top of the Chrome application window): NoPlugin extension for Chrome.
- Hit the
Enterbutton on your machine’s keyboard to force Chrome to perform a search task on Google using the inputted keywords as the query. - Once the Google Search results page comes up, you have to click on NoPlugin – Google Chrome, which is usually the first entry on the list.
You will be directed to the NoPlugin page on the Chrome web store.
- Click on the Add to Chrome button.
Chrome will now work to add or install the NoPlugin extension on the browser application running on your computer.
After the installation operations for the NoPlugin extension reach completion, you have to test the new add-on. Continue with the instructions below:
- Open the website or webpage where the multimedia content refused to play due to the lack of plugin support.
- Check and confirm that all the relevant media content can now be played without issues (since the NoPlugin extension is active).
If the playback operation for the media content on the affected webpage fails again, then you can click on the Open content button (from the NoPlugin extension menu) to save the media file to your drive.
The file will be downloaded. You will then be able to use your preferred media player to play the video or audio file.
Fix 5: Update Chrome
Finally, we have to consider the possibility that the plugin is not supported issue is not down to Chrome’s lack of support for old plugins but rather newer technologies.
Perhaps, the affected website or webpage is using some HTML5 technologies that your current browser build does not recognize.
In that case, we can safely infer that your computer is running an old or outdated version of Chrome – because the newest Chrome build is always embedded with support for the relevant web technologies.
Chrome is supposed to check for, download, and install updates automatically.
However, on your PC, it seems something is wrong with the automatic update mechanism or the update function is currently broken. In any case, you have to initiate the manual check for updates.
Follow these instructions to update Chrome manually:
- Open Chrome. Click on the icon formed from three dots arranged vertically (in the top-right corner of the browser window).
If you see the Update Chrome button already, then you must click on it.
- Click on Help. Select About Chrome (from the shortlist).
You will be directed to the About Chrome screen or menu now. Chrome will now get in touch with Google servers to see if there are updates for the Chrome application running on your computer.
Google Chrome will download the updates while you watch the operations progress.
- You will have to relaunch or restart Chrome to finish things.
- After the fresh Chrome window comes up, you have to go to the website or webpage where the media content refused (or failed) to play to see if everything now works fine there.
Use Auslogics BoostSpeed for Optimal Performance
With this application running on your system, you can execute multiple effective repairs, top-level optimizations, and other performance-enhancing operations.
After everything gets done, your PC will invariably end up in a better state than it is currently.
Other things you can try to fix the This plug-in is not supported issue in Google Chrome and other browsers
If you still cannot get Google Chrome (or your preferred web browser) to play media on certain websites or webpages, then you have to try the following fixes:
- Open the affected webpage in incognito mode on Google Chrome (or similar mode on your preferred browser).
The incognito mode allows Chrome to stop saving your browsing activity to the browser history repository. This mode could help you load the webpage without issues.
To open Incognito Mode, click on the three vertically arranged dots in the top-right corner and select New Incognito Window or tap Ctrl + Shift + N.
- Reset Google Chrome (in its entirety).
You may have installed an extension or applied some settings that may be causing the problem. If you’re not sure about the possible culprit, then you should reset your browser.
Here’s how to do that:
- Launch Google Chrome.
- Click on the three vertically arranged dots in the top-left corner.
- Select Settings.
- After Settings appears, head to the left pane and click on Reset and Clean Up.
- Select Restore settings to their original defaults on the Reset and Clean Up Page.
- Click on Reset Settings.
Uninstall the browser application, restart your computer, and then install the latest build of the browser available.
If nothing worked, consider removing Chrome from your computer and reinstalling it.
Follow these steps if you run Windows 10:
- Open the Settings app.
- Click on Apps.
- On the Apps & Features page, scroll down to Chrome or use the search bar to call up the app.
- Click on Google Chrome and select Uninstall.
- Select the Uninstall option again in the confirmation pop-up.
- After that, follow the subsequent instructions on the screen to remove the program, then restart your computer.
Follow these steps if you run Windows 11:
- Launch the Settings application.
- Click on Apps on the left side of the Settings window and click on Apps & Features once the Apps screen appears.
- Go to the Apps List section and scroll to Google Chrome. You can also use the search bar to find the browser.
- After Chrome appears, go to its right and click on the three dots.
- Select Uninstall.
- Click on the Uninstall button again.
Conclusion
Go through the steps to fix the “This plug-in is not supported” error on your PC. If you’ve found this article helpful, share it with your friends and let us know what you think in the comments below.