![[SOLVED] How to Fix Hard Drive Not Showing Up on Windows PCs](https://www.auslogics.com/en/articles/wp-content/uploads/2025/06/SOLVED-How-to-Fix-Hard-Drive-Not-Showing-Up-on-Windows-PCs-568x359.webp)
- Why Is My Hard Drive Not Showing Up On Windows?
- How to Fix the Hard Drive Not Showing Up on Windows 10/11
- The first thing to do: Restart the PC
- The second thing to check: Check whether the hard drive is showing up in Disk Management
-
What should I do if the hard drive is present in Disk Management but not showing up in File Explorer?
- Solution 1: Initialize the disk
- Solution 2: Import the foreign disk
- Solution 3: Change the disk status to Online
- Solution 4: Assign a new letter to the drive
- Solution 5: Check the situation with a RAW disk
- Solution 6: Run a CHKDSK scan
- Solution 7: Mount volume
- Solution 8: Disable drive restriction in the Group Policy Editor
- Solution 9: Uninstall recent Windows updates
-
What should I do if the hard drive is not showing up in Disk Management?
- Solution 1: Try a different USB port or computer (external drives)
- Solution 2: Check the USB cord (external drives)
- Solution 3: Check the power supply (external drives)
- Solution 4: Disable the USB selective suspend feature (external drives)
- Solution 5: Enable the drive in Device Manager (external drives and secondary internal drives)
- Solution 6: Update or reinstall the drive software (external drives and internal drives)
- Solution 7: Run the Hardware and Devices troubleshooter (external drives and secondary internal drives)
- Solution 8: Check whether the hard drive is detected and enabled in the BIOS/UEFI settings (external and secondary internal drives)
- Solution 9: Check whether the drive is part of a storage pool in Windows Storage Spaces (external drives and secondary internal drives)
- Solution 10: Reinstall and update NVMe or IDE ATA/ATAPI controllers (for secondary internal drives)
- Solution 11: Run the System File Checker scan (external drives and secondary internal drives)
- Solution 12: Check the SATA and power cables for your internal hard drive
- Solution 13: Open up the hard drive to save the disk (external and internal hard drives)
- How to Fix an External Hard Drive Not Showing Up After Being Dropped
- Fixing the Problem of the Hard Drive Not Showing Up in Windows
- FAQ
It’s such a bothersome situation when your computer is not recognizing an external hard drive or SSD. This gets trickier when your important files are at stake.
In some cases, even the built-in drive on the PC could also go missing in File Explorer.
Rest assured, there are certain things you can do to fix this problem and still keep the data stored on the drive.
And if it’s a new drive, it should also start showing up on your PC by the time you are done with the solutions presented here.
However, if you are dealing with a mechanically damaged drive, you would need the services of a professional to help recover your files.
🆕 New hard drives typically don’t appear in File Explorer until you initialize them through Disk Management.
🛠️Preliminary checks:
- Restart the computer.
- Check whether the hard drive is showing up in Disk Management.
📁 What should I do if the hard drive appears in Disk Management but not in File Explorer?
- Change the disk status from Offline to Online in Disk Management.
- Initialize the drive.
- Run a CHKDSK scan.
- Mount volume.
- Disable drive restriction in the Group Policy Editor.
- Uninstall recent Windows updates.
❓ What should I do if the hard drive is not showing up in Disk Management?
- Check for connectivity and power issues.
- Check for driver issues.
- Check whether the drive is part of a storage pool.
- Check the BIOS/UEFI settings and update the BIOS firmware.
- Check for system file issues.
- Run the Hardware and Devices troubleshooter.
- Open up the hard drive to save the disk.
Why Is My Hard Drive Not Showing Up On Windows?
There are a few possible reasons why your hard drive isn’t appearing on your Windows PC. Understanding them will enable you to approach and fix the problem more effectively.
Here are some of the issues:
| Problem | Solutions |
|---|---|
| SOFTWARE ISSUES | |
| System glitch |
|
| Outdated, problematic, or missing external hard drive software | Update or reinstall the hard drive software |
| New hard drive not initialized or still unallocated | Initialize the hard drive and create a new simple volume |
| The drive is offline | Change the status to Online |
| The drive is a dynamic foreign disk | Import the disk |
| Your hard drive is a RAW disk |
|
| Unassigned or conflicting drive letter | Assign it a drive letter or change the existing drive letter to resolve possible conflicts with an existing drive |
| Unmounted volume | Run the mountvol /E command in the elevated Command Prompt to prompt the computer to automatically mount new hard drives and hard drive partitions on your PC |
| The hard drive is hidden in File Explorer using the Group Policy Editor setting | Disable drive restriction in the Group Policy Editor |
| The hard drive is part of a storage pool in Windows Storage Spaces | If necessary, delete the drive from the pool |
| Internal hard drive disabled in the BIOS | Enable hard drive in the BIOS |
| Outdated BIOS firmware or misconfigured BIOS settings | Load the default BIOS settings and update the BIOS firmware |
| Conflicting IDE ATA/ATAPI or NVMe controllers | Uninstall all existing controllers and reinstall an updated version from the manufacturer’s website Replace system files using System File Checker (SFC) |
| Missing, modified, or corrupt Windows files | Replace system files using System File Checker (SFC) |
| System drive issues | Run a CHKDSK scan to fix issues in the system drive |
| Problem | |
|---|---|
| HARDWARE ISSUES | |
| Power supply issues (external hard drives) |
|
| Input/Output errors (external hard drive) | Inspect the USB cord and USB ports |
| Input/Output errors and power supply issues (internal hard drive) | Open up the computer and inspect the SATA cable and SATA ports |
| Hard drive damage | Open up the hard drive casing and save the disk (should be done by a professional |
How to Fix the Hard Drive Not Showing Up on Windows 10/11
When dealing with hard drive detection issues on Windows, checking Disk Management to see whether the drive is showing up should be the first port of call.
Because if a hard drive is not appearing in Disk Management, it means that it’s not being recognized on Windows, and you’d have to follow a particular course of action.
Therefore, the solutions in this guide will be grouped into two sections:
- What to do if the hard drive is not available in File Explorer but is showing up in Disk Management.
- What to do if it is not showing up in Disk Management.
So, without further ado, let’s get started.
The first thing to do: Restart the PC
This is the most basic fix you can try if your internal or external hard drive is not showing up on your PC. You might be surprised just how effective it can be in resolving simple system glitches that could result in the HDD not showing up.
- You’ll have to power off the PC.
- Unplug the charger and all connected peripherals such as printers, hard drives, USB flash drives, etc.
- Then press and hold the power button on the PC for up to 30 seconds to drain all the residual power.
- You can then turn on the PC afterwards.
If the restart and power flush did nothing to make the hard drive show up, then move on to the next fix below.
If the issue is with an internal drive, and you hear clicking sounds, beeps, or some other unusual noises during Windows startup, then it’s an indication of mechanical hard drive failure in the hard drive, which could lead to data loss.
The same goes for an external hard drive when it’s plugged in.
In that case, power off the PC at once. You’d have to seek a hard drive repair service and data recovery expert to help you resolve the issue and retrieve your data.
The second thing to check: Check whether the hard drive is showing up in Disk Management
Checking whether the disk in question is showing up in Disk Management will determine how you’ll proceed. Follow these steps:
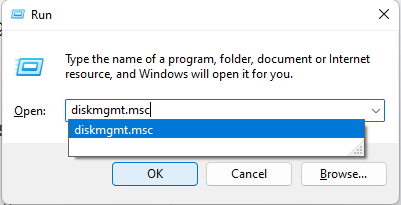
- Press the
Windows + Rkeyboard shortcut to open the Run dialog box. - Type diskmgmt.msc and click OK to open the Disk Management window.
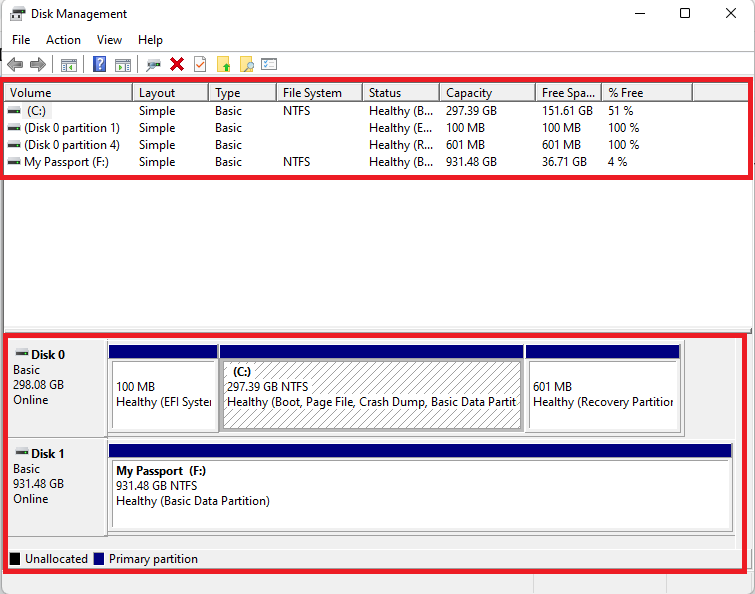
A healthy, functional disk should appear as follows:
- All the information for the volume is presented, including the name, drive letter, file system, capacity, free space, etc.
- The disk should have a blue bar, which shows that it has been initialized and allocated. An unallocated disk will have a black bar.
- The disk has to be labeled as Basic and Online. Any other label on the disk, such as Dynamic, Offline, RAW, Unallocated, Uninitialized, or the lack of a drive letter, means that the associated drive won’t show up in File Explorer.
As I mentioned, we’ll be providing solutions to the detection issue, whether the drive appears in Disk Management or not. The next section handles drives that show up in Disk Management but not in File Explorer. If you don’t see your drive in the Disk Management window, scroll further down.
![IMG]() What should I do if the hard drive is present in Disk Management but not showing up in File Explorer?
What should I do if the hard drive is present in Disk Management but not showing up in File Explorer?

If the disk is listed in Disk Management, then there are certain things you can do to make it start showing up in File Explorer.
Take a look at the solutions presented below. They can be applied to both external hard drives and secondary internal hard drives in Disk Management.
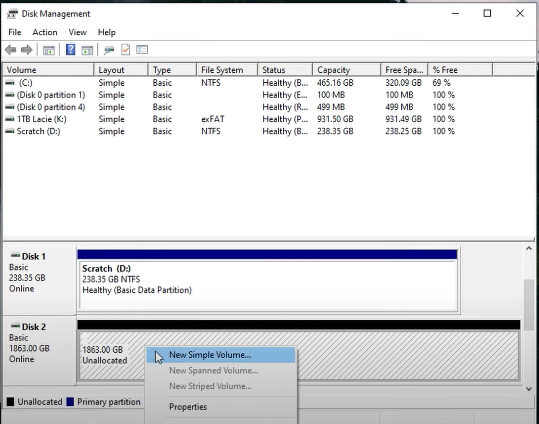
Solution 1: Initialize the disk
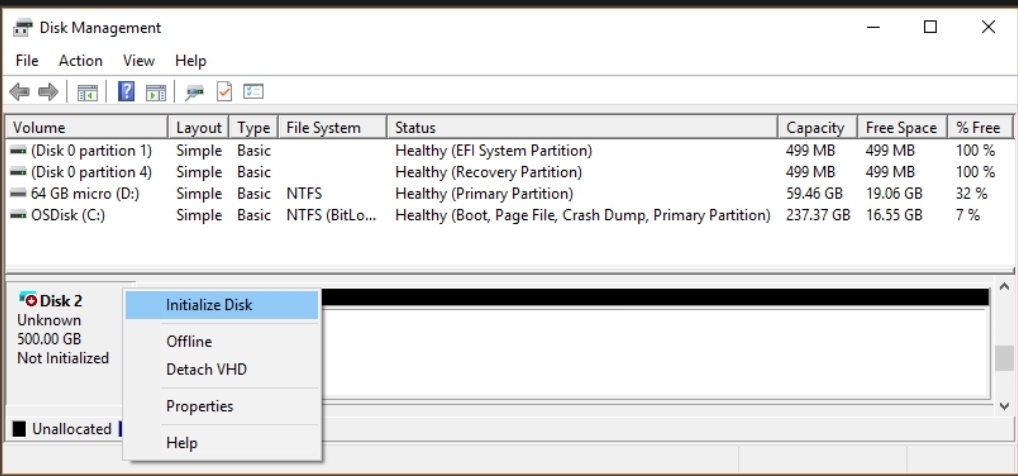
If your drive is new, you will have to initialize it before it can be used. This basically means activating the drive with a functional file system. Therefore, if your drive is listed in Disk Management but the disk is labeled as Not Initialized or Unallocated, here is what you have to do in order to fix the issue of a new internal or external hard drive not showing up in File Explorer:
- Right-click on the disk labelled as Not Initialized and click on Initialize Disk.
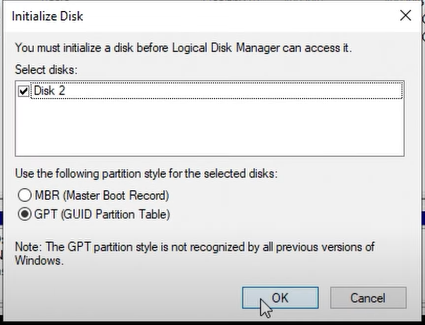
- Leave the default settings on the Initialize Disk dialog box and click the OK button.
- Afterwards, you’ll need to format the drive. So right-click on the space labelled Unallocated and click on New Simple Volume.
- Click Next to open the page where you’ll have to specify the size of the new simple volume.
- Click Next again.
- Note the letter that’s automatically assigned to the drive.
- Click Next again.
- Choose a file system for the drive. You can leave the selected default file system and simply click Next.
- Click Finish.
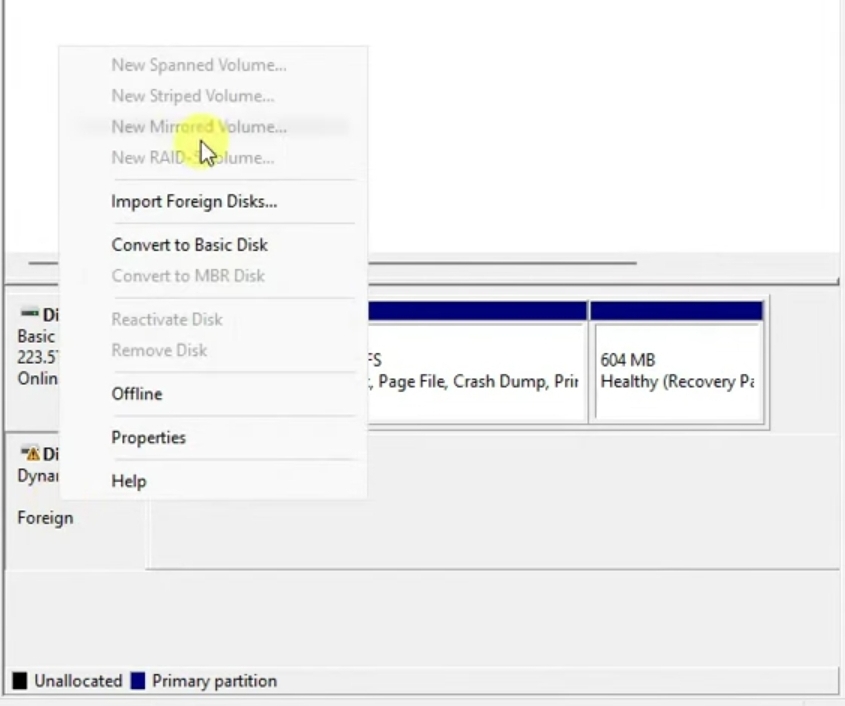
Solution 2: Import the foreign disk
If the hard drive is listed in Disk Management, but the disk has an exclamation mark icon and is labeled as Dynamic and Foreign, you will need to import the disk to fix the issue of your internal or external hard drive not showing up in Windows 10/11:
- Right-click on the disk and click on Import Foreign Disks.
- Afterwards, it should show up in File Explorer.
Solution 3: Change the disk status to Online
The drive may not be appearing because it is currently offline. You should see the Offline label in Disk Management if that is the case.
- Right-click the drive and select Online in the context menu.
Solution 4: Assign a new letter to the drive
This will enable Windows to recognize the drive. And if there’s a drive letter conflict with another existing drive, this will also help resolve that, thereby solving the problem of your HDD not showing up in File Explorer.
Here’s how to get it done:
- Right-click on the disk space below the blue bar and click on Change Drive Letter and Paths.
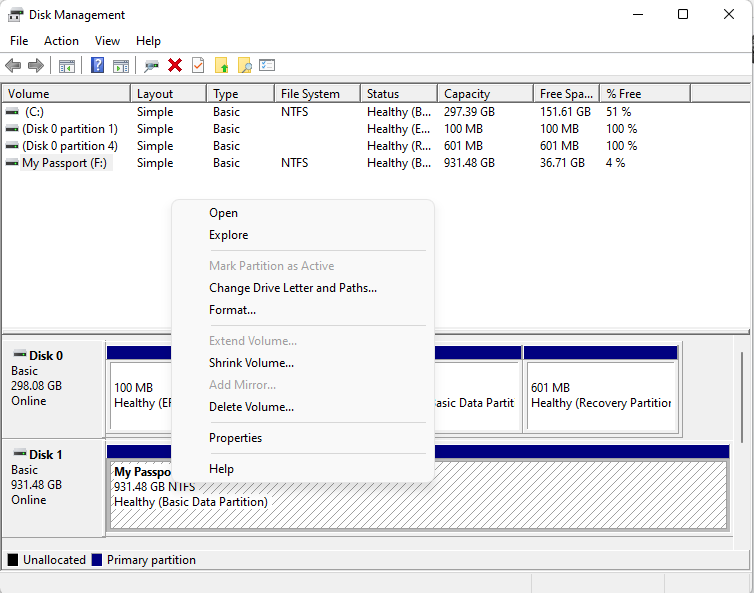
- Click the Change button and then select a drive letter from the menu. Select something like K or O that’s unlikely to have been previously assigned, just to be safe.
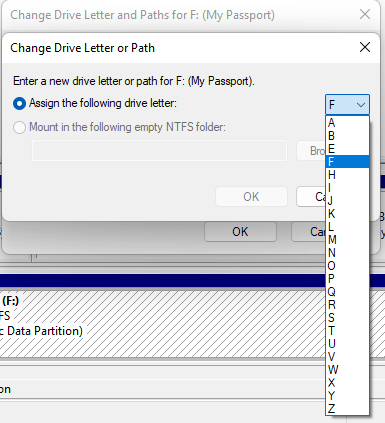
- Click OK.
Solution 5: Check the situation with a RAW disk
If your drive is labeled as RAW in Disk Management, it will not show up in File Explorer because it lacks a file system, or its current file system is corrupted.
In this case, formatting the drive is the best way to get it to show in File Explorer.
If a drive has been formatted with a file system other than exFAT, FAT32, or NTFS, your computer may struggle to recognize it. Some file systems specifically designed for other operating systems, such as HFS+ and APFS for macOS and Btrfs and EXT3/4 for Linux, also cause read issues in Windows.
You can format the drive and choose a compatible file system if you don’t mind losing your files. If not, you would have to use a third-party program, such as MacDrive, before you can access the drive and its contents on Windows.
Follow these steps to format the drive:
- Right-click the Start button and select Disk Management.
- Right-click the entry for the RAW drive and select the Format option.
- When the Format dialog window appears, select a drive name, file system, and allocation unit size.
- Using the quick format option allows Windows to only replace the current file system structure and delete drive contents, while unchecking the option runs a full format, which may take longer.
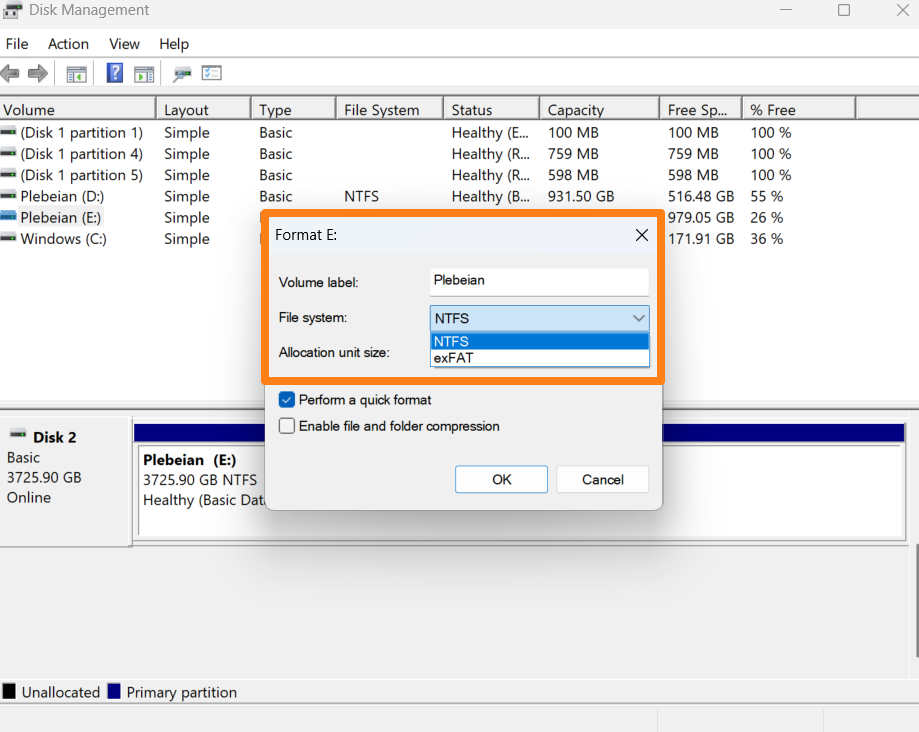
- Click the OK button.
Solution 6: Run a CHKDSK scan
If your drive is visible in Disk Management and it has a drive letter assigned to it, you can run a CHKDSK scan to resolve file system issues in the drive:
- Take note of the drive letter.
- Click the Start icon on your taskbar and type cmd in the search bar.
- Click on Run as administrator.
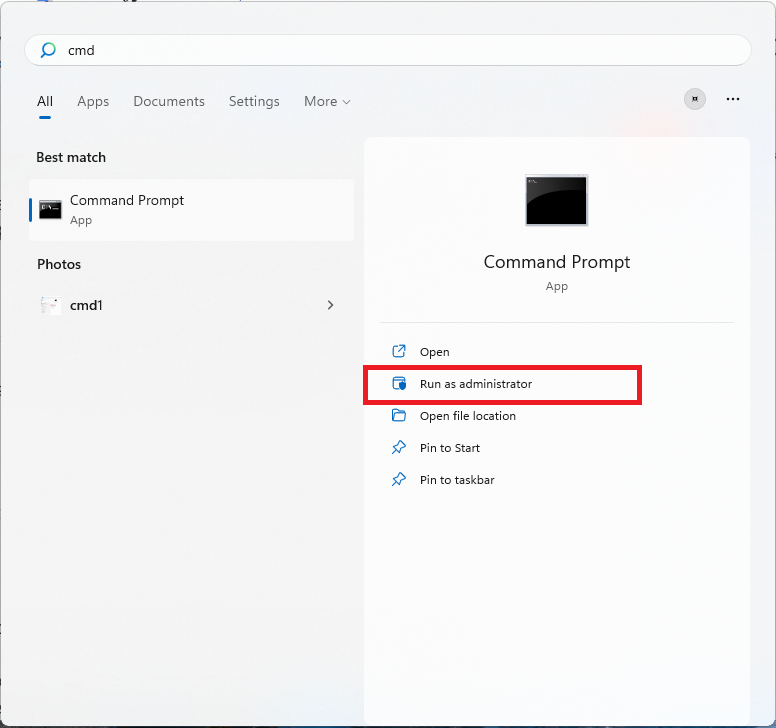
- In the CMD window, type chkdsk {drive letter}: /f /r and press Enter to run it. Be sure to replace {drive letter} with the actual letter of the drive. Thus, the command should be like this: chkdsk E: /f /r

- Ensure that the drive is connected, and leave your PC undisturbed until the scan comes to a conclusion. Keep the PC plugged in.
After the scan is done, restart the computer and then check to see if it now appears in File Explorer. Be sure to disconnect and reconnect the drive if it is a USB-connected external drive.
Solution 7: Mount volume
The mountvol /E command in CMD ensures that automatic mounting of new volumes is enabled on your computer if it was once disabled. This makes it possible for new drives and partitions to be automatically mounted and assigned a drive letter so that they can be accessed:
- Press the Windows logo button on your keyboard.
- Type cmd in the search bar and click on Run as administrator.
- Click Yes on the User Account Control prompt.
- Type or copy and paste the following command and press Enter to run it:
mountvol /E
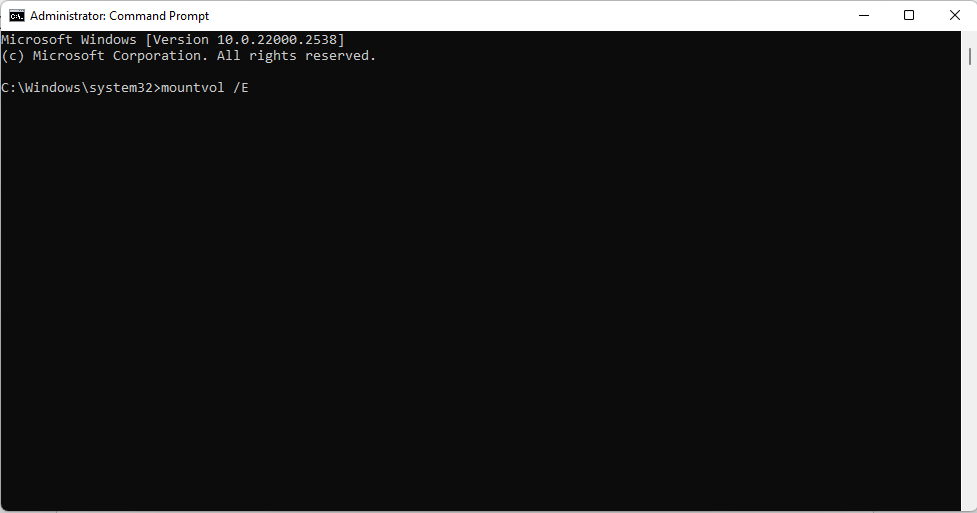
Afterwards, restart your computer, reconnect your external hard drive, and check whether it is now being detected.
Solution 8: Disable drive restriction in the Group Policy Editor
On Windows Pro, Enterprise, and Server editions, there is a setting in the Group Policy Editor that hides or restricts access to selected drives or all of your drives (including the C: drive), making them not show up in File Explorer.
Disabling this option in the Group Policy Editor could be all you need to fix the problem of the hard drive not showing up in Windows .
Follow these steps:
- Click the Start icon on your taskbar and start typing Group Policy into the Start menu search bar.
- Click Open under the Edit group policy option.

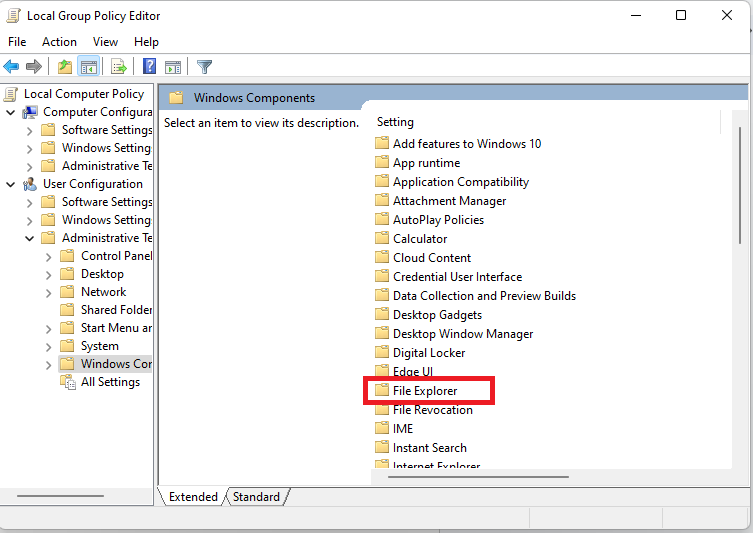
- Once in the Group Policy Editor window, click on Administrative Templates under User Configuration in the left pane.
- Double-click on Windows Components on the main window.
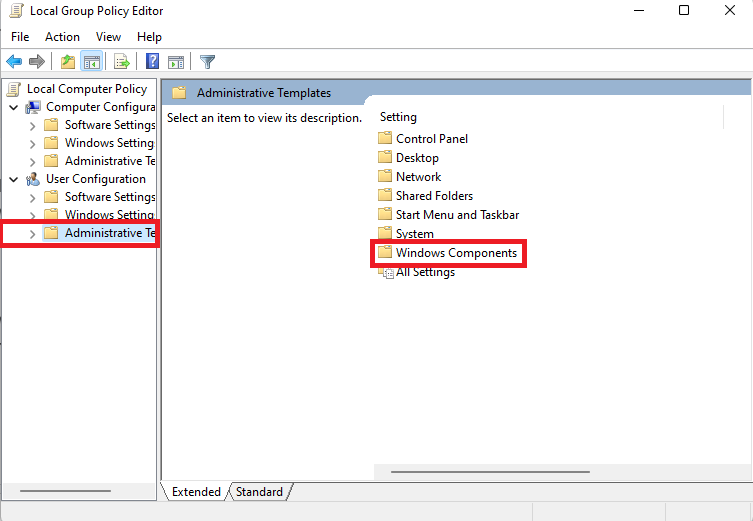
- Locate File Explorer in the list of items and double-click on it.
- Scroll down to the Hide these specified drives in My Computer option and double-click on it.
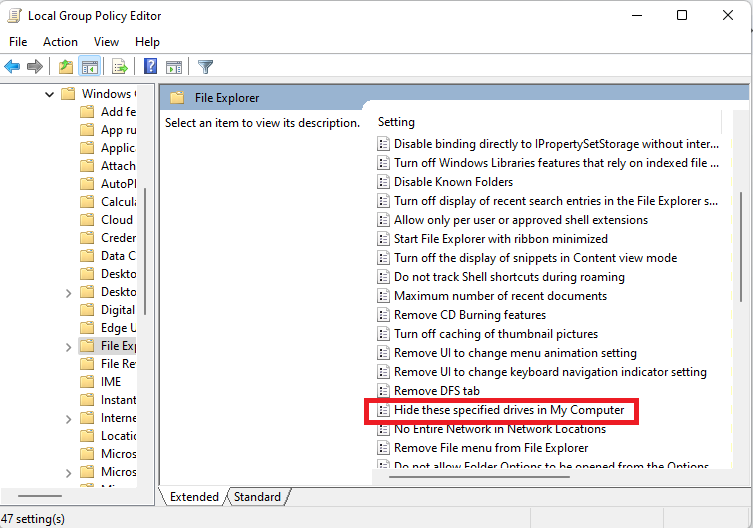
- Click the Apply button to save the changes. Then click OK.
Solution 9: Uninstall recent Windows updates
This issue of the hard drive not showing up on Windows 10/11 might have to do with conflicting Windows updates.
Thus, if you recently installed new updates before the problem emerged, then it could be that the updates are buggy. Reverting them could be the solution you are looking for.
Windows 11:
- Press the
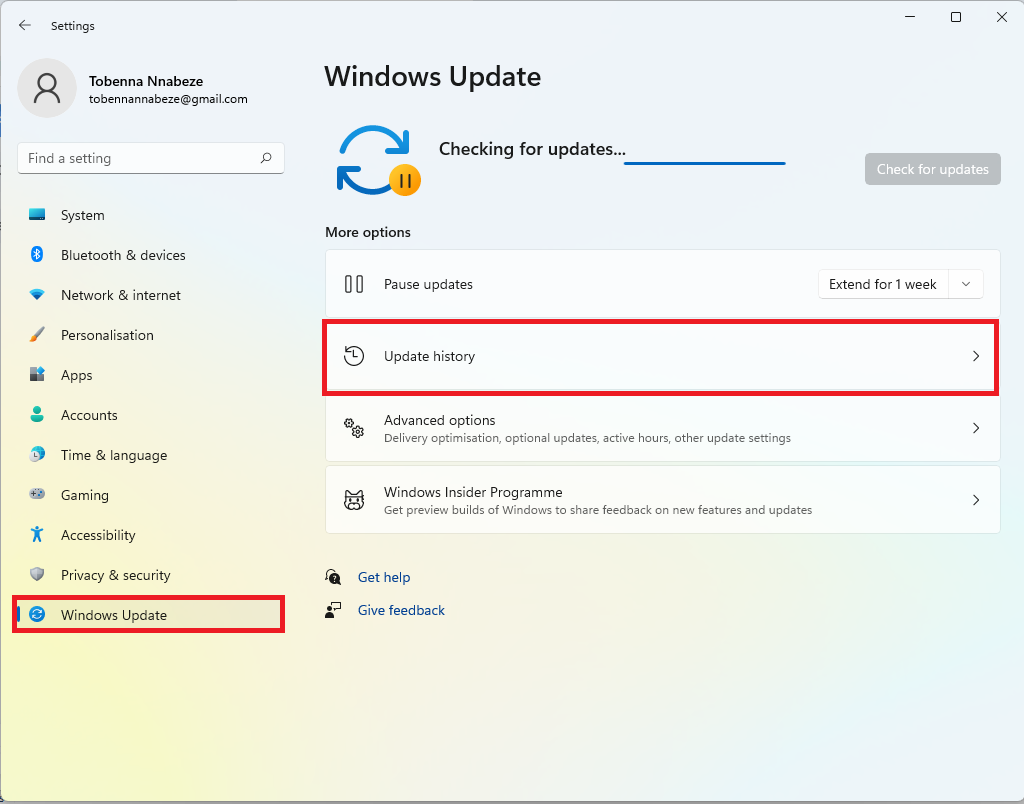
Windows + Ihotkey on your keyboard to open the Settings app. - Click on Windows Update in the left pane.
- Click on Update history under More options.
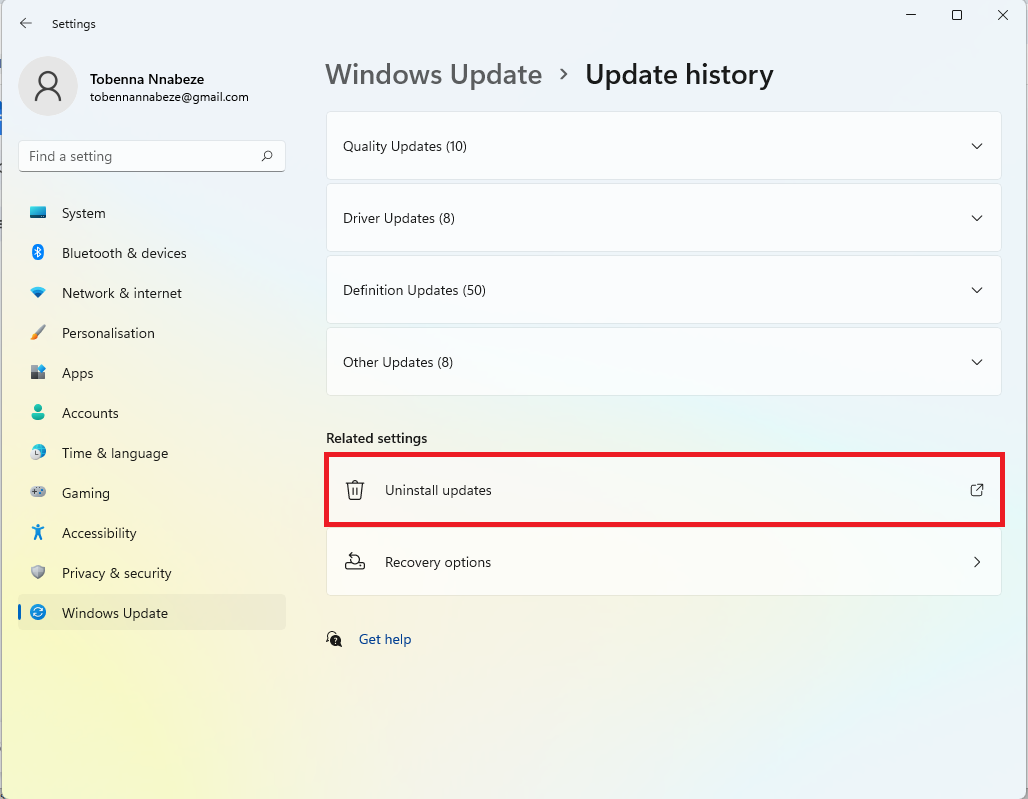
- Collapse the updates lists to easily locate the Related settings category.
- Click on Uninstall updates.
- On the list of installed Windows updates, click the Uninstall option next to the recent updates to remove them.
Windows 10:
- Press the
Windows + Ihotkey on your keyboard to open the Settings app. - Click on Update & Security in the left pane.
- Click on Uninstall updates under View your update history.
After uninstalling the recent Windows updates, check whether the issue of the hard drive not showing up on Windows 10/11 has been resolved. If there’s no positive result, you can go ahead and rerun Windows Update to get everything updated again.
![IMG]() What should I do if the hard drive is not showing up in Disk Management?
What should I do if the hard drive is not showing up in Disk Management?
If the drive is not showing up in File Explorer and Disk Management, then there are basic considerations to be ruled out before you begin suspecting that the drive has failed.
Solution 1: Try a different USB port or computer (external drives)
Before anything else, ensure that the USB ports on your PC are actually functional.
Also, if you are using a USB hub, first try a different port on the hub and see if that makes a difference. If it doesn’t, disconnect the hub and plug the drive directly into the computer’s USB port.
No difference still? Then try plugging the drive into a USB 2.0 port instead of the 3.0 port.
If it’s still not showing up, see if it will work on a different computer so you know what you’re dealing with.
Solution 2: Check the USB cord (external drives)
The fault could be from the USB cord, which connects the hard drive to the computer. Therefore, check for any physical damage to the cord or the plug. Also, try using a different cord if available.
Solution 3: Check the power supply (external drives)
Windows might not be reading your storage drive because the drive is not being powered adequately, if at all.
It could be that the drive is so power-heavy that connecting it to the computer at the same time that other devices are connected is preventing it from getting the juice it needs.
In any case, try disconnecting all other connected devices and see whether that would make a difference.
On the other hand, if the external drive is the type that doesn’t draw power from the PC’s USB ports but instead uses a power adapter, then you should ensure that the adapter is plugged in and well-connected.
Solution 4: Disable the USB selective suspend feature (external drives)
USB selective suspend is a feature in Windows that switches off USB ports to save power when you’re not using them.
Even though it’s a great setting, if your external hard drive is not showing up in File Explorer, then that could be the problem.
Let’s fix that by disabling it in the Control Panel:
- Click the Windows icon on your taskbar to open the Start menu.
- Type Control Panel in the search bar and click on it to open.
- Select Category in the View-by drop-down in the top-right corner of the page.
- Next, select Hardware and Sound.
- Click on Power Options.
- Click on the Change plan settings link next to your current power plan.
- Click the Change advanced power settings link to open the Power Options dialog.
- Locate the USB settings option and click the + sign to expand it.
- Click the + sign on the USB selective suspend setting.
- Open the drop-down menu and select Disabled if you’re using a desktop. If it’s a laptop, turn off the setting for both On battery and Plugged in.
- Finally, click Apply and click OK.
Check to see if your USB-connected hard drive is now being recognized. If there’s no change and it’s still undetected, simply go back and re-enable the USB selective suspend setting since it’s not the cause of the problem. Try the other solutions below.
Solution 5: Enable the drive in Device Manager (external drives and secondary internal drives)
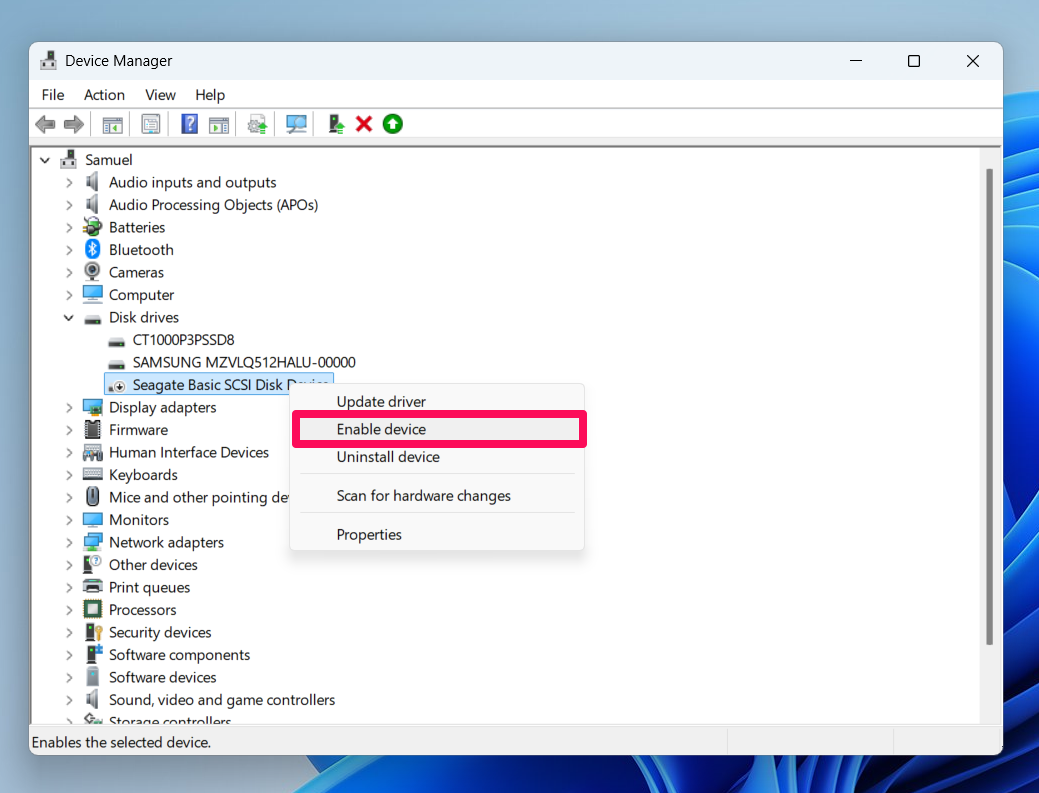
It may be that the hard drive is not showing up in File Explorer nor in Disk Management because it is disabled in Device Manager. So head over to Device Manager and ensure that the drive is enabled. Here’s how to get it done:
- Click the Start icon on the taskbar and start typing Device in the search.
- Click Open on the Device Manager option to open the system utility.
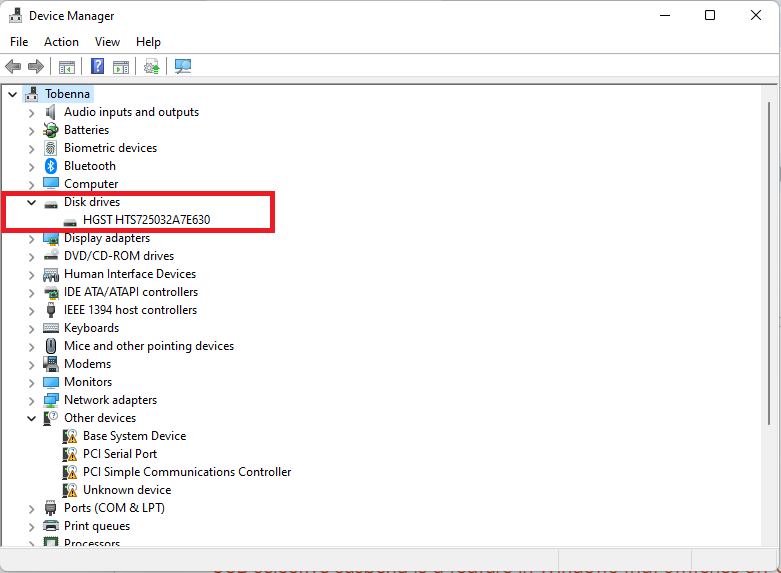
- Locate the Disk drives category from the list and expand it to see if your drive is listed.
- If your drive is listed, right-click on it and click on Enable device.
Also, if the drive in question is an internal drive, being greyed out could indicate that the drive is disabled in the BIOS. You can consult your PC or motherboard manufacturer to learn how to enable your internal hard drive in the BIOS settings.
Solution 6: Update or reinstall the drive software (external drives and internal drives)
Some external and internal drives have dedicated software that enables them to function on your PC. It’s important to see that they are installed and up to date.
Afterwards, ensure that you initialize and format the drive, as shown previously, so as to get it ready for use.
However, it may happen that the associated drivers have already been installed, and the device is present in Device Manager. And you’ve also previously initialized the drive, but it’s now not being recognized on your PC. In that case, you should try updating or reinstalling the drivers.
Here’s how you can update your hard drive driver:
- Press the
Windows + Xhotkey on your keyboard, and click on Device Manager. - Under Disk drives, right-click on your device and click on Update driver.
- Click Search automatically for drivers.
- Check if your drive is showing up afterwards.
If updating the driver didn’t work, then follow these steps to uninstall the current driver so that you can reinstall it afterwards:
- Go to Device Manager as shown above.
- Under Disk drives, right-click on your device and click on Uninstall device.
- Click Uninstall in the confirmation prompt.
- Restart your computer, download the driver from the device’s manufacturer’s website, and install it.
Solution 7: Run the Hardware and Devices troubleshooter (external drives and secondary internal drives)
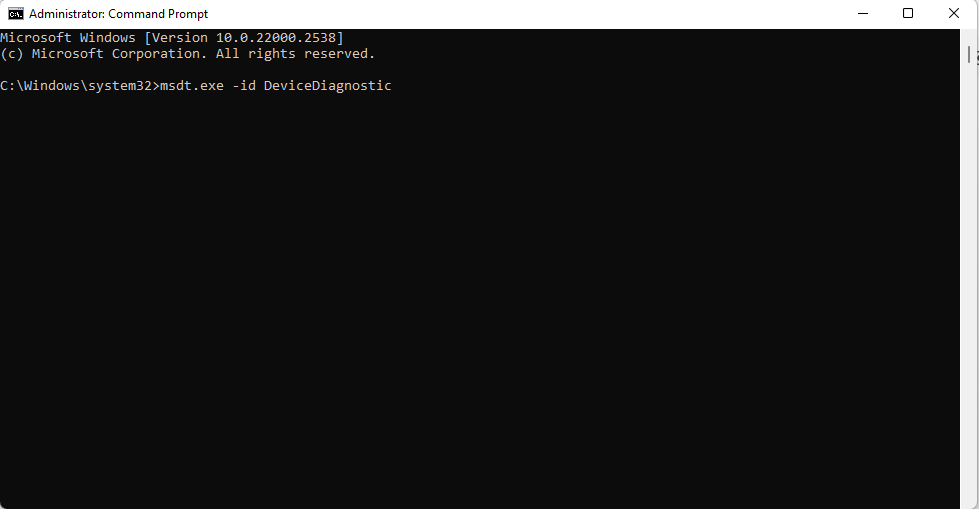
The Hardware and Devices troubleshooter is a legacy tool that is now being phased out in Windows 11. If you are using Windows 10 or an older version of Windows 11, it might help fix hardware problems that may be causing the issue of your computer not recognizing an external hard drive or secondary internal hard drive. Here’s what you should do:
- Press the Windows logo key on your keyboard to open the Start menu.
- Type cmd in the search bar and click on Run as administrator.
- Click the Yes button to allow administrator access when the User Account Control prompt pops up.
- Type or copy and paste the following command into the CMD window, then press Enter to run it:
msdt.exe -id DeviceDiagnostic
- Click on the Advanced link in the Hardware and Devices dialog that opens.
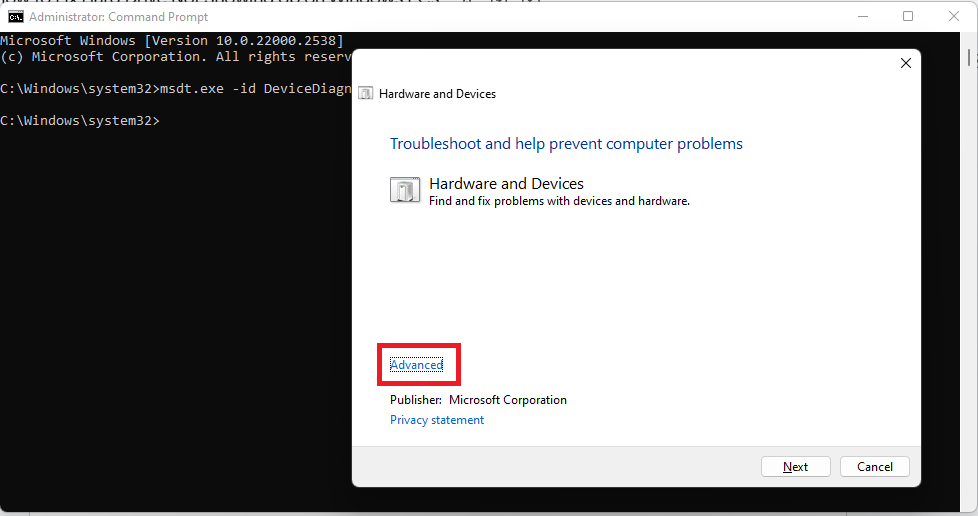
- Enable the Apply repairs automatically option.
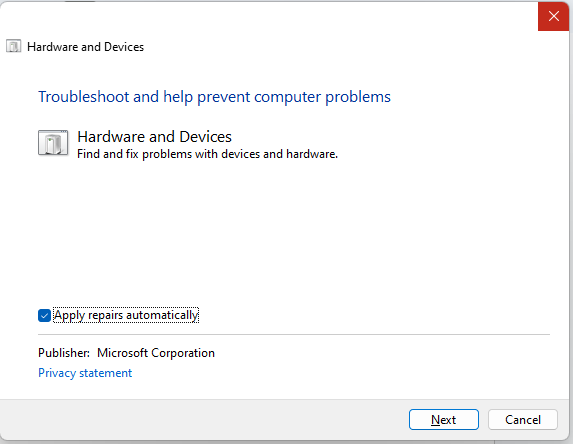
- Click Next to run the troubleshooter and start the scan for potential issues.
Solution 8: Check whether the hard drive is detected and enabled in the BIOS/UEFI settings (external and secondary internal drives)
The BIOS is responsible for testing and initializing the hardware on your computer. You have to boot into the BIOS/UEFI firmware settings to check whether your hard drive is enabled or being detected.
You could also go through the Advanced startup option in the Settings app on Windows 10 and 11:
- Press the
Windows + Ihotkey to open the Settings app. - Click on System in the left pane.
- Click on Recovery on the main window.
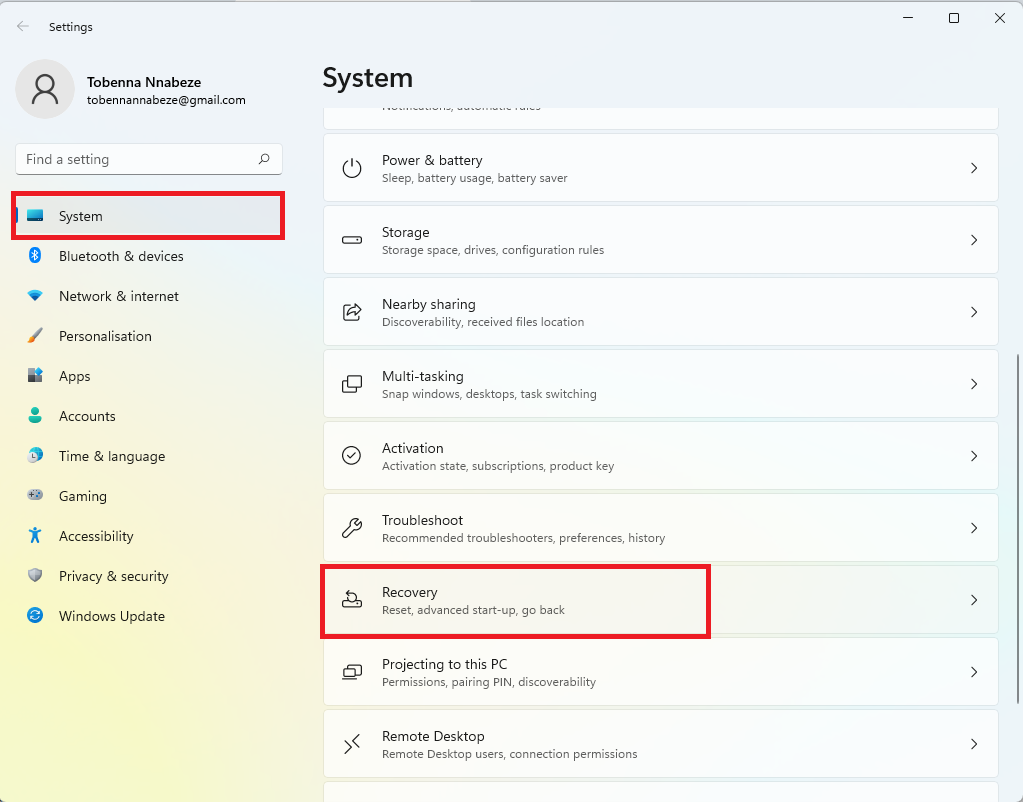
- Click the Restart now button next to Advanced startup.
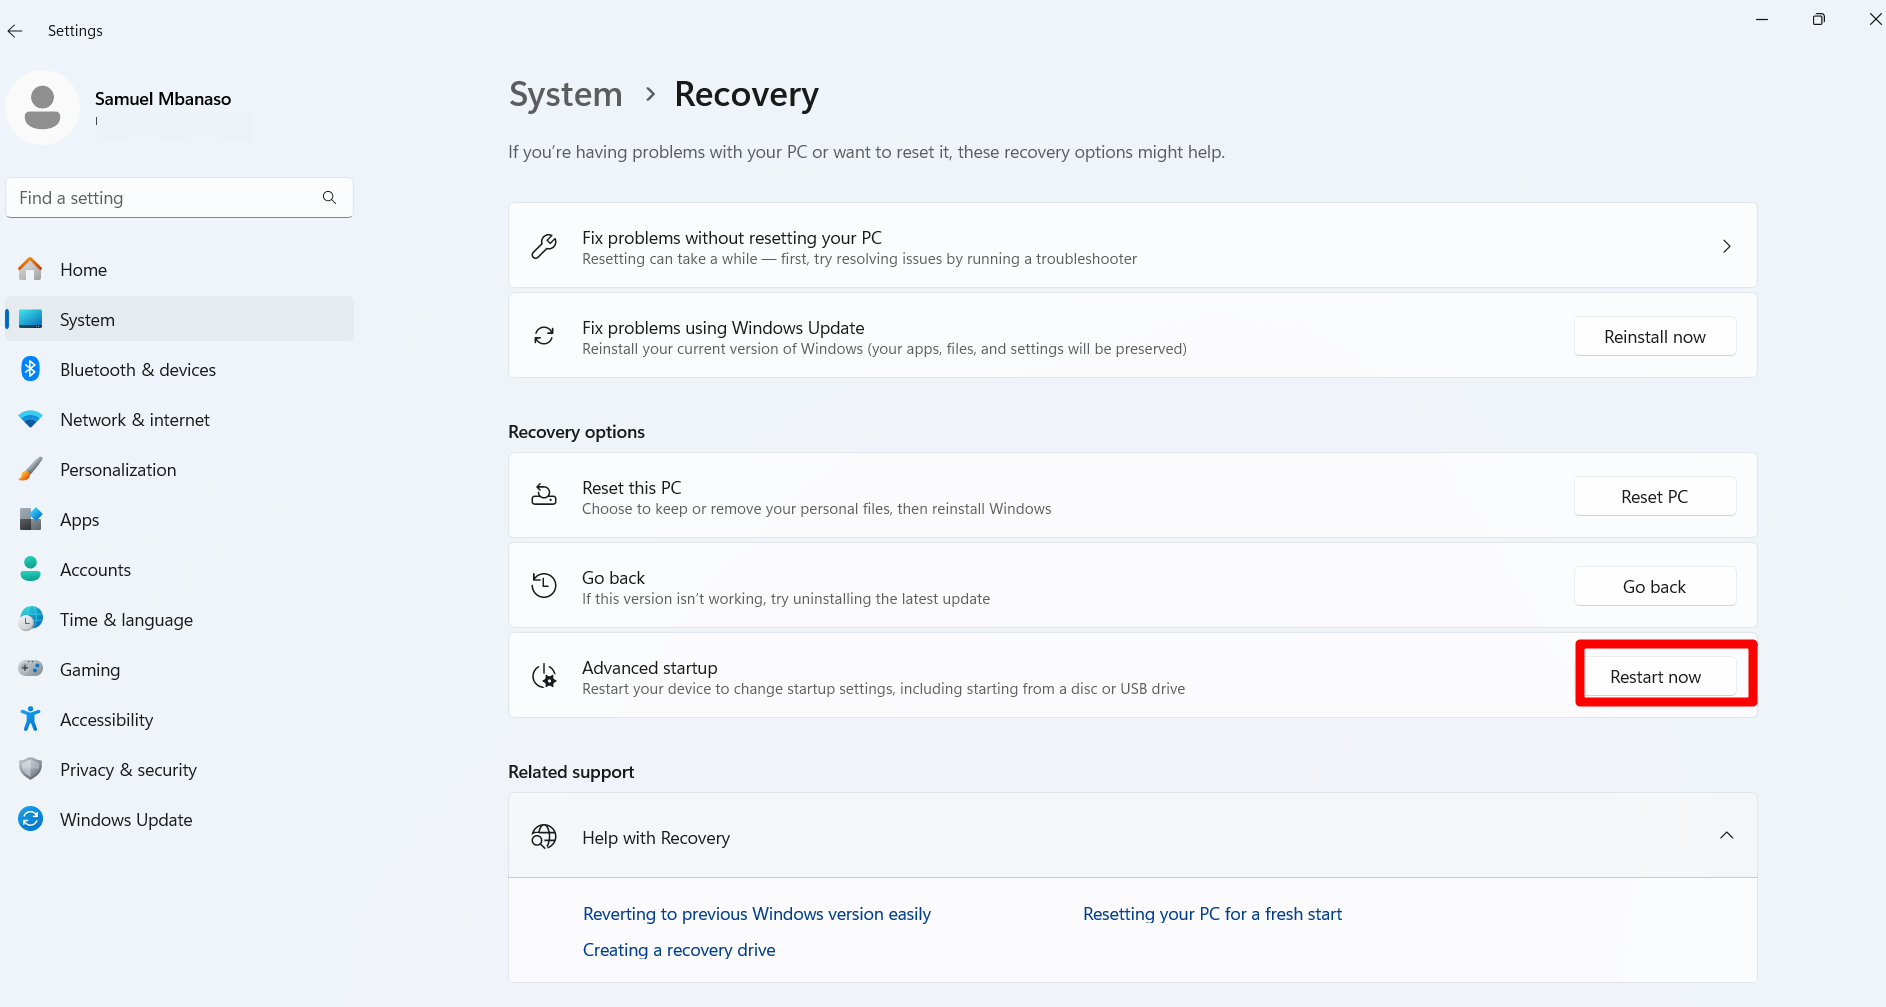
- Once the PC restarts into the Windows Recovery Environment, navigate to Troubleshoot > Advanced options > UEFI Firmware Settings > Restart.

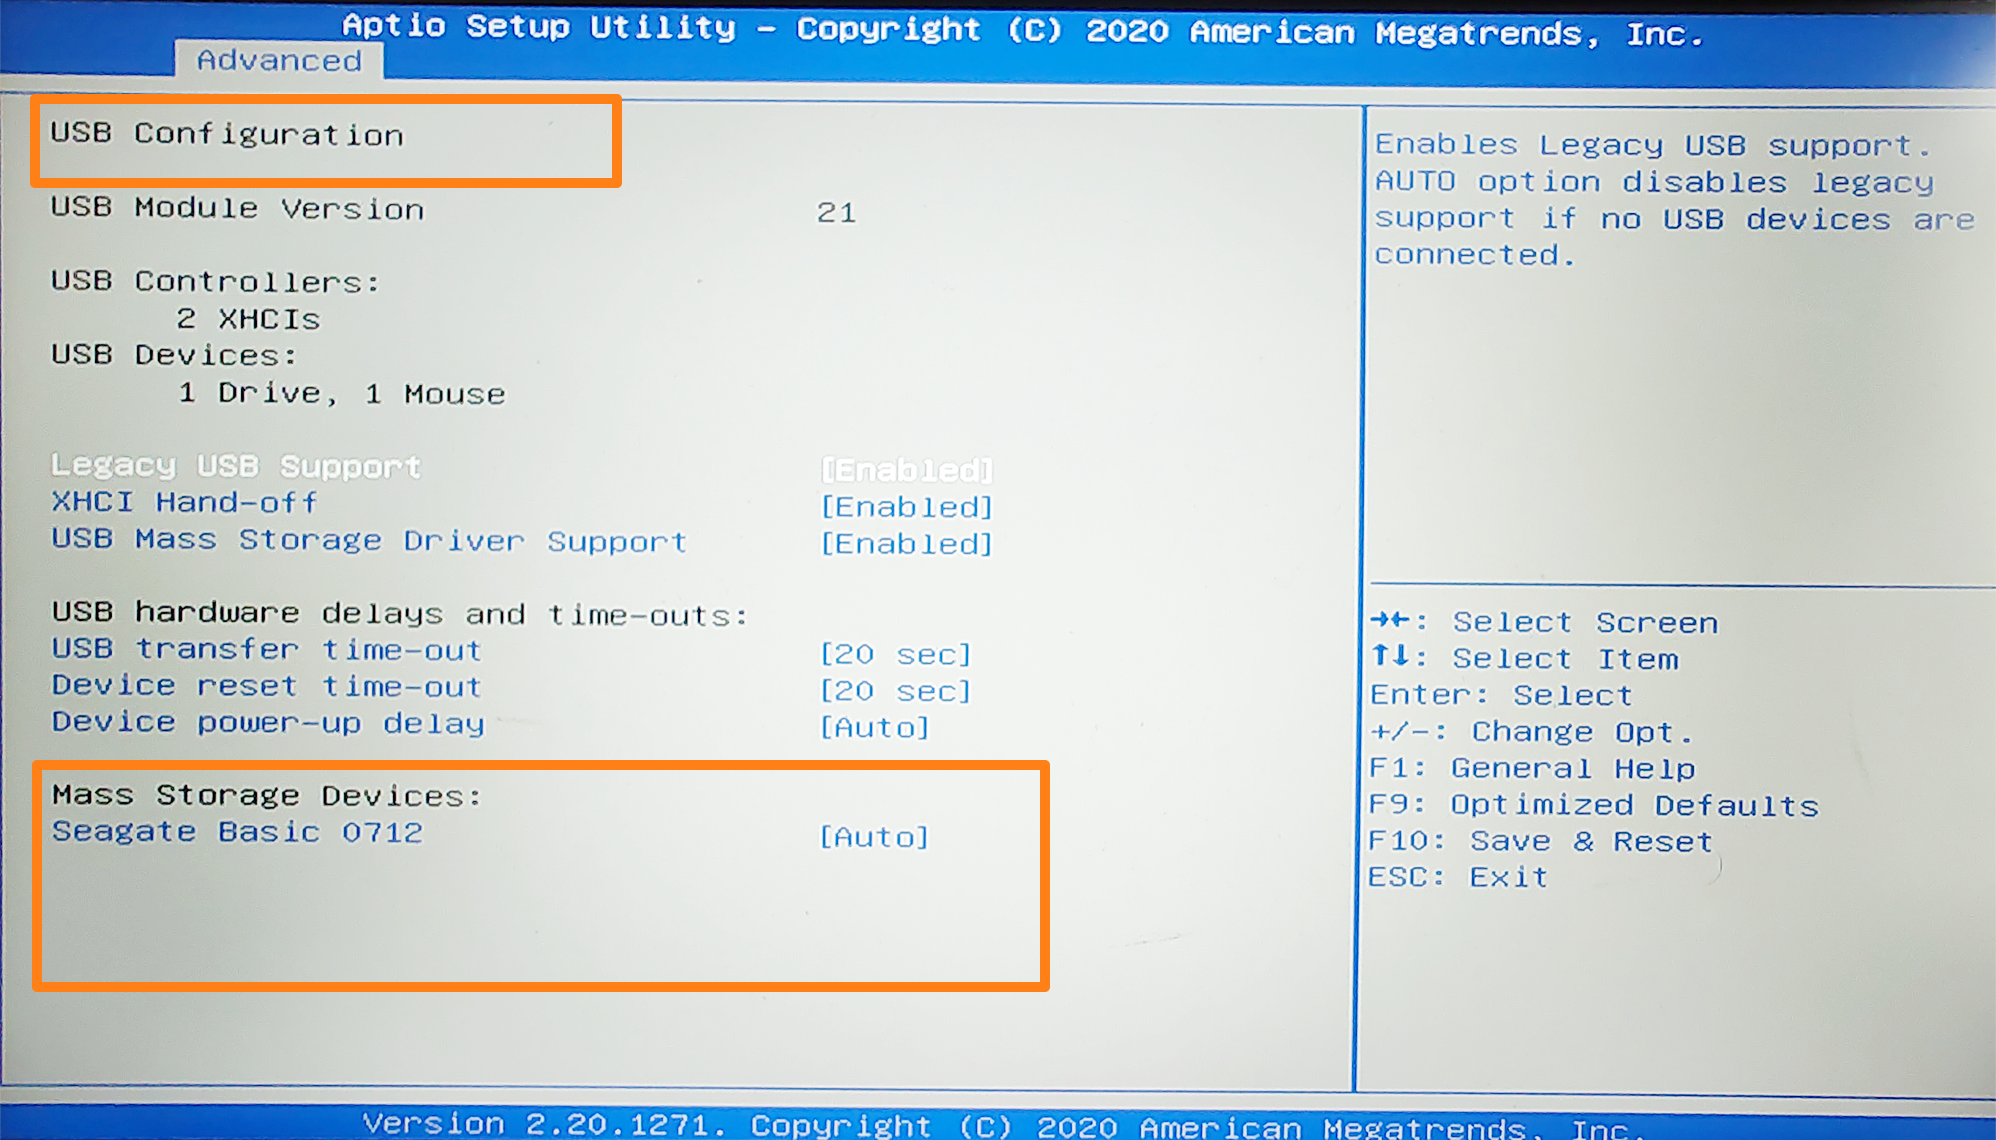
Once in the BIOS/UEFI settings, the interface varies according to your PC or motherboard manufacturer. Generally, you can go to the storage-related tab or menu to check your storage devices. You can also check USB-related areas, such as USB configuration, to view external drives.
A quick search on your motherboard’s manufacturer’s website will show you where to look if you’re still unsure.
You should also check with your motherboard manufacturer on how to enable your hard drive if it’s disabled. Further, you can select the default BIOS options (you’ll see which keys to press in the BIOS environment) to get your drives working again.
Additionally, you can update the BIOS/UEFI firmware to resolve configuration issues. Use support apps, such as Lenovo Vantage, HP Support Assistant, or Dell SupportAssist, to automatically download and install the latest version.
You can check out our article for more information on how to update the BIOS/UEFI firmware.
Solution 9: Check whether the drive is part of a storage pool in Windows Storage Spaces (external drives and secondary internal drives)
Windows has a feature in the Control Panel called Storage Spaces. It enables users to group multiple physical drives together into a single storage pool. The drives, thus combined, make a virtual drive.
Therefore, if you’ve once used this feature and your drive appears in the BIOS, that could be the reason why you can’t find your individual drive in Windows.
If you don’t remember using this feature, you should check it out all the same just to be sure.
So head to the Storage Spaces feature in Windows Control Panel and check whether your drive has been used to create a virtual drive. Then go ahead and delete it from the pool if you so wish:
- Click the Start icon on your taskbar and start typing Control in the search bar.
- Click Open on the Control Panel option.
- Select Category in the View by drop-down menu in the top-right corner of the window.
- Now click on System and Security.
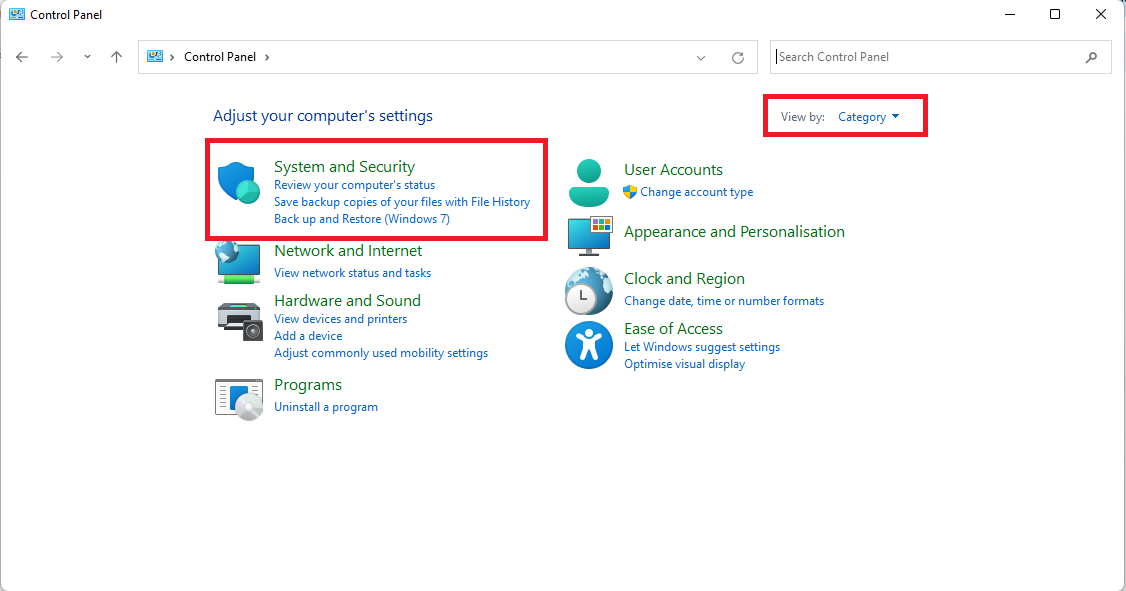
- Click on Storage Spaces.

- If there’s an existing pool, delete your disk from it.
Solution 10: Reinstall and update NVMe or IDE ATA/ATAPI controllers (for secondary internal drives)
The SSD or HDD not showing up could be a result of conflicting or problematic IDE (for hard disk drives and optical drives) or NVMe controllers (for modern SSD drives).
Without these crucial drivers, the operating system will not be able to communicate with your hard drive or SSD. In this case, your BIOS might be seeing the drive, but Windows isn’t, due to the driver issues.
You can fix this by deleting all instances of the driver in Device Manager and then checking for hardware changes to prompt the OS to reinstall the basic drivers:
- Click the Start icon (Windows logo) on your taskbar and type Device Manager in the search bar.
- Click Open.
- Once in the Device Manager window, locate IDE ATA/ATAPI controllers and click the drop-down arrow to expand it and see the entries under it.
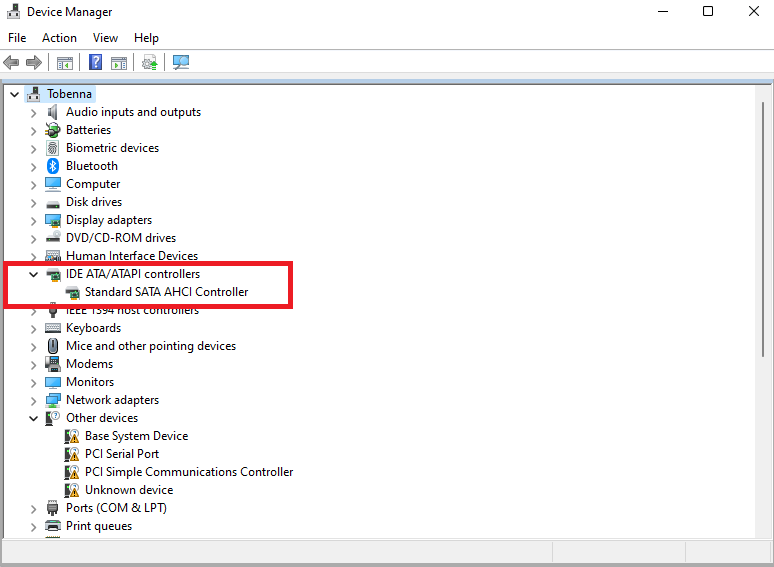
- Right-click on the entry and click Uninstall device.
- If there are multiple entries, uninstall each one accordingly.
- Afterwards, restart your computer.
Now, after uninstalling the IDE or NVMe controllers, it’s advisable to get the latest drivers other than the basic version that’s installed after the PC is restarted. To do this, you can:
- Go to the PC or motherboard manufacturer’s website to download and install the driver.
- Use your PC maintenance app to identify missing and outdated drivers and install the updates.
You can also use a dedicated third-party driver updater tool such as Auslogics Driver Updater to run an automatic search and download all the latest required drivers for all your hardware devices.
Solution 11: Run the System File Checker scan (external drives and secondary internal drives)
Windows requires its system files to be in order so as to function normally and efficiently. If some of these files have become missing, modified, or corrupt, it results in various issues, including the inability to detect and manage hardware components.
System File Checker (SFC) is used to replace these crucial files. However, to make certain that SFC replaces all the necessary files, you’d first have to run the DISM tool to check the integrity of the system file image, ensuring that all the required replacements are present.
Follow the instructions presented in this guide to successfully run the DISM and SFC scans.
After the PC restarts, see if the drive is now being recognized by the system.
Solution 12: Check the SATA and power cables for your internal hard drive
A faulty SATA cable is one of the causes of the hard drive not showing up in Windows 11 or 10.
The SATA data cable connects internal hard drives and SATA SSDs to the PC motherboard, making the transfer of data between the drive and the computer possible.
In addition, the power cable connects the hard drive to the computer’s electrical power supply, giving it the current it needs to operate and communicate with the PC.
If these cables have somehow become unplugged, loosened, or damaged, or if the cables are OK but there is an issue with the port on the hard drive or motherboard, then there’s no way that the hard drive will show up on Windows.
This would require opening up the computer casing. You may need the help of a PC repairperson to assist you with this process if it’s not something you can manage yourself.
- You need to check the cables. See if they are well-fitted.
- Try a different SATA port on the motherboard and hard drive.
- You could also try getting new cables.
If the cables and ports are in good condition, that probably indicates that the drive itself has become problematic or that your BIOS firmware needs to be updated.
Solution 13: Open up the hard drive to save the disk (external and internal hard drives)
If your hard drive is still not showing up after going through all the methods, you may have to remove the disk from the case and test it to see if it’s working. This should be done by a professional.
If the mechanical components of the hard drive have failed, the disk itself could still be functional. In the case of an external hard drive, it could be that the component responsible for converting the SATA drive to USB isn’t functioning. In other words, the hard disk itself could be just fine.
How to Fix an External Hard Drive Not Showing Up After Being Dropped
If you dropped your external hard drive, or your internal hard drive after removing it from the computer, and now it’s no longer functioning normally, stop usage immediately and seek the help of a hard drive repair professional. They’d have to open up the hard drive in order to check its components.
The disk could still be saved and they’d be able to recover the data stored on it. But you’d have to get a new drive afterwards, onto which they’d transfer your recovered data.
If a hard drive is showing signs of failure or physical damage, such as vibrating, overheating, or making unusual sounds, continued usage will eventually lead to total and permanent data loss as a result of continued damage to the hard drive platters.
Fixing the Problem of the Hard Drive Not Showing Up in Windows
Internal or external hard drives not showing up on Windows is an issue that should be approached carefully, especially when the user has already saved their important files on the drive.
If the problem stems from software issues, then it’s relatively easy to fix.
However, if it’s a hardware issue, you have to proceed carefully, first checking all the connections to ensure that they are properly fitted and functional.
After the connectivity and software issues have been dealt with, then mechanical damage and disk failure become the primary suspects, especially if the hard drive is displaying signs such as overheating, vibrating, making clicking sounds, or the computer letting out a series of beeps at startup.
We hope this guide has benefited you. Do leave a comment. We’d like to know the solutions that worked for you. Also, don’t forget to like and share with your friends.
FAQ
If your drive shows up in the BIOS/UEFI environment but not in Windows, it could be a result of your BIOS settings. Enabling the drive in the BIOS and restoring default BIOS settings might resolve the issue. However, if that doesn’t work, then try:
- Uninstalling all the IDE or NVMe controllers in Device Manager and getting the latest driver versions from the PC manufacturer’s website.
- Unrestricting the drive in the Group Policy Editor so that it becomes visible in File Explorer.
- If the drive shows up in Disk Management, change the drive letter, as long as it’s not the primary system drive (the C: drive).
- Run an SFC scan to fix system file issues.
- Mount the drive via the Command Prompt.