
- Why is the Windows 11 Security or Defender App Empty?
- Fix 1: Update the operating system
- Fix 2: Repair and reset the Windows security app
- Fix 3: Reinstall the security app via Windows Terminal (Admin)
- Fix 4: Redeploy every native Windows app
- Fix 5: Repair broken Windows files
- Fix 6: Reset Windows 11
- Fix 7: Upgrade your system using Microsoft’s Official Windows 11 installer
- Conclusion
One of the issues rocking Windows 11 PCs is the empty Windows Security interface. As it turns out, some people are left with unprotected systems when they upgrade to Windows 11.
When going through the Settings app, the Windows Security option doesn’t respond.
Once you try to open the app directly from the Start menu, its interface is blank.
Also, when going to the Services app and attempting to Start the Windows Security Service, you’ll see the following message:
“The Windows Security Service service on local computer started and stopped. Some services stop automatically if they are not in use by other services or programs.”
That means the service is broken.
Why is the Windows 11 Security or Defender App Empty?
If you’re seeing this problem, you might have installed one of the early unstable releases. As we mentioned, the preview builds are experimental versions of the OS, and it’s common to see such issues.
That said, if you installed more recent builds, then something must have gone wrong during installation.
This article will show you how to fix the empty Windows 11 Security app.
Fix 1: Update the operating system
Windows 11 has come a long way since its first release in the Windows Insider Program’s Dev Channel. As you know, Microsoft releases these builds to find and fix errors and bugs.
Each preview version came with new features that were accompanied by glitches.
Moreover, every subsequent version was designed to eliminate those glitches and introduce new features.
Since the official release has started rolling out, it’s wise you stay up to date. That said, if you’re still in the Insider program, you’ll continue receiving preview builds.
However, the problem might have been resolved in newer builds.
If you’re still using the preview build, you’ll likely get the latest preview version depending on your channel.
However, if you installed the official release, then you’ll be receiving the latest stable build.
So, head to the Windows Update interface. Start the Settings application using the Windows + I hotkey and click on Windows Update. Then, click on the Check for Update button.
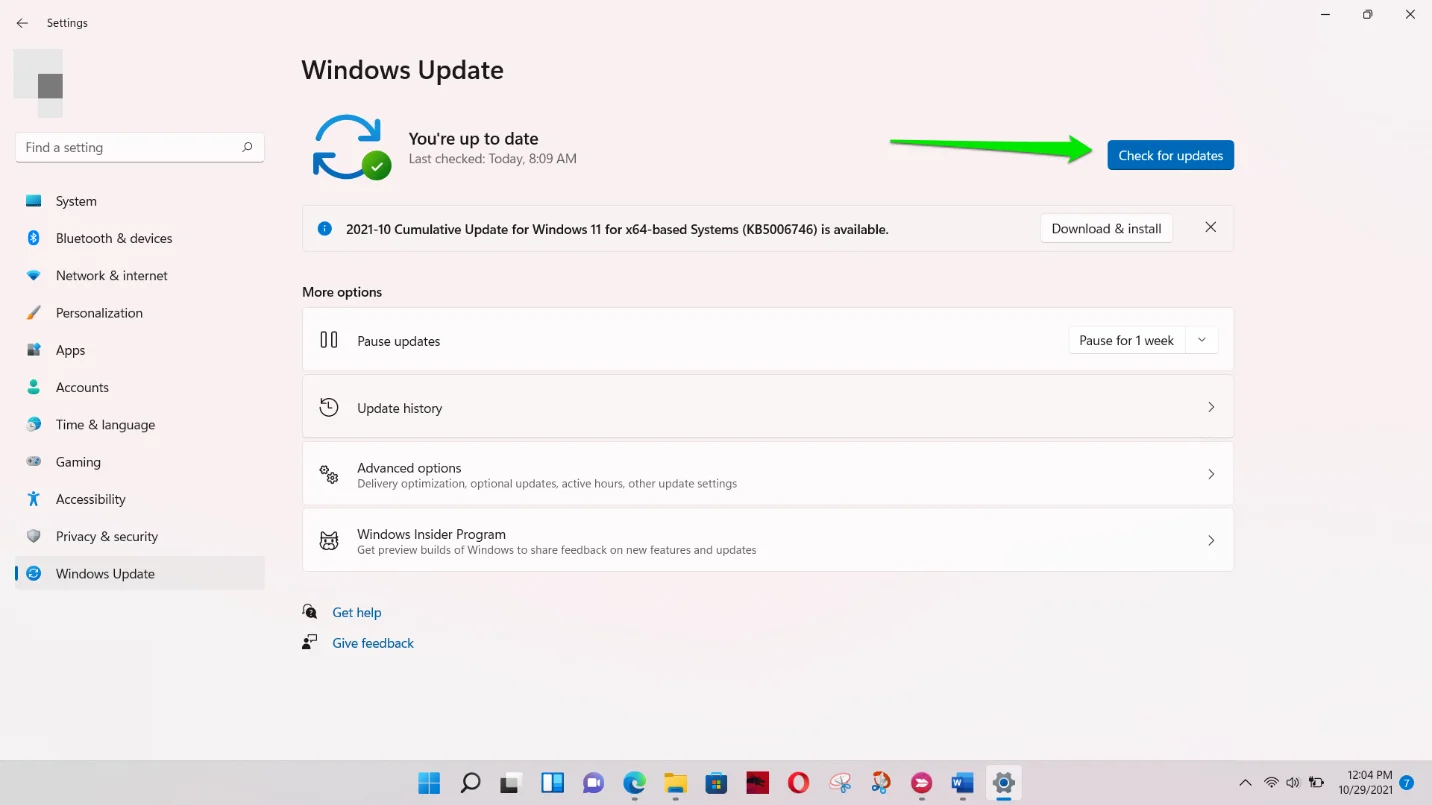
If you have a cumulative release update, click on the Download & Install button to start the update process.
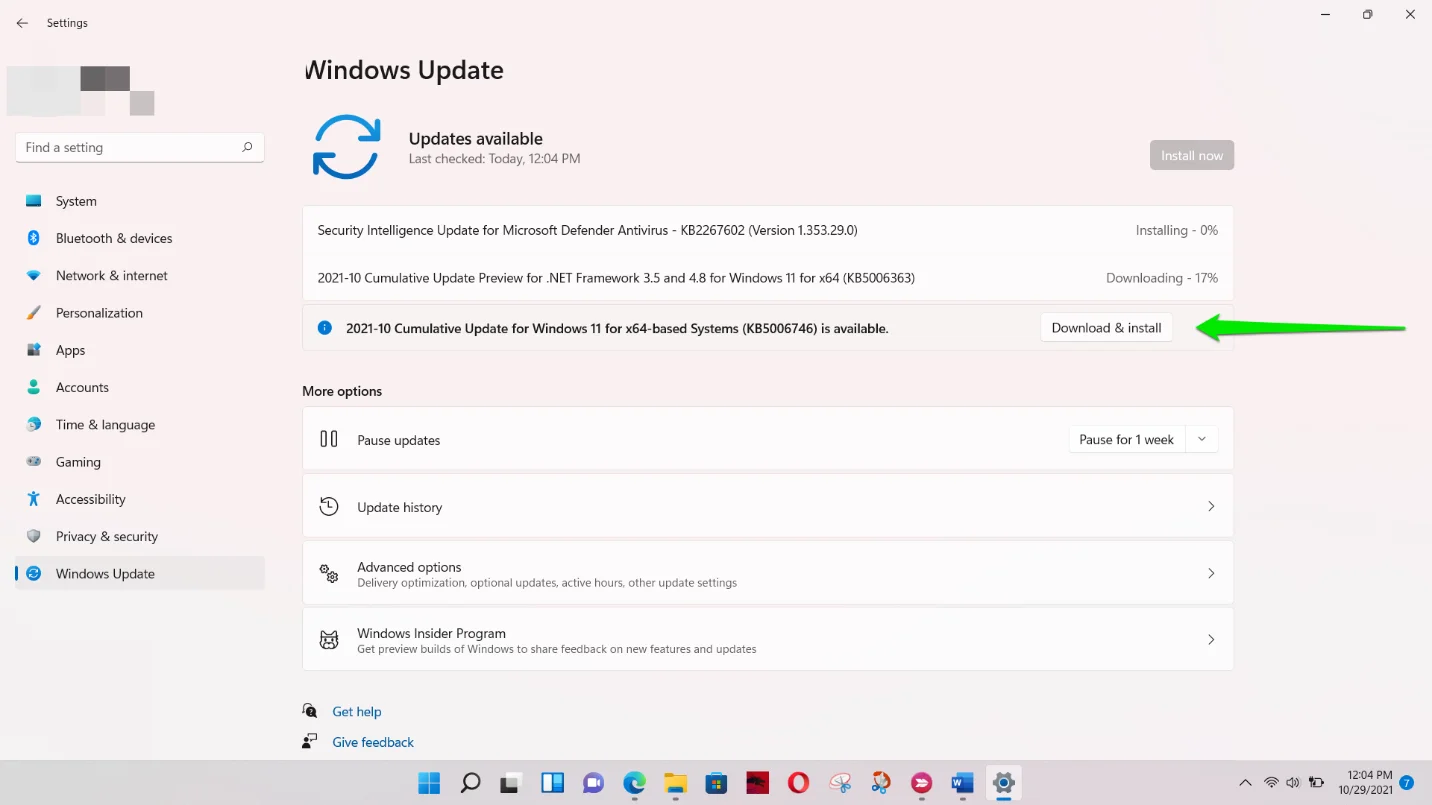
You’ll have to Restart your computer to complete the process once the downloads are complete.
Fix 2: Repair and reset the Windows security app
The next possible solution is repairing and resetting the Windows Defender app. You can easily do this via the Settings application. Follow these steps:
- Firstly, launch the Settings application. To do that, open the Start menu and select the gear icon. It would be easier to tap the
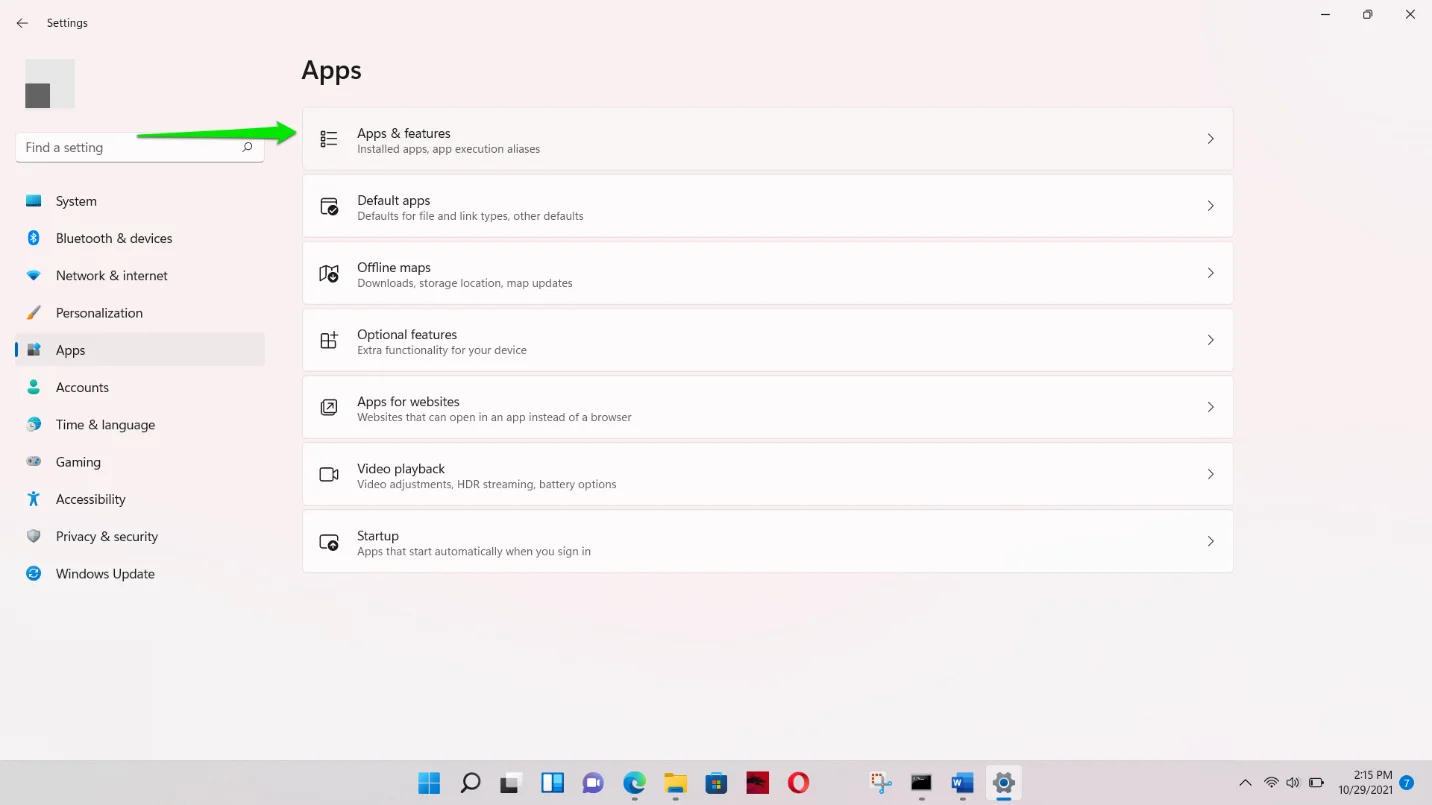
Windows + Icombination, though. - After the Settings application flies out, click on Apps on the left side.
- Next, go to the main window and click on the Apps & Features section.
- On getting to the Apps & Features interface, use the search box to find the Windows Security app or scroll down.
- Click on the three dots to the right of Windows Security and select Advanced Options.
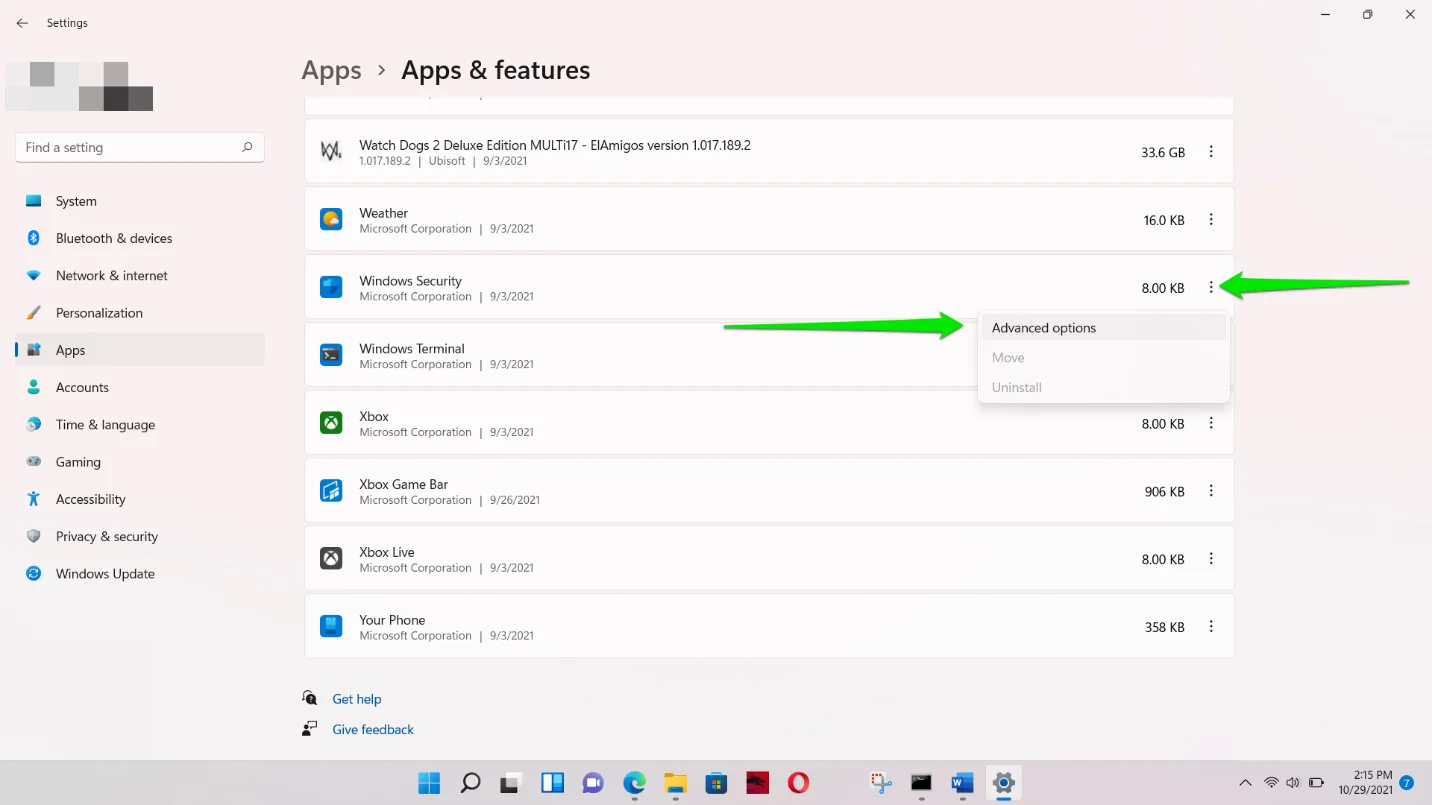
- Scroll down to the Reset section when you see the Apps > Apps & Features > Windows Security interface.
- Click on Repair. Doing this will prompt windows to search for problematic Windows Security files and replace them.
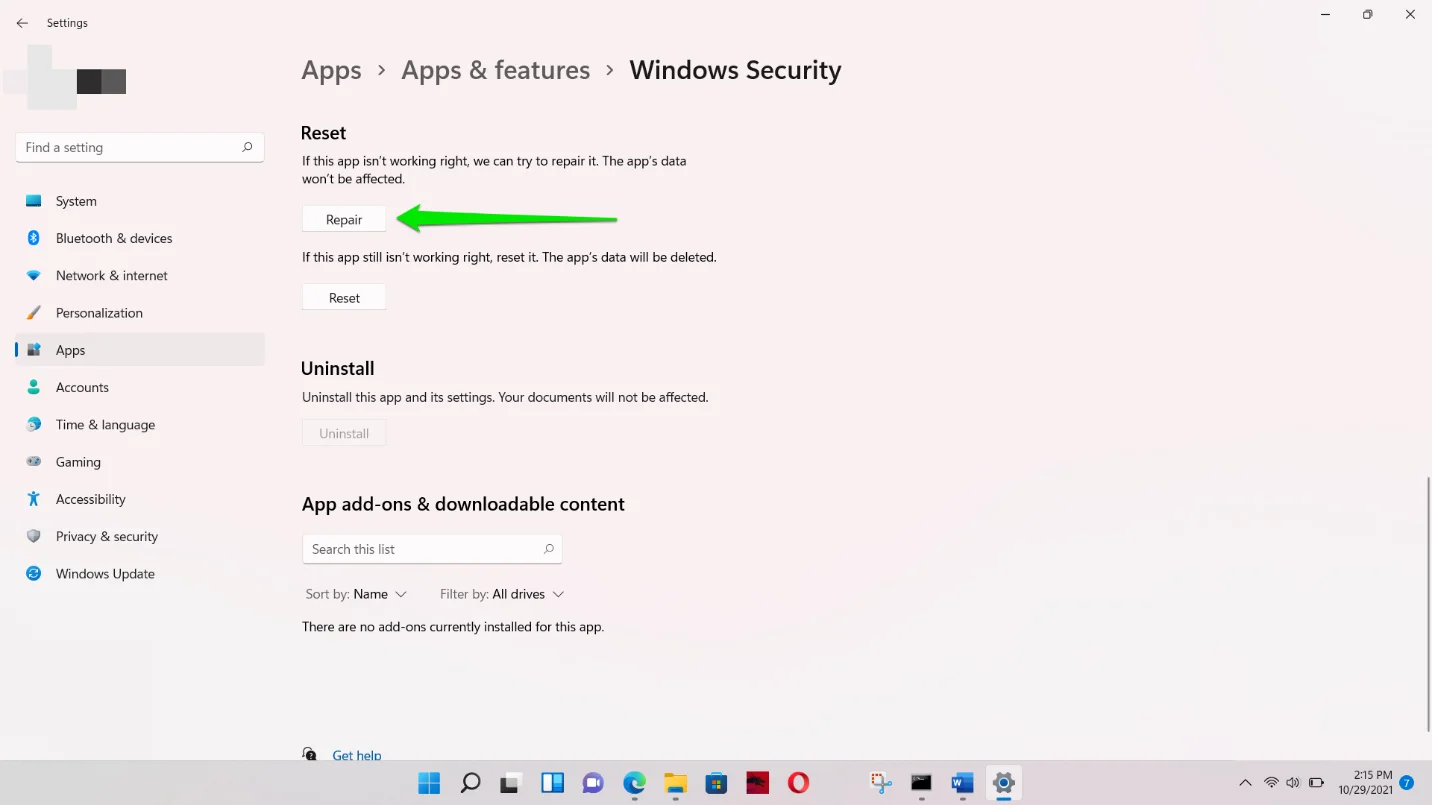
- If repairing the program doesn’t work, click on the Reset button. Then, click on Reset again in the confirmation dialog.
- Restart your computer after the process is complete and check for the blank screen on Windows Security again.
Fix 3: Reinstall the security app via Windows Terminal (Admin)
If the problem persists after repairing and resetting the app, your next course of action should be reinstalling it via Windows Terminal (Admin).
The command will remove every instance of Windows Security and reinstall it.
This particular fix mainly helped correct a problem that came with a Windows Insider Preview build. The issue has been resolved in subsequent updates.
So, if you’re still running the preview build, you don’t have to apply this fix. Instead, head to Windows Update and install the latest official version of Windows 11.
However, if you want to fix the problem for now, here are the steps you should follow:
Follow these steps:
- Right-click on your Start button or go to your keyboard and press the
Windows + Xkey combination. - Select Windows Terminal (Admin) in the Power User menu that flies out on top of the Start button.
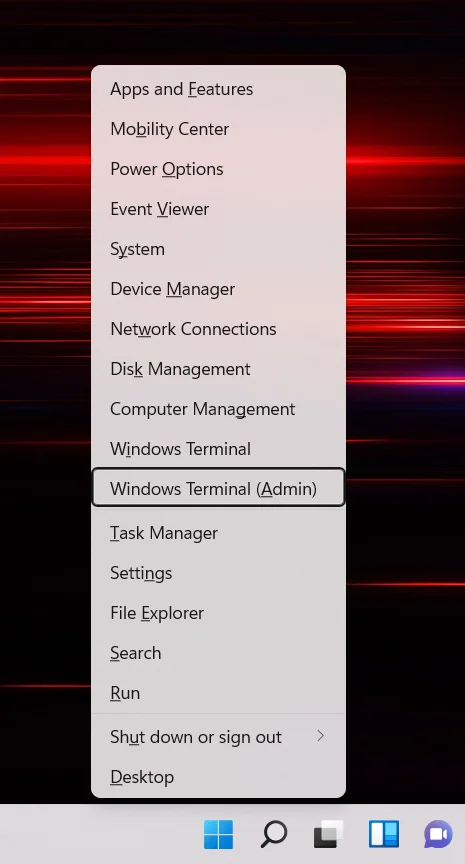
- Now, select Yes in the User Account Control pop-up.
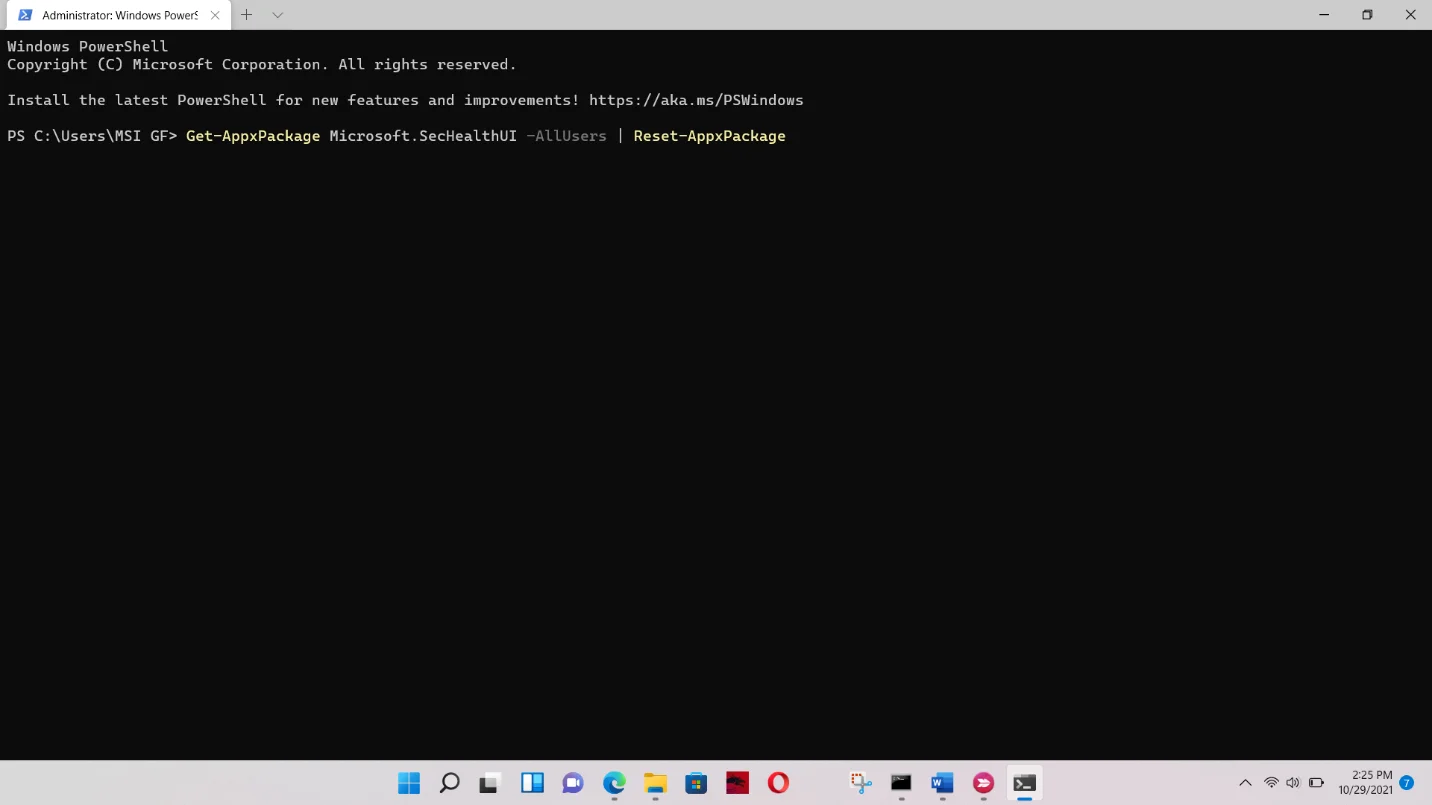
- After Windows Terminal (Admin) appears, type the following and press the Enter key:
Get-AppxPackage Microsoft.SecHealthUI -AllUsers | Reset-AppxPackage
Related: Most Useful Powershell Commands: Cheat Sheet with Examples
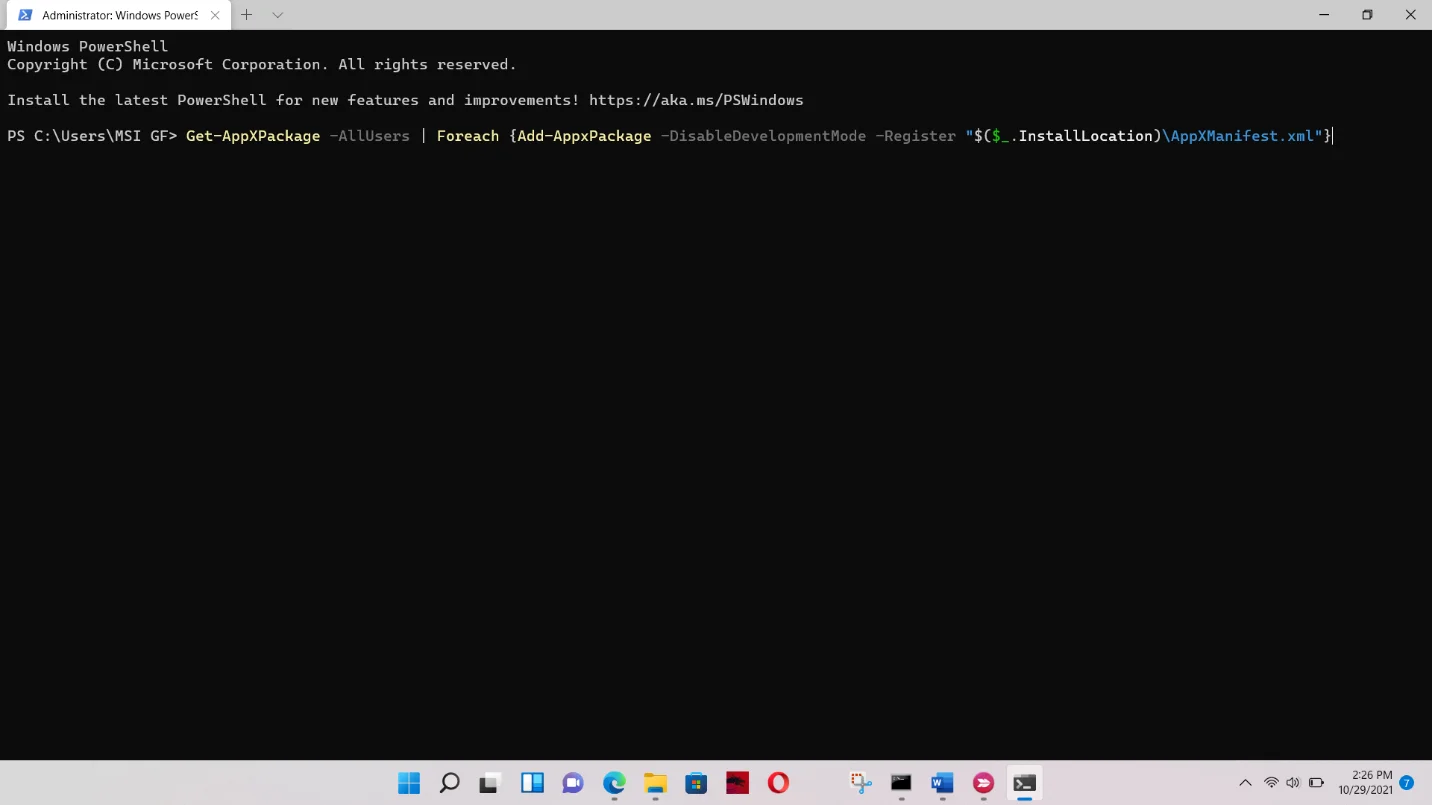
Fix 4: Redeploy every native Windows app
The next method is reinstalling all your native Windows applications. Some of these programs’ files may have been corrupted during your upgrade to Windows 11.
So, head to the admin version of Windows Terminal again. This time, type the following codes and hit the Enter button on your keyboard after typing each line:
Set-ExecutionPolicy Unrestricted

Get-AppXPackage -AllUsers | Foreach {Add-AppxPackage -DisableDevelopmentMode -Register "$($_.InstallLocation)\AppXManifest.xml"}
Related: CMD Navigation: How to Change Directory in CMD (Command Prompt)
Fix 5: Repair broken Windows files
Some Windows system files may have also been affected during the upgrade. Repairing these files should resolve the problem in this case.
Running the System File Checker (SFC) is a great option here. It’s a command-line program that deals with system file integrity violations.
It scans protected Windows files and automatically replaces those that are missing or damaged.
Microsoft recommends that you run the Deployment Image Servicing and Management (DISM) tool before running SFC.
Both programs work hand in hand. DISM uses the Windows Update client to download the replacement files to be used by SFC.
You’ll have to launch Command Prompt as an administrator to get the privilege required to run these tools correctly.
Here are the steps you’ll be following to apply this fix:
- Launch the Run window. Press
Windows + Ror right-click the Start button and choose Run from the Power User menu. - After the Run window opens, type CMD.
- Next, press
Shift + Ctrl + Enteron your keyboard to open the Command Prompt as an administrator. - Select Yes in the User Account Control confirmation window.
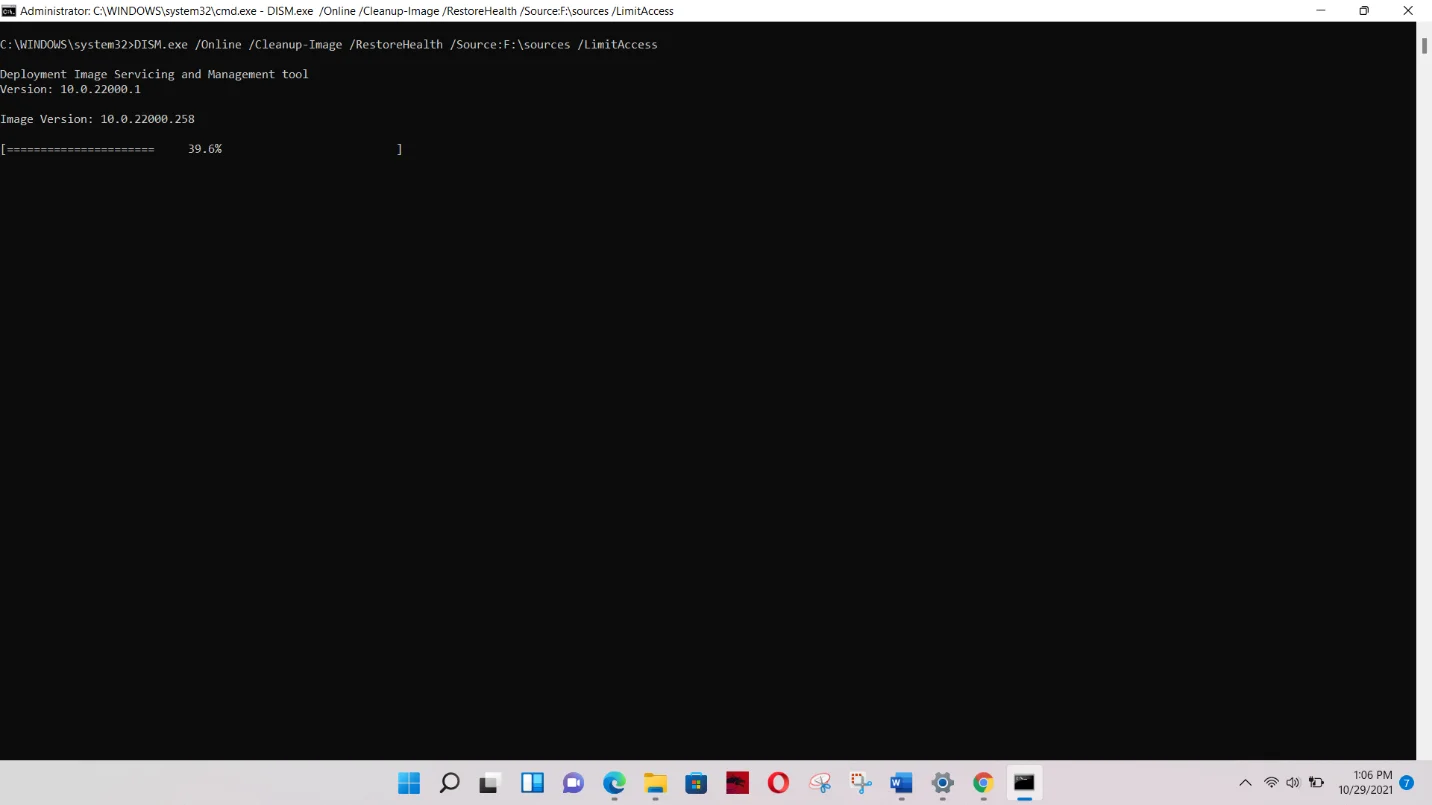
- Once the Command Prompt window appears, type the following code and press the Enter button on your keyboard:
DISM.exe /Online /Cleanup-image /Restorehealth

As we mentioned, DISM uses the Windows Update client to download repair files. The System File Checker then uses these files to fix integrity violations.
In some cases, the DISM tool may fail to initiate the client and fetch the files. This could be because you’re not connected to the Internet, or the Windows Update service has encountered a problem.
There’s a workaround. You can use a Windows installation DVD or the Windows 11 ISO you used for the upgrade as your repair source. Since you’re on Windows 11, it would be best to go for the latter.
Now, mount the ISO file (double-click it or right-click and select Mount) as a virtual DVD. Then, enter the following code:
DISM.exe /Online /Cleanup-Image /RestoreHealth /Source:X:\FileSource\Windows /LimitAccess
When entering the code, make sure you replace the Source:X:\FileSource\Windows part of the command with the path to the ISO file’s Sources folder.
The ISO file should appear on This PC after mounting it.
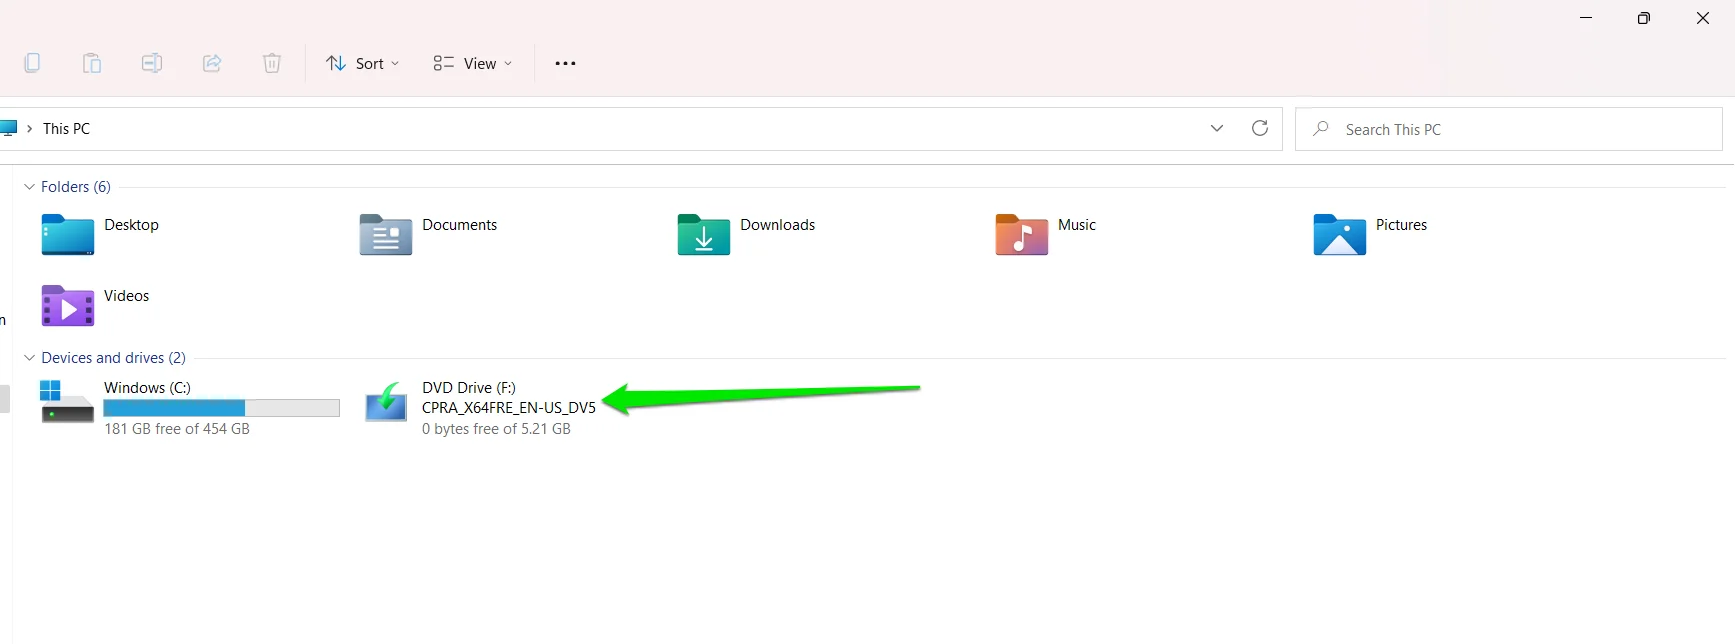
Since it’s mounted as drive F on my computer, the code should look like this in my case:
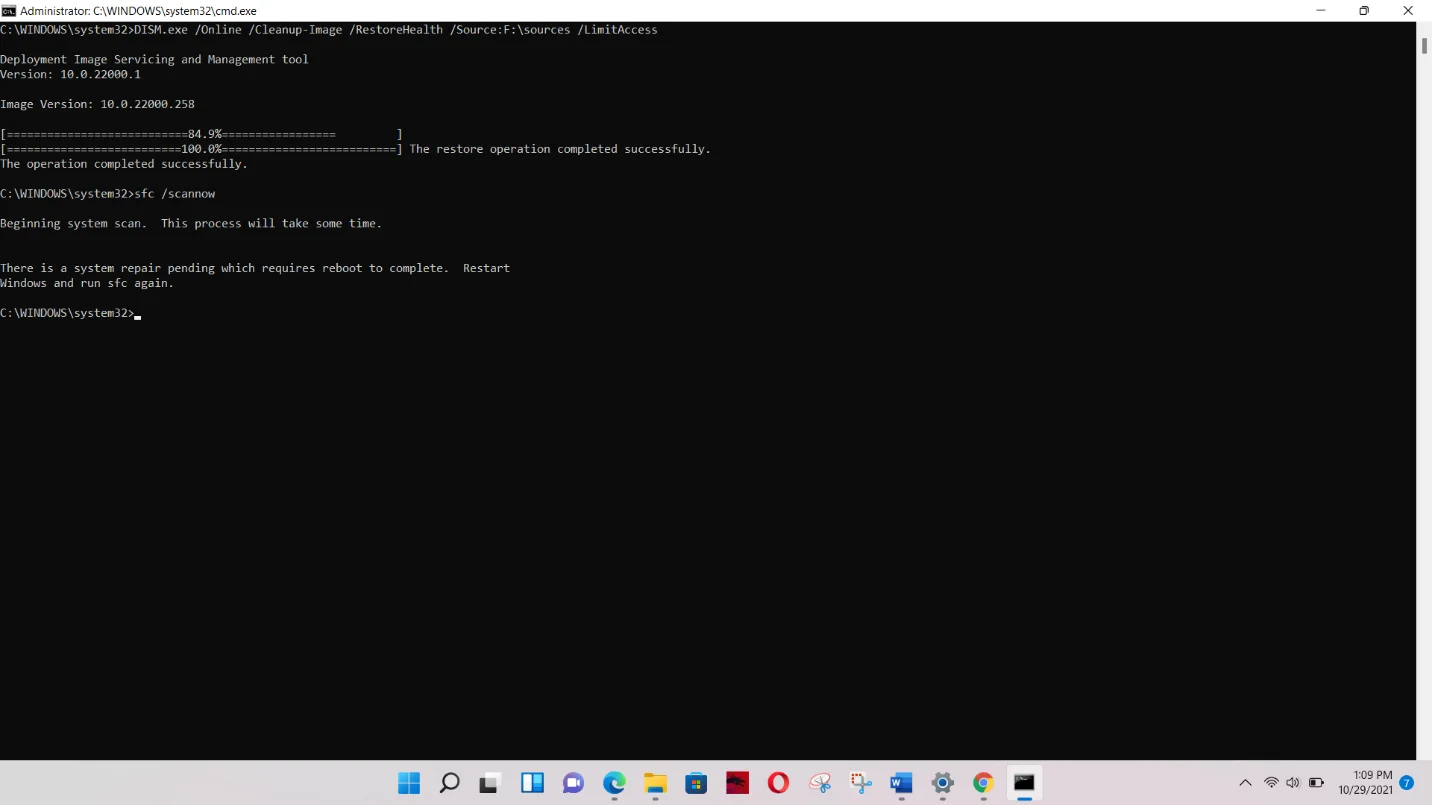
DISM.exe /Online /Cleanup-Image /RestoreHealth /Source: F:\sources /LimitAccess
You can also enter only F: as the source.
After the tool completes the process, type the following code on the next line and hit Enter:
sfc /scannow
It may tell you that a repair is pending, and you have to reboot your PC. This is likely due to the DISM process you just ran. Restart your computer as instructed.
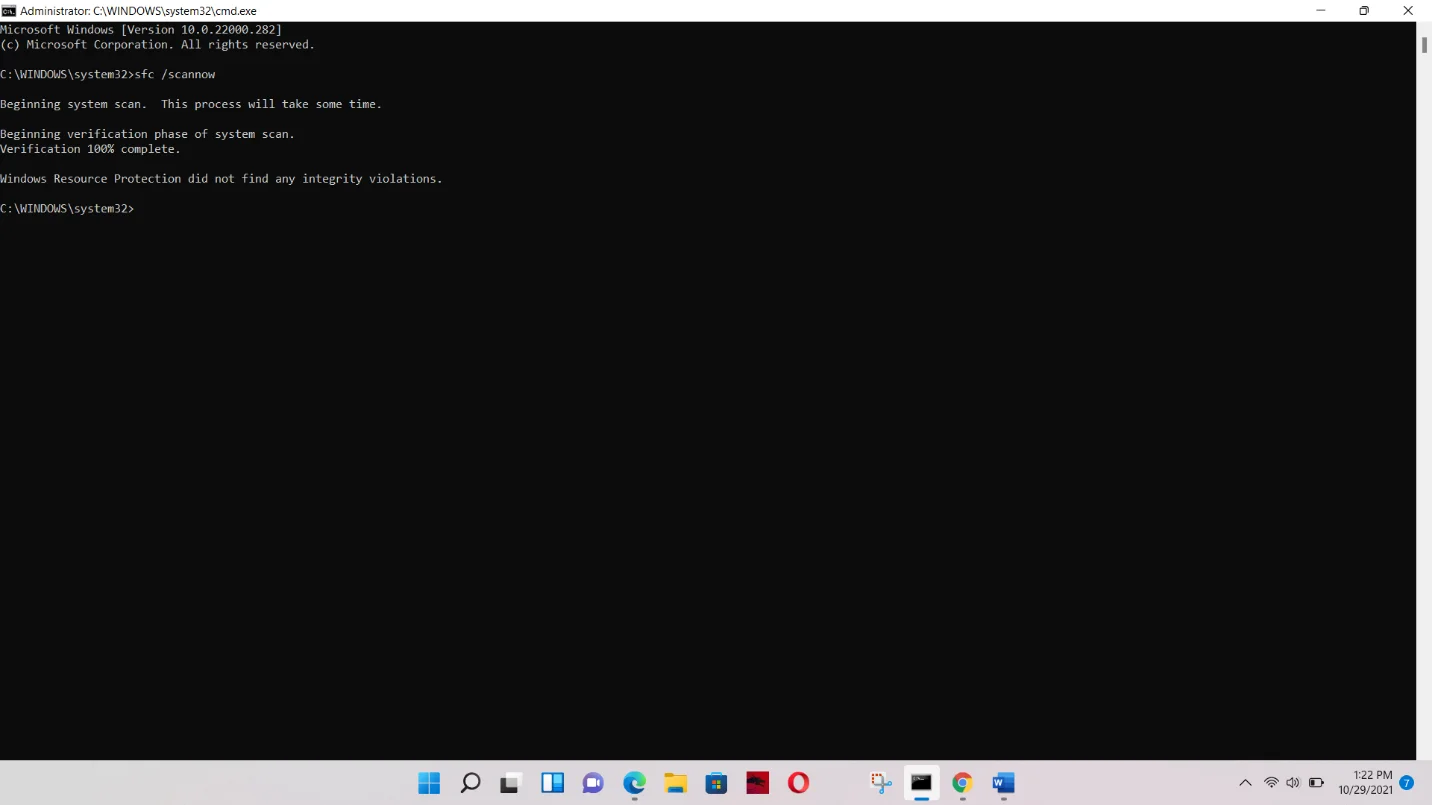
After your PC reboots, rerun the command. It should tell you that the process will take some time.
The tool will show you the following message if it does not find corrupt files:
“Windows Resource Protection did not find any integrity violations.”
If it finds and replaces corrupt files, you’ll see the following message instead:
“Windows Resource Protection found corrupt files and successfully repaired them.”
Fix 6: Reset Windows 11
If none of the above methods worked, then you have to reset the operating system. Using the reset function, you’re essentially reinstalling the operating system as a whole.
This way, files and system components that were botched during the first installation can be reinstalled. This method worked for most people.
Before you start, however, you should understand a few things:
- You have to back up your files if you haven’t already. Even if you choose to keep your files, it would be best to stay on the safe side.
- If you’ve installed apps after your upgrade or you chose the option to keep your third-party programs when you installed Windows 11, they’ll be uninstalled during the process. Only apps that came with your PC will be retained.
- If you haven’t already, update the operating system before performing the reset. You can also allow Windows to install updates before resetting your PC.
- Remember to follow the steps to a tee.
Now, down to business:
- Firstly, launch the Settings application. Open the Start menu and select the gear icon. It would be easier to tap the
Windows + Icombination, though. - After the Settings application flies out, go to the left side of the window and click on Windows Update.
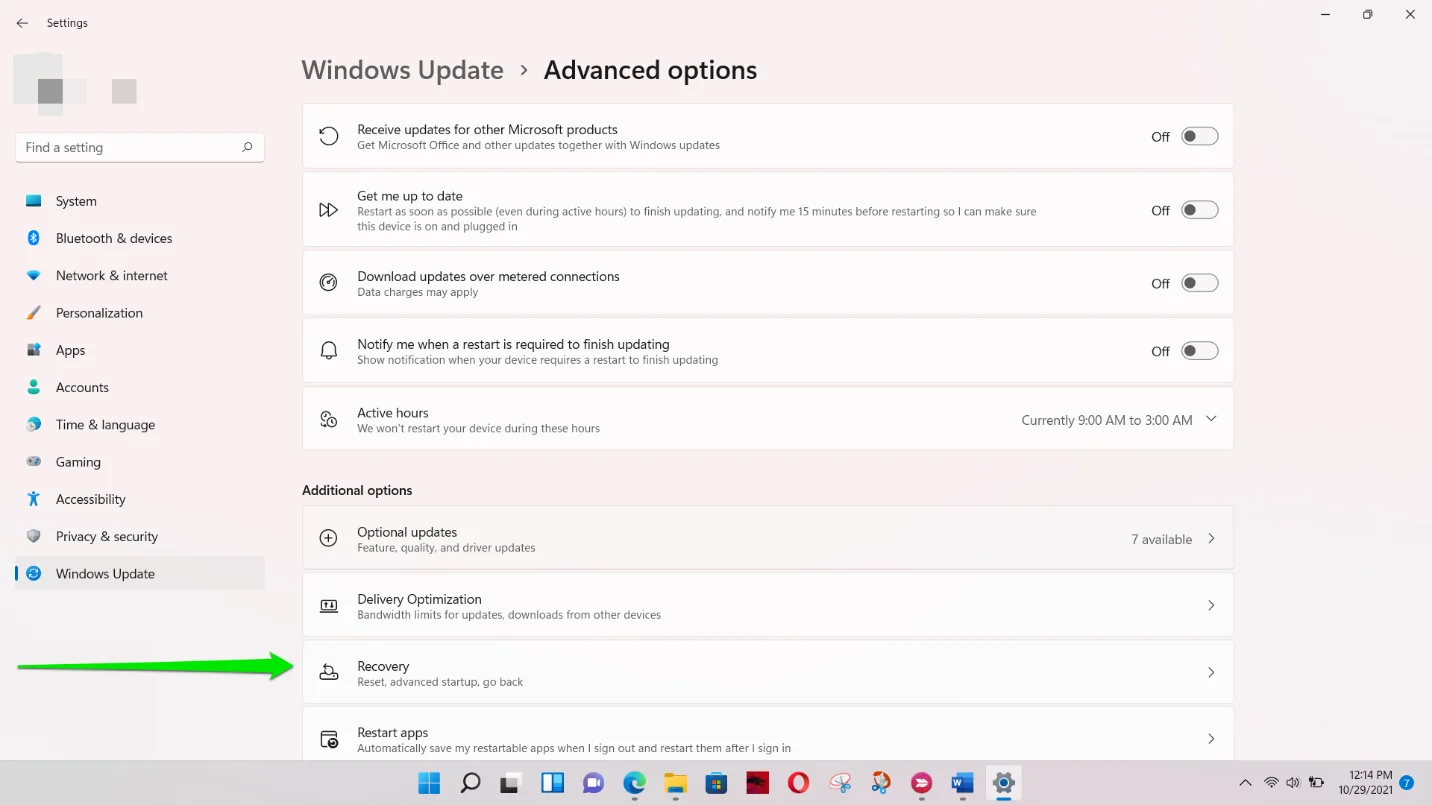
- Click on Advanced Options under the Windows Update interface.

- Scroll down and select Recovery on the Advanced Options page.
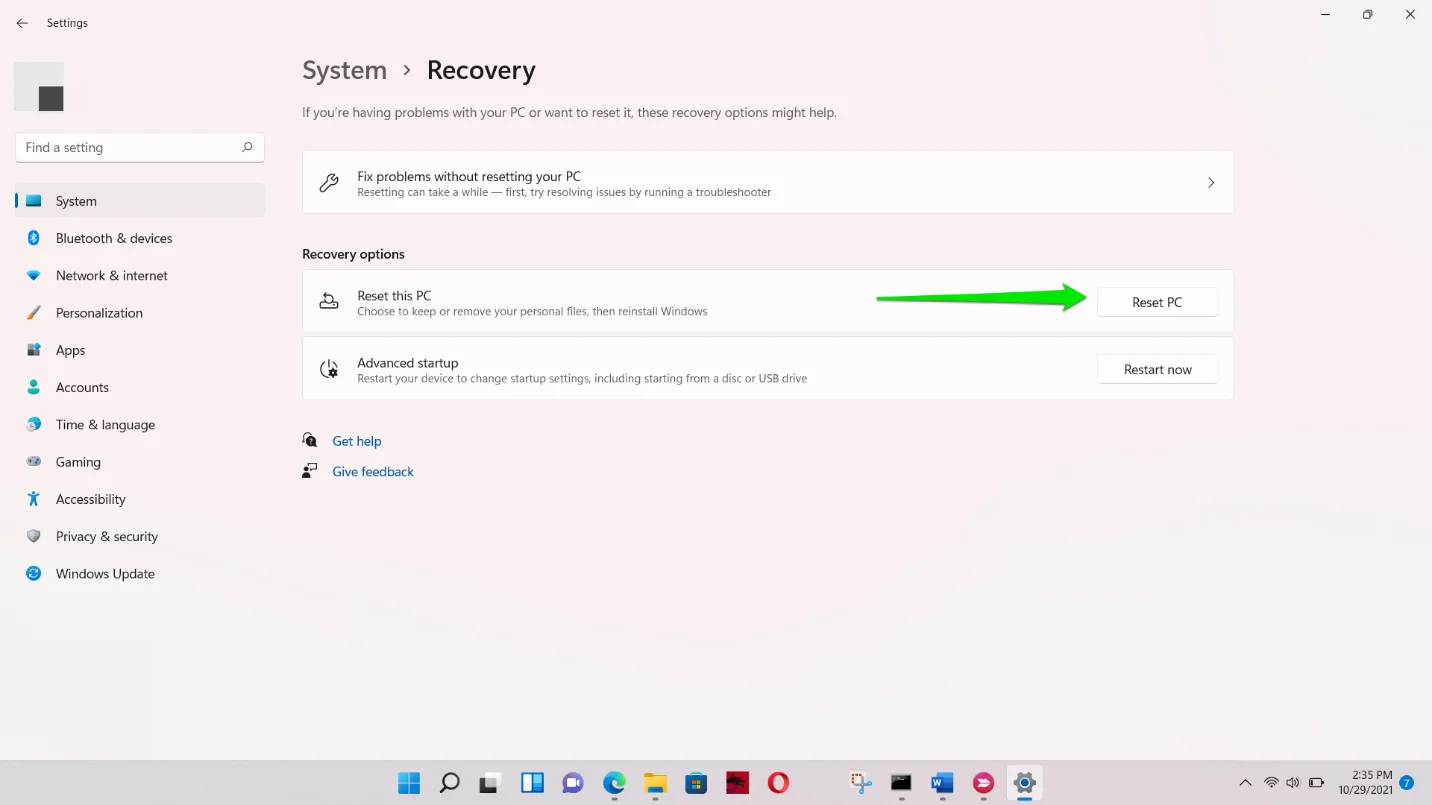
- Select Reset next to Reset PC.
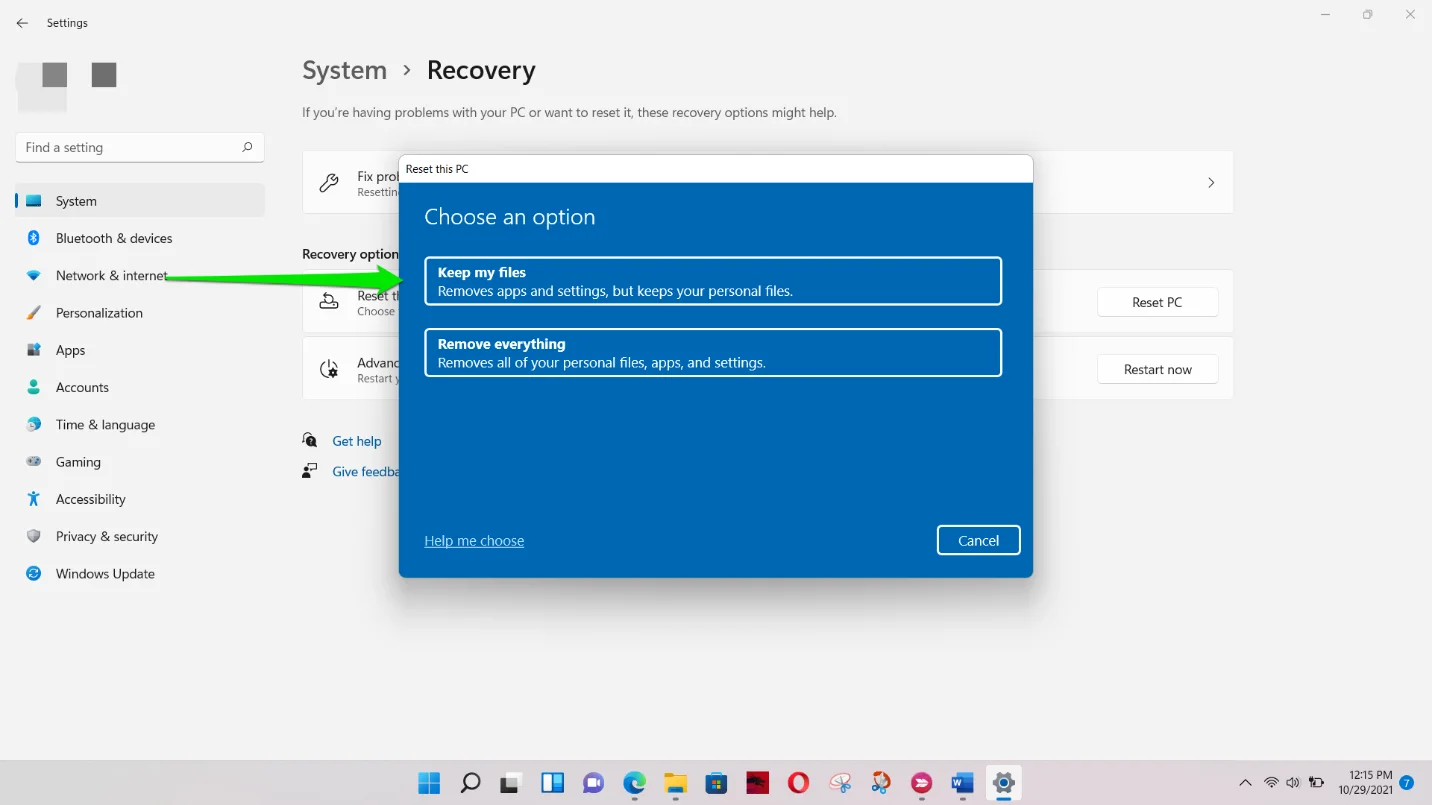
- Select the Keep My Files option.
Also Read: How to Download and Install Windows 11: The Most Up-to-Date Information
Fix 7: Upgrade your system using Microsoft’s Official Windows 11 installer
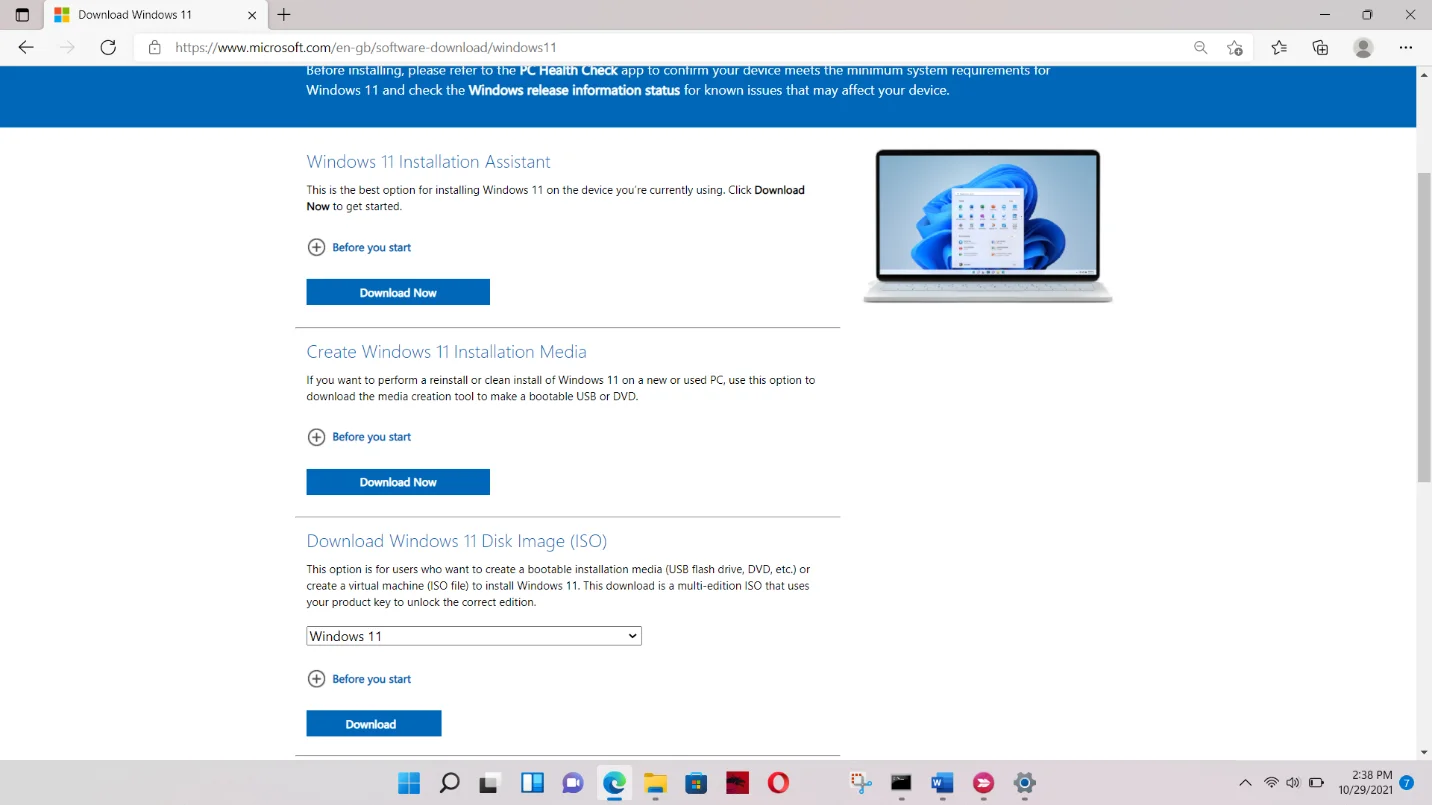
You can also upgrade your computer using the latest official Windows release. Microsoft started a phased rollout on October 5th. This means the OS is available to the public, not just Insider.
So, head to the site, download the ISO file, mount it, and run the setup.
Conclusion
That’s how to fix empty Windows 11 or Defender app. To prevent future bugs and frustrating PC issues, you can download and install Auslogics BoostSpeed on your Windows 11 PC.
The program catches potentially problematic temp and junk files and removes them before they cause errors. It also takes care of leftover registry keys that can break specific system processes.