![[In a Few Steps] How to Remove Recycle Bin from Desktop on Windows 10/11](https://www.auslogics.com/en/articles/wp-content/uploads/2024/08/In-a-Few-Steps-How-to-Remove-Recycle-Bin-from-Desktop-on-Windows-1011-568x359.png)
The Windows 10 Recycle Bin is an important component of the Windows OS. It works as a repository for deleted files. Basically, its role is to provide Windows users with a safety net before deleted files are permanently removed from the system.
The Recycle Bin was first introduced by Microsoft with Windows 95.
Without exaggeration, the Recycle Bin revolutionized file management. It has offered us a safeguard against accidental deletions. The name “Recycle Bin” comes from the tool’s real-world counterpart. It emphasizes the concept of recycling digital content and giving users a chance to reconsider and “fish out” what they have previously deleted.
However, there’s an opinion that Microsoft decided to go with the “Recycle Bin” metaphor in response to the legal challenges from Apple, avoiding potential accusations of infringing on Apple’s “Trash” concept.
That said, if it wasn’t for that conflict, the article might have been titled “How to Remove Trash Bin from Desktop” instead of its current designation.
Even though the Recycle Bin is a default feature on Windows desktops, there are users that choose to remove the Recycle Bin from the desktop for a cleaner layout, to free up some desktop space, or for security and privacy reasons in shared environments.
How to Remove the Recycle Bin from the Desktop
If you find yourself wondering how to delete the Recycle Bin from your desktop, take a look at the solutions below.
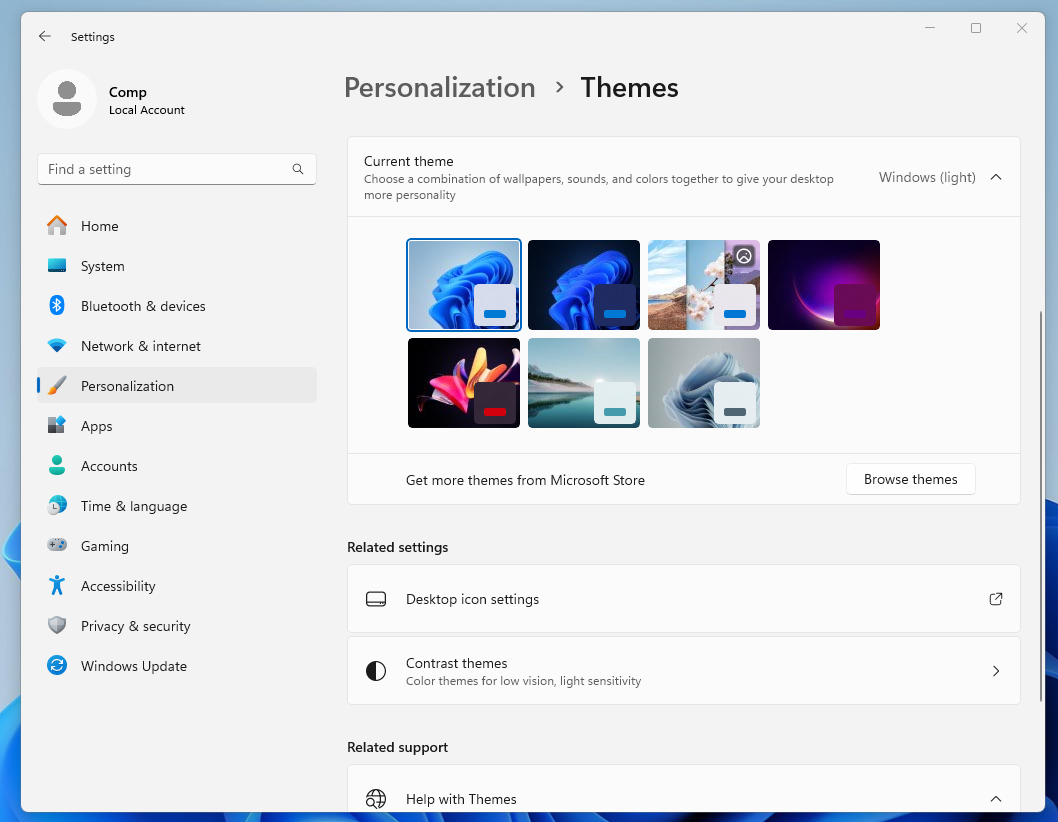
Remove the Recycle Bin from the desktop using the Settings app
It will only take you a few steps to remove the Recycle Bin from your desktop using the Settings app.
Here’s how to remove the Recycle Bin from the desktop on Windows 10:
- Right-click anywhere on the desktop.
- From the context menu, select Personalize.
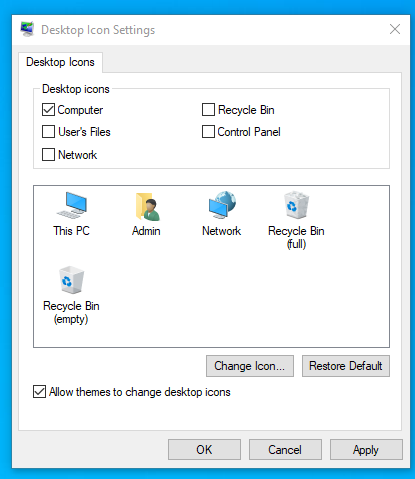
- In the Themes category, click on Desktop icon settings under Related Settings.
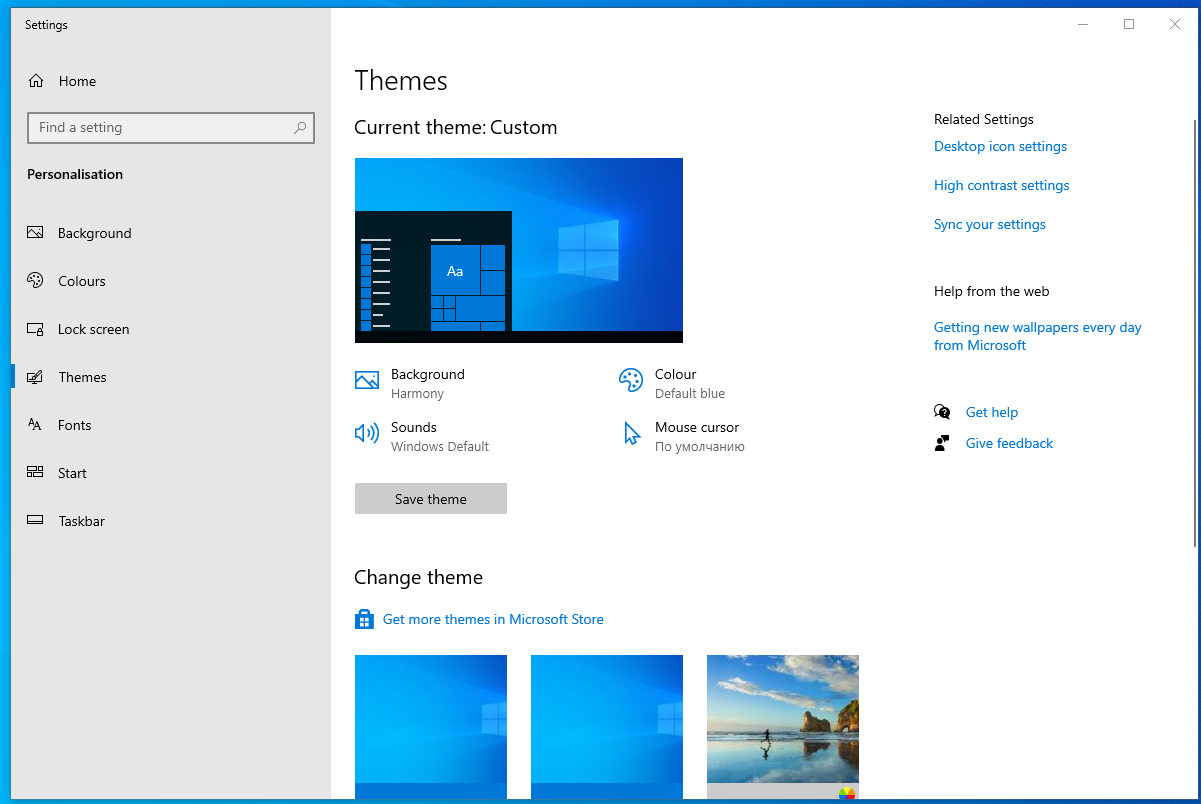
- Deselect the Recycle Bin option, then click on Apply.
Here’s how to remove the Recycle Bin from the desktop on Windows 11:
- Use the
Win + Ikeyboard shortcut to access Windows Settings. - Choose Personalization and then select Themes .
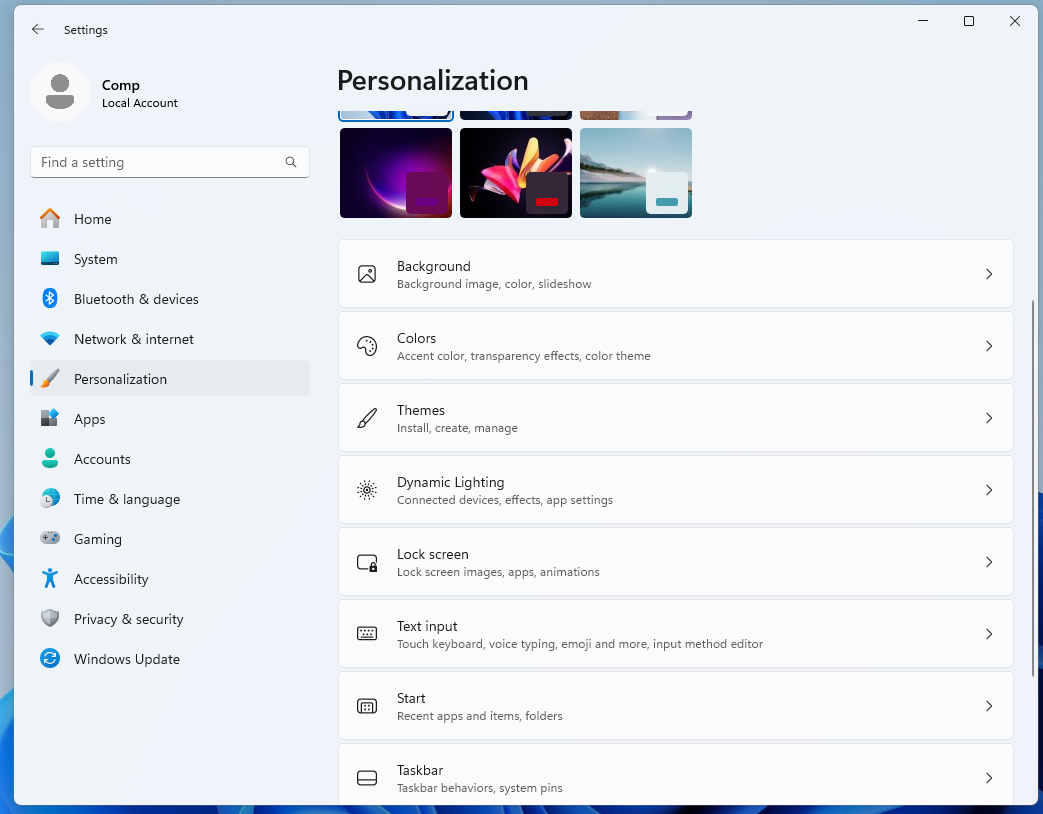
- Choose Desktop icon settings within Related settings .
- Uncheck the Recycle Bin option and click Apply to remove it from the desktop on Windows 11.
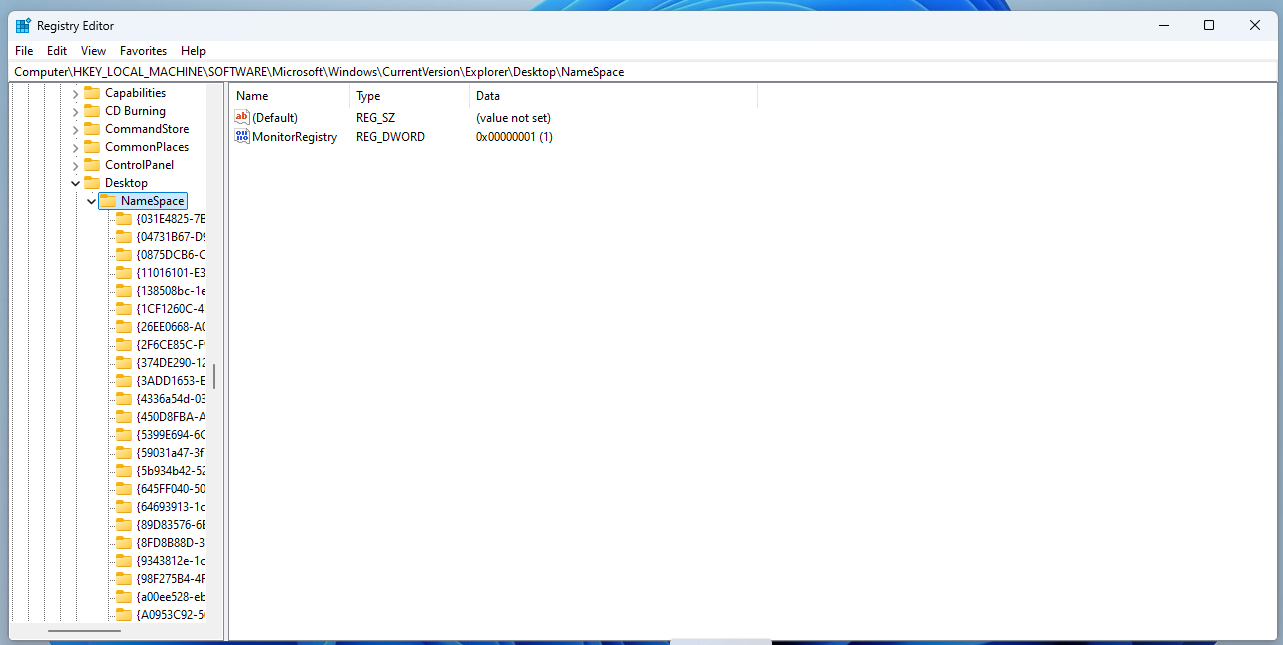
Remove the Recycle Bin from the desktop using the Windows Registry
If for any reason removing the Recycle Bin via Settings is not an option, you can also do this via the registry.
Here’s how to remove the Recycle Bin from the desktop via the registry:
- Open the Run tool (
Win + R) and typeregedit. - Navigate to:
HKEY_LOCAL_MACHINE\SOFTWARE\Microsoft\Windows\CurrentVersion\Explorer\Desktop\NameSpace
- Find and delete the key: 645FF040-5081-101B-9F08-00AA002F954E .
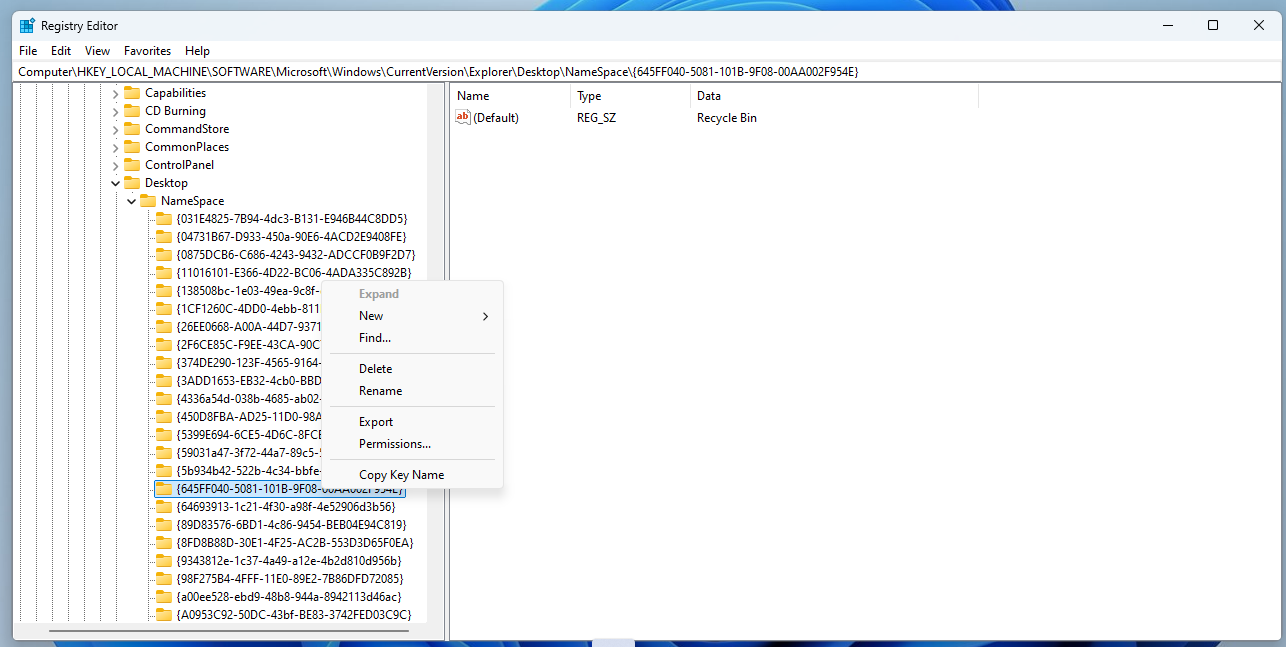
- Restart your computer.
These two solutions would be the best options for most users . If you’re looking for more ways to remove the Recycle Bin from the desktop on Windows 11 or Windows 10 and happen to be the lucky owner of the Pro version of the OS , the next one is for you.
📌 Also read: [REVIEW] Auslogics Registry Cleaner: The Best Tool to Optimize Your Windows Registry
Remove the Recycle Bin from the desktop using the Local Group Policy Editor
How to get rid of the Recycle Bin on the desktop via the Local Group Policy Editor:
- Open the Run tool and type
gpedit.msc. - Navigate to Administrative Templates > Desktop .
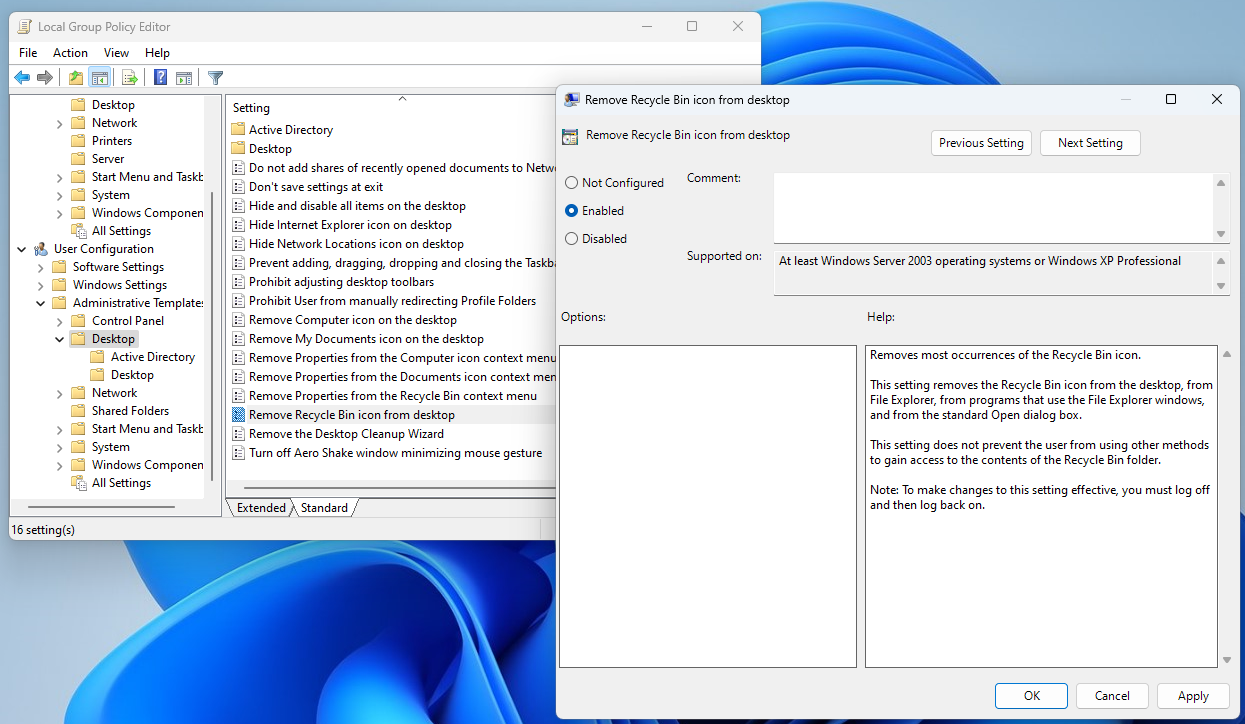
- Double-click Remove Recycle Bin icon from desktop and enable it.
- Restart your computer.
How to Access the Recycle Bin after Deletion
Now that you’ve learned how to get the Recycle Bin off the desktop and how to get rid of the Recycle Bin icon on Windows 10 and 11, it’s time to explore how to gain access to your deleted files after removing the Recycle Bin icon from your desktop.
It still remains effortlessly achievable through File Explorer . Take a look at the following approach to navigate to the Recycle Bin and retrieve your important data.
- Press
Windows key + Eor click on the File Explorer icon in the taskbar to open File Explorer. - On the left sidebar, click on Desktop under This PC . This will show the contents of your desktop.
- If the Recycle Bin is hidden, you might need to reveal hidden items. Click on the View tab in the File Explorer menu and check the Hidden items box.
- Navigate to your main drive and locate a folder named “$Recycle.Bin.”

- Double-click on it to access the Recycle Bin contents. Here, you’ll find folders corresponding to different user profiles, each containing deleted files.
How to Recover Deleted Files
Deleting a file by accident is very common. So, now that you know how to remove the Recycle Bin from the desktop on Windows 11 and Windows 10 and how to regain access to the Recycle Bin, it’s a very good idea to find out how to recover accidentally deleted files.
It also provides other features like recovering files from lost partitions, file shredding, advanced sorting, and disc image creation.
How to Remove the Recycle Bin from the Desktop: Explained
In this guide, we’ve explored how to get rid of the Recycle Bin on the desktop on Windows 10 and 11 and how to find the Recycle Bin after deleting its icon.
Whether customizing your desktop layout or retrieving accidentally deleted files, following simple step-by-step instructions provided in this article and leveraging powerful tools like Auslogics File Recovery ensures an efficient PC experience and confidence in navigating the Windows environment.
FAQ
To change the way the Recycle Bin looks on your desktop, here are the steps to take:
- Right-click anywhere on the desktop and click Personalize .
- Next, go to Themes and click Desktop icon settings .
- Select Recycle Bin (full) or Recycle Bin (empty) and click Change Icon .
- Choose a new icon and click OK , then Apply .