Are you searching for a simple way to add BCC to Outlook ? In this guide, we’ll show you the differences between CC and BCC and thoroughly explain how BCC works in Outlook.
We’ll also show you how to add BCC to Outlook emails and permanently add BCC to Outlook for convenience.
We’ll also discuss the advantages of using BCC and provide some advice on how to use it effectively.
Let’s begin.
What Does BCC Mean in Email?
When sending out emails, it’s important to understand the BCC meaning and how to use it effectively. So, what does blind carbon copy mean?
Blind carbon copy is what BCC stands for. Recipients added to the “Bcc” field receive the email just like any other recipient, but others can’t see their email addresses.
This means the recipients listed in the “To” and “Cc” areas can’t view the other recipients included in the “Bcc” field for the email.
For example, let’s say you’re throwing a party and have to send out email invitations to every guest to plan a surprise party for a friend. But you want the guest list to remain private.
In this situation, you can use BCC in Outlook to ensure that each guest receives the email without seeing the email addresses of other attendees.
This will ensure everyone’s privacy is protected and keep the surprise.
Also read: How to Add a Gmail Account to Outlook?
How Does BCC Work in Outlook?
The “Bcc” field in Outlook is hidden, so you can’t see it when creating a new message or replying to an email.
Here’s how to BCC in Outlook on Windows:
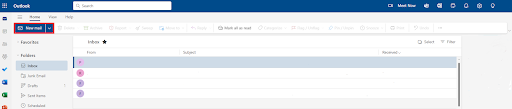
- Open the Windows version of Outlook.
- Click New mail.
- Click Bcc in the To box.

- When you click the Bcc, it’ll open a field to enter the recipient’s email address.
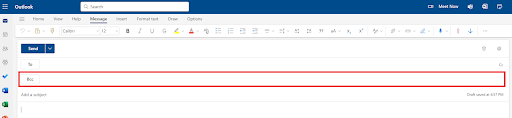
That’s how to add BCC to an Outlook email . After that, send your emails normally as you always do.
How to add BCC to classic Outlook
There are different versions of Outlook, so the BCC’s location can differ. Here’s how to add BCC to the classic Outlook email:
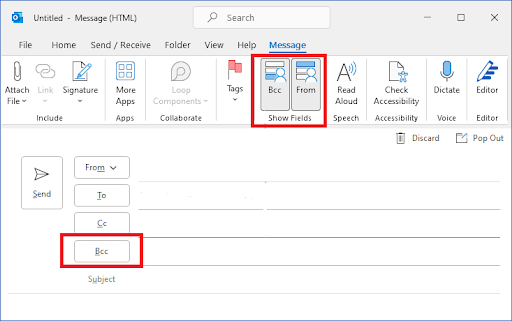
- Open Outlook.
- Click New Email to compose a new email.
- Click Options and select Bcc in the Show Fields section. This will display the BCC box.
- Enter the recipient’s address manually or select from your address book.
During the typewriter era, before copy machines and computers, the only way to make an exact copy of a typewritten document was to use a carbon copy.
The typewriters typed on the original document with a sheet of carbon paper underneath it, which copied the content onto a blank page below.
A typewriter would usually add “CC to: Name” at the end of the letter as a courtesy to the primary recipient.
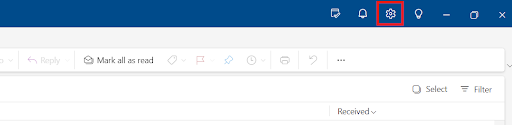
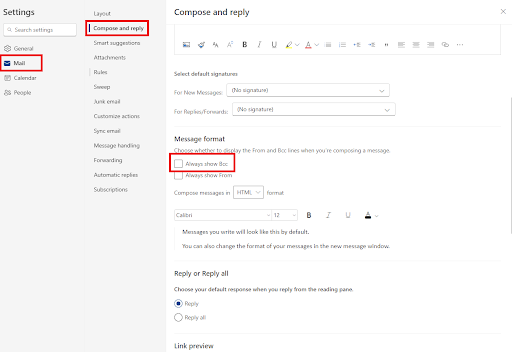
How to add BCC in Outlook permanently
Here’s how to BCC in Outlook permanently:
- Open Outlook.
- Click the gear icon at the top right corner of the window.
- Click Mail and select Compose and reply.
- Check Always show Bcc under Message format.
Related: How to Only Get Alerts for Certain Emails in Outlook?
Benefits of Using BCC
Now that you know how to use BCC in Outlook, here is how to turn its benefits to your advantage:
1. Avoid “Reply All” overload
If you email a group and don’t expect everyone to respond, use BCC to avoid flooding the recipients with unnecessary replies. This prevents recipients from clicking “Reply All” and filling their inboxes with irrelevant replies.
2. Maintain professionalism
Using BCC shows professionalism and respect for recipients’ privacy when sending emails to numerous parties, especially in business or professional situations.
3. Avoid email harvesting
You lower the chances for spammers to maliciously collect and use email addresses using BCC instead of CC.
4. Avoid misusing email addresses
Ensure that recipients’ email addresses aren’t visible to unauthorized individuals. Blind carbon copy ensures that the email reaches only the designated recipients and that the privacy of their email addresses is maintained.
We recommend using Auslogics Anti-Malware to safely remove malware , spyware , and viruses from your computer.
This program is developed to complement your primary antivirus. So you won’t have any compatibility issues.
Learn more: Auslogics Anti-Malware: Features and Reviews
BCC in Outlook: Explained
Throughout this guide, we’ve learned how to add BCC in Outlook, which is an important skill for maintaining professionalism and privacy in email communication.
We hope that our step-by-step guide on how to use BCC in Outlook has made the process easier for you.
Now, we’d love to hear from you! What are your thoughts on using BCC in Outlook? Do you have any tips to share?
Leave your comments below and kindly share this article with people you think would find it helpful!
FAQ
Note: If you’re using Classic Outlook, click “New Email” and select “Options.” Click “Bcc” in the “Show Fields” section.