- How Do SSDs Write and Delete Data?
- What Is SSD TRIM?
- How Does Garbage Collection Work?
- How to Enable TRIM on an SSD
- Can I Manually Enable Garbage Collection on SSDs?
- What Happens if TRIM Is Not Enabled?
- Can I Make TRIM and Garbage Collection Work Better?
- Common Misconceptions About TRIM and Garbage Collection
- Improve SSD Lifespan and Performance with TRIM and Garbage Collection
- FAQ
My first time using a gaming laptop with an SSD exposed the shortcomings of hard disk drives. Windows booted faster, and game launches were quicker. But SSDs are not immune to performance drops.
I learned about TRIM and garbage collection (GC) after experiencing unusual slowdowns and delays when starting games and copying large files.
Activating TRIM resolved my issue because I had optimization turned off across my system.
Alongside other SSD optimization practices, my drive now fires on all cylinders, and I have absolutely no issues with performance. I can also rest easy about drive health. So what are TRIM and garbage collection? This article will break everything down and show you how to get the best out of your hard drive, regardless of the type of SSD you have.
🏷️ TRIM is a Windows command that tells your SSD which pieces of data it should erase.
↕️ Garbage collection is a process initiated by the SSD to rearrange data and free up space.
📥 SSDs write and read data at the page (smallest storage unit) level but can only delete data by erasing blocks (groups of pages).
🧹 During garbage collection, valid pages are moved into new blocks so that old blocks can be erased and freed up for new data.
🗃️ Without TRIM, garbage collection will shuffle invalid data since it does not know which pages should be deleted.
✅ TRIM is enabled by default on Windows.
</>_ You can use the Command Prompt to verify whether TRIM is turned on. You can also use a CMD command to enable or disable TRIM.
💻 Third-party applications like Auslogics SSD Optimizer can also run TRIM operations.
How Do SSDs Write and Delete Data?
To understand the meaning and purpose of TRIM and garbage collection, you need a background understanding of how SSDs work.
Every SSD stores data as electrical charges in NAND flash cells, which enables it to read and write files faster than HDDs. A group of cells makes up a page, and a group of pages makes up a block. Whenever you save a file to your SSD, the file is broken down into pieces that fit into pages.
If a page on an SSD is 4 KB (it can be 16 KB or larger), a 10 MB file will occupy about 2,560 pages on the SSD. The number of pages that make up a block varies by SSD. It can be 64, 128, 256, or more.
You can read and write to a page just fine, but you can’t erase at that level. SSDs can only erase at the block level. However, the SSD must first move pages it considers valid out of a block before erasing the block.
TRIM and garbage collection are required to identify the files you want to delete and move valid pages out of the blocks that are earmarked for erasure.
What Is SSD TRIM?
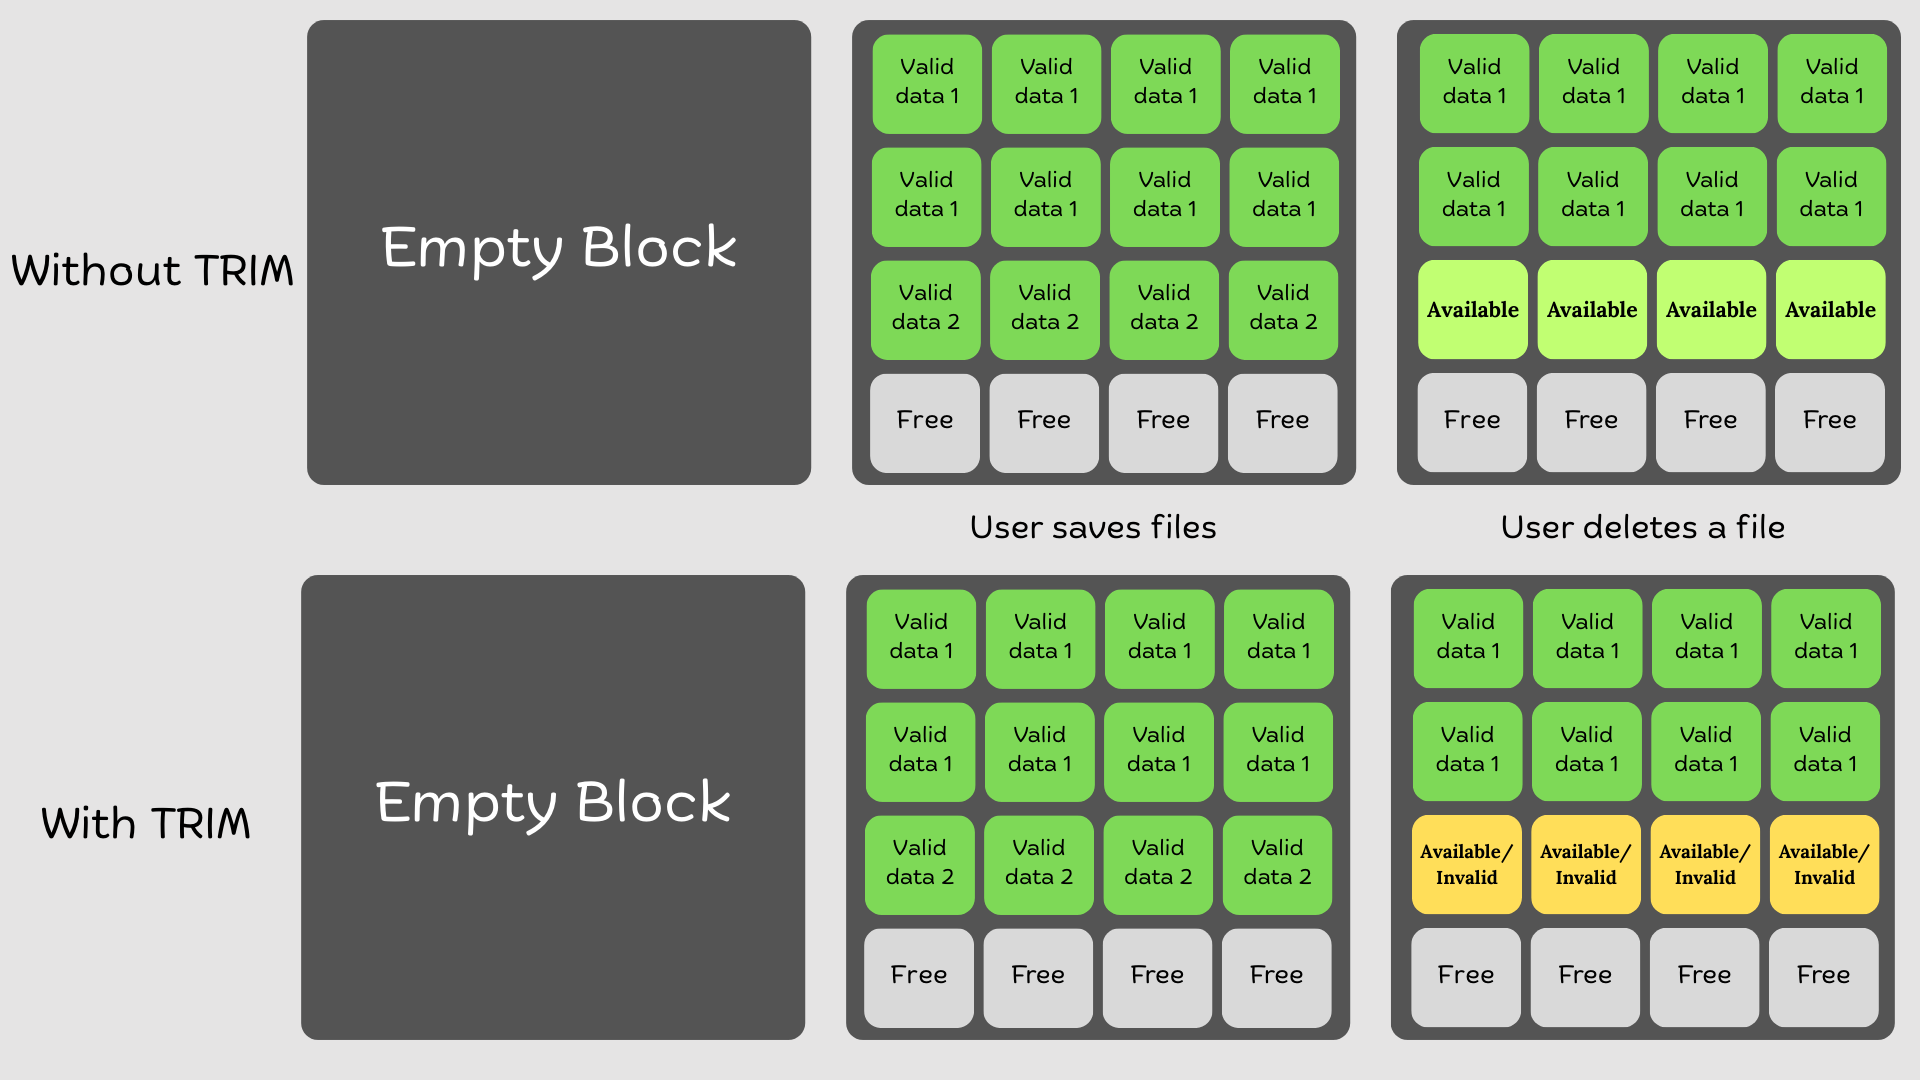
TRIM is a command that helps your SSD identify invalid data. Here’s why that matters. When you delete a file, it doesn’t just vanish from your drive. Windows simply marks the pages containing the data as available. But before you can write to those “available” pages again, their host blocks must be deleted.
The term “TRIM” is not an abbreviation. It is a command for the ATA interface, which is written in capital letters. Other storage interfaces have different names for the same process, but TRIM is the popular and widely accepted term.
For example, eMMC/UFS storage (for smartphones and tablets) uses the Discard command, while NVMe drives use the Data Set Management command with the Deallocate attribute.
Without TRIM, the SSD still thinks the data you deleted is valid, but it has to make the space it currently occupies available, per your operating system’s instructions.
The SSD’s controller moves the “deleted” data to a new block so that the old block can be erased and prepared for new writes.
This process slows down the drive over time.
Microsoft addressed this issue in Windows 7 by adding native TRIM support. The OS could now inform the SSD that your deleted files are no longer valid. That way, the drive can safely delete the data when it is idle.
The process of moving valid data and deleting old blocks is called garbage collection.
How Does Garbage Collection Work?
As I mentioned earlier, SSDs don’t delete blocks containing valid pages. So they run a housekeeping process called garbage collection. The operation involves gathering still-valid pages from unfilled blocks, copying them into fresh blocks, and then erasing the old blocks.
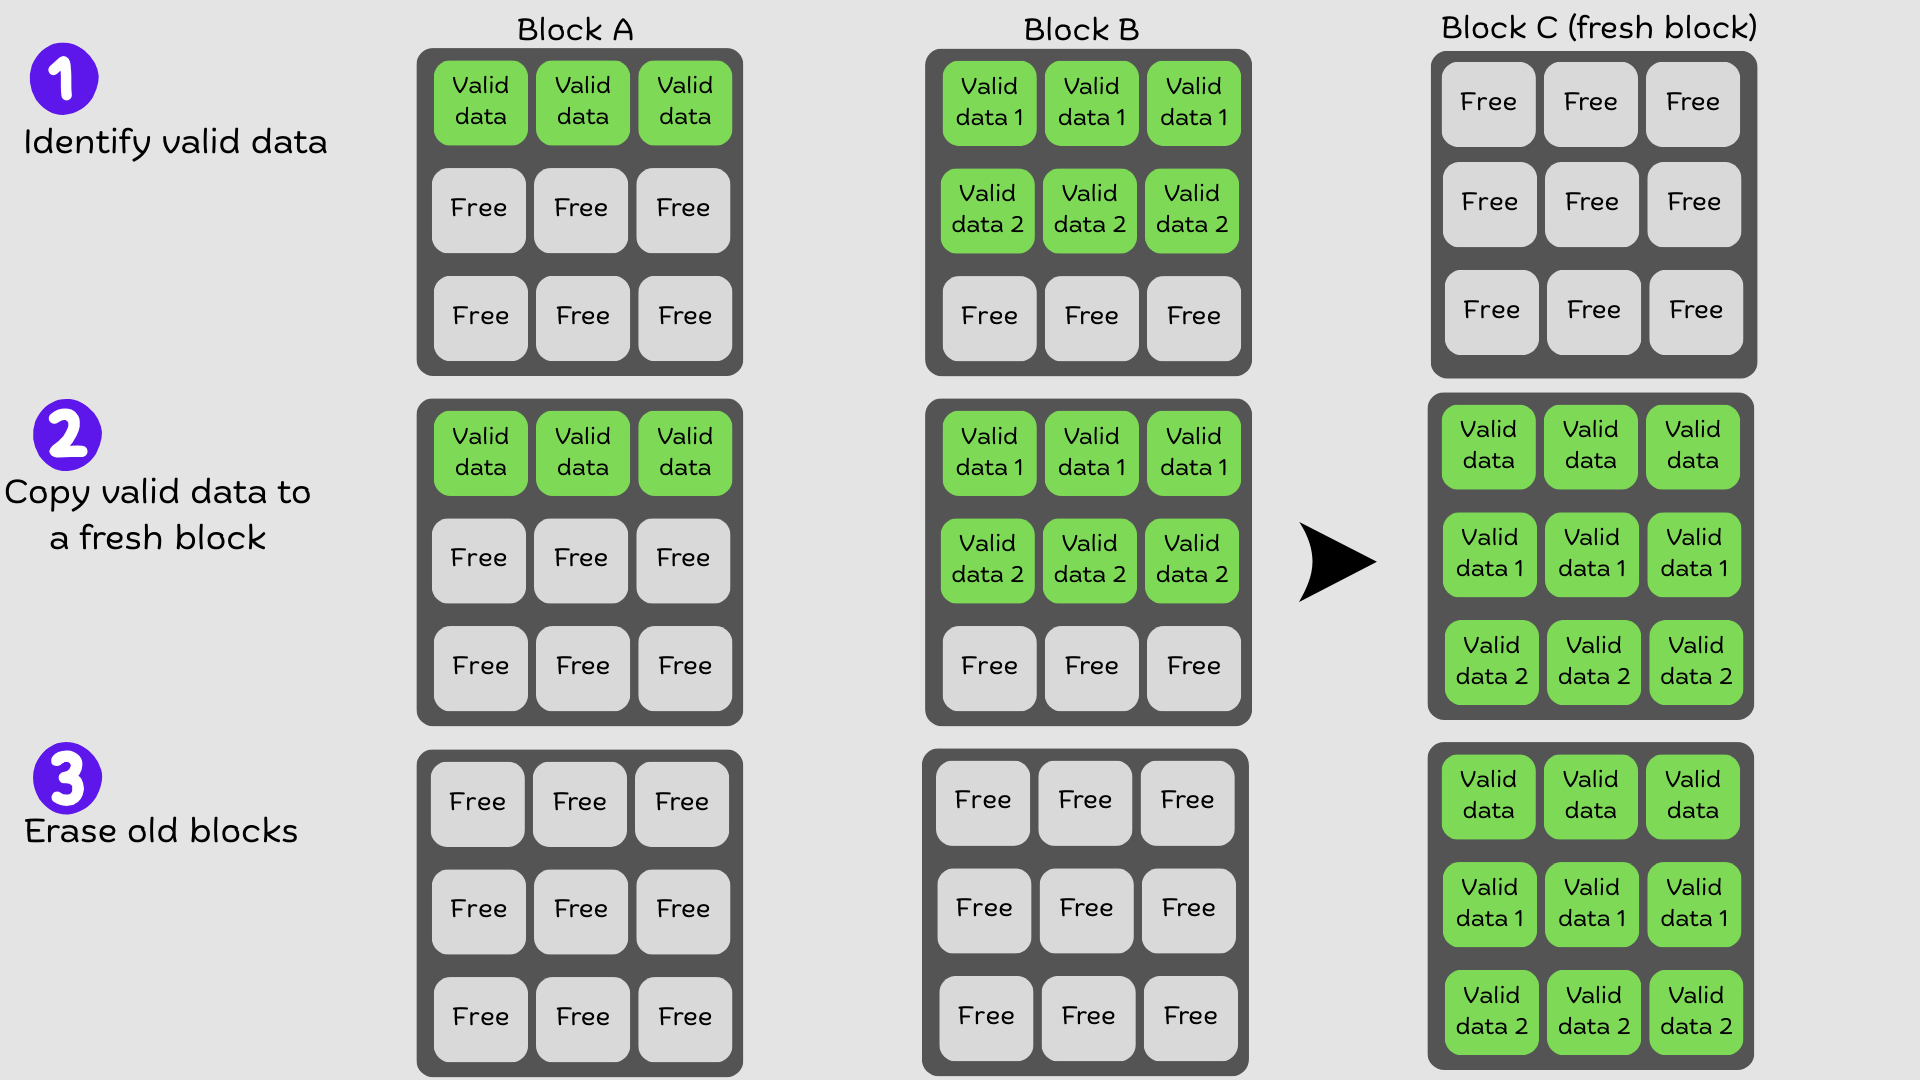
That “shuffling” is how the SSD makes space for new writes. TRIM helps by telling the SSD ahead of time which pages are truly garbage (invalid). That way, the SSD will copy only the valid pages and leave “garbage” pages behind in blocks that will be later deleted.
It makes the process lighter, faster, and less punishing on the drive. It also speeds up hard drive performance and prolongs SSD lifespan.
Garbage collection on SSDs comes in these two flavors:
- Active garbage collection: Happens while you’re using the SSD. The controller is constantly reorganizing valid pages and cleaning blocks in the background, even as you’re reading and writing files. This type of GC keeps performance steady, but it can sometimes mean the drive is juggling more than one task at once.
- Passive garbage collection: Kicks in when the SSD is idle. The drive takes advantage of downtime to aggressively clear out blocks and consolidate free space. I consider passive GC to be the “housekeeping at night” routine. It’s usually more thorough because the SSD isn’t competing with your workloads.
How to Enable TRIM on an SSD
TRIM is generally enabled by default on Windows. Once you set up your SSD and Windows detects it as a primary drive, the OS automatically turns on SSD TRIM support.
But it doesn’t hurt to verify that TRIM support is turned on. You can follow this process in the Command Prompt window:
- Open the Start menu, type CMD, and launch the Command Prompt as an administrator.
- After the Command Prompt window opens, type fsutil behavior query DisableDeleteNotify and press the Enter key.
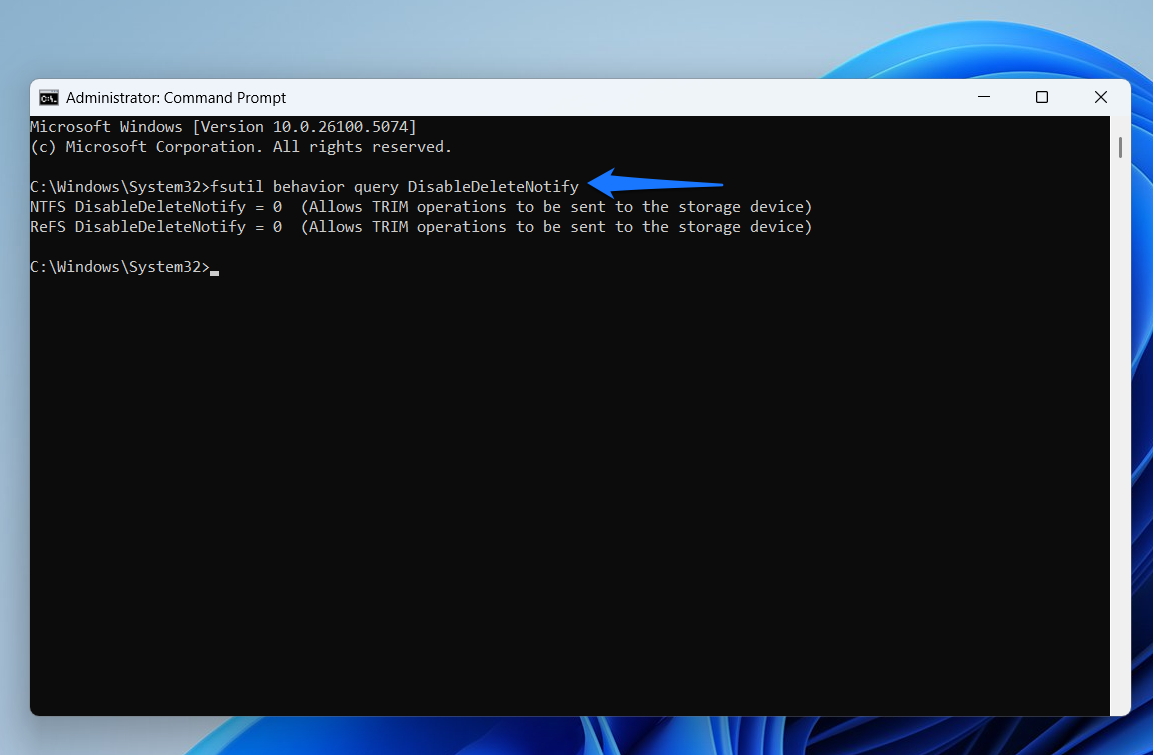
- SSD TRIM is enabled if the prompt returns 0. It is disabled if you see 1.
- To enable TRIM, type fsutil behavior set DisableDeleteNotify 0.
Can I Manually Enable Garbage Collection on SSDs?
No. Garbage collection is part of the SSD’s firmware, not something controlled by Windows or users. The controller (firmware) manages data behind the scenes by moving valid pages around and freeing up blocks when needed.
Unlike TRIM, which the operating system has to send as a command, garbage collection is self-directed. The drive decides when and how aggressively to clean house. Some drives do it when idle, some more proactively while you’re working.
Either way, you don’t flip any switches to activate or deactivate the process. However, you can ensure garbage collection works efficiently by doing the following:
- Keep TRIM enabled so the SSD knows what’s safe to erase.
- Leave some free space on the drive, as a nearly full SSD has far less room to shuffle data around.
- Enable power management features that allow the drive to become idle, since that is when most garbage collection happens.
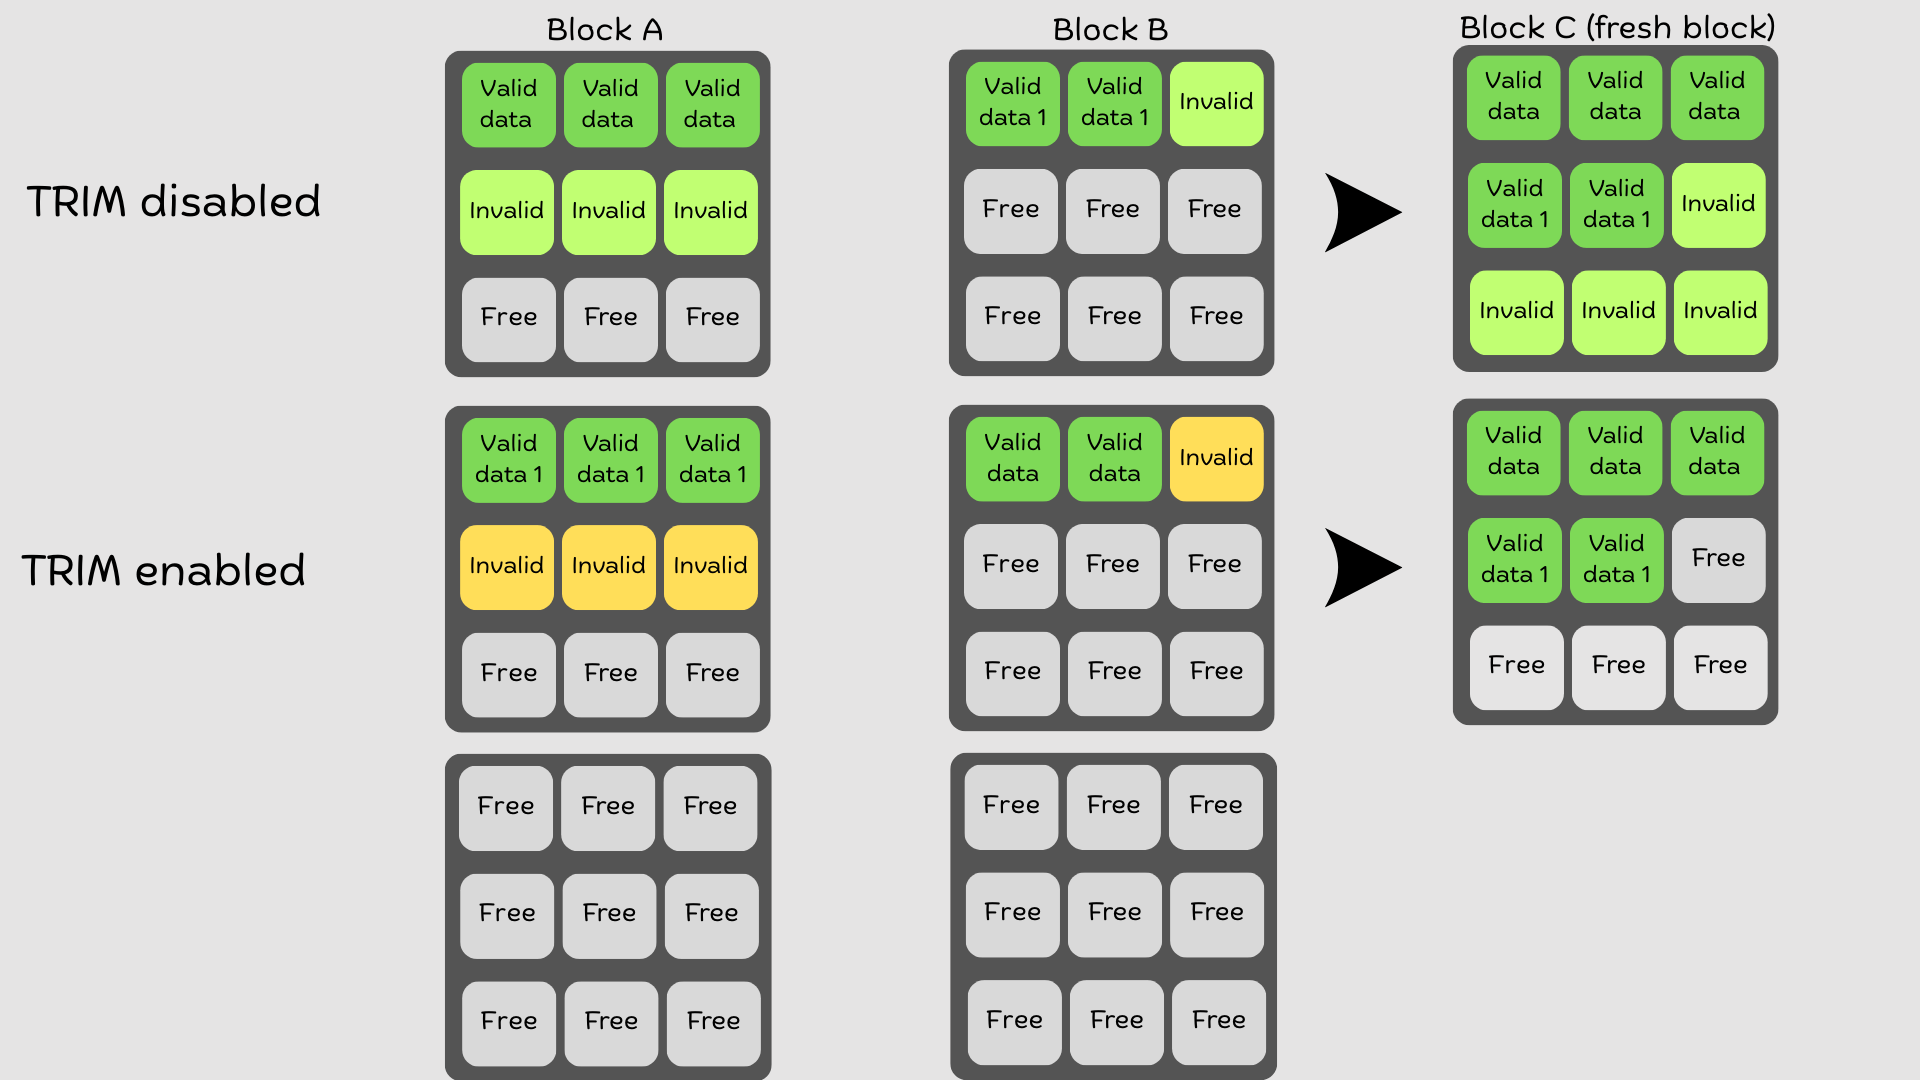
What Happens if TRIM Is Not Enabled?
The SSD loses its ability to identify invalid (deleted) data. That’s because Windows marks the pages containing the data as unavailable instead of invalid. From the drive’s perspective, every page still looks valid, even when the operating system sees it as empty.
Thus, the SSD’s garbage collection process will copy everything in a block (including those invalid pages) to a new block before erasing the old one.
That unnecessary shuffling slows your computer and drive down. You should see the impact when you run SSD speed tests and performance benchmarks.
Let’s look at the impact of disabling vs. enabling SSD TRIM.
| Without TRIM | With TRIM |
|---|---|
| ❌ Write speeds slow down because the SSD moves junk data along with valid data. | ✅ Consistent write speeds since the SSD knows exactly what to erase. |
| ❌ Garbage collection wastes time consolidating invalid pages. | ✅ Garbage collection is efficient since it only moves valid data and skips invalid pages. |
| ❌ Deleted files remain physically present, reducing efficiency. | ✅ Deleted files are flagged for removal and cleared out when GC erases blocks. |
| ❌ The SSD wears out faster due to extra unnecessary writes. | ✅ Fewer writes extend the SSD’s lifespan. |
| ❌ Available storage space isn’t fully reclaimed. | ✅ Free space is properly reclaimed for new data. |
| ❌ Performance steadily degrades as the drive fills up. | ✅ The SSD retains optimal performance over an extended period. |
Can I Make TRIM and Garbage Collection Work Better?
As I mentioned, TRIM and garbage collection both work on autopilot. So you don’t have to interfere with the process or supervise. However, as mentioned earlier, you can leave more space on your computer and allow your system to periodically stay idle to facilitate the process.
Additionally, the following practices will help:

Manufacturers like Samsung and Crucial often deploy firmware updates that optimize how operating systems TRIM SSDs and how drives handle garbage collection. These updates can also fix some SSD-related issues.
You can update your drive’s firmware using the manufacturer’s software program, such as Crucial Storage Executive and Samsung Magician.
Visiting the manufacturer’s website is another option.

Sometimes users may unknowingly turn off automatic optimization. You can type optimize drives in the Start menu and open the Defragment and Optimize Drives tool to check whether scheduled optimization is turned on.
If it isn’t, click the Turn on button under Scheduled optimization, select a schedule, ensure the Increase task priority option is checked, and click the OK button.

Avoid using your SSD as a scratch pad for torrents or temporary downloads that you’ll delete in a short period. Turn off pointless logging and indexing, like Windows Search indexing.
You can also move large files to a secondary drive and disable Windows virtual memory if you have more than 32 GB of RAM. Reducing unnecessary writes reduces the number of pages that GC has to move around in the future.

Third-party tools like Auslogics SSD Optimizer and SSD Fresh run TRIM operations alongside other SSD optimization techniques, which can help improve the efficiency of garbage collection and enhance overall drive health and performance.
For example, Auslogics SSD Optimizer can clean your drive, wipe free space, and monitor temperature during optimization.
Keep the heat down Bombarding your drive with high temperatures can cause glitches over time. Such issues could threaten garbage collection’s efficiency and cause a world of other problems.
If your motherboard supports SSD heatsinks or your drive comes with its own heat dissipator, be sure to use it. You can also get aftermarket heatsinks to protect your drive.
Common Misconceptions About TRIM and Garbage Collection
❌ TRIM is the same as garbage collection
✅ No. TRIM tells the SSD what’s invalid; garbage collection actually cleans it up.
❌ TRIM triggers garbage collection
✅ Not directly. TRIM provides information, but the SSD decides when to run garbage collection.
❌ Users can manually start garbage collection
✅ You can’t. It’s built into the SSD’s firmware and runs automatically.
❌ Garbage collection only occurs with TRIM support
✅ False. Garbage collection runs either way. It just works better with TRIM.
❌ TRIM deletes data
✅ Not exactly. TRIM just marks data as unnecessary; the SSD erases it later.
❌ Garbage collection is similar to defragmentation
✅ No. Defragmentation rearranges files for speed on HDDs. Garbage collection clears space on SSDs.
Improve SSD Lifespan and Performance with TRIM and Garbage Collection
At the end of the day, TRIM and garbage collection are two gears turning the same wheel. TRIM is the operating system’s way of telling the SSD which data it no longer needs. Garbage collection is the drive’s built-in process of cleaning up that data.
Together, they prevent the drive from writing junk data to new blocks, which boosts performance and extends lifespan.
Both TRIM and garbage collection happen automatically in the background. So you don’t have to start or babysit the process.
Just remember to leave enough free space on your drive to make it easier to move files around during GC. Also, allow your drive to go to sleep occasionally to allow GC to kick in automatically.
Let us know if you’ve verified TRIM and how your SSD performs!