
From resetting your Microsoft account password to utilizing the Command Prompt , in this article we’ll cover how to unlock a laptop or a PC running the Windows 10 OS. Without further ado, let’s get straight to the point.
How to Unlock Windows 10 Without a Password
Before exploring how to unlock a locked computer, it’s worth saying that the methods outlined below vary in duration and complexity. Check all of them to evaluate which solution suits you best and then move on to the next one, in case the previous one didn’t work for you.
Method 1: Resetting the Microsoft account password
Here’s how to unlock a computer if you’re using a Microsoft account to log in:
- On a separate device, navigate to the Recover your account page .
- Follow the prompts to verify your identity. This may include providing a secondary email, phone number, or security questions associated with your Microsoft account.
- Choose the password reset option. This could involve receiving a security code on your linked email or phone.
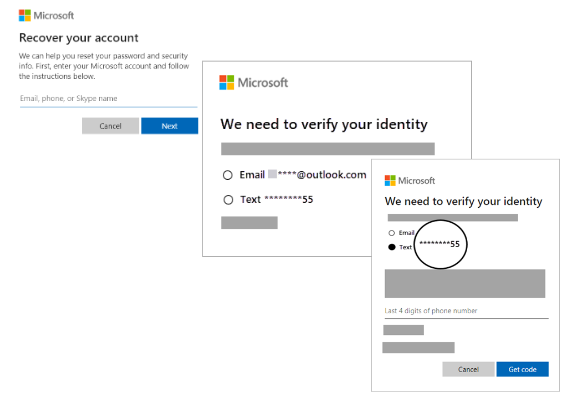
- Once verified, create a new password for your Microsoft account.
- Use the newly created password to log in to your laptop or PC.
Resetting your Microsoft account password is a straightforward way to regain control over your computer. Move on to the second method to learn how to get into a laptop without a password if you’re using a local account.
Method 2: Resetting the local account password
If you’re using a local account, there’s also a way to restore access to your system. To do that, however, you need to have previously set up security questions that will be asked, should you forget your password.
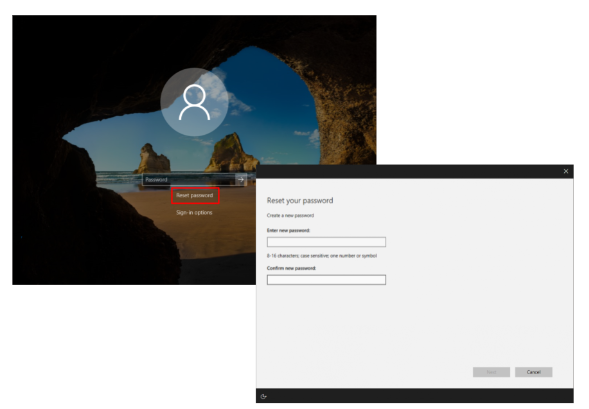
Assuming you added security questions earlier, here’s how to unlock a computer without a password on Windows 10 version 1803 or later:
- After an incorrect password attempt, click the “Reset password” link on the sign-in screen.
- Answer the security questions.
- Set a new password.
- Sign in with the newly created password.
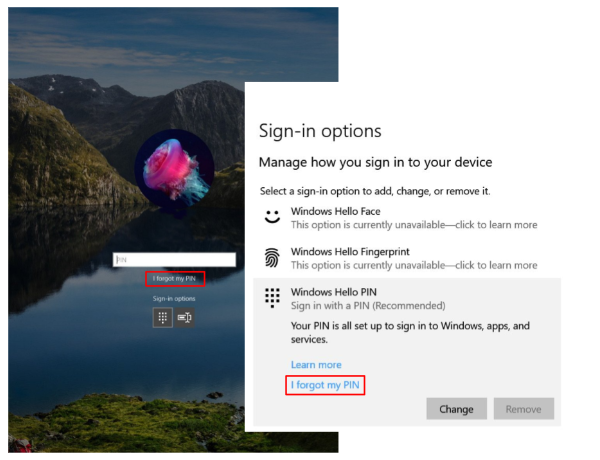
If you’re using PIN:
- Click on the I forgot my PIN option below the text box and follow the instructions on the screen to reset your PIN.
- If I forgot my PIN is not visible, select Sign-in options and then choose Enter your password.
- If already signed in, navigate to Start > Settings > Accounts > Sign-in options > Windows Hello PIN > I forgot my PIN. Follow the instructions for PIN reset.
Bad news is, for Windows 10 versions earlier than 1803, local account passwords can’t be reset due to the absence of security questions feature. In this case, you can only fully reset your Windows 10 system . But be mindful that it would permanently delete data, programs, and settings on your PC. If you’ve backed up your files, you can restore them after the reset.
If your Windows 10 version is earlier than 1803, you should create a password reset disk as soon as possible. We’ll tell you all about it in the section below.
Method 3: Unlocking a computer with a password reset disk
Here’s how to unlock a laptop without a password by creating and using a password reset disk.
To create it:
- Sign in with your local account , as this method is not applicable for Microsoft accounts.
- Plug a USB flash drive into your laptop or PC. Although creating a password reset disk won’t format your USB flash drive, it’s advised to back up any data on the drive before proceeding, as a precaution.
- In the search box, type
create password reset diskand select the first option from the list. - Once accessed the Forgotten Password Wizard, click Next. Then, choose your USB flash drive and click Next.
- Type your current password and click Next to confirm your identity.
- Once the wizard is done, select Finish to conclude the process.
To reset your password:
- Plug in the disk, turn on the PC, and select the Reset password option that appears after the incorrect password attempt.
- Follow the instructions in the Password Reset Wizard to reset or change your Windows password.
- Enter a new password as prompted by the wizard.
- Click Finish to reset the password and close the wizard.
- Use the newly set password to log in to your computer.
Using a password reset disk is a workable solution to get back access to your PC. But if it’s a little too late for that, move on to the next methods to learn how to unlock a computer without a password with the Command Prompt and by booting from the Windows installation disk.
Also read: Best Ways to Store Passwords
Method 4: Unlocking a computer via the Command Prompt
Let’s delve into more sophisticated ways to get by if you forgot a password on the Windows 10 system. The first one to try is to create a new administrator account in the Windows Recovery Environment (WinRE) using the Command Prompt. Here’s how to do it:
- Turn your PC or laptop on, then off three times before it can boot Windows to access WinRE.
- Once in, go to Troubleshoot > Advanced options > Command Prompt.
- Once the Command Prompt window opens, input the following commands separately and press
Enterafter each (replace “c” with your system drive letter):
copy c:\windows\system32\sethc.exe c:\ copy /y c:\windows\system32\cmd.exe c:\windows\system32\sethc.exe
- After executing the commands, restart your computer.
- When you get to the logon screen, press the
SHIFT keyfive times. This will bring up the Command Prompt again. - Input these commands, replacing
{user_name}with your chosen username and pressEnterafter each command:
net user {user_name} /add
net localgroup administrators {user_name} /add
- Reboot your computer. Now, you can log in using the freshly created admin account.
Also read: 28 Most Useful Commands in Command Prompt
Method 5: Unlocking a computer by booting from the Windows installation disk
If you have a Windows installation disk (USB or CD/DVD), you can do more than just install the OS. There’s a tricky way to override your password using this disk and the Command Prompt utility:
Step 1: Boot from the installation disk
- Insert the Windows 10 installation USB or CD/DVD into the computer.
- Start or restart the computer and press any key when prompted to make the computer boot from the installation disk.

Step 2: Replace files with the Command Prompt
- After booting from the installation disk, the Windows Setup screen will appear. Press
Shift + F10to bring up the Command Prompt window. - Type the following commands and press
Enterafter each (replace “d” with your system drive letter):
d:

cd Windows
cd system32
- Next, type these commands pressing
Enterafter each:
copy utilman.exe  utilman1.exe

copy cmd.exe cmd1.exe
- Once you see “1 file(s) copied” under both, type the following commands and hit
Enterafter each:
del utilman.exe
rename cmd.exe utilman.exe
- Close the Command Prompt and restart the PC. Don’t press any keys this time to boot from the system drive .

Step 3: Reset the password
- After the computer boots to the sign-in screen, click the Ease of Access icon in the lower right corner.
- This will bring up the Command Prompt window. Type this command and hit
Enter:
control userpasswords2
- This will open the User Accounts window. Select your account, then click on “Reset Password” under the Password for Administrator section.
- Create a new password or leave it blank and press “OK.”
- Close the Command Prompt window and use the new password to sign in.
While this method is rather complicated and more suitable for experienced users, it could be a lifesaver when you can’t access your PC, risking all those valuable files you have there being wiped out.
Also read: Getting and Using Windows 10 Media Creation Tool
Conclusion
Well, that’s how to unlock a computer without a password. Hopefully, at this point you’ve already regained control over your PC or laptop and, perhaps, are willing to share your success story in the comments below. By sheer luck, we’d like to hear from you too, so don’t hesitate!
And for the future: if you want to save yourself the trouble of forgetting a password again, consider using reliable password managers . Those will automatically generate and securely store your passwords for you to sleep well at night.