Overwatch without voice chat is certainly not enjoyable. You’re sure to feel exasperated when the feature isn’t working. Fortunately, we will show you how to fix Overwatch voice chat problems after Windows 10/11 update.
Here’s how to troubleshoot Overwatch voice chat not working:
- Check your microphone/ headset
- Overwatch in-game audio settings
- Update your PC’s audio driver
- Set default devices on your PC
- Disable PC Audio Device Exclusive
Read through this detailed explanation of how to apply each option. If the first method doesn’t work, try the next one until your voice chat starts working.
Option 1: Check Your Microphone/ Headset
The very first step is to check your hardware.
The issue could be as simple as:
- Your headset/ microphone isn’t plugged in or is loosely plugged in.
- The mute switch on your headset/ microphone is pressed.
Once you check those two issues, confirm if Overwatch voice chat is working.
Also Read: Why is My Microphone Not Working: Easy Fixes for Windows 10/11
Option 2: Check Your Overwatch In-game Audio Settings
The issue could be the audio settings in Overwatch.
Changing the settings can instantly bring voice chat back to life. Follow these steps to fix it:
- Open Overwatch, then click Options and select Sound.
- Turn up the sound on your microphone or speakers to an audible level.
- Ensure that TEAM VOICE CHAT, and GROUP VOICE CHAT are set to AUTO JOIN.
- Make sure the right devices are selected for VOICE CHAT DEVICES.
- Change the keybind for Voice Chat if voice chat is set to Push To Talk. That means changing “Push to Talk” to a different key in the Controls menu.
After doing that, join the team chat. Now, test to see if the Overwatch voice chat issue is resolved.
Option 3: Update Your PC’s Audio Driver
After trying the previous method, what if voice chat is still not working in Overwatch on Windows 10/11?
Well, if the simple changes in Overwatch didn’t help, it’s now time to do a more in-depth investigation of the real cause.
Start by investigating the most basic requirement for audio to work on Windows 10/11: your PC’s audio driver. You may have the wrong audio driver, or it could be out of date. This means searching online for the right audio driver and installing it.
However, a more convenient and safe way to go about is to use Auslogics Driver Updater. This way, you’ll easily update your driver with one click and know that you’ve installed the right driver that won’t harm your computer.
Further Reading: Auslogics Driver Updater: Update Your Drivers in One Click!
Why use Auslogics Driver Updater? Here are a few reasons:
- Convenient and easy driver updates with one click.
- Prevents driver conflicts and ensures smooth hardware operation.
- It automatically detects your system and identifies the correct drivers suited to it.
- No worry about installing the wrong drivers or understanding your system requirements.
- Free scan for missing or outdated drivers.
- One-click download of all necessary drivers with the Pro version.
- 24/7 support with a 60-day money back guarantee.
- Creates backups for safety so you can go back to previous drivers if you wish.
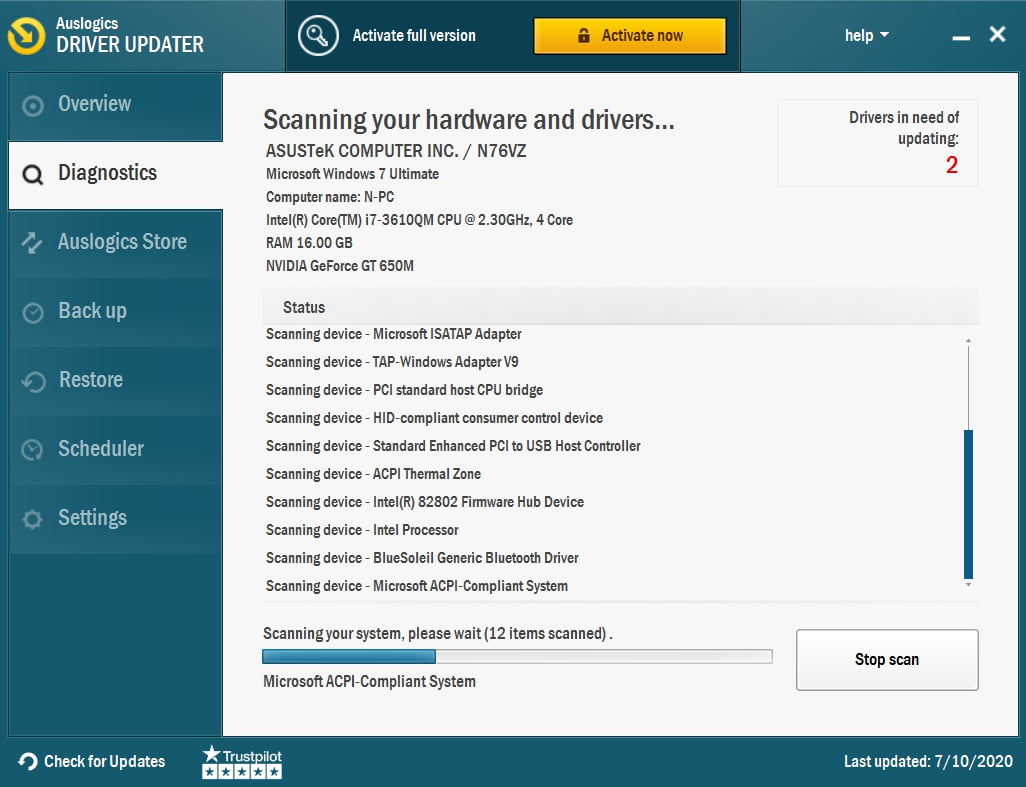
So, here’s the simple process of using Auslogics Driver Updater to update your PC’s audio driver:
- Download and install Auslogics Driver Updater.
- Once you run Auslogics Driver Updater, it starts scanning your computer for missing or outdated drivers.
- After scanning, Auslogics Driver Updater presents a list of the drivers you need.
- You can click to update all, or select the PC audio driver only and update it. If you haven’t already bought the premium version, you’ll be redirected to a payment page.
- After activating the premium version, Auslogics Driver Updater updates your drivers.
- Once the drivers are updated, you can now restart your computer.
When your computer comes back on, check if the Overwatch voice chat not working problem is fixed.
Also Read: How to Update Device Drivers on a Windows 10 PC?
Option 4: Set Your PC’s Default Devices
If updating the audio driver doesn’t help, there could be a problem in your PC’s settings.
It may be that your Windows computer had detected your audio device automatically when you plugged it in, but hadn’t set it as the default playback device. This means you’ll have to manually set the default devices for input and output audio devices.
Follow these steps:
- Start by exiting Overwatch.
- Press
Windows key + Ron your keyboard. On the tab that appears, typemmsys.cpl, then pressEnter. - In the window that appears, go to the Playback tab. Identify the speaker/ headphone you’ll use. Right click on it, then select Default device.
- Right-click and select Disable on all devices except the one you want to set as the default device.
- Now go to the Recording tab. Identify the speaker/ headphone you’ll use. Right-click on it and select Default device.
- Click OK.
After doing that, relaunch Overwatch and join a voice chat to see if the voice chat not working issue is sorted.
Related: How to Change Default Program to Open File in Windows 10
Windows 10/11 (8, 7, Vista, XP)
Option 5: Disable PC Audio Device Exclusive Mode
If the PC default audio device settings didn’t help, you probably have a third party app preventing Overwatch from using your audio devices.
This means you have to disable the exclusive mode of your speakers, headset or microphone.
Follow these steps:
- In the window which opens up, go to the Playback tab. Identify your default device, right-click it, and select Properties.
- In the Properties window, click on the Advanced tab. Locate Allow application to take exclusive control of this device and uncheck it.
- Click Apply, then OK.
Once that is done, go to Overwatch and check if the voice chat issue is resolved.
When you apply these changes systematically, you’re sure to find the issue without wasting too much time. Apply the options one by one, starting with the most obvious problems, before embarking on more in-depth changes on your computer, which might be unnecessary.