
- How to Transfer Photos from an iPhone to a Computer
- Method 1: How to transfer pictures from an iPhone to a computer using File Explorer
- Method 2: How to get photos from an iPhone to a computer via the photo app
- Method 3: How to transfer photos from an iPhone to a PC using iCloud
- Method 4: How to transfer iPhone photos to a PC via Dropbox
- Method 5: How to transfer photos from iPhone to a PC using Google Drive
- Conclusion
- FAQ
In this guide, we’ll show you how to transfer photos from an iPhone to a PC on Windows 1 0 and 11. Back in the day, this used to be quite complicated and quite frustrating.
You had to use iTunes to manage your data, which wasn’t the best and most intuitive way to t ransfer photos from an iPhone to a PC.
But these days, you can just use a USB cable, and your iPhone will display like a regular drive on your computer.
Plus, cloud services like iCloud, OneDrive, or Google Drive now make it easy to sync your files wirelessly.
Now, let’s find out how to download photos from an iPhone to a computer.
How to Transfer Photos from an iPhone to a Computer
Here’s how to transfer photos from an iPhone to a PC on Windows 11 and 10. Go through the methods and choose one that works well for you.
Method 1: How to transfer pictures from an iPhone to a computer using File Explorer
The easiest way to learn how to transfer iPhone photos to your PC is via USB. Here’s how to transfer your pictures: Connect your iPhone to your computer using a USB-C or Lightning-to-USB cable. It’s the same cable you use to charge your phone. When you connect the cable to your PC for the first time, you’ll get a popup prompting you to trust your computer.

- Open your File Explorer. Your iPhone will appear under This PC . Go there and double-click it. If you don’t see your iPhone, unplug the USB cable and plug it in again. And make sure the device is unlocked.
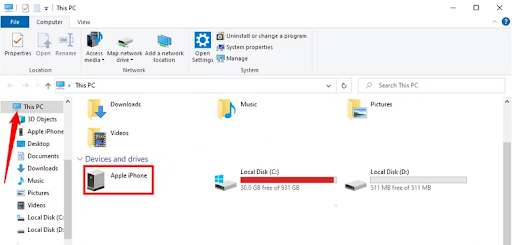
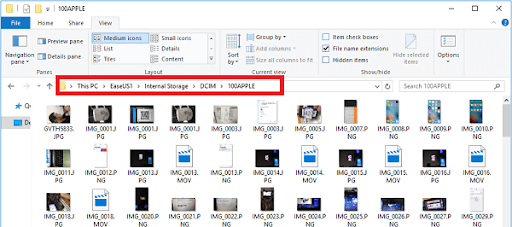
- After opening, go to Internal Storage , click DCIM , and select 100APPLE . You should be able to see your photos and videos.
- Copy and paste the photos you want to transfer to your PC.
📌 Related: Windows File Explorer Not Responding? Try These Solutions
Current iOS versions have folders with numerical names. For older versions of iOS, the folder is named 100APPLE.
If you have lots of videos and photos, you’ll see 101APPLE, 102APPLE, 103APPLE, etc. The same goes for iCloud. You’ll see 100CLOUD, 101CLOUD, 102CLOUD, etc.
Method 2: How to get photos from an iPhone to a computer via the photo app
Did you know you can use your Photos app to copy photos from an iPhone to a PC? And the process is quite easy, too. Let’s go through it:
- First, connect your iPhone to your computer using a USB cable.
- Then, unlock your phone and accept the prompt that pops up.
- Open the Photos app. You can do that by typing “ Photo ” in the search box and clicking on it.
- When the app opens, click Import at the top-right corner and select From a USB device . Photos will search for connected devices and import your photos.
- If there are pictures you don’t want to transfer, uncheck them and click Continue to transfer iPhone photos to your PC.

This is how to transfer iPhone photos to a PC using the Photos app. If you can’t use this approach for some reason, follow the next method.
📌 Also read: How to Find and Remove Duplicate Photos in Windows
The Photo app on Windows 11 will automatically detect any connected device the moment you click on Import .
Also, keep in mind that you can only transfer photos from your iPhone to your computer on File Explorer and the Photos app, not the other way around.
Method 3: How to transfer photos from an iPhone to a PC using iCloud
If you want to know how to send photos from an iPhone to a computer without using USB cables, this method is the best option for you.
Also, this method is the best choice if you want to know how to download photos from iCloud to a PC and vice versa.
Before we begin with the steps, make sure you have enough space to save your photos. With that said, here’s how to download photos from iCloud to your PC.
If you have iCloud installed on your Windows PC, follow the steps below:
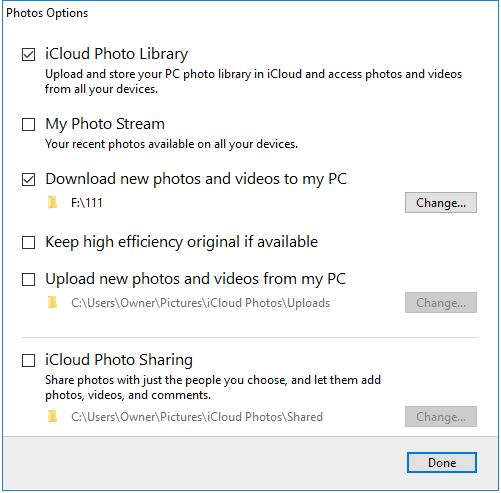
- Turn on iCloud Photos on your device in the Settings app.
- Then, go to iCloud settings on your computer and click Options .
- After, enable iCloud Photo Library and select Download new photos and videos to my PC .
- You’ll see the photos from your iPhone in the folder under Options.
If you don’t have iCloud installed on your Windows PC, follow the steps below:
- Turn on iCloud Photos on your device in the Settings app.
- Go to iCloud.com on your computer
- Sign in with your Apple ID account, which should be the same account you use on your iPhone.
- Select Photos among the available options.
- You should be able to see your photos from your iPhone.
- You must download iCloud Photos and transfer your photos from an iPhone to a PC.
📌 Related: How to Stop iCloud on Windows 10 from Asking for Passwords?
So, if you want to know how to download all photos from iCloud to a Windows PC , download the iCloud app from the Microsoft Store.
Method 4: How to transfer iPhone photos to a PC via Dropbox
You can use Dropbox to transfer your photos to your Windows PC. Here’s how to do that:
- Install the Dropbox app on your iPhone and upload your photos.
- After that, install Dropbox on your computer and sign in with the same account you used on your iPhone.
- After signing in, you’ll see the photos you uploaded there. You can proceed to download them to your computer.
Also, you can’t select your pictures in batch, and it won’t keep your original folders on your iPhone. And it won’t detect any duplicates if you accidentally copy a photo twice.
Method 5: How to transfer photos from iPhone to a PC using Google Drive
Here’s h ow to transfer photos from an iPhone to a PC on Windows 1 1 and 10 using Google Drive:
- Download Google Drive on your iPhone and upload your photos.
- Then, install Google Drive on your computer and log in with the same account used on the iPhone.
- After signing in, you’ll see the photos you uploaded there. You can proceed to download them to your computer.
Conclusion
If you were searching for how to transfer photos from an iPhone to a PC on Windows 10 and 11, the methods we’ve talked about should help you do that.
Overall, I think the best option is to use Windows Photos to transfer your photos manually.
Of course, you can learn how to download photos from iCloud to your PC. However, there is a 1,000 photo limit if you download from iCloud.com, unless you use the iCloud app for Windows.
At the end of the day, the choice is yours. Please share this article with your friends and let us know if there are any methods we missed!