- Why Is My Printer Offline?
- How to Get the Printer Back Online: Simple Solutions to Try First
- Solution 1: Restart the printer and your computer
- Solution 2: Run the Windows printer troubleshooter
- Solution 3: Set the printer as the default
- Solution 4: Turn off your VPN
- Solution 5: Check your printer’s Wi-Fi connection
- Solution 6: Remove the printer from offline mode
- Solution 7: Use your printer manufacturer’s tool
- How to Get the Printer Online: Next Fixes to Try
- Why Is My Printer Offline: Explained
- FAQ
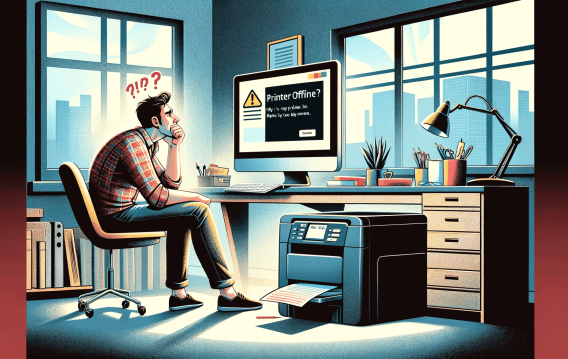
Did you know some airlines still require A4-printed boarding passes? I sure didn’t. When I found out, well, it was a little too late. Picture me standing in front of my PC—just a few hours before my flight, taxi on the way—and realizing my printer is offline.
Looking back, I think I know where these gray hairs are coming from.
With a bit of luck, despite the limited time, I managed to fix the problem and even catch my flight—yay—so now I’m ready to share some wisdom that suddenly fell into my lap. This article will explain why your printer shows as offline and walk you through solutions—from the simplest to more advanced—on how to get your printer back online.
- 🔄 Restart both your printer and PC to clear temporary glitches.
- 🌐 Make sure your printer is set as the default and disconnect any active VPN.
- 🛜 Check cables or Wi-Fi: reset wireless settings (or use WPS) so the printer and PC share the same network.
- 🖱️ Turn off Use Printer Offline in Windows, then run the built-in printer troubleshooter.
- 🏷️ Use your manufacturer’s tool to restore the connection.
- 🖨️ Clear any stuck jobs in the print queue, restart the Print Spooler service, and update or reinstall drivers.
- 🛡️ Ensure your antivirus/firewall isn’t blocking printer traffic.
🧠 Best solution
Microsoft recommends running the Windows printer troubleshooter as the primary fix if your printer is offline —and it’s hard to disagree, since it worked for me too.
Windows 11:
Go to Settings > System > Troubleshoot > Other troubleshooters, then click Run next to Printer and follow the on-screen prompts.
Windows 10:
Open Settings > Update & Security > Troubleshoot > Additional troubleshooters, then click Run under Printer and follow the on-screen prompts.
Why Is My Printer Offline?
Windows shows your printer as offline because it can no longer communicate with it. This loss of communication can be due to a wide range of factors:
- Connectivity issues: The printer may not be properly connected to your computer or network. This could be due to loose cables, port issues, incorrect network settings, IP conflicts, or Wi-Fi problems.
- Driver or software problems: Outdated or corrupted printer drivers can disrupt the communication between your operating system and the device.
- Printer settings: Windows has a setting that puts the printer into offline mode.
- Printer status: You may have accidentally changed the printer’s status to offline.
- Print jobs stuck in queue: A stuck print job can prevent the printer from interacting with Windows, causing it to appear offline.
- Print spooler errors: If the Print Spooler service is malfunctioning, Windows can’t communicate with the printer.
- Antivirus or firewall interference: Your security software may be blocking printer communication.
- Hardware issues: Problems with the printer itself, such as paper jams or other hardware faults, can also interrupt communications.
How to Get the Printer Back Online: Simple Solutions to Try First
Here’s where you should start when your printer is offline:
Solution 1: Restart the printer and your computer
Power cycling your devices can help you get rid of temporary glitches, such as software conflicts, that may cause random issues like computer freezes, application errors, and printers appearing offline.
Turn off your printer and unplug it from its power source. Shut down Windows and allow your devices to stay turned off for about 30 seconds. Now, turn your devices back on and check if the problem persists.
Issues with printers and other peripherals, like mice and keyboards, often happen because a cord has been dislodged or a connection isn’t in place.
So, check to confirm that your printer’s cable is correctly connected to your computer. If the printer works over a network, assess the network cable to ensure it’s still properly hooked.
Solution 2: Run the Windows printer troubleshooter
Windows comes with a built-in troubleshooter that can fix everything from a computer not recognizing your headphones to a printer showing as offline.
If your printer is offline, you can use the printer troubleshooter to run diagnostics and fix the underlying issue. The tool can run in two modes: general and pre-targeted. The first scans for issues with all printers installed on the system, while the second focuses on the specific printer you select. I’ll show you how to run both.
Windows 10
Follow these steps to run the printer troubleshooter in general mode:
- Start the Settings application and click Update & Security.
- Go to the left sidebar and select Troubleshoot.
- Click Additional troubleshooters under the Troubleshoot page.
- Next, click Printer and select Run the troubleshooter.
- Allow the troubleshooter to run and look for issues that may be causing your printer to appear offline.
To run the printer troubleshooter in the pre-targeted mode:
- Start the Settings application and click Devices.
- Go to the left navigation bar and click Printers & scanners.
- Select your printer under Printers & scanners and click the Manage button.
- Click Run the troubleshooter.
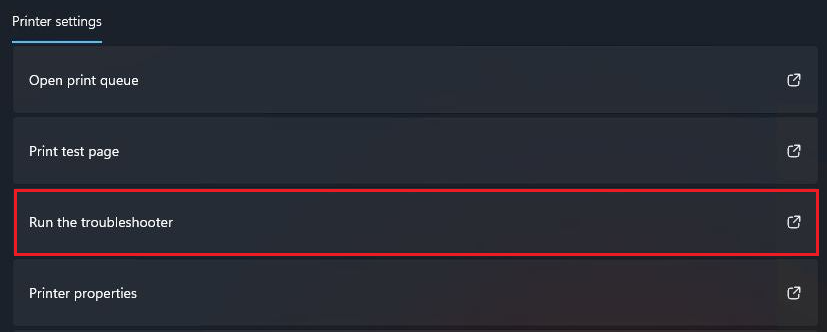
Windows 11
Follow these steps to run the printer troubleshooter in general mode:
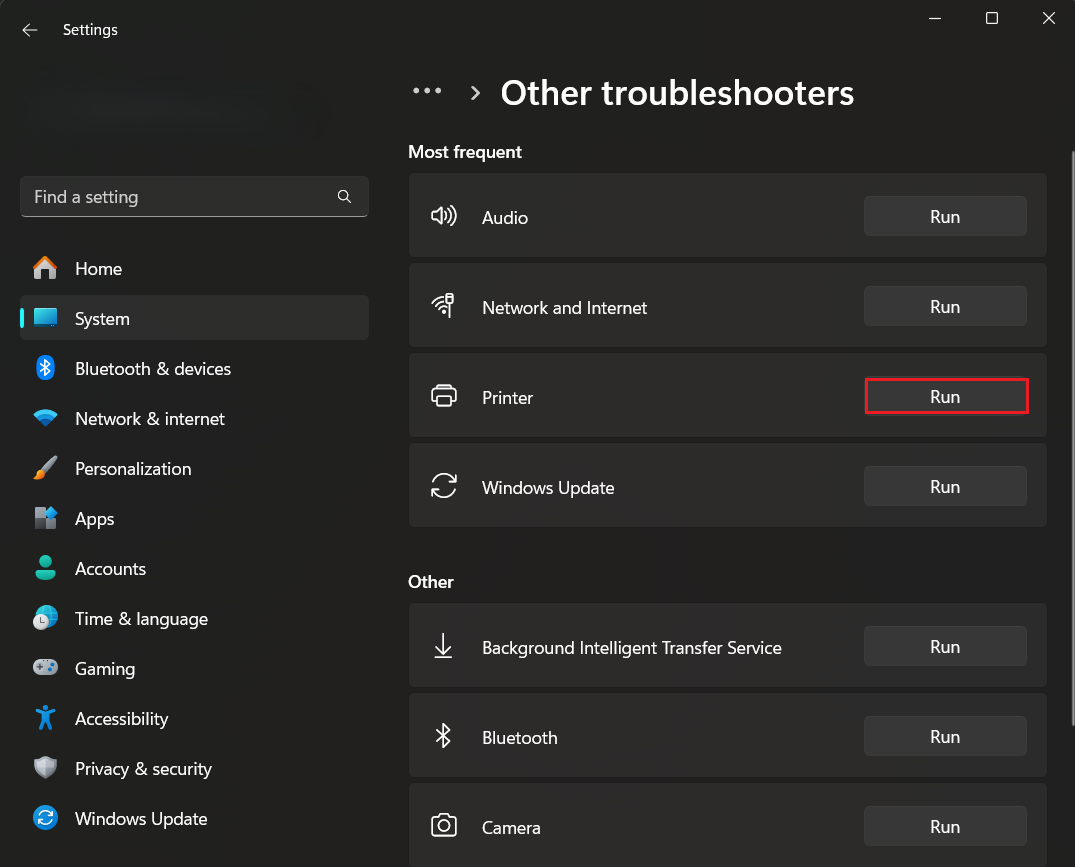
- Go to Settings, select System in the left sidebar, then scroll down and select Troubleshoot.
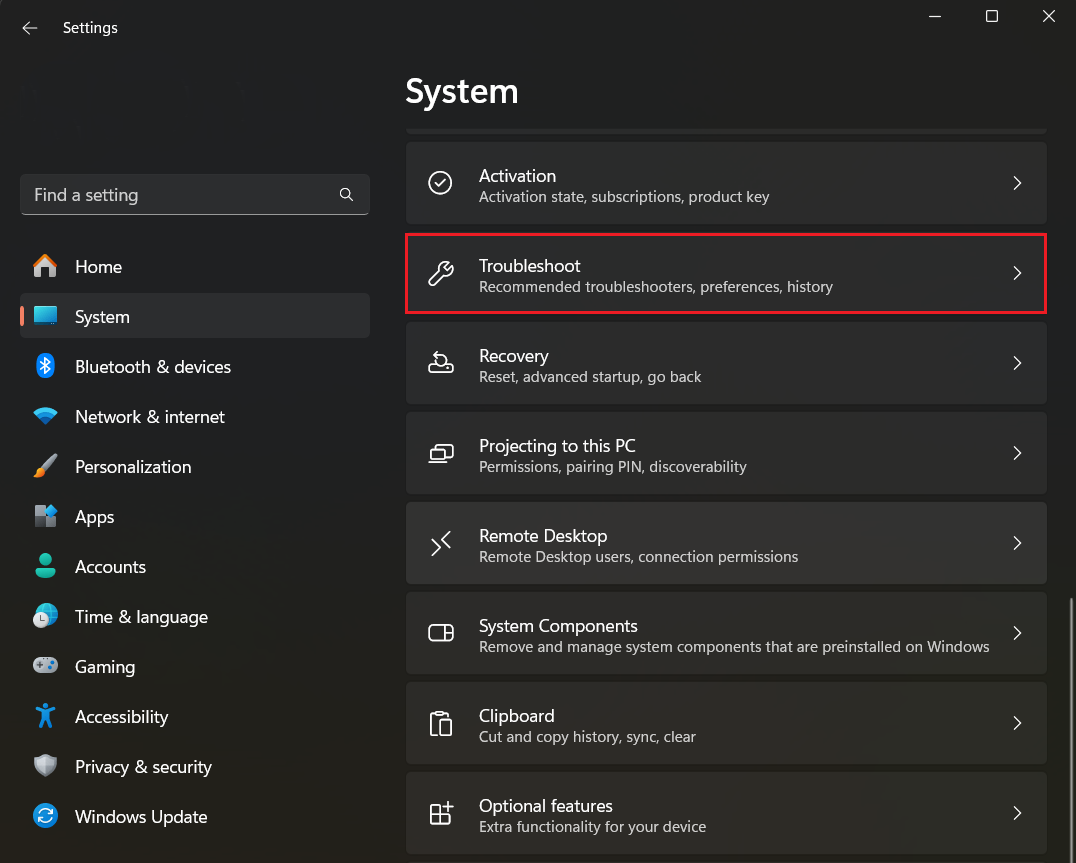
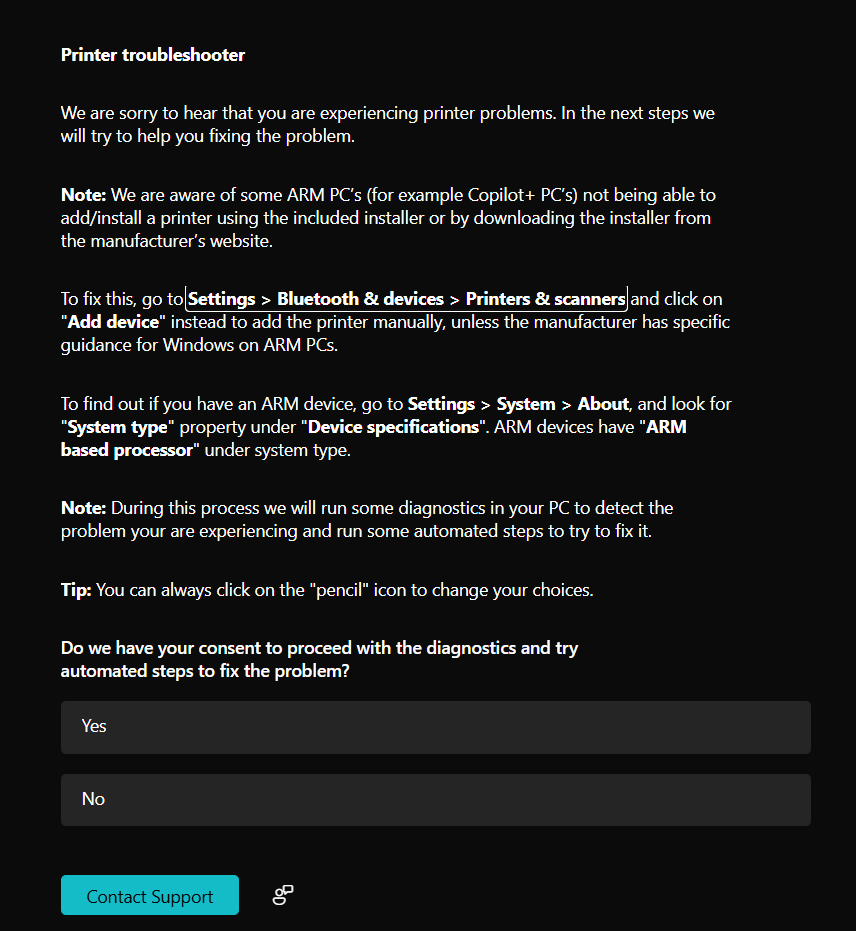
- Click Other troubleshooters and select Run next to Printer.
- The Get Help interface will now appear. Permit the app to diagnose your printer issues and provide the required feedback to complete the process.
Here’s how to run the printer troubleshooter in the pre-targeted mode:
- Launch the Settings app.
- Click Bluetooth & devices on the left-hand side of the page.
- Select Printers & scanners.

- Select your printer.
- Click Run the troubleshooter.
Solution 3: Set the printer as the default
Your printer may be offline because Windows does not recognize it as your primary printing device. By default, the operating system manages and sets your default printer.
In most cases, Windows gets it right. But it can also mix things up. Thankfully, you can manually set your default printer in Windows 11 and Windows 10.
Follow these steps for Windows 10:
- Press
Win + Ion your keyboard to open Settings. - Select Devices on the Settings home page.
- Click Printers & scanners in the left navigation bar.
- Scroll down and uncheck the Let Windows manage my default printer checkbox.
- Now, scroll up and select your printer.
- Click Manage and select Set as default.
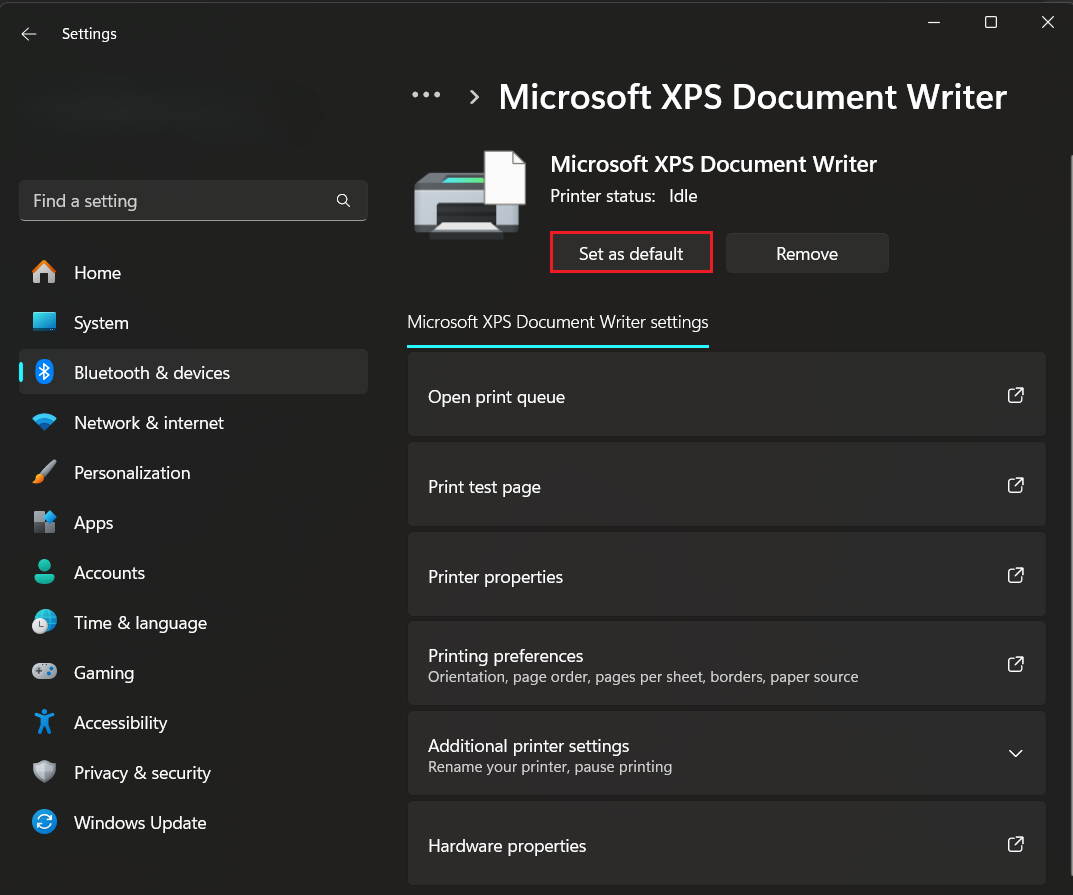
Follow these steps for Windows 11:
- Launch the Settings app.
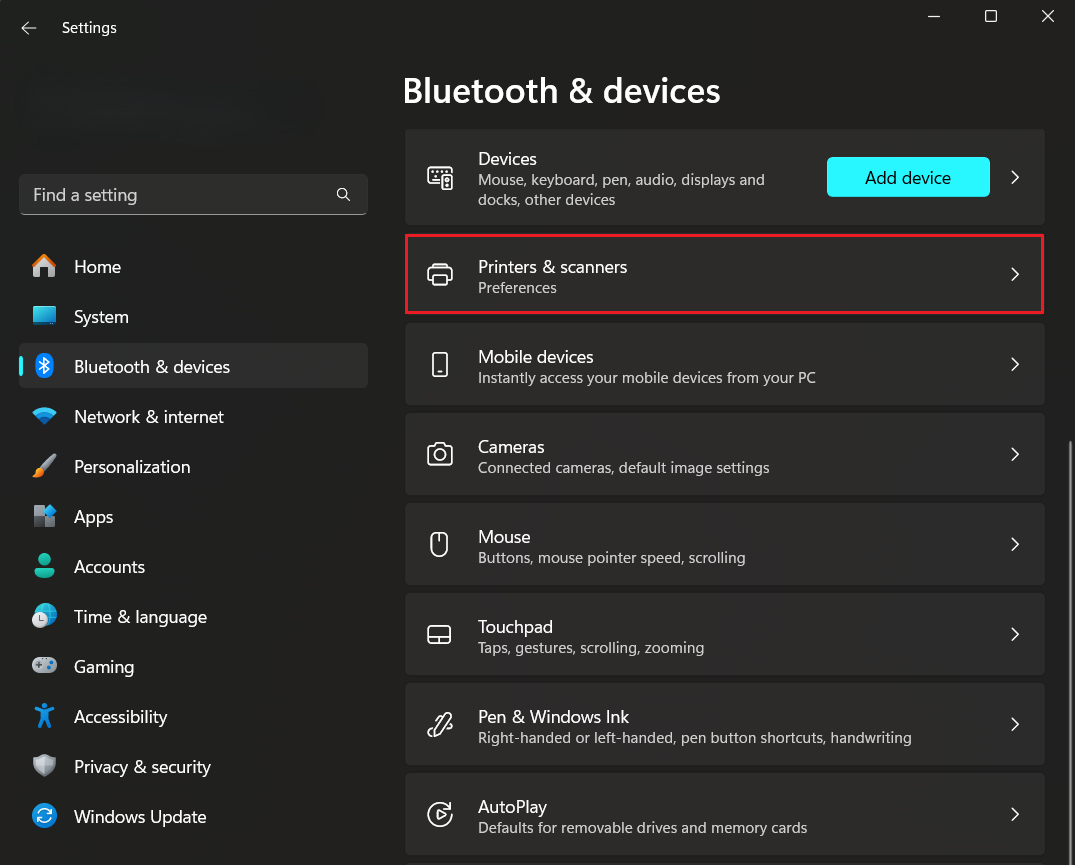
- Click Bluetooth & devices on the left-hand side of the page.
- Select Printers & scanners.

- Scroll down to Printer preferences and turn off the switch for Let Windows manage my default printer.
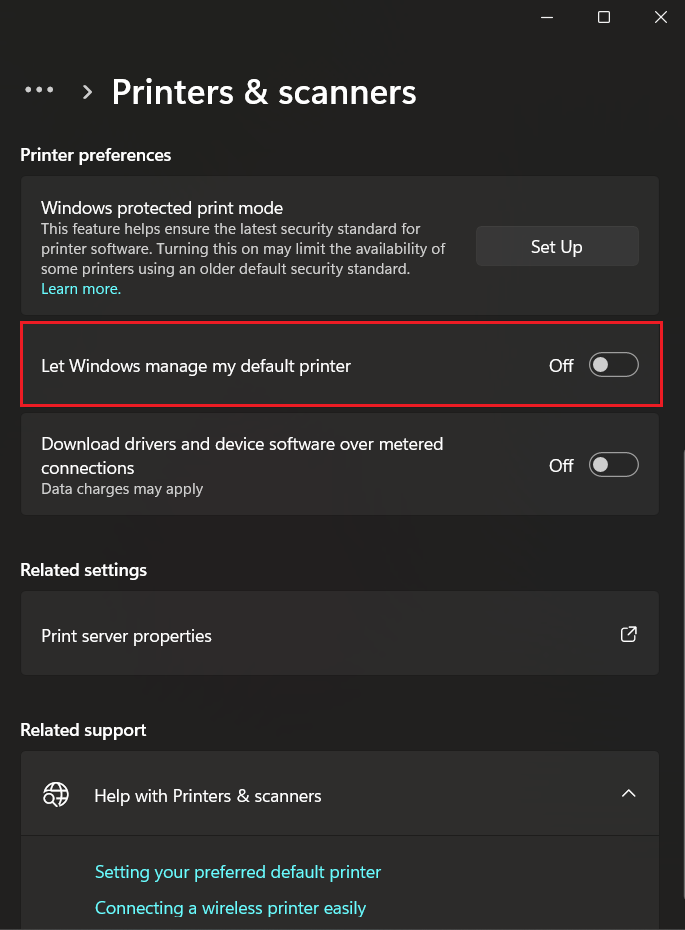
- Now, scroll up and select your printer.
- Click Set as default at the top of the page.
Solution 4: Turn off your VPN
Most VPN clients have limitations that disconnect your printer, usually when it’s connected to the local area network (LAN).
So, first, disconnect your VPN to see if that resolves the problem. If it does, check with your VPN service provider if they support local networking during connection. Some VPNs allow exceptions for some apps to allow you to connect to the LAN.
You can also check if you have the setting that allows LAN access when using a VPN and enable it.
This can help you resolve the issue.
Solution 5: Check your printer’s Wi-Fi connection
If you use a device that prints over Wi-Fi, try connecting it directly to your computer via cable to confirm whether the Wi-Fi connection is the problem. For example, printers may be unable to obtain valid IP address configurations from your Wi-Fi network.
The printer must be connected to the same Wi-Fi network as your computer to work. You can try reducing the distance between the printer and your Wi-Fi router if the printer keeps going offline.
You can also go through the printer’s menu or support web page to check how to connect it to your Wi-Fi if the connection still proves difficult.
Solution 6: Remove the printer from offline mode
Windows has a setting that allows you to use your printer offline. Your printer’s status will be offline if this option is active. Turning it off will bring your printer back online.
These steps will show you how to change your printer from offline to online via Control Panel:
- Press
Win + Rto start the Run dialog window. - Type Control Panel into Run and press the
Enterkey.

- Set View by to Category and click View devices and printers under Hardware and Sound once the Control Panel window opens.
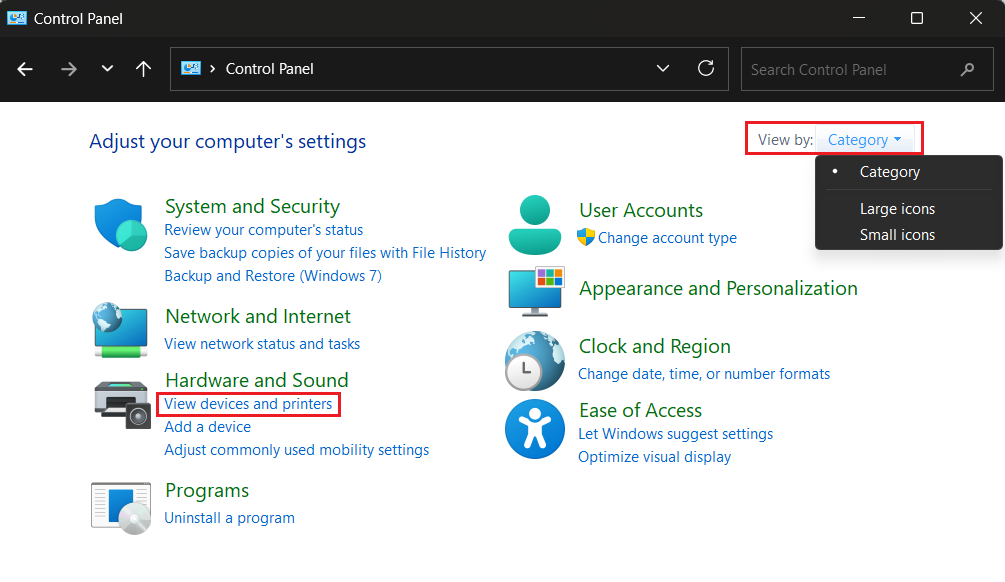
If you’re running Windows 11, you’ll be redirected to the Bluetooth & devices page in the Settings app. From there, click Devices, then click More devices and printer settings under Related settings.
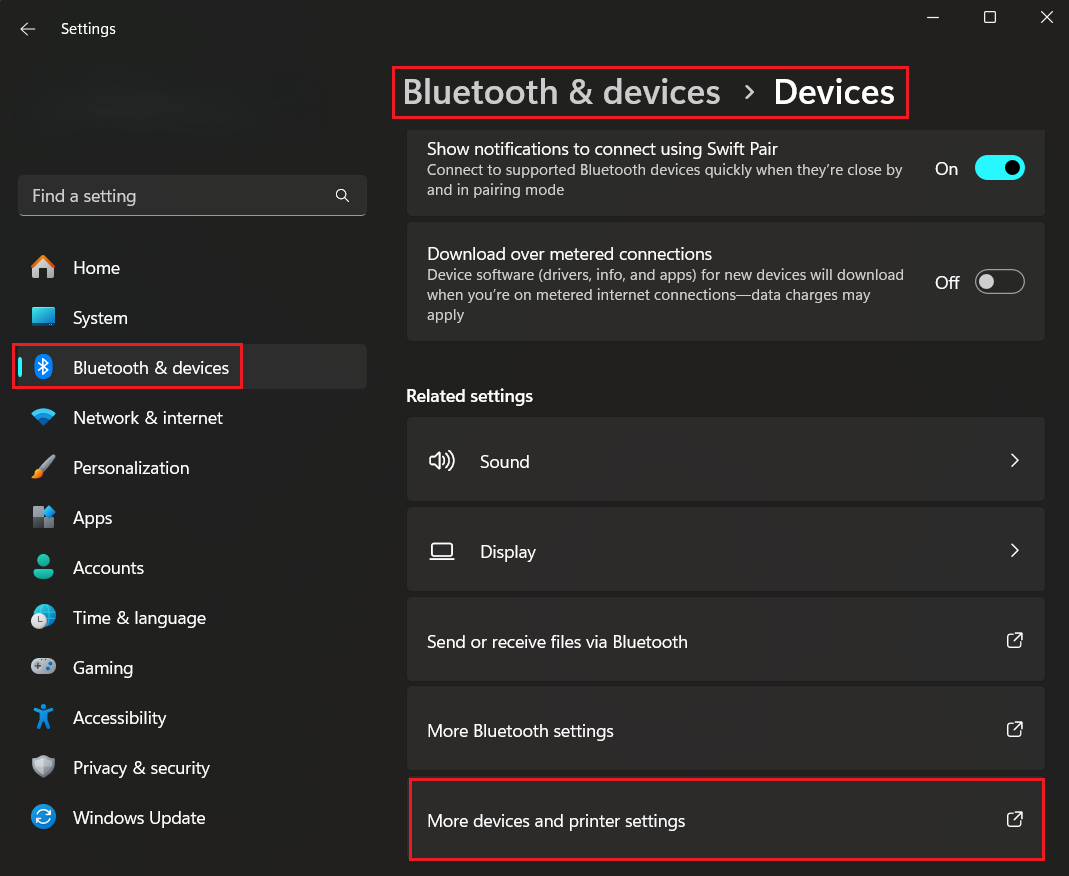
- The Devices and Printers window will now appear.
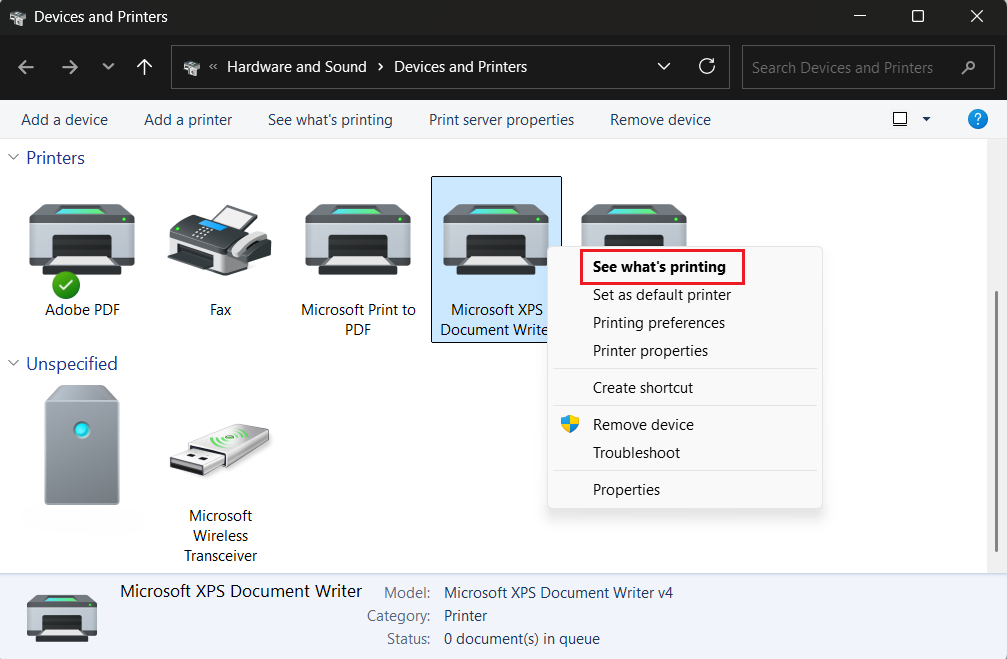
- Go to the Printers section, right-click your printer, and select See what’s printing.
- Now, click Printer in your printer’s dialog window and ensure the Use Printer Offline option is unchecked.
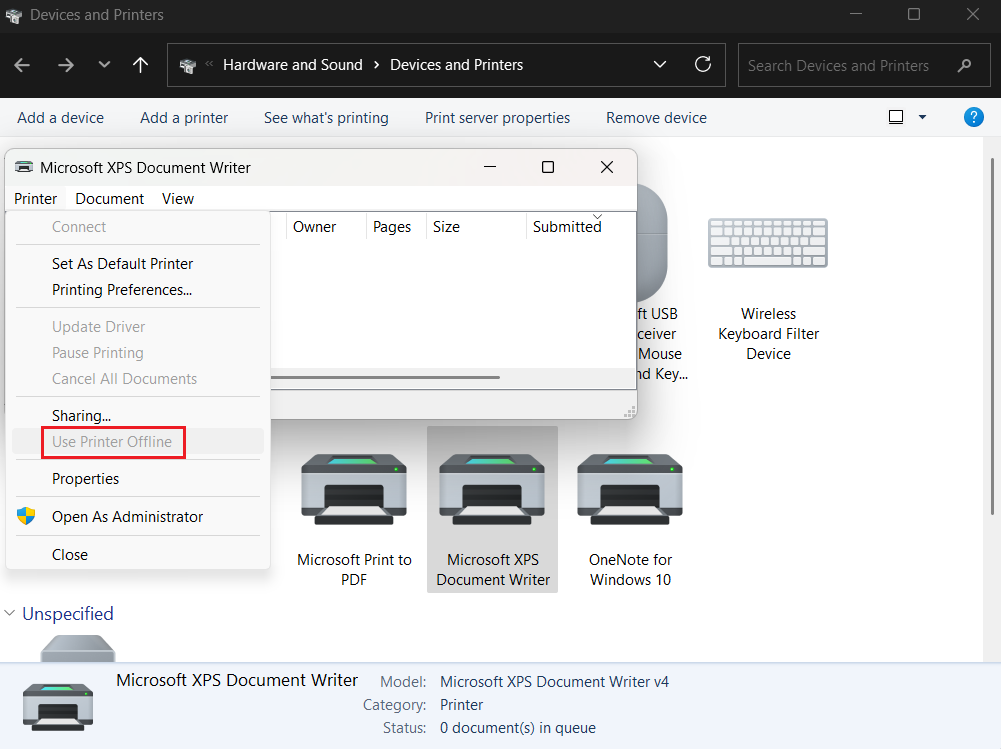
- You can now check if the problem has been resolved.
Move on to the next method if your printer keeps saying Offline.
Solution 7: Use your printer manufacturer’s tool
Although Windows’ built-in troubleshooter can deal with spooler errors, problematic settings, and other general problems, your printer’s maker likely offers a tool of its own, designed with your specific model in mind.
Let’s look at how to get your printer back online using the major brands’ utilities:
![IMG]() HP
HP

Before firing up the app, try restoring Wi-Fi defaults directly from the control panel:
- Make sure the printer is powered on.
- Press and hold the Wireless button and the Cancel (X) button simultaneously for about 5 seconds.
- Release when the Wireless light starts blinking.
- The printer will reboot with its network settings cleared; the Wi-Fi light should blink to indicate it’s ready for a fresh setup.
- Reconnect and check if it worked.
If it didn’t help, here’s plan B. Since the old HP Print and Scan Doctor has reached end-of-support and was removed from HP’s site due to security concerns, HP now recommends using HP Smart whenever your printer shows as offline or print jobs stall in the queue.
Here’s how:
- Download HP Smart from the Microsoft Store and run the app.
- Click Add Printer, select your model from the list, and follow the prompts.
- Once set up, click the Diagnose & Fix (wrench) icon.
- Click Start and follow the instructions if the tool finds any issues.
- Check if your printer is back online.
![IMG]() Epson
Epson
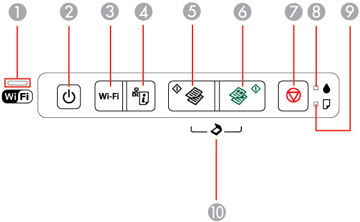
If you own an Epson printer, first try resetting its Wi-Fi settings by simultaneously pressing and holding the Power and Network Status buttons (buttons number 2 and 4 in the image below) until the Wi-Fi and Wi-Fi Direct lights flash alternately. When the lights go out, the network settings are reset.
After resetting, reconnect and check if that helped. If your printer is still offline, install the Epson Connect Printer Setup Utility to re-establish the network link. Follow these steps:
- Download the app from Epson’s support page, run the installer, and follow the prompts.
- Run the app and wait until the tool automatically locates your printer (if it’s on the same network).
- Select your printer and click Next.
- Select Printer Registration and click Next again.
- Follow the prompts to register your printer with Epson Connect.
- Sign in to your Epson Connect account (or create a new one) and follow the instructions on the screen.
- Try printing the setup information sheet or sending a test print via email to the printer’s assigned address.
If the printer still appears offline, double-check that your PC and printer are on the same Wi-Fi network and retry.
![IMG]() Brother
Brother
If you own a Brother printer, you can reset its network card or Wi-Fi setup right from the front panel:
- Press Menu, then use the ▲/▼ arrows to select All Settings (or Initial Setup).
- Navigate to Network > Network Reset and press OK.
- When prompted with “Reset Network?” select Yes, then press OK again to confirm.
- The printer will reboot with its network settings restored to factory defaults.
If you have a laser/laser-all-in-one series printer, try the following:
- Open the front cover and press and hold the WPS and X buttons simultaneously for about 5 seconds.
- Release when the printer starts rebooting—its network card is now back to factory defaults.
If that didn’t do the trick, let’s go for the software fix. In some cases, Brother’s Status Monitor tool may incorrectly show Offline.
You can reconfigure it to watch the correct device—or disable it entirely if it keeps giving false alarms. Here’s how:
- Click Start and open Brother Utilities.
- In Brother Utilities, click Tools > Status Monitor.
- Right-click the Status Monitor icon in the task tray and choose Device to Monitor.
- Uncheck any devices you’re not using. Leave only your active printer checked.
- Click OK.
- If it still shows offline, right-click the Status Monitor icon and select Exit.
- Reopen via Brother Utilities > Tools > Status Monitor.
- The icon should now display Ready instead of Offline.
- If you want to stop Status Monitor from launching at startup, right-click the icon, uncheck Load Status Monitor on Startup, and exit.
![IMG]() Canon
Canon
First, try reconnecting your Canon printer via WPS:
- Press and hold the Wi-Fi button on the printer until the Wi-Fi light starts blinking quickly (about 2–3 seconds).
- Within two minutes of the printer entering WPS mode, press the router’s WPS button once. The router and printer will handshake automatically.
- The printer’s Wi-Fi light will stop blinking and remain steady once connected.
- Check if your printer is back online.
If it is still offline, use the Canon Wi-Fi Connection Assistant app:
- Download and install Canon Wi-Fi Connection Assistant.
- Run the app and select Diagnose and Repair.
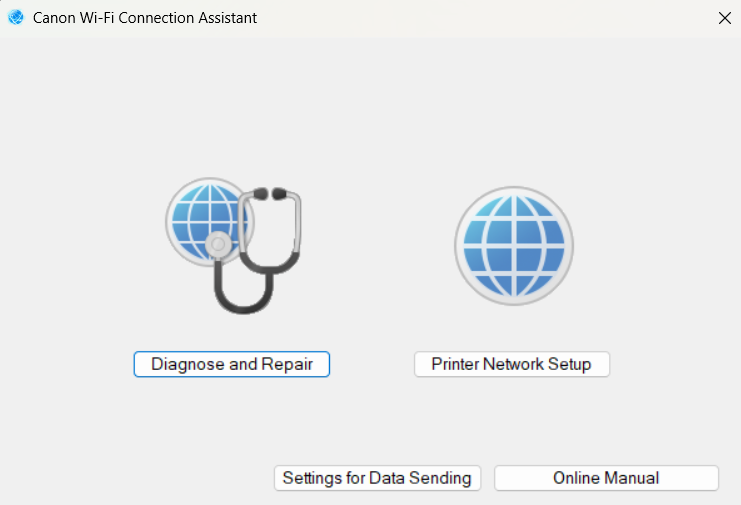
- Let the app find your printer (or add it manually) and follow the prompts to reset or reconfigure network settings.
Let’s summarize the fixes for each printer brand:
| Manufacturer | Manual fix | Software fix |
|---|---|---|
| HP |
|
HP Smart:
|
| Epson |
|
Epson Connect Printer Setup Utility:
|
| Brother |
|
Brother Utilities:
|
| Canon |
|
Canon Wi-Fi Connection Assistant:
|
How to Get the Printer Online: Next Fixes to Try
Solution 8: Clear the print queue
Stuck print jobs and backlogs can interrupt the communication between Windows and your printer. You can resolve the problem by clearing your print queue and reinitializing the printer. Here’s how to fix a printer that is offline by clearing the print queue:
- Press
Win + Ion your keyboard to open Settings. - Click Bluetooth & devices (Windows 11) or Devices (Windows 10) on the Settings home page.
- Go to Printers & scanners.
- Locate and select your printer.
- Click Open print queue on your printer’s page.
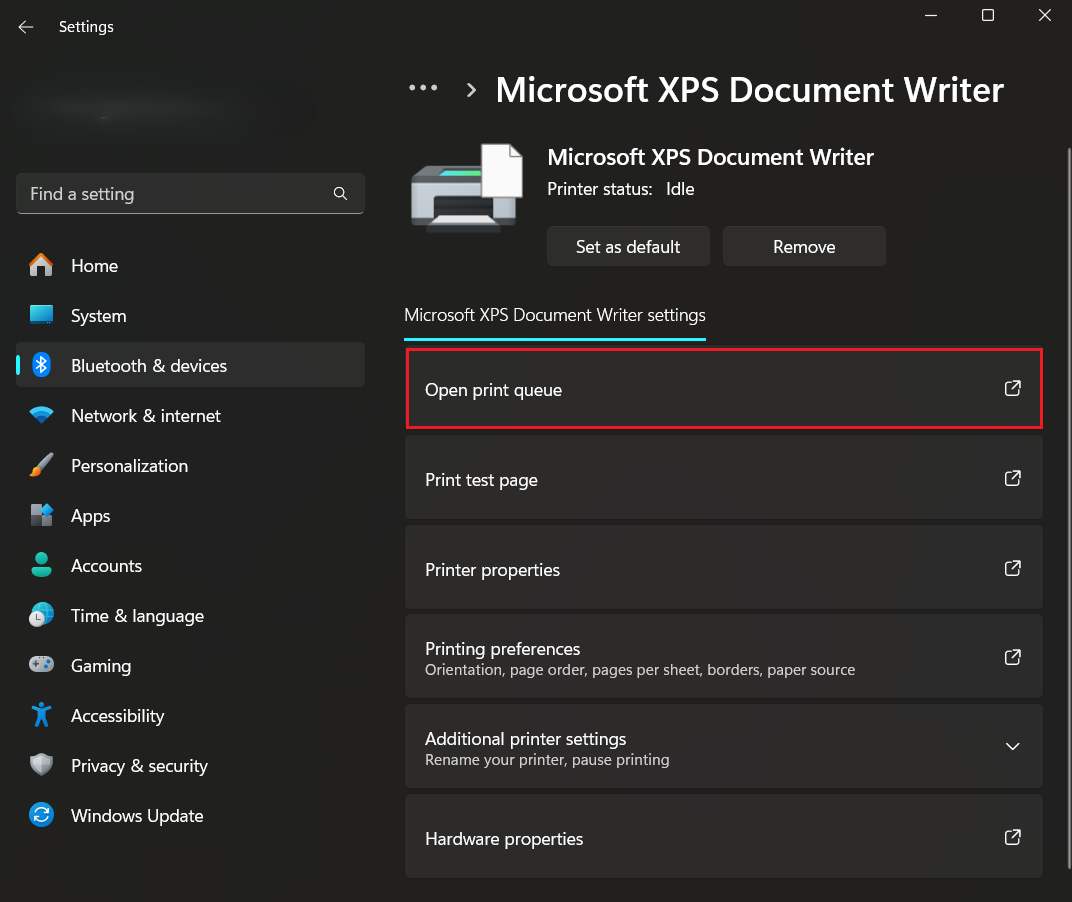
- Click Cancel all.
You can also clear the print queue manually. Follow these steps:
- Open the Run dialog window using the
Win + Rshortcut. - Type spool into the textbox and click OK.

- Open the PRINTERS folder and delete its contents.
Solution 9: Restart the Print Spooler service
The Print Spooler service is responsible for ordering and managing print jobs. It also facilitates your operating system’s interactions with your printer. If the service is somehow interrupted or malfunctions, Windows won’t be able to establish any connection with your printer, causing the device to appear offline.
Restarting the service can clear print queue errors, resolve conflicts, and refresh your computer’s connection to the printer. These steps will show you how to get your printer online by restarting the Print Spooler service:
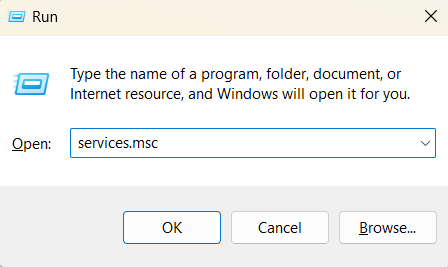
- Open the Run dialog using the
Win + Rkeyboard combination. - Type services.msc and hit the
Enterkey.
- After the Services application shows up, scroll down to the Print Spooler service, right-click it, and select Restart.
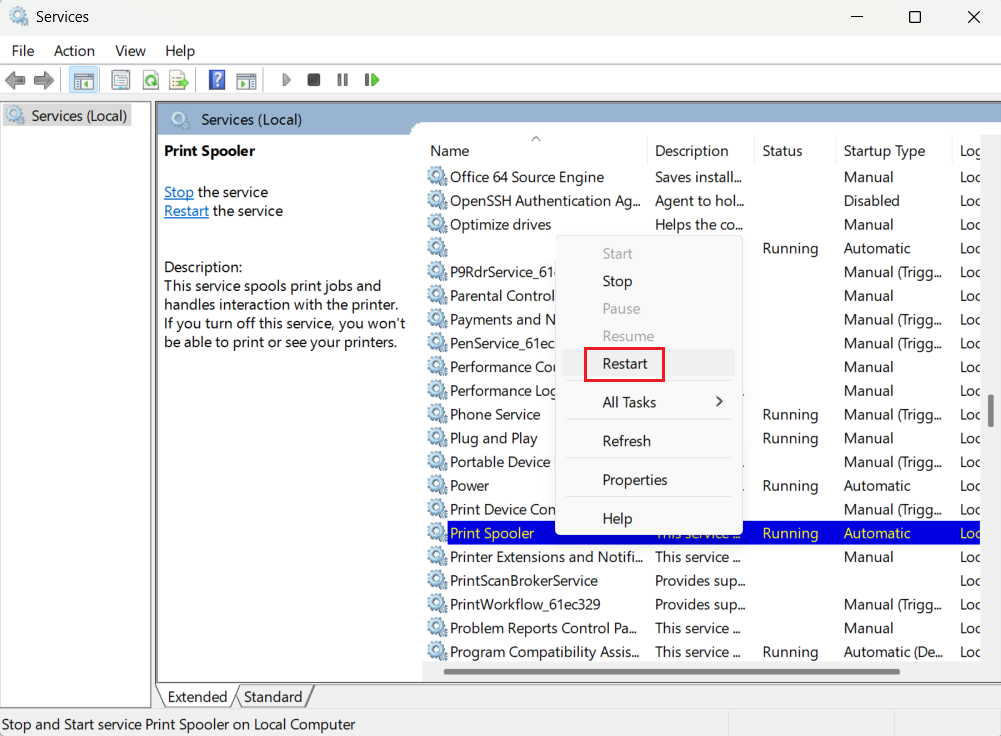
- Wait for the service to restart, then check if your printer is now online.
Solution 10: Update your printer drive
Most printers are plug-and-play, and Windows automatically installs their drivers the first time you connect them. However, Windows can be slow to refresh its database, so updating drivers may help if your printer is offline.
The surefire way to get the latest driver for your printer is to download it directly from your device manufacturer’s support page. Just be sure to pick the correct version for your specific model and OS, since installing the wrong driver can complicate things further.
Y ou can skip the stress and risks of hunting down the right printer drivers by using third-party driver updaters like Auslogics Driver Updater, IObit Driver Booster, or Snappy Driver Installer.
These tools automatically scan devices connected to your computer, identify and install the latest manufacturer-approved drivers, check them for viruses, and even optimize your hardware—all in one place.
Solution 11: Reinstall the printer
Drivers can get corrupted, leading to all sorts of problems like a disappearing mouse cursor or the very issue we’re discussing.
If that’s the case, the issue won’t be resolved until you reinstall the printer driver from scratch, completely removing your current one and installing the latest version. Before you start, ensure you download the latest driver from your printer manufacturer’s website.
Here’s how to uninstall your printer and its driver in Windows 10 and 11:
- Press
Win + Ion your keyboard to open Settings. - Click Bluetooth & devices (Windows 11) or Devices (Windows 10) on the Settings home page.
- Go to Printers & scanners.
- Select your printer.
- Click Remove device under the printer if you’re on Windows 10. Go to the top of the screen and click Remove if you’re on Windows 11.
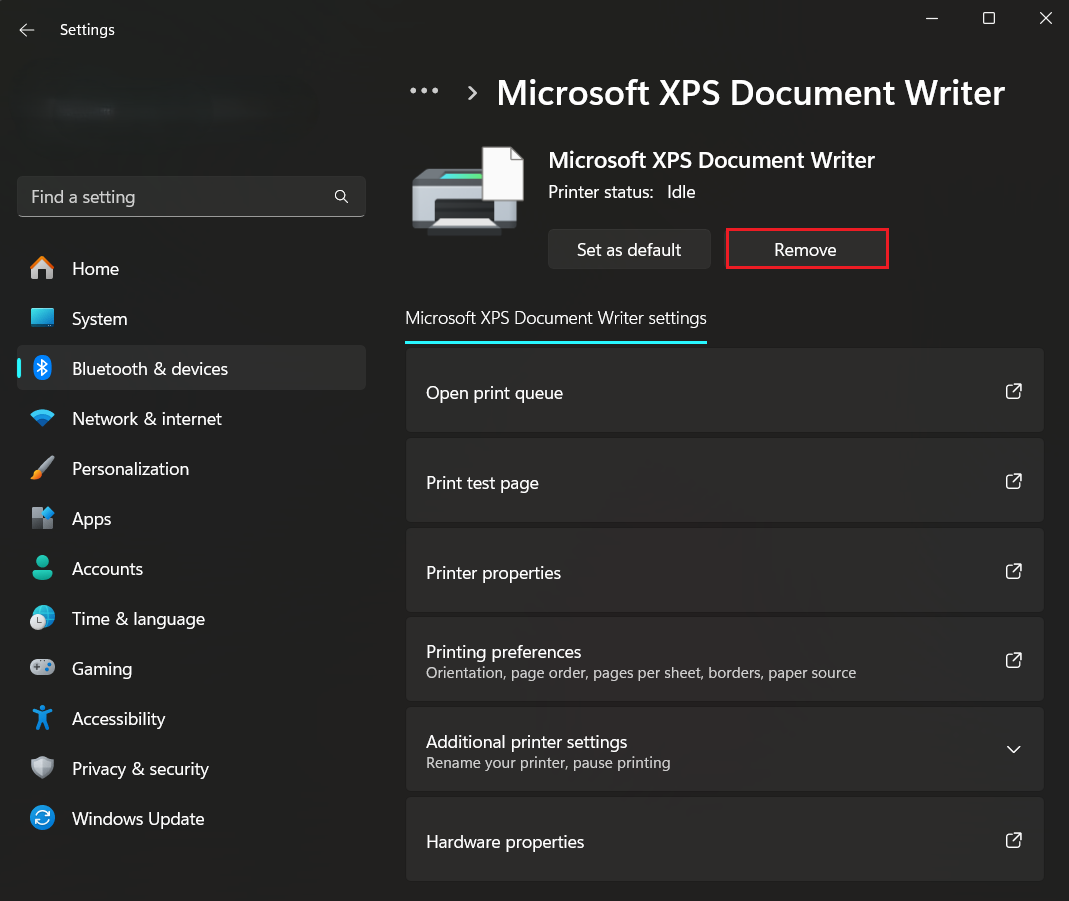
- Select Yes in the confirmation pop-up.
Now follow these steps to completely remove the printer’s driver:
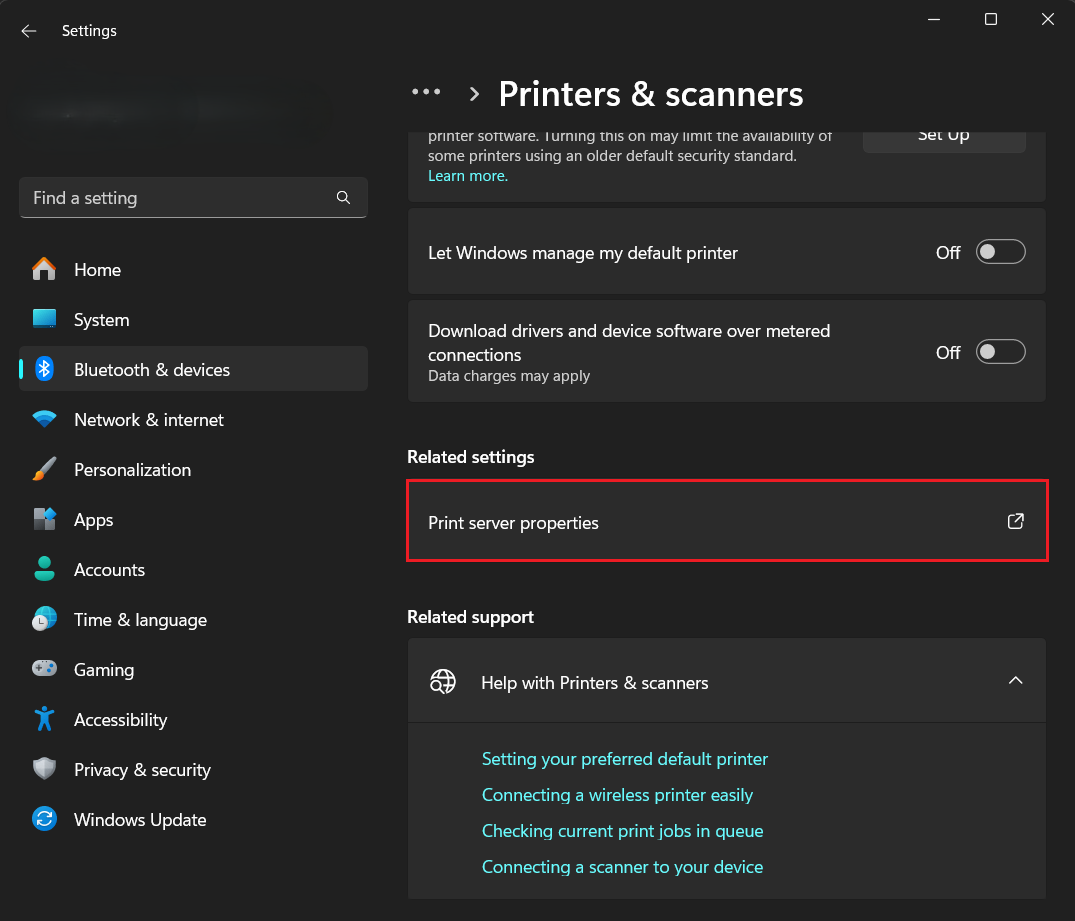
- Return to the Printers & scanners page.
- Go to the Related settings section and click Print server properties.
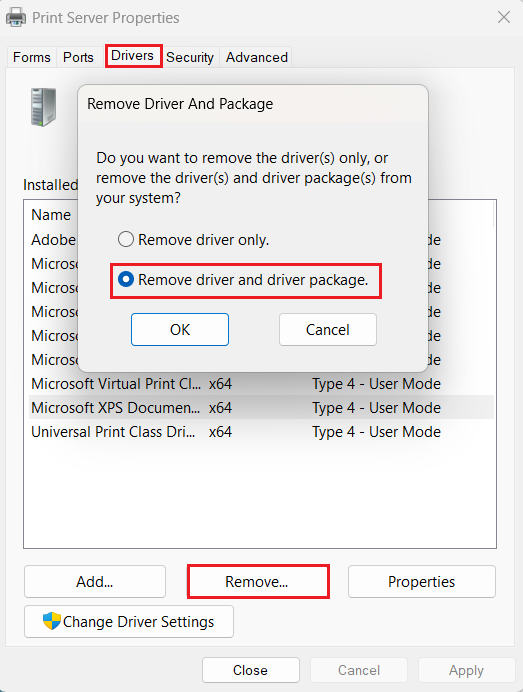
- Head to the Drivers tab after the Print Server Properties window opens.
- Select your printer’s driver from the list and click the Remove button.
- Select Remove driver and driver package and click OK.
After removing the driver, you can now install the package you downloaded from the printer manufacturer’s website or use a reputable driver updater tool, like Auslogics Driver Updater, to get your printer online.
📌 Related: How to Update Your Graphics Driver in Minutes on Windows 10/11
Solution 12: Check your antivirus settings
Your security software can block traffic from your printer and make it appear offline. Some users in this thread claim that adding a printer’s IP address to their antivirus exclusion list did the trick for them. So let’s check if your antivirus or firewall is to blame.
- Open Settings and go to Privacy & security > Windows Security (Windows 11) or Update & Security > Windows Security (Windows 10).
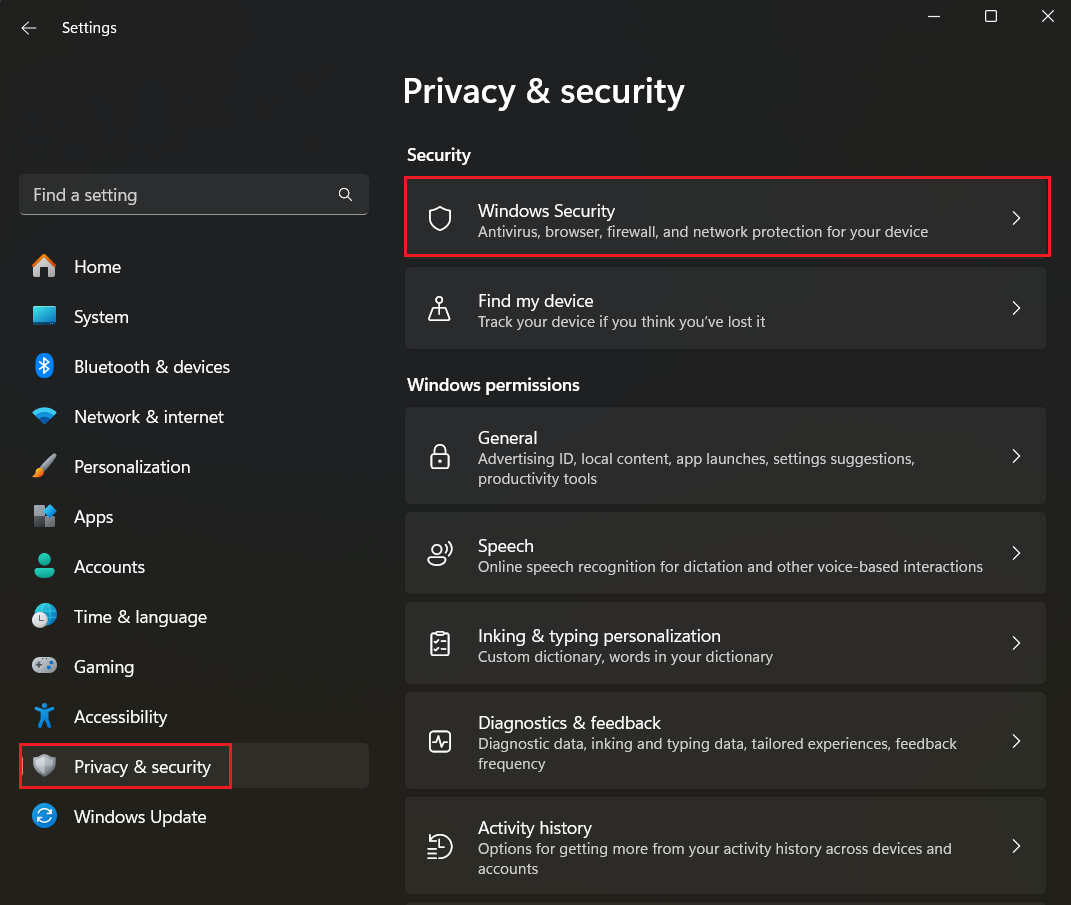
- Click Firewall & network protection.
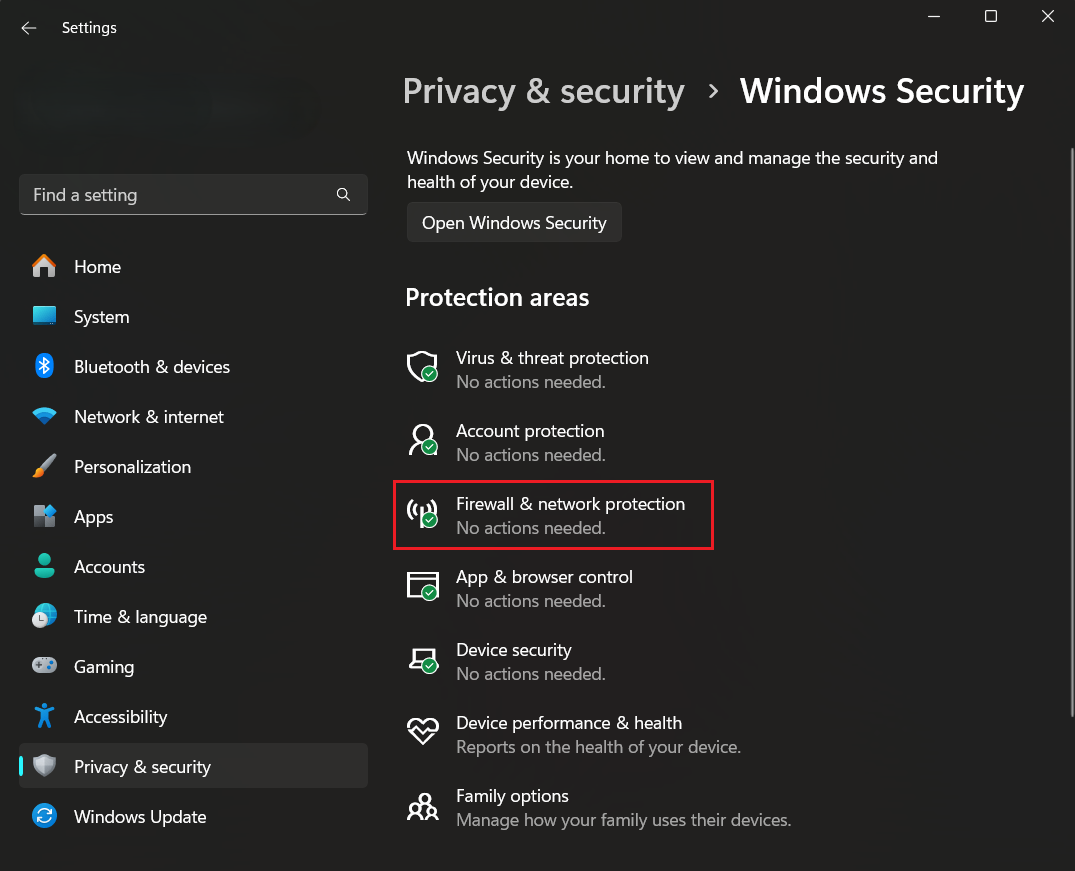
- Select your active network profile and toggle Microsoft Defender Firewall off.
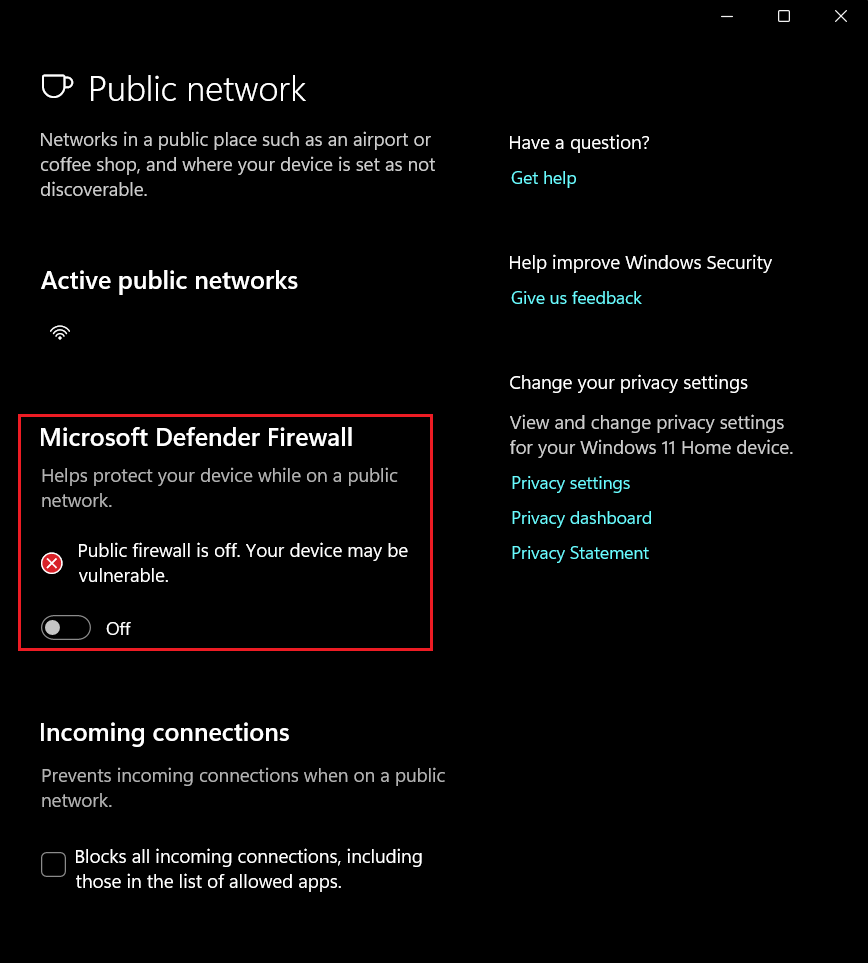
- Try sending a test page to your printer. If it prints, you’ve found the culprit.
Now, let’s allow traffic from your printer through the firewall:
- Go back to the Firewall & network protection page and click Allow an app through firewall.
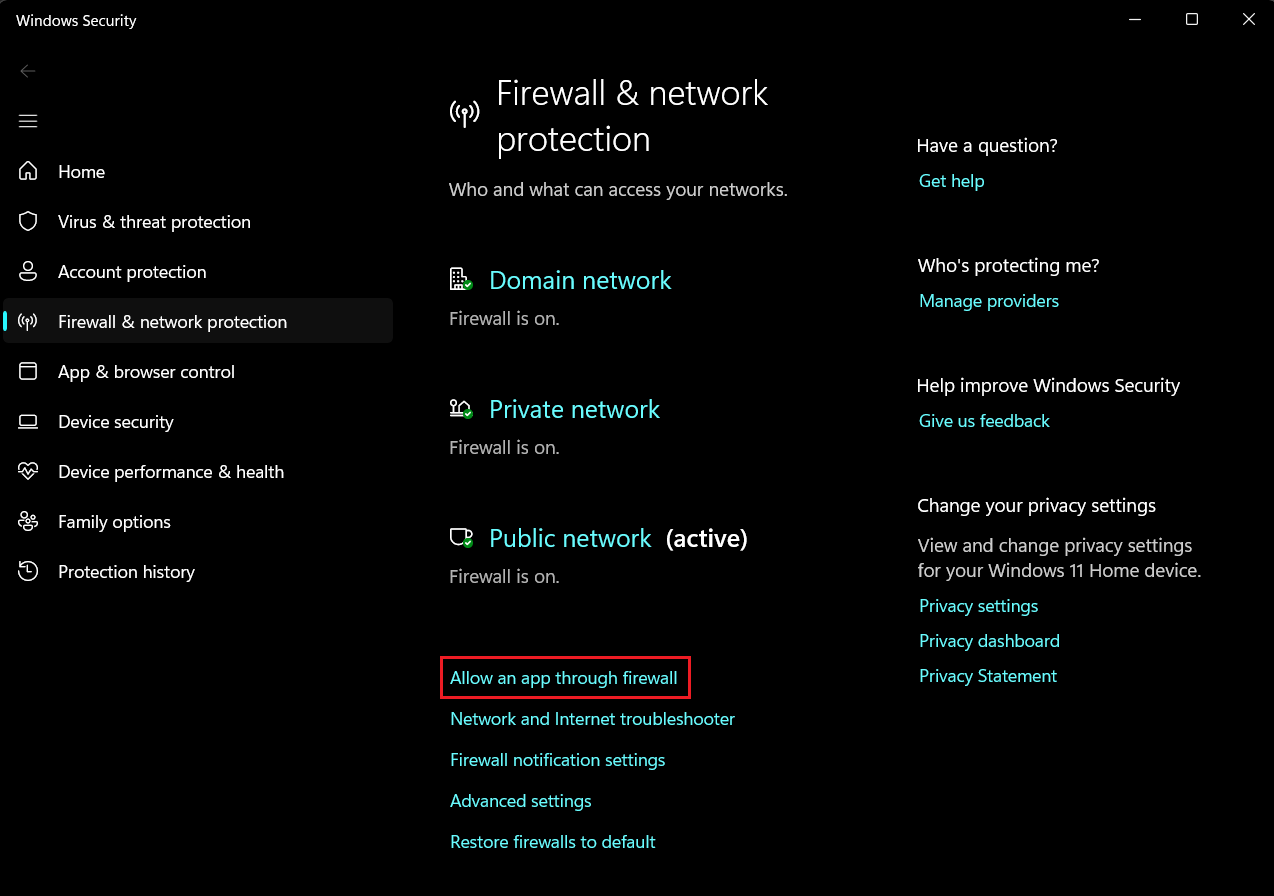
- Scroll down, find File and Printer Sharing, and make sure both the Private and Public boxes are checked.
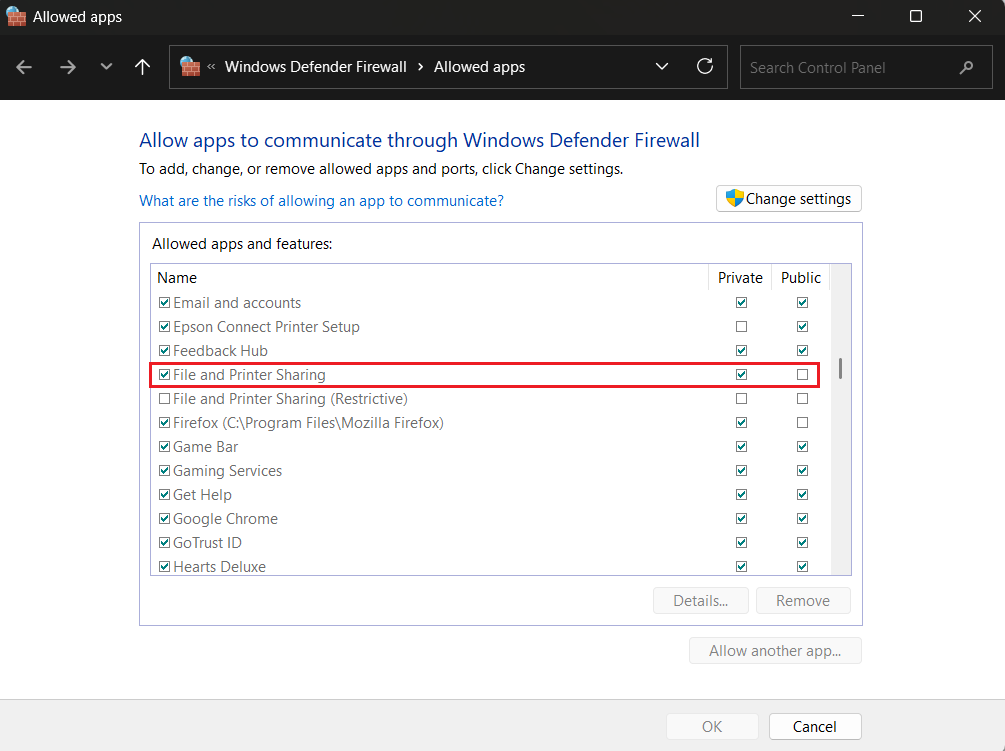
- If you use your manufacturer’s app for printing (e.g., HP Smart, Epson Connect), click Change settings > Allow another app, browse to that app’s .exe file, and add it with both Private and Public network profiles enabled.

- Now go back to Firewall & network protection and toggle Microsoft Defender Firewall back on.
- Print another test page to confirm the printer works correctly.
Why Is My Printer Offline: Explained
If your printer is offline, remember—no rough patch is permanent, and, with the fixes above, yours has come to an end (at least where printing is concerned).
Keep your drivers updated and don’t let print jobs pile up in the queue to prevent this issue in the future.
Did you find the article helpful, or maybe you know other fixes? Drop a comment below!