
While I prefer my taskbar clean, sometimes it can be a challenge to switch between tasks when icons are combined and unlabeled.
If you are currently experiencing this issue, you don’t have to put up with the unease anymore. In this article, I will guide you on how to ungroup taskbar items in Windows 11. First, let’s see why this feature is there in the first place.
Windows 11 Taskbar Grouping: What Does It Do?
Taskbar grouping is a Windows feature that automatically combines icons of the same application into one button in the taskbar. It helps save space on your taskbar, especially when you have lots of programs open.
The feature was prominent on Windows 10 and was active by default. Most Windows users didn’t notice it because they had no issues with how their taskbars looked. It could be the reason why Microsoft decided to remove the option to disable it in Windows 11.
Thankfully, the company decided to allow Windows 11 ungroup taskbar icons in version 23H2.
So why ungroup the taskbar in Windows 11 if it is so great?
Benefits of Ungrouping Taskbar Items
There are many different reasons you may want to ungroup your taskbar:
- Improved productivity:
With an ungrouped taskbar, you can quickly move between applications more efficiently.. You also get to drag and rearrange the applications on your taskbar, however it feels most efficient to you. That way, you can work faster and get more accomplished.
- Better taskbar management and resource control:
Ungrouped icons can cover up your taskbar quickly. The sight of the cluttered taskbar will force you to close unnecessary programs, reducing your CPU’s burden and improving your system’s performance.
How to Ungroup Taskbar Icons in Windows 11
The process involves choosing to never combine taskbar buttons on Windows 11. It is pretty easy if you know where to look.
I’ll be walking you through two methods.
Method 1: Ungroup taskbar icons through the Settings app:
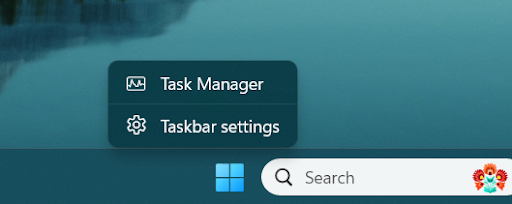
- Take your cursor to any space on the taskbar and right-click it.
- Choose Taskbar settings.
- Scroll down and click on the expand Taskbar behaviors.
- Next, navigate to the Combine taskbar buttons and hide labels drop-down menu.
- You will find three options, namely: Always, When taskbar is full, and Never. In our case, you want to click on the last one to ungroup taskbar icons in Windows 11.
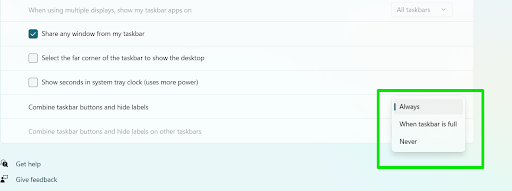
- Always: This option prioritizes space-saving by combining the taskbar buttons for the same application and hiding their labels. But it means that you’d have to click on combined icon thumbnails to access individual windows.
- When taskbar is full: I go with this option when I am looking for a combination of space and a visually appealing experience. It ungroups the icons when there is enough space on the taskbar and combines them when too many apps are open.
- Never: This option ensures Windows 11 doesn’t combine taskbar icons.
”
- The changes will be applied automatically, so you can go ahead and close your Settings app and enjoy your new cleaner look.
Method 2: Ungroup taskbar icons using the Windows Registry
The Settings window is not the only way to ungroup taskbar icons and show app labels. You can make changes in the Windows Registry to achieve the same result.
Even if you know your way around the Registry Editor, we recommend creating a restore point so that you can undo changes later.
Follow these steps:
- Open the Start menu, type regedit, and click Registry Editor on the search result page.
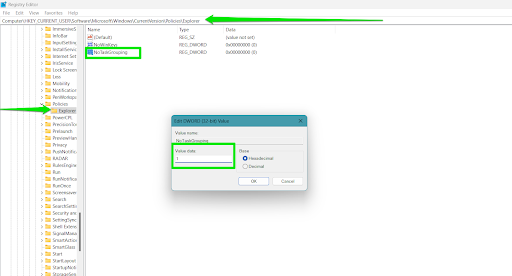
- After the Registry Editor opens, head to the left navigation panel and go to the following key:
Computer\HKEY_CURRENT_USER\SOFTWARE\Microsoft\Windows\CurrentVersion\Policies\Explorer
- Switch to the right side of the window, right-click the empty area, and select New > DWORD (32-bit) Value.
- Change the name of the new DWORD to NoTaskGrouping.
- Now, double-click the NoTaskGrouping DWORD and type 1 in the Value data text box.
- Click OK and restart your computer for the changes to take effect.
Further reading: How to Reset Taskbar in Windows 10/11?
Ungroup Taskbar Icons in Windows 11 Easily: Explained
This article has provided you with two ways you can ungroup taskbar items on Windows 11. The first method allows you to ungroup the taskbar through in-built functionalities in the Settings app, and the second one involves going through the Registry Editor.
FAQ
- Open up the search menu on your Windows 11 computer.
- Type in whatever application you want to pin to your taskbar.
- Right-click it and select “Pin to taskbar.”
- It will immediately appear on the taskbar.
- Right-click your taskbar and select “Taskbar settings.”
- Scroll down and click “Taskbar behaviors.”
- Check the option labeled “Automatically hide the taskbar.”
- Your changes will be effected immediately, so you can go ahead and close the Settings app.