![[FIXED] Why Does My Computer Keep Going to Sleep?](https://www.auslogics.com/en/articles/wp-content/uploads/2023/06/FIXED-Why-Does-My-Computer-Keep-Going-to-Sleep-568x359.png)
- So, How to Keep My Computer from Going to Sleep?
- Solution 1: Use Task Manager
- Solution 2: Tweak Windows 10 sleep mode settings
- Solution 3: Restore Power Plan defaults
- Solution 4: Use Registry Editor
- Solution 5: Configure display timeout
- Solution 6: Optimize screen saver settings
- Solution 7: Examine the battery
- Solution 8: Disable the theme
- Solution 9: Update your OS
- Solution 10: Run a system scan
- Solution 11: Run Power Troubleshooter
- Solution 12: Change What the Power Buttons Do
- Solution 13: Check for problematic drivers
- Solution 14: Reset your BIOS
- Solution 15: Check for corrupt or missing system files
- Solution 16: Perform a complete checkup
- In Summary
- FAQ
Tired of dealing with a computer that keeps going to sleep, disrupting your workflow? We understand the frustration, and we’re here to help.
Imagine this scenario: you sit down with your cup of coffee, ready to tackle your tasks, but your Windows 10 computer decides to take an unscheduled nap after just a few minutes of inactivity.
The prevalence of excessive sleepiness in Windows 10 is becoming a common concern among users.
Fortunately, there’s a silver lining. Despite its annoyance, the Windows 10 sleep mode problem is fixable, and we’re here to guide you through the process.
So, grab another cup of coffee because we’re about to show you how to keep your computer from sleeping.
So, How to Keep My Computer from Going to Sleep?
You’ve had enough of your computer’s impromptu sleep sessions, and now you’re on a mission to stop your laptop from going to sleep.
In this section, we’ll delve into 16 effective methods and solutions to keep your computer from sleeping:
Let’s dive in and discover how you can get your PC back on track by breaking its bad sleep habits.
Solution 1: Use Task Manager
First and foremost, open your Task Manager and look out for not responding programs – they might cause the lethargy shown by your PC.
Here’s what you should do:
- Press Ctrl + Alt + Del on your keyboard and select Task Manager.
- Click on the Processes tab and select the problematic program.
- Finally, click End task.

If frozen programs are not the case, keep moving ahead.
📌 Also read: Ultimate Guide: How to Set the Priority Using Windows Task Manager
Solution 2: Tweak Windows 10 sleep mode settings
To keep your laptop from sleeping, try adjusting the Windows 10 sleep mode settings:
- Start -> Control Panel -> Power Options
- Choose when to turn off the display -> Change advanced power settings -> Adjust the options to your needs -> Apply
If your PC keeps being intolerably drowsy, try out the following trick.
Solution 3: Restore Power Plan defaults
Another tip to keep your computer from going to sleep randomly is to restore its default power plan settings:
- Start -> Settings -> Power & sleep
- Additional power settings -> Choose when to turn off the display -> Restore default settings for this plan
No such option? Then go to:
Choose when to turn off the display -> Change advanced power settings -> Restore plan defaults
All to no avail? Then it is time to let your Registry Editor have a go.
📌 Also read: Simple Guide: How to Restore Missing Power Plans Options on Windows
Solution 4: Use Registry Editor
Here are 6 easy steps to fix your listless computer using Registry Editor:
Windows logo key + S-> Typeregedit-> Right-click on Registry Editor -> Run as Administrator- Navigate to the following:
HKEY_LOCAL_MACHINE\SYSTEM\CurrentControlSet\Control\Power\PowerSettings\238C9FA8-0AAD-41ED-83F4-97BE242C8F20\7bc4a2f9-d8fc-4469-b07b-33eb785aaca0
- Right-click Attributes -> Type 2
- Close Registry Editor
- Well done! Now go to: Win key -> Type Power Options -> Open Power Options -> Selected Plan -> Change Plan Settings -> Change Advanced Power Settings
- Click on Change Settings that are Currently Unavailable -> Sleep -> System Unattended Sleep Timeout -> Set your preferred settings
Too early for that? Then keep working your way down.
Solution 5: Configure display timeout
You can address the ‘Windows 10 goes to sleep too fast’ drama by configuring your display timeout.
Here is how to do that:
- Windows Key + X -> Command Prompt (Admin)
- Type the commands for the times when your laptop is
plugged in:
powercfg.exe /setacvalueindex SCHEME_CURRENT SUB_VIDEO VIDEOIDLE <time in seconds>
powercfg.exe /setacvalueindex SCHEME_CURRENT SUB_VIDEO VIDEOCONLOCK <time in seconds>
powercfg.exe /setactive SCHEME_CURRENT
In battery mode:
powercfg.exe /setdcvalueindex SCHEME_CURRENT SUB_VIDEO VIDEOIDLE <time in seconds>
powercfg.exe /setdcvalueindex SCHEME_CURRENT SUB_VIDEO VIDEOCONLOCK <time in seconds>
powercfg.exe /setactive SCHEME_CURRENT
Close everything and Restart your PC
Does the problem remain unresolved? There is no need to despair – you still have lots of tricks up your sleeve.
📌 Related: CMD Navigation: How to Change Directory in CMD (Command Prompt)
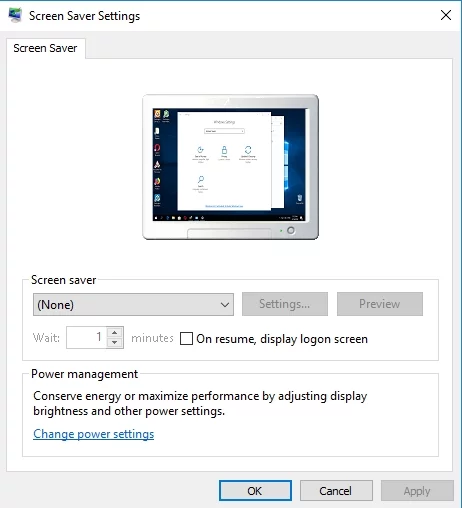
Solution 6: Optimize screen saver settings
Tweaking your screen saver this way may save the day:
- Start -> Control Panel -> Appearance and Personalization -> Screen Saver
- Set its sleep settings to None or choose the amount of time you like -> Restart your computer
Does the issue persist? Well, your battery might be feeling a bit under the weather.
Solution 7: Examine the battery
If tweaking your PC’s sleep settings was to no avail, take a closer look at your battery – it might be the culprit.
Does the issue persist only when you are running your laptop off the battery? If so, remove the battery from the laptop, wait for a while and then reinsert it.
If your PC keeps going into sleep, we recommend you to have your computer serviced – your battery might need replacement or a firmware update.
Solution 8: Disable the theme
The sad truth is, your nice-looking theme might be the cause of your Windows 10 having a ‘sleep disorder’.
There is nothing left to do but go back to the default theme:
Windows + S -> Type “themes” -> Go to the theme settings -> Select the default theme -> Exit
Solution 9: Update your OS
If your Windows 10 is acting weird and keeps falling asleep after a few minutes idle, check if there are any updates waiting to be installed on your PC.
Make use of Windows Update:
Start -> Settings -> Update & Security -> Check for updates -> Let your Windows 10 download and install new updates
Keep in mind that not only helpful updates arrive at your PC.
For instance, if you Windows 10 is suspiciously sleepy, some malicious programs might have penetrated your system and stolen a march on your antivirus.
📌 Related: Ultimate Guide: How to Manually Check and Install Windows Updates
Solution 10: Run a system scan
Excessive Windows 10 sleepiness can be a symptom of malware infection. Indeed, some malicious invaders might have tampered with your power settings.
We recommend you to scan your operating system with your main anti-virus software.
If you do not have a third-party security solution installed, make use of the built-in Microsoft Windows Defender:
Start -> Settings -> Update & Security -> Windows Defender -> Open Windows Defender -> Full
Besides, a special anti-malware tool can contribute to the investigation into the case.
For example, Auslogics Anti-Malware can detect and remove the nefarious intruders your main security solution may miss.
📌 Also read: How to Remove Virus and Other Malware from Windows
Solution 11: Run Power Troubleshooter
To fix the issues that put your PC into sleep mode after a few minutes of inactivity, try running Power Troubleshooter – it is aimed at resolving the most common problems with your power plan.
To run Power Troubleshooter, do the following:
Windows key + S -> Type Troubleshooting -> Select the result -> System and Security -> Power -> Follow the onscreen guidelines
No luck so far? Then proceed to the following trick.
Windows 10/11 (8, 7, Vista, XP)
Solution 12: Change What the Power Buttons Do
If none of the above has fixed your issue, try tweaking the Power Buttons:
- Start -> Contol panel -> Hardware and Sound
- Power Options -> What the power buttons do -> Choose Do nothing for all the options
And what if the Power Buttons have nothing to do with your Windows 10 sleep problems?
It is time to look for dodgy drivers.
📌 Related: Simple Guide: How to Restore Missing Power Plans Options on Windows
Solution 13: Check for problematic drivers
Faulty or outdated drivers can bring about Windows 10 sleep mode problems.
Here are some tips to get your drivers in tip-top shape:
Make Use of the Built-in Windows Tools
To fix your driver issues in Windows 10, try using:
- Windows Driver Verifier (Start menu -> Type verifier -> Enter)
- Device Manager (
Win + X-> Device Manager -> Expand the device entries -> Search for the problematic driver -> Right-click on it and select Update Driver Software)
Troubleshoot Your Drivers Manually
It is OK to fix your drivers one by one.
Pay particular attention to:
- BIOS drivers
- Network drivers
- Chipset drivers
Explore the vendors’ websites – you need the latest driver versions for your models.
📌 Also read: [EASY GUIDE] How to Update Device Drivers on a Windows 10 PC?
Use a Special Tool
No time to handle problematic drivers on your own? Auslogics has the perfect solution for you.
Auslogics Driver Updater, takes care of fixing and updating all your drivers automatically. It scans your system, identifies outdated or faulty drivers, and installs the latest versions from trusted sources.
Say goodbye to manual driver management and enjoy an optimized and stable computer performance.
If the ‘sleepy Windows’ issue keeps cropping up despite your best efforts, hold your breath and proceed to the following tip – your BIOS might need some tweaking.
📌 Related: How to Check if My Drivers Are Up to Date on Windows 10 PC?
Solution 14: Reset your BIOS
Your BIOS might cause your Windows 10 to ignore the sleep settings and take a nap after just a few minutes idle.
First and foremost, we recommend you to take some precautions before interfering with your BIOS. Just in case.
To create a system restore point, follow these steps:
- Start menu -> Type restore -> Create a restore point
- System Properties -> Create -> Describe briefly the restore point -> Create
Then reset your BIOS to its default settings:
- Turn on your laptop and simultaneously press F2, DEL or F12 (the exact key depends on your laptop brand) -> You will enter your BIOS settings
- Find the reset to default settings option: it can be called Reset to default, Clear BIOS settings, Load setup defaults, etc. -> Select it -> Enter
If there is something wrong with you PC after the manoeuvre above, restore your computer to its previous functioning state:
- Start (right-click) -> Control Panel -> System and Security -> File History
- Recovery -> Open System Restore -> Next -> Select the latest restore point -> Next -> Finish -> Yes
📌 Related: What is BIOS on a Computer: Everything You Need to Know
Solution 15: Check for corrupt or missing system files
Missing or corrupted system files can cause Windows 10 sleep mode issues.
Try resolve them, run System File Checker:
- Start -> Enter Command Prompt -> Right-click Command Prompt -> Select Run as administrator -> Enter DISM.exe /Online /Cleanup-image /Restorehealth -> Enter sfc /scannow
- Wait for the system scan to finish -> Reboot your Computer
Solution 16: Perform a complete checkup
If you are so far at a loss to explain why your PC keeps going to sleep after a few minutes of inactivity, your OS needs a comprehensive checkup.
You can perform it manually (do not miss junk files, corrupt keys, invalid entries, and non-optimal settings) or use a special diagnostic tool to save your time and effort.
For example, Auslogics BoostSpeedcan help you out and Auslogics Driver Updater will help you to automatically update all the drivers you have.
In Summary
In conclusion, if you’re tired of dealing with a computer that keeps going to sleep and disrupting your workflow, don’t worry, we’ve got you covered. We’ve provided you with 16 effective methods and solutions to keep your computer from sleeping.
From using Task Manager to tweaking sleep mode settings, restoring power plan defaults, and even utilizing Auslogics Driver Updater to automatically fix and update your drivers, we’ve covered it all.
So, no need to rest when you’re on planetary duty. Follow these tips and keep your computer awake and productive.
FAQ
To turn off sleep mode on your computer, you can adjust the power settings. Here’s how:
- Open the Control Panel on your computer.
- Select “Power Options” or “System and Security” followed by “Power Options.”
- Look for the option that says “Choose when to turn off the display” or a similar setting.
- Adjust the settings to “Never” or a desired time period for both “On battery” and “Plugged in” modes.
- Save the changes.
By disabling sleep mode, your computer will stay awake and active without entering sleep mode automatically.
Some common causes include scheduled tasks, network activity, and hardware settings. To troubleshoot the issue, you can check your power settings, disable wake timers, update drivers, and ensure that there are no external factors triggering the wake-up.
Additionally, using Auslogics BoostSpeed, a powerful system optimization tool, can help identify and resolve any underlying issues that may be causing the frequent wake-ups, ensuring a more stable sleep mode for your PC.