![[FIXED] Kindle Not Showing Up on PC](https://www.auslogics.com/en/articles/wp-content/uploads/2024/07/FIXED-Kindle-Not-Showing-Up-on-PC-568x359.png)
- What if Kindle is not Recognized Under Windows 10/11?
- Method 1: Trying a different port or cable
- Method 2: Use a different computer
- Method 3: Try charging your Kindle for a longer period
- Method 4: Performing a hard reset
- Method 5: Connecting Kindle as a camera
- Method 6: Connecting Kindle using caliber
- Method 7: Enabling ADB
- Method 8: Installing the Kindle driver
- Method 9: Reinstalling Kindle
- Method 10: Disabling the USB selective suspend feature
- You Kindle Not Showing Up On PC Issue: Solved
- FAQ
Over time, Amazon’s Kindle has transformed from a simple e-book reader into a versatile and user-friendly device packed with a wide range of features.Users can conveniently browse, purchase, and download various books and magazines, making it a powerful tool for reading enthusiasts .However, despite Amazon’s efforts to align this device with Microsoft’s updates to the Windows OS, the Kindle, like other tablets, remains susceptible to connectivity issues, such as the Kindle not showing up on a PC.
What if Kindle is not Recognized Under Windows 10/11?
If you’re having trouble connecting your Kindle to your PC, do not worry. In this article, we will teach you what to do if your computer doesn’t detect a Kindle.The workarounds for this issue are quite easy to follow. Make sure you work your way down the solutions until you successfully fix your PC’s failure to recognize the Kindle.
Method 1: Trying a different port or cable
The first thing you should do is check if there are physical issues with your computer’s USB port or with the cable itself. You must make sure that they are not damaged.You can check your USB port’s functionality by connecting a different device to it. For instance, if you have an external web camera, you can try plugging that into the USB port.If your PC automatically recognizes the device, then the port is functional. In this case, it is possible that the problem lies with the USB cable.Also you can try other ports and see if they can recognize your Kindle. If you’ve found out that the cable is the problem, you can try using a different USB cable to fix the PC’s failure to recognize the Kindle.
Method 2: Use a different computer
You can also try connecting your Kindle to a different PC. This will allow you to identify whether the problem is with your computer, Kindle, or USB cable.
Method 3: Try charging your Kindle for a longer period
Users who had experienced the same problem tried charging their Kindle for around 30 minutes. After that, they performed a hard reset and were able to connect their device to their computer successfully.
Method 4: Performing a hard reset
Like other smartphones and tablets, Kindle also has a reset function that allows users to clear their device’s memory and clean install the operating system.When you try to reset your Kindle, you will be able to address software problems that might prevent your PC from recognizing the device. To hard reset your Kindle, follow the steps below:
- Plug Kindle to your computer.
- Press and hold the Power button for around 40 seconds.
- Wait for your Kindle to restart automatically.
- Once your device restarts, release the Power button.
- If your Kindle does not restart automatically, you can turn it on by pressing the Power button.
Related: Easily Reset Your PC: How to Factory Reset a Windows 10 & 11 Computer
Method 5: Connecting Kindle as a camera
If your PC does not recognize your Kindle, you can try connecting it as a camera. Once you’ve plugged your device into your computer, open the Notifications bar, then select the Connection Options .Choose the Connect as a camera option. If this is not available from the list, you can select it from the Settings or Storage options on your device.
Method 6: Connecting Kindle using caliber
You can also try connecting your Kindle to your PC using Caliber. Switch off your computer and Kindle, then unplug all the cables attached.Once you’ve switched your PC back on, you can open Caliber, then try connecting your Kindle to your computer. Turn on your device and check if you’ve resolved the issue.
Method 7: Enabling ADB
Another solution you can try is enabling the ADB (Android Debug Bridge) feature on your Kindle. If you notice that it is already activated on your device, you can disable it and check if that fixes the issue.You can do this by going to Settings and then selecting Device . There, you will see an option to either enable or disable the ADB feature.
Method 8: Installing the Kindle driver
It can happen that your computer is not detecting Kindle because you haven’t installed its driver properly. It is possible that the driver is corrupted or missing.So, the best solution is to update or install the Kindle driver. You can update your drivers manually, but you should know that the process can be complicated and time-consuming.Follow the steps below:
- On your keyboard, press
Windows Key + S. - Type device manager then hit Enter.
- Expand the contents of the Portable Devices category.
- Right-click MTP Device or Kindle , then select Update Driver Software from the options.
- Select the Browse my computer for driver software option.
- Choose the Let me pick from a list of drivers device on my computer option.
- Select Show Compatible Hardware.
- Choose MTP USB Device , then click Next .
- Install the driver on your computer.
When you use this program, it will automatically recognize your system and find the latest compatible drivers for it.
It will address your Kindle issues and other driver-related problems. Once the process is complete, you will notice a significant improvement in your computer’s performance.
Method 9: Reinstalling Kindle
You can also try reinstalling the latest Kindle software for Windows 10/11 to resolve the issue. To do this, follow the instructions below:
- Press Windows Key + S on your keyboard.
- Type settings then hit Enter .
- Select Apps .
- Go to the left-pane menu, then choose Apps & Features .
- Go to the right pane, then search for Kindle.
- Click it, then select Uninstall .
- Restart your computer.
- Go to the Downloads page of Amazon , then get the latest Kindle software for Windows 10/11
Method 10: Disabling the USB selective suspend feature
If your computer still doesn’t detect a Kindle, you can try disabling the USB selective suspend feature.By default, it is enabled in portable computers to conserve power and help prolong the battery’s life. However, it can also cause USB connectivity problems. So, try to disable it to get rid of the issue.Here’s how to do that:
- Open the Run dialog box by pressing
Windows Key+Ron your keyboard. - Type control panel , then hit Enter.
- Once the Control Panel is up, make sure that the View By option is set to Category.
- Select Hardware and Sound.
- Click Power Options.
- On the new window, look for your chosen power plan, then click Change Plan Settings.
- Click the Change advanced power settings option.
- Expand the contents of USB Settings.
- Click USB Selective Suspend Setting, then choose Disabled for the Battery and Plugged In options.
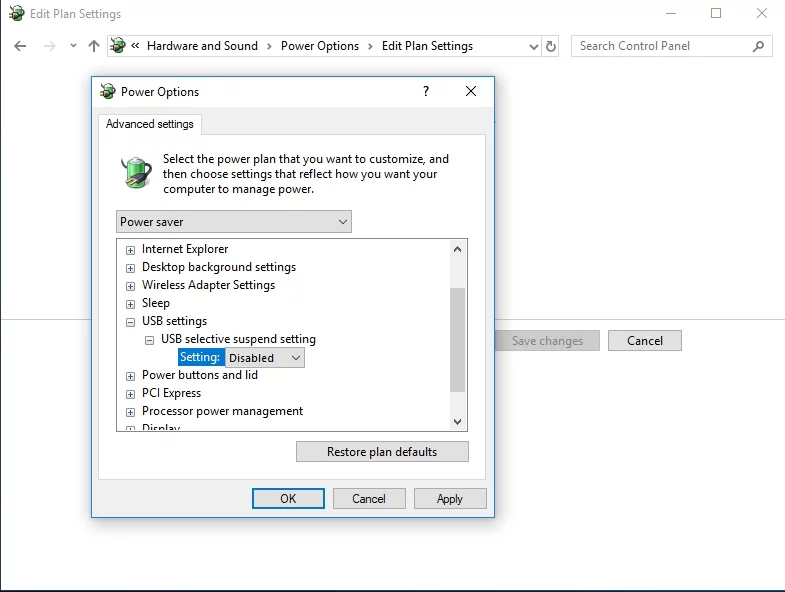
- Save the changes you made.
Also Read: How to speed up USB 3.0 transfer speed in Windows 10?
You Kindle Not Showing Up On PC Issue: Solved
While Amazon’s Kindle has evolved into a feature-rich device, it still faces connectivity issues when it comes to recognizing it under Windows 10/11However, several easy-to-follow methods address this problem. From checking USB ports and cables to reinstalling Kindle software, users have various options to troubleshoot and establish a successful connection.Was this guide helpful? Share the article with your friends and let us know in the comment section below any additional thoughts you have!