
To keep your connection safe, it’s strongly recommended to password-protect it . And since we’re all humans and tend to forget things, sometimes this protection may work in the opposite direction, preventing you from accessing your own network. Stay with me as we walk through multiple methods in search of the perfect way to take back control of your Wi-Fi network despite your memory playing tricks on you.
How to Check the Wi-Fi Password on Windows 10/11
Assuming that you are still connected to your Wi-Fi, below you can find easy-to-apply tips on how to show the Wi-Fi password on Windows 10 and 11 . Choose the most convenient one for you and give it a try.
Method 1: Find the Wi-Fi password using Settings
- Right-click the Start menu search bar, type “Control Panel,” and hit Enter.
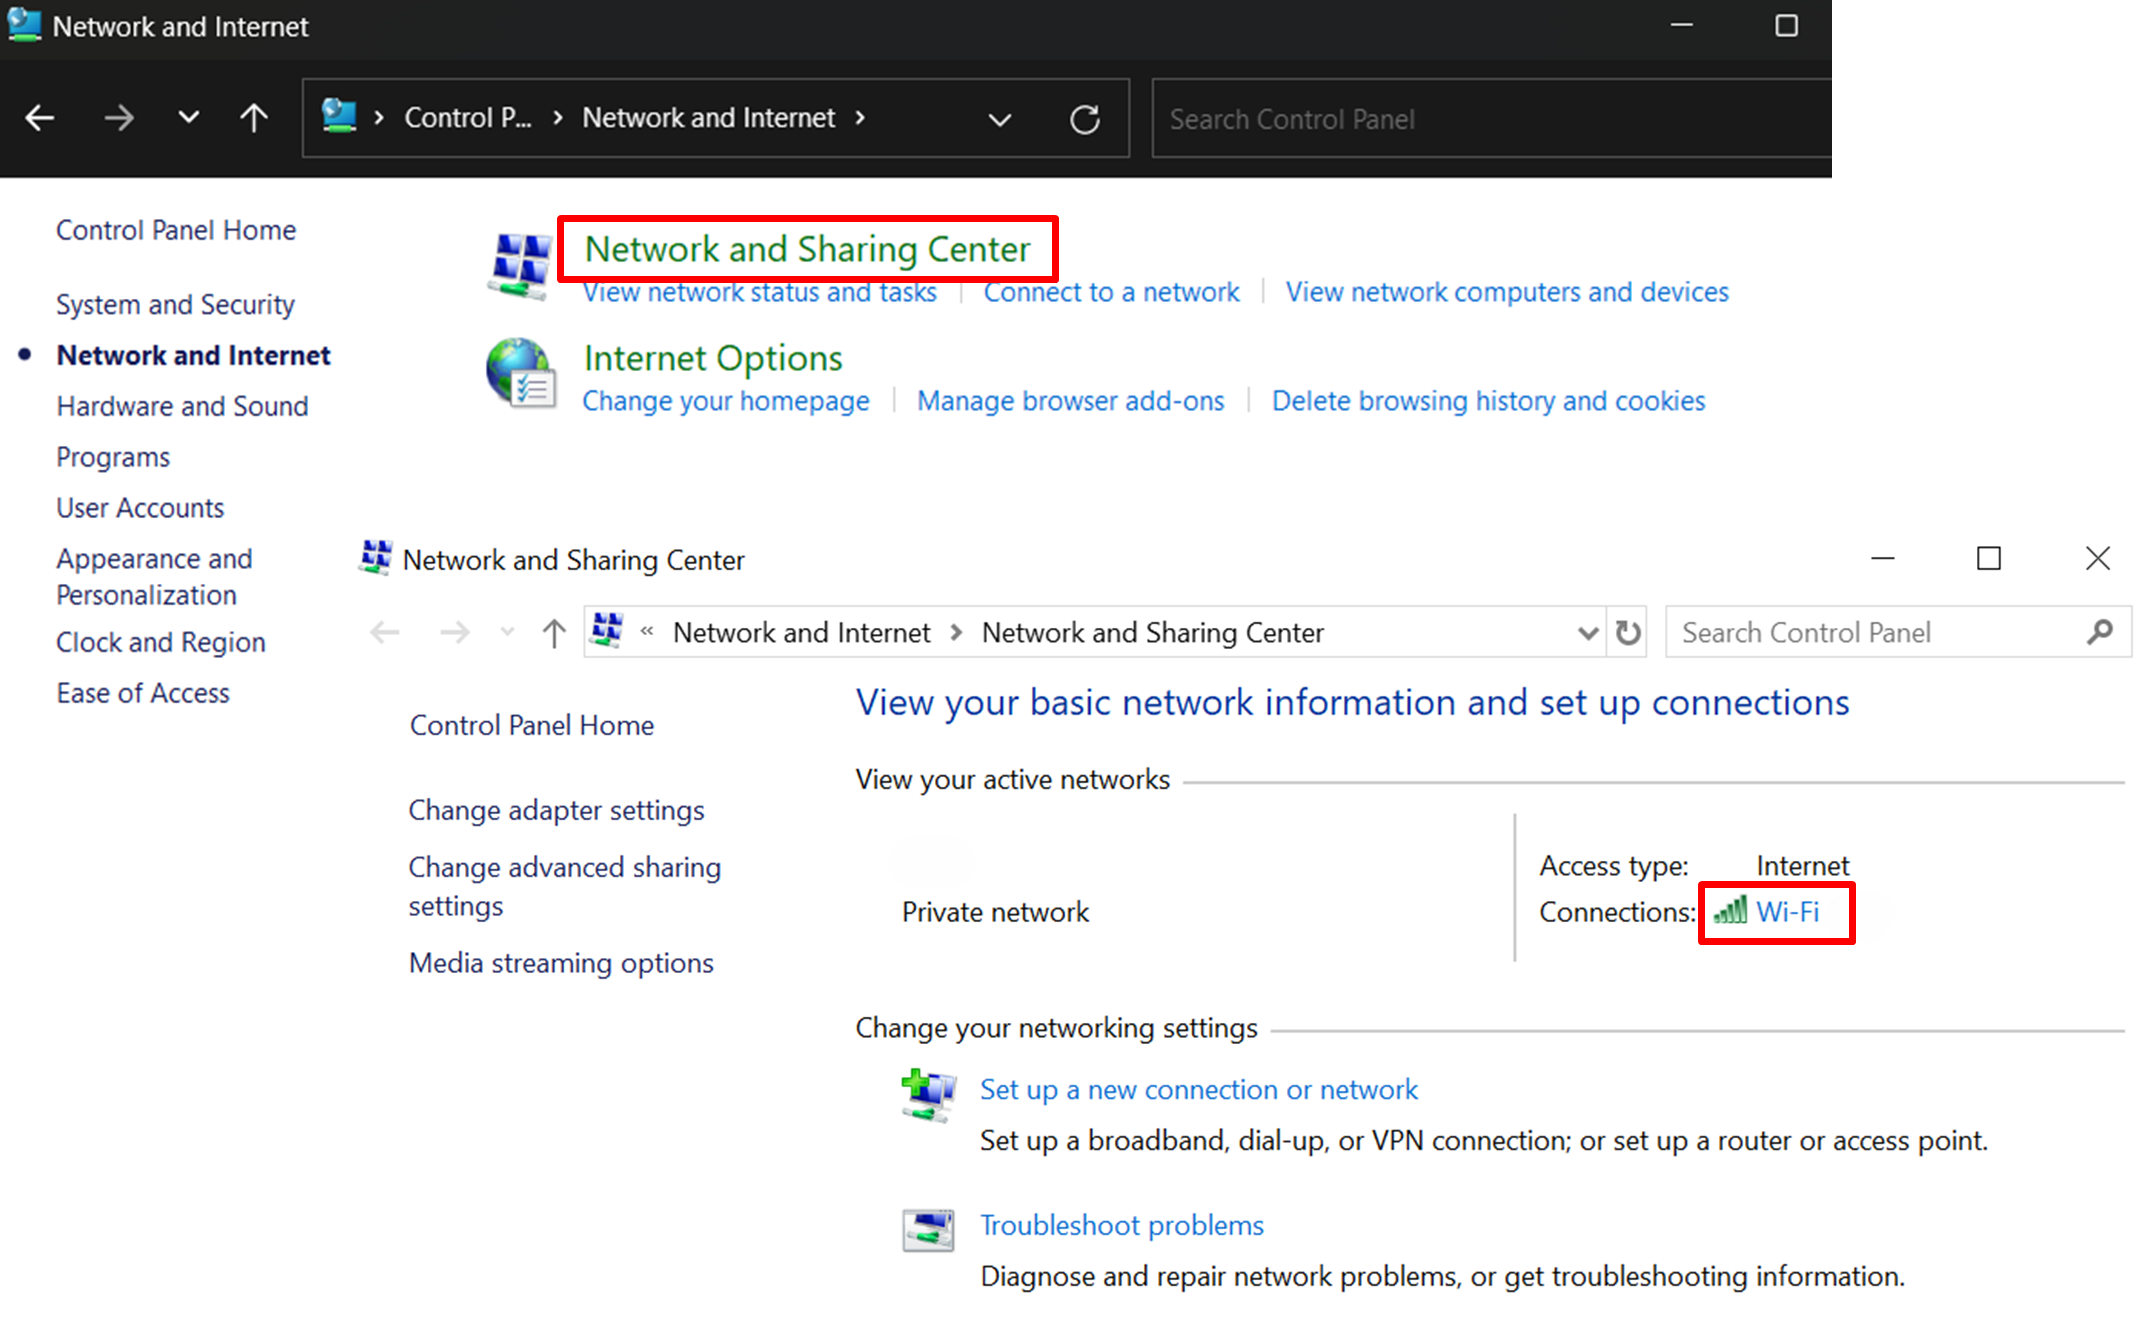
- Select “Network and Internet,” then click on “Network and Sharing Center.”
- In the “View your active networks” section, click on your Wi-Fi connection’s name.
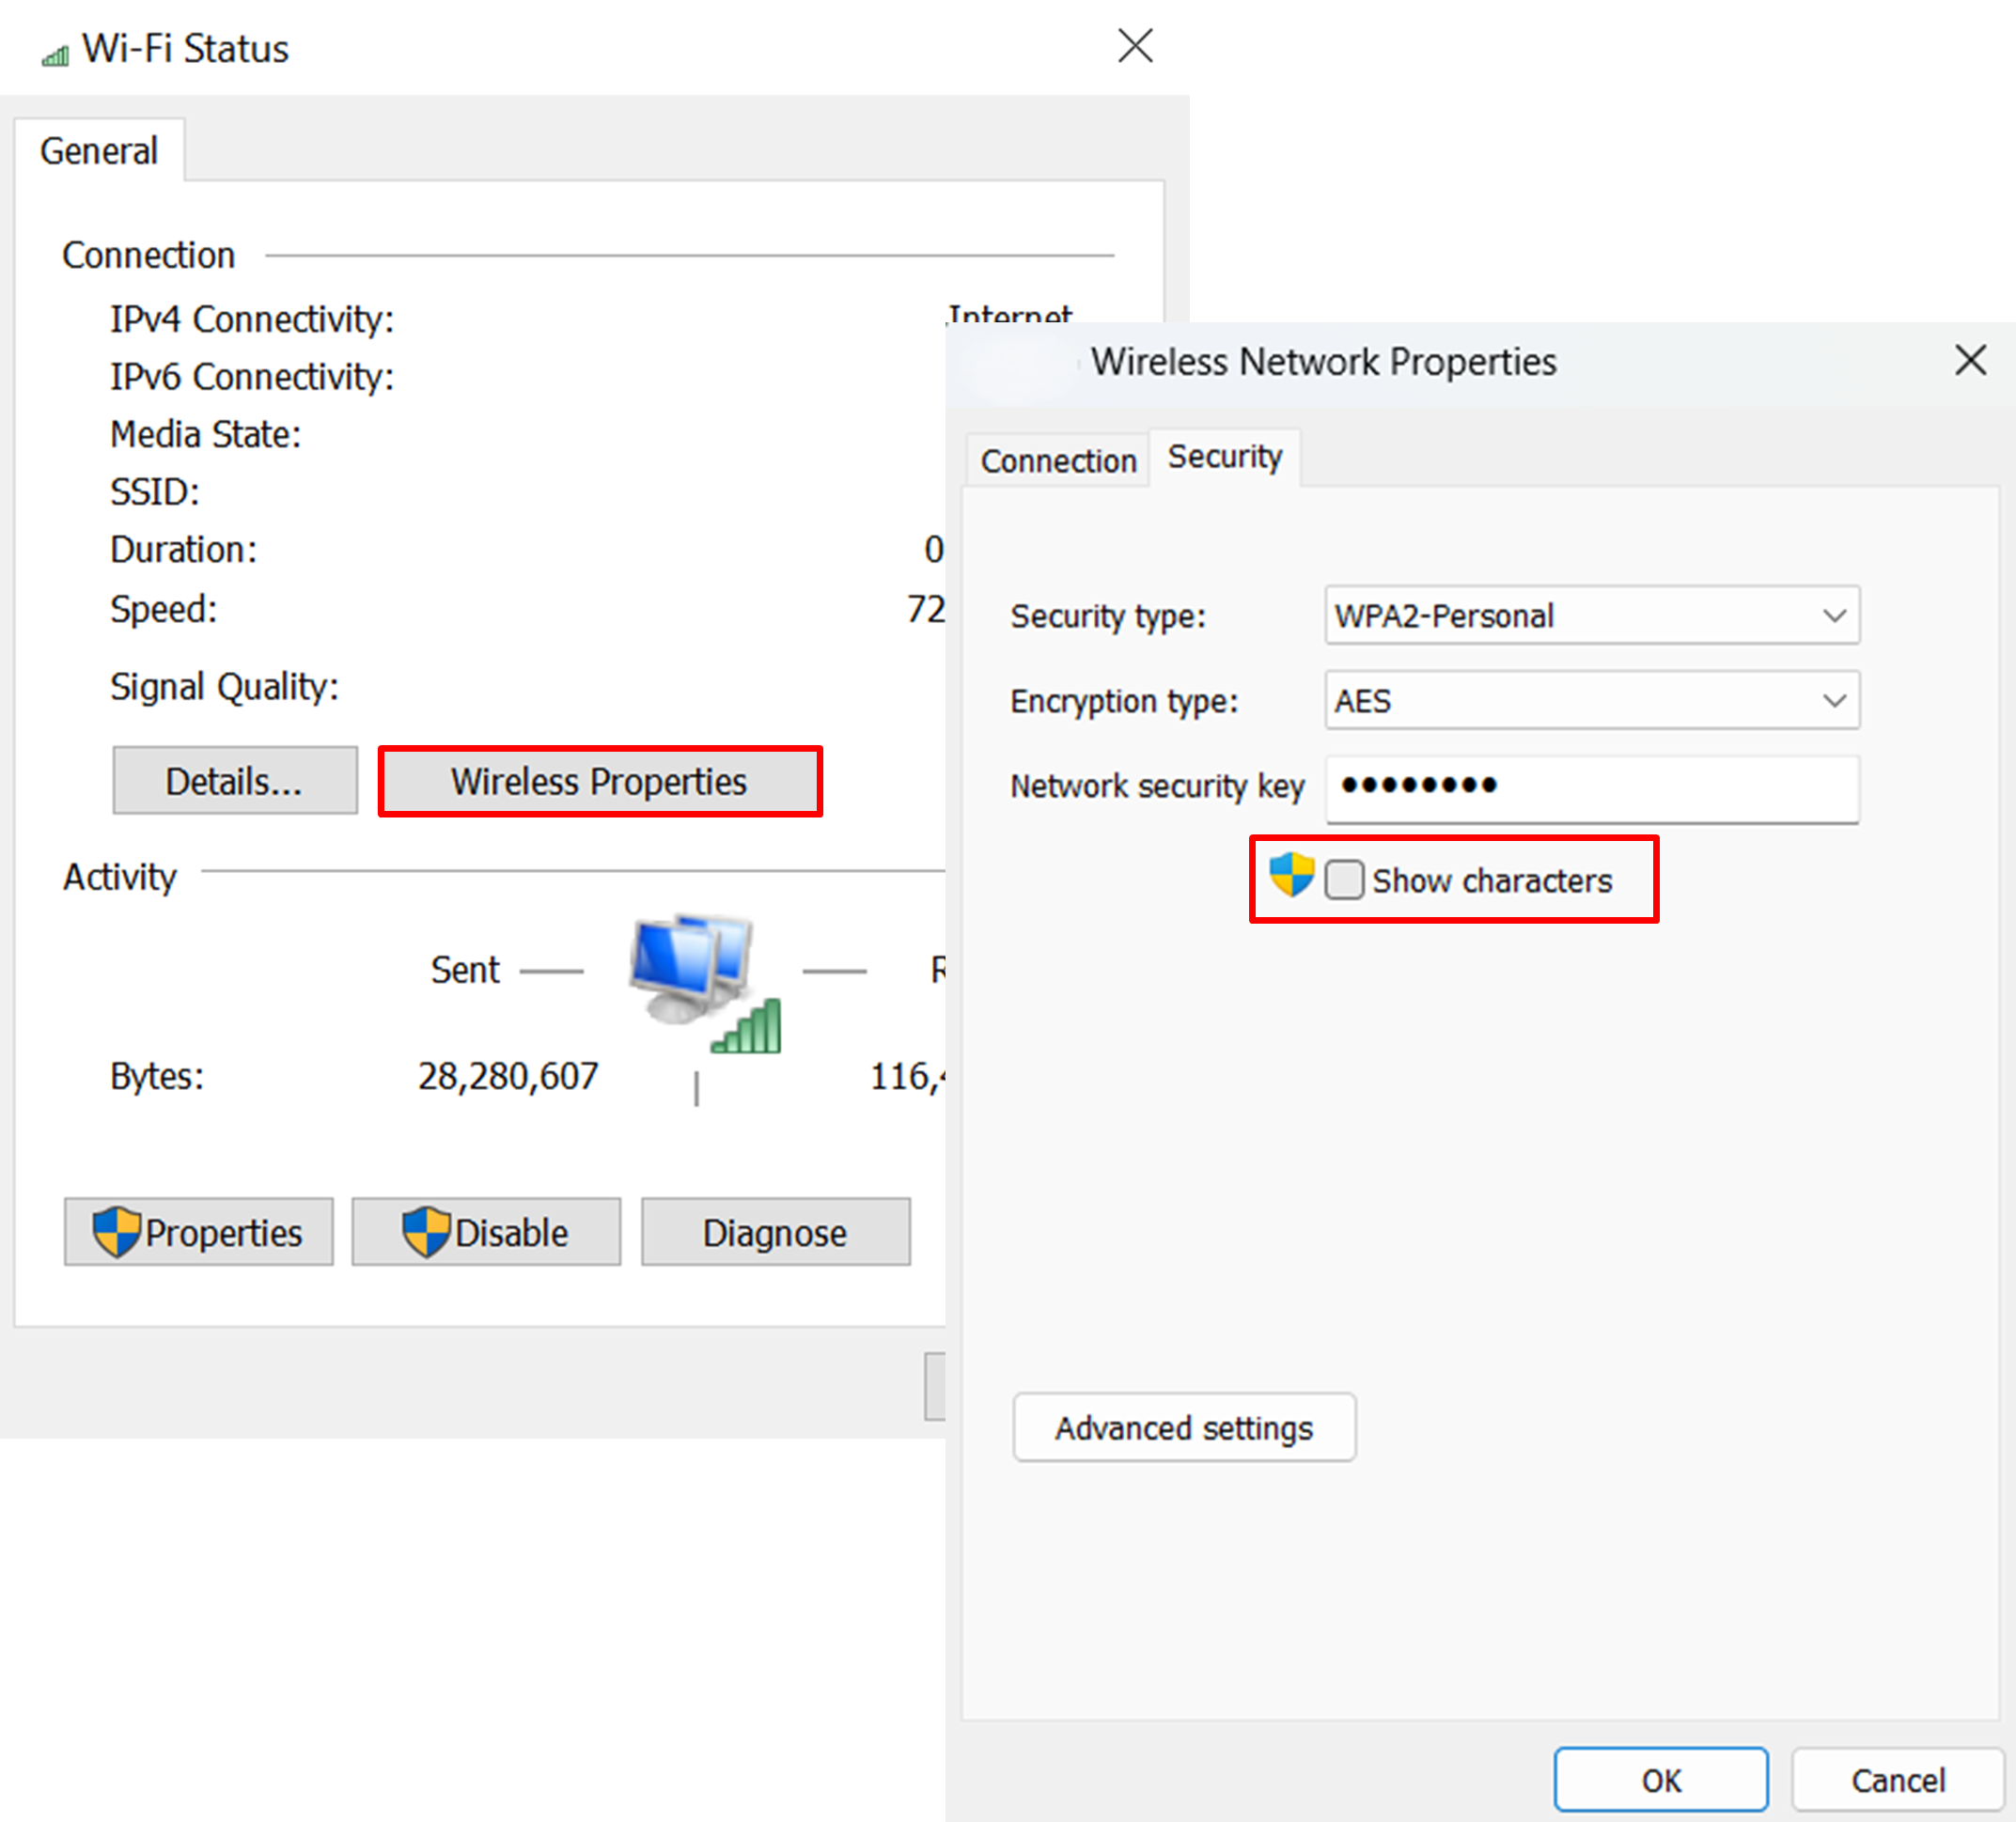
- Click on the “Wireless Properties” option once in the “Wi-Fi Status” window.
- Navigate to the “Security” tab and check the “Show characters” box to view your Wi-Fi password. It will be displayed next to “Network security key.”
Windows 11 has made it even easier:
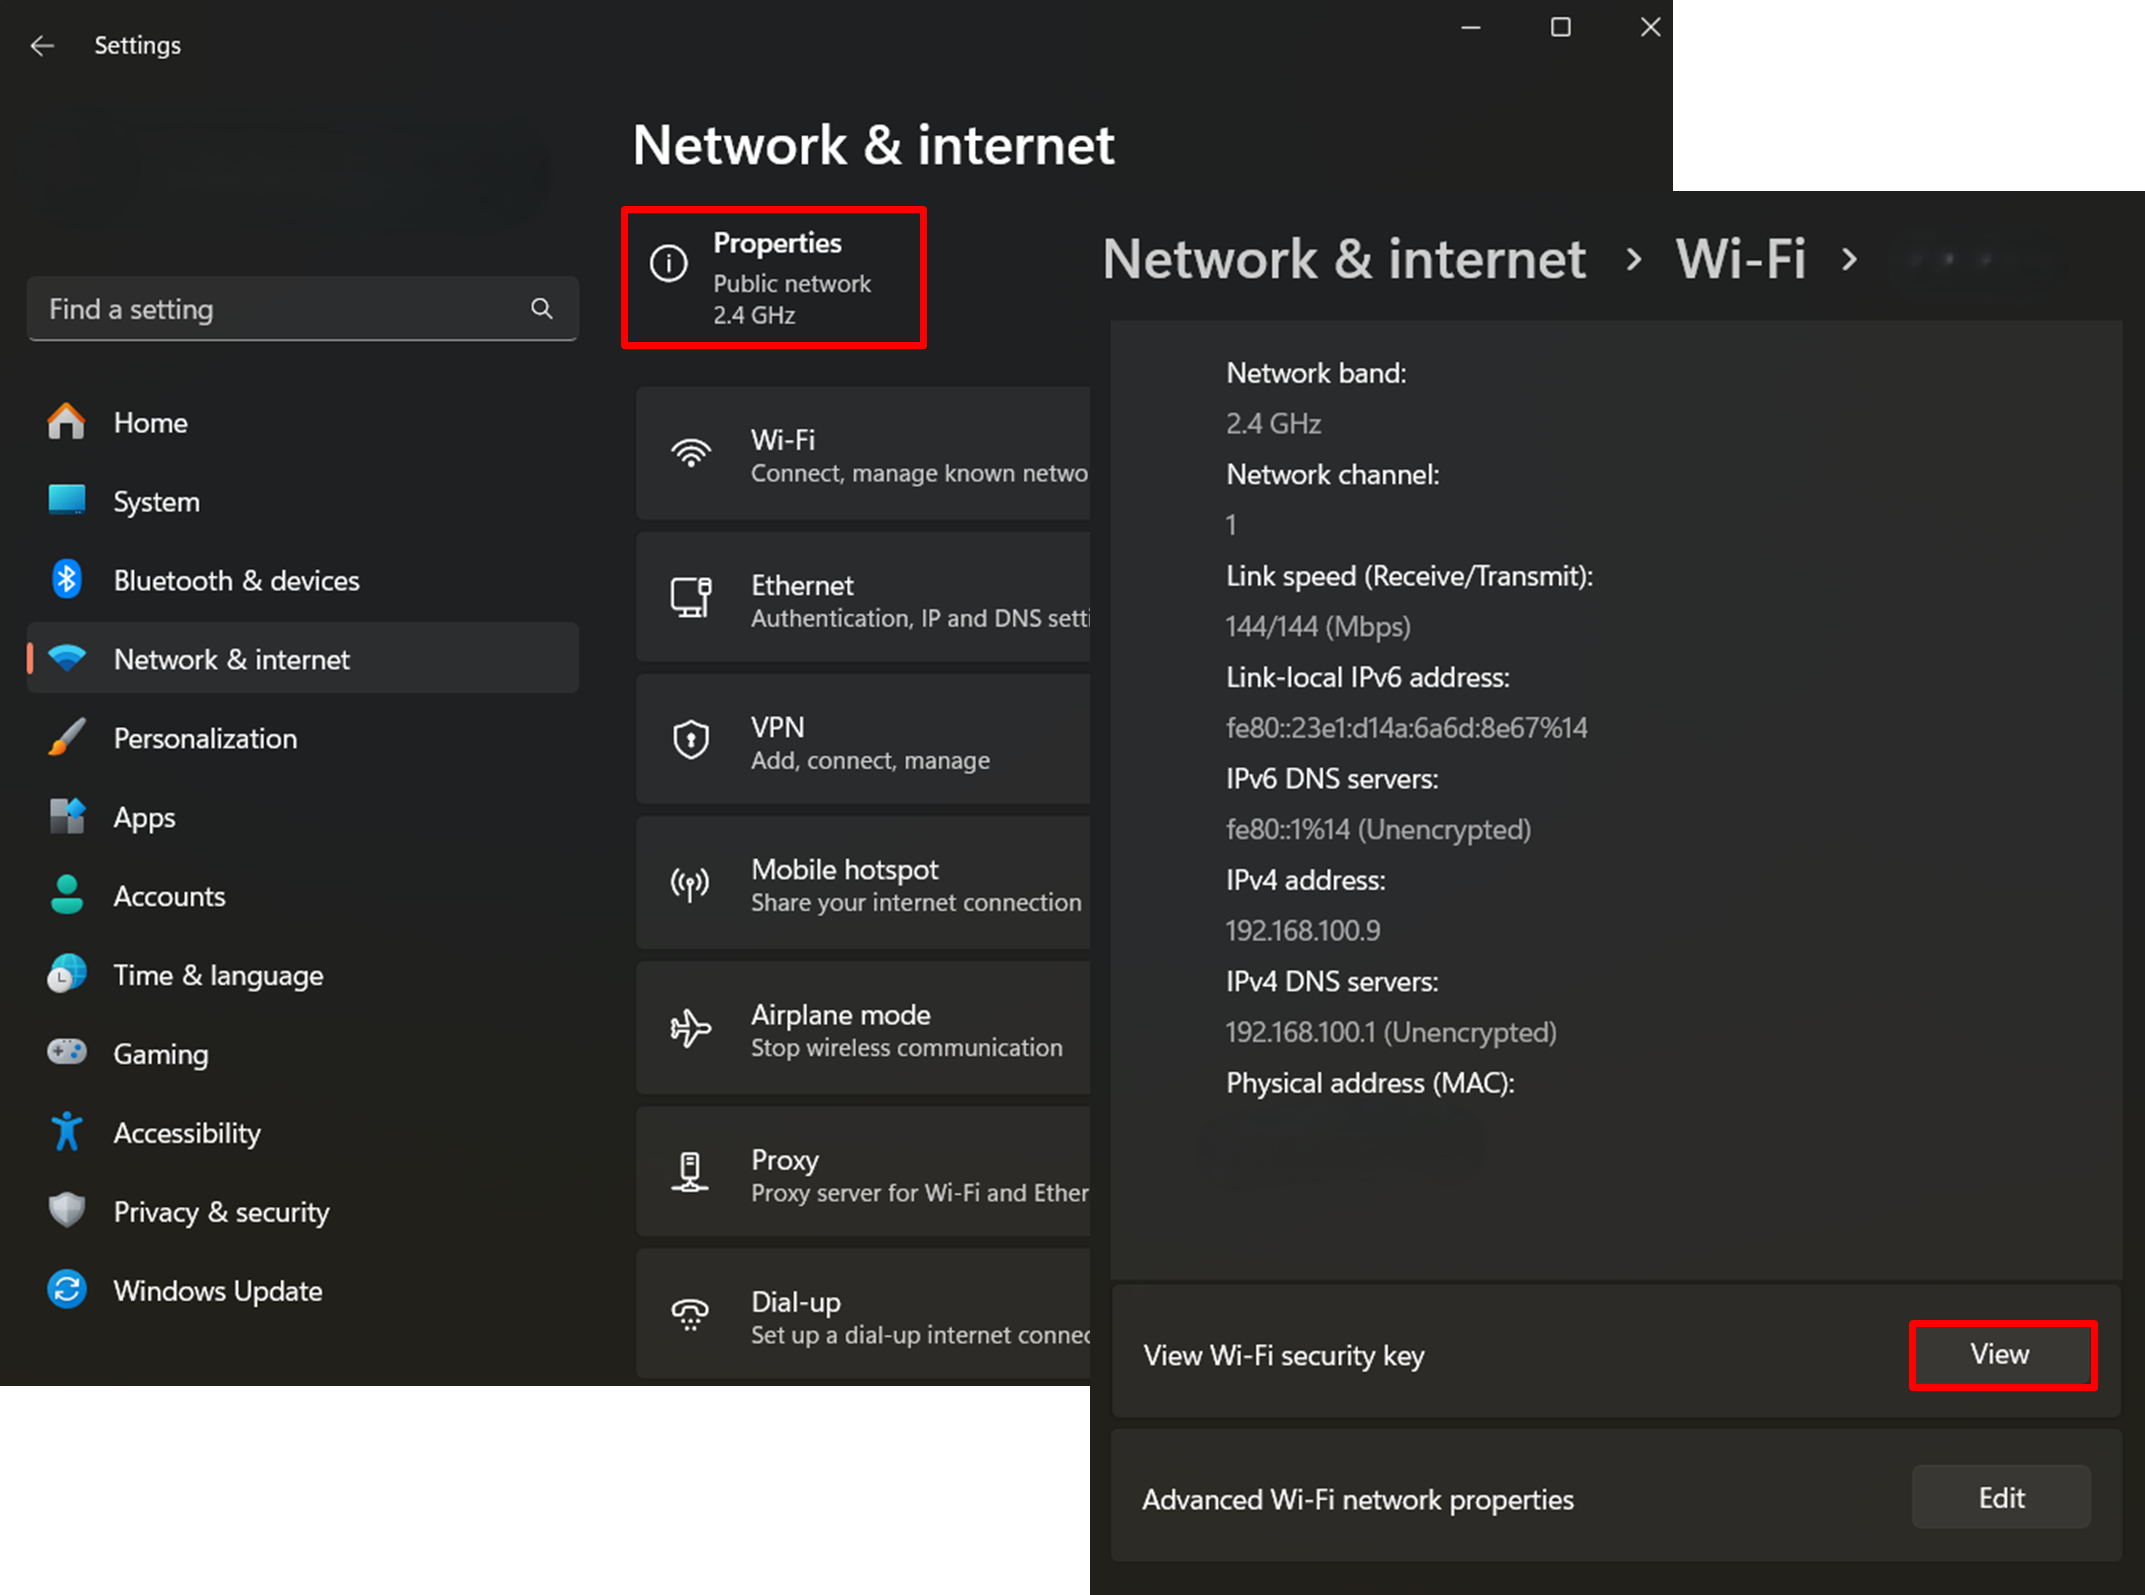
- Right-click the Start menu, select Settings, and click on “Network & internet.”
- On the right-hand side of the window, click “Properties.”
- Scroll down to “View Wi-Fi security key” and click “View.”
Also read: Stay Safe Online: The Best Ways to Store Passwords
Method 2: Get the Wi-Fi password using the Command Prompt
Another way to show the network password is to use the Command Prompt . It works both for Windows 10 and 11. Here is how:
- Type “cmd” into the search bar (
Win + S), right-click on the Command Prompt result, and select “Run as administrator.” - Enter the following command :
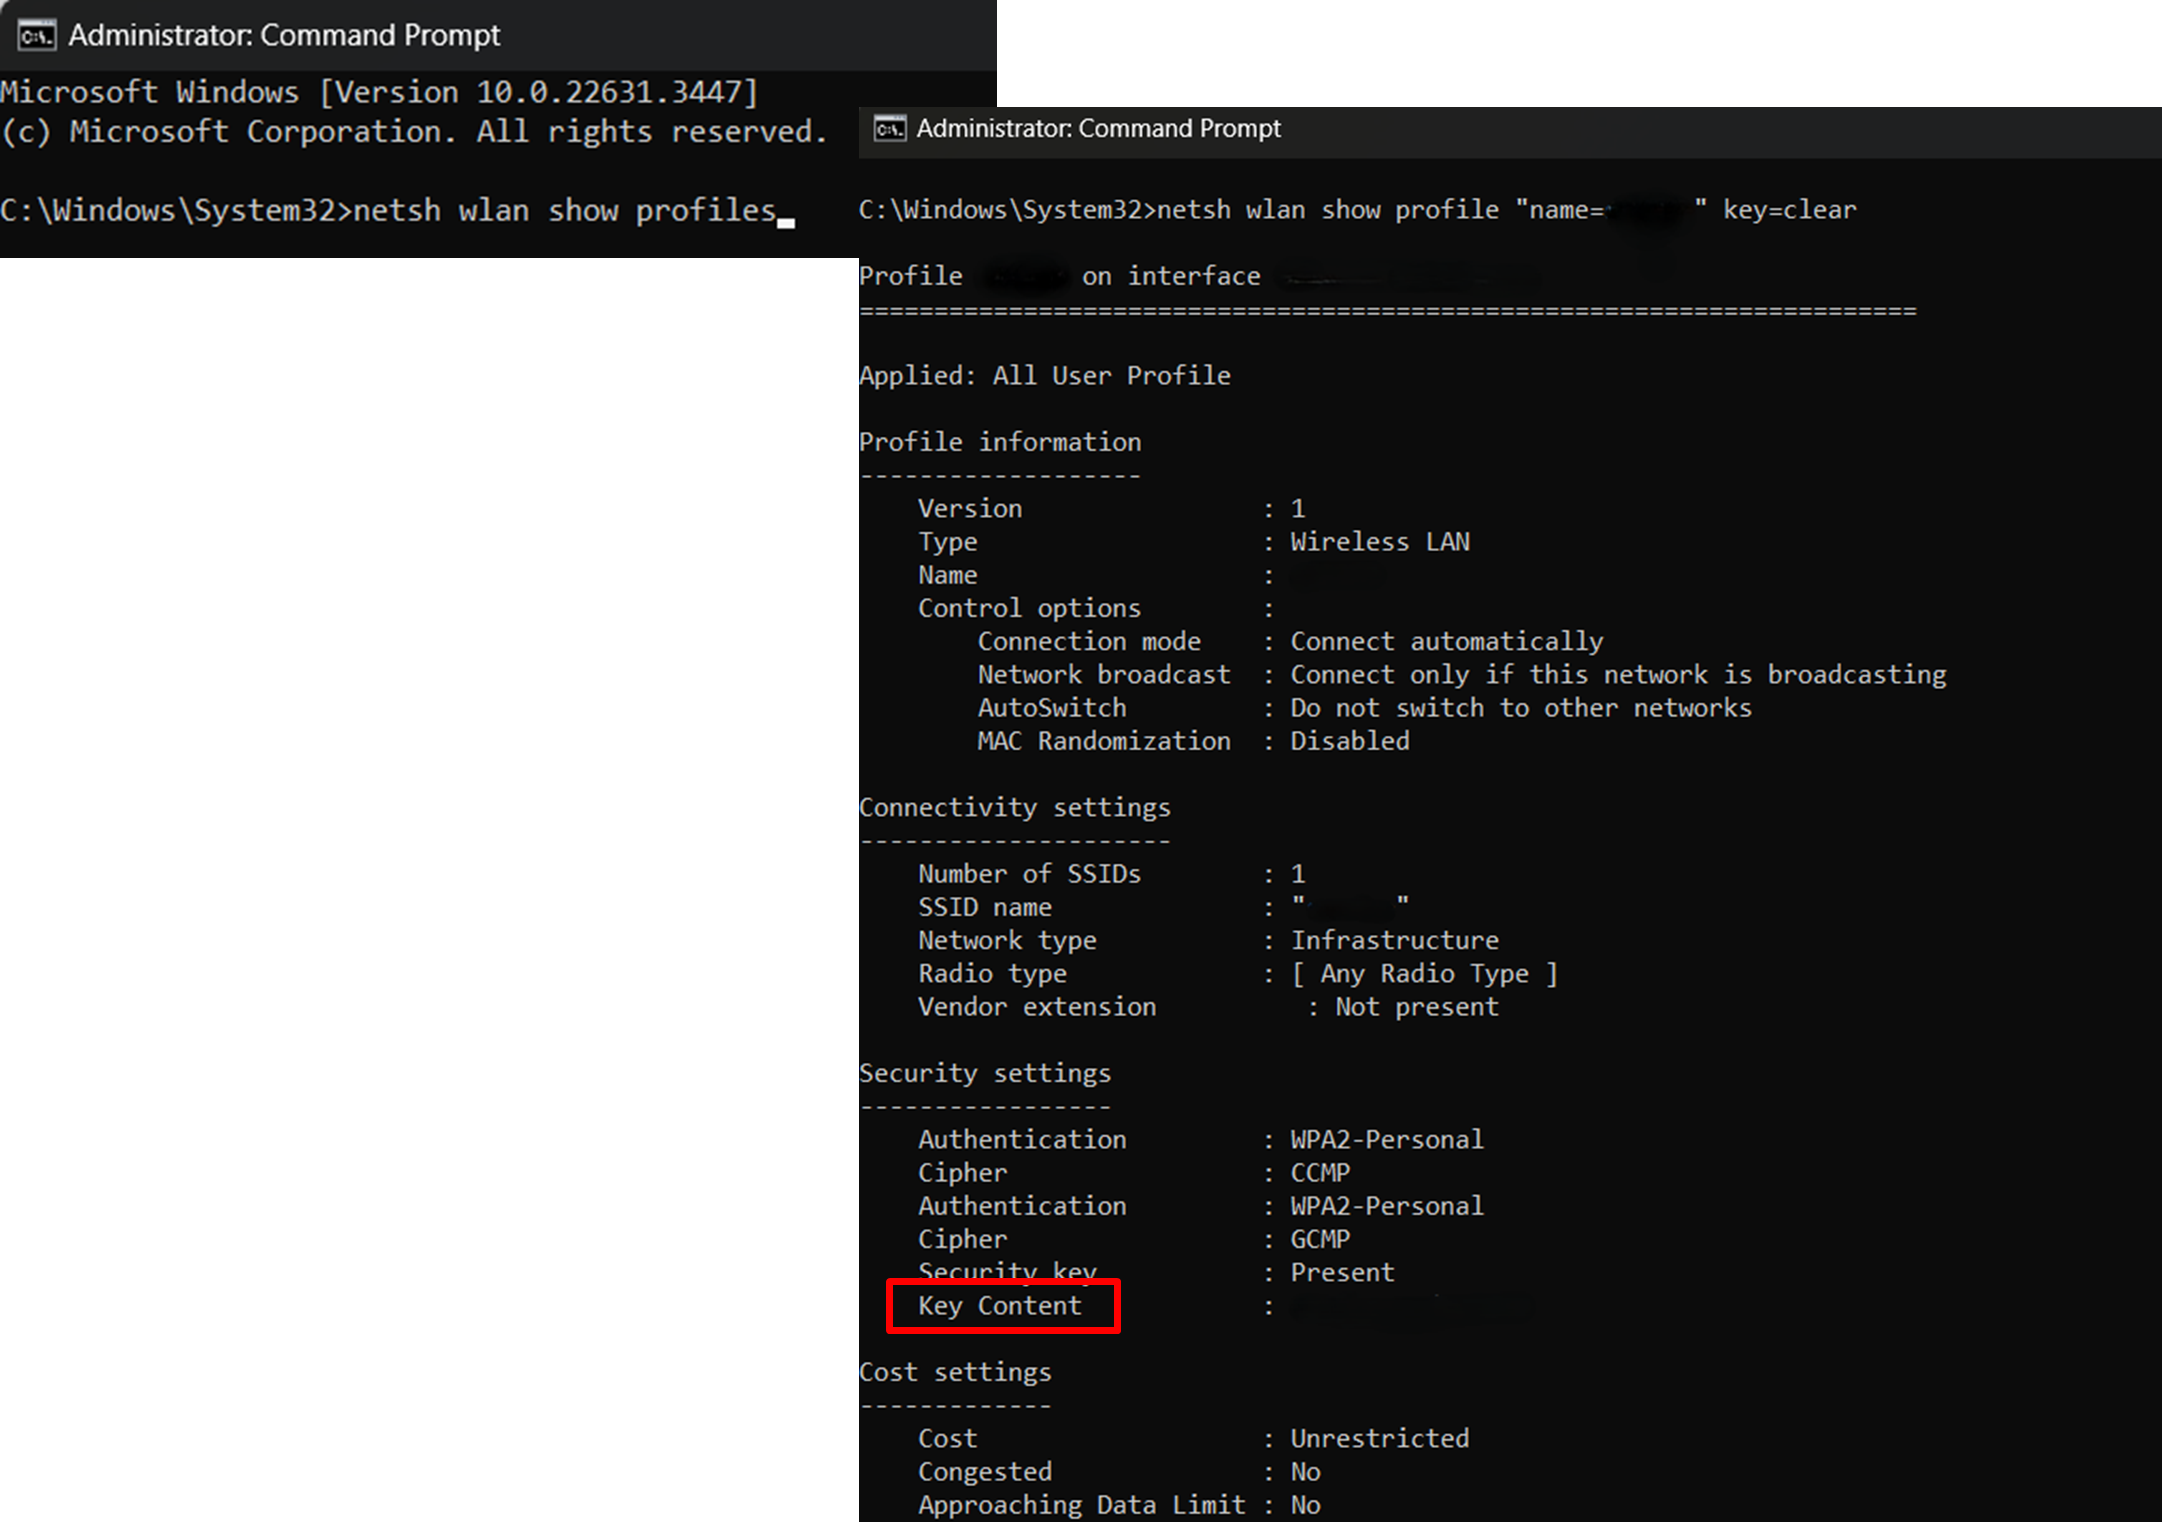
netsh wlan show profiles
- You will see your wireless network profiles. Copy the name of the network whose password you want to see and enter the following command:
netsh wlan show profile “name=WI-FI_NAME” key=clear
- Replace “WI-FI_NAME” with the name of your network.
- Scroll down to the “Security settings” section.
- The Command Prompt will show your Wi-Fi password next to the Key Content parameter.
You can enter the same commands into Windows PowerShell to view saved Wi-Fi passcode on both Windows 10 and 11.
You can view passwords for all the Wi-Fi networks your computer has ever connected to using the following command:
for /f "skip=9 tokens=1,2 delims=:" %i in ('netsh wlan show profiles') do @echo %j | findstr -i -v echo | netsh wlan show profiles %j key=clear
Also read: Windows Command Prompt: 28 Most Useful CMD Commands
Method 3: Check the Wi-Fi password in the router’s web interface
To find the Wi-Fi password via the router’s web interface, you need to access your router’s administration page. While the exact steps depend on the make and model of your router, here’s a general guide you can follow:
- Make sure your PC is connected to the Wi-Fi network whose password you want to retrieve.
- Launch your web browser, enter your router’s IP address into the address bar (you can usually find it on the back or bottom of the router), and press Enter.
- Input the router’s username and password to access its administration page. The default login details should also be on the router itself or in the router’s manual. If you have changed them, make sure you enter the new ones.
- Locate and go to the Wi-Fi settings section. Its exact location and name depend on the router’s make and model. Search the wireless settings section to find the Wi-Fi password or network security key. It may be masked with asterisks. If so, reveal the password by clicking on the “eye” icon next to it or using a similar option.
- Note down the Wi-Fi password displayed on your screen. You can even modify it in the same section by typing in a new password and saving the change.
You can access your router’s web interface directly via an Ethernet connection (or using your phone’s hotspot). Once logged in with your admin credentials, navigate to the wireless settings to view the Wi-Fi password.
This is a handy way to recover your Wi-Fi credentials if you’re unable to access the network but need to reconnect or share the password.
Method 4: Find the Wi-Fi password using third-party software
One simple solution for finding the network passcode is to use dedicated third-party software as WirelessKeyView and Wi-Fi Password Revealer. Both options work on Windows 10 and 11.
- Check your router’s back for labels or stickers. This is where you are most likely to find the Wi-Fi key and the Wi-Fi network name ( SSID ).
- Next, locate the reset button on your router, then press and hold it until you notice the router’s lights flicker or change behavior in some other way. It should take around 15 seconds.
- Release the reset button and wait for the router to reset to the factory default settings. It may take several minutes, so you need to be patient. During this time, your router’s lights may blink or change.
- Once the router is done resetting, you can connect to your network using the default password.
Also read: Windows Computer Won’t Connect to Wi-Fi: What to Do?
How to Find the Wi-Fi Password on a Computer: Explained
You’re now all set to recover your Wi-Fi password that somehow managed to slip your memory. With the help of this article, you can easily check it using the Settings app, the Command Prompt, the router’s web interface, or third-party tools. I hope you’ve found this article useful and will share it with your friends who may also find it helpful. And if you have any additional insights to share, feel free to drop a comment below!