
If you’re here, you’re probably wondering, “Why is there no sound on my computer?” Don’t worry, you’re not alone. Having no audio can be really frustrating, especially when you’re trying to join an important meeting, watch a video, or enjoy music.
In this guide, we’ll walk you through simple steps to troubleshoot and fix the issue.
Whether it’s caused by outdated drivers, incorrect settings, or a software glitch, you’ll learn how to get your sound back.
Plus, we’ve covered common reasons why your computer has no sound and what to do if the issue arises after a Windows update.
Let’s begin.
First of All: Why Is There No Sound on My Computer?
There are many reasons for your audio not working on Windows 11 or 10. Let’s go through them:
- Your computer isn’t updated. Most users, like me, hate Windows updates, so we try to avoid them as much as we can. However, this can lead to various problems, like the “Audio service not responding” error, because these Windows updates often include bug fixes that improve compatibility with drivers and new software. Without these updates, your system may struggle with newer software, causing services to fail. Making sure your system gets the latest updates might be all you need.
- PC running on outdated audio drivers. If you haven’t updated your sound drivers in a while, it’s a good time to do so now. You can do this with Device Manager or third-party tools. If you’re a gamer, this is also a great opportunity to update your graphics drivers for optimal performance and a smoother gaming experience.
- Your audio jack is broken. When your audio jack is loose or malfunctioning, it can disrupt the connection, which can make it seem like there is no sound on your computer. Try using a different jack or USB port and check for any physical damage.
- Changes to the system’s settings. Any recent changes to the settings on your computer, like adjusting the sound settings or installing volume booster software, can affect the audio output. Go to your system sound settings and adjust the settings as described below.
- Your computer is connected to another device with a speaker. Some external monitors have built-in speakers that can reroute your sound or cause conflicts. If your computer is connected to an external speaker, monitor, or any other audio-capable device, turn off the device, restart your computer, and check if the sound is restored.
Basic Fixes to Try When There’s No Sound on Your Computer
Before diving into technical solutions, run these simple checks first. Some of them may seem obvious, but sometimes the issue isn’t as complex as it seems. These quick fixes can save you time if the problem is minor. Give them a try before moving on to more advanced troubleshooting.
| Method | Steps to fix | Key notes |
|---|---|---|
| Restart your PC | Click Start, navigate to Power > Shut down, then turn the PC on again | You can wait a for 1–2 minutes before turning it on |
| Check if the sound is muted |
|
|
| Check plugs and connections |
|
Loose or damaged cords can prevent Windows from recognizing your audio device |
| Disconnect USB devices | Unplug all USB devices and test sound again |
|
| Test sound with different apps | Play audio from multiple apps to check if the issue is app-specific | If sound works in one app but not others, the issue might be within the app’s settings |
| Verify that the correct playback device is selected |
|
|
| Check your antivirus for interference |
|
|
1. Restart your PC
Before anything else, try restarting your computer. This solution often addresses various problems, including the no audio signal. Restarting your PC refreshes the operating system and background processes that may be interfering with your audio.
Check to see if the sound is working after starting your PC again.
2. Check if the sound is muted
It’s possible that a faulty keyboard or you may have accidentally muted the audio. Click the sound icon at the taskbar and check if it’s set to the right volume. After that, right-click on the sound icon again and select Open volume mixer to check the current level of volume for all the applications playing audio. Increase the microphone volume if it’s low, adjust the volume to your preference, and check if that resolves the problem.
3. Check your plugs, jacks, or headphone connections
Sometimes, Windows may not recognize your headphones if there is a loose cable or cord. So, if the audio doesn’t work when connected, check the headset. If nothing is wrong with the device, check if the cords are correctly plugged in, especially if you have 5 mm jacks on your surround sound system.
These jacks can be tricky to connect properly. Inspect the jacks and ports for any signs of damage, such as frayed wires, bent pins, or dust buildup. If you’re using external speakers, try connecting them to a different device to rule out hardware issues.
4. Disconnect all USB devices
Sometimes USB devices can interfere with audio output due to power fluctuations, driver conflicts, or Windows mistakenly assigning audio to them. Unplugging any connected USB devices, like monitors or any other devices with speakers, might help resolve the issue and restore sound. A user on Reddit claims this worked for them.
5. Test sound with different apps to determine if the issue is app-specific
If the sound isn’t working on your laptop or PC in a particular app, test other programs to see if the issue is isolated. For instance, if you can’t hear audio in Zoom or Skype, play audio with Spotify. If, after testing, you discover the problem is limited to just one app, you need to check its audio settings to ensure the correct output device is selected.
And if that doesn’t work, you might need to update or reinstall the application to fix the problem. However, if there is no sound output across multiple apps, you can go through the solutions covered in the next section.
6. Verify that the correct playback device is selected
If your computer has multiple audio output devices, ensure the correct one is selected. Click on the sound icon in the taskbar, then tap the arrow next to the volume slider to view the available audio devices. Choose your preferred device, like speakers or headphones, to ensure sound is directed to the right output.
7. Check your antivirus for interference
Sometimes, your antivirus program might mistakenly block your audio settings or equalizer, which could explain why the s ound is not working on your computer. To see if this is the problem, try temporarily turning off your antivirus and then test your sound. If the issue goes away, you can fix it by adding your audio program or equalizer to the antivirus’s whitelist. This will prevent it from getting blocked in the future.
How to Fix Audio Not Working on Windows 10/11
If the simple fixes above don’t work, the issue may be deeper. Here are advanced solutions to help you restore your audio:
| Method | Steps to fix | Key notes |
|---|---|---|
| Run the Playing Audio troubleshooter |
|
A quick, automated tool to find and resolve common audio issues, especially configuration errors |
| Disable audio enhancements |
|
|
| Adjust advanced sound settings |
|
Fine-tune audio settings to restore sound |
| Check for Windows updates |
|
|
| Update audio drivers |
|
Alternatively, you can use a trustworthy driver updater, such as Auslogics Driver Updater, to get the right drivers compatible with your system |
| Restart the Windows Audio service |
|
Restarting the audio service can fix background issues that prevent sound output |
| Use System Restore |
|
|
Method 1: Run the Windows Playing Audio troubleshooter
The Windows Playing Audio troubleshooter can scan your system for configuration errors and recommend fixes. It’s an excellent first step in troubleshooting audio problems when your PC or laptop sound isn’t working. Here’s how it works:
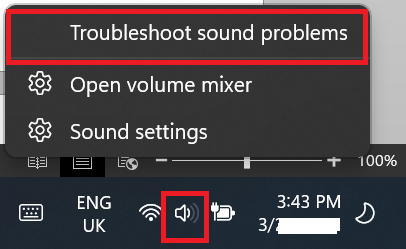
Step 1: Right-click the speaker icon located in the taskbar and select Troubleshoot sound problems.
Step 2: Select Speakers and click Next to continue.
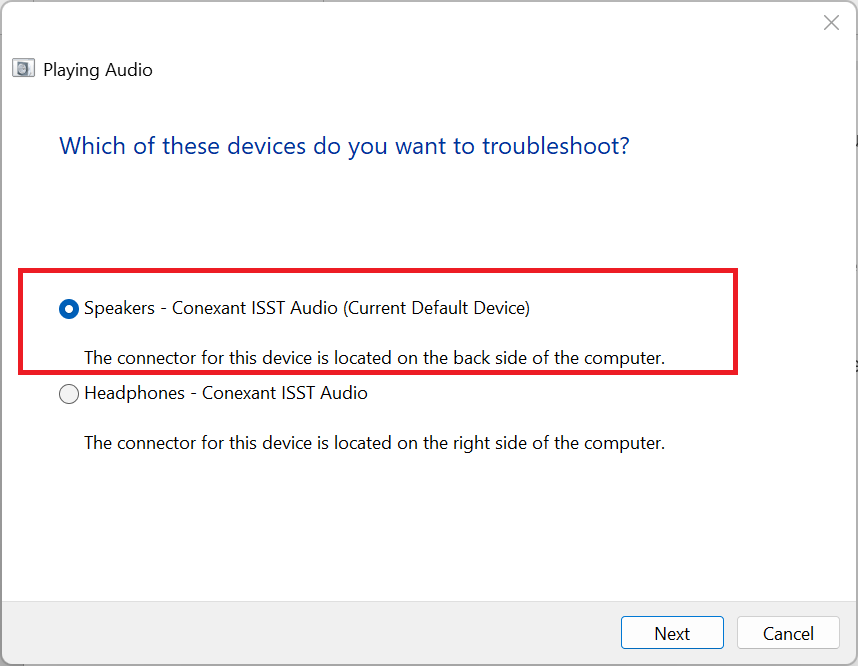
The troubleshooter will automatically scan for issues and suggest fixes. Follow the prompts to apply any recommended solutions.
Once the troubleshooting is complete, test your audio to see if the problem is resolved.
Method 2: Disable audio enhancements
Audio enhancements are settings or software features designed to improve the quality of sound on your computer. These enhancements can adjust the sound output by applying effects like equalization, bass boost, virtual surround sound, and noise cancellation.
While these features can improve audio quality in some cases, they can also cause issues such as distorted sound, delays, or compatibility problems with your audio device.
This is because not all audio devices or drivers are fully compatible, and some enhancements like noise cancellation require additional system processing, which can introduce slight delays in audio playback.
If sound isn’t working on your Windows 10 or 11 PC, disabling these enhancements might help resolve the problem. Here’s how you can turn them off:
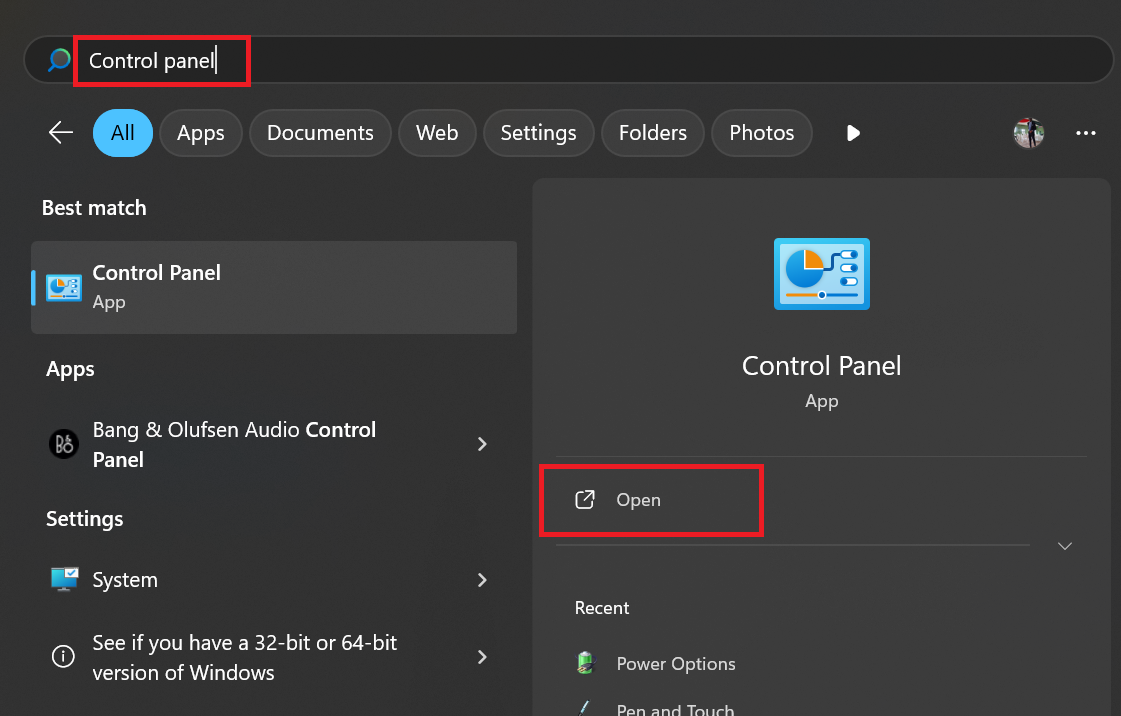
Step 1: Search for Control Panel and open the app.
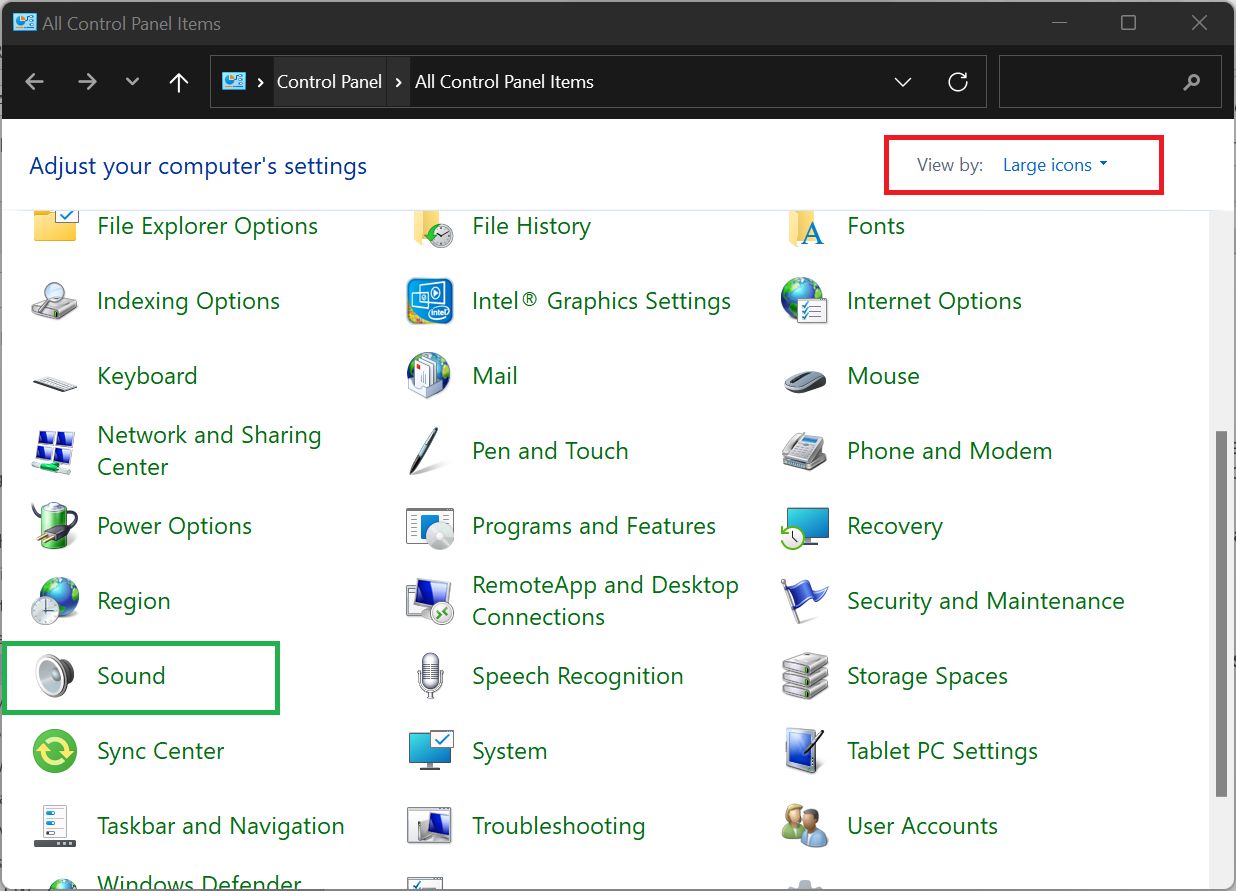
Step 2: Set View by to Large icons and then select Sound.
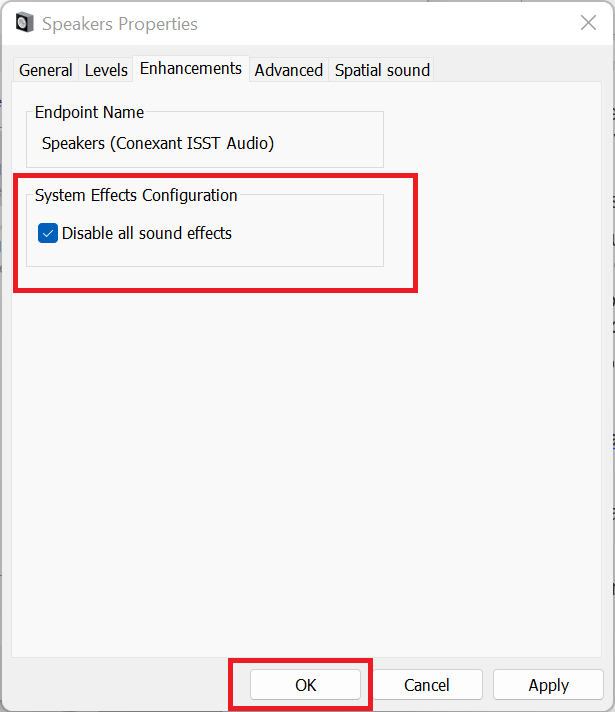
Step 3: Select Speakers and click Properties.

Step 4: Navigate to the Enhancements tab and check Disable all sound effects. If the Enhancements tab is missing, switch to the Advanced tab and uncheck Enable audio enhancements. Click OK to apply the changes. The settings should take effect immediately, but you may restart your computer if the issue persists.
If the problem persists, even after the restart, move on to the next method.
Method 3: Adjust advanced sound settings
Sometimes, having no sound on Windows 10 and 11 comes down to the unsupported sample rate being selected or Exclusive Mode being enabled.
Here is how to adjust advanced sound settings and restore proper audio functionality:
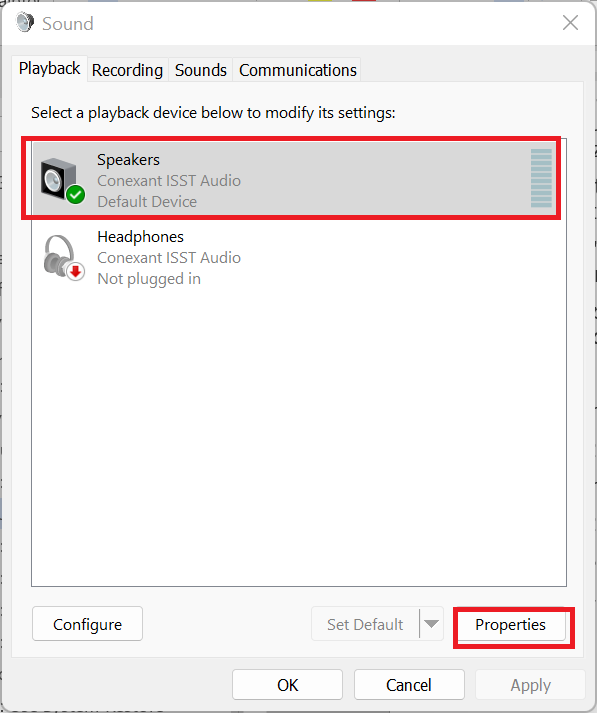
Step 1: Open Control Panel and click Sound.

Step 2: In the Playback tab, select your default audio device and click Properties.
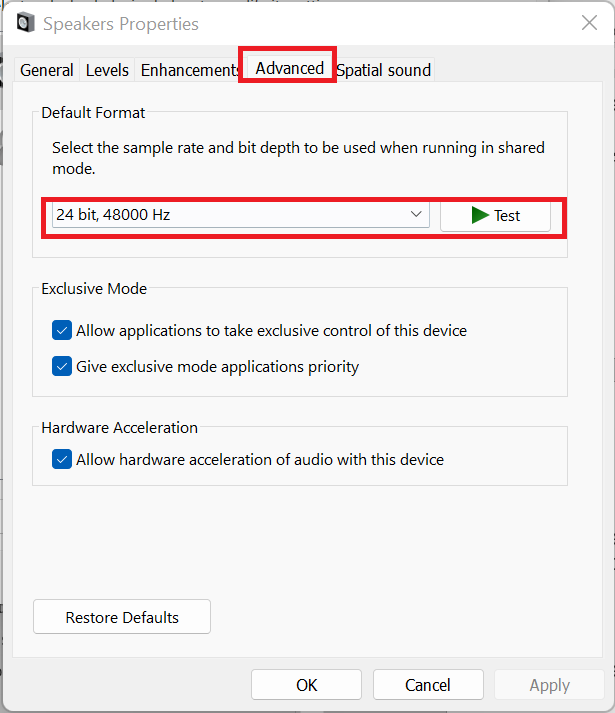
Step 3: Go to the Advanced tab and try different sample rates from the Default Format dropdown.
Step 4: Ensure both options under Exclusive Mode are unchecked to prevent apps from controlling audio.
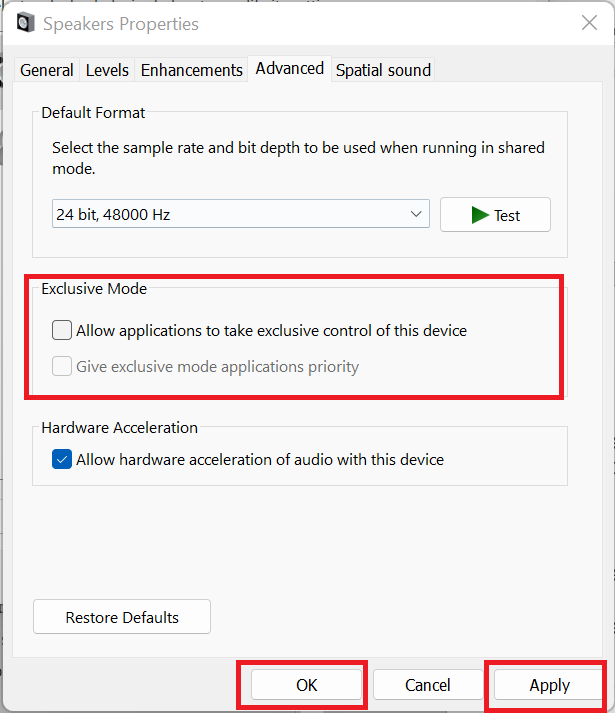
Step 5: Click Apply > OK, then restart your PC and test the sound.
If the problem persists, move on to the next troubleshooting step.
Method 4: Check for Windows updates
Your current Windows version may not support your audio drivers. Check for updates to make sure your system has the latest fixes and features. Here’s how to do it:
Step 1: Press the Windows key, then search for Windows Update settings and hit Enter.
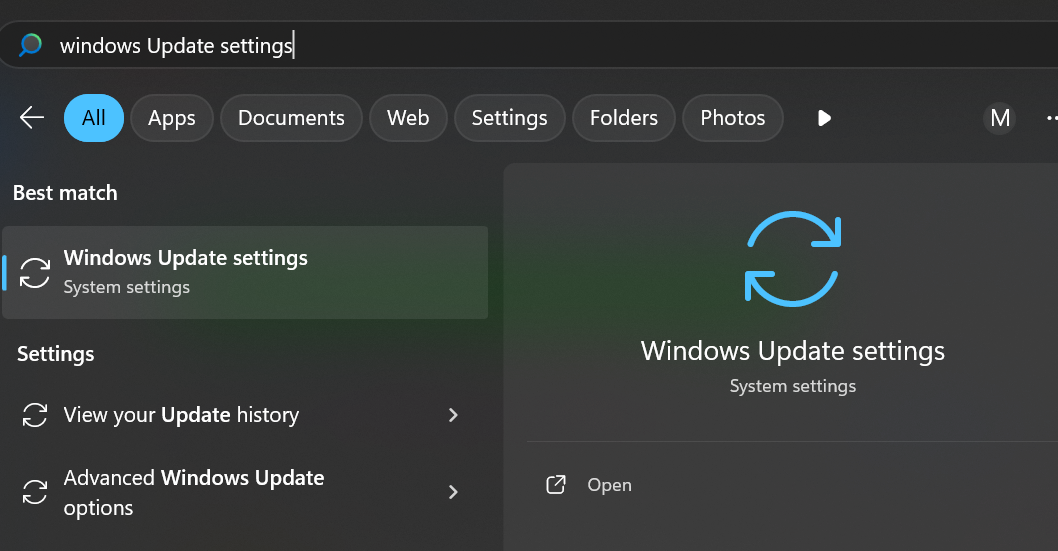
Step 2: Click Check for updates to scan for available updates.

Once the updates are installed, restart your PC and check if the sound issue is resolved.
Method 5: Update audio drivers
If updating Windows doesn’t resolve the issue, outdated drivers might be responsible. Sadly, Windows updates don’t always include the latest drivers, so you may have to update your audio drivers yourself. Here’s how:
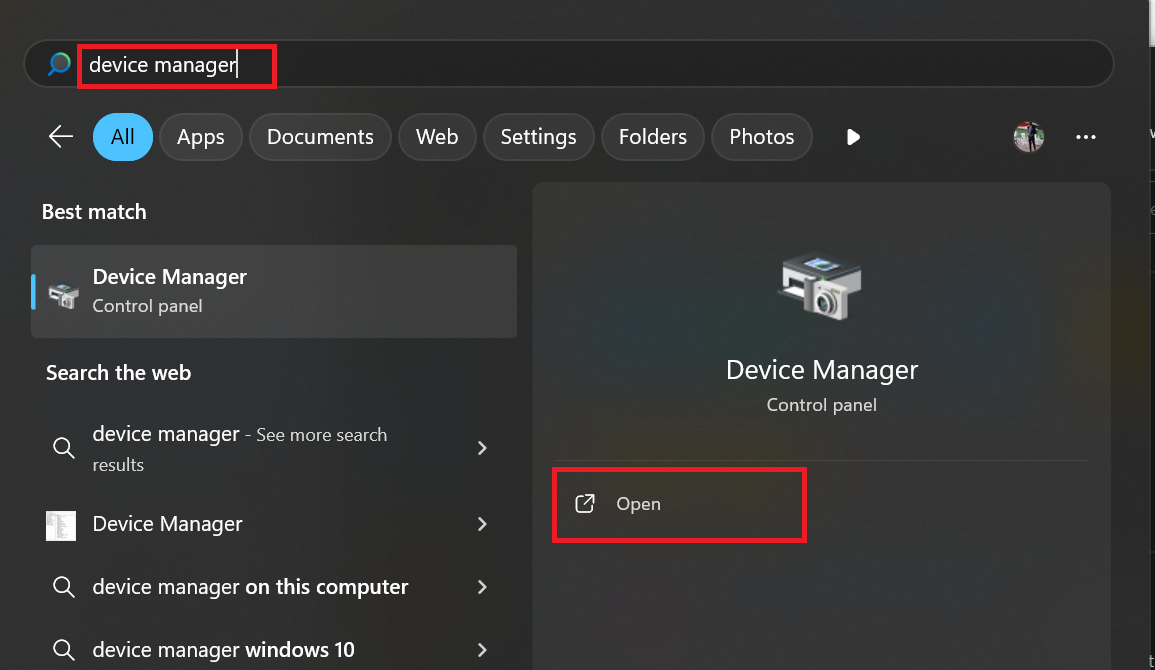
Step 1: Search for Device Manager in Windows Search and open it.
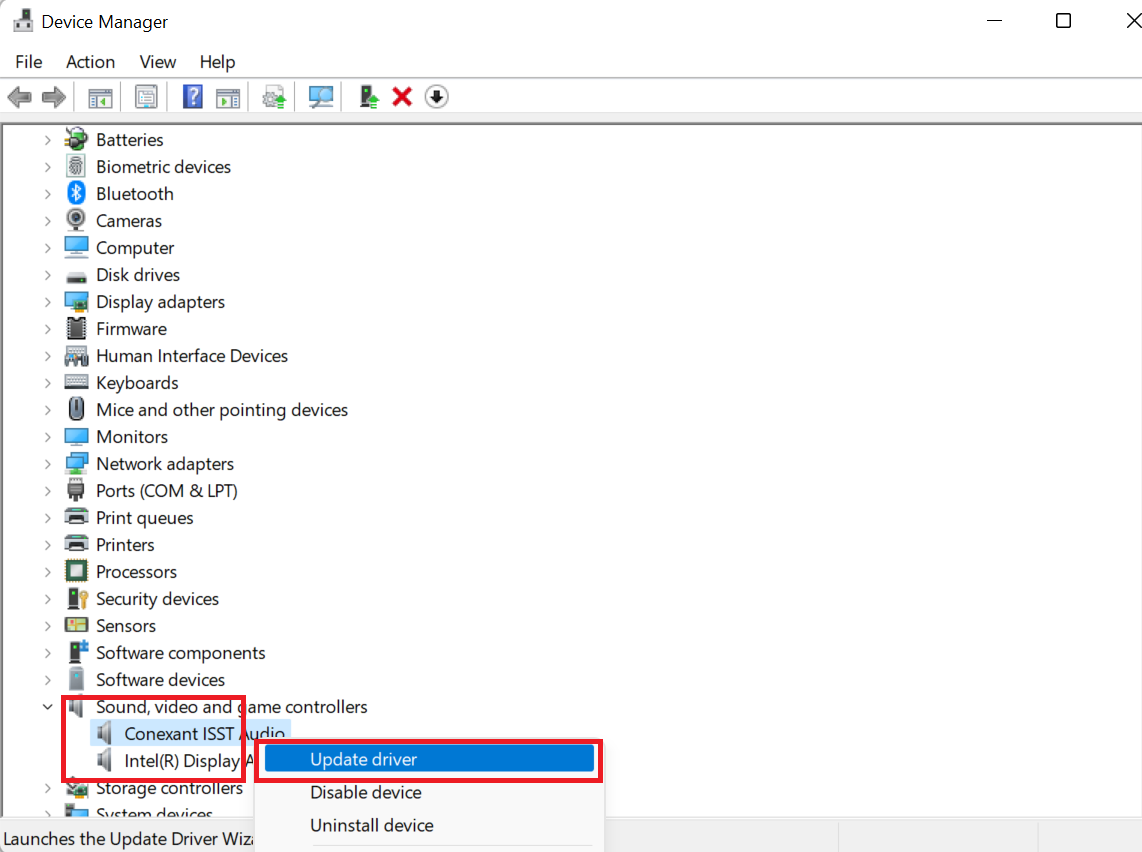
Step 2: Search for the Sound, video and game controllers category and expand it. Then, right-click on each device in this section and select Update driver > Search automatically for drivers.
Step 3: Restart your PC and see if the problem has been fixed.
It’s great at finding drivers that Windows Update or Device Manager might miss. This saves you time and ensures you’re using the right, manufacturer-approved drivers for your system.
Method 6: Restart the Windows Audio service
The Windows Audio service is one of the many things that work behind the scenes to manage sound output. However, this service can stop working due to system glitches, failed updates, or conflicts with third-party apps.
When this happens, you might have no sound on Windows 10/11, even if everything else seems fine. Restarting the service can often resolve the issue and restore sound.
Here’s how to restart the audio services:
Step 1: Press Windows + R and type services.msc in the search field.
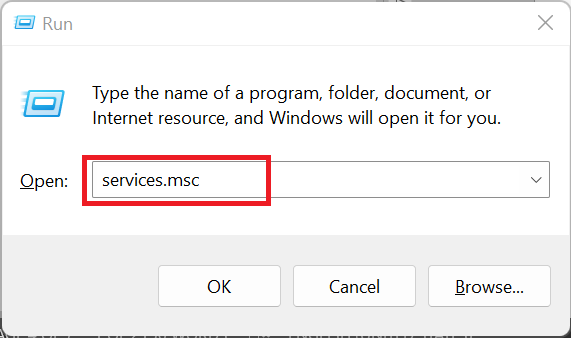
Step 2: Search for Windows Audio, right-click it, and choose Restart.
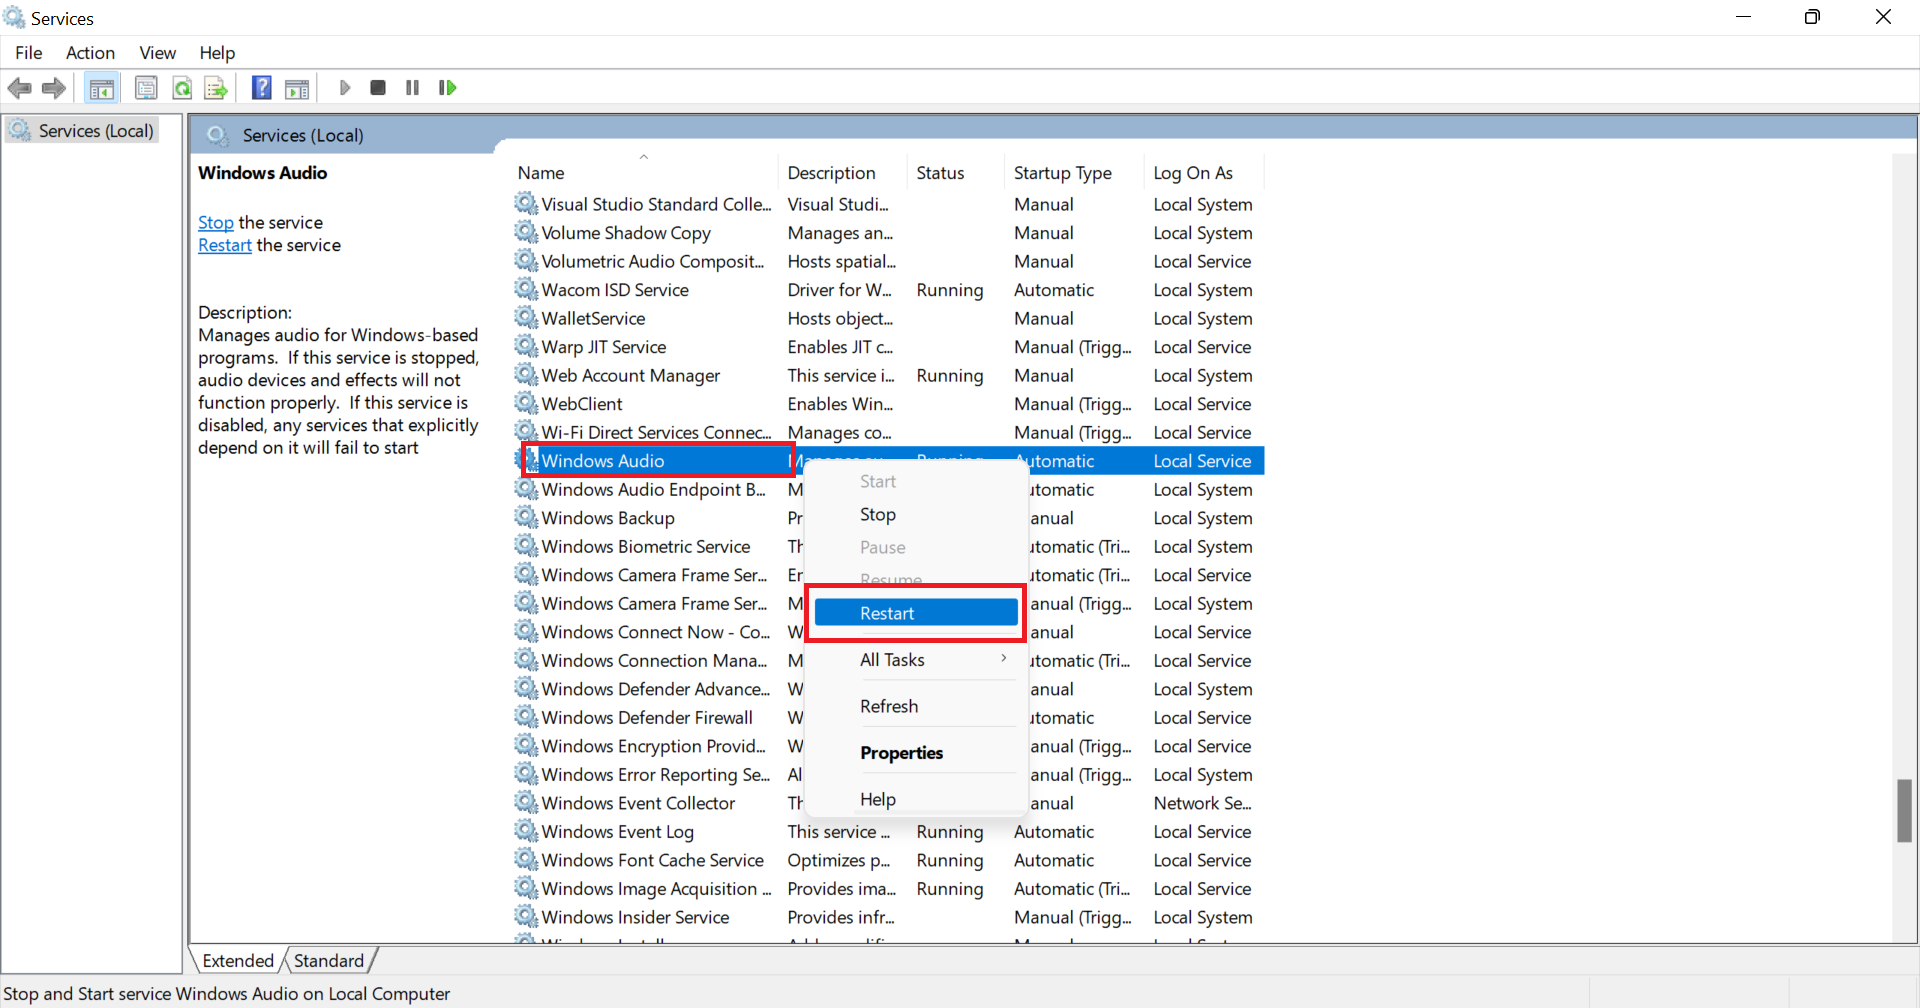
Restart your computer and check if the issue has been fixed.
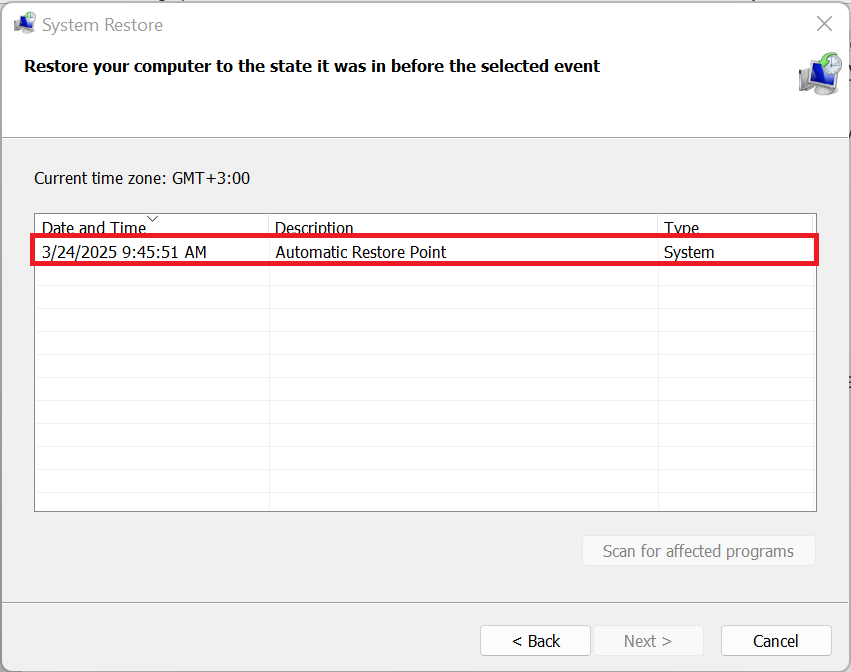
Method 7: Use System Restore
Finally, if all else fails, you can try to restore Windows to the point it worked properly. Windows creates restore points automatically, usually after Windows updates.
Provided you have a restore point and the audio problem started recently, you can roll back and restore Windows and fix the problem by doing the following:
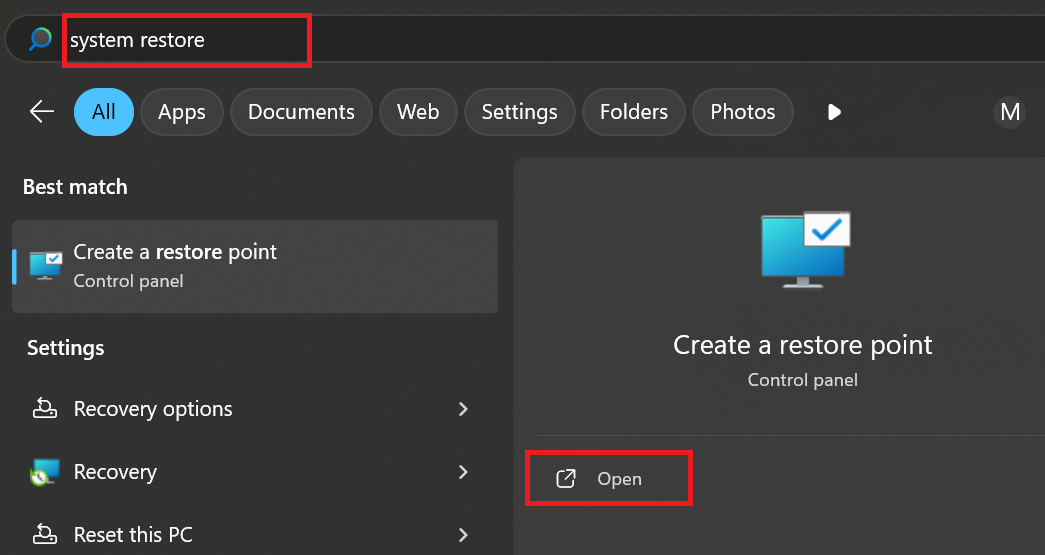
Step 1: Type system restore in Windows Search and open it.
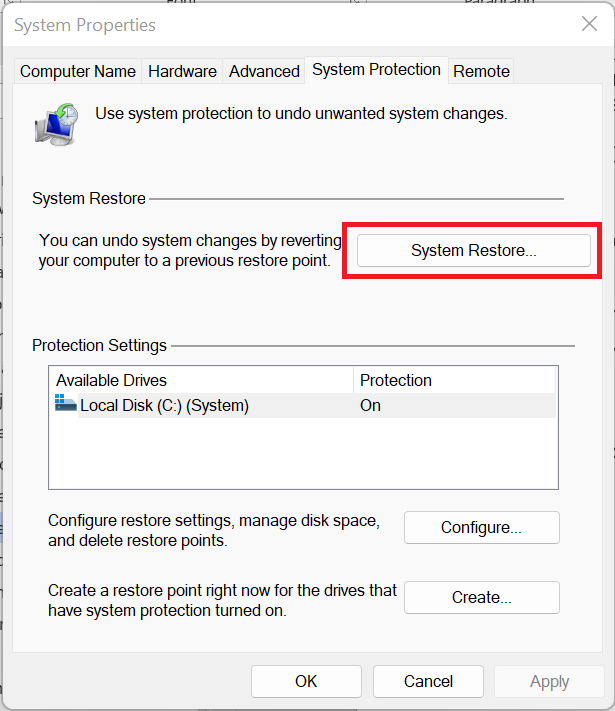
Step 2: In the new window, click on System Restore.
Step 3: A new window will appear explaining what System Restore does. Click Next.
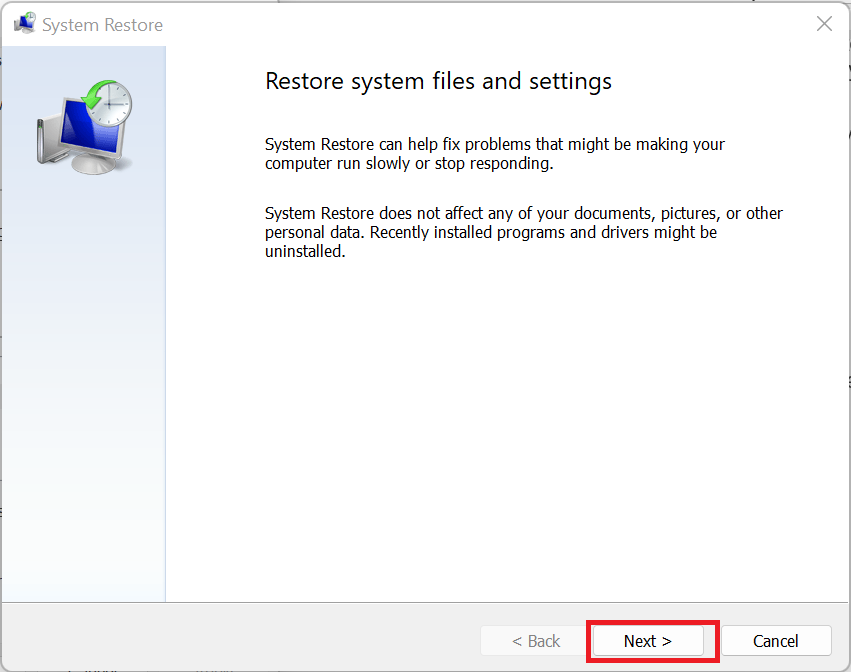
Step 4: Select the preferred restore point. Now, click Next for the process to begin.
How to Fix the Sound Not Working on Windows 10/11 Right After an Update
The fixes above are general fixes that should work in most scenarios. However, if you discovered that your audio wasn’t working after an update, whether a driver or Windows update, follow the below solutions to fix the problem:
1. Roll back audio drivers
Rolling back audio drivers lets you switch to a previous version that worked properly before the update. If the update installed problematic drivers, reverting to the old version can often resolve sound issues on your PC or laptop, bringing your audio back to normal.
Follow the steps below:
Step 1: Open Device Manager and go to the Sound, video and game controllers section.
Step 2: Right-click on your audio device and select Properties.
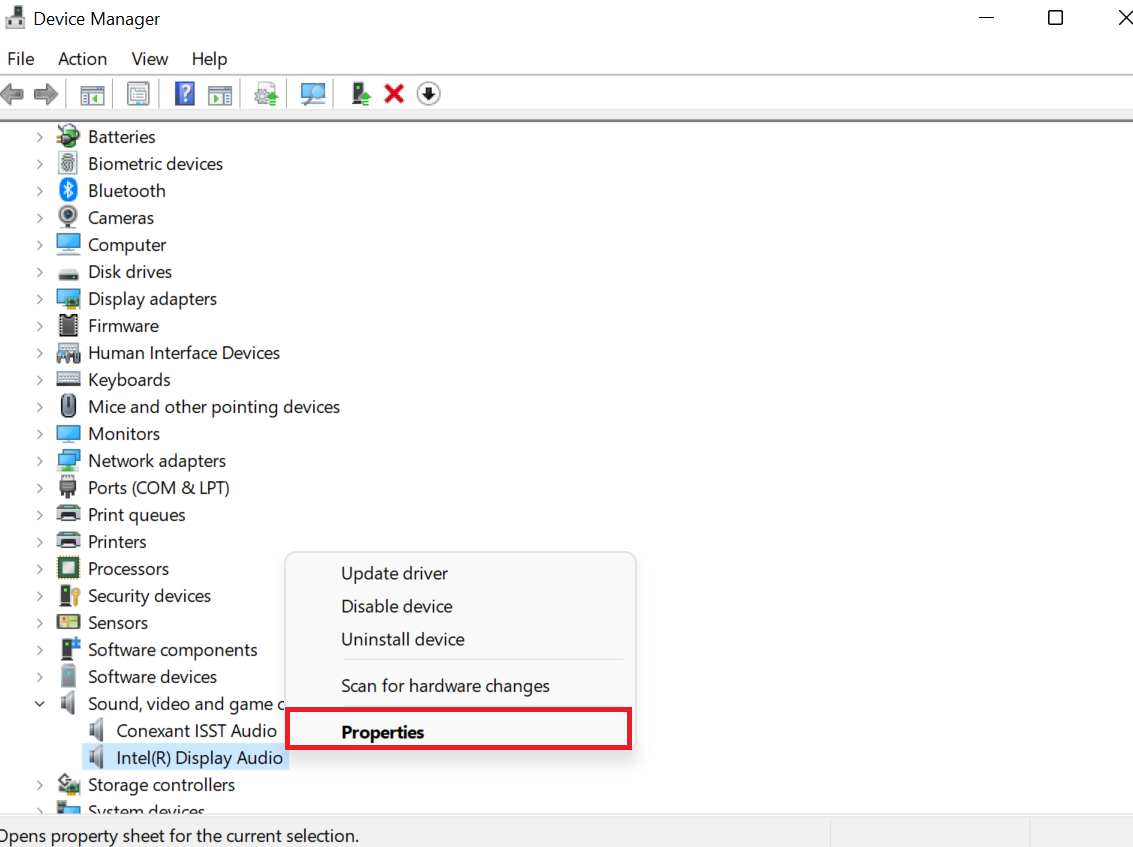
Step 3: In the Driver tab, click on Roll Back Driver (if the option is available). If the option is grayed out, move on to the next solution.

Follow the on-screen instructions and restart your computer to apply the changes. Repeat the process for all the devices in the section.
After rolling back your audio drivers, Windows might reinstall the same problematic drivers. In some cases, the same drivers will be reinstalled after restarting your PC. So, before restarting, temporarily disable the automatic driver updates by pressing Win + R and typing sysdm.cpl.
Then, go to the Hardware tab, click on Device Installation Settings, and select No. After the restart, use a reliable driver updater to get the most compatible, manufacturer-approved drivers for your system. You can enable the automatic updates again when you’re done.
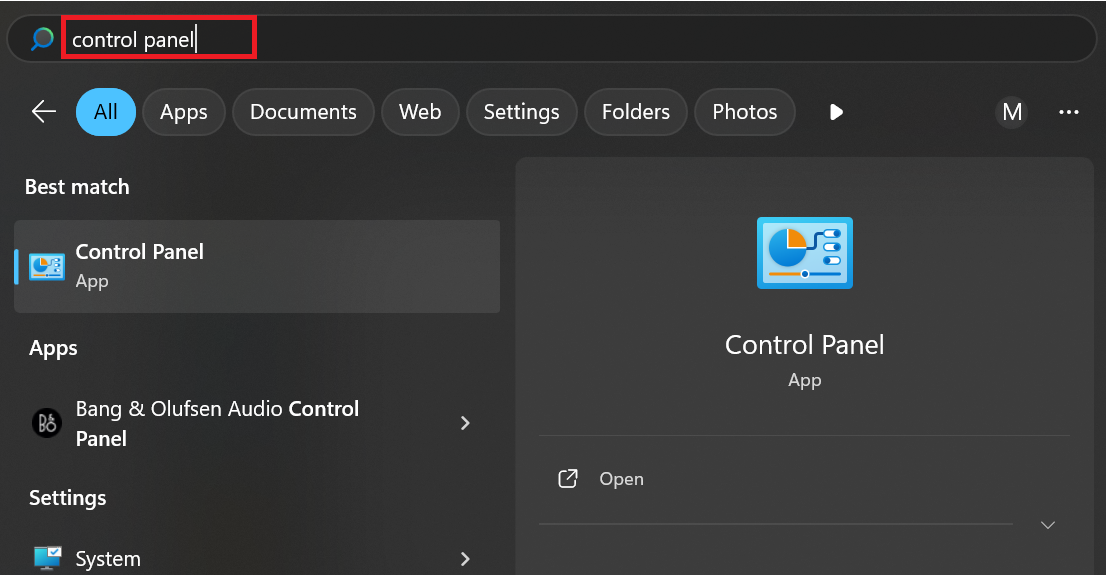
2. Uninstall problematic Windows updates
If your sound stops working right after a Windows update, the update itself might be the cause. Uninstalling the recent update might fix the issue. Here’s how to do it:
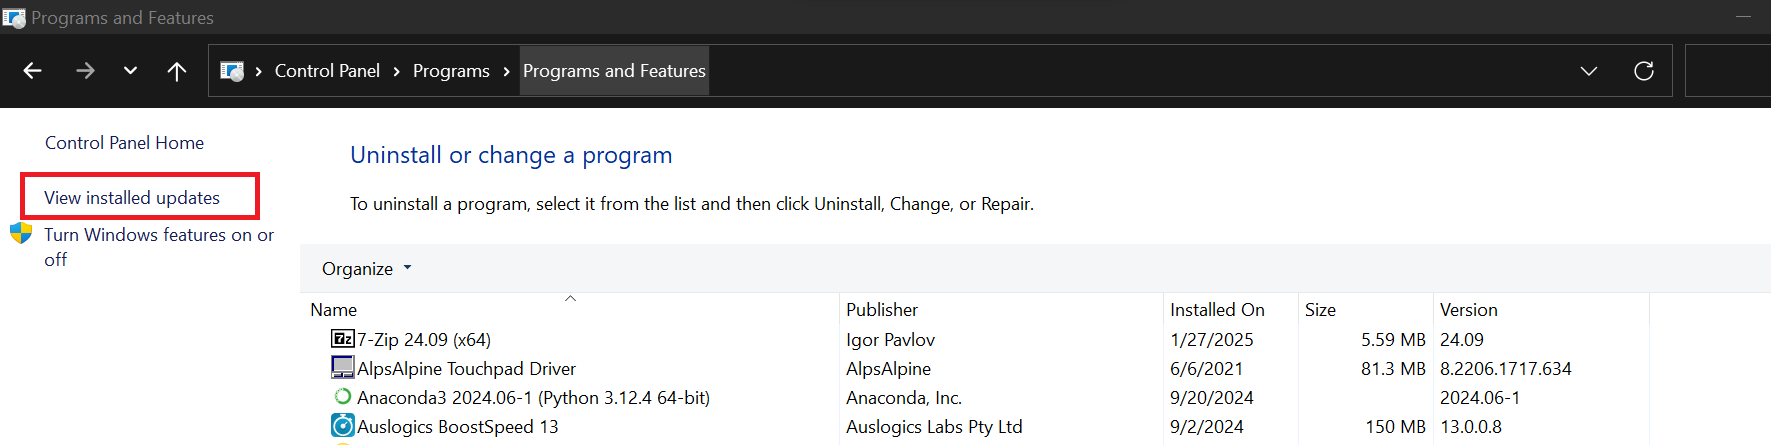
Step 1: Open Control Panel by searching for it in Windows Search.
Step 2: Ensure View by is set to Category. Then, under Programs, select Uninstall a program.
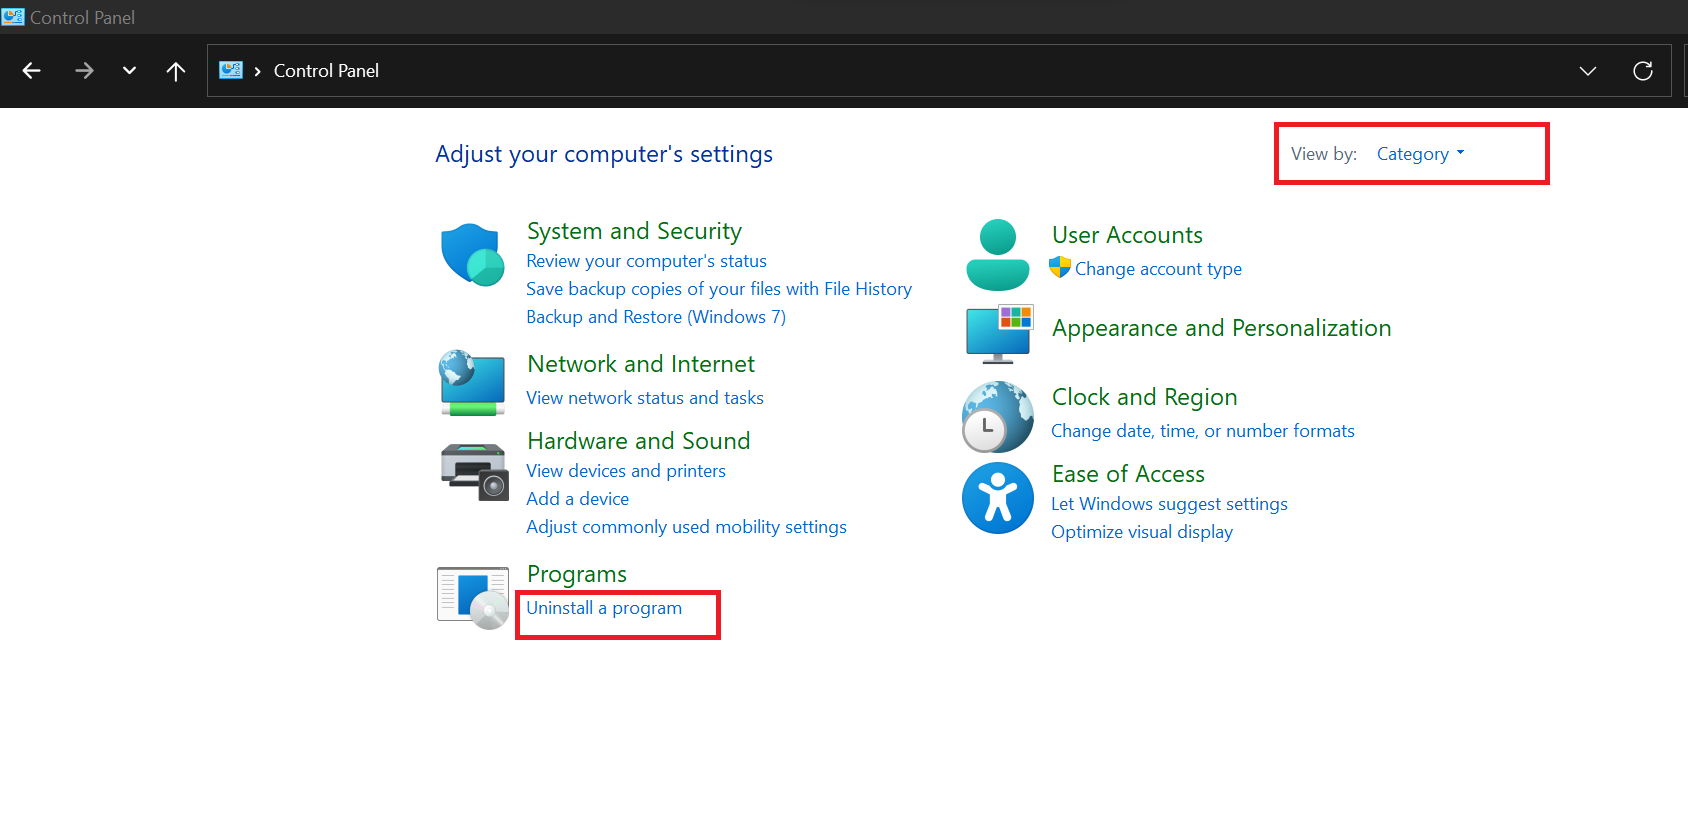
Step 3: On the left pane, click on View installed updates.
Step 4: From the list, select the update you installed around the time the problem started. Right-click the update and click Uninstall.
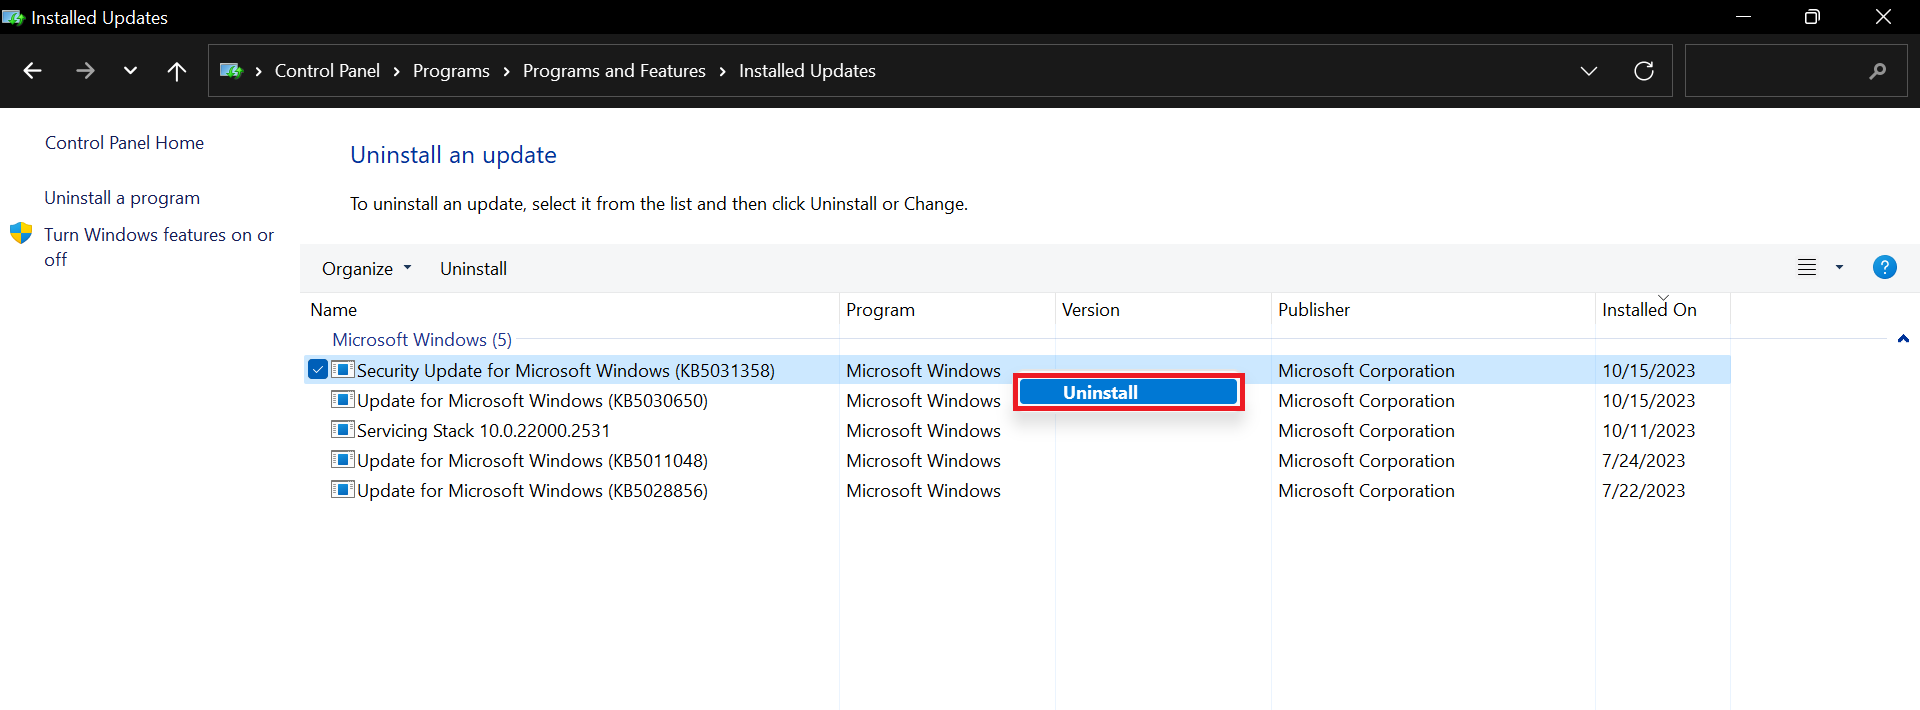
Follow the prompts to complete the process. When done, restart your computer and see if this fixes the problem.
What if the Sound Is Still Not Working?
If your sound is still not working after trying all the steps in this guide, don’t lose hope. Sometimes the issue may be tied to hardware problems, like a faulty sound card, damaged speakers, or malfunctioning ports. These kinds of issues are tricky and usually require professional help.
At this stage, it’s best to reach out to a technician who can diagnose the problem and provide repair or replacement options. Regular driver and system updates and maintenance can prevent many audio issues, but hardware problems need an expert touch.
We’d love to hear from you! Have you successfully resolved your audio issues? Share your experiences and tips in the comments below!
FAQ
Win + R), type services.msc, and press Enter. Find Windows Audio, right-click it, and select Restart. This refreshes the audio system and often fixes the audio sound not working.