

Every contemporary computing device allows easy screen capturing, especially Chromebooks. But Chrome OS is quite different from Windows, macOS, and Linux. The screenshot methods you’re used to will not work here.
However, you shouldn’t panic. This article will show you how to screenshot on a Chromebook. We’ll also point you to your screenshot locations.
How to Screenshot on a Chromebook: Different Methods
Whether you want to learn how to take a screenshot on a school Chromebook or how to take a screenshot on a Chromebook laptop, the methods are not so dissimilar. It generally involves triggering the screen capture toolbar, which offers different screenshotting and screen recording options.
How to screenshot on a Chromebook using keyboard shortcuts
The keyboard combination you use depends on your type of keyboard. For example, some Chromebooks have dedicated screenshot buttons (a circle bordered by a rectangle) at the top rows of their keyboards while others don’t.
Here’s how to take a screenshot on Chromebooks with keyboard shortcuts:
- Tap the dedicated screenshot key if it’s available to capture your screen.
- Follow these steps if your keyboard does not have the screenshot key:
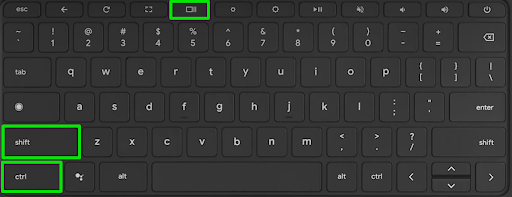
- Press Shift + Ctrl + Show windows/Overview. The Show windows key is located at the top of the keyboard and is represented by a rectangle followed by two vertical lines.
- If your keyboard lacks the Show windows key, tap Ctrl + Shift + F5 instead.
- Click the Screenshot option (first camera icon from the left) at the screen capture toolbar above the Shelf (taskbar).
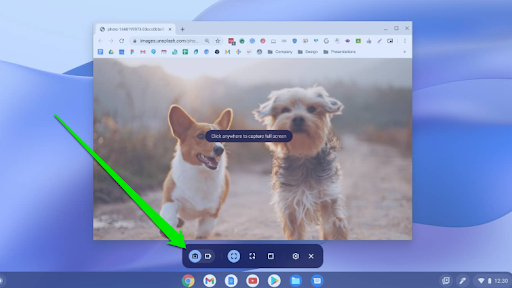
- Select an option in the middle section of the toolbar between:
- Full screenshot: Captures the entire screen.
- Partial screenshot: Allows you to select where to capture.
- Windows screenshot: Captures a specific open window.
Other keyboard tips:
- You can press Ctrl + Show windows to capture your entire screen.
- You can tap your space bar to change the screen section you want to capture.
- Resize your screenshot by pressing the Tab key until one of the section’s circle corners is highlighted. You can then use the arrow keys to change your screenshot’s height and width.
How to screenshot using the Quick Settings menu
The quick settings menu allows you to take the screenshot with your mouse or trackpad. It’s the best way to capture your screen without having to always remember keyboard combinations.
The following steps will show you how to screen capture on a Chromebook via Quick Settings:
- Go to the Quick Settings menu by clicking your time display in your taskbar’s right corner.
- Select Screen Capture once the menu appears. Switch to the next menu page if you don’t see the Screen Capture icon immediately.
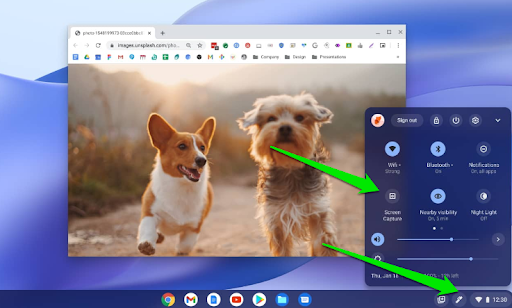
- Select how you want to take your screenshot once the screen capture toolbar appears right on top of your Shelf.
How to do a screenshot on a Chromebook tablet
These tips will be beneficial to people who want to learn how to screenshot on HP Chromebook tablets or other Chromebook tablets with stylus keys. It’ll also show you what to do if your ChromeOS tablet does not have a keyboard.
Here’s how to screenshot on a Chromebook tablet with a stylus:
- Go to your desktop environment and tap the pen or stylus icon.
- Next, use your stylus to select Capture region.
- Use the stylus to touch and hold your screen and drag to cover the area you want to capture.
- Release the stylus to complete the screenshot process.
If you want to screenshot the entire screen, select the stylus icon on your desktop and tap the Capture screen option.
If you use a ChromeOS tablet without a stylus and keyboard, press your power and volume-down buttons together to take a screenshot.
Editing Your Screenshots
After taking the screenshot, a small window pops up in your screen’s bottom-right corner with Edit and Delete options. Clicking Edit opens a window with numerous editing tools, such as crop, filter, and draw. You can also delete and share the screenshot from this window.
However, you may need one of the best video editing tools to execute professional-level editing for your recorded videos.
Finding Your Screenshots and Recordings in Chrome OS
Screenshots are automatically added to your clipboard and stored in your Downloads folder. You can also access them easily when you click Tote in the bottom right corner of your screen, close to the time display. Tote contains your recent files, including screenshots, and allows you to pin files you want to see for a while.
You can always change the default screen captures folder if you want to save screenshots to a different location. Follow these steps:
- Activate the screen capture menu. Press the screenshot button or tap Shift + Ctrl + Show windows (or F5). You can also click your time display and select Screen Capture in the Quick Settings menu.
- Now, click the Settings icon (cogwheel) in the captures toolbar at the bottom of your screen.
- Click the Select folder option under Save to and choose a new location to save your screenshots and recordings.
How to Screenshot on a Chromebook Using Third-Party Apps
You can capture screenshots on Chrome OS through a variety of third-party tools, each offering unique features beyond the operating system’s built-in screenshot capabilities. Here are three different tools that you can use:
- Lightshot
Lightshot is a popular free screenshot tool that is available as a Google Chrome browser extension. This makes it easily accessible for Chrome OS users. Lightshot allows you to quickly capture any part of your screen, edit the screenshot using simple tools, and share it online. It offers features such as selecting the capture area, adding text or arrows, and uploading screenshots to a server for easy sharing.
- Nimbus
This is another extension for Google Chrome that is well-suited for Chrome OS users. Nimbus allows you to capture the entire screen, a selected area, or even a scrolling webpage. Beyond screenshots, it also offers screen recording features. The tool provides editing features like cropping, annotation, and blurring sensitive information. Screenshots can be saved locally, to Google Drive, or Nimbus’s cloud service for easy access from anywhere.
- Awesome Screenshot
This tool is available as an extension for Chrome and is compatible with Chrome OS. Awesome Screenshot allows you to capture all or part of a webpage, annotate it with rectangles, circles, arrows, lines, and text, and blur sensitive information. It also provides screen recording functions, including the ability to record your screen or a specific tab. The tool offers users options to save images and videos locally or to its cloud service or Google Drive.
Extra Tip: Record Videos with Audio and Selfie
Chrome’s screen capture tool also allows you to record screen footage and add explainer audio if you like. Here’s how:
- Press the screenshot button or use the Shift + Ctrl + Show windows (or F5) shortcut to open the screen capture menu.
- Select the second icon from the left (camcorder icon) and choose whether you want to record your entire screen, a portion you select, or a specific window.
- Click the Settings icon and select Microphone under Audio input if you want to add your voice to the recording.
- Turn on the switch for “Clicks and keys” if you want viewers to see your mouse and keyboard actions.
- Select Front camera under Camera to show your face in a small corner in the recording.
- Once you finish entering your preferences, your recording will begin after the 3-second countdown. You can click the red button in the bottom-right corner to stop recording at any time.
Taking Screenshots on ChromeOS Is Easy
Now you know how to screenshot on Chromebooks without the Windows key or command button as you’ve been used to. You can quickly use keyboard shortcuts or go through the Quick Settings menu.
Remember that you can always move your important screenshots to Google Drive, especially if your Chromebook has limited space.
Go to the comments section below to let us know how this guide helped you take screenshots and record your screen.