
Are you experiencing loud fan noise, lagging applications, and overheating? Learning how to lower CPU usage can resolve the problem. There’s nothing good about CPU usage at 100% almost all the time.
Apart from messing up your user experience, it can cause data loss and component damage.
This guide shows you the main reasons for the problem and how you can resolve it for good.
I’ll also throw in effective measures to keep your CPU usage low and prevent future occurrences.
What Is CPU Usage and How Do You Check It?
CPU usage is a metric that indicates how much CPU resources are occupied.
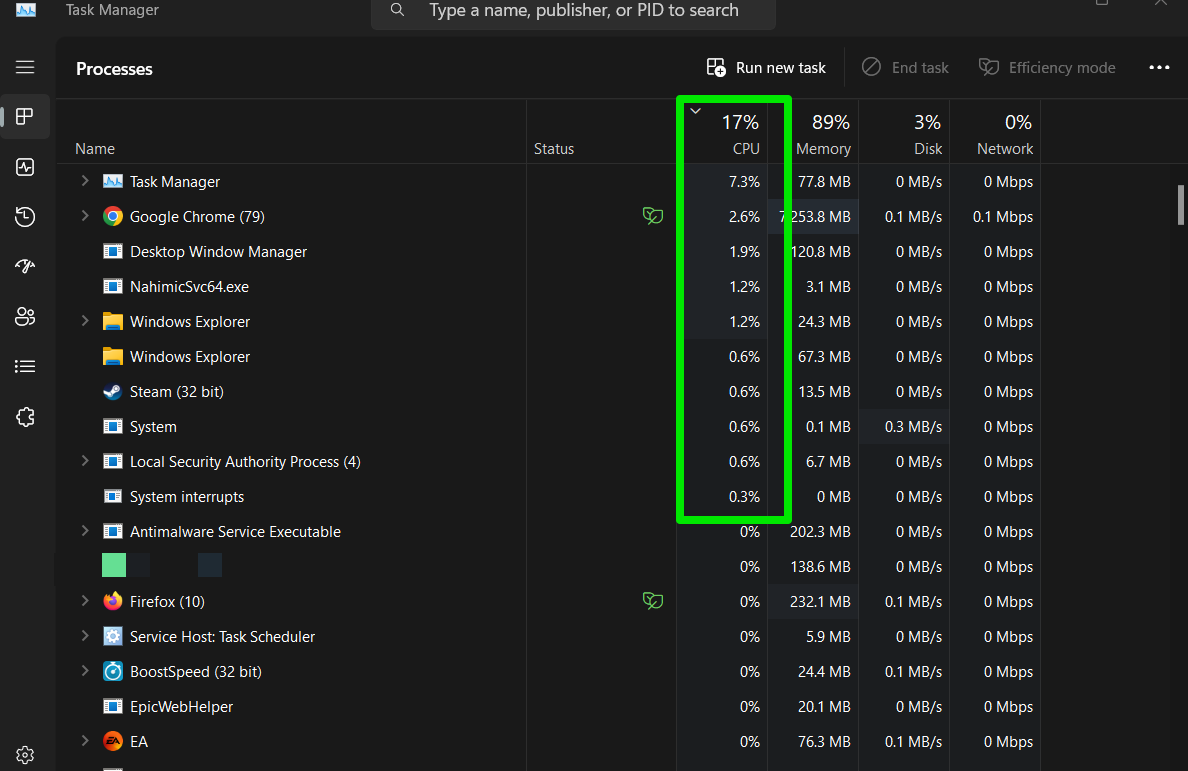
Tools like the Task Manager and Resource Monitor show how much of these resources are being used in real time and the percentage used by each process.
When your computer starts lagging or overheating, you can head to the Task Manager to check if your system is dealing with 100% CPU usage.
Follow these steps:
- Right-click your taskbar and select Task Manager or tap the CTRL, Shift, and Esc buttons simultaneously.
- The Processes tab will show your real-time CPU, memory, disk, and network usage.
What Percentage of CPU Usage Is Considered Normal?
Normal CPU usage depends on your use cases at any given time and your CPU configuration.
When your computer is idle, usage should ideally be below 10%.
When performing light tasks, it should be around 10%. Browsing the web, especially with a lot of tabs open, and running other productivity apps should bump usage to about 20 to 30%.
However, it’s normal to see usage above 45 and 60% when running heavier tasks, such as gaming, 3D modeling, and video editing.
Why Is My CPU Usage So High?
Every app and process, no matter how small, takes a share of your CPU’s power when running. So, it’s easy to overload even the most powerful 14th gen Intel processors.
However, high CPU usage can be more complex than that. These are the common reasons you keep seeing the 100% mark for your CPU in the Task Manager:
- Background apps: Running too many apps in the background at the same time can significantly drive up CPU usage.
- Too many open apps: Sometimes, the CPU simply runs slow because you’re putting too much on its plate by running too many CPU-intensive programs at once. It could even get worse if your computer doesn’t have the required cores to keep up.
📌 Also read: CPU Cores Explained: Does the Number of Cores Affect CPU Performance
- Malware: Harder-to-trace sources of high CPU usage often indicate virus and malware activity. These programs are usually designed to collect massive amounts of data or run mining activities using your system’s resources. They’re also good at covering their tracks.
- Windows services: Some Windows services, such as the State Repository Service, often run in the background and drive up CPU usage.
- WMI provider host: The WMI ( Windows Management Instrumentation) provider host is an important Windows component that allows applications to fetch important data about your computer’s current configuration. This data could range from things like an IP address and DNS to power management information.
While the component shouldn’t drive high CPU usage, it’s my experience that it does. A lot.
- Bottleneck: A bottleneck event in Windows occurs when one device cannot keep up with another. In this case, your GPU may be requesting too much information from your CPU and causing the usage spikes.
- Outdated and unoptimized software components: High CPU usage will be an ongoing problem if Windows is out of date or you have poorly optimized, outdated, and incompatible applications and drivers.
- Junk files: Accumulated junk files, such as the files stored in the temp and software distribution folders, can also cause some damage. They can interfere with the running process and artificially jack up your CPU usage.
- Dirty internal components and overheating: CPUs throttle badly when they run too hot. While heat can be a result of heavy software loads, dirty internal components and poor cooling systems can also cause high temperatures.
What Are the Symptoms and Consequences of High CPU Usage
Your computer will almost always run slow when programs and other elements drive up your CPU usage. It means the CPU will consume more energy to try and keep up. This activity leads to high temperature levels and louder fans.
If the issue continues, you risk shortening the lifespan of most of your internal hardware components and the CPU itself, as electronic devices don’t do well with heat.
How to Reduce CPU Usage
The following methods will show you how to lower CPU usage issues and keep your system smooth. You can start from the first solution and work your way down to the more complex fixes.
Close processes that consume too much CPU resources
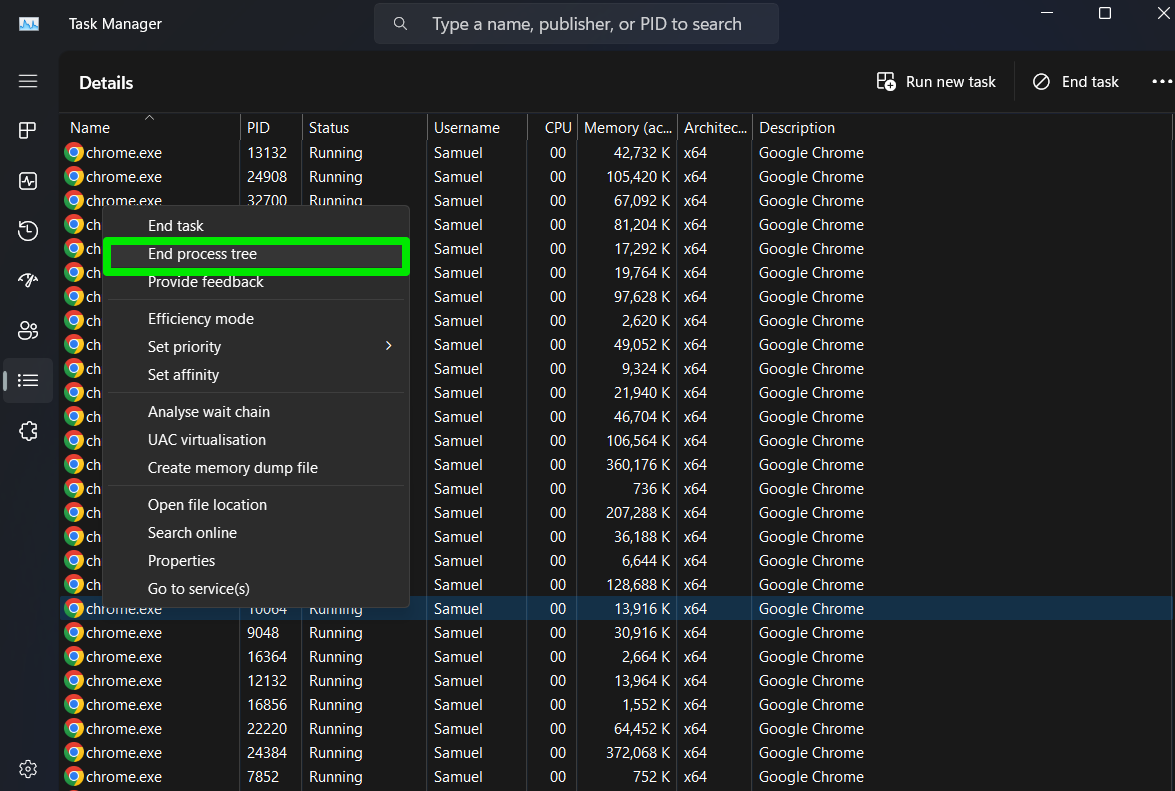
Head to the Task Manager, click CPU, and shut down the application causing the problem. In some cases, there will be many instances of the program and they may just start up again. You can ensure you close them all by using the End process tree command. Here’s how:
- Open the Task Manager and expand the program category driving up CPU usage.
- Right-click the one instance of the program and select Go to details from the context menu.

- Once you get to the details tab, right-click the process again and select End process tree.
Check if the issue has been resolved.
Restart your computer
Restarting your computer should rid your system memory of the programs running in the background and spiking your CPU usage. Ensure you use the Restart command, as shutting down the computer and starting it up again may not have the desired effect.
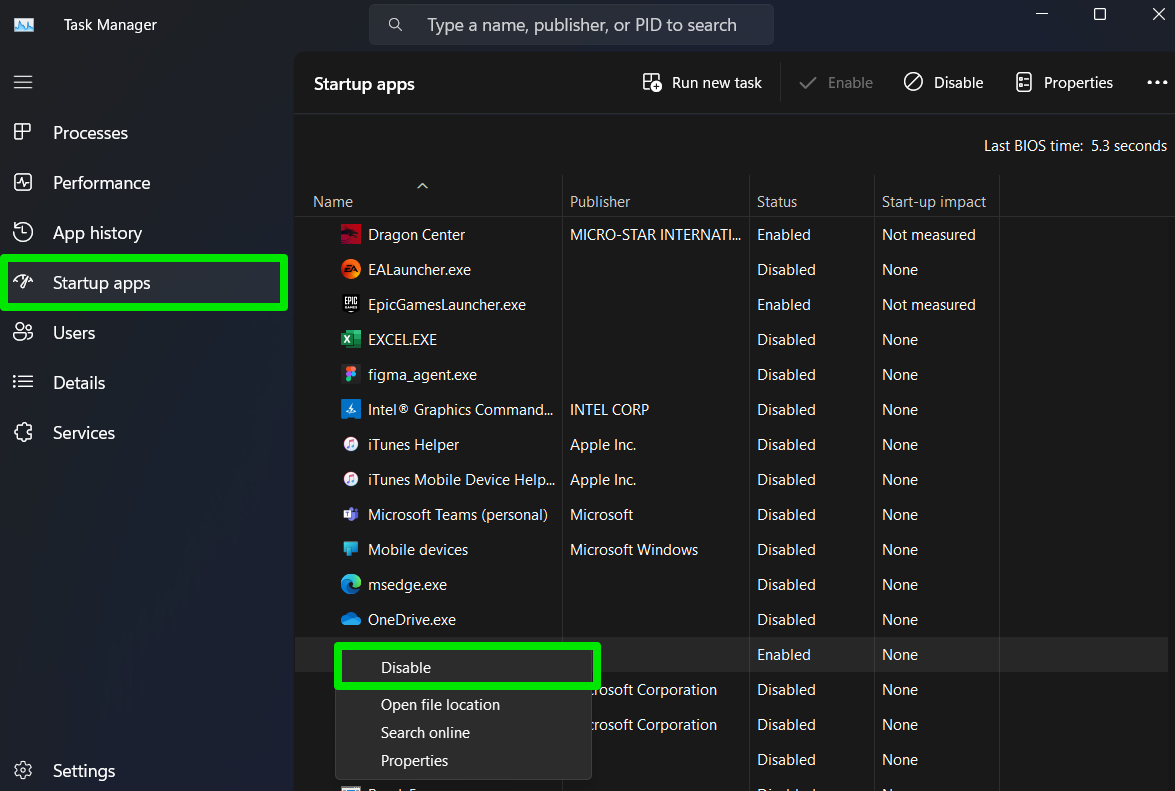
Disable startup programs
Startup programs are applications configured to launch immediately after you log in to your computer. They are the main reason your computer seems to struggle at startup. However, some of these programs continue to run for long periods and can cause serious slow downs.
You can open the Task Manager, select the Startup apps tab, and disable these applications.
You can also go to Settings > Apps > Startup and toggle off the startup applications you want to disable.

📌 Our explainer on disabling such programs will show you more.
Check for malware
Removing malware and virus applications
that drive up CPU usage involves running full antivirus scans. These scans usually take a lot of time (and they will likely further increase CPU usage) but they are worth it. You can go to your scan options or similar page in your antivirus and choose the full scan option.
Update your drivers and BIOS
If you haven’t updated your BIOS or drivers in a while, consider doing that, as they could be the reason your CPU usage keeps spiking. You can update your BIOS by visiting your computer’s OEM page and searching for the firmware that matches your system’s make and model.
In some cases, OEMs ship firmware upgrades through the Windows Update client or their dedicated programs. So, head to the Start menu, type Updates, and click the Check for updates option. Ensure you restart your computer when the client downloads the updates.
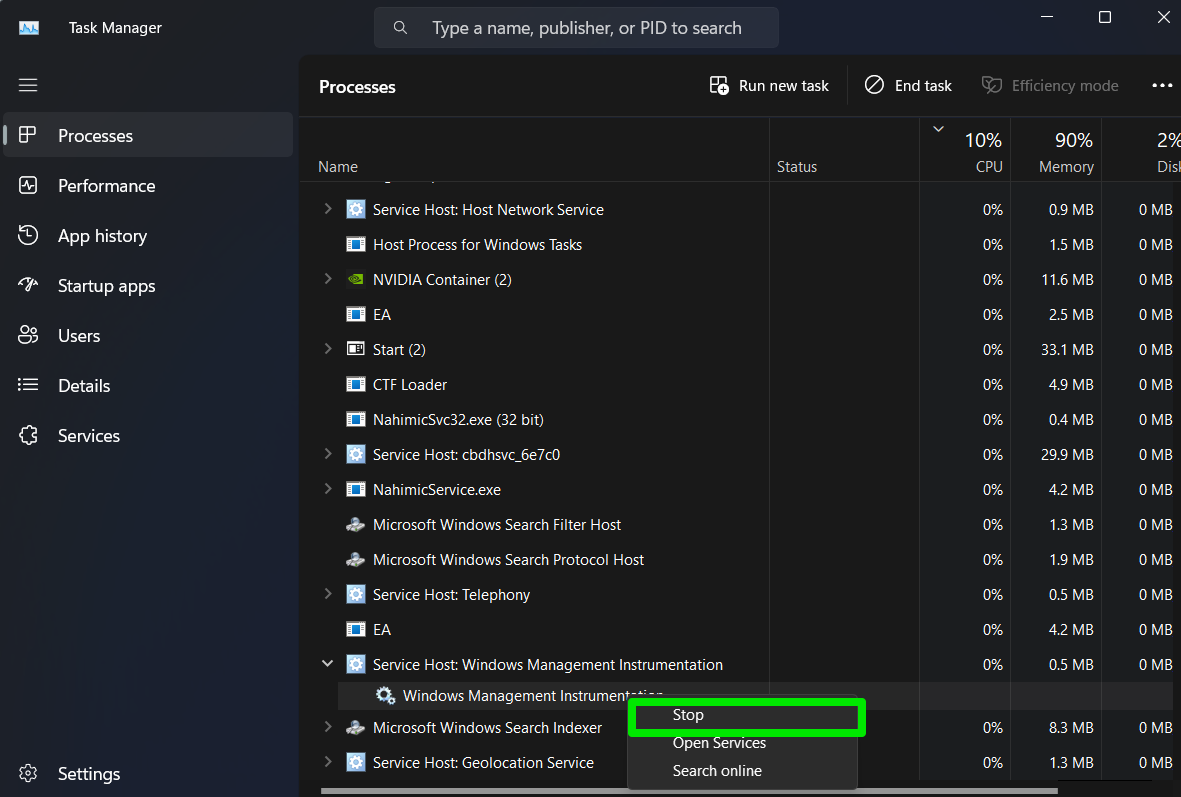
Restart the WMI provider host
The WMI provider host typically displays under Service Host: Windows Management Instrumentation.
You’ll see it under the Processes tab
Right-click it and select Stop.
Click Shut down in the dialog window.
You can also go through the Services app to restart it. Follow these steps:
- Launch the Start menu, type “ services ,” and select Services in the results page.
- After the Services app opens, scroll down to Windows Management Instrumentation and click it.
- Go to the left pane and select Restart the service.
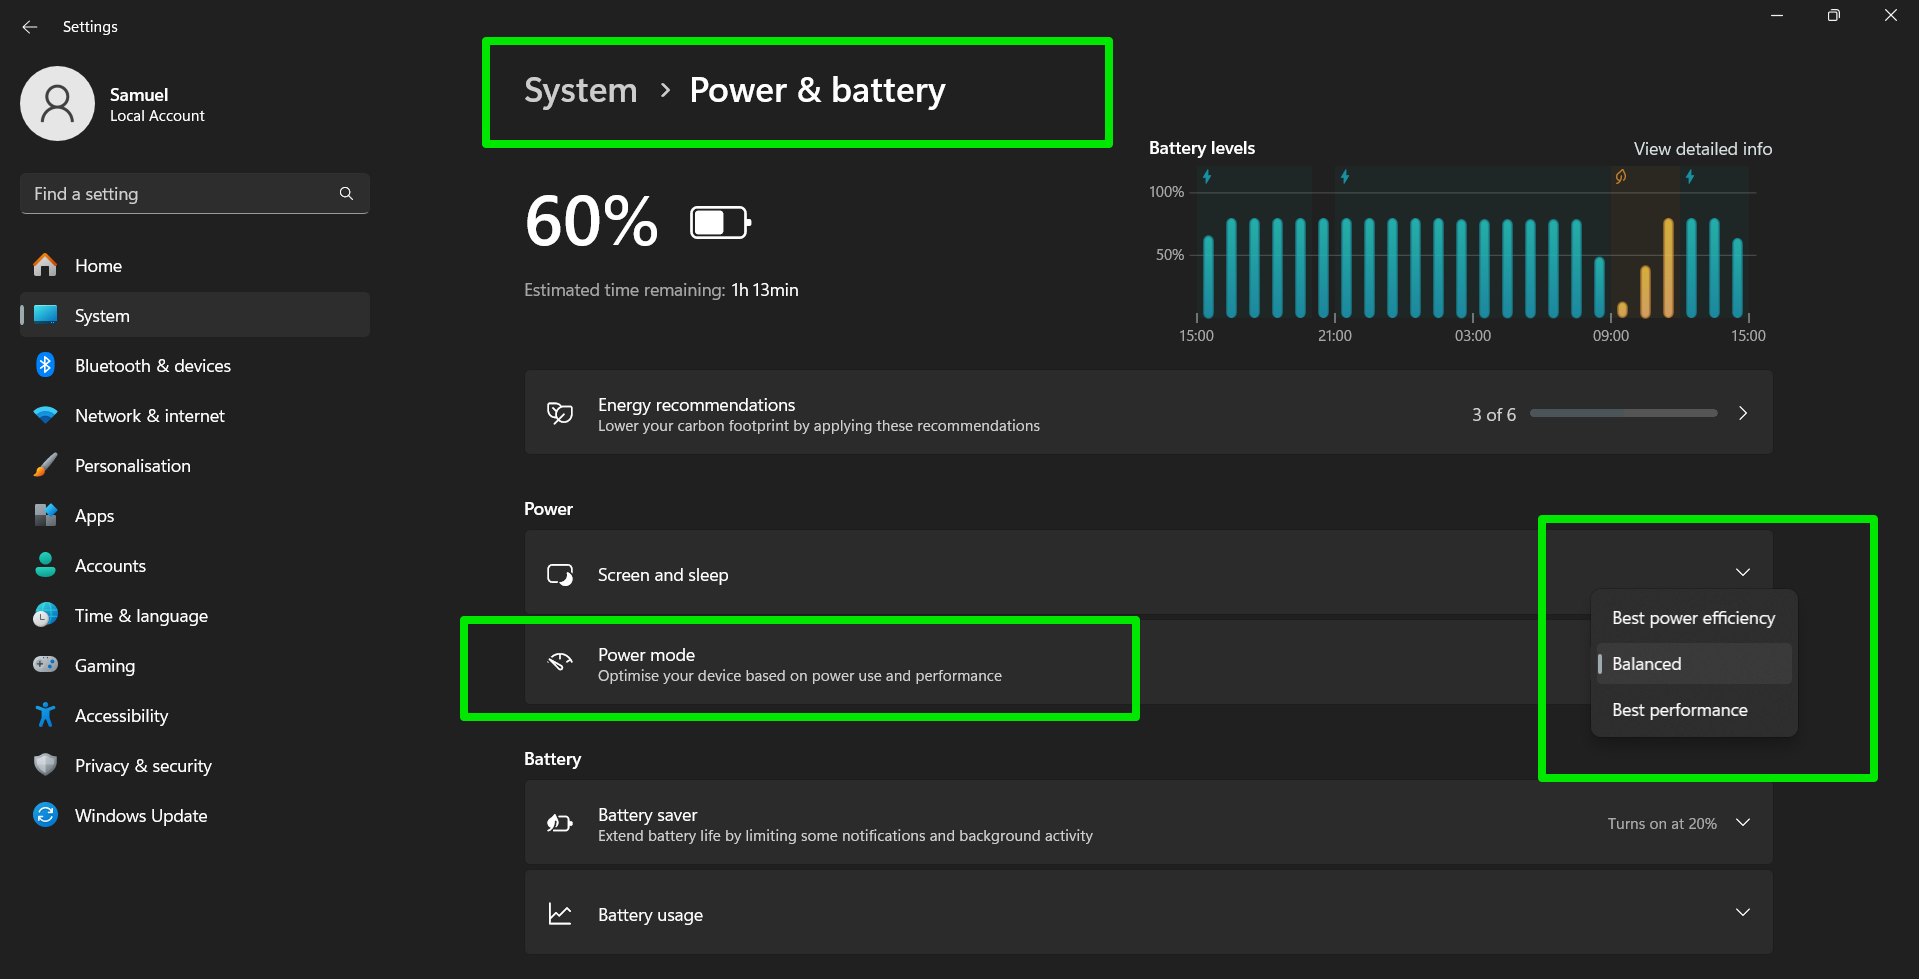
Change your power options
The Best power efficiency power mode on Windows can cap your CPU resources and trigger the high usage. Using a different power option should fix the issue.
Head to the Settings application and select System > Power & battery. Go to Power mode and select Balanced. If you want to run demanding tasks over long periods, select Best performance.
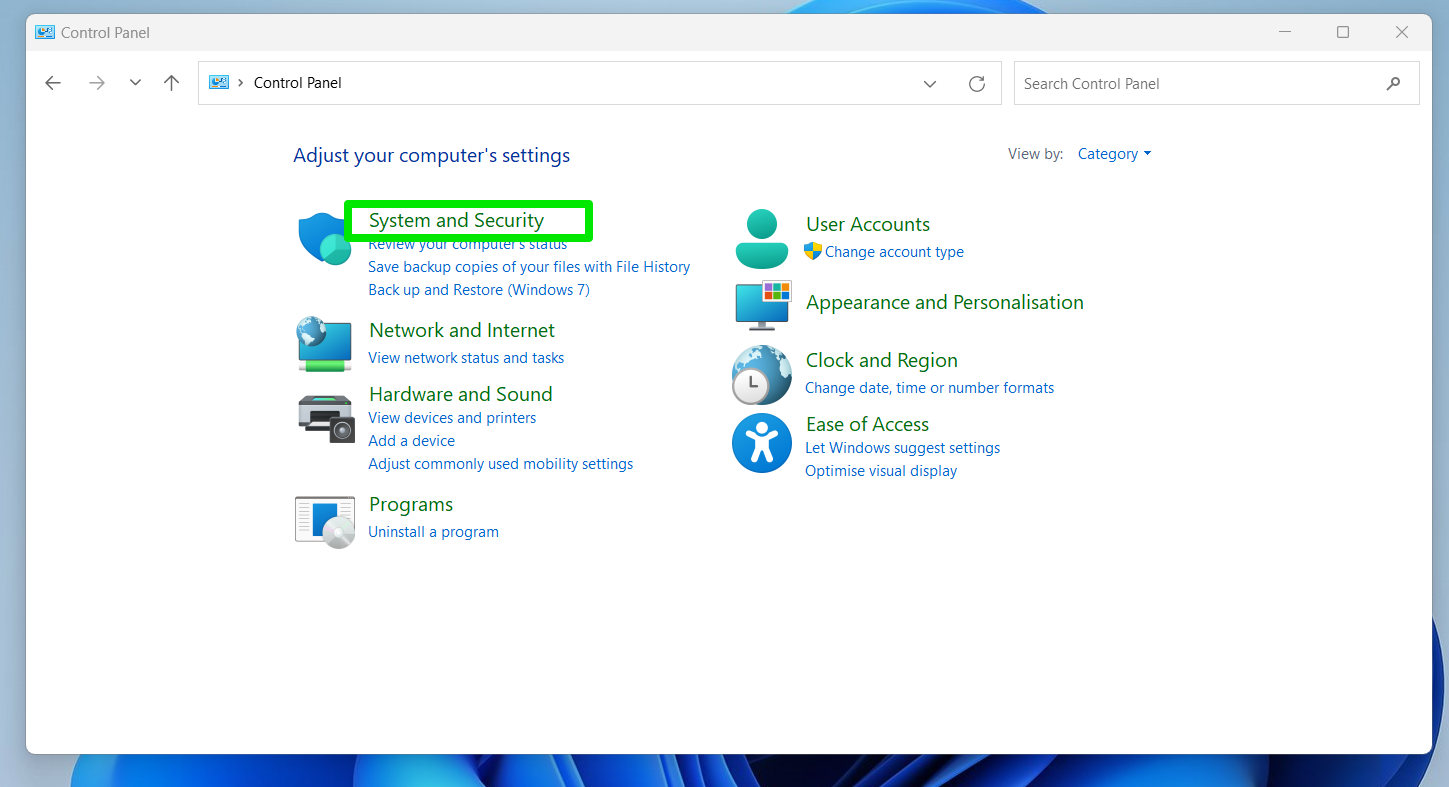
You can also go through the Control Panel window to change your power options. Follow these steps:
- Tap
Windows + Rto open Run. - Type “ control panel” into the Run dialog and click OK.
- Click System and Security when the Control Panel window opens.
- Click Power Options.
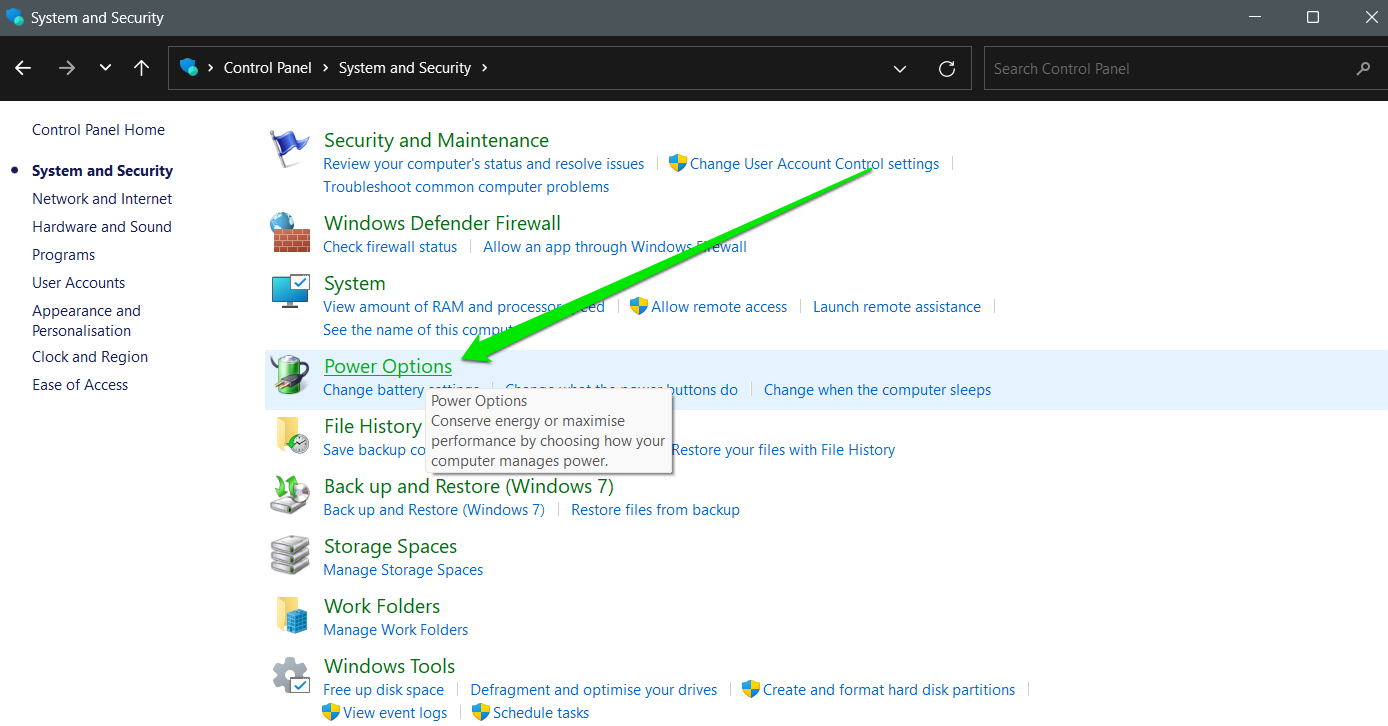
- Now, select a different power plan.
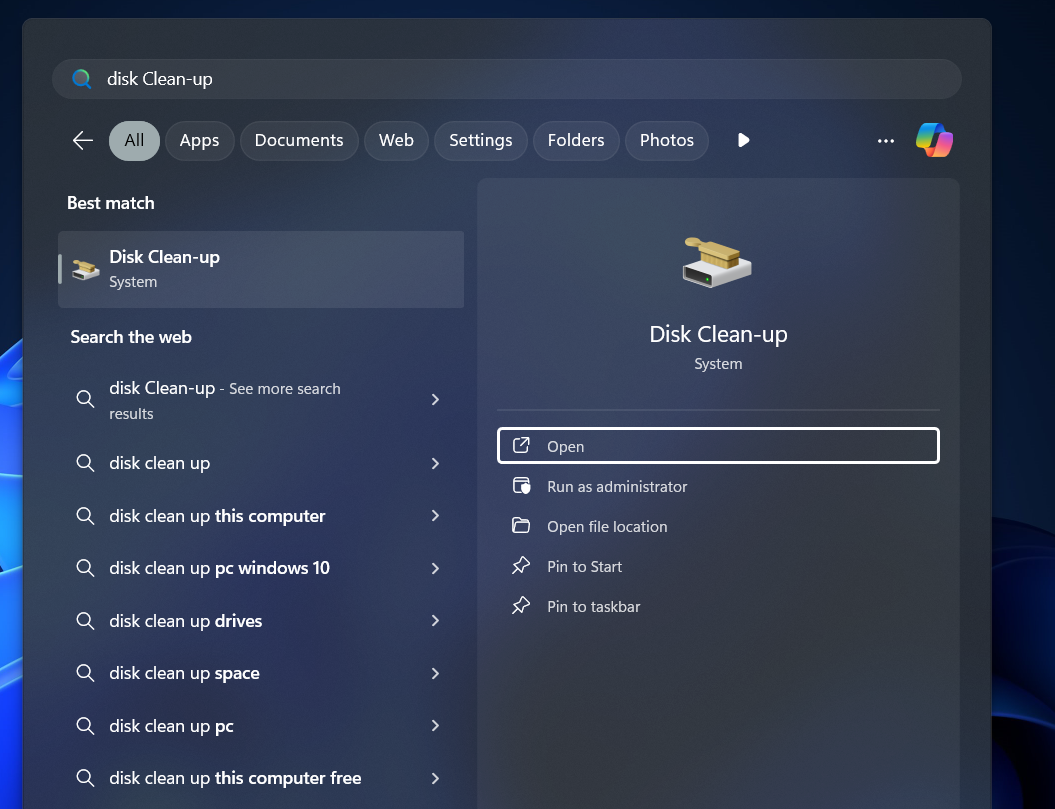
Get rid of junk files
You can use the Disk Cleanup utility or go through Settings to clear out junk files. Let’s start with Disk Cleanup:
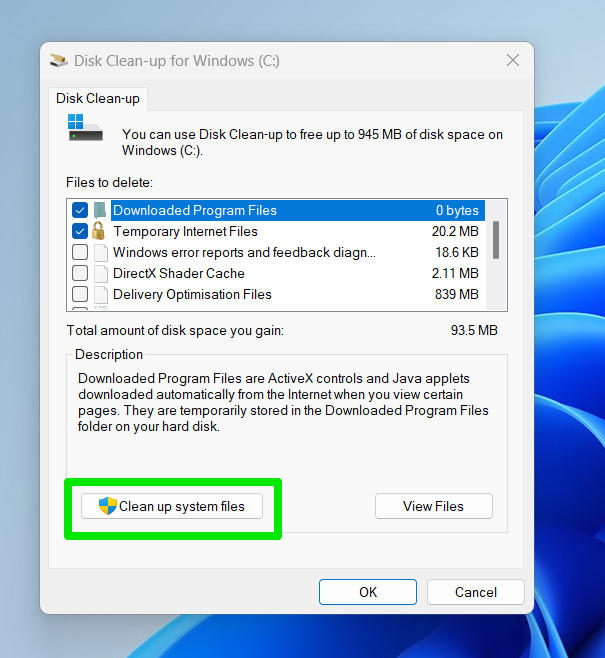
- Open the Start menu, search for “disk clean-up ,” and launch the tool.
- If you have multiple hard drives or partitions, select the volume you want to clean.
- Select the files you want to wipe, such as thumbnails, temp files, and delivery optimization files
- Click OK.
You can also get rid of system files like Windows update, log, and error reporting files. Click the Clean up system files button, select the files you want to remove, and click OK.
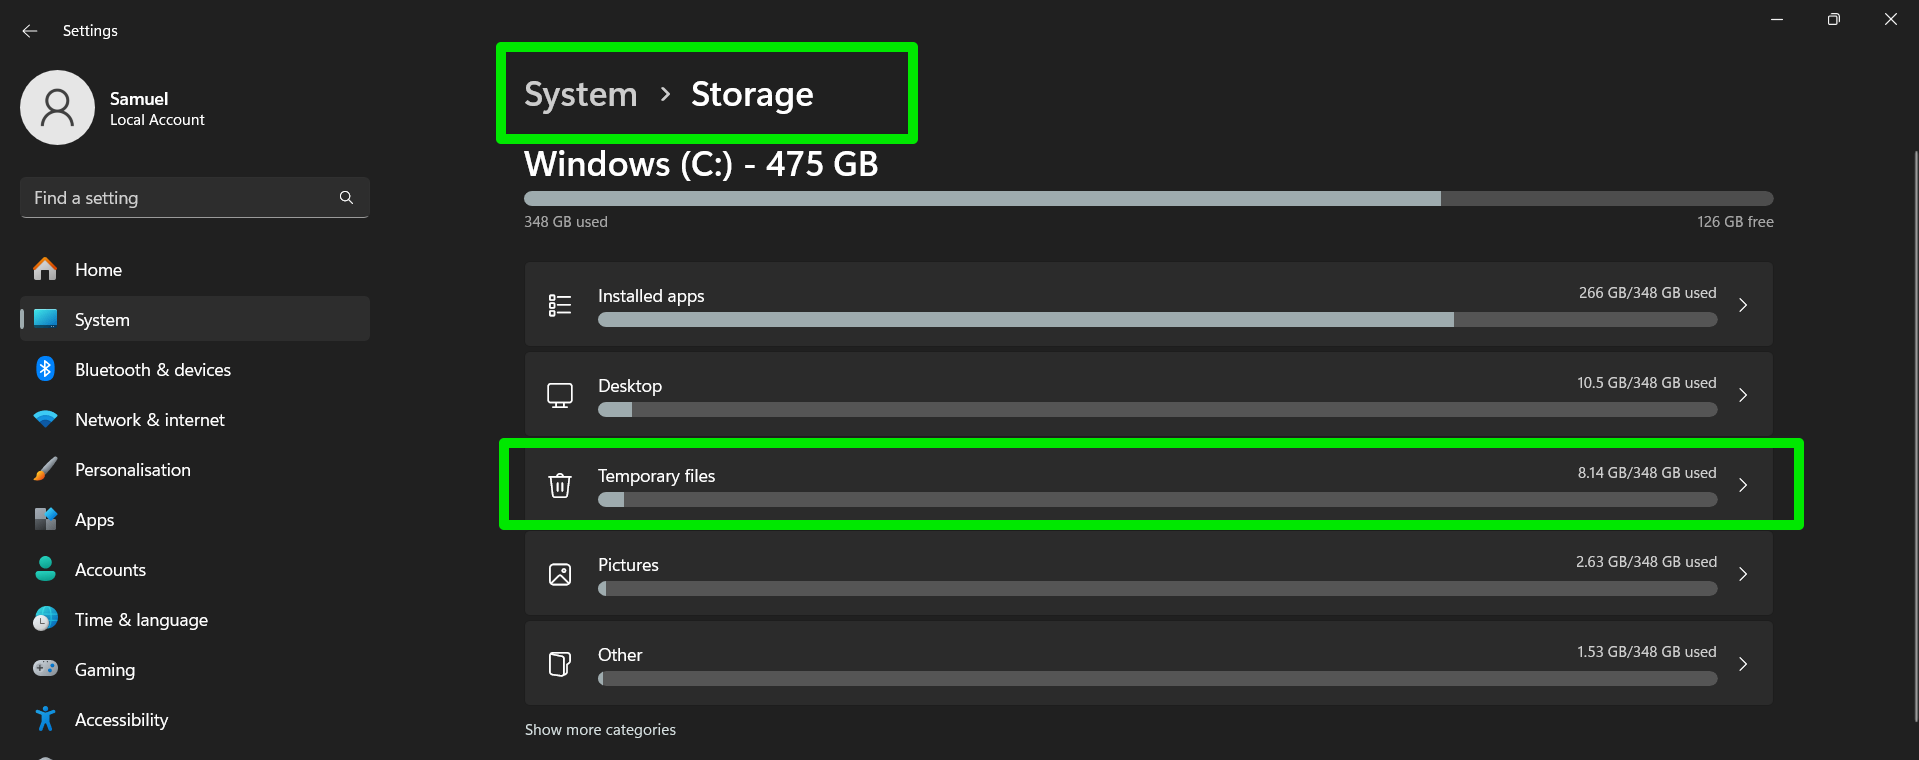
To use the Settings app, go to System, select Storage, and click Temporary files. Select the types of files you want to delete and click Remove files.
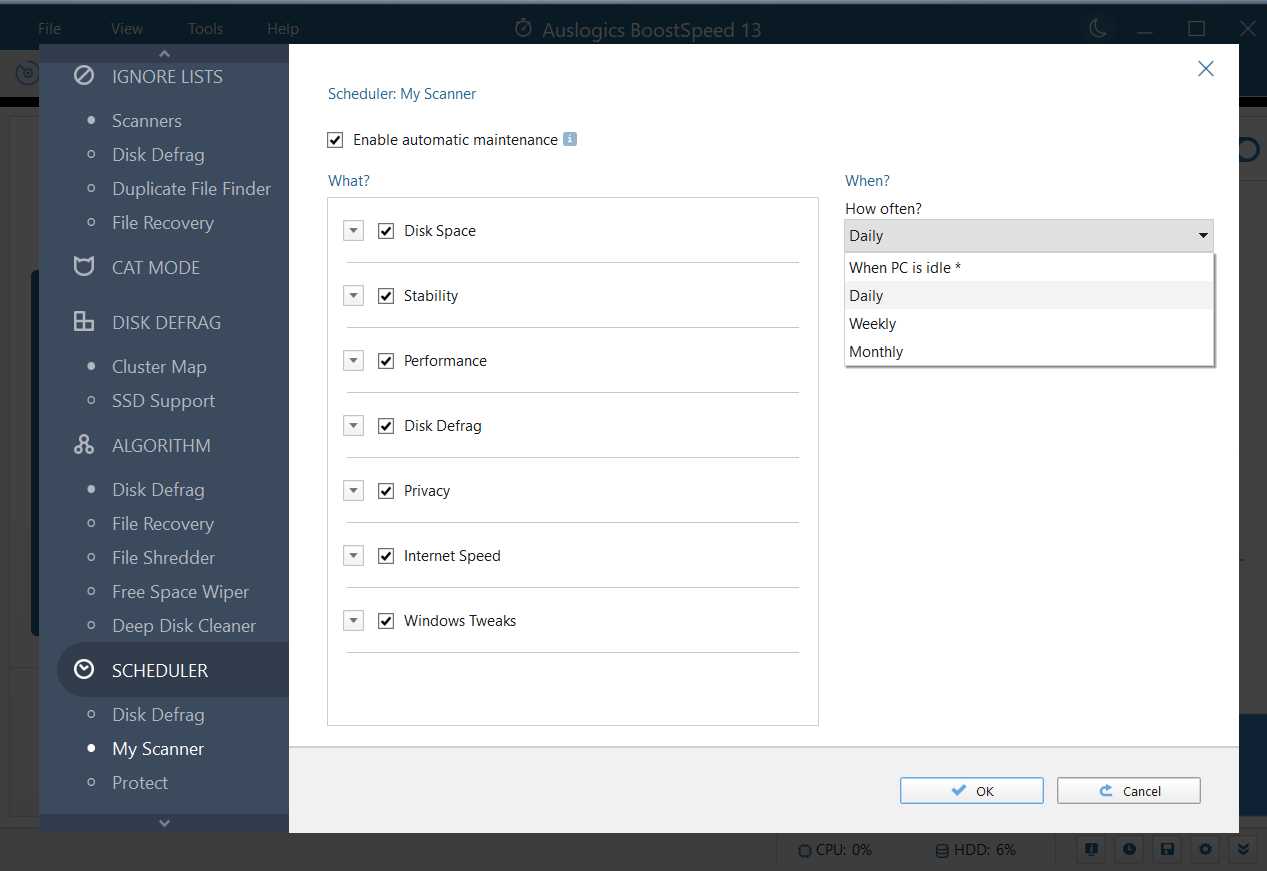
You can use Auslogics BoostSpeed to stop worrying about temporary files and prevent them from causing future issues. The tool allows you to get rid of these files at the click of a button.
You can also schedule automatic maintenance, so you don’t have to create manual routines and reminders to clean up your system. It also helps you get rid of duplicate files, unused applications, and other components that spike CPU usage.
Do some physical cleaning
If you haven’t taken a look inside your computer in a long time, it’s time to open it up and get rid of dust and dirt.
If you use a fan setup, brush the fans to ensure there are no elements impeding them. If you use a liquid cooling system, our walkthrough on flushing and cleaning water cooling systems provides the kind of step-by-step instructions you need.
Keep your computer cool
Even after cleaning up dirt and keeping your cooling system in good shape, you have to help your PC dissipate heat better. You can further cool down your system by placing it in better positions to improve airflow and reduce external high temperature.
For example, if you use a laptop, consider placing it on flat surfaces.
Desktop computers are better placed in areas that won’t obstruct fans. You also have to know when to allow your computer to cool off after hours of gameplay and running demanding apps. There are different ways to monitor CPU temperature so you can know when to ease the processor’s burden.
Reset your computer
If nothing works, factory resetting your computer may be the right solution. It removes the accumulated registry errors, corrupt Windows processes, and damaged system files that may be causing the issue. This method will clear out your installed applications but you can preserve personal files.
How to Lower CPU Usage: Explained
That’s how to reduce CPU usage and get your system working again. Remember to stick to a maintenance culture and prevent dust and junk file buildup. Also, ensure your drivers and software are always up to date to avoid asking, “Why is my CPU usage so high?” in the future.
Let us know if these solutions helped you resolve the problem.