In this post, we will teach you how to remove read-only from PowerPoint. By the end of the article, you will learn how to open such files and edit them without any restrictions.
How to Unlock Read-Only PowerPoint Presentations
Some people still wonder how they’ll know if a PPT file is in read-only mode. Well, there are two ways to identify locked presentations. The first method is to check if there is “Read-Only” text after the title of the file. Secondly, when you open the presentation, you will see a yellow message bar across the top of the presentation, telling you that you have limited access to the file.
Now, we will show you two methods for unlocking a PPT file.
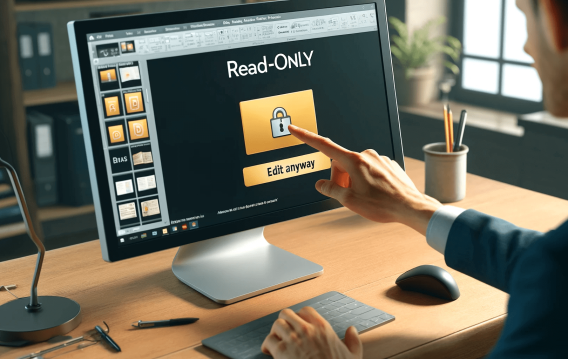
Method 1: Clicking “Edit Anyway”
- Open the PowerPoint presentation.
- Now, go to the yellow banner message and look for the button that says, Edit Anyway.
- To unlock the PowerPoint presentation, click the Edit Anyway button.
You will notice that the yellow message bar will disappear. Also, you will no longer see the “Read-Only” suffix in the file name. Try making some changes to the PPT file to see if it is now editable.
Method 2: Selecting “Mark as Final”
Of course, there is more than one way to learn how to unlock read-only PowerPoint files. If you prefer taking the scenic route, you would not mind taking a few extra steps to remove the read-only feature in your PPT presentation. Here are the steps:
- Of course, the first thing you need to do is open the PowerPoint presentation.
- Now, go to the top menu and click the File tab. You should be taken to the Info page when you do this.
- You will notice that the Protect Presentation option is in yellow. You may even see a message saying, The presentation has been marked as final to discourage editing.
- To reverse this feature, select Protect Presentation.
- A context menu will appear. Click Mark as Final to unlock the PowerPoint presentation.
After performing the steps above, you will notice that the yellow message banner has disappeared. Of course, the Read-Only suffix at the file name will also be gone.
The Importance of Using the Read-Only Feature on PowerPoint Presentations
You may wonder why the read-only feature exists in the first place. It is worth noting that it has various uses for many people. For example, locking the file enables users to discourage edits. Activating this feature allows them to alert recipients that they already have the final version of the file. Moreover, the read-only feature secures the file against accidental edits that other people may unknowingly perform. In many ways, locking a presentation is a protective measure. It is also a polite way to ask other people to avoid modifying the file.
While this locking feature is a protective measure, it may negatively affect user experience: some users download the PowerPoint files they need to work on from the Internet, only to realize that Protected View is enabled when opening them.
Also read:How to get rid of “PowerPoint can’t read” error message?
Various Ways to Protect Your PowerPoint Presentation
You may be interested in knowing how to secure your PPT files. If this is true, then you will be delighted to know that we can show you three ways to do so. Here are some of the methods you can use to prevent other users from tampering with your presentation:
Method 1: Enabling read-only
- Open the PowerPoint presentation, then click the File tab at the top of the window.
- Once you get to the Info page, click Protect Presentation.
- Select Mark as Final from the drop-down menu.
- You will see a dialog box which will tell you that the action will mark the file as final and saved. Click OK.
Method 2: Restricting access
You can also use the Restrict Access option to prevent other people from editing your PowerPoint presentation. Here are the steps:
- Launch the PPT file, then go to the File tab.
- Select Protect Presentation to show its drop-down menu.
- Select Restrict Access.
Once you enable the Restrict Access feature, people will still have access to the file. However, they won’t have the ability to modify, copy, or print the presentation.
Method 3: Encrypting the presentation
If you are using PowerPoint 2010, 2013, or 2016, you can use the steps below to encrypt your file:
- Open the PowerPoint file, then click the File tab at the top of the window.
- Go to the left-pane menu, then select Save As.
- Choose a location for saving the file.
- At the bottom of the Save As window, click Tools.
- Select General Options from the context menu.
- Click the Password to modify box, then enter any password you want.
- Save the changes by clicking OK.
- Submit the password again, then click OK to confirm the action.
- Once you get back to the Save As dialog, click Save.
Do not forget the password you used, because there is no way to recover it. Microsoft won’t even be able to help you remove the password.
This tool can detect malicious items you’d never suspect existed. It is also easy to set up and run, especially since it has a user-friendly interface.
What’s great about Auslogics Anti-Malware is that it was designed by a certified Microsoft Gold Application Developer.
So, you can rest easy knowing that it won’t interfere with your operating system or your main antivirus. In a way, installing this program is like adding another layer of protection on your computer.
Also read:[EASY GUIDE] How to Lock a Word Document and Protect It from Editing
How to Remove Read-Only Mode in PowerPoint Presentations: Explained
Unlocking a read-only PowerPoint presentation is easy with the right steps. Whether you click “Edit Anyway” or remove the “Mark as Final” setting, you can quickly make your presentation editable. Additionally, methods like restricting access and encrypting your presentation ensure your files stay secure. So, now you know how to turn off read-only in PowerPoint!
Do you have suggestions on how we can improve this article?
We’d love to hear from you! Let us know your thoughts in the comments below!