- How to Fix Audio Stuttering in Windows 10 and 11
- Fix 1: Disable audio enhancements
- Fix 2: Restart your audio service
- Fix 3: Change the audio format
- Fix 4: Resolve network conflict with audio
- Fix 5. Restart your audio device
- Fix 6: Reinstall your computer’s audio device driver
- Fix 7: Update your audio driver
- Fix 8: Using Windows Update
- Fix 9: Downloading the driver
- Fix 10: Using Auslogics Driver Updater to update drivers
- Wrapping Up
Everyone needs functioning computer speakers for many reasons, from gaming and movies to meetings and video editing.
That’s why audio issues, especially stuttering, tend to be frustrating.
Unlike regular audio headaches, this problem can persist even after ditching your default speakers for externals.
So, what should you do? Thankfully, this article contains solutions for the audio stuttering in Windows 10.
How to Fix Audio Stuttering in Windows 10 and 11
Fix 1: Disable audio enhancements
Windows ships with a default audio enhancements feature to help you get the best from your system’s speakers.
Other third-party applications also use audio-enhancement technology to significantly improve audio quality.
While the feature works flawlessly in most cases, sometimes issues may come up.
For example, the enhancement feature may encounter problems with a new audio device or a piece of incompatible hardware.
So, your audio could be stuttering because Windows or a third-party app may be trying and failing to enhance your sound.
The solution, in this case, would be to disable the feature. Follow these steps:
- Tap the
Windows + Ikeyboard shortcut to quickly launch Settings. - Click on System > Sound after Settings opens.
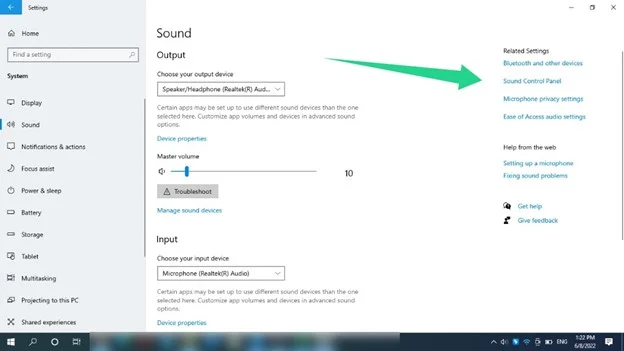
- Go to the right side of the Sound page and click on Sound Control Panel.
- Stay in the Playback tab when you see the Sound dialog window.
- Now, right-click on the default sound device under the Playback tab and click on Properties in the context menu.
- You’ll see a Speakers Properties dialog window.
- Switch to the Enhancements tab.
- Check the Disable all enhancements box and click the OK button.
Note that the Enhancement tab is no longer available from Windows 10 version 21H2. You’ll see the spatial sound tab instead.
In this case, go to the Advanced tab and uncheck the Enable Audio Enhancement box. The option will be available if your device supports audio enhancements.
Also Read: Windows Audio Device Graph Isolation: Fixing High CPU Usage
Fix 2: Restart your audio service
Next on the list of possible causes of the stuttering problem is the Windows Audio service. The service is responsible for your system’s sounds.
Being a native Windows problem doesn’t mean it can’t have issues. It could be stuck or clashing with a third party or another system program.
Any of these cases would see it fail at managing your computer’s sound, which could explain the stuttering.
So, try restarting the service to check if it resolves the problem.
- Open the Start menu, type services, and click on the Services result.
- After the Services application appears, scroll down to the Windows Audio service.
- Right-click Windows Audio and select Restart from the context menu.
- You should also check to confirm that the service startup type is set to Automatic. You’ll find that info under the Startup Typed column to the right of the service.
- If it isn’t set to Automatic, double-click the service to open its Properties dialog.
- Next, select Automatic in the Startup Typed dialog window and click the OK button.
Also Read: [FIXED] ‘Audio Service Not Responding’ error in Windows 10 and 11
Fix 3: Change the audio format
Windows has different bit rates and audio frequencies that work well with different speakers.
The higher the hertz (Hz), the larger the frequency range you can enjoy.
That means better audio sharpness, clarity, and detail, whether high pitched, bass, or treble.
In the same vein, the higher the bit rate, the higher the audio quality.
However, a lot depends on the file you’re trying to play and the speaker producing the sound.
Your current Windows audio format may not be compatible with your speaker. So, try switching to other bit rates and frequencies to see what works.
The guide below will show you how to change your audio bit rate and frequency. Choose different options and check for the stuttering issue until it goes away.
- Tap the
Windows + Ikeyboard shortcut to quickly launch Settings. - Click on System > Sound after Settings opens.
- Go to the right side of the Sound page and click on Sound Control Panel.
- Stay in the Playback tab when you see the Sound dialog window.
- Now, right-click on the default sound device under the Playback tab and click on Properties in the context menu.
- You’ll see a Speakers Properties dialog window.
- Switch to the Advanced tab.
- Once you get to the Advanced tab, open the drop-down menu under Default Format.
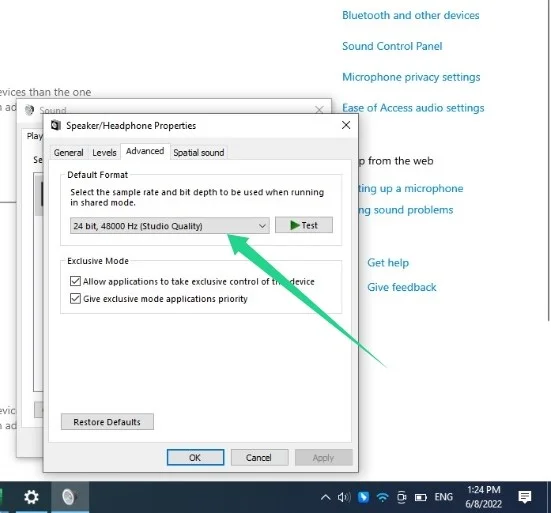
- Then select 16 bit, 44100 Hz (CD Quality).
- Click on the OK button.
Fix 4: Resolve network conflict with audio
Some users complained that the audio stuttering or delay issue always started after connecting to their WiFi or LAN.
No one really understands the cause of the problem, but the network driver may be clashing with your audio device driver once activated.
In some cases, it’s specific to your WiFi network.
If you haven’t checked, try disconnecting your WiFi or LAN and check if the audio problem persists.
If the issue disappears, then you should switch to a different network.
You can also reinstall your network driver. Follow these steps:
- Go to the taskbar and right-click on the Start button.
- Select Device Manager in the menu.
- Expand the Network Adapters category, right-click on your local network adapter, such as the Realtek PCIe GbE Family controller, and click on Uninstall Device.
- Click on Uninstall and restart your computer.
- You can now check for the stuttering issue.
You should also reinstall your wireless adapter and check if that resolves the problem.
If nothing works, consider updating the driver.
Fix 5. Restart your audio device
Rebooting your audio device may do the trick if your speaker is somehow stuck or no longer responding.
- Go to the taskbar and right-click on the Start button.
- Select Device Manager in the menu.
- Expand the Audio inputs and outputs category.
- Right-click on your speaker and click on the Disable Device option.
- Right-click on the speaker and click on Enable Device.
- Check for the stuttering issue.
Fix 6: Reinstall your computer’s audio device driver
The audio driver is responsible for relaying information between the operating system and the speaker.
It interprets the operating system’s commands to the speaker and sends feedback to the OS.
If the driver begins to malfunction, this information exchange process breaks down, and the speaker stops playing sounds as it should.
That’s why issues like stuttering start occurring.
In most cases, reinstalling the driver will give it the required nudge to resume optimal operations.
Here’s how to do that:
- Go to the taskbar and right-click on the Start button.
- Select Device Manager in the menu.
- Expand the Audio inputs and outputs category.
- Right-click on your speaker and click on the Uninstall Device option.
- Click on Uninstall again once the confirmation dialog box opens.
- Restart your PC.
- After restarting your computer, Windows will automatically reinstall the audio driver.
Fix 7: Update your audio driver
The issue could be associated with your audio driver software.
Sometimes, the driver can go missing or become corrupt and cause problems such as the stuttering sound.
It’s also possible that the driver is too old to properly communicate with your operating system.
In any case, reinstalling it won’t solve the problem. Instead, you must install its updated version.
There are different ways to update your driver.
You can go through the Windows Update client or download the driver from the speaker’s manufacturer’s website.
You can also get the driver from your laptop’s OEM’s website or use any native driver-updating software program that shipped with your system.
Fix 8: Using Windows Update
To use Windows Update, head to the Settings app by pressing Windows + I, then go to Update & Security and click on View all Optional Updates.
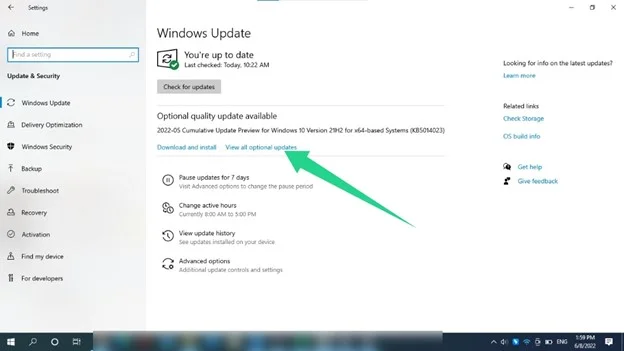
Under the Optional Updates page, expand Driver Updates, select your audio driver, and click on the Download and install button.
We also recommend that you go to the Windows Update page, check for updates, and install them.
This way, the problem will be resolved if it’s caused by other outdated system components.
Related: Ultimate Guide: How to Manually Check and Install Windows Updates
Fix 9: Downloading the driver
You can download the driver’s latest version from the speaker’s manufacturer’s or your computer’s manufacturer’s website.
Make sure you only visit the official website. Also, ensure you select the correct driver software.
For example, if you’re going through your laptop’s manufacturer, look for drivers for your PC’s make and model.
In both cases, ensure you choose the setup file that matches your operating system’s 62-bit or 32-bit architecture.
Fix 10: Using Auslogics Driver Updater to update drivers
You’ll have to agree that scouring the Internet searching for one driver can be stressful. That’s why it’s better to use a program that does all the work.
Auslogics Driver Updater is a dedicated driver-updating tool designed to check for faulty and outdated drivers and automatically update them.
Once you download and install the tool, it scans your system for any of these drivers. After finding them, it will display a list.
Then you can click on the update button to install your driver’s latest version.
The tool scans all the drivers on your computer, not just one. It also updates them from a server that contains official, manufacturer-approved driver programs.
Wrapping Up
The audio issue should be resolved using any of the troubleshooting methods above.
However, you must keep your computer in tip-top shape at all times to avoid issues like this.
To do that, ensure you continually update your operating system and drivers.
You should also get rid of junk files and problematic registry keys that uninstalled applications may have left behind. However, doing all that can be tasking and stressful.
That’s why you need Auslogics BoostSpeed. The program comes with a suite of tools that helps you get rid of junk files and cleans up your system registry.
This way, you can rest easy and be assured that your system is ending optimized.