
These days, your computer feels like a lifeless device without an internet device. You’re unable to send and receive emails, join work meetings, and even sync your shared files.
If you run Windows’ network troubleshooter and find the message that reads, “Your computer appears to be correctly configured, but the device or resource (DNS server) is not responding,” you’ve come to the right place.
This article covers different tips on how to fix the “Your computer appears to be correctly configured” problem on Windows 11 and Windows 10.
Check for Issues with Your Computer’s Internet Connection
Start by confirming that the problem isn’t connected to your internet devices such as your modem or router.
Restarting your router is always the first of many internet connection troubleshooting steps. Even big manufacturers like NETGEAR and Linksys say you should restart your internet device periodically.
When you restart the router, you are giving it an opportunity to refresh and reset. The reboot clears out any hung or stuck operation and removes problematic data stuck in its memory, which may be the cause of the connection issue you’re experiencing.
How do you power cycle your devices? Follow these steps:
- Completely shut down your computer and unplug it from its power source.
- Power down your router or modem and also unplug it from its main power source.
- Wait for two to four minutes, then plug in your computer and hit the power button.
- Plug in your router.
- Allow the devices to fully initialize and connect.
- Check for the problem.
You should also make sure:
- Your ethernet connection cables are properly connected (if you use a wired connection).
- Your WiFi device is close enough to your computer.
- Use a 2.4 GHz connection if you’re not too close to the wireless router.
Forget the Network and Reconnect
Sometimes, you may be experiencing connection issues because the WiFi password has been changed recently or your computer’s connection with the device has been somehow affected. In some cases, the issue comes out of nowhere.
You can resolve the problem by forgetting the network, entering the correct password, and reconnecting.
Here’s how to do that on Windows 11:
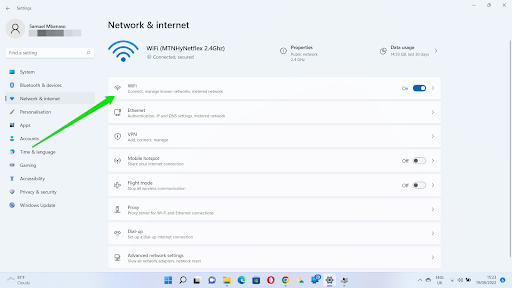
- Go to the network icon in the right corner of your taskbar. Right-click on the icon and select Network and Internet Settings.
- Click on the WiFi option once you get to the Network & Internet page of the Settings app.
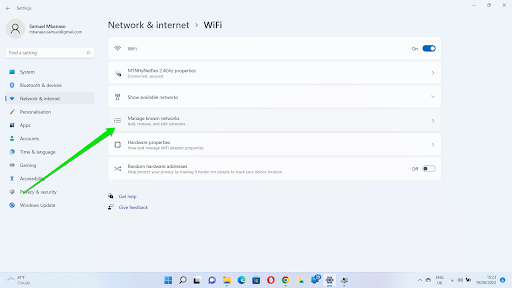
- After the Network & Internet > WiFi page shows up, click on Manage Known Networks.
- Under the Network & Internet > WiFi > Manage Known Networks page, locate your WiFi network device and click on the Forget button.
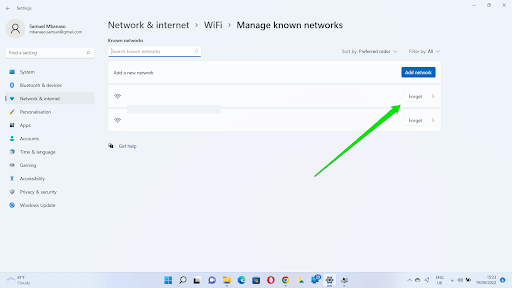
- Now, go to the wireless connection dialog and reconnect to the network.
Follow these steps for Windows 10:
- Go to the network icon in the right corner of your taskbar. Right-click on the icon and select Open Network and Internet Settings.
- Once the Status page of the Settings app opens, go to the left pane and click on WiFi.
- Under the WiFi page, click on Manage Known Networks.
- Once you get to the Manage Known Networks page, go to your network connection, click on it, and then select Forget.
Update Your Network Adapter Driver
Your network adapter driver controls how your operating system communicates with your network adapter. Internet connection issues will show up in different forms if the driver is corrupt or outdated. That could be the reason for the error.
You can do the following to fix the driver problem:
- Force restart the driver – Works when the driver is stuck or conflicting with other apps
- Reinstall the network adapter – Works when the driver has installation problems
- Update the driver – Works when your current driver version is not compatible with your operating system
Let’s start with restarting the network adapter:
- Right-click on the Start button and click on Device Manager in the Power User menu.
- After the Device Manager shows up, expand Network Adapters.
- Right-click on the network adapter your computer relies on to connect to your Internet device. For example, if you connect to a wireless router, right-click the Wireless network adapter such as the Intel(R) Wireless-AC 9560 160MHz. If you use a wired connection, right-click the Ethernet controller such as the Realtek PCIe GbE Family Controller.
- Click on Disable Device and click on the Yes button.
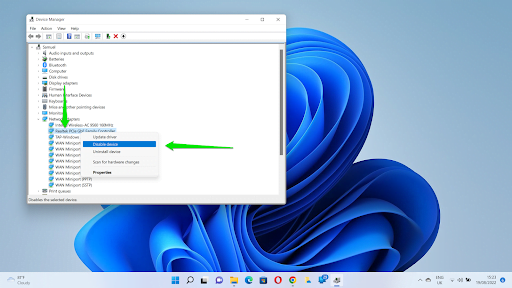
- After that, right-click the device again and click on Enable Device.
Reinstall the network Adapter:
- Right-click on your network adapter and click on Uninstall device.
- Confirm your decision in the pop-up dialog.
- Restart your system and Windows will automatically reinstall the driver.
Update the Network Adapter Driver:
There are different ways to update the network adapter driver:
- Use Windows Update:
- Search for Windows Update in the Start menu and select Check for Updates.
- In Windows 11: Click on Advanced Options once the Windows Update page opens, then scroll down and click on Optional Updates under Additional Updates.
- In Windows 10: Click on View Optional updates once the Windows Update client appears.
- Expand the Driver Updates section, select your network adapter driver, and click on Download and Install.
- Go to the device manufacturer’s website:
Going to the device manufacturer’s website involves searching for the device’s driver and downloading the right piece of software. Make sure you enter your system’s correct details including the operating system and CPU architecture.
- Use third-party driver updater:
Auslogics Driver Updater allows you to search for and install updates for device drivers on your system. Using this program means you won’t have to suffer driver-related problems in the future. The tool can notify you when driver updates become available, allowing you to prevent issues like this.
Flush Your PC’s DNS Cache
Your DNS cache is a file on your computer where your operating system saves details of IP addresses and URLs you’ve visited. Instead of always resolving these domain names and IP addresses whenever you want to visit a site, the computer keeps a reference to avoid going through the same process over and over.
However, the DNS cache file can become corrupt over time and begin to cause issues. Problems can also occur if the cache contains outdated IP addresses and domain details.
Fixing the problem is as easy as flushing the DNS cache and allowing your computer to rebuild it with updated information.
Follow these steps:
- Go to the Start menu, search for
CMD, and click on Run as Administrator under Command Prompt. - Click on Yes in the UAC prompt.
- After the Command Prompt window opens, type the following lines of code and press the
Enterkey after typing each:
ipconfig /flushdns

ipconfig /registerdns
- Restart your computer and check for the problem.
Change the DNS Server
By default, your computer uses your ISP’s DNS server if the settings are left on automatic. So, if your ISP’s DNS runs into problems – which can be common for some ISPs – you’ll get the response error.
You can go for a more reliable DNS server like Google’s or Cloudflare’s public DNS servers and check if that resolves the problem.
Follow these steps:
- Open the Run dialog box using the
Windows + Rkeyboard shortcut. - After the box shows up, type
ncpa.cpland hit theEnterkey to open the Network Connections page. - Right-click on your active connection and click on Properties.
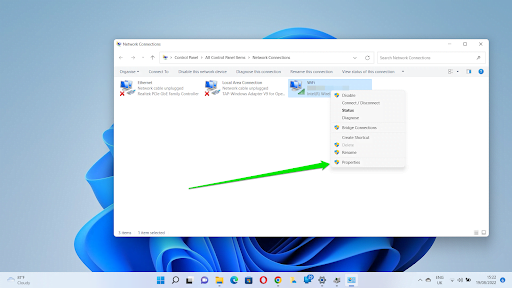
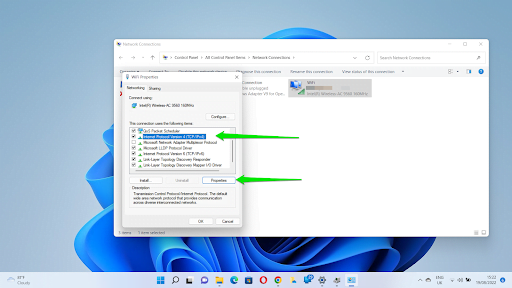
- Go to the Internet Protocol Version 4 (TCP/IPv4) item and click on it.
- Click on Properties.
- Next, click on the radio button for “Use the following DNS server address.”
- Enter
8.8.8.8next to Preferred DNS Server and8.8.4.4next to Alternate Server.
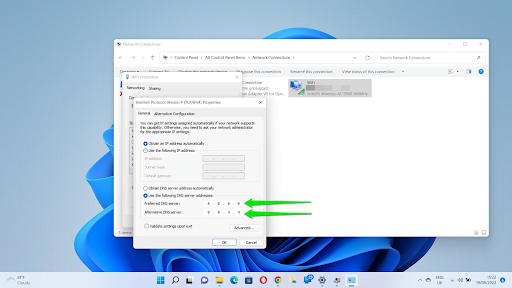
- Click on the OK button.
- Check for the connection issue.
Disable Proxy and VPN Settings
Using a VPN or personal proxy to hide your IP, change your location, or browse faster may be causing the “web proxy or DNS server not responding” issue. So, disable the VPN and get rid of your proxy.
You can turn off your VPN connection by going to the app and toggling it off.
If you have a manual proxy, head to the Settings app on Windows 11, click on Network & Internet, and select Proxy.
On Windows 10, open the settings app and click on Network & Internet. Click on Proxy on the left pane, then go to the Proxy page and turn off your manual proxy setup.
Change Your Power Settings
Your computer may have permission to turn off your network adapter to conserve power. Turning off this setting could roll back the error message and get your connection back on. Follow these steps:
- Press the
Win + Xcombo and click on Device Manager. - After the Device Manager window appears, expand Network Adapters and right-click on your network card.
- Click on Properties in the context menu.
- Go to the Power Management tab of the Properties window and uncheck the box beside, “Allow the computer to turn off this device to save power.”
Conclusion
That’s how to fix “Your computer appears to be correctly configured but the device detected or resource (www.microsoft.com) is not responding.” Ensure you continue to reboot your router from time to time and keep your network adapter driver up to date to avoid the issue in the future.