‘If things were easy to find,
they wouldn’t be worth finding’
Tom Hanks
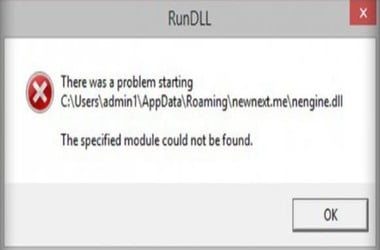
It is no wonder at all that one can get distressed when not being able to access their USB drive. So, if that is you case and you keep asking, ‘What is The specified module could not be found error message on Windows 10?’, do not let that trouble get you down too much. Fortunately, the issue you have run into is 100 % fixable – just read on to know how to resolve The specified module could not be found error in Windows 10.
Run an SFC scan
The best way to start your troubleshooting is to scan your operating system for problematic system files. The point is, some of them might have gone missing or corrupt. In a situation like this, System File Checker is just the thing you need: it will check your system files and replace them at boot if need be.
Here are the necessary instructions for performing a System File Checker scan in Windows 10:
- Press the Windows logo key + X shortcut on your keyboard. Select Command Prompt (Admin).
- And here is another way to access your elevated command prompt: type cmd into the Search bar, locate Command Prompt in the list of results, right-click on it, and select Run as Administrator.
- Now that you have accessed your Command Prompt with administrative privileges, type ‘sfc /scannow’ (no quotes).
- Hit Enter and wait for the command to be executed. Follow the on-screen prompts if you are required to.
- When the scan is over, close your Command Prompt window. Then restart your machine.
Now see if you can access your USB drive.
Run an anti-malware scan
The chances are your PC is infected with malware, which may be the reason why you keep encountering ‘The specified module could not be found’. In such a scenario, a good anti-malware tool is what you need to solve the problem.
For this purpose, you are free to use the built-in Windows Defender solution. It comes as part of your Windows 10 and is designed to protect your system against malicious entities. Here is how you can use this tool to your advantage:
- Open your Settings app by simultaneously pressing the Windows logo and I keys.
- Select Update & Security. Then go to the left-pane menu and click Windows Defender.
- Now click the Open Windows Defender link. This will open up Windows Defender Security Center.
- Move to the left-pane menu and click on the shield icon.
- Click the Advanced scan link, which is under the Quick Scan button.
- Select the Full scan option and click Scan now.
- Wait for the scan to complete. Windows Defender will provide you with the details of the scan so that you can take appropriate action.
That said, you can use a third-party solution to check you Windows 10 for malware. For instance, Auslogics Anti-Malware will scan every nook and cranny of your system for suspicious items and processes and remove or quarantine them according to your choice. The best thing is, this tool can work in tandem with your main anti-virus product, be it Windows Defender or non-Microsoft software – their conflict-free coexistence will actually give you the best of both worlds.
Update your drivers
If your USB issue persists, one of your drivers might be behind that. As such, the most obvious solution is to find the culprit and fix it. The catch is, it might turn out to be extremely difficult to locate the exact source of the trouble, which means you are supposed to update all your drivers to ensure that the one that caused the issue is in tip-top shape now.
Obviously, in such a case, the best way to go about the problem is to automate the process and get all your drivers updated in just a click – Auslogics Driver Updater can help you with that.
However, you can opt to fight the battle yourself and update all your drivers one by one. Just keep in mind that this method is definitely not the best bet – partly because it is ridiculously time consuming and tiresome and partly because you are running the risk of downloading and installing something wrong and thus harming your system.
Another way out is to use Device Manager – this Windows tool will search for the drivers you need online. Nonetheless, it may fail to find what is required. Apart from that, you should use the instructions below to update each of your drivers, which may take quite a while:
- Press the Windows logo key and X key simultaneously.
- Select Device Manager from the menu.
- Select a device and right-click on it.
- Select the Update driver option.
- Click ‘Search automatically for updated driver software’.
Device Manager will search for the latest driver versions for your hardware.
Whichever method you choose, it is necessary to reboot your Windows after updating your drivers so that they can settle down and start working the way they are supposed to. After that, check if your USB issue has been resolved.
Fix your registry issues
Sometimes the reason you see ‘The specified module could not be found error message’ on your screen is your system registry having issues. This means you should fix it to access the files that are blocked thanks to the error in question.
As a general rule, we advise our readers to steer clear of Windows Registry – this component is immensely fragile, so it is better to avoid editing it. In fact, even a tiny error may prove fatal to it. That is why we recommend you to take the safe route of resolving your registry problems, which is using the Auslogics Registry Cleaner freeware. This tool will work on your registry with superb precision and accuracy and get it back on track in the most risk-free way possible.
If we have failed to talk you out of modifying your registry manually, make sure to back up all your important files to secure them against permanent loss.
Another reasonable precaution is to back up your registry in case things go astray:
- Press the Windows logo key + R shortcut on your keyboard.
- Once the Run app is up, type regedit and hit Enter or click OK. The Registry Editor window will open.
- Go this way: File -> Export -> Export Range -> All.
- Select where you wish to save your backup.
- Name the backup file and click Save.
You will be able to restore your registry if something goes wrong:
- Open Registry Editor and select Import.
- Locate your registry backup file.
- Retrieve it to restore the registry.
Now is the time to deal with your ‘The specified module could not be found’ problem:
- Enter your Registry Editor tool.
- Go to HKEY_LOCAL_MACHINE > Software > Microsoft > Windows > CurrentVersion. Double-click on it. Then delete Run.
- Navigate to HKEY_CURRENT_USER > Software > Microsoft > Windows > CurrentVersion. Double-click it and delete Run.
- Find HKEY_LOCAL_MACHINE > Software > Microsoft > Windows > CurrentVersion. Double-click that. Remove RunOnce.
- Move to HKEY_CURRENT_USER > Software > Microsoft > Windows > CurrentVersion. Double-click. Eliminate RunOnce.
Finally, restart your machine and see if your issue is no more.
Now you know how to resolve The specified module could not be found error. If you need further assistance, do not hesitate to ask your questions in the comment section below.