
- How to Fix the Social Club Failed to Initialize Error Code 17 Error
- Fix 1: Change your Steam nickname
- Fix 2: Add the Social Club folder as an exception in your antivirus program
- Fix 3: Verify the game’s files
- Fix 4: Rename the game’s configuration files
- Fix 5: Grant the Social Club application admin privileges
- Fix 6: Reinstall the Social Club app
- Fix 7: Uninstall Social Club
- Conclusion
The Social Club app is a Rockstar Games introduction that validates a member’s profile. Being a member of the Rockstar Games Social Club offers you many in-game and online benefits.
You’ll have exclusive access to member-only weaponry, cars, haircuts, and statistics, among other offerings.
The Social Club application is meant to start up whenever you launch GTA V. If it doesn’t, the game won’t run.
Many gamers have reported that the “Social Club failed to initialize. Error code 17” error keeps popping up whenever they try to run the game.
If you’re experiencing this problem, not to worry, we’ll be showing you how to resolve Error code 17 in Grand Theft Auto 5.
How to Fix the Social Club Failed to Initialize Error Code 17 Error
Fix 1: Change your Steam nickname
As bizarre as it sounds, changing the username in Steam and using one without any special characters resolved the problem for many gamers.
The solution felt like a joke until frustrated players began to give it a try. There are no specifics as to how the username affects GTA V’s Social Club app or how changing it gets rid of the problem. What matters is that it works.
Note that the name you’re changing is what other users see you as and can search for you with. It isn’t your Steam account name.
If you don’t know how to change your Steam nickname, follow the steps below:
- Go to the Start menu, search for Steam, and then click on the app’s icon once it shows up in the results. If you have a desktop shortcut, double-click it.
- Once the Steam client appears, go to the top of the window (where you’ll find the Store, Library, and Community menus) and hover your mouse pointer over your username.
- Once you see a context menu, click on Profile.
- On the page that appears, click on the Edit Profile button on the right side of the window.

- Now, go to the Profile Name box on the next screen and change your username. Make sure you use only letters.
- Scroll down and click on the Save Changes button.
- You can now launch GTA V and check if that resolves the problem.
Fix 2: Add the Social Club folder as an exception in your antivirus program
Antivirus interference is a common issue in the gaming world. Many protection programs block files associated with games because they consider them to be security threats.
This issue mostly occurs when the game files are relatively new. As it turns out, this could be the cause of the Social Club Error Code 17.
You can easily resolve the problem by adding the Social Club installation folder as an exception in your antivirus program.
Depending on the antivirus program you’re using, you might have to add the folder as an exclusion or exemption.
In other cases, you’ll be working with the SafeList or Whitelist feature. Whatever program you’re using, you can easily find the feature in the Settings or Preferences environment.
If you don’t know what to do, go to the website of the app’s developer to search for a guide that will show you what to do.
Note that the folders you’re to add as an exception are:
C:\Program Files\Rockstar Games\Social Club
C:\Program Files (x86)\Rockstar Games\Social Club
You don’t have to go anywhere if you rely on Windows Security as your system’s primary protection program as the steps below will guide you:
- Launch the Settings application by clicking on the gear icon in the Start menu or by pressing the Windows key and I key simultaneously.
- After the application opens, click on the Update & Security icon at the bottom of the window.
- Next, click on Windows Security in the left pane of the Update & Security interface.
- Now, go to the right pane and click on Virus & Threat Protection under Protection Areas.
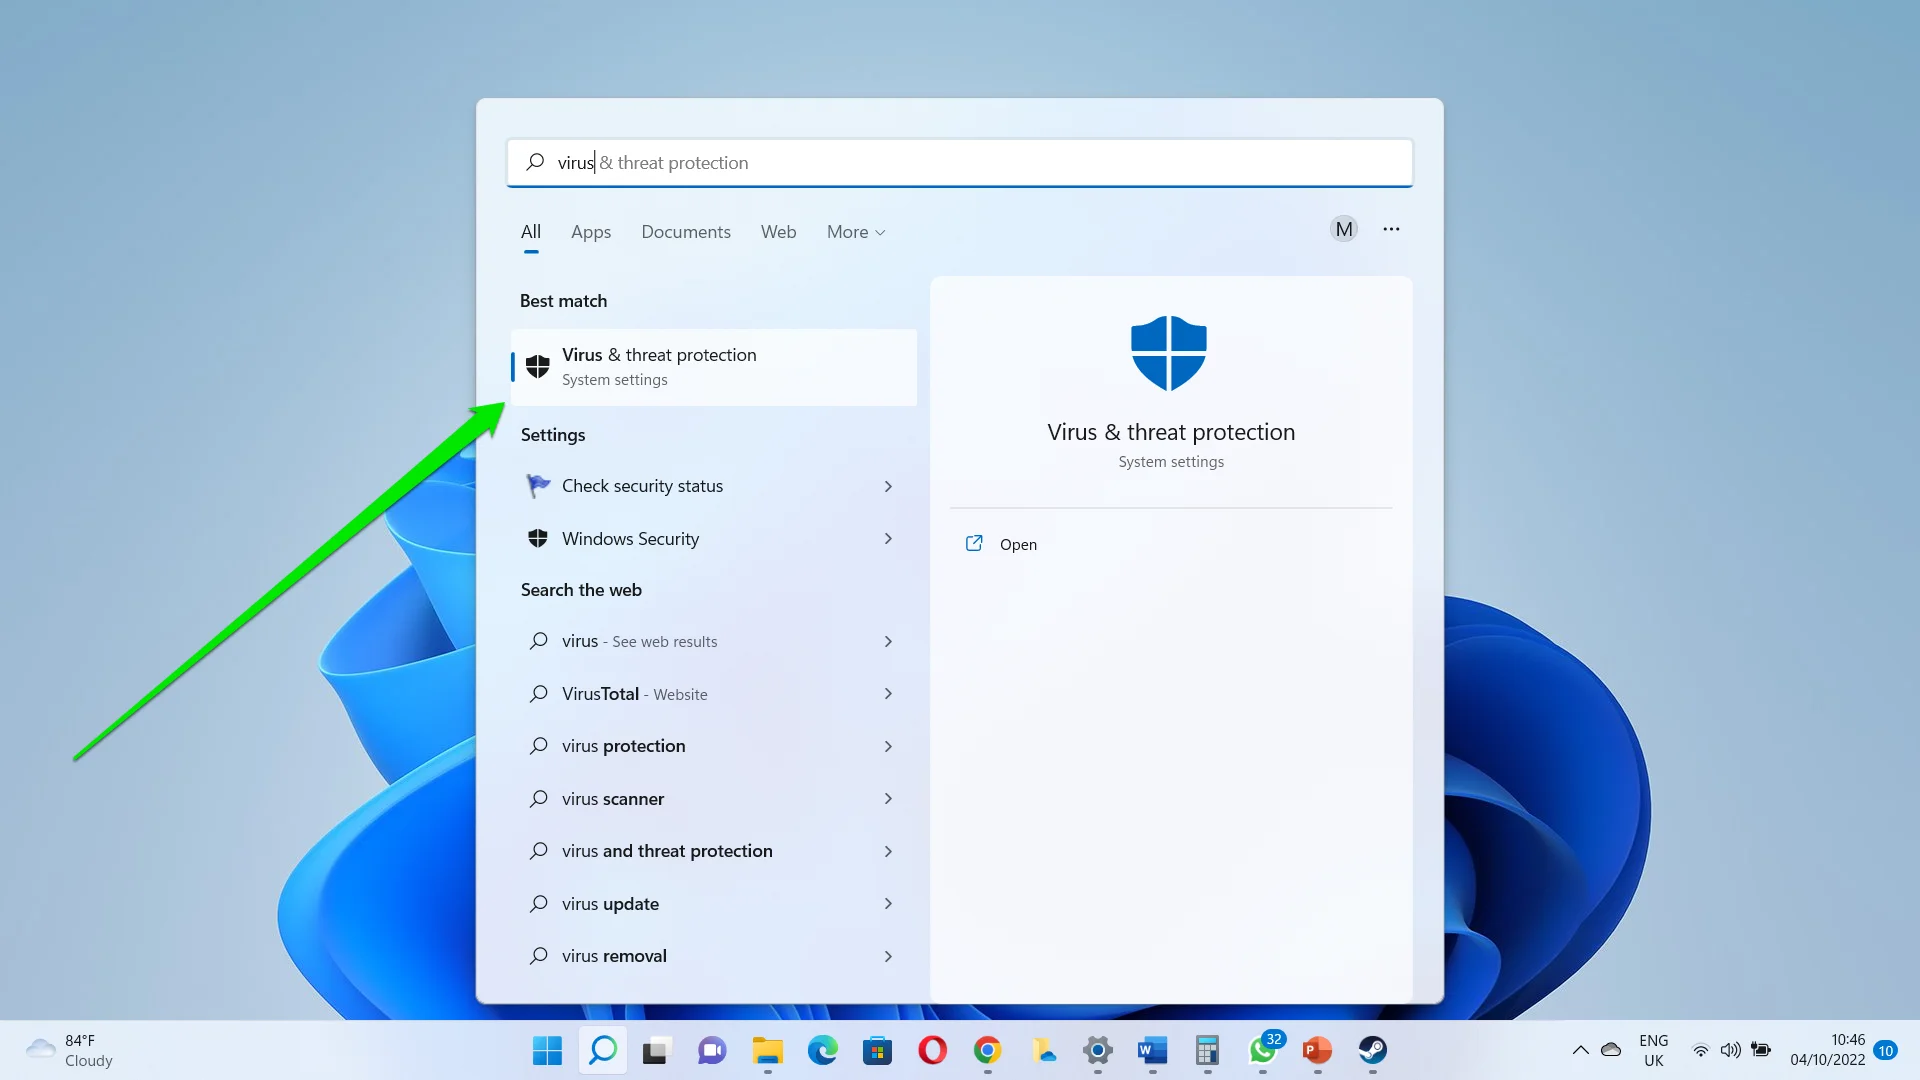
- Once the Virus & Threat Protection interface of the Windows Security application shows up, go to the Virus & Threat Protection Settings segment and click on the Manage Settings link.
- The Virus & Threat Protection Settings screen will now appear. Scroll down and click on Add or remove exclusions under the Exclusions section.
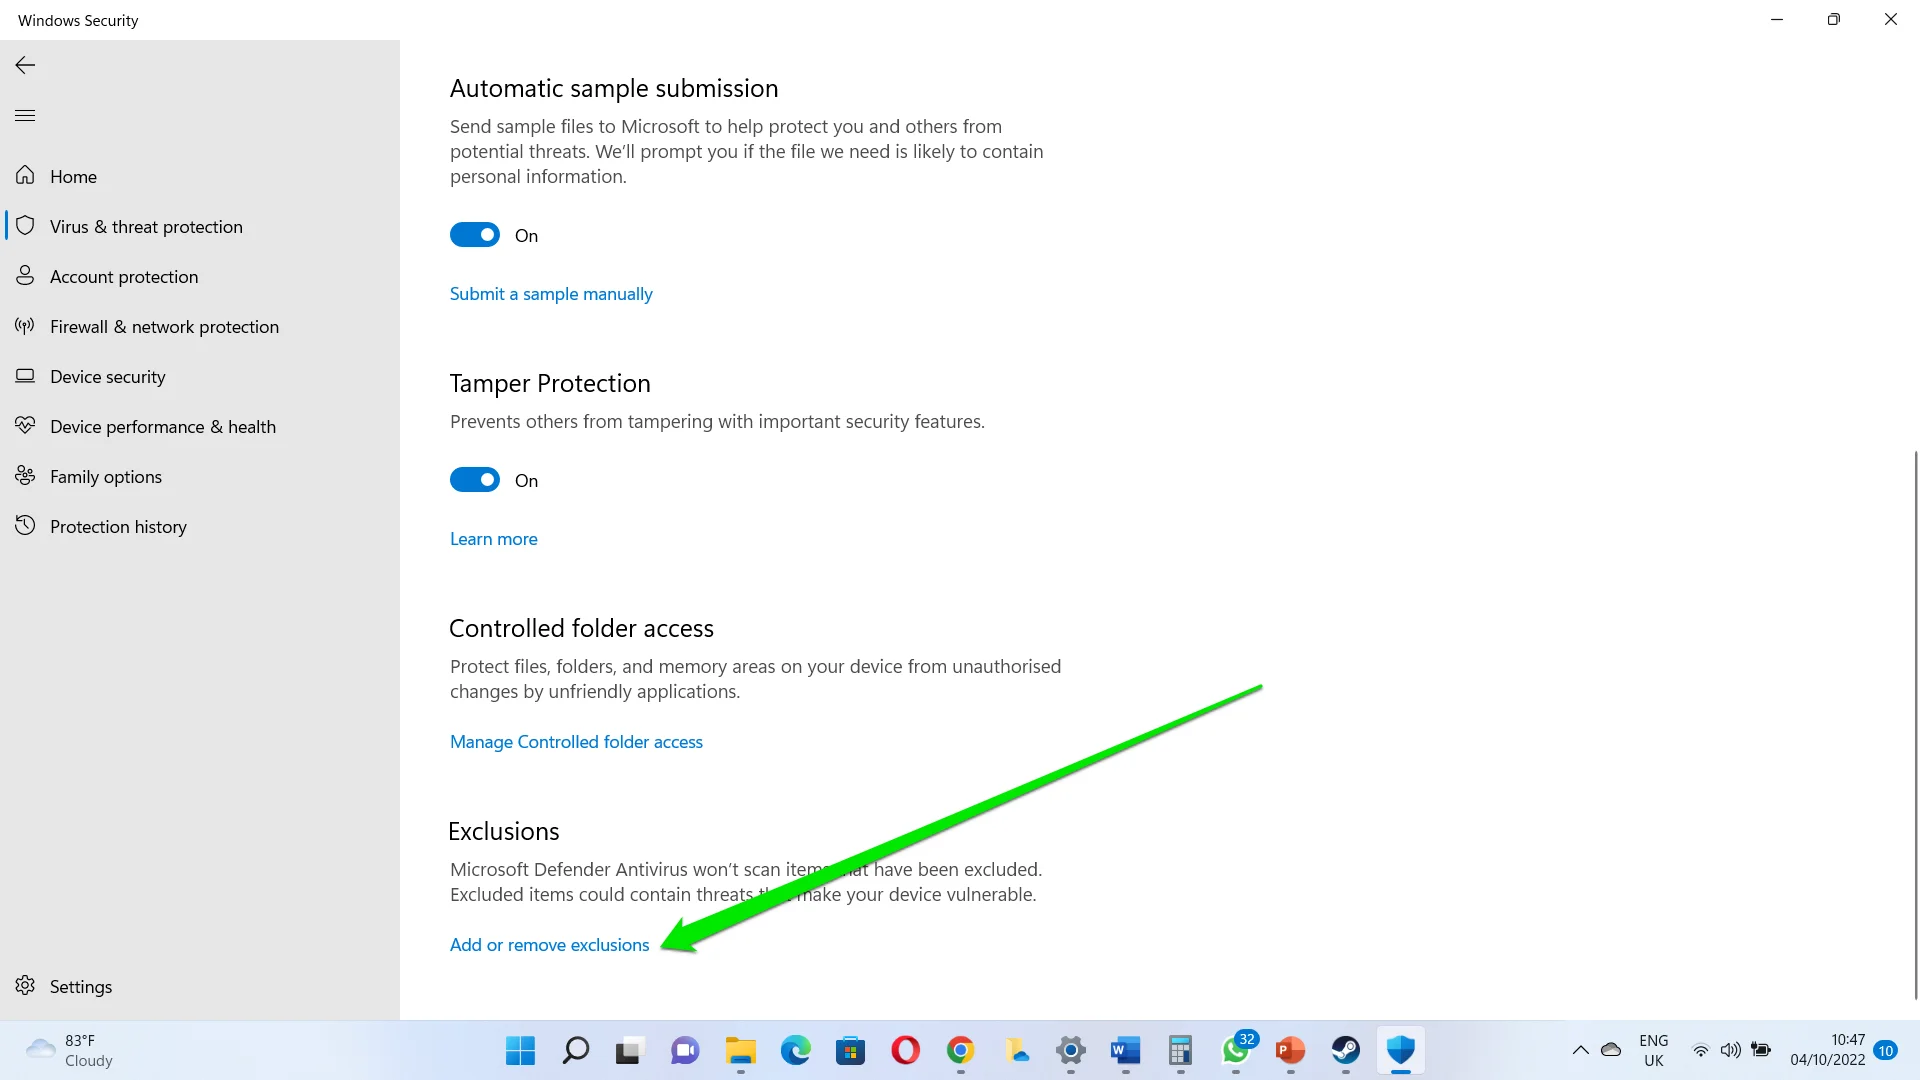
- After the Exclusions screen appears, click on Add an exclusion, and then select Folder.
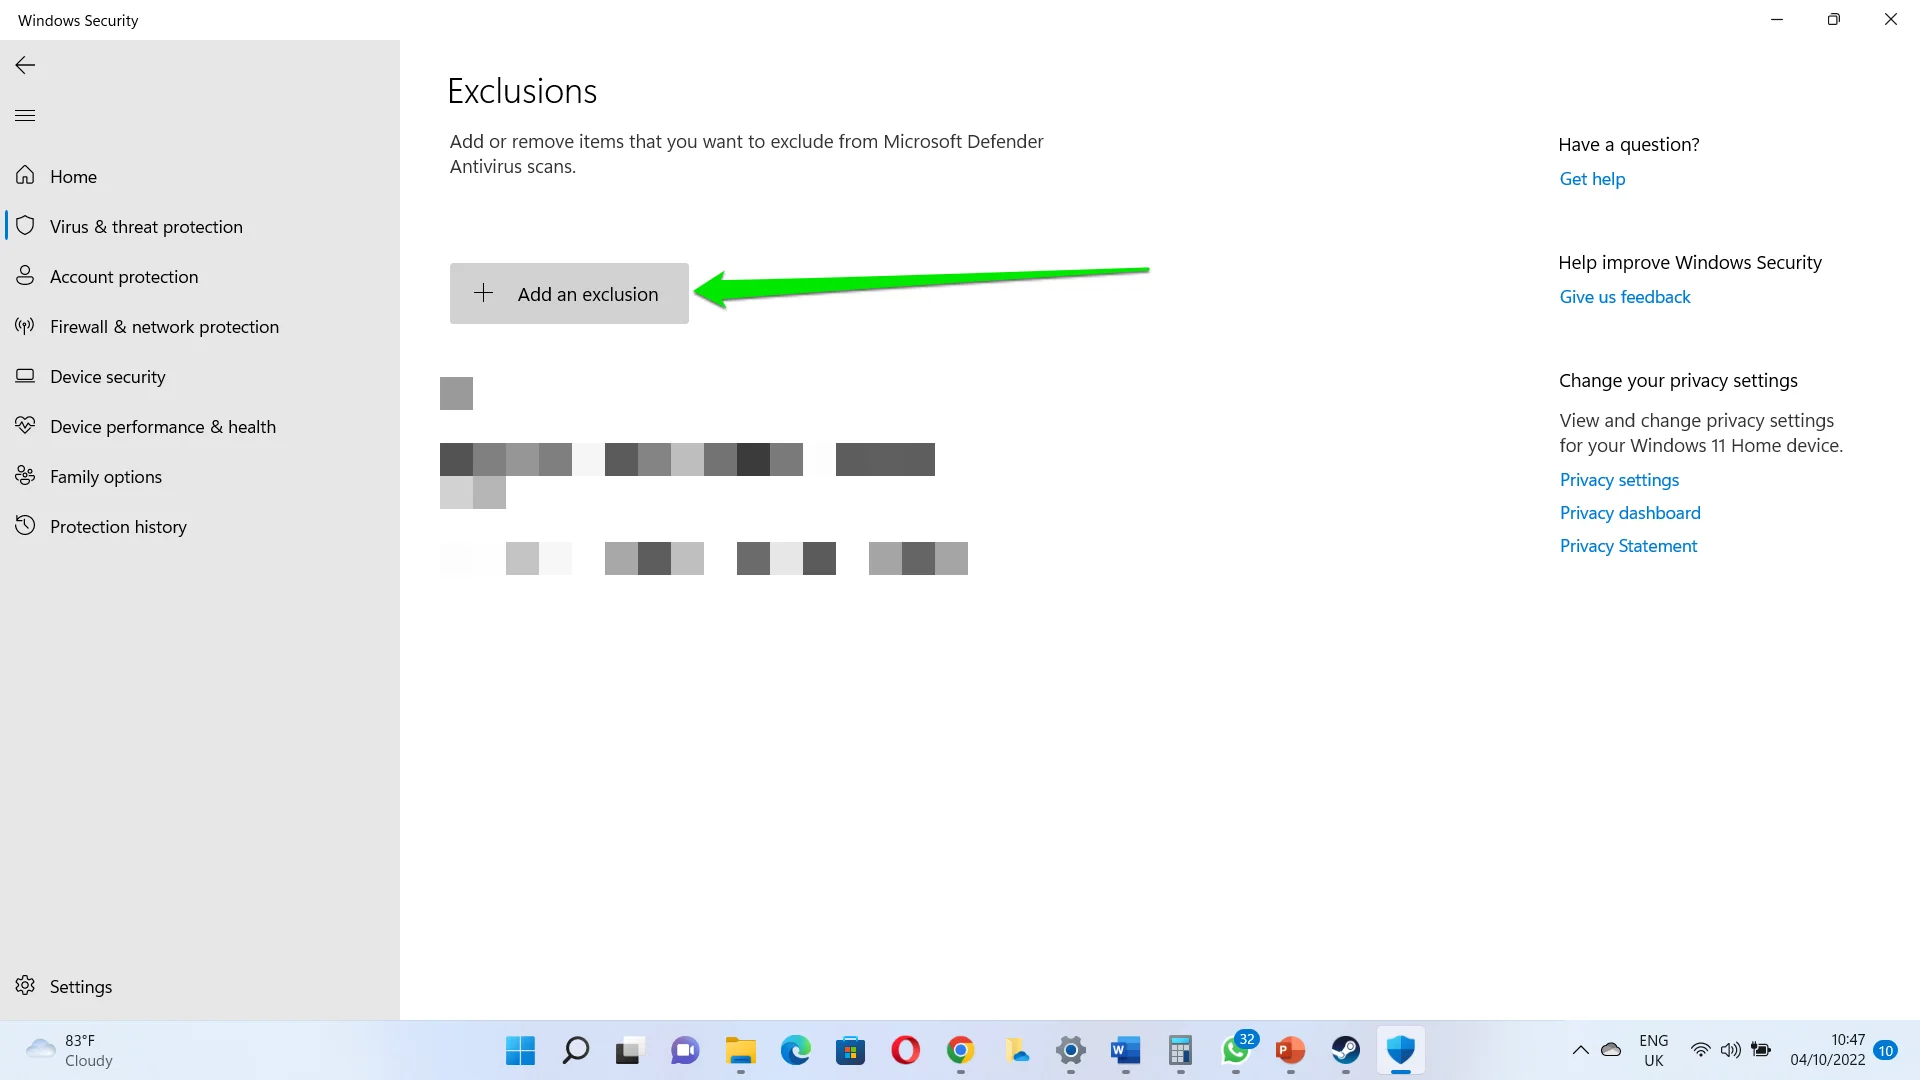
- Once you see the Select Folder dialog, navigate to the installation folder shown before in this guide and select it.
- Now, run GTA V and check if the error message shows up again.
It can work with other antivirus programs without causing conflicts, and it’s perfectly compatible with Windows 10.
Fix 3: Verify the game’s files
Some corrupt game files in GTA V’s folder might be the cause of the error. Whenever you launch the game from the Steam client, it refers to some game files to initialize the Social Club application.
If these files are broken or missing, the process will fail and the error message will appear. So, try repairing problematic game files and check if that resolves the problem.
The steps below will show you how to do that:
- Go to the Start menu, search for Steam, and then click on the client’s icon once it shows up in the results. You can double-click on the app’s desktop icon if you have one.
- After Steam opens, go to the top of the window and click on Library.
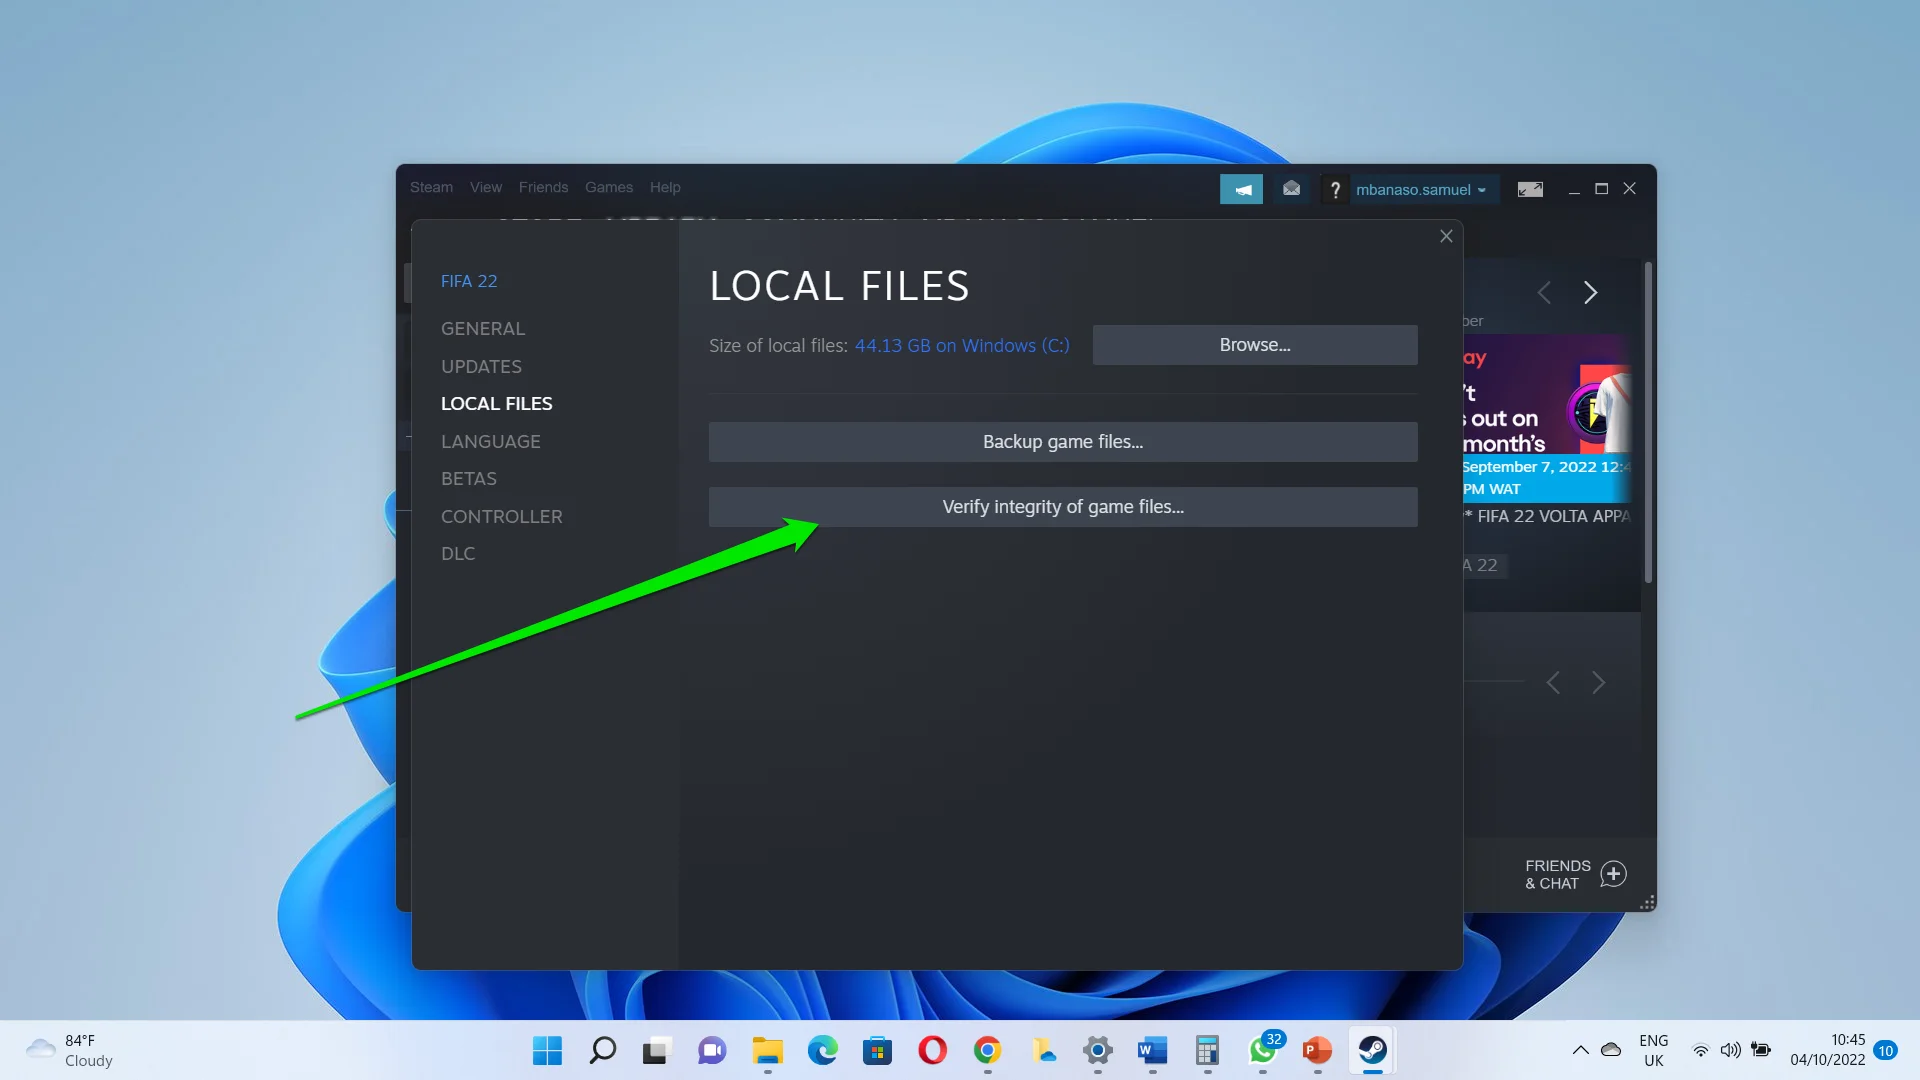
- Once you see your list of games, locate GTA V, right-click it, and then click on Properties.
- After the Properties page of the game shows up on the right, navigate to the Local Files tab on the left side of the window.
- Under the Local Files tab, click on the Verify integrity of game files button.
- The client will now begin to compare the game’s files on your computer with their updated versions on its servers. If any game file doesn’t match its counterpart, Steam will automatically replace it.
- Note that the duration of the process depends on your system’s general speed, the strength of your Internet connection, and the size of the files being replaced.
- After the client validates your game’s installation, restart it and launch GTA V to check for the problem.
Fix 4: Rename the game’s configuration files
The issue might be tied to some of your current settings. Since you can’t open the game to change those settings, renaming its configuration files might do the trick.
Once you rename these files, every setting in the game, including sound, control, and graphics settings, will be rolled back to its default state.
The Story Mode Cloud Save settings will also be rolled back to the defaults.
The guide below will walk you through the process step by step:
- Launch a File Explorer window. You can do that by right-clicking the Start button and selecting File Explorer. If you want to launch the app faster, click on the folder icon in the taskbar or press the
Windows key + Ekey on your keyboard together. - After File Explorer opens, go to the left pane of the window and click on Documents. Specifically, you need to open the Documents folder of your user account. To do that, click on This PC, then go to the right side of the window and navigate to C:\Users\-USERNAME-\Documents.
- After you get to the Documents folder, navigate to the Rockstar Games folder and open it.
- Now, open the GTA V folder.
- Locate the ‘settings.xml’ file and rename it to Settings.old.
- Accept any pop-up.
- Next, open the Profiles folder under the GTA V folder.
- Once you get to the Profiles folder, go to the folder named after your profile and open it. Normally, this should be a bunch of random codes.
- Now, locate the “cfg.dat” and pc_settings.bin files and rename them.
After you rename the files, the game will automatically create new ones, which will contain default settings. Restart GTA V and check if the error message shows up again.
Fix 5: Grant the Social Club application admin privileges
It’s possible that the “Social Club failed to initialize. Error Code 17” is coming up because the Social Club application doesn’t have the permission to run properly. The main fix to this issue is granting the program administrator rights.
To apply this fix, make sure you’re logged into an administrator user account. The steps below will show you what to do:
- Launch a File Explorer window. You can do that by right-clicking the Start button and selecting File Explorer. If you want to launch the app faster, click on the folder icon in the taskbar or press the
Windows key + Ekey on your keyboard together. - After File Explorer opens, go to the left pane of the window and click on This PC.
- Go to the right side of the window and open your Windows volume, which should be the Local Disk C under normal circumstances.
- After the Local Disk C shows up, open the Program Files (x86) folder.
- Once you get to the Program Files (x86) folder, open the Rockstar Games folder.
- Now, locate the Social Club folder under the Rockstar Games folder and open it.
- Once you get to the folder, go to the “subprocess.exe” file, right-click it, and then click on Properties.
- After the Properties dialog window opens, go to the Compatibility tab.
- Under the Compatibility tab, check the box next to “Run this program as an administrator,” and then click on the OK button.
Fix 6: Reinstall the Social Club app
According to Rockstar Games, incorrect installation is the most common cause of the “Failed to initialize” error. So, if nothing has worked to this point, consider uninstalling and reinstalling the Social Club application.
You’ll find guides explaining every procedure below.
Fix 7: Uninstall Social Club
You can do this by using the Programs and Features window via Control Panel or via the Settings application. Here’s how to use the former method:
- Click on the magnifying glass in the taskbar or press the
Windows key + Skey simultaneously to open the search function beside the Start button. - Next, type Control Panel without the quotes and click on Control Panel once the results show up.
- After the Control Panel window opens, click on Uninstall a Program under Programs.
- Once the Programs & Features window opens, locate Social Club, click on it, and then click on the Uninstall button.
- Accept any pop-up, then follow the on-screen instructions in the wizard to remove the application.
Now, go to the Rockstar Games website, download the Social Club application, and then make sure you install the app to the right directory – Program Files\Rockstar Games\Social Club – so that it can be called up appropriately.
Also, make sure you log in to the right Social Club account when you’re setting things up.
Conclusion
That’s it! The “Social Club failed to initialize” error shouldn’t be an issue anymore. If you have further issues or questions, do well to use the comments section below.