

Chances are that after learning its advantages, you might not want to remove Skype for Business from your PC at all. So, first, let’s delve into the reasons why and explore how to tailor your Skype for Business settings for a more enjoyable experience. But if you decide to stick with your initial decision to uninstall Skype for Business, we’ll guide you through the steps to do it.
Unlocking the Potential of Skype for Business
Before diving into how to delete Skype for Business, let’s acknowledge its positive aspects. Skype for Business offers several compelling features that can enhance your business communication:
- Effortless meetings: Conduct meetings with large groups, accommodating up to 250 contacts.
- Wide-ranging broadcasting: Reach wider audiences by broadcasting your meetings to up to 10,000 people.
- Recording capabilities: Capture and revisit your meetings or broadcasts with the recording feature.
- Integration with Microsoft Office: Seamlessly consolidate your communications by integrating with Microsoft Office apps.
- Configurability: Easily customize Skype for Business to meet your specific needs.
- Security and reliability: Experience enhanced levels of security and reliability.
However, perfection eludes even the best, and Skype for Business is no exception. Its persistent tendency to start at boot, run in the background, and inundate users with notifications can be a bit irritating. Fear not, though, as we’ll explore ways to tailor your Skype for Business settings for your enjoyment.
Tailoring Your Skype for Business Experience
While Skype for Business brings efficiency to business communication, some users may find it intrusive. Below are some Skype for Business tweaks that can improve your experience.
Preventing automatic startup
- Open your Skype for Business app.
- Sign in if you haven’t already.
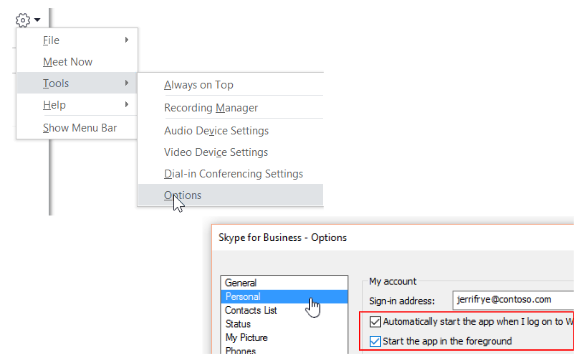
- Locate the Wheel button, click the down arrow, and navigate to Tools > Options.
- In the Personal tab, uncheck “Automatically start the app when I log on to Windows” and “Start the app in the foreground.”
- Click OK to save changes.
Images: support.microsoft.com
Also Read: Quick Tips: How to Disable Startup Programs in Windows 10
Managing background processes
- Right-click on the Skype for Business icon in the system tray.
- Select Exit to ensure it doesn’t run continuously in the background.
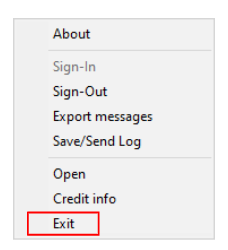
- Use Task Manager (Ctrl + Alt + Delete > Task Manager > Processes) to confirm Skype for Business is inactive.
Also Read: How to Stop Apps from Running in the Background on Windows 10 PC?
Signing out for a breather
- Open Skype for Business.
- Click File, and select Sign Out.
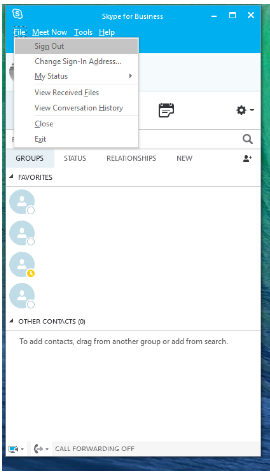
Image: answers.microsoft.com
Customizing notifications
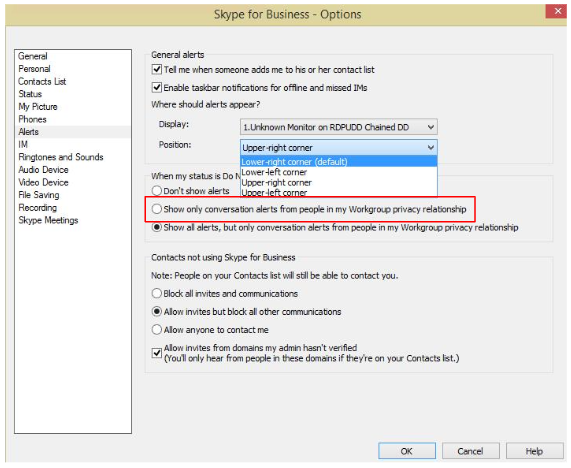
- Access Skype for Business.
- Click the Wheel icon, go to Tools > Options > Alerts.
- Tailor where alerts appear and allow only urgent notifications.
Adjusting Communication Preferences
Customize invites and communications for contacts not using Skype for Business.

Fine-tune status alerts for specific contacts or disable them altogether.
Uninstalling Skype for Business
Despite these adjustments, if you still desire to uninstall Skype for Business, we’re here to arm you with the know-how.
- Open Skype for Business.
- Choose the tools icon and navigate to Tools > Options.
- In the Personal tab, uncheck “Automatically start the app when I log on to Windows.”
- Right-click on the Skype For Business icon in the system tray and choose Exit to stop background processes.
- Open Task Manager (Ctrl + Alt + Delete), go to Processes, and ensure there are no active Skype entries.
- If you decide to remove Skype from Windows 10 completely, go to Control Panel > Programs > Programs and Features.
- Find Skype for Business (or Skype for Business Basic), select it, and click the Uninstall button.
- Confirm the removal by clicking Uninstall again.

Image: support.microsoft.com
How to uninstall Skype for Business on Windows 11
To uninstall Skype for Business from Windows 11, the process is similar:
Follow steps 1-5 from the Windows 10 instructions.
- If you decide to uninstall completely, access Control Panel > Programs > Programs and Features.
- Locate Skype for Business (or Skype for Business Basic), select it, and click the Uninstall button.
- Confirm the removal by clicking Uninstall again.
Image: support.microsoft.com
Further Reading: How to Uninstall Programs and Delete Unnecessary Files in Windows 10
Conclusion
In conclusion, whether you’re opting for fine-tuning settings or deciding to completely uninstall Skype for Business, this guide ensures you have full control over your Windows experience. Embrace the customization, bid farewell to intrusions, and enjoy a seamless digital journey.
Have thoughts or questions on this topic? Share your comments, and let’s enhance your Windows experience together!