
![[EASY GUIDE] How to Lock a Word Document and Protect It from Editing](https://www.auslogics.com/en/articles/wp-content/uploads/2023/11/EASY-GUIDE-How-to-Lock-a-Word-Document-and-Protect-It-from-Editing-.jpg)
Other people can edit your Word document unless you apply restrictions. This default unlimited access and control can cause workflow problems in content creation whether you’re collaborating online or offline.
So, you may be wondering how to protect a Word document from editing if you have sensitive content that you don’t want others to alter.
Thankfully, Microsoft allows you to prevent people from making specific changes to your content and limit who has access to what and their level of control. You can also specify the parts of the document they can edit.
You can enjoy these controls in the latest Microsoft Word versions, whether you use a Microsoft 365 subscription or the product’s desktop apps. The restrictions you can apply include password encryption, read-only mode, digital signatures, and editing and formatting restrictions.
Also Read: Advanced Data Protection: How to Encrypt Files in Windows 10
This article will show you how to lock your Word documents from editing and the different restriction controls you can use.
How to Protect Word Documents from Editing
As mentioned earlier, Microsoft Word allows you to enforce various levels and types of restrictions. Applying protections can ensure your document’s appearance remains the same, enable you to regulate file size, and keep the content authentic and verifiable. We’ll explain what each restriction means and how you can apply it.
Also Read: How to Reduce the Size of a Word Document
Restrict Editing
The Restrict Editing pane appears on the right side of your document and contains formatting and editing restrictions.
There are two main ways to open the pane.
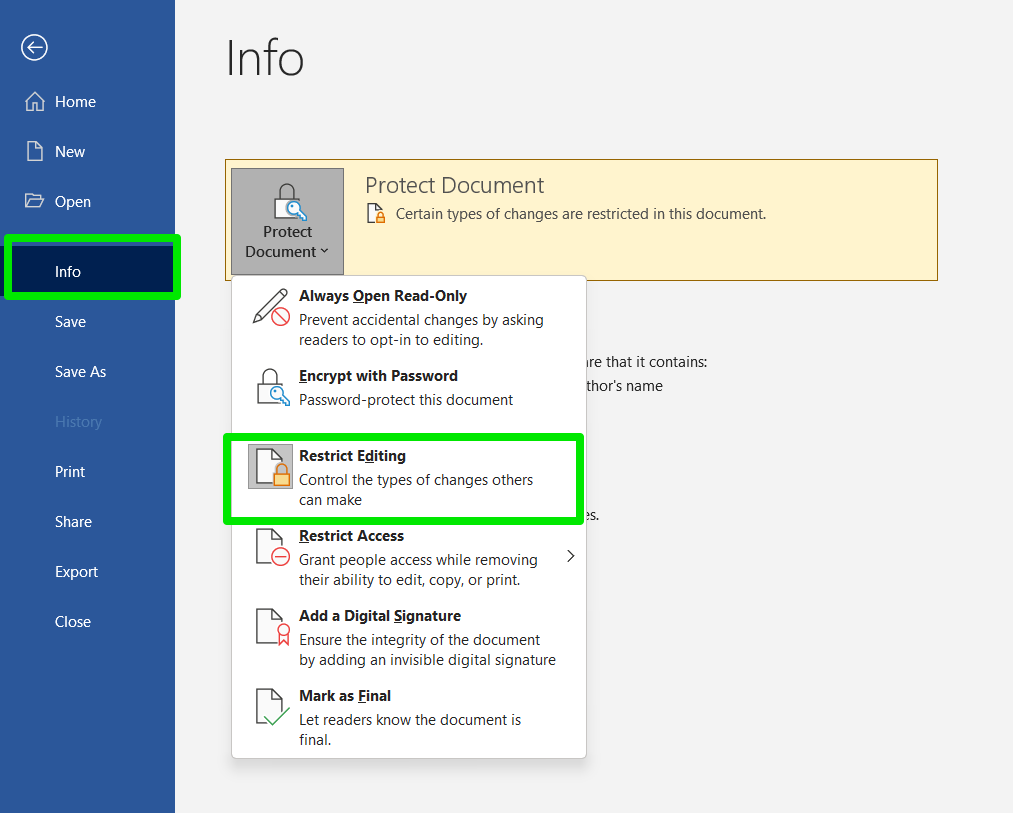
The first method involves going to the Review tab in the ribbon menu and selecting Restrict Editing in the Protect ribbon.
The second method involves clicking File in the top-left corner, going to the Info tab, clicking the Protect Document drop-down menu, and selecting Restrict Editing.
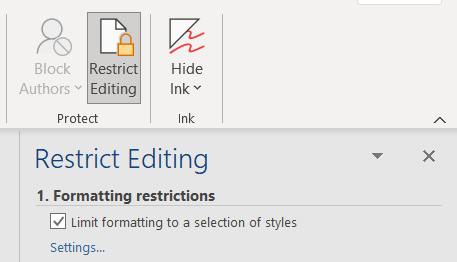
Formatting Restrictions
Formatting options in Microsoft Word allow you to define how your content is presented, from font type, color, and alignment to bullets and numbering, margins, and page orientation.
Also Read: How to Change the Default Font in Microsoft Word
The Formatting Restrictions option allows you to restrict users from changing your applied formats, keeping the document appearance how you left it. The section will enable you to set the specific formats other users are restricted from altering.
This protection can help keep your document exactly how you want it, even if you want other users to edit the content. It can also help you keep the file’s size the same since people won’t be able to add unnecessary formats.
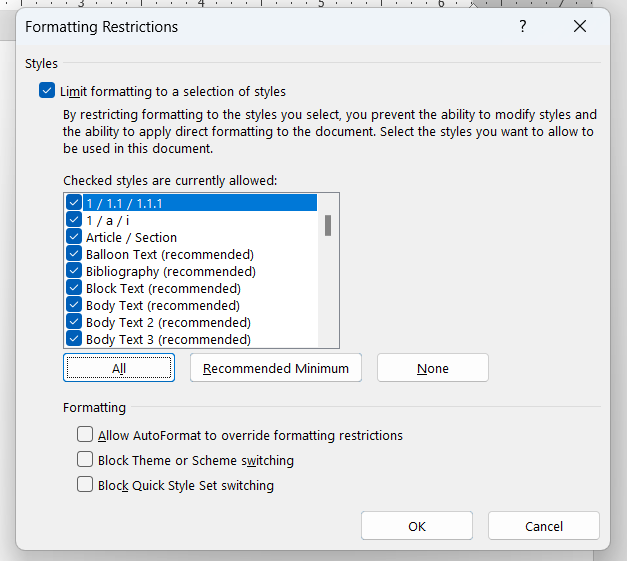
You can apply the setting by checking the box beside “Limit formatting to a selection of styles.” Click Settings under the checkbox to specify which styles are allowed and restricted.
You can click the All button to allow every style on the list or click None to do the opposite. The Recommended Minimum button allows only a number of styles.
The checkboxes under Formatting allow you to choose whether to limit some formatting presets and overrides.
Click OK once you finish entering your preferences.
Editing Restrictions
The Editing Restrictions section allows you to limit how people edit text. You can restrict other users in the following ways:
- Tracked changes: This protection lets people edit the document, but every adjustment will be tracked. That way, the document’s owner can view and accept or reject what was changed. Other users won’t be able to turn off the Track Changes option.
- Comments: This restriction allows other users to comment on your document without editing any other part.
- Filling in forms: Other people can only fill out forms and cannot edit other parts of the document when you apply this setting.
- No changes (Read only): This protection completely prevents others from making any kind of change to the document.
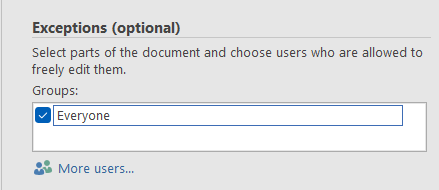
Go to the Editing restrictions section in the Restrict Editing pane, check the box for “Allow only this type of editing in the document,” and select an option from the drop-down menu.
Exceptions
If you’ve always wanted to know how to lock parts of a Word document, the Exceptions area in the Restrict Editing pane is what you’ve been looking for.
The subsection under Editing restrictions allows you to choose parts of the document where your selected protections will not apply.
These steps will show you what to do:
- Start by highlighting the parts of the document you want a user to edit regardless of your selected restriction.
- After that, go to the Groups drop-down and check the box beside Everyone.
- You can also use the drop-down menu to specify the users to whom the exceptions will apply.
That’s how to protect parts of a Word document from different types of editing.
So, for example, you can choose the Track Changes protection and highlight a part of the document as an exception. You cannot track changes to the highlighted part once the user edits it.
Start Enforcing Your Protections
Go to the Start enforcement section after choosing the restrictions you want to apply and click the “Yes, Start Enforcing Protection” button. A dialog with the same name as the button will appear.
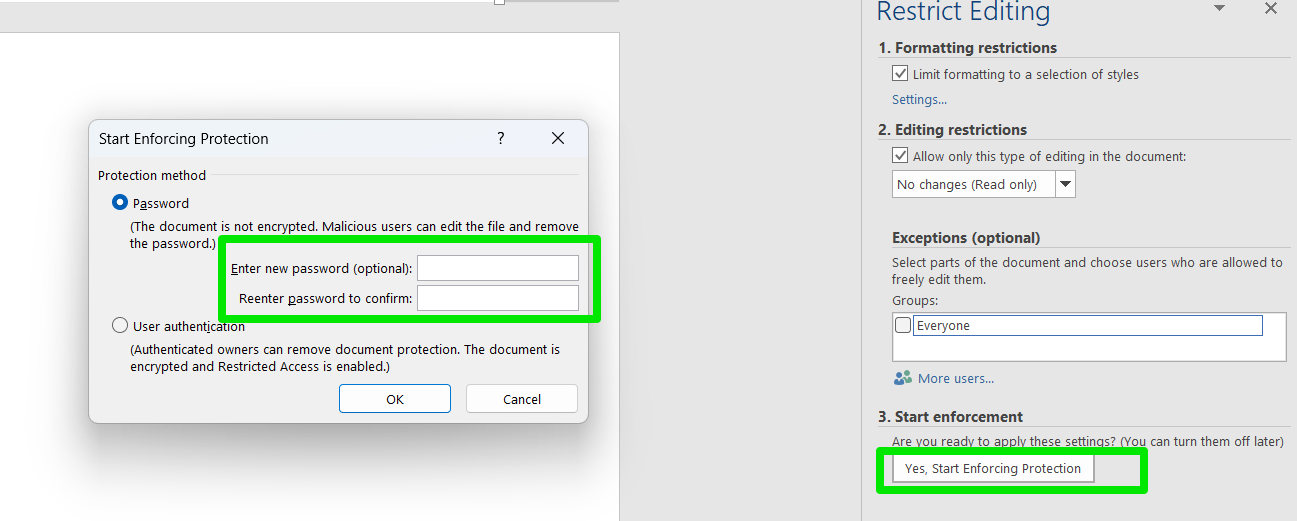
Enter a password to protect your restrictions and click the OK button. Note that the User Authentication option may not work if your computer is not set up for Information Rights Management.
Also Read: How to fix Can’t type password in Windows 10?
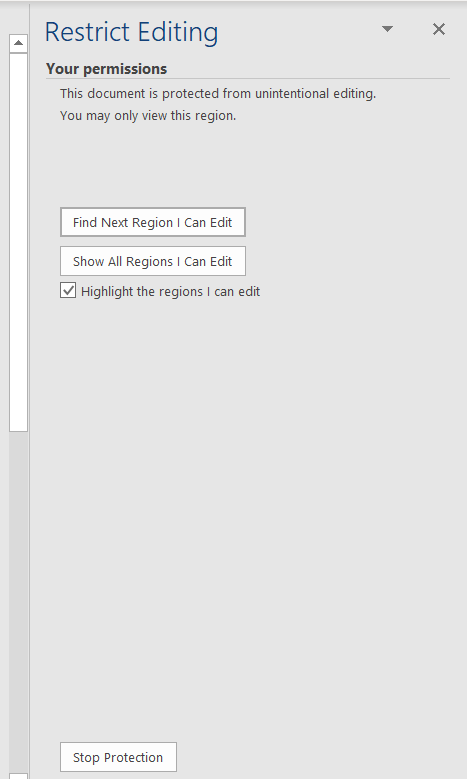
When you open the document again, the editing controls at the top of the window will be grayed out except the ones you allowed (if you allowed any). Writing assistants, such as Grammarly, and other add-ins will also not have editing access.
Also Read: Why Is Grammarly Not Showing in Microsoft Word
You can turn off the protection by clicking the Review tab, selecting Restrict Edit from the Protect ribbon, and clicking the Stop Protection button in the Restrict Editing pane. Note that if you added a password, you must provide it to turn off the protection.
Allowing Users to Opt-in to Editing (Always Open Read-Only)
You can let other users choose whether to edit the document. This measure is designed to prevent accidental edits and ensure the document’s integrity rather than completely protect the document against edits.
You can set the document to open in read-only mode and show a prompt that allows the user to accept.
These steps will show you how:
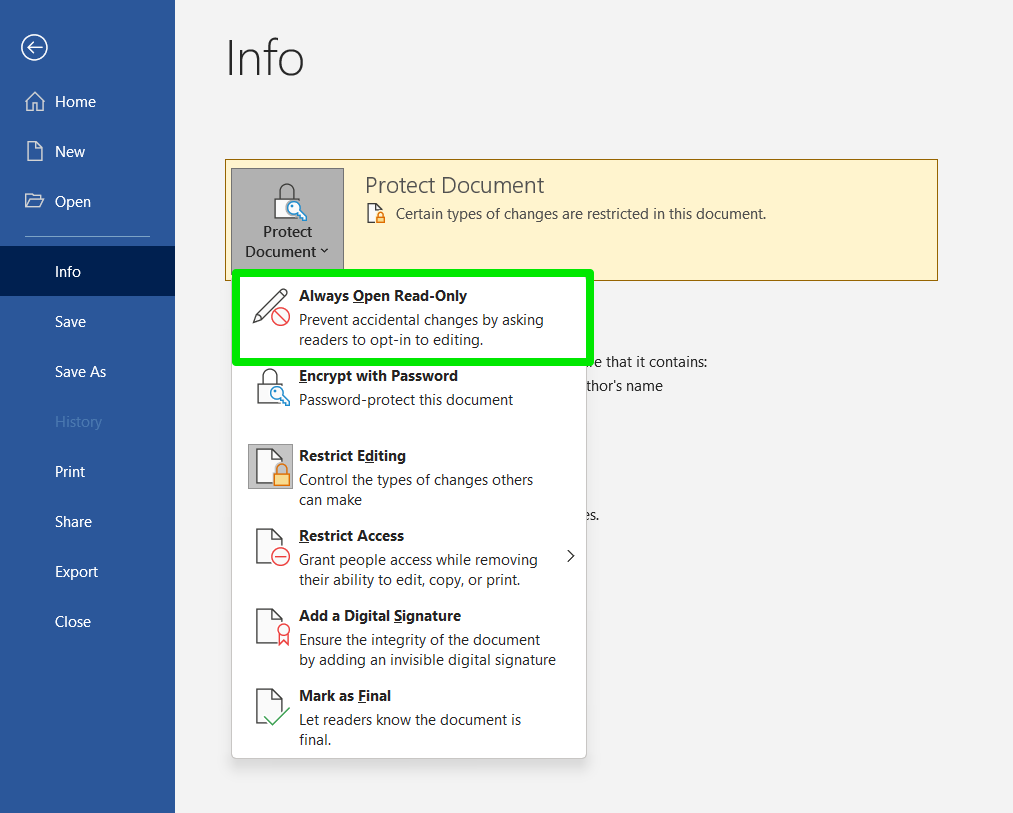
- Go to the top-left corner of the window and select File.
- Click Info.
- Next, go to the Protect Document drop-down and click “Always Open Read-Only.”
- Whenever the document is open, the following message will be displayed:
“The author would like you to open this as read-only, unless you need to make changes. Open as read-only?”
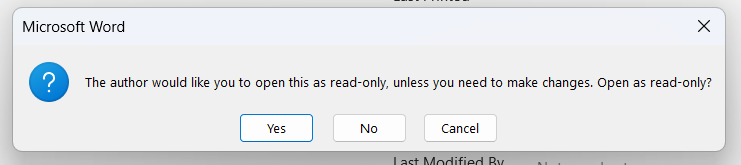
If the user selects No, they can edit the document without restrictions. If they choose Yes, the document will open as read-only, but the Restrict Editing pane will appear whenever they attempt to edit it.
Also Read: How to remove Read-Only mode in PowerPoint presentations?
Password Encryption
Besides the optional password protection in the “Start Enforcing Protection” dialog, Microsoft allows users to encrypt the entire document with a password.
The password encryption feature mandates users to provide the document’s password before they can view its contents. The feature is an extra layer of protection on top of the editing restrictions.
Follow these steps to encrypt your document with a password:
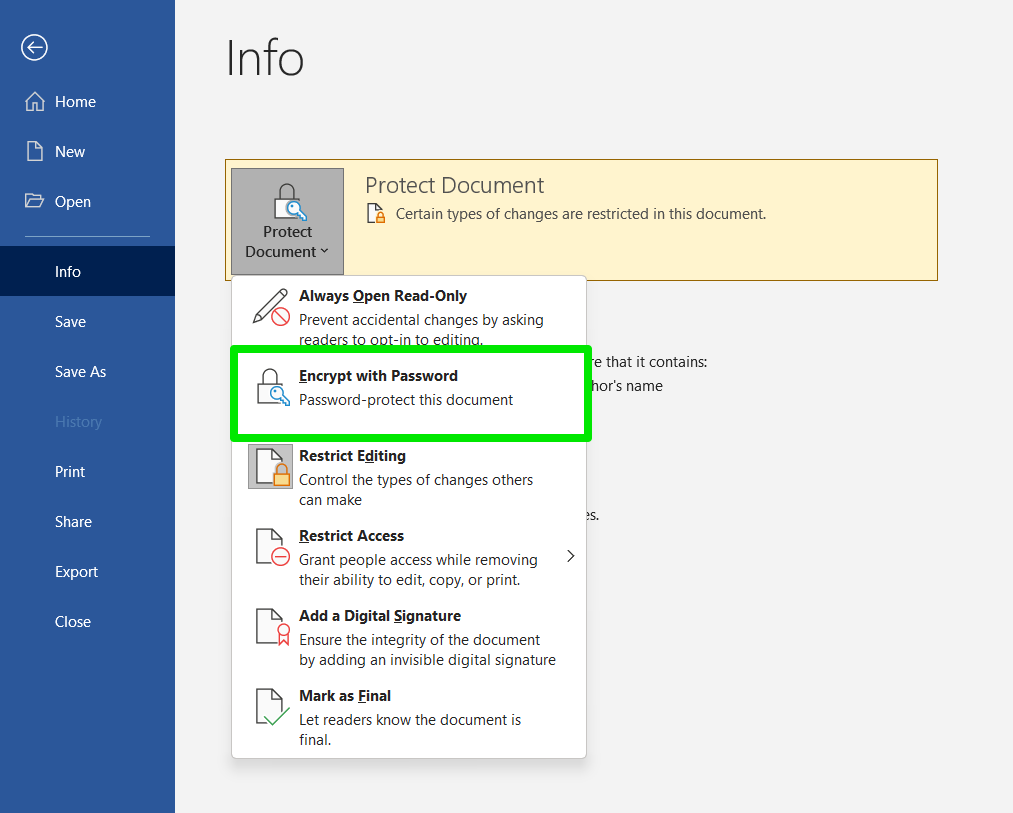
- Go to the top-left corner of the window and select File.
- Click Info.
- Next, go to the Protect Document drop-down and click “Encrypt with Password.”
- Enter a password you can remember in the Encrypt Document dialog and click OK.
There’s a caution in the Encrypt Document dialog warning that you cannot recover your case-sensitive password if you forget or lose it.
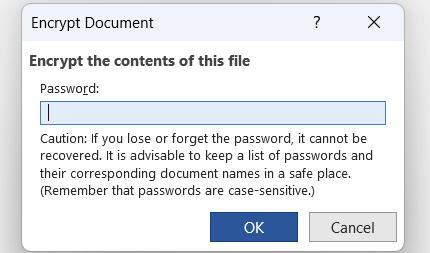
Take this warning seriously and ensure you use a password that you can remember. If you use different passwords for different documents, you can maintain a list in a safe place.
Also Read: Stay Safe Online: The Best Ways to Store Passwords
Losing your password means potentially losing the file, as it may become corrupt if you try to use third-party software to recover it.
Also Read: How to Repair and Recover a Corrupted Microsoft Word File
Digital Signatures
Digital signatures in Word allow you to electronically sign a document to verify and protect its integrity and authenticity. When you digitally sign your document, Word automatically makes it read-only and marks it as final.
The signature will become invalid if anyone tampers with the document.
Word requires a signing certificate to digitally sign your document. You can easily import the document from your browser if it isn’t available or not trusted.
Follow these steps to sign your document electronically:
- Go to the top-left corner of the window and select File.
- Click Info.
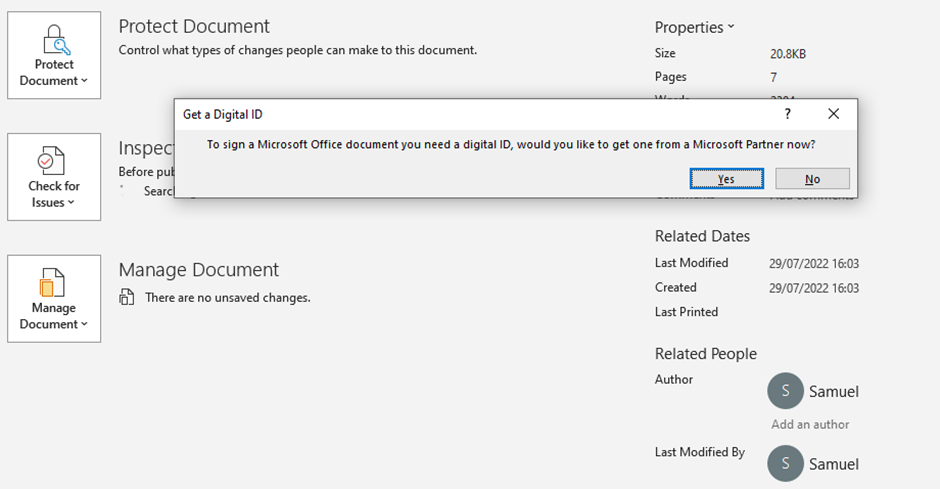
- Next, go to the Protect Document drop-down and click “Add a Digital Signature.”
- If you don’t have a digital signature, Word will show you the Get a Digital ID dialogue, asking you to get a certificate from a Microsoft Partner.
Pro Tip: You can quickly get a Digital ID using your phone. Open the Phone Link app and connect your PC to your smartphone. After successfully syncing your phone and PC, the Sign dialog box will open.
Also Read: How to Mirror Android Screen on Windows PC?
- Once the Sign dialog opens, choose the following:
Commitment Type: Choose whether you created and approved, only approved, or only created the document.
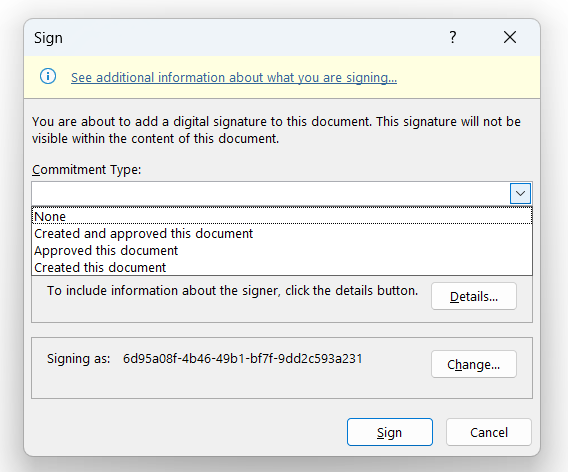
Purpose for signing this document: Type in the specific reason for signing the document.
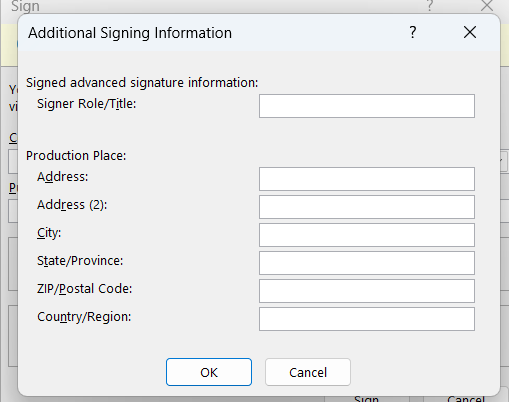
Details: Click the Details button to enter additional details, such as your Role/Title and Production Place.
Signing as: Use the Change button to switch your certificate.
- Make sure your certificate is trusted before you continue. To do that, click the Change button and select “Click here to view certificate properties.”
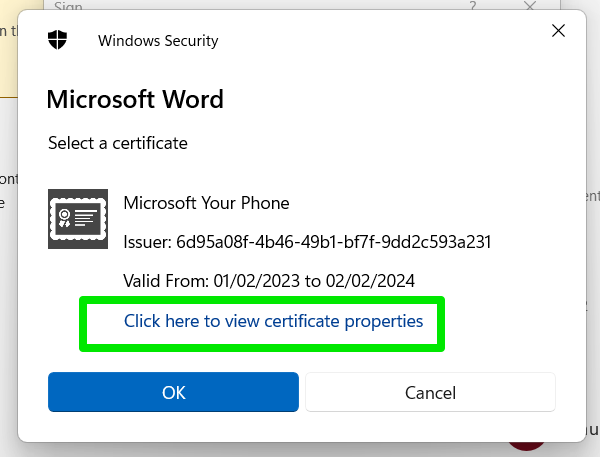
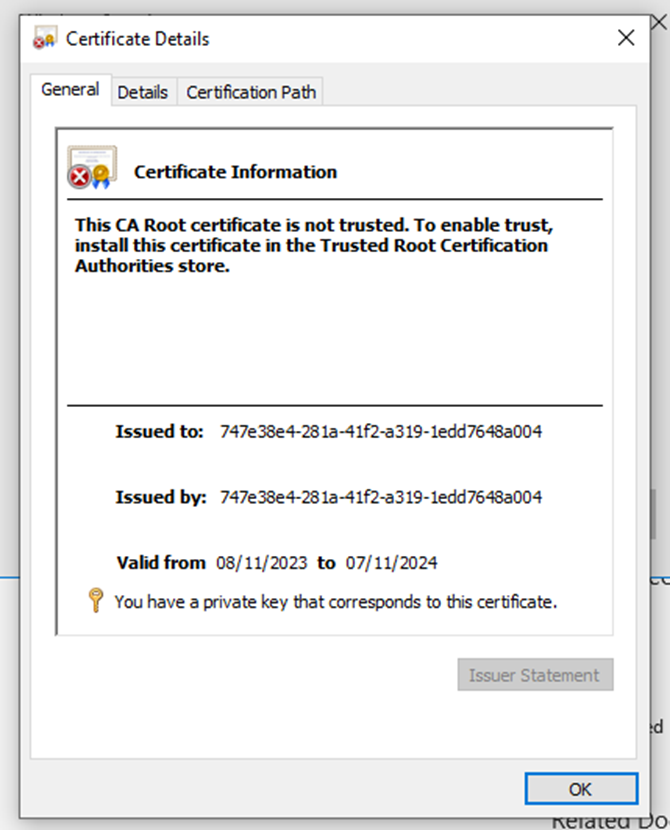
- You can now see whether the certificate is trusted under the General tab.
- Return to the Sign dialog and click OK.
If your certificate is not trusted, follow these steps to import it from your browser and install it in the appropriate store:
- Go to your browser, click the menu button, and select Settings.
- Go to the security-related page. For example, you can click “Privacy, search, and services” in Microsoft Edge and “Privacy and security” in Chrome.
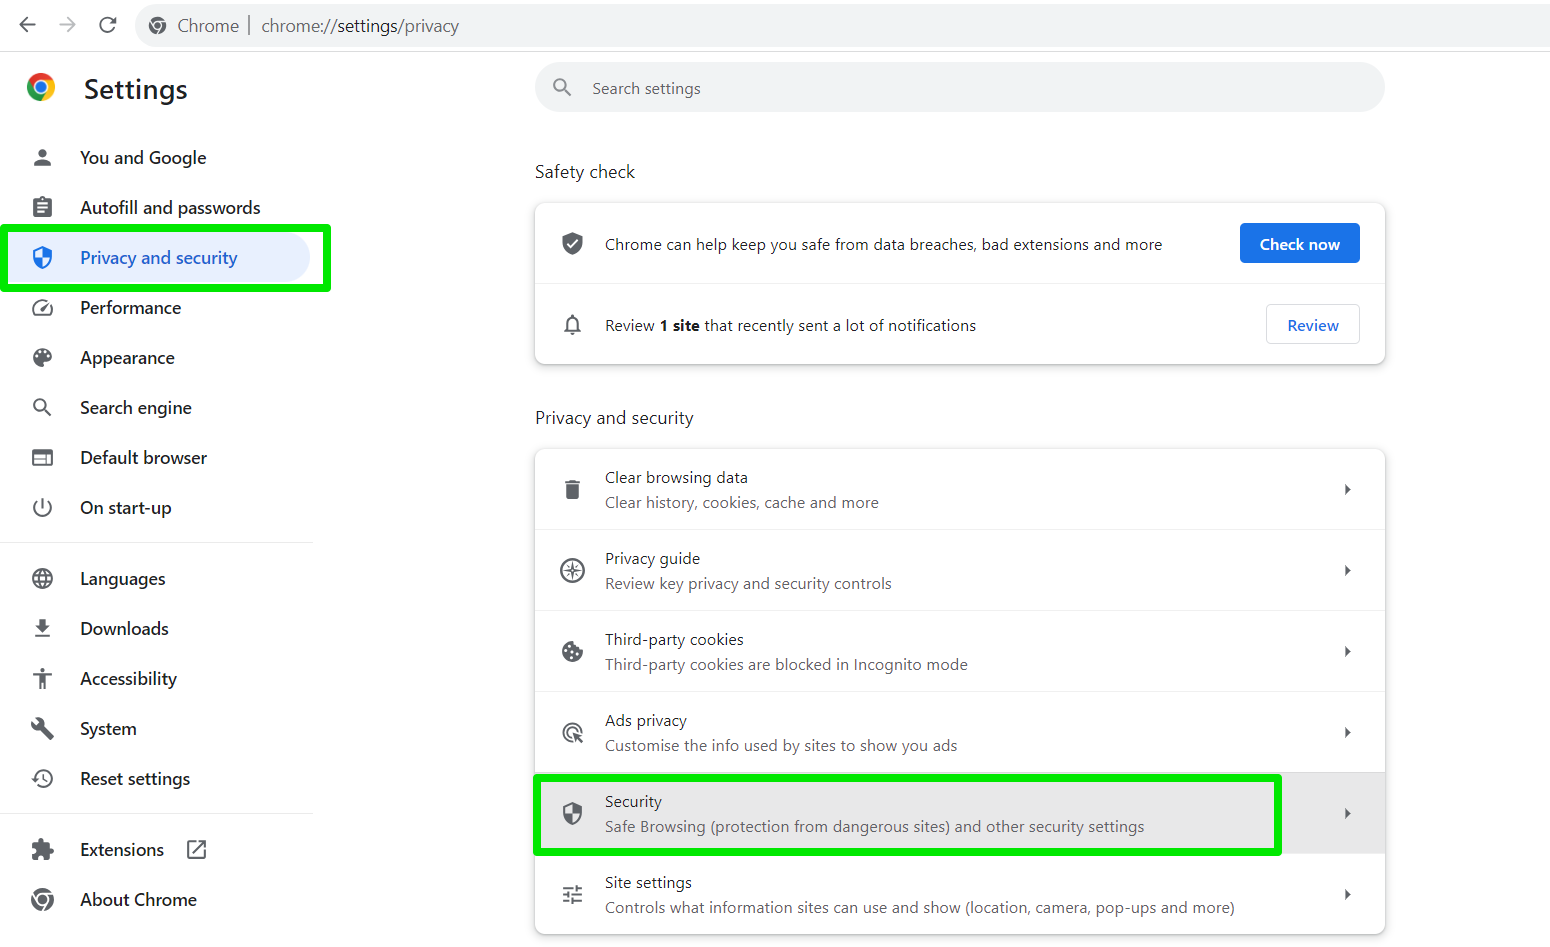
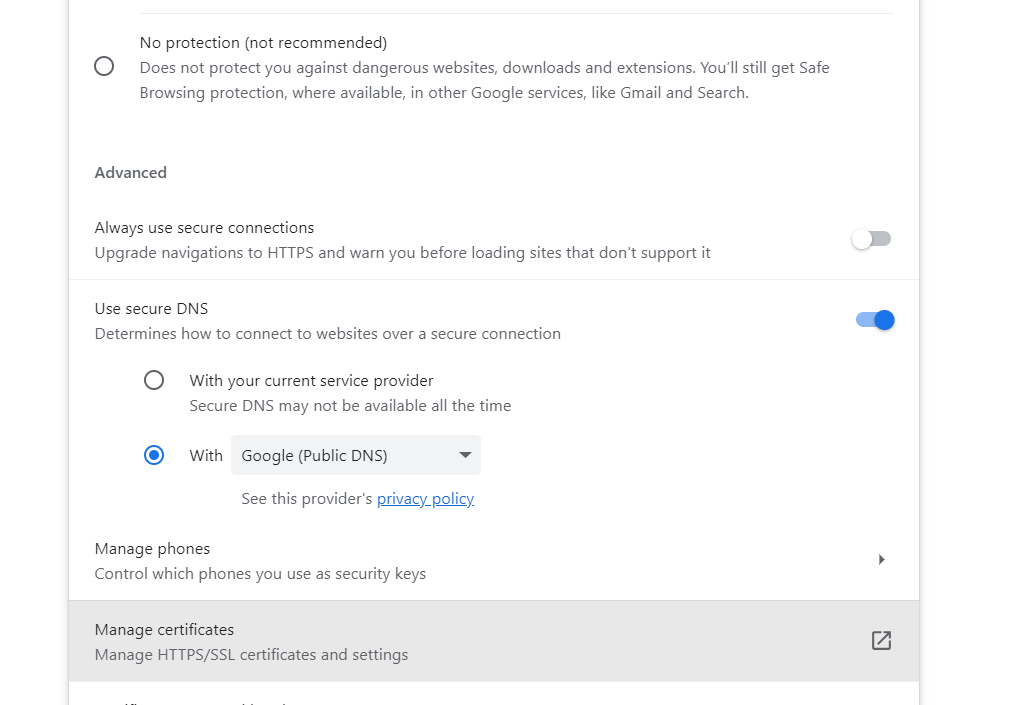
- Go to the Security section and click Manage certificates.
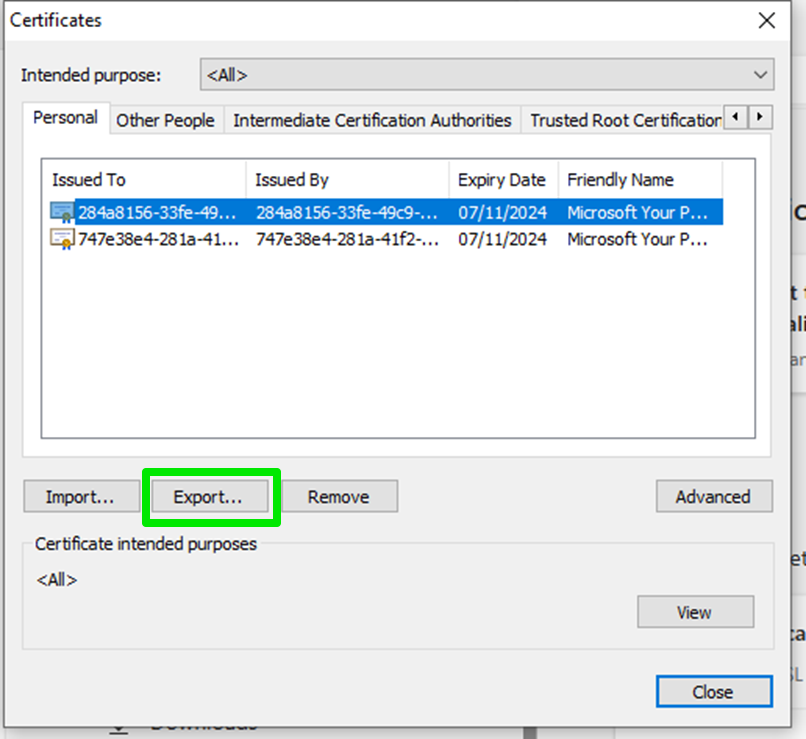
- Once the Certificates dialog opens, choose an active certificate and select Export.
- Click Next.
- Select “No, do not export the private key” and click Next.
- Choose a format and click Next.
- Click the Browse button, select the folder to export the file, and enter a filename.
- Click the Next button again and export the file.
- Now, go to the folder where you exported the certificate and double-click the file.
- Next, click Install Certificate.
- Select Current User or Local Machine, depending on your preference, and click Next.
- Choose “Place all certificates in the following store,” click Browse, select Trusted Root Certificate Authorities, and click OK.
- Now, click Next in the Certificate Import Wizard and click Finish.
Mark as Final
The Mark as Final option makes the file read-only and turns off editing commands, typing, and proofing marks. It indicates that the document has gone through the final editing stages and is now the complete version. Its Status bar will also display the Mark as Final icon.
Follow these steps to mark the document as final:
- Go to the top-left corner of the window and select File.
- Click Info.
- Next, go to the Protect Document drop-down and click Mark as Final.
- Click OK.
Note that, without restrictions, other users may also be able to edit the document when they click the Edit Anyway button.
How to Protect Word Documents from Editing and Copying
Most Word restrictions allow you to turn off editing. However, users can still copy the document’s content, paste it into a new Word document, and edit that version. For that reason, you may want to restrict everyone else’s ability to copy your content due to its sensitivity.
To be clear, users determined to copy your text may successfully use workarounds, as there are numerous ways to lift text off documents and images. But you can give it your best shot and lock others from editing and copying your work.
The most practical way to prevent copying is by selecting the Filling in Forms option in the Restrict Editing pane. This restriction prevents others from taking any kind of action on the document, even selecting text.
Conclusion
Protecting Word documents from editing gives you peace of mind if you want to maintain a document’s authenticity, avoid unnecessary and accidental changes, and keep sensitive information intact. You no longer have to go through the hassle of exporting your Word documents to PDFs to restrict access.
FAQ
How to Lock a Shared Word Document from Editing?
You can lock a shared document using the Restrict Editing pane as you would typically do for offline files. However, encrypting and digitally signing a shared file may be challenging, especially when it is currently open on multiple devices.
Is Password Encryption the Most Secure Way to Protect a Word Document?
While there are many different ways to protect a document, password encryption remains one of the best, as it only allows access to users with whom you have shared your password.
Can I Protect My Document from Copying Without Restricting Editing?
No, you must restrict editing to protect your work against copying.
What Should I Do if I Forget the Password to My Encrypted Word Document?
You may be unable to recover the document if you forget the password.