

Generally, you shouldn’t use auto-login to sign in to Windows because that exposes all your confidential information to anyone with physical access to your PC.
However, we’ve got you covered if you want to know how to set auto login in Windows 10 or 11 for various reasons.
This guide offers numerous ways to set auto-login on your Windows PC.
Let’s begin.
How to Set Auto Login on Your Windows 10/11
Here are 3 proven ways to bypass the Win 11/10 login screen:
Method 1. Change your sign-in options using the Settings menu.
The easiest way to let your OS boot right to the desktop is by changing your sign-in options in Settings.
To do that, take the following steps:
On Windows 10:
- Start menu -> Settings -> Accounts
- Sign-in options -> Require sign-in -> Set it to Never
- Go the PIN section below -> Click on the Remove button
If this method has been in vain and the annoying login screen persists, just work your way down—you have two more tricks up your sleeve.
On Windows 11:
- Use the
Windows + Ikeyboard shortcuts to open Settings. - Go to Accounts in the left panel and click on Sign-in options in the right sidebar.
- Under Additional settings, click the dropdown list next to If you’ve been away, when should Windows require you to sign in again? and set it to Never.
Also Read: How to Create a Local User Account on Windows 10/11?
Method 2. Configure your login settings via the User Accounts panel.
If you are tired of typing a password every time your PC boots, you can tweak your account settings to switch on the automatic logon feature in Windows 10.
Here is how to perform the trick:
- Type
Windows key + Ron your keyboard -> Typenetplwizinto the Run box -> Press Enter - Enter the User Accounts dialog box -> Select your user account
- Find the Users must enter a user name and password to use this computer option -> Uncheck it -> Apply
- You will see the Automatically sign in dialog box -> Type your password into the appropriate line -> Then confirm your password -> Click OK.
- After saving the changes, restart your PC to see if you can skip the login screen.
On Windows 11:
- Launch the Settings app using the
Windows + Ikeys and open Accounts -> Sign-in options. - Check if the For improved security, only allow Windows Hello sign-in for Microsoft Accounts on this device (Recommended) option under Additional settings is activated. If it is, toggle the button to turn it off. If the option is grayed out, log out of your account and log back in.
- You will be prompted for a password. Enter it and hit Yes.
- Now, hit the Windows + R hotkeys to launch the Run dialog box. Type or paste the command
netplwizand press the Enter key. - On the User Accounts window, uncheck the option Users must enter a username and password to use this computer.
- Click Apply and then OK.
- You’ll be prompted to enter your password to validate the change.
- The next time you start your Windows 11 computer, it should automatically log in.
Sometimes, auto login in Windows 11 may not work if any of the Windows Hello sign-in options (Facial recognition, Fingerprint recognition, or PIN) are enabled.
Therefore, you may need to disable Windows Hello and try to enable auto-login.
To do that:
- Select your current sign-in method, and click the Remove button.
- Select the Remove button again to confirm your action.
- Next, enter your password to confirm your identity and click OK.
- Once you’re done, repeat the steps above to enable automatic login on your Windows 11 PC.
You should disable auto logon if you want to undo the changes and password-protect your computer.
Just go the ‘Users must enter a user name and password to use this computer’ option and check it.
Method 3. Enable Windows 11/10 auto login via Computer Management.
This procedure works in both Windows 11 and Windows 10:
In case of data loss, use Auslogics File Recovery to restore the files.”
- Press the
Windows + Rhotkeys, type or pastecompmgmt.mscin the Run dialog box, and hit Enter. Alternatively, right-click the Windows key and select Computer Management. - Select Local Users and Groups -> Users in the left pane.
- Find the user you want to enable password-less login on the right sidebar, right-click it and select Set Password.
- You’ll get a warning that Resetting the password might cause irreversible loss of information for this user account. Click Proceed to enable auto login.
- In the popup window, leave the New password and Confirm password options empty.
- Click OK.
Pressing OK removes any password you had set earlier. This means the next time you restart your PC, you shouldn’t be prompted for a password.
Related: How to Open Disk Management in Windows 11?
Method 4. Modify your Windows Registry to enable automatic login.
This tweak requires much caution. Editing your registry is quite risky – it may cause your system to fall apart, so there is no excuse for sloppiness in this kind of work.
To begin with, back up your important files to prevent permanent data loss.
You can migrate your data to another PC using a transfer cable or the HomeGroup feature.
You can also use a cloud solution, such as Google Drive, OneDrive, etc., or a portable storage device (an external drive will come in very handy for this purpose).
Our article provides more information on these methods, but remember that they all involve a substantial amount of manual work.
To save time and effort, you can use special backup software, such as Auslogics BitReplica.
In addition, we strongly advise you to back up your registry. Here is how to do that:
- Open Registry Editor by pressing the
Windows logo key +Rat once and typingregedit.exeinto the Run box. - In your Registry Editor, select the keys you wish to back up -> File > Export
- Choose where you want to place your backup file -> Choose the name for it -> Save
Here is how to restore the registry in Windows 10:
- Open Registry Editor -> Choose File -> Import
- Import Registry File -> Locate your backup file -> Open
Now you can edit your registry to set automatic logon:
- Go to your Registry Editor
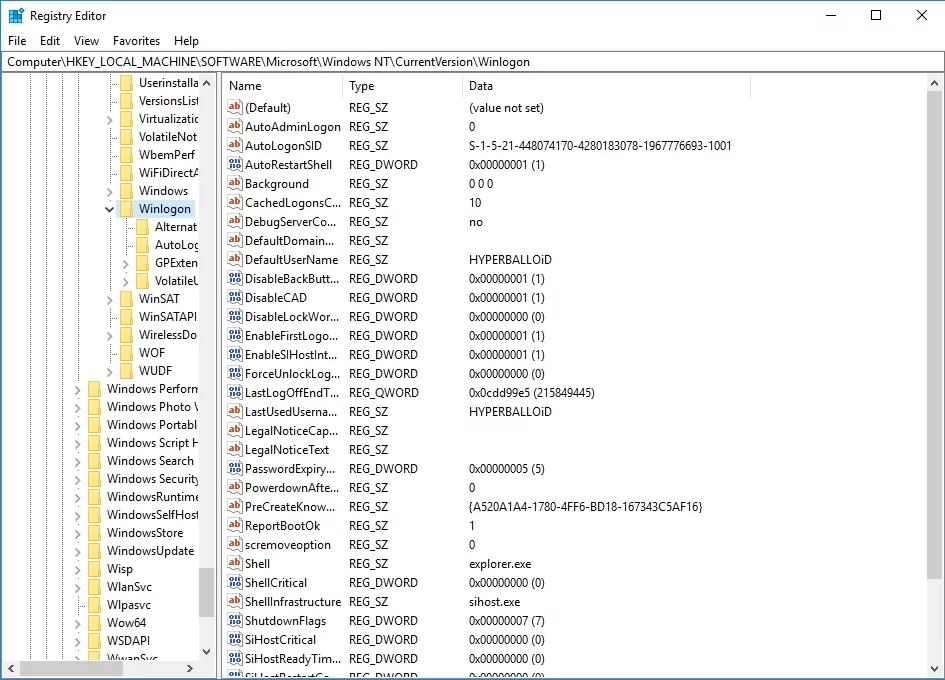
- Locate the key HKEY_LOCAL_MACHINE\SOFTWARE\Microsoft\Windows NT\CurrentVersion\Winlogon
- Navigate to the entry named DefaultUserName -> Double-click on it
- Edit String -> Make sure you can find your account name in the Data value box.
- Now search for the DefaultPassword entry -> If you cannot find it, you should create such an entry.
- Right-click on the empty space -> New -> String Value -> Name it DefaultPassword -> Go to the Value data box and enter your password -> Click OK to save the changes.
- Find the entry named AutoAdminLogon -> Change its value from 0 to 1 -> Click OK for the changes to take effect.
Restart your PC to see if automatic login has been successfully enabled. If not, you should revert the registry changes you made to turn it off.
Related: Ultimate Guide: Why and How to Defrag Windows Registry?
Conclusion
We hope our tips have proved useful to you. Go through the various points outlined in this guide and choose the one that works best for you.
Do you have any ideas or questions regarding this issue? We are looking forward to your comments!
FAQ
Then, select Credential Manager, and enter the network address, login credentials, and password after selecting Add a Windows credential. Windows will use the credentials you add automatically for logins when needed. Click Apply and OK to complete the process.
Windows key + R to open the Run dialog box.netplwiz and press Enter.
2 replies on “How to set auto login in Windows 11/10?”
Could it be Microsoft changed something after the 2018 Spring Update? I made a few fresh Hyper-V clients with Windows 10 and all of them fail to auto login. I’m using local accounts. I already tried all 3 options here. I noticed that for option 3 (registry key DefaultPassword) isn’t remembered after the reboot. Smells like a new security “feature”. I so do not understand MS – with their forced reboots it messes up my online tools that need to keep working until *I* allow a reboot 🙁
Hi devnullius, thanks for your question!
We suggest you to use TweakManager utility which will help you to setup automatic logon. To start it you should:
1. Uncheck all the checkboxes marked at the screenshot (here you can see them all in Startup and Shutdown –> Automatic Logon subcategory).
2. Setup the username and enter your password.
3. Apply the settings and restart the computer.
!!! But be careful! If you’ve entered an incorrect username, you won’t be able to log into the system.
You can test the Auslogics TweakManager utility (ATM) from Auslogics Boost Speed 10 in such a way:
To download ABS 13 please use this link: https://www.auslogics.com/en/software/boost-speed/after-download/